1
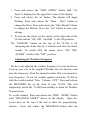
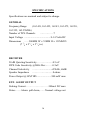
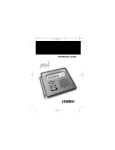
Model 74-200
Digital Weather Receiver with
NWR-SAME decoding and
Digital clock with alarm
PRODUCT INFORMATION
The 74-200 N.W.R./ S.A.M.E. (National Weather Radio/Specific
Area Message Encoding) Weather / All Hazard Monitor provides
you with constant monitoring of your local National Weather
Service broadcast for messages warning you of hazardous
conditions. The NWR/SAME decoding allows you to hear only
messages concerning the area concerning you. You now have a
choice as to what information will be brought to you. No more
will you be awakened to hear of a problem many miles from your
home that will not affect you. A clock with alarm is also featured.
The 74-200 has an emergency battery backup system for use if
you lose power. It will provide up to three hours of operation if
power fails.
The 74-200 NWR/SAME Weather / All Hazard Monitor is the
latest advance in Weather monitoring technology providing you
with the information you need for your greatest safety from the
effects of weather and other external hazards.
FEATURES:
•
VHF Weather Monitor with seven different National
Weather Service channels in the 162 MHz FM band
– Provides 24-hour-a-day National Weather Service
information from seven different channels for
2
•
•
•
•
•
•
•
•
•
maximum reception possible (in areas where
available)
Alert monitor system receives NWR/SAME codes
transmitted by National Weather Service stations
warning of dangerous weather conditions and other
general hazards. The SAME codes designate which
counties or parts of counties are affected by the
individual message. When the alert feature is
activated, the receiver remains in a standby mode.
As SAME coded messages are received, the
receiver automatically activates to warn you of
dangerous weather conditions.
User-selectable warning system – Your choice of
siren alarm, voice or visual flasher.
Weather Command Button – large touchbar turns
unit from alert mode to full time monitoring.
High Performance Chassis – Receives weather
broadcasts up to 50 miles from transmitter.
Large Top-Firing Speaker – Directs alerts and audio
toward listener.
Eight-character LCD display for viewing alert type
and monitor status.
Clock displays time and date and has alarm and
snooze functions.
Emergency Powered from a single 9-volt battery
(optional).
Telescopic Antenna – Provides maximum range
3
•
•
•
•
•
•
•
reception-up to 50 miles. Antenna folds down for
easy transport.
Fully Variable Volume Control – Adjusts audio
output.
Alert siren volume adjustable for maximum
flexibility.
External Alert jack to operate external warning
devices.
External Antenna Jack – Permits use of an optional
extended range base antenna or a mobile antenna.
External Power Jack – Allows use of AC adapter
(included) or DC cigarette lighter power cord
(optional) to run off a car or boat battery.
Compact, Ultra Modern Styling – Small enough to
take along – looks good anywhere.
Earphone Jack – Allows private listening or remote
speaker location.
CONTROLS:
[add illustration with numbers and lines to controls.]
1.
Weather Bar Button – This is a push "on" button.
One push activates the weather receiver. Push
again to return receiver to standby.
2. Alert Bar Button – This is a push on switch. It
4
3.
4.
5.
6.
7.
8.
9.
10.
enables and disables the alert siren and external
alert signals. When Alert is off, only the LED
indicators are active.
Off Bar button – this switch cancels alert siren
sounds and any external alert features when alert is
active.
“WARNING” LED Indicator – This red light emitting
diode visual indicator tells you that the unit has
received a SAME message that has issued a
warning for your area.
“WATCH” LED Indicator – This yellow light emitting
diode visual indicator tells you that the unit has
received a SAME message that has issued a watch
for your area.
“STATEMENT” LED Indicator – This green light
emitting diode visual indicator tells you that the unit
has received a SAME message that has issued a
statement for your area.
Off/On/Volume Control – This is the volume control
and the main power switch. It lets you adjust
volume to the desired listening level.
Earphone Jack – Allows private listening with use of
an optional earphone. Also may be used for
connecting an external speaker.
Alarm Switch – Enables and disables clock alarm
function.
DISP. MODE/year button – Normally this button
selects what is seen on the LCD display. Pressing
the button changes the display from current time to
current date to alarm time to weather alert. The
5
11.
12.
13.
14.
display automatically switches to display messages
from the SAME decoder when they are received.
SET button – Press this button to switch from
display to set mode in time, date or alarm time
display modes. Characters will flash in set mode.
Use the other three adjacent buttons to change
settings. Press SET again to return to display
mode.
MIN/ MONTH and HOUR/DATE buttons – Used
mostly for time and date setting. Not active in
normal display mode.
SNOOZE button – Used for advancing the alarm
time by 9 minutes each time the clock alarm
sounds.
Programming Keypad – used to enter “FIPS” codes
into the memory of the radio, to set the radio to the
National Weather Radio channel for your area and
to change other programmable functions. See
section on programming your radio for details.
NWR-SAME:
In 1994, the National Oceanic and Atmospheric Administration
(NOAA) began broadcasting coded emergency signals that
identify the specific geographic area (such as a county) affected
by an emergency. Until that time such specific emergency
weather information was sent in other ways to broadcast stations
and others then relayed to the public.
NOAA transmits the coded weather emergency signals using a
6
technique called SAME (Specific Area Message Encoding). The
Midland 74-200 7-channel weather/ all hazards monitor is
designed to receive these SAME transmissions.
Your Midland 74-200 can be programmed with up to 15
predefined state/county codes that will define which notices
broadcast by your NOAA weather station will cause the radio to
alert you. Warnings, watches and statements of weather and other
area emergencies, about 40 different types- will activate the radio
if one or more location code programmed into your unit is
included in the SAME message.
Also included in the SAME message is the amount of time for
which the message is effective. The 74-200 will continue to
display the alert until its time expires.
You don’t need to wait for the 74-200 to give you an alert. Just
find the NWR station broadcasting to your area from the 7
available channels. You can listen at any time, day or night to the
latest weather information from the National Weather Service.
EMERGENCY POWER
To install the emergency backup battery, turn the unit off and
disconnect it from the AC power adapter. Remove the cover by
pushing the battery door in the direction of the arrow.
7
Install a 9-volt alkaline battery (Eveready 522 or equivalent, not
supplied). Observe the battery polarity (+ and -). Replace the
battery cover. (Rechargeable batteries are not recommended
because the 74-200 will not charge the battery.)
INITIAL SETUP
Connecting power –
The AC power adapter is required for normal operation if the
radio is to be in service for more than a few hours. Plug the wall
adapter into a 110-115 Volt AC (standard house current) outlet.
Connect the cord end to the DC-12Volt power jack on the back of
the unit.
A backup battery as stated above is also recommended. The
condition of the battery is monitored by the radio. When
REPLACE BATTTERY appears on the display, the battery has
been discharged and should be replaced. Do not leave a dead or
weak battery in the radio. Do not leave a battery in the radio
when it is not in use. The battery may leak and possibly damage
your unit. Dispose of batteries properly.
Antenna The telescoping antenna on the back of the radio should be
positioned vertically and extended to its full length. In most cases
this antenna should provide good reception of your NWR
broadcast.
In some cases especially in remote areas an external antenna may
be used to improve weak reception.
8
NOTE:
The National Weather Radio service operates
Weather Broadcast systems covering a large area of the
United States. Some areas are not included. Check the
directory enclosed for weather broadcast availability.
Your 74-200 can receive broadcasts from the Weather Stations up
to 50 miles. Hills and certain terrain can reduce reception. An
external antenna can improve range. If your city is listed as
having a Weather Service Station but you do not receive it please
call your local Weather Service to confirm they are broadcasting
(Sometimes these stations are shut down for maintenance). If your
local Weather Service is transmitting and you are not receiving
the broadcasts, you may need an outdoor antenna.
What is a FIPS Code:
The NWR divides the United States and territories by state and
county (or parish) and assigns a six digit code number called a
FIPS (Federal Information Processing System) code or also
known as a NWR/SAME county code. The first digit identifies
subdivision. The next two identify the state or territory, and the
last three identify the county. For example the code for Clay
county Missouri is 029047. The“047” indicates the county, the
“29” indicates the state, and the “0” indicates the subdivision of
the county. In this case and most cases the code will have a zero
for the first digit, indicating that no subdivision is in use. The
NWS plans to introduce subdivisions of some counties in the
future, assigning digits 1 through 9 to the parts resulting in codes
9
like 529047.
Acquiring FIPS codes for Your Area:
The FIPS codes can be found by calling the NWS toll free
number
1-888-NWS-SAME
(1-888-697-7263)
Automated instructions will guide you to the numbers you
need.
The FIPS codes and much more information can be found by
way of the Internet at www.nws.noaa.gov/nwr/indexnw.htm
Note: You might want to obtain the codes for other counties
close to you or those you might frequently travel
through. The counties still must be within the coverage
area of your NWS broadcast.
This is what to expect when you call the NWS number.
You will be prompted to enter your state. We suggest
entering the entire state to expedite the process. Next you
will be prompted to enter the county. Again spell the entire
county. We suggest you locate several counties surrounding
you especially the county in the direction most of the storms
will be coming from. When you have entered the county,
the system will ask you to confirm what you entered is
correct. Be ready to write the number. The system tells you
10
the number fairly quick but you have the option to have it
read back to you so you can get the whole number.
Remember the number will be six digits long.
Setting the Clock, Alarm and Calendar
CLOCK
1. Press and release the “Display Mode” button until “Time” is
displayed in the upper left corner of the display.
2. Press the “Set” button, the display will start flashing. Press
and release the “Hour / Date” button to increment the hour.
Each press of the “Hour / Date” button changes the time by
one hour. Press and release the “Min / Month” button to
increment the minute. Each press of the “Min / Date” button
changes the time by one minute. Press the “Set” button to
store the setting.
DATE
1. Press and release the “DISP. MODE” button until “Date” is
displayed in the upper left corner of the display.
2. Press and release the set button, The display will start
flashing. Press and release the “Hour /Date” button to
increment the Date by one day. Press and release the “Min /
Month” button to increment the month by one month. Press
and release the “DISP. MODE / Year” button to increment
the Year by one year. Each press of the “DISP. MODE
changes the year by one year. Press the “Set” button to store
your settings.
ALARM
11
1. Press and release the “DISP. MODE” button until “AL
Time” is displayed in the upper left corner of the display.
2. Press and release the set button. The display will begin
flashing. Press and release the “Hour / Date” button to
change the Hour. Press and release the “Min /Month” button
to change the Minute. Press the “Set” button to store your
settings
3. To activate the alarm, set the switch on the right side of the
74-200 marked “ON OFF ALARM” to the ON position.
The “SNOOZE” button on the top of the 74-200 is for
advancing the alarm time by 9 minutes each time the alarm
sounds. To switch OFF the alarm, move “ON/ OFF/
ALARM” switch to the “OFF” position.
Adjusting the Weather Frequency
We have not adjusted the weather frequency for your local area.
Look up your city in the supplied Weather Service directory and
note the freque ncy. Find the channel number that corresponds to
your frequency. To test for weather signals, switch the 74-200 on
with the switch marked “Max / Volume / OFF”. Press and release
the WEATHER bar on the front of your 74-200. This will
temporarily switch the 74-200 from standby to listen for Weather
Transmissions.
To set the channel. Press and release the “DISP. MODE” button
until “WEATHER ALERT” shows on the display. Open the
access door on the top of the unit to show the programming
buttons. Press and release the PROGRAM button then the
12
channel button corresponding to the frequency of your NOAA
weather broadcast station. If you find there is more than one
broadcast station in your area, be sure that station will broadcast
your county code. To confirm this listen to the broadcast
associated with the weekly test. Durring the broadcast they will
give a list of counties covered by the transmitter.
Channel
Frequency
(MHz)
1
162.400
2
162.425
3
162.450
4
162.475
5
162.500
6
162.525
7
162.550
When you have selected the correct channel press and release the
YES button to continue programming or press and release the
program button to end programming.
NOTE: If no program keys are pressed for about 30 seconds the
74-200 will go back to alert mode. To continue after the 74-200
goes back to alert mode, follow the previous step above.
13
Changing the Alert Pattern
The alert tone is a high low alternating sound. The speed of the
tones depends on if the 74-200 received a watch or warning.
The alert pattern has two options available through the program
button, VOICE and ALERT. If VOICE is chosen, the alert will
sound for about 8 seconds then the voice weather broadcast will
be heard for about 5 minutes when an alert message is received. If
you desire to listen to the broadcast longer, press the
“WEATHER” bar on the front the 74-200.
If ALERT is chosen, alert tones will sound for the duration of the
alert(in some cases for several hours) or until the OFF button is
pressed. To change the pattern, press and release “DISP. MODE”
button until the display is showing WEATHER ALERT. Open the
top hatch to reveal the programming keys. Press and release the
“PROGRAM” button then “YES” to display the current alert
pattern. Press and release the “YES” button to keep that pattern
or “NO” to change it to the other option then press and release the
“YES” button to accept that option and continue with
programming or press and release the “PROGRAM” button to
return the radio to alert mode.
NOTE: Remember if there are no buttons pressed for 30 seconds
the 74-200 will go back to alert mode. To continue after the 74200 goes back to alert mode, go back to “Adjusting Weather
Frequency” to continue with programming..
FIPS Code programming:
14
NOTE: The 74-200 has enough memory to store 15 “FIPS”
codes.
The next display after VOICE/ALERT will display six numbers.
These numbers will determine the areas or counties that your 74200 will be set to respond to SAME messages. See “Acquiring
FIPS Codes for Your Area” for how and where to find the codes
for your area.
To change the first code displayed,(this will usually be “999999”
this provides all county alert in your area) press and release the
YES button to overwrite the code displayed or no to keep the
code. If you pressed YES the display will now show “_ _ _ _ _ ”.
Press and release the number buttons to enter the FIPS code you
want. When the display shows the correct number press and
release the YES button. This accepts the code you entered and
will go to the next code slot. If you make a mistake while entering
the code, press and release the NO button to clear the digits then
reenter the code. After you press and release the YES button, the
display will show “000000” if no other codes are programmed. If
there is a code in the next slot, decide if you want to keep the
code or overwrite the code (see above). If you press YES the
display will go to “_ _ _ _ _ _ “ asking for another code. Proceed
as you did for the first code. When you have entered all the
desired codes, press and release the “Program” button to store
your settings.
Reviewing stored “FIPS” codes
Enter the program mode as described earlier. When the “FIPS”
codes are displayed, press and release the “NO” button repeatedly
15
to review all memory locations you desire. All empty memory
locations will be “000000”. When finished reviewing the “FIPS”
codes press and release the program button.
ALL County Code
To cause the 74-200 to receive all SAME messages without
regard to area, enter the code “999999. Be sure there are no other
codes programmed in any other memory location.
If you have not selected a weather channel frequency for your
local area follow the instructions in “Adjusting Weather
Frequency”. To listen to the weather broadcast, press and release
the “WEATHER” bar on the front of the 74-200. Adjust the
volume for your best listening level. Press and release the
“WEATHER” bar again to mute the voice broadcast.
USING THE ALERT FUNCTION:
Setting the Alert Volume
To set the alert volume, find the alert tone volume control on the
bottom of the radio. Use a coin or small screwdriver to turn the
control clockwise for more volume or counter-clockwise for less
volume. We recommend setting the control to maximum volume
when first setting up the radio then decreasing the volume if
necessary.
Connecting the External Alert Output to an External Device
You may need to turn on or off another device when an alert is
16
received. The 74-200 provides a switch closure to signal other
devices at the EXT. ALERT jack when the radio receives an alert.
The output is compatible with home automation devices from
suppliers like X-10 and others. Connect the positive lead of the
interface to the tip of the 1 /8 inch (3.5mm) phone plug and the
negative lead to the body of the plug.
A DC powered device using 12 Volts or less and requiring less
than 300mA of current can be switched directly using the EXT.
ALERT jack. Observe the polarity of the jack so that the negative
side of the external power source is connected to the body of the
1
/8 inch (3.5mm) phone plug and the device is connected to the
positive source and to the tip of the phone plug.
The internal switch is closed when an alert is received. Pressing
the OFF button on the front of the radio will open the switch. For
best control of external devices we recommend using the ALERT
only mode as opposed to the VOICE mode.
NWR Alert Descriptions
This table contains the NWR descriptions of all the types of alerts
that your 74-200 will display. The display text and type of alert
sound are shown for each type of alert
What You See
TORNADO
WATCH
TORNADO
WARNING
SEVERE
Weather Alert
Description
Tornado watch
Tornado warning
Severe thunderstorm
17
Alert Sound
Fast siren
Very fast siren
Fast siren
THUNDERS
WATCH
SEVERE
THUNDERS
WARNING
FLASH
FLOOD
WATCH
FLASH
FLOOD
WARNING
FLOOD
WATCH
FLOOD
WARNING
WINTER
STORM
WATCH
WINTER
STORM
WARNING
BLIZZARD
WARNING
HIGHWIND
WARNING
DUST STORM
WARINING
HURRICAN
WATCH
HURRICAN
WARNING
TROPICAL STORM
WATCH
TROPICAL STORM
WARNING
COASTAL
FLOOD
WATCH
COASTAL
FLOOD
WARNING
Watch
Severe thunderstorm
warning
Flash flood watch
Flash flood warning
Flood watch
Flood warning
Winter storm watch
Very fast siren
Fast siren
Very fast siren
Fast siren
Very fast siren
Fast siren
Winter storm warning
Very fast siren
Blizzard warning
Very fast siren
High wind warning
Very fast siren
Dust storm warning
Very Fast siren
Hurricane watch
Hurricane warning
Tropical storm watch
Tropical storm warning
Coastal flood watch
Coastal flood warning
18
Fast siren
Very Fast siren
Fast siren
Very Fast siren
Fast siren
Very fast siren
SPECIAL
MARINE
WARNING
AVALANCH
WATCH
AVALANCH
WARNING
EARTHQUA
WARNING
VOLCANO
WARNING
Special marine warning
EVACUATI
IMMEDIAT
SHELTER
IN PLACE
WARNING
CHILD
ABDUCTIO
EMERGENC
911TELE
OUTAGE
EMERGENC
CIVIL
DANGER
WARNING
NUCLEAR
POWER
WARNING
RAD
HAZARD
WARNING
MATERIAL
HAZARD
WARNING
LAW
FORCE
WARNING
FIRE
WARNING
TUNE
TV
Avalanche watch
Very fast siren
Fast siren
Avalanche warning
Very fast siren
Earthquake Warning
VeryFast siren
Volcano warning
Very fast siren
Immediate evacuation
warning
Shelter in place warning
Very fast siren
Child Abduction
Emergency (Amber
alert)
911 Telephone outage
Emergency
Very Fast siren
Civil danger warning
Very fast siren
Nuclear Power Plant
Warning
Very Fast siren
Radiation hazard
warning
Very fast siren
Hazardous materials
warning
Very fast siren
Law enforcement
warning
Very fast siren
Fire warning
Very fast siren
Other Watch message
not defined
19
Very fast siren
Very Fast siren
Fast siren
TUNE
TV
LOCAL
AREA
EMERGNCY
SEVERE
WEATHER
STATEMEN
SPECIAL
WEATHER
STATEMEN
FLASH
FLOOD
STATEMEN
HURRICAN
STATEMEN
Other warning message
not defined
Local area emergency
Very fast siren
Very fast siren
Severe weather
statement
Beeps
Special weather
statement
Beeps
Flash flood statement
Beeps
Hurricane statement
Beeps
The SAME message the NWR sends contains information, which
tells the radio the time period for which the alert is valid. The
time can be set from 15 minutes up to 6 hours. When the
designated time has passed the display message and light will be
reset to their normal state.
Reviewing Overlapping Alerts
The 74-200 radio can store up to three different alerts (with
overlapping effective times) in its memory. If the radio receives a
new alert while a previous alert is still in effect, is automatically
displays the alert description and sounds the alert for the new alert
message. To scroll backward and forward through the radio’s
memory and review all the effective alerts, press NO (to scroll
forward) or YES (to scroll backward).
When a Test or Demo Alert Occurs
NWR sends out weekly test and occasional demonstration signals
20
to let everyone with weather monitor receivers verify the
operation of their equipment.
To find out the test schedule of for your area, contact the local
NOAA or NWS office. Look for the number under US
Government, Department of Commerce.
The following alert descriptions are for testing only.
What You See
REQUIRED
WEEKLY
TEST
REQUIRED
MONTHLY
TEST
SYSTEM
DEMO
NATIONAL
PERIODIC
TEST
NWS Alert Type
What You Hear
Beeps
Beeps
Beeps
No sound
As the NWS adds new alert capabilities your radio is set to
receive them and alert you automatically with no modifications.
Reset Button
Should your 74-200 become unresponsive to button entries or
does not work properly, a reset button has been added. This
button is accessed from the bottom of the 74-200. To activate this
function, use a long object such as a straightened paper clip.
Carefully insert this into the small hole marked “Reset”. When
you press the button inside the 74-200, you will feel a click. This
resets the Clock, Calendar and alarm time. This reset will not
affect the “SAME” codes entered.
21
Back Light of the Display
When the AC to DC adapter is used the display back light is
always on. When only the backup battery is used to power your
74-200, pressing and releasing the “SNOOZE” button will turn on
the back light for about 5 seconds.
Button press Beeps
When a button is pressed with the “Max / Volume / Off” switch
ON, the 74-200 emits a beep sound. One beep represents that the
74-200 has received a command and has taken effective action.
Two beeps represents the command is not valid (wrong button
pressed) and no action is taken.
TROUBLESHOOTING
Problem
Suggestion(s)
No power.
No sound.
Ensure that the wall power
adapter is connected to AC
power, that the cord to the radio
is securely seated in the radio
and that a fresh back- up battery
is installed (if AC power has
failed).
Check VOLUME setting
No weather broadcast when
you press WEATHER
Ensure that telescoping antenna
is fully extended.
22
If you are using an external
antenna, ensure that it is
connected properly.
Ensure that the radio is set to
the NOAA weather channel in
use in your area. Contact
NOAA to ensure they are
presently broadcasting.
Ensure that the all signals code
(999999) is not stored in a
memory.
One or more FIPS codes are
stored in memory but the radio
responds to alerts for areas
other than those for the codes
stored.
The radio is not responding
properly to NWS weather alert
broadcasts
Ensure that you have
programmed the correct FIPS
code(s) into the radio’s
memory. Be sure that “999999
is not programmed with any
other “FIPS codes
If you desire to hear the alert or
operate a device from
EXT.ALERT jack ensure that
display shows WEATHER
ALERT ON. If not, press
ALERT.
23
NOTES AND
MAINTENANCE
1.
The typical weather (162MHz) reception distance will
range from 25-50 miles depending on your location and
conditions of weather, terrain, etc. Also, some Weather Stations
operate at much higher power levels than others and have their
transmitting towers on the top of high buildings or hills. For better
reception from greater distances, an external antenna can be used.
To use an external antenna, you must have an antenna with an
RCA phono plug or an adapter to RCA phono plug to connect
into the back of the 74-200. If reception in your area is not good,
check with your local dealer for assistance and ask about typical
reception range in your area. Also try different locations in your
home or office to find a place of good reception. A location near a
window is a good starting place.
2.
If Weather Stations cannot be heard on any channel,
contact your local National Weather Service office to verify that
the station is on the air and also verify the CHANNEL
(Frequency) and location of the weather station.
3.
All National Weather Service stations periodically
transmit an Alert test signal. Some broadcast only once a week
and others more often. You can always find out when the test
signal is broadcast by calling the U.S. Weather Service's phone
number for your local NOAA station.
4.
Mobile home reception is difficult due to the metallic
24
structure preventing reception. Put your 74-200 near a window. If
this doesn't provide reasonable reception-then an outside antenna
must be used. One suggested antenna is the Midland 18-259W
VHF through-glass antenna. This antenna must be used on single
pane windows only.
12 VOLT OPERATION
Your 74-200 can be powered from any 12-Volt CAR-TRUCKRV or BOAT battery. An optional (Model 18-235) power cord
adapter is available from Midland or your local dealer.
FCC Compliance Information
Midland NWR-SAME Weather Monitor
Model 74-200
This device complies with part 15 of the FCC Rules. Operation is
subject to the following two conditions:
This device may not cause harmful interference.
This device must accept any interference received including
interference that may cause undesired operation.
For compliance information contact:
Midland Radio Corporation
1120 Clay St.
N. Kansas City, MO 64116
Tel: (816) 241-8500
25
SPECIFICATIONS
Specifications are nominal and subject to change.
GENERAL
Frequency Range
(162.4O, 162.425, 162.45, 162.475, 162.50,
162.525, 162.55MHz)
Number of WX Channels
…………….7
Input Voltage .........................................9-14 Volts DC
Dimensions ….. 200MM W x 53MM H x 131MM D
(7 7 /8 x 2 1 /8 x 5 1 /4 in.)
RECEIVER
20 dB Quieting Sensitivity…………...…..0.5 uV
FIPS Code Sensitivity @5kHz Dev..…….0.5uV
Channel Selectivity ………..................±25kHz, 60dB
Speaker Impedance ……………......…..8 ohms
Power Output @10%THD........................500 mW max.
EXT. ALERT OUTPUT
Sinking Current………………………300mA DC max.
States…….Alarm: pull down,……Normal: voltage out
26
SERVICE:
If it ever becomes necessary to return your 74-200 for service:
1.Pack the unit in its original box and packing. Pack the original
box in a suitable shipping carton along with the following.
Improper packing may result in damage during shipment.
2.Include a full description of any problems and a daytime
telephone number.
3.For warranty service include a photocopy of the bill of sale or
other proof of purchase showing the date of sale.
4.Include a money order for $7.50 to cover shipping and handling
(this may not be required in some states).
You do not need to return accessory items (AC/DC Adapter,
Owners Guide) unless they maybe directly related to the problem.
A flat rate of $45.00 will apply to repairs not covered by warranty
or units that are over one year old. Send only cashiers check,
money order or Master Card or Visa card number.
Midland Radio Corporation
1120 Clay St
N. Kansas City, Mo. 64116
Tele. 816-241-8500
27
ONE YEAR LIMITED WARRANTY
Midland Radio Corporation will repair or replace, at its option
without charge, your 74-200 weather alert radio which fails due
to a defect in material or workmanship within one year
following the initial consumer purchase.
This warranty does not include any antennas, which may
be a part of or included with the warranted product, or the cost of
labor for removal or re- installation of the product in a vehicle or
other mounting.
Performance of any obligation under this warranty may be
obtained by returning the warranted product, freight prepaid,
along with a copy of the original sales receipt, to Midland Radio
Corporation, Warranty Service Department, 1120 Clay St., N.
Kansas City, Missouri 64116.
This warranty gives you specific legal rights, and you may
also have other rights, which vary, from state to state.
Note: The above warranty applies only to merchandise
purchased in the United States of America or any of the
territories or possessions thereof, or from a U.S. Military
exchange. For warranty coverage on merchandise
purchased elsewhere ask your dealer.
28
Midland Radio Corporation
1120 Clay St.
N. Kansas City, Mo. 64116
Printed in China
E- mail: [email protected]
visit us at http://www.midlandradio.com
Note: Features & Specifications are subject to Change without notice. MIDLAND is
not responsible for unintentional errors or omissions on its packaging.
29
FIPS codes
Use this space to record the FIPS codes you have programmed
into your 74-200-weather monitor.
1._____________
2._____________
3._____________
4._____________
5._____________
6._____________
7._____________
8._____________
9._____________
10.____________
11.____________
12.____________
13.____________
14.____________
15.____________
30