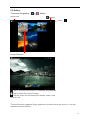
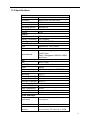
1
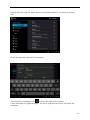
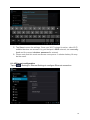
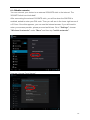
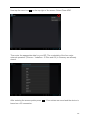
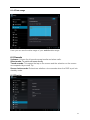
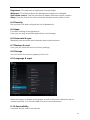
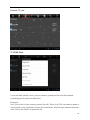
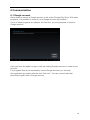
Manual Tablet PC ENDEAVOUR TV seven Android Ver. 4..0.3 English Thank you for choosing a Blaupunkt product. A good choice. Of course, we are also after the purchase for you. For technical questions and / or problems, please contact us by phone under 0511/270 496 90 or email at [email protected] Manuals for other languages as well as detailed instructions are available for download also on www.blaupunkt.de Meaning of symbols: Caution: Improper handling can damage the unit Beware of potential demage. Please note and remenber. Important information, general information, definitions, general information and pointers etc. It may be that there is interest in trademarks and trade names, or refer to their products. The manufacturer disclaims any ownership rights to third party trademarks and trade names. The user manual can be changed without prior notice. Any reproduction without written permission of the manufacturer is strictly prohibited. Product illustrations contained in this manual are for guidance only. Depending on your Tablet PC, it may be that some functions are not changed or only be available (eg, Camera, Bluetooth, 3G, etc.). 2 Content Meaning of symbols ................................................................................ 2 Content ................................................................................................... 3 Safety Precautions .................................................................................. 5 Product view ........................................................................................... 6 2. Safe handling of PAD ....................................................................... 7 2-1 Touchscreen ........ .. 7 2-2 Accessories ........... 8 2-3 Further details........ 8 3. Carraging of PAD ............................................................................. 8 Attention!.................... 8 4. Power adapter / power on / off 9 4-1 Connecting the power adapter 9 4-2 Enable / disable of PAD 9 5. System operation ........................................................................... 10 5-1 System language change 10 5-2 Main screen 12 5-3 App menu 13 5-4 Screen keyboard……………………………………………… 14 6. System settings 15 6-1 Wireless and network 15 6-1-1 Flight mode............................................................................. 15 6-1-2 Wi-Fi ....................................................................................... 15 6-1-3 Tethering and portable Hotspot .............................................. 17 6-1-4 Ethernet configuration ............................................................ 18 6-1-5 Mobile networks 19 6-1-6 Data usage 21 6-2 Sounds .................. 21 6-3 Display................... 21 6-4 Safety .................... 22 6-5 Apps ...................... 22 6-6 Accounts and synch 22 6-7 Backup and reset 22 6-8 Storage .................. 22 6-9 Language and input 22 6-10 Accessibility ......... 22 3 6-11 Date and time 6-12 About tablet 7. Filemanagement 7-1 Edit files 7-2 Back from the folders 8. Communication 8-1 Google account ..... 8-2 Browser ................. 8-3 Contacts ................ 8-4 E-Mail .................... 9. Fun 9-1 Camera ................. 9-2 Gallery ................... 9-3 Music ..................... 9-4 Connecting headphones 10. System connection 10-1 Connection to PC 11. Attachment ................ 11-1 Troubleshooting ... 11-2 Specifications ...... 23 23 23 24 25 26 26 27 27 29 32 32 33 34 35 35 35 35 35 37 4 Safety Precautions 1. Keep the Tablet-PC/PAD NOT together with small items, because they will scratch the screen or enter the PAD. 2. Set the PAD from NOT a dirty or dusty environment. Maintain a clean and dry environment. 3. Place the PAD NOT on uneven or unstable work surface. 4. DO NOT place things on the PAD and let nothing fall for it. Slide NO foreign objects into the PAD. Cover the touch screen / screen NOT with materials that have a rough surface. 5. Do not expose the PAD strong magnetic or electric fields. DO NOT put disks in the vicinity of the PADs, otherwise the data may be lost to it. 6. Let the PAD NOT lie in the sun / hot environment, especially in the car because the screen can be damaged. 7. TEMPERATURE: This PAD may only be operated in environments with average between 5 ° and 35 ° C. 8. Use the PAD NOT near liquids, rain or moisture. 9. Take the PAD NOT in the trash. Dispose of electronic products in accordance with local regulations. 10. The PAD and the AC adapter may become warm during operation or charging. Let the PAD NOT lie on your lap or other body parts in order to avoid any injury from heat. 11. INPUT POWER: Make taking into account ¬ the label on the PAD that the power supply to the power input matches. Use only manufacturer-approved accessories 12. Check the connections between the main unit and the accessories attached before turning on the PAD. 13. Use the PAD NOT while eating, to avoid contamination of the unit. 14. Do NOTHING in the PAD, this may cause a short circuit and damage the circuit. 15. Disconnect the PAD from the power supply before attempting to clean it. Keep the device away from children also. 16. Install the PAD NOT apart. Repairs to your PAD may only be made by professionals. Otherwise, it may result in accidents, for which the manufacturer is not liable. The warranty does not pay attention at. 5 Product view Vol+ Vol- Power MIC Camera Headphones SD-/TF-Slot Micro HDMI Micro USB 5V-DC Netzanschlu ss Camera Antenna Speaker 6 2. Safe handling of PAD The PAD is a precision instrument. Improper use can result in equipment demage. 2-1 Touchscreen The touch screen is the most sensitive component of the PADs and is made of glass. DO NOT scratch the screen of PAD, the scratches can´t be removed. DO NOT cover the screen to / in order to avoid scratches or other damage. Insert any objects on the unit to prevent damage to the screen and the device, even not to cover. Do not carry your PAD in an appropriate carrying case to protect it from dirt, water, shock and scratches. DO NOT drop place heavy objects on the screen and do not put anything on it. Ensure scratch to the screen NOT use your fingernail or anything hard. When cleaning your PAD a soft, fiber-free cloth and gently wipe over it, to prevent damage to the touch screen. Power the PAD off when not using the unit for some time. Do NOT use chemical cleaners to clean the touchscreen. Make sure that the touchscreen NOT use hard objects such as buttons, rings or watches, etc. come in contact. Spilling NO liquids on the PAD, otherwise the device will be demaged. Clean the touchscreen NOT with caustic cleaners and spray cleaning spray NOT directly to the PAD. 7 2-2 Accessories Stick to the following steps before you clean your PAD or accessories. 1. First Turn off the PAD. Disconnect, the mains supply ¬ from your PAD and any external devices. 2. Second Moisten a soft, lint-free cloth with water and wipe it gently across the surface of your PADs. DO NOT spill water on the unit to avoid electric shock or damage the device. 3. Turn the pad on only when it is dry. 2-3 Further details 1. First Let the PAD NOT lie in hot environments, especially not in the car. Otherwise it may be that parts of the device become deformed. 2. Keep this information in order to access any future reference. 3. Renew your software regularly to keep your PAD compatible and up to date. 4. To increase the life of the battery, you should charge the PAD every three months, even if you rarely use the device. 3. Carriage of PAD Turn off the pad and remove before transporting all cables and external devices. Consider the following steps when you want to travel with your PAD. Attention! 1. Turn off the pad and remove all connectors. 2. Transport the PAD in an appropriate carrying case to protect it from dirt, water, shock and scratches. 3. Make sure that you have a plug adapter, power adapter, user guide and warranty card with you. DO NOT forget the password to your PAD. 4. Ask for the power supply that apply to your destinations. Your PAD is equipped with a universal adapter. So you need to buy only a line cord or ask at your hotel for universal cables that fit your power supply. If you go by car, leave your PAD NOT lie in the sun. Make sure that your device is in the shade and cool. The Internet connection of your PADs will be interrupted if the System in the hibernate / sleep mode. 8 4. Power adapter / power on / off 4-1 Connecting the power adapter The PAD is equipped with a universal adapter, which is suitable for an input voltage of 100 V to 240 V. Perform the following steps to connect the adapter: 1. Plug the charger into the socket provided of PADs 2. Plug the AC adapter into the power outlet. 4-2 Enable / disable of PAD Press the power button for a few seconds to turn the unit on. Once the device is powered up, you see the start screen. Press and release the power button to switch to the standby mode. Press the button again to activate the unit. To switch off, press and hold the power button until the pop-up menu appears. Press OK to turn off the PAD. If the system does not respond, you hold the power about ten seconds to force a power off. 9 5. System operation First time you turn on the tablet PC, you need to unlock the screen by dragging the lock Icon out of the circle and enter the home screen, which makes it easily for you to access frequently used functions. (Screen can be different due to the model you are using). 5-1 System language change If you want to change the default Language to your home country language, please do the following steps. Open the Settings with a tap on Press on “Language & input”. 10 Tap on “Language”. A list of all available languages opens. Please choose your preferred language. You can change the system language at any time from this menu. 11 5-2 Main screen touch to get back to the previous page touch to access the home screen touch to browse the track record of opened application Tap the notification bar to obtain more information, and tap to go directly to the settings. 12 Add shortcuts to the home screen Tap on . Then tap the link between the app and drag it to the desired field of the main screen. Widgets: Tap on > Widgets. Then tap the widget and drag it to the desired field of the main screen. Delete shortcuts from the home screen Press long on the link to be deleted, until the icon appears to clear at the top of the screen. Drag the links on this icon until they turn red, and then let go. 5-3 App menu Tap on the main screen Access app menu. , as shown below in order to 13 Browser: Internet connection Calculator: Performs all basic arithmetic operations. Calender: Date display and add / manage appointments. Camera: Easy take photos and videos. Clock: With alarm. Downloads: The download files are stored DVB-T: Program to digital TV E-Mail: Your E-mail client / account File Manager: Overview of the different locations (Device memory, SD card, USB stick) Flash Player: Program for displaying multimedia and interactive content Gallery: View and manage your photo and video files. Google Mail: E-mail client / account from Gmail Google settings: General Settings for Google Apps GPS: Display the available satellites for navigation Hangouts: Google messenger Local: POI’s of Google maps Maps: Maps and imaging the Earth's surface Music: Music and entertainment. Navigation: Navigation software from Google maps Play Store: Google Marketplace for Android Apps Search: Quick search function. Search (Google): Quick Google search Settings: System settings. Soundrecorder: To generate contacts, locations, etc. via speech TravelPilot: Blaupunkt navigation software 5-4 On-Screen keyboard Switch between numbers and letters Backspace Enter Input options change Space bar Caps Lock Just tap on a text field to open the on-screen keyboard. Tap on , to close. 14 6. System settings 6-1 Wireless and network 6-1-1 Flightmode Wireless connections such as Wi-Fi and Bluetooth and 3G are thereby deactivated. 6-1-2 WiFi Tap on > Settings >Wi-Fi > OFF to enable Wi-Fi. 15 Now choose the right list pane, select the wireless network, you want to connect with. Enter the required password if necessary. You will get the reception icon in the lower right of the screen. It also indicates the signal strength. The more segments are blue, the better the reception. 16 6-1-3 Tethering and portable hotspot You can make your PAD Wi-Fi hotspot, the other WiFi-enabled devices serves as a practical portable Internet access point. Ensure a safe access. To protect your PAD and your hotspot from unauthorized access, it is recommended that a security key with a password (WPA2 is the most secure level) to set up. Perform the following steps to use your pad as a wireless hotspot: 1. Disable the WLAN function: > Settings >WiFi > ON/OFF. 2. Tap on > Settings > More... >Tethering & portable Hotspot. 3. Tap Portable W-Fi-Hotspot, to activate the hotspot feature. 4. Tap Configure Wi-Fi hotspot to change the security configuration: Network SSID-Enter a name for your hotspot. Select the Security-encryption. If encryption is selected, a password must be set. Other users can not access your Wi-Fi hotspot, when the correct password is entered. 17 5. Tap Save to save the settings. Once your Wi-Fi hotspot is active, other Wi-Fi enabled devices can access it by your hotspot's SSID entered, set a security level and the correct wireless password is entered. 6. Please note that this mode consumes more power. A shorter battery life may be the result. 6-1-4 Ethernet configuration Tap on > Settings > Ethernet Settings to configure Ethernet connection. 18 6-1-5 Mobile networks You can connect your device to an external 3G/UMTS stick to the internet. The 3G/UMTS stick is not included! After connecting the external 3G/UMTS stick, you will be when the SIM PIN is enabled, asked to enter your PIN code. Then you will see in the lower right corner of a 3G icon. Once this appears, you can use the Internet access. If you still need to enter your access provider, please proceed as follows. Go to "Settings", choose "Wireless & networks" under "More" and then tap "mobile networks". Now tap "Access Point Names". 19 Now tap the menu icon on the top right of the screen. Select "New APN" Then enter the appropriate data for your ISP. The credentials of the four major network operators (Telecom - Vodafone - E-Plus and O2) in Germany are already stored. After entering the access points press based on a 3G connection. . Your entries are saved and the device is 20 6-1-6 Data usage Here you can see the data usage of your mobile data usage. 6-2 Sounds Volumes: Volume for all sounds except media and alarm calls. Silent mode: To switch all tones silently Touch sounds: This opens the tap on the screen and the selection on the screen accompanied by sounds Tip. Screen lock sounds: Determines whether a tone sounds when the PAD is put into standby mode. 6-3 Display 21 Brightness: This adjusts the brightness of the backlight. Wallpaper: This feature allows the background image to be changed. Auto-rotate screen: Tap this selection to disable automatic screen rotation. Sleep: Here the time is set, after which the machine should switch to idle. 6-4 Security Set a screen lock and configure the use of passwords. 6-5 Apps Functions relating to the application. Here you can stop and delete applications, and manage. 6-6 Accounts & sync Managing user accounts and automatic data synchronization. 6-7 Backup & reset Here you can reset the device to factory settings. 6-8 Storage You can check the memory capacity of the unit. 6-9 Language & input Select the region to display its language, as well as the input method for the onscreen keyboard. You can also add or remove user dictionaries. 6-10 Accessibility Universal Access can be set up here. 22 6-11 Date & time Here you can set or change the date, time, and time zone of the system. 6-12 About tablet System information for PAD. 7. Filemanagement For managing files file manager is installed. With File manager, you can move your data, copy, delete, etc. After opening, you see several tabs with the internal and external memory. Now select the location from where you want to work. e.g. internal memory (disk icon). Here are all stored in the machine data and system files. or the external memory - SD card icon or USB icon. Here you will find all your files that are stored on your memory card or USB stick. 23 External TF card: 7-1 Edit files If you edit files (delete, move, copy or rename, press and hold the file pressed something and it opens the edit menu. Example: So if you cut out of your memory card a file with "Move (cut) File" and want to paste it into a folder on the hard drive, hold in the local folder, a little longer pressed and then click "Add in the folder "to insert the file. 24 7-2 Back from the folders If you are moving in the individual folders and then back to a want to return to the previous folder, you can do this with With the lower curved arrow close the file manager and return to the main menu. Attention! Do not change or delete any data in the internal memory. This could lead to a malfunction of the operating system and the loss of guarantee of manufacturer. 25 8 Communication 8-1 Google account Some features require a Google account, such as the Google Play Store. With other programs, it is possible to connect it to a Google account eg Contacts. If one of these programs are used for the first time, you are prompted to create a Google account. Here you have the option to sign in with an existing Google account or create a new account. For programs that do not necessarily need a Google account, you can skip the registration procedure with the item "Not now". You can connect later that particular program with a Google account. 26 8-2 Browser Tap the Browser icon , after a network connection is established, you can access the browser. Alternatively, you can also click bookmark symbol, to go directly to a website. Back, Forward, Refresh Tab Open new Tab Here you entert he desired address Set Bookmark for actual Webpage Open Menu Bookmarks 8-3 Contacts To access the contacts: Contacts If you do not have a Google account connected with the PAD, now you will do it on demand. See paragraph 8-1. 27 Create new contact: Create a contact. If no account is linked to the Contacts app can´t sync these contacts. Sign in an account: Configure a user account. E.G. Google Account or Exchange account. Import / export contacts: Import vCard files from the internal User memory. Adding a new contact Tap screen to enter the options for adding a new Contact. Then tap Done to save the contact. Sorting options for Contacts Search for Contacts New Contact Menu for settings, user accounts, import / export, or delete pats Edit contact current 28 8-4 E-Mail To access the e-mail function: E-Mail Sign up. Please make sure you have all the necessary information from your email provider. 1. Use the onscreen keyboard to use the e-mail address and the corresponding password and tap Next: 29 2. Select the input server, such as POP3. then enter To the menu for the outgoing server. Make sure that you have the correct names provided for input and output servers. 30 3. Re-check your account information and tap Next to the complete e-mail account settings. Then tap Next to go to the settings page, shown below: 4. Tap Next, after you enter the account name, To access your e-mails: Open email Write and send email Account settings Refresh 31 9 Fun 9-1 Camera To access the camera: Camera Taking pictures Zoom in / out Play / show Front or camera use rear activator Photo options change Selection camcorder, photo mode or panorama Flash: Auto, On or OFF White Balance: Adjusts for conditions. Exposure: adjust the exposure level Camera Settings: General settings such as image quality. Camcorder White Balance: Adjusts for conditions.. Effect: Choose a cool background effect. Video quality: HD 720p or SD 480p. Time Lapse: selection of the interval for the time-lapse. 32 9-2 Gallery To access the gallery: Display mode Gallery Slideshow Options Image Playback : Tap to send the current file, for example via Bluetooth. : Tap to delete the current image. : Tap the menu for functions such details, rotate, crop to open, etc.. The touch screen supports finger gestures to functions such as zoom in / out and leaves can be performed. 33 Illustration Gesture Function Abbildung Pull apart Zoom in contract Zoom out Gesture Function Emphasize Next picture to the right Emphasize Previous to the left picture 9-3 Music To access your music: Music Change sorting Music playing: By long tapping the title can be added to the playlist etc. Select the title you want to play. Pause the title by tapping and go on by tapping . Tap on / , to play the previous / next track. Select a repaet mode Playlist Shuffle Playback control back 34 9-4 Connecting headphones Headphones can be connected to the PAD. After a pair of headphones is connected to the PAD the speakers turn off automatically. Excessive volume can impair your hearing. They therefore reduce the volume before putting on the headphones, and then increase it to a level only then pleasant. 10 System connection 10-1 Connection to PC About the micro USB port, you can use the included Micro USB cable to connect your pad to a PC to sync photos, contacts, data, etc.. This requires MTP drivers and Windows 7 installed on your PC. These are available on the Microsoft website. 11 Attachment 11-1 Troubleshooting How do I stop the PAD when the system is not responding? Hold down the power button for about eight seconds to force a power off. How do I check the PAD if it does not turn on? 1. Connect the device to a power source if the battery power is low. 2. Make sure that the charge indicator lights up and the adapter is functioning properly. 3. Remaove external devices. What to do if water has got into the PAD? 1. Turn the PAD NOT on. 2. Do not press the power button, but disconnect the power cord, so as to eliminate the PAD. Remove all external devices and send to the PAD to the service center. 3. Transport the PAD NOT again in the dirty carrying case. 35 How do I reset the device to factory settings? Tap on: Settings---Back up & reset---Factory data reset, to reset the system to factory settings. How do I increase the battery time? 1. Adjust the brightness of the touch screen display menu at an adequate level. 2. Turn down the volume. 3. Reduce the menu idle time until the unit automatically switches to the idle state. What to do when the camera is out of focus? Check that the lens is clean, and clean it if necessary with a soft cloth. What to do if the SIM card can not be read? (only for 3G models) Please turn off the device and insert the card again. What to do if an error message about the Bluetooth connection appears? Make sure that the time for entering the password hasn´t been exceeded. What to do if Bluetooth, Wi-Fi and 3G are disabled? Verify if the airplane mode is on. If this is the case, can not be activated Bluetooth, WiFi and 3G. 36 11-2 Specifications Main function Chipset Processor Processor Speed Main memory Operating system Storage Storage Display Size Display Technology Resolution Touch-Panel Type Camera Specifications Amlogic AML 8726-MX ARM Cortex A9 Dual Core 1,5GHz 1GB DDR3 Android 4.0 8 GB 8” IPS2 Display 1024X768 (WXGA) Kapazitives Touch-Panel Front: 0,3 Megapixel; SXGA CMOS; Fixed Focus Rear: 2 Megapixel; QSXGA CMOS; Autofocus WiFi WiFi 802,11 b/g/n Audio/Video Audio Stereo Video HD-Output (supports 1080 P Max) Environmental conditions Operating 5-35 °C Operating Humidity 35-85 % Storage temperature -20-55° C Humidity in storage 20-93 % Power sypply Adapter AC 100~240 V; DC 5 V/2.5 A Output (maximum) ≤10 W Battery Type integrated Li-Ionen-Polymer Battery Voltage 3,7 V Inputs and Bays Headphone jack, speaker, integrated Audio Input microphone SIM card slot Input for external Devices Non-existant Port for 3G USB Stick (3G USB stick not included), SD card up to 32GB 37 (not included), mini-HDMI port Device Properties Weight Dimensions about 0,5 kg 205 mm x159 mm x11 mm Design and specifications are subject to change without notice. The # symbol means that the feature is optional. Hotline: + 49(0)5 11-270 496 90 Adresse und Kontaktdaten: First Service Center Kleine Düwelstr. 21 DE-30171 Hannover Fax: + 49 (0)5 11-161 25 36 [email protected] www.blaupunkt.de 38