1
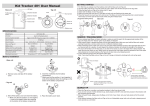
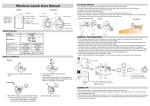
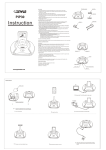
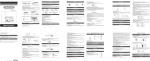
USER MANUAL QSDL503AD Intelligent Auto-Dial Alarm System Rev 10.28.2009 QSDL503AD USER MANUAL TABLE OF CONTENTS Section 1:USAGE ................................................................................................................................ 1 Section 2:FEATURES ......................................................................................................................... 1 Section 3:PACKAGE CONTENTS ...................................................................................................... 1 Section 4:SYSTEM INSTALLATION ................................................................................................... 2 4.1: Main Control Panel ........................................................................................................... 2 4.2: Wireless Indoor Lighted Siren ......................................................................................... 2 4.3: Magnetic Window/Door Sensor Alarms .......................................................................... 3 4.4: Infrared Sensor (with Mounting Bracket)........................................................................ 3 4.5: Magnetic Code Controller ................................................................................................ 4 Section 5:SETTING UP THE MAIN CONTROL PANEL ..................................................................... 5 Section 6:SETTING UP THE MAGNETIC CODE CONTROLLER ...................................................... 6 Section 7:TURNING YOUR SYSTEM ON ........................................................................................... 7 Section 8:SETTING UP THE ADDITIONAL ACCESSORIES ............................................................. 8 Section 9:TECHNICAL DATA ............................................................................................................. 9 Section 10: LOCATION SUGGESTIONS ....................................................................................... 10 Section 11: DIAGRAM .................................................................................................................... 11 Q-SEE PRODUCT WARRANTY ........................................................................................................ 12 CUSTOMER INFORMATION CARD .................................................................................................. 13 QSDL503AD USER MANUAL Section 1: USAGE Ideal for use in a home, business or warehouse environment and virtually anywhere an increased amount of anti-theft assurance is needed. This Auto-Dialing Wireless Alarm System deters unwanted intruders from entering by emitting a high pitched alarm signal if the parameters of the secured area have been breached. Once the alarm is triggered, the system then automatically dials the telephone numbers you store in its memory with a pre-recorded message notifying you of the intrusion. Section 2: • • FEATURES • Wireless 433MHz Auto-Dial Alarm System Program up to Six Telephone Numbers to Automatically Dial Out with Pre-Recorded Voice Message in Case of Emergency Panic Mode • • Code Enabled Arm and Disarm Remote Access Arm and Disarm • • Voice Recording Function Battery Operated Setting Storage and Dial Out Capability During Power Loss • • Ability to Add up to 38 Accessories Easy Do-It-Yourself Installation • Easy to Program and Use Section 3: PACKAGE CONTENTS • One Main Control Panel • • One Wireless Indoor Lighted Siren Four Magnetic Window/Door Sensor Alarms (Batteries Included) • • Two Infrared Sensors (With Brackets) One Magnetic Code Controller • • One Standard Telephone Wire One Adapter (9V 300mA) • Two Lithium Batteries (3.7V, 850mA) 1|Page QSDL503AD USER MANUAL Section 4: 4.1: SYSTEM INSTALLATION Main Control Panel 1. Connect one end of the enclosed standard telephone wire to the wire inlet on the Main Control Panel (See Picture 1) and the other end to the telephone. 2. Plug the jack of enclosed adapter into the DC plug of the Main Control Panel (See Picture 1) and connect the AC plug into a wall plug or surge protector. 3. Load 4 “AAA” batteries into the back of the Main Control Panel to use as a backup energy source in the event of a power failure. 4. It is recommended to install the Main Control Panel in a discreet location and out of clear view of a potential intruder. 5. As depicted in Picture 1, the ON/OFF switch on the left side of the Main Control Panel allows you to turn the power to your system on or off. When you turn the system on, the indicator light on the front of the Main Control Panel will emit a red light and you will hear a single beep indicating that the power is on. Antenna Input ON/OFF DC Plug Phone Input (Side View 1) (Front View) (Side View 2) (Picture 1) 4.2: Wireless Indoor Lighted Siren 1. Remove the battery compartment cover on the back of the Wireless Indoor Lighted Siren and insert the enclosed L+ Battery. Replace the battery compartment cover and mount the Wireless Indoor Lighted Siren in a location that is elevated and in plain sight. 2. The LED light on the front of the Wireless Indoor Lighted Siren (See Picture 2) will notify you that the device is powered on by flashing in 5 second intervals. (Picture 2) 2|Page QSDL503AD USER MANUAL 4.3: Magnetic Window/Door Sensor Alarms 1. Position the Magnetic Window/Door Sensor Alarm (Picture 3) along the conjoining edges of any window or door you wish to protect using heavy duty double-sided adhesive tape. It is recommended to use your Magnetic Window/Door Sensor Alarms on entries and windows that are most susceptible to break-ins and vulnerable to intruders. 2. To ensure maximum performance of your Magnetic Window/Door Sensor Alarms, position the edge of the alarm transmitter no more than 10mm away from the edge of the magnet. (Picture 3) 4.4: Infrared Sensor (with Mounting Bracket) 1. Remove the battery compartment cover on the back of the Infrared Sensor, insert 4 “AA” alkaline batteries and replace the battery compartment cover. 2. Hang the Mounting Bracket (using the included hardware) at approximately 3-5 feet high in an area that is free from obstruction. 3. Attach the Infrared Sensor (Picture 4) to the Mounting Bracket after you have decided on your desired location and adjust the directional angle to a degree that maximizes the scope of the Infrared Sensor. It is suggested that you keep the area around your Infrared Sensor clear of obstacles and avoid placing it in direct sunlight. (Picture 4) 3|Page QSDL503AD USER MANUAL 4.5: Magnetic Code Controller 1. Remove the battery compartment cover on the front of the Magnetic Code Controller (Picture 5), insert 3 “AA” alkaline batteries and replace the battery compartment cover. 2. Decide on the location you would like to attach your Magnetic Code Controller. It is recommended to use a door that is central to your home and in an area that is easy for you to access. 3. Attach the Magnetic Code Controller to the door molding using heavy duty double-sided adhesive tape or mount it down using a small size screw. 4. Peel the protective film off the double sided tape on the back of the Magnetic Sensor (Picture 5) and affix it to the edge of the door. Make sure to align the Magnetic Code Controller and Magnetic Sensor so that they are no more than 10mm (1/3”) apart as illustrated in Picture 6. Distance Cannot be Greater than 10mm (1/3”) (Picture 5) (Picture 6) 4|Page QSDL503AD USER MANUAL Section 5: SETTING UP THE MAIN CONTROL PANEL Display Screen Indicator Light Record Panic (Alarm) Code Microphone Lock Keypad (Picture 7) After loading the batteries in the Wireless Indoor Lighted Siren, Infrared Sensors and Magnetic Window/Door Sensors, you are now ready to configure the Main Control Panel. Turning the Main Control Panel ON will generate the message NO-SAVE in the Display Panel. This means that your system has no information stored and must be configured in order to operate. To set your system up correctly, you will need to do the following: 1. Record an Outgoing Message into your System: Your alarm system will call you in the event of a security breach with a pre-recorded outgoing message. Press the REC button on the front of your Main Control Unit (See Picture 7) in order to begin recording your outgoing message. Once you press the REC button, the system will respond by displaying a message that says REC in the Display Screen (Picture 7). Once this message is displayed, you can begin recording a 10 second message. You will hear an audible beep when you have reached the allotted 10 seconds. You have now set up the outgoing message that will be played when your system auto dials the telephone numbers you need to configure in step 2. 2. Program up to 6 Telephone Numbers into your System: Your alarm system will call you in the event of a security breach with a pre-recorded outgoing message. To program the telephone numbers your system will automatically dial, press the following keys on the front your Main Control Unit (Picture 7): + 1 + 10 Digit Telephone Number + # Use the same sequence of keys above to program up to 6 telephone numbers. For each number you successfully store, your system will respond by displaying a Serial Number in the Display Screen that corresponds to the order of entry (the first number you store will generate the Serial Number 1, the second will display the Serial Number 2, the third will display the Serial Number 3, and so on). The order in which your system dials out in the event of a security breach correlates to the Serial Number. To erase the telephone numbers saved into your system, press the + # keys on the front of your Main Control Unit (Picture 7). You will hear an audible beep informing you that you have successfully erased the numbers stored in your system. 5|Page QSDL503AD USER MANUAL Section 6: SETTING UP THE MAGNETIC CODE CONTROLLER Alarm Button – Press to Instantly Activate the Alarm in the event of an emergency Arm Button – Press to set Your Magnetic Code Controller in Arm Mode (Picture 8) Pressing the ARM button once on the Magnetic Code Controller will activate it after 30 seconds. After 30 seconds, the Controller is actively on and protecting the doorway that you chose to mount it on. You must deactivate the Magnetic Code Controller in order to gain access to the doorway by entering in a 4-digit Access Code. The default Access Code on your Magnetic Code Controller is 0123. To change this number, hold down the ARM button continuously for 3 seconds until you hear a beep. Press the 4 digit code of your choice followed by the ARM button. You have now reset your Magnetic Code Controller Access Code. You must use this Access Code to deactivate your Magnetic Code Controller and to turn off the alarm in the event that the door the Controller is protecting has been opened improperly. 6|Page QSDL503AD USER MANUAL Section 7: TURNING YOUR SYSTEM ON 1. Once you have configured your Main Control Unit and your Magnetic Code Controller, you can now use your alarm system. With the power to your Main Control Unit on, press the ARM button on the Magnetic Code Controller (Picture 8). You will hear the Main Control Unit and the Wireless Indoor Lighted Siren respond by beeping to let you know that they are on and armed. You will also see the message “SAVE” displayed on the display screen of your Main Control Unit. 2. Your system is now on and after 30 seconds, you can no longer enter through any protected windows or entry ways without triggering the system’s alarm. Entry through any of the doorways or windows being protected will constitute a breach of security and your system will immediately respond by emitting a high pitched alarm from the Wireless Indoor Lighted Siren and automatically dialing out to the stored telephone numbers. 3. Pressing the “ALARM” button on your Main Control Unit should be used in the event of an emergency as it also constitutes a breach of security and will trigger all the alarms on your system instantaneously. The Wireless Indoor Siren will respond with a high pitched alarm and your Main Control Unit will automatically dial out to all stored numbers in the event the “ALARM” button is pushed. 4. Entering your 4 digit Access Code in the Magnetic Code Controller will disarm the system and allow you to enter without triggering the system. 5. It is time to replace the batteries in your Wireless Indoor Siren when the LED light on the front flashes in 5 second intervals. Your Infrared Sensor will notify you that it is time to change the batteries when the LED light on the front is yellow. 7|Page QSDL503AD USER MANUAL Section 8: SETTING UP THE ADDITIONAL ACCESSORIES To enable communication between the Main Control Unit and the various accessories, you must follow these steps: 1. To Connect the Main Control Unit to the Wireless Indoor Lighted Siren: Press the CODE button on the front of the Main Control Unit and the CODE button on the back of the Wireless Indoor Lighted Siren simultaneously. You will hear a beep from both the Main Control Unit and the Wireless Indoor Lighted Siren indicating that you have successfully enabled these two devices to communicate after approximately 30 seconds. 2. To Connect the Magnetic Window/Door Sensor Alarm: Turn the switch on the side of the Magnetic Window/Door Sensor Alarm to the “RF+Alarm” position. This will enable communication between the Magnetic Window/Door Sensor Alarm and the Wireless Indoor Siren which is connected to your Main Control Unit. You will hear a beep from both the Main Control Unit and the Wireless Indoor Lighted Siren indicating that you have successfully enabled communication between these devices after approximately 30 seconds 3. To Connect the Infrared Sensor to the Main Control Unit: Point the Infrared Sensor to a moving object until the LED blinks. This will enable communication between the Magnetic Window/Door Sensor Alarm and the Wireless Indoor Siren which is connected to your Main Control Unit. You will hear a beep from both the Main Control Unit and the Wireless Indoor Lighted Siren indicating that you have successfully enabled communication between these devices after approximately 30 seconds. 4. To Connect the Magnetic Code Controller to the Main Control Unit: Press the ALARM button on the Magnetic Code Controller. This will enable communication between the Magnetic Window/Door Sensor Alarm and the Wireless Indoor Siren which is connected to your Main Control Unit. You will hear a beep from both the Main Control Unit and the Wireless Indoor Lighted Siren indicating that you have successfully enabled communication between these devices after approximately 30 seconds. 8|Page QSDL503AD USER MANUAL Section 9: TECHNICAL DATA Main Control Unit: Input voltage: DC6V-9V Working current: <12 m A Receive frequency: 433.5MHZ-434MHZ Infrared Sensor: • Input volts: DC4.5V (AAAx4) • Stand by current: <0.1mA • Transmission current: <8mA • Transmission frequency: 433.5MHZ-434MHZ • Transmission distance: >100m (330 ft) (open area) • Inductive distance: >5m (16 ft) (open area) • Low voltage indication: <3.1V +/- 0.1V Magnetic Window/Door Sensor Alarm: • Input volts: DC4.5V (Lr44x3) • Standby current: <10uA • Transmission current: <8mA • Transmission frequency: 433.5MHZ-434MHZ • Transmission distance: >100m (300 ft) (open area) Magnetic Code Controller: • Input volts: DC4.5V (AAAx3) • Standby current: <10uA • Transmission current: <5mA • Transmission frequency: 433.5MHZ-434MHZ • Transmission distance: >100m (open area) Wireless Indoor Lighted Siren: • Power volts: AC 220V DC3.7V • Standby current: <10uA • Alarm current: <200mA • Alarm volume: >90dB (within 0.5m) • Receive frequency: 433.5MHZ-434MHZ • Direct-current indication: < 4.3V 9|Page QSDL503AD USER MANUAL Section 10: LOCATION SUGGESTIONS Wireless Indoor Lighted Siren – Infrared Sensor Magnetic Code Controller 10 | P a g e QSDL503AD USER MANUAL Section 11: DIAGRAM 11 | P a g e QSDL503AD USER MANUAL Q-SEE PRODUCT WARRANTY Thank You for Choosing a Q-See Product! All of our products are backed by a conditional service warranty covering all hardware for 12 months from the date of purchase. Additionally, our products also come with a free exchange policy that covers all manufacturing defects for one month from the date of purchase. Liability Exclusions: Any product malfunction or abnormalities in operation or damage caused by the following reasons are not within the free service scope of our company: (1) Equipment damage caused by improper operation. (2) Improper equipment operation environment and conditions (e.g., improper power, extreme environmental temperatures, humidity, lightning and sudden surges of electricity). (3) Damage caused by acts of nature (e.g., earthquake, fire, etc). (4) Equipment damage caused by the maintenance of personnel not authorized by Q-See. (5) Product sold over 12 months ago. In order to fulfill the terms of your warranty, you must complete the registration process after purchasing our product. To do this, simply fill out the User’s Information Card below and fax or mail it in to us at the information listed below. You can also register the product by going to the www.q-see.com website and clicking on the Register link. 12 | P a g e QSDL503AD USER MANUAL CUSTOMER INFORMATION CARD User’s Name Mr./Mrs. Company Name Postal Address Postal Code Phone Number E-mail Model Number of Product Serial Number of Product Purchase Date Distributor The material in this document is the intellectual property of Q-See. No part of this manual may be reproduced, copied, translated, transmitted, or published in any form or by any means without our company’s expressed written consent. 1. Our products are under continual improvement and we reserve the right to make changes without notice. No guarantee is given as to the correctness of its contents. 2. We do not accept any responsibility for any harm caused by using our product. 3. The product picture may differ from the actual product, which is only for your reference. The accessories may be different according to the region you purchased our product. For more information on specific accessories, please contact your local distributor. Copyright Reserved QUESTIONS OR COMMENTS? Contact Us: Mailing Address: Customer Service: DPS Inc. Phone: 877-998-3440 x 538 8015 E. Crystal Dr. Email: [email protected] Anaheim, CA 92807 Live Chat from our Website Website: Tech Support: http://www.q-see.com Phone: 877-998-3440 x 539 Fax: Email: [email protected] 714-998-3509 Live Chat from our Website 13 | P a g e