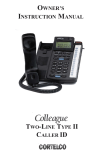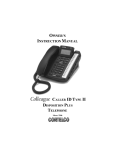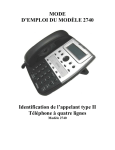
1
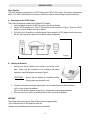
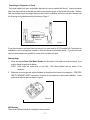
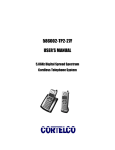
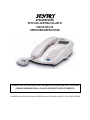
SENTRY SPEAKERPHONE WITH CALL WAITING CALLER ID 879015-TP2-27S OPERATING INSTRUCTIONS SUBSCRIPTION TO CALLER ID WITH CALL WAITING SERVICE FROM YOUR LOCAL TELEPHONE COMPANY IS REQUIRED FOR ALL CALLER ID FEATURES TO OPERATE CORRECTLY PLEASE READ AND FOLLOW THIS MANUAL BEFORE USING YOUR TELEPHONE AND KEEP IT FOR FUTURE REFERENCE IMPORTANT SAFETY INSTRUCTIONS This symbol is to alert you the important operating or servicing instructions that may appear in your owner’s manual. Always follow basic safety precautions when using this product to reduce the risk of injury, fire or electric shock. When using your telephone equipment, basic safety precautions should always be followed to reduce the risk of fire or electric shock including the following: 1. Read and understand all instructions. 2. Follow all warnings and instructions marked on the product. 3. Unplug this product from the wall outlet before cleaning. Do not use liquid or aerosol cleaners. Use a damp cloth for cleaning. 4. Do not use this product near water, for example, near a bathtub, washbowl, kitchen sink, or laundry tub, in a wet basement, or near a swimming pool. 5. Do not place this product on an unstable cart, stand, or table. The product may fall, causing serious damage to the product. 6. Slots and openings in the enclosure and the back or bottom are provided for ventilation to prevent overheating. These openings must not be blocked or covered. The openings should never be blocked by placing the product on a bed, sofa, rug, or other similar surface. This product should never be placed near or over a radiator or heat register. This product should not be placed in a built-in installation unless proper ventilation is provided. 7. This product should be operated only from the type of power source indicated on the marking label. If you are not sure of the type of power supply to your home, consult your dealer or local power company. 8. Do not allow anything to rest on the power cord. Do not locate this product where the cord will be abused by persons walking on it. 9. Do not overload wall outlets and extension cords as this can result in the risk of fire or electric shock. 10. Never push objects of any kind into this product through enclosure slots as they may touch voltage points or short out parts that could result in a risk of fire or electric shock, Never spill liquid of any kind on the product. 11. Do not disassemble this product; take it to a qualified service technician or service center when repair work is required. Opening or removing covers may expose you to voltage or other risks. Incorrect reassembly can cause electric shock when the appliance is subsequently used. 12. Unplug this product from the wall outlet and refer to qualified service personnel under the following conditions: A. B. C. D. E. F. When the power supply cord or plug is damaged or frayed. If liquid has been spilled into the product. If the product has been exposed to rain or water. If the product does not operate normally by following the operating instructions. Adjust only those controls that are covered by the operating instructions. Improper adjustment of other controls may result in damage and may require extensive work by a qualified technician to restore the product to normal operation. If the product has been dropped or the enclosure has been damaged. If the product exhibits a distinct change in performance. 13. Avoid using a telephone during an electrical storm. There may be a remote risk of electric shock from lightning. 14. Do not use the telephone to report a gas leak in the vicinity of a leak. 15. Never install telephone wiring during a lightning storm. 16. Never install telephone jacks in wet locations unless the jack is specifically designed for wet locations. 17. Never touch un-insulated telephone wires or terminals unless the telephone line has been disconnected at the network interface. 18. Use caution when installing or modifying telephone lines. SAVE THESE INSTRUCTIONS - 1- FCC INFORMATION This equipment complies with Part 68 of the FCC Rules. The label affixed to this equipment contains, among other information, the FCC Registration Number and Ringer Equivalence Number (REN) for this equipment. We suggest that you review the following information provided by the FCC. NOTIFICATION TO THE TELEPHONE COMPANY Notification to the telephone company is no longer required prior connecting the registered equipment. However, upon request from the telephone company the user shall tell the telephone company which line the equipment is connected to as well as the registration number and the ringer equivalence of the registered protective circuitry. In most, but not all areas, the sum of all REN’s should be 5.0 or less. TELEPHONE CONNECTION REQUIREMENTS Except for ringers provided by the telephone company, all connections to the telephone network must be made through standard plugs, telephone company provided jacks, or equivalent, in such a manner as to allow for easy and immediate disconnection of the terminal equipment. Standard jacks should be so arranged that, if the connected plug is withdrawn, no interference to the operation of the equipment at the customer’s premises, which remains connected to the telephone network, should occur by reason of such withdrawal. INCIDENCE OF HARM Should terminal equipment or protective circuitry cause harm to the telephone network, the telephone company shall, where practical, notify the customer that temporary discontinuance of service may be required. However, where prior notices are not practical, the telephone company may temporarily discontinue service if such action is deemed reasonable in the circumstances. In the case of such temporary discontinuance, the telephone company shall promptly notify the customer who has the right to bring a complaint to the FCC if he feels the disconnection is not warranted. - 2- CHANGES IN TELEPHONE COMPANY EQUIPMENT OR FACILITIES The telephone company may make changes in its communications facilities, equipment, operations or procedures, where such action is reasonably required and proper in its business. Should any such changes render the customer’s terminal equipment incompatible with the telephone company facilities, the customer shall be given adequate notice to make modifications to maintain uninterrupted service. GENERAL The FCC prohibits customer-provided terminal equipment to be connected to party lines or to be used in conjunction with a coin telephone service. INSTALLATION The device is equipped with a USOC RJ11C standard miniature modular jack and is designed to plug directly into a modular jack. *** THIS TELEPHONE HAS BEEN CERTIFIED AS HEARING AID COMPATIBLE *** - 3- BATTERIES CAUTIONARY INSTRUCTIONS CAUTION – To Reduce the Risk of Fire or injury to Persons, Read and Follow these instructions. 1. Use only the following type and size of battery: 3 ‘AAA’ (UM-4) alkaline batteries. 2. Do not dispose of the battery in a fire. The cell may explode. Check with local codes for possible special disposal instructions. 3. Do not open or mutilate the battery. Released electrolyte is corrosive and may cause damage to the eyes and skin. It may be toxic if swallowed. 4. Exercise care in handling batteries in order not to short the battery with conductor material such as rings, bracelets, and keys. The battery or conductor may overheat and cause burns. 5. Do not attempt to rejuvenate the battery provided with or identified for use with this product by heating them. Sudden release of the battery electrolyte may occur causing burns or irritation to eyes or skin. 6. All batteries should be replaced at the same time. Mixing fresh and discharged batteries could increase internal cell pressure and rupture the discharged batteries. 7. When inserting batteries into this product, the proper polarity or direction must be observed. Reversed insertion of batteries can cause charging, which may result in leakage and explosion. 8. Remove the batteries from this product if it will not be used for a long period of time (several months or more) since during this time the battery could leak, damaging in the product. 9. Discard “dead” batteries as soon as possible since “dead” batteries are more likely to leak in a product. 10. Do not store this product, or the batteries provided with or identified for use with this product in hightemperature areas. Batteries that are stored in a freezer or refrigerator for the purpose of extending shelf life should be protected from condensation during the storage and defrosting. Batteries should be stabilized at room temperature prior to use after storage. SAVE THESE INSTRUCTIONS - 4- INTRODUCTION TO CALLER ID INSTRUCTIONS Read this manual carefully before using this product. Congratulations on your purchase of this product! The unit allows you to take advantage of the Caller Identification service that may be offered by your local telephone company. Not all local telephone companies provide Caller Identification service; therefore you must make sure the service is available. IMPORTANT: For your Caller ID to function, you must first contact your local telephone company to arrange to have Caller ID with Call Waiting service installed on your line. There will be an extra charge added to your monthly telephone bill for this service. Please consult with your local telephone company for the Caller ID service charge. 1. The Caller ID function can be used to screen unwanted calls, eliminate harassment from annoying calls, or to return missed calls using the displayed speed dial feature. 2. When used with Caller ID service, the unit displays the name and telephone number of the person calling, along with the date and time of the call before you pick up your telephone. 3. Additionally, if you subscribe to Call Waiting combined with Caller ID service, this phone lets you see who’s calling while you’re on another call (your telephone company must provide the service needed for this feature to work). - 5- CONTROLS AND FEATURES Controls 1. Menu Button – Set time, date, language, area code and long distance code. 2. Delete Button – Erase an individual record or all records from the Caller ID Memory 3. Dialing Keys (1 to 9 and 0) 4. Flash Button - For call waiting 5. Speakerphone Microphone – Picks up your voice during speakerphone mode 6. Speaker LED Indicator – Lights when unit operates in speakerphone mode 7. Speakerphone Button - Used for handsfree dialing and answering 8. Hold LED Indicator – Lights when the Hold Button is pressed during a conversation 9. Redial Button - Press to dial the last phone number dialed 10. Hold Button – Allows you to put line on hold 11. Program Button –To save a number to Memory 12. MEM Button –For speed dialing Two-Touch Memory 13. Speaker Volume Control - Adjusts volume of Speakerphone 14. Handset Volume Control – Adjusts volume of the handset receiver from low to high (LO-HI) 15. 3 One Touch Speed Dial Memory Buttons – To store numbers into memory (M1 to M3) 16. Call Back Button – Calling back a number from the Caller ID Memory 17. New Call LED indicator – Flashes when new calls have been received 18. LCD Panel – Display caller’s name & telephone number; date and time of day 19. Up / Down Buttons – Press to review all calls received 20. Line Modular Jack – Line cord connection 21. Ringer On / Off Switch – Turns off ringer for privacy 22. Tone / Pulse Switch – Select the dialing mode 23. DC Jack – Used with the included external AC adaptor 24. Desk/Wall Mount Bracket – This bracket can be used for improving the viewing angle of the LCD display on the desk or mounting this product on the wall 25. Hook Switch - Press down to release the line, hold it down and then release it to get a new dial tone - 6- 26. Handset Hanger - Holds the handset in place when the telephone is mounted on a wall 27. To Handset – Insert coiled cord from handset here 28. Battery Compartment – Optional - 3 size ‘AAA’ (UM-4) alkaline batteries 29. Speaker – For speakerphone mode 30. Memory Index - Write down names and numbers that you stored into 10 Two-Touch Memory for easy reference (Auto 0 to Auto 9) Features o CID Type I / II Features: Displays the caller’s name and caller’s number for the last 60 incoming calls that you have received. Display total and new calls received in standby screen. Up & down buttons allow easy review of call records. Multi-language selectable – allows you to select English, French and Spanish as desired (Default to English). Caller ID with call waiting and call waiting icon. Delete button allows call records to be deleted individually or collectively. Programmable area code and long distance code. Real time clock. Recall a number from the caller ID memory. Set date and time in setup manual. o Telephone Features: 3 one-touch (24 digits memory each) and 10 two-touch (24 digits memory each) speed dial buttons. Require 3 “AAA” alkaline batteries (Not Included). Speakerphone with slide volume control. HOLD button. FLASH button MEM button REDIAL button PROG button Ringer on/off switch. Handset LO/HI volume switch. Desk/ wall mountable. TONE/ PULSE dialing Low battery warning icon. Adjustable LCD contrast in 8 levels (default to 3). Call timer. Idle display clock. Pots mode operation when battery is not installed. Programmable pause in user memories. AC adaptor included. - 7- INSTALLATION Power Supplies This unit is designed to operate from an AC-DC adaptor with a 9VDC 100mA output. This may be supplemented with 3 x 1.5V ‘AAA’ (UM-4) batteries for backup to maintain the caller ID memory during line power interruption. A. Operating from the AC-DC Adaptor This unit should always be used with the included AC-DC adaptor. 1. Insert the adaptor’s plug into the DC Power Jack at the back of the base. 2. Plug the AC-DC adaptor into a 120V AC 60Hz electrical outlet as shown in Figure 1. When the AC-DC adaptor is in use, the batteries will not be drained. 3. If the unit is not to be used for an extended period of time, unplug the AC-DC adaptor from the mains and the unit. Also remove the batteries from inside the battery compartment. Figure 1 B. Installing the Batteries 1. Unscrew and open the battery cover located on the bottom of the base. Please note this construction is for compliance with safety regulations. Install the batteries according to Figure 2. IMPORTANT: Be sure that the batteries are installed correctly. Wrong polarity may damage the unit. Figure 2 2. For better performance and longer operating time, we recommend the use of alkaline batteries. (a) Do not mix old and new batteries. (b) Do not mix alkaline, standard (carbon-zinc) or rechargeable (nickel-cadmium) batteries. 3. If the unit is not to be used for an extended period of time, remove all the batteries. WARNING To avoid the memory loss from the Caller ID phone while changing batteries, - Do not disconnect the AC-DC adaptor from the unit; - Replace all the old batteries with new ones as soon as possible. - 8- Connecting the Telephone Line Cords One coiled handset cord and a long straight telephone line cord are packed with this unit. Insert one modular plug of the coiled cord into the handset jack and the other plug into the jack on the left side of the base. Similarly, insert one modular plug of the straight telephone cord into the Line Modular Jack at the rear end of the base and the other plug into the telephone wall jack as shown in Figure 3. Figure 3 If your phone system is hard-wired (does not use jack), you must install an RJ11W modular jack. These jacks are available from your local telephone company or from an electronic and hardware retailer. If you have the older style 4 pin jacks, adaptors are available to convert them to modular style jacks. Desktop Usage 1. Attach the supplied Desk / Wall Mount Bracket onto the bottom of the telephone (as shown below), if you want to change the angle of the display. NOTE: Arrow signs are printed both on the Desk / Wall Mount Bracket and the bottom of the telephone. 2. Make sure the arrow signs are matched between the bracket and the bottom of the telephone. “FOR DESK USE PUT BRACKET HERE” is printed on the bottom of the telephone for desk mount installation. Locate and snap the tabs into place as shown in Figure 4. Figure 4 Wall Mounting There are two different methods for installing the base as follows: - 9- A. 1. 2. 3. If your house is equipped with a modular wall plate: Insert the plug of the longer end of the telephone line cord into the Line Modular Jack on the rear of the base. Insert the other modular plug into the telephone jack in the modular wall plate. Wrap up excess length of straight telephone line cord and place in Wall Mount Bracket as shown in Figure 5. Figure 5 4. 5. 6. Insert the wall mount bracket at the bottom of the base. Find the FOR WALL MOUNTING PUT BRACKET AND CORD HERE printed on the bottom of the telephone, and then match with the arrows. Locate and snap the tabs into place. Put your phone over the wall plate; make sure both studs fit into the slots on the bottom of the Base. Then slide base down firmly onto the wall plate. See Figure 6. Reverse the Handset Hanger as shown in Figure 7. Figure 7 Figure 6 B. If your house is not equipped with a modular wall plate: 1. Determine the desired position on the wall (54” above the floor is suggested). Mark the wall at the desired position. Make another mark exactly 3¼” above the first mark. Drill holes 1” deep at these 2 marks. 2. Insert plastic anchors in both holes by tapping gently with a small hammer. 3. Drive a screw into each anchor. Tighten them until the head of screw is the thickness of 2 pennies from the wall as shown in Figure 8 below. 4. Proceed to mount the telephone as described in part A above. Figure 8 - 10- CUSTOMIZING YOUR PHONE **Make sure 3 ‘AAA’ (UM-4) alkaline batteries are installed. Setting the Contrast In idle state, press # to adjust the LCD contrast. There are 8 levels of contrast setting. Level 1 is the lowest and level 8 is the highest. Default is at level 3. Each press will increase the display contrast by one level. The contrast will return to level 1 when # pressed at the highest contrast setting. Setting the Language 1. In idle state, press Menu. 2. Display shows E S F in the 7-segment array and SET LANGUAGE in the dot array. 3. The current language setting is flashing. E is for English, S is for Spanish and F is for French. Use ▼▲ to select a language from the display prompts (English, Spanish or French). Default is English. Press menu to confirm and exit to set area code. E S F Setting the Long Distance Code 1. Users located in the United States and Canada are required to select “1” as their long distance code. 2. This option allows you to enter a long distance code of 1 digit (0 – 9 or none) only. 3. When in this option, the display shows long distance code in the dot array and the previous set code or – if not set before in the 7 segment array. The digit or – will be flashing. Use dial pad to enter the long distance code. For example, the previous set code is 0. 0 is flashing. Press 1. The code becomes 1. You may continue to change the code or press menu to save the code 1 and enter set time mode. 4. If you want to delete the long distance code setting, press delete when you first enter the setting menu, when the first digit or – is flashing. Press menu to save and enter set time mode. - 11- Setting the Area Code 1. When you enter an area code or prefix using this feature, the phone will remove that code or prefix from incoming numbers if a complete match of the prefix with the area code setting occurs when you dial from the Callers List. This option allows you to enter only one area code of 1, 2, or 3 digits to be stripped off from the incoming calls. Please note that this setting will not change the number stored in the Callers List but the dialed number will have the area code or prefix stripped off. For example, if the number stored in the Callers List is 8521234567 and the area code is set as 852, the displayed number changes as 123-4567 right adjusted in the 7 segment array and when dialed, the dialed numbers 1234567. 2. When in this option, the display shows SET AREA CODE in the dot array and the previous set code or “ _ _ _” if not set before in the 7-segment array. The first digit or _ will be flashing. Use dial pad to enter the area code. 3. For example, the previous set code is 513. 5 is flashing. Press 2. The code becomes 2 _ _ and the second cursor is flashing. Press 4, 6 in sequence. The code becomes 246 and 2 is flashing. You may continue to change the code or press “Menu” to save the area code 246 and enter the set long distance mode. 4. If you want to delete the area code setting, press Delete when you first enter the setting menu, that is, when the first digit is flashing. Press Menu to save and enter set long distance code. Set Time Display shows the time/date and ENTER HOUR. The tens hour is flashing. Use dial pad to enter the hours. Display shows ENTER MINUTES and the tens minute is flashing. Use dial pad to enter minutes. Display shows * KEY SET AM/PM. Press * to set AM or PM. Press Menu to save AM or PM and enter set month. Set Date Display shows ENTER MONTH and the tens month is flashing. Use dial pad to enter the month. Display shows ENTER DAY and the tens day is flashing. Use dial pad to enter day of the month and the phone will exit to idle state after the day is entered. Clear Message Waiting Sometimes the Message Waiting Icon and the LED for message waiting flashes when there are no messages waiting on your Voice Mail service. You can cancel the Message Waiting indication by pressing Delete for 5 sec in idle state. Display shows CLR MSG WAITING. Press Delete again to clear the Message Waiting Icon and flashing LED and exit to idle state. The LED will flash again when there are new messages waiting. - 12- Reset your phone If you cannot set up your phone or if the display is blank or erratic or the New Call Indicator stays on continuously, your phone may have received a pulse of abnormal voltage from the phone line. To reset the product, simply uninstall all batteries and unplug the AC adaptor from this product. Wait for at least 5 minutes before reinstalling the batteries and then the AC adaptor. NOTE: All stored data will be lost when the unit is reset. Please write down any important numbers before resetting the phone. - 13- TELEPHONE OPERATION Ringer On/Off Switch (#21) ON - Ringer sounds to alert you to incoming calls. OFF - Ringer does not sound to avoid being disturbed by incoming calls. Tone/Pulse Switch (#22) The PULSE position is used if your local telephone system only offers Pulse (rotary dial) service or if Tone service is available but you do not subscribe to it. The TONE position is used if you subscribe to Tone Dialing (DTMF) service. If you are not certain what type of service you have, check with your local telephone company. Dialing Keys (#3) To make a phone call, pick up the handset. When you hear the dial tone, tap out the phone number you are calling using the Keys 1 to 9 and 0. The number dialed will be shown in the LCD Panel. When your call is completed, hang up the handset. Hook switch (#25) If you want to make another call after completing a call, press and hold the Hookswitch for a second. This will release your first call and give you a dial tone for the next call. Speakerphone Button (#7) Press this button to make or answer calls “handsfree”. The call timer will appear in the LCD panel. To make an outgoing call: 1. Press the Speakerphone Button and the Speaker Indicator will light. 2. When you hear the dial tone, tap out the phone number you are calling using keys 1 to 9 and 0 (or recall the number from memory). 3. When you hear your party answer, you can carry on a conversation without picking up the handset. Adjust the volume of your party’s voice by using the Speaker Volume Control on the right side of the base. 4. When your call is completed, press the Speakerphone Button again to terminate the call. NOTE: Should you encounter feedback noises during speakerphone operation, the Speaker Volume Control should be reduced until the feedback stops. To answer an incoming call: Follow steps 1, 3, and 4 above. Redial Button (#9) The last number you have dialed remains in a memory known as REDIAL memory. If you call a number and receive a busy signal or no answer, hang up the handset. When you are ready to try the same call again, pick up the handset or press Speakerphone Button and tap the Redial Button. Please note that if you have made any other calls in the meantime, only the last number you called will be stored in the REDIAL memory. - 14- Flash Button (#4) For residential phone systems with “Call Waiting Service”, instead of pressing the Hookswitch to pick up the other call, press the Flash Button. This will automatically send the correct signal to the telephone company to switch calls. The amount of time you hold the Flash Button down is not critical. Hold Button (#10) If you want to temporarily suspend your conversation with the other party or take the call on a different extension phone, press the Hold Button once. The Hold Indicator will light. To cancel HOLD and resume your conversation, either pick up the handset again or press the Speakerphone Button to resume handsfree conversation, or pick up an extension phone on the same line. Handset Volume Control (#14) You can adjust the volume level of the handset receiver by sliding the volume control to the “Hi” or “Lo” position during conversation. The “Hi-Lo” switch is located on the right side of the base. Call Timer A call timer (TIMER 00:00) is displayed to count the total off hook time in minutes and seconds. The timer starts to count 6 seconds after the phone goes off hook to make dialing. It starts counting immediately when the phone goes off hook to answer a call. Flash will reset call timer. Receiving Calls When the phone rings twice: 1. Lift the handset and speak into the mouth piece of the handset. 2. To end the call, hang up the handset. The display will return to the standby screen. To make Calls Regular Call Lift the handset or press “SPEAKERPHONE”. Enter the number using the dial pad. To redial the Last Dialed Number Regular Call Lift the handset or press Speaker. Press Redial/Pause to dial the last dialed number. Dialed digits will be displayed one by one from left to right and then shifted to left one by one when the number of digits exceeds 15. If there is no number in Redial, display shows NO NUMBER for 2 sec and exits to off hook state. - 15- Predialed Call Press Redial/Pause to view the last dialed number. If more than 15 digits, display the first 14 digits and –. If there is no number in the Redial list, display will shows NO NUMBER for 2 sec and exits to idle state. Lift the handset or Press Speaker or Dial (activate Handsfree when the handset is on cradle). Dialed digits will be displayed one by one from left to right and then shifted to left one by one when the number of digits exceeds 15. To delete the Last Dialed Number In idle state, press Redial/Pause to view the last dialed number. Press Delete once and then exit to idle state. Temporary Tone Dialing Temporary tone dialing is used only when you have Pulse (rotary) service. It allows you access to services that require tone signaling, including some Tone-Activated Computer Systems or phone-banking. To change from Pulse (rotary) to Tone dialing during a call, do the following: 1. Dial a phone number in PULSE (Tone / Pulse Switch at PULSE position). 2. Press the * Button, all buttons pressed after this will send only tone signals to the computer or phone banking system. 3. After you hang up, the phone automatically returns to Pulse (rotary) service. - 16- MEMORY OPERATION Using the Memory Keys When the phone is in on hook state, you can save up to 13 speed dial numbers (3 one-touch and 10 two-touch of 24 digits each without name). To save a number to the one-touch memory key (M1 – M3) In idle state, press “PROG”. Display shows ENTER NUMBER. Enter the number using the dial pad. If you require a pause, press Redial where you want the pause. Press “MEM” and display shows SAVED TO? Press one of the memory keys. And the phone will exits to idle state. To save a number to the one-touch memory key (M1 – M3) from the Callers List Ensure the number is on the display by accessing the Callers List. Press “MEM” and display shows SAVED TO? Press one of the memory keys. The phone will exit to view Callers List state. Press Menu or wait 12 sec to exit to idle state. To save a number into two-touch memory key (0-9) In idle state, press “PROG”. Display shows ENTER NUMBER. Enter the number using the dial pad. If you require a pause, press Redial where you want the pause. Press “MEM” and display shows SAVED TO? Press one of the 10 keys on the dial pad. And the phone will exits to idle state. To save a number to the two-touch memory key (0-9) from the Callers List Ensure the number is on the display by accessing the Callers List. Press “MEM” and display shows SAVED TO? Press one of the 10 keys on the dial pad. The phone will exit to view Callers List state. Press Menu or wait 12 sec to exit to idle state. To make a call from a memory key Lift the handset or press “SPEAKERPHONE” key Press the one-touch Memory key (M1-M3) or “MEM” + digit key (0-9) which contains the number you want to dial - 17- out. If the memory is empty. Display shows KEY IS EMPTY for 2 sec and exits to off hook state. To predial from a memory key Press the one-touch Memory key (M1-M3) or “MEM” + digit key (0-9) which contains the number you want to dial out. Display shows the number. If the memory is empty, display shows KEY IS EMPTY for 2 sec and exits to idle state. Lift the handset or press “SPEAKERPHONE” or Dial (Note: activate hands-free when the handset is on cradle). Digits will be dialed out and displayed from left to right one by one. To delete the item in a memory key In idle state, press the one-touch Memory key (M1 toM3) or “MEM” + digit key (0-9) to see memory contents. To delete the item, press Delete and exit to idle state. CALLER ID OPERATION Using the Callers List The Caller’s List, list the last 60 caller’s records by caller’s sequence. Calls from the same telephone number will not be combined. Answered call is not treated as NEW. The telephone display will indicate when there are new callers. When the Callers List is full, new callers are added to the list, and the oldest callers are deleted. To view the Callers List In idle state, press ▼▲ to scroll through the Caller’s List. If Caller’s List is empty, display shows NO CALLS and exits to idle state. When it is scrolled through the last listing, display shows END OF LIST. Cycling scrolling through the Callers List is possible. Press Menu or wait 12 sec (5 sec if at END OF LIST) to exit to the idle state. To make a call from the Callers List Regular call. Lift the handset or press “SPEAKERPHONE”. Find the item you would like to call in the Caller’s and press the Dial key. Predial call. - 18- Find the item you would like to call in the Callers List. Lift the handset or press “SPEAKERPHONE” or Dial (Note: activate hands free when the handset is on cradle). To change a number in the Callers List before dialing Tip: If you have to frequently remove area code to return local calls, you should use the Area Code option and add your local area code. Note: The Callers List does not save changes. If you plan to dial the number again, edit the number in Callers List and save it to Memory. By pressing ▼▲ key find the item you want to edit. By pressing the “PROG” key. The first digit of the number will flash and this indicates the cursor position. Use the dial pad to add digits. The added digit will appear to the left of the cursor. Press Delete to erase the digit at the cursor position and all digits at the right of the cursor will shift up. The cursor will remain at its original position. Use the Redial key to insert a pause. The pause icon P will appear. Lift the handset to dial the number, or press Dial or “SPEAKERPHONE” to dial the number using Handsfree. For example, if the number is 123-4567. Press “PROG” and the number will be displayed as 1234567 left adjusted. Digit 1 will be flashing. Press 8, 5 and 2 in sequence. The displayed number will be 81234567, then 851234567 and then 8521234567 and digit 1 remains flashing. Press Delete. The displayed number becomes 852234567 and digit 2 will be flashing. To edit a number in the Callers List and save to Memory By pressing ▼▲key to find the item you want to edit. By pressing the “PROG” key. The first digit of the number will flash and this indicates the cursor position. Use the dial pad to add digits. The added digit will appear to the left of the cursor. Press Delete to erase the digit at the cursor position and all digits at the right of the cursor will shift up. The cursor will remain at its original position. Use the Redial key to insert a pause. The pause P will appear. Press Mem and display shows SAVED TO? Press one of the one-touch Memory key (M1-M3) or one of the digit keys (0-9) on the dial pad. The prompt exits to view Callers List state. To delete an item in the Callers List Press ▼▲ to find the item you want to delete. Press Delete. Display shows DELETE ITEM? Press Delete again to confirm. The phone exits to view Callers List state. - 19- To leave the Callers List at any time, press Menu or wait 12 sec (5 sec if at END OF LIST) to exit to idle state. To delete all items in the Callers List By pressing ▼▲ key to enter the Callers List. Press Delete for 5 sec. Display shows DELETE ALL? Press Delete again to confirm deletion of the entire Callers List. Display shows NO CALLS. To leave the Callers List at any time, press Menu or wait 12 sec (2 sec if at NO CALLS) to exit to idle state. New Call LED Indicator The New Call LED Indicator will flash slowly to alert you that there is a new incoming call. Blocked or Unavailable Calls 1. If the caller’s telephone number is blocked (that is, the caller wishes to keep his telephone number private) the display will show “PRIVATE” in place of the caller’s name. 2. If the call is international or from an area where Caller ID service is not available, the display will show “OUT OF AREA” in place of the caller’s name. 3. Calls from a Cellular phone will either display as “PRIVATE” with the caller’s number only displayed. 4. If the data received from the telephone company contains corrupted information, the display will show "ERROR". NOTE: The display characteristics described above may vary depending on the telephone company or long distance carrier you or the caller subscribe to. TROUBLE SHOOTING - 20- PROBLEMS CHECK No dial tone Is the line cord disconnected from the wall jack or telephone? Is jack improperly wired? Phone does not work Are all cords connected properly? Phone does not ring Ringer Switch may be set to OFF? Slide switch to ON position. Cannot dial Check the Tone/Pulse Switch setting. You may only have PULSE service. Switch the Tone/Pulse switch to PULSE position Other party cannot hear you Ensure Handset cord is connected properly. Display showing erroneous figures Setup the phone by pressing the Menu Button and then the Redial Button. After that, reset the Language, Long Distance Code, and Area Code. OR Your phone must be reset by uninstalling all batteries or unplugging the AC adaptor. Wait for 5 minutes before reinstalling the batteries or plugging the AC Adaptor. This will also clear all memories. OR Display is corrupt or does not work as intended The display is faded (Numbers are hard to see) Is the AC adapter connected? If batteries are used, are the batteries fresh? Change all 3 batteries. (Replace all 3 batteries at the same time.) Cannot store numbers into memory Is the AC adapter connected OR batteries installed correctly? Caller ID does not work Make sure the Caller ID service is active. - The phone is connected to a working wall jack. - All line cord connections are correct and secure. - Your answering machine is set to answer after at least 2 rings and you only pick up the phone after 2 rings. The Caller ID display is blank Press either Up or Down button to see if "-NO CALLS-" appears. Is the AC adapter connected OR batteries installed properly? Check if you have received the first Caller ID record. - 21- The Caller ID display does not show the caller's The Caller ID unit will not function until you have Caller information ID service from your local telephone company. Call your local telephone company to have Caller ID installed on your phone line. Check your phone line connections. Make sure all connections are secure and connected. If it is a private call or a blocked call, the caller's name and/or phone number will not appear on the display. ERROR appears on the LCD panel - Your phone received no information or unclear call information. Static can cause this message. If this condition persists, contact your local telephone company to ensure that there is no problem with your phone line. - You might have answered the phone before 2 rings. Cannot erase all records in memory The Delete Button must be quickly pressed twice to erase a single call record. To erase ALL call records, press and hold the Delete Button for at least 5 seconds after you view all new calls. Caller ID displays in the wrong language Reset the language by pressing the Menu Button and then the Redial Button until E S F shown on the display and press theÀ Down Button to confirm. The language will be set to English mode. Memory Dialing does not work Check the phone if you have programmed the numbers correctly by pressing that memory number button. Also programming can only be done if fresh batteries are installed correctly. Handset falls out of phone base when wall mounted Handset hanger was not installed properly for wall use. Cannot see the name or number of the caller Did you wait for the second ring before picking up the phone or pressing the Speakerphone Button? The Caller ID will only detect information between the first and second ring. Caller's information is not registered The caller may have an unlisted or blocked number to prevented Caller ID identification or it may be an overseas call or you may have noise on the line during that call. Did you or your answering machine answer calls before the second ring? - 22- Message Waiting does not work Check with your telephone company if this service is available or if you have subscribed to it. Pressing a Memory button does not display number Your Memory button has no stored number. Please store the number again by pressing the PROG Button, dialing the number and pressing the Memory Button you want. CARE AND MAINTENANCE 1. Clean your phone with a damp (never wet) cloth. Solvent or detergent should never be used. 2. If your phone stops working, check to be certain that all modular plugs are properly “snapped” into their jacks. If the phone still doesn’t work and you have other telephones installed in your home, check to see if they are working. If they are, try using your telephone on another outlet. If it still doesn’t work, it is more than likely that there is a problem with your telephone. In this case, return the unit for service in accordance with the instructions on your warranty card. DO NOT CALL THE TELEPHONE COMPANY SINCE YOU MAY BE RESPONSIBLE FOR CHARGES FROM THEM. CHARGES FROM THE TELEPHONE COMPANY ARE NOT COVERED BY THE TERMS AND CONDITIONS OF THE WARRANTY. 3. If other telephones in your house have also stopped working, the problem is most likely with your telephone line service. Do not return your telephone for service since most likely there is nothing wrong with it. You should however, consult with your telephone company to see if there has been any interruption to your line service. . - 23- LIMITED WARRANTY If you purchased this product new in the U.S. or Puerto Rico, CORTELCO warrants it against defects in material and workmanship for a period of one (1) year from the date of original purchase. This warranty is in lieu of all other express warranties. During the warranty period, CORTELCO agrees to repair or, at its option, replace the defective product, or any part of it without charge for parts or labor. This is your exclusive remedy. This warranty does not cover damage resulting from accident, misuse, abuse, improper installation or operation, lack of reasonable care, the affixing of any attachment not provided by CORTELCO with the product and loss of parts. The warranty is voided in the event any unauthorized person alters or repairs the unit. Telephone companies use different types of equipment and offer various types of services to customers. CORTELCO does not warrant that this product is compatible with the type of equipment of any particular phone company or the services provided by it. CORTELCO DISCLAIMS ANY IMPLIED WARRANTY, INCLUDING THE WARRANTY OF MERCHANTABILITY AND THE WARRANTY OF FITNESS FOR A PARTICULAR PURPOSE, AS OF THE DATE ONE YEAR FROM THE ORIGINAL PURCHASE OF THE PRODUCT. CORTELCO ASSUMES NO RESPONSIBILITY FOR ANY SPECIAL, INCIDENTAL OR CONSEQUENTIAL DAMAGES. THIS WARRANTY GIVES YOU SPECIFIC LEGAL RIGHTS, AND YOU MAY HAVE OTHER RIGHTS, WHICH VARY FROM STATE TO STATE. SOME STATES DO NOT ALLOW THE EXCLUSION OR LIMITATION OF SPECIAL, INCIDENTAL OR CONSEQUENTIAL DAMAGES OR LIMITATIONS ON HOW LONG AN IMPLIED WARRANTY LASTS, SO THE ABOVE EXCLUSION AND LIMITATION MAY NOT APPLY TO YOU. If failure occurs and your Call Waiting ID is in warranty, service shall be provided by returning it to CORTELCO Repair Center, 1703 Sawyer Road, Corinth, Mississippi 38834, shipping prepaid. The product will be repaired or replaced if examination by us determines the product to be defective. Call Waiting IDs received damaged as a result of shipping will require you to file a claim with the carrier. 879015 TP2 27S Revision 3 01-2005 - 24-