1
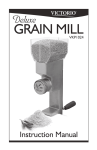
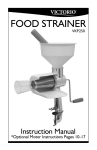
Deluxe
VICTORIO
GRAIN MILL
VKP1024A
Instruction Manual
*Optional Motor Instructions, p. 10-17
Table of Contents
Parts Diagram............................................................................................1
Operating Precautions..............................................................................2
Product Overview.....................................................................................2
Care Instructions.......................................................................................3
Helpful Tips...............................................................................................3
Mounting Instructions.............................................................................4
Hopper Assembly.....................................................................................5
Grain Mill Assembly Instructions..........................................................5
Use Instructions........................................................................................7
Troubleshooting Guide............................................................................8
Recipes........................................................................................................9
Optional Motor
Features.................................................................................................... 10
Important Safety Instructions.............................................................. 11
Grounding Instructions........................................................................ 12
Circuit Breaker Instructions................................................................. 13
Motor Use Instructions......................................................................... 14
Troubleshooting Guide......................................................................... 17
Warranty/Contact Info......................................................... Back Cover
*For the most up-to-date manual, or for more information regarding
this product, visit our website: www.Victorio.info.
Copyright © 2014 Victorio Kitchen Products. All Rights Reserved.
Victorio Grain Mill
Model VKP1024A
Parts Diagram:
Your complete grain mill includes everything shown below:
(1)
(2)
(5)
(6)
(7)
(3)
(4)
Parts List:
(1)
(2)
(3)
(4)
(5)
(6)
(7)
VKP1024-5 Hopper
Housing - Not Sold Separately
VKP1024-4 Clamp Assembly
VKP250-15 Handle
VKP1024A-1 Milling Cone Shaft Assembly
VKP1024-2 Nylon Adjustment Tip
VKP1024-3 Adjustment Knob w/Tip
1
Operating Precautions
Read and follow ALL instructions and warnings before
operating your Grain Mill for the first time. If certain
precautions are not taken, damage to the Grain Mill and/or
injury to persons could result.
•
•
•
•
•
•
•
•
•
•
DO NOT turn the handle of the Grain Mill if it is empty. This
will damage the milling head.
Never put any foreign objects into the Grain Mill. Small rocks or pieces
of metal could damage the milling cones.
Never put fingers near the milling cone shaft while the Grain Mill is
being operated, as that could cause serious injury.
Using tools to tighten the adjustment knob will damage the Grain
Mill and void the warranty. Tighten the adjustment knob only by
hand.
Do not operate the Grain Mill without the clear plastic hopper in place.
Never operate the Grain Mill if any parts are missing or damaged.
Always make sure the Grain Mill is clamped securely to a sturdy surface
before assembling and using.
Do not clean any part of the Grain Mill in a dishwasher.
Not intended for use by children.
For household use only.
Product Overview
Congratulations on your purchase of the Victorio® Grain Mill. You
will find it to be a very valuable tool to have on hand. You’ll enjoy the
natural, wholesome flavors of home ground ingredients, prepared fresh
and free from all the preservatives and additives contained in commercially
processed foods. Your Victorio® Grain Mill will serve you well for years to
come.
Caring well for your Grain Mill will help it last, so be sure to read through
all the instructions contained in this manual before using your product for
the first time.
The basic procedure is simple. Once your Grain Mill arrives, inspect it
thoroughly and wipe all parts with a damp cloth. Assemble it according to
the instructions, then mount it to a stable, solid work surface. Adjust the
coarseness by using the adjustment knob. Last, add grain to the hopper and
start the grinding process.
2
Care Instructions
To ensure your Grain Mill works properly at all times, please follow the care
and handling instructions below:
•
•
•
•
•
•
When you receive your Grain Mill, dismantle all parts and wipe them
off using a damp cloth to remove any residue from manufacturing and
packaging.
Small parts are easily lost, so be sure to handle with care.
After each use, the Grain Mill can be easily cleaned with a dry, soft
brush or soft cloth.
If thorough cleaning is necessary, hand wash the Grain Mill in warm
water and dry all parts thoroughly.
Do not leave any part of the Grain Mill soaking in water.
Do not clean any part of the Grain Mill in a dishwasher.
Helpful Tips
1. The first time you use the Grain Mill be sure to dispose of the
first 2-3 cups of grain which has been ground as it may contain
metal residue from the manufacturing process.
2. We suggest always starting the Grain Mill adjusted to the finest setting.
However, if you started grinding on a coarse setting and need to
adjust back to fine, then turn the handle counter-clockwise for 2-3 full
rotations while tightening the adjustment knob to the desired setting.
3. Grind white rice through the Grain Mill to remove any build up caused
by normal use.
4. The adjustment knob has a nylon tip that helps keep the milling cone
accurate. This must be in place for the adjustment settings to work
correctly (see diagrams below). In the event the tip receives damage
or is missing, please contact our Customer Service department for a
replacement at 866-257-4741.
3
Mounting Instructions
Choose a firm, sturdy surface when mounting the Grain Mill. The best
surfaces are built-in counter tops and heavy tables, like a dining room table.
These types of surfaces ensure the Grain Mill can remain in place while
grinding.
Open the clamp screw as wide as it will go by turning counter-clockwise.
Then push the Grain Mill forward, so the inside of the body sits flush with
the edge of the surface. Twist the clamp screw clockwise until it is tight
and the Grain Mill is securely in place (see mounting diagrams below).
Correct
Incorrect
4
Hopper Assembly
Assemble the hopper by lining up the sides and firmly pressing them
together, until both sides are fully touching and no gaps remain. After
correct assembly, the hopper should fit snugly on the top of the Grain Mill.
If the hopper doesn’t fit correctly then the halves have not been pressed
together far enough.
Grain Mill Assembly Instructions
For proper assembly, please follow ALL instructions below:
1. With your Grain Mill now clamped correctly to a sturdy surface, insert
the milling cone shaft through the front of the Grain Mill body (see
diagram 1).
2. Screw the adjustment knob onto the threads on the front of the Grain
Mill body, just until it is snug (see diagram 2). Do not over-tighten.
3. Push the handle into the shaft on the back of the Grain Mill, by lining
up the tabs on the handle with the grooves in the shaft (see diagram 3).
1
2
3
5
4. Place the hopper on top of the Grain Mill, making sure it is pushed all
the way down.
5. Place a shallow bowl or pan in front of the Grain Mill, under the
milling cone, before you begin the grinding process (see picture below).
6. Your Grain Mill is now completely assembled and ready for use. Please
see the Use Instructions on p. 7 before operating your product.
6
Use Instructions
DO NOT turn the handle if the Grain Mill is empty. This will
damage the milling heads.
Now that you have assembled your Grain Mill properly, read through
ALL of the following instructions before you start the grinding
process.
The first time you use the Grain Mill be sure to dispose of the first
2-3 cups of grain which has been ground as it may contain metal
residue from the manufacturing process.
1. Before you put grain into the hopper,
select the desired coarseness you
want your flour to be by turning the
adjustment knob, clockwise for fine and
counter-clockwise for coarse (see diagram
at right).
2. Never use tools to tighten the
adjustment knob, as it will damage
the mill.
3. For best results, adjust the knob clockwise to the finest setting, just
until the knob is snug, then turn the knob counter-clockwise 1/4 turn
to prevent over tightening and possible damage to the milling cone.
As you grind, you can adjust the knob counter-clockwise, for a coarser
textures, if that is what is desired.
4. Once you have your adjustment knob set, pour grain into the hopper.
The Grain Mill holds 4-1/2 cups of grain, which yields approximately 7
cups of fine flour, depending on the grain.
5. Turn the handle clockwise to begin grinding.
6. *TIP - If the grain mill is grinding too coarse, you can adjust it to be
finer by turning the handle counter-clockwise 2-3 full rotations while
tightening the adjustment knob towards the fine setting.
7
GRAIN MILL TROUBLESHOOTING GUIDE
PROBLEM
The Grain mill rocks from side to
side when the handle is cranked.
The grain mill only grinds coarse
no matter what I do.
The nylon tip is missing from my
adjustment knob.
I am trying to grind (X) and it
doesn’t seem to be working.
When I turn the handle, very little
or no flour comes out.
8
SOLUTION
The Grain Mill is not properly
mounted and clamped. See p. 4 for
mounting instructions. Also, make
sure the surface you are using is
sturdy and immovable, such as a
built-in counter top.
Make sure the adjustment knob
has the nylon tip on it (see p. 3).
Also, see p. 5 for proper assembly
instructions and p. 7 for Use
Instructions. Be sure to read all
steps carefully. If the problem
persists, contact customer service at
866-257-4741.
See Helpful Tips #3 on p. 3.
Contact customer service at 866257-4741.
Carefully follow the Use
Instructions on p. 7 and make
certain, after you tighten the
adjustment knob, you turn it
back at least 1/4 turn. An overlytightened adjustment knob can
damage the milling cone.
½ c. Butter, melted
½ c. Sugar
2 c. Water, very warm
2 tbsp Active Dry Yeast
Wheat Dough Recipe
In a stand mixer, beat the above ingredients well. Then add:
2 c. White Wheat Flour
2 Eggs, beaten
2 tsp Salt
Once all of the ingredients are mixed together, add 3-4 more cups of regular white
flour, a little at a time, checking the consistency of the dough constantly. When
finished, the dough should feel very sticky. Let the dough rest for 5 minutes, then
mix for 5 more minutes. Using 1 tbsp of cooking oil, coat a large bowl thoroughly.
Remove dough from the stand mixer and place into the pre-greased bowl. Rub the
dough around in the bowl, so the outside of the dough also becomes coated in oil.
Then, cover and let rise until double in size, or until an impression remains when
poked. Punch dough down and let rise another 10 minutes.
For Bread Loaves:
Divide dough in half, shape, and place into two greased, 8.5” X 4.5” loaf pans. Let
rise in loaf pans until double in size. Then bake in oven, at 350°F, until golden
brown, or when loaves sound hollow when tapped. Remove from pan and let cool
on a wire cooling rack.
For Basic Rolls:
Form dough into 2-inch balls, place onto a greased baking pan and let rise for 15
minutes. Bake in oven at 350°F for 20-30 minutes, or until rolls are golden brown.
Remove from oven and let cool.
For Cinnamon Rolls:
Roll dough out on a floured surface, into a rectangle. Pour ½ c. butter onto dough
and sprinkle with any of the following toppings: Cinnamon, sugar, brown sugar,
nuts and/or raisins. Roll up the dough, starting with the short side. Once rolled,
pinch the edge closed and cut into 1 ½ inch rolls. Place cut rolls onto a greased
baking pan and let rise for 15 minutes. Bake in oven at 350°F for 20-30 minutes, or
until rolls are golden brown. Remove from oven and glaze with the frosting of your
choice.
For Orange Rolls:
Roll dough out on a floured surface, into a rectangle. Pour ½ c. butter onto dough
and sprinkle with any of the following toppings: orange zest and orange juice. Roll
up the dough, starting with the short side. Once rolled, pinch the edge closed and
cut into 1 ½ inch rolls. Place cut rolls onto a greased baking pan and let rise for 15
minutes. Bake in oven at 350°F for 20-30 minutes, or until rolls are golden brown.
Remove from oven and glaze with a powdered sugar and orange juice frosting.
9
Victorio Deluxe Grain Mill Motor
VKP1024-M (optional)
*The electric motor is an optional accessory and is sold separately.
Vent
Drive Shaft
Overload
Breaker
On/Off
Switch
Motor
Latch
Features:
Cord
•
Installs quickly and is easy to use.
•
Energy efficient and durable.
•
High torque power combined with all metal gears provide years of
reliable service.
•
Very low power consumption keeps your power bill low and allows for
worry free use with backup emergency power such as generators or a
battery powered electrical inverter.
•
Motor specifications: 120 VAC, 60Hz
10
IMPORTANT SAFETY INSTRUCTIONS
WARNING! - Failure to follow these safety
instructions correctly will lead to a risk of fire, electric
shock or personal injury.
SAVE THESE INSTRUCTIONS
When using electric appliances, basic precautions should always be
followed, including the following:
•
Read and follow all instructions before operating the motor.
•
Connect motor to a properly grounded outlet only (See ‘Grounding
Instructions’ on p. 12).
•
Do not use electrical outlet adapters with this appliance.
•
Do not operate if the cord or plug is damaged, or after the appliance
malfunctions, or is dropped or damaged in any way. Return the
appliance to the manufacturer for examination, repair, or electrical or
mechanical adjustment.
•
Do not disassemble. The motor must be serviced by qualified
technicians only.
•
To disconnect the motor, turn all controls to the off (“O”) position,
then remove the plug from the outlet.
•
Do not unplug by pulling on the cord. To unplug, grasp the plug, not
the cord.
•
Do not leave the motor plugged in when not in use and before
servicing or cleaning.
•
Keep the motor unplugged and make sure the switch is in the off
(“O”) position when installing or uninstalling from the grain mill.
•
Never turn on the motor with nothing in the grain mill.
•
To reduce the risk of electric shock, do not immerse the motor in water
or other liquid. Do not place or store the motor where it can fall or be
pulled into a tub or sink.
•
Children should only use the Grain Mill under adult supervision.
•
Do not contact any moving parts.
•
NEVER put hands or foreign objects in the grain mill hopper.
11
•
Never use the grain mill without the hopper in place.
•
Do not cover the motor ventilation holes.
•
Make sure the motor is attached to the grain mill properly before
operating (See ‘Motor Use Instructions’ on p. 14).
•
This appliance is for household use only.
GROUNDING INSTRUCTIONS - (See diagrams below)
THIS APPLIANCE MUST BE GROUNDED. In the event of
malfunction or breakdown, grounding provides a path of least resistance
for electric current to reduce the risk of electric shock. This appliance is
equipped with a cord having an equipment-grounding conductor and a
grounding plug. The plug must be plugged into an appropriate outlet that
is properly installed and grounded in accordance with all local codes and
ordinances.
DANGER – Improper connection of the equipment-grounding conductor
can result in a risk of electric shock. The conductor with insulation
having an outer surface that is green with or without yellow stripes is the
equipment-grounding conductor. If repair or replacement of the cord
or plug is necessary, do not connect the equipment-grounding conductor
to a live terminal. Check with a qualified electrician or serviceman if the
grounding instructions are not completely understood, or if in doubt as
to whether the appliance is properly grounded. Do not modify the plug
provided with the appliance – if it will not fit the outlet, have a proper
outlet installed by a qualified electrician.
Correct
12
Incorrect
Circuit Breaker Instructions:
The motor includes a resettable overload breaker to prevent risk of
personal injury or grain mill damage.
Instructions for resetting overload breaker: Turn the switch to the off
(“O”) position and unplug the motor from the outlet. Remove the motor
from the grain mill. Wait 10 minutes for the motor to cool, then manually
reset the breaker by pressing in on the top of the breaker until it locks.
Important: Before reinstalling the motor, check the grain mill operation
by installing the handle and manually operating the grain mill to make sure
the milling cone isn’t jammed or overly hard to turn. If the grain mill is
jammed then the adjustment knob, milling cone and shaft must be removed
to inspect and clear any obstructions.
Caution: If the breaker trips immediately after plugging in or turning on
the motor, do not bypass the breaker and do not use the motor. Contact
Victorio Customer Service at 866-257-4741.
Power Switch
ON
OFF
Overload Breaker
Breaker in normal Breaker that has
operating position
been tripped
Motor Specifications: 120 VAC, 60 HZ
13
Motor Use Instructions
Make sure you have read the Important Safety Instructions on
p. 11 before installing the motor.
Installation Steps:
1. Remove the motor from the packaging and
make sure the power switch is in the off
(“O”) position (see diagram on p. 13) and the
motor is unplugged.
2. Use the crank handle to position the grain
mill shaft so the motor shaft key is aligned
with the notches (see diagram at right).
3. Once the shaft is positioned correctly, insert
the motor shaft into the grain mill shaft by
pushing forward on the motor.
4. Now that the motor has been inserted, twist the motor counterclockwise to lock it into place (see diagrams below).
Twist Counter
Clockwise
5. You will know the motor has been installed
correctly when the motor latch is secure around
the grain mill body (see diagram at right).
14
6. Make sure the power switch is still in the off (“O”) position and plug
the motor cord into a correct power source (see diagram on p. 12).
7. WARNING! - Do not turn on the motor at this point! You will
damage your grain mill by running it without grain.
8. Now that the motor is connected properly and plugged in, you can
add your grain to the hopper. If needed, review the Grain Mill Use
Instructions on p. 7 before you begin the grinding process.
9. You may now turn the power switch to the on (“I”) position. Never
use any tools in the hopper. Keep hands, hair, clothing and any
other foreign objects, away from the hopper opening at all times.
Removal Steps:
1. To remove the motor, make sure the power switch is in the off (“O”)
position and the cord is unplugged.
2. Firmly grasp the motor and twist in a clockwise direction to release the
motor latch from the body of the grain mill. (See diagrams below).
Twist
Clockwise
15
3. The motor may be tight or hard to remove. If so, rock it up and down
gently as you pull straight back. (See diagram below).
4. If needed, you can clean the motor by using a damp cloth to wipe away
any dust or residue on the outside surfaces. Dry immediately. Never
immerse in water or disassemble to clean.
5. To store, place the motor back in its original box and packaging
and keep it in a cool, dry place, away from moisture and extreme
temperatures.
16
MOTOR TROUBLESHOOTING GUIDE
PROBLEM
I cannot attach the motor.
I cannot remove the motor.
The motor is working but no grain
is going through the mill.
Grain is going through, but the
grain mill is producing very little or
no flour.
The motor does not turn on.
The motor does not turn on and
the overload switch is not tripped.
SOLUTION
Review p. 14 on how to attach the
motor, including how to correctly
align the motor shaft with the grain
mill shaft.
Sometimes the motor shaft can
get stuck or be difficult to remove.
Read all the Removal Steps on p.
15.
Sometimes grain can get stuck
and will not flow into the grinding
chamber. Gently tap the side
of the grain mill, just below the
hopper, using the side of your fist
or heel of your hand. This will
loosen the grains and help them
flow into the grinding chamber.
Carefully follow the Use
Instructions on p. 7 and make
certain, after you tighten the
adjustment knob, you turn it
back at least 1/4 turn. An overlytightened adjustment knob can
damage the milling cone, especially
while using the motor.
Review the instructions and
diagram on p. 13 about the Power
Switch and the Overload Breaker.
Make sure the cord is plugged into
a live power outlet. Review the
diagram on p. 13 about the Power
Switch. Make sure the switch on
your motor matches the diagram
for the on, (“I”) position.
17
Product Warranty
Model VKP1024A - Grain Mill Warranty: 2 years
Model VKP1024-M - Optional Motor Warranty: 1 year
We are confident in the quality of our products and back each one with a
limited warranty for the length of time specified above. Should you experience any problems with your product, please contact our customer service
department.
All warranty claims must be accompanied by proof of purchase and are
only valid if the appliance has been operated for its intended purposes. This
product is for household use only.
Items Not Covered:
•
Shipping costs or items lost in transit.
•
Damages to the product due to accident, misuse, abuse, negligence,
or if the appliance has been altered in any way..
Victorio Kitchen Products
1804 Sandhill Rd
Orem UT, 84058
By Phone: 866-257-4741
By Email: [email protected]
www.Victorio.info
© Copyright 2014 Victorio Kitchen Products, Inc. All rights reserved.