1
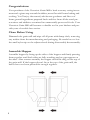
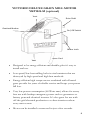
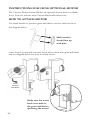
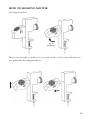
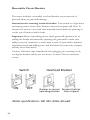
Important safety instrucƟons. Read carefully to reduce the risk of personal injury or damage to appliance. Read all instrucƟons carefully before using. WARNING! 1. Never put hands or foreign objects in hopper or input chute of grain mill. 2. Only ghten the adjustment knob by hand. Never use tools of any kind to ghten the adjustment knob. Use of tools to Ɵghten the adjustment knob will damage the mill and void the warranty. 3. Never operate the mill if any parts are missing or damaged. Always make sure the mill is clamped securely to a sturdy surface before using. 4. Appliance is not intended for use by children close supervi‐ sion is necessary when appliance is used near children. 5. Only use grain mill with electric motor a achment model VKP1024‐M (op onal accessory). 6. For household use only. 1 YOUR DELUXE GRAIN MILL SHOULD INCLUDE EVERYTHING ILLUSTRATED BELOW. Copyright © 2012 Victorio Kitchen Products. All Rights Reserved. 2 Congratulations Your purchase of the Victorio® Grain Mill is both a money saving investment and a giant step towards healthier, more flavorful home baking and cooking. You’ll enjoy the natural, wholesome goodness and flavor of home ground ingredients prepared fresh and free from all the usual preservatives and additives contained in commercially processed foods. Your Victorio® Grain Mill will become a valuable tool in your kitchen and provide years of trouble free service. Clean Before Using Dismantle the grain mill and wipe off all parts with damp cloth, removing any residue from the manufacturing and packaging. Be careful not to lose the small nylon tip on the adjuster knob during disassembly & reassembly. Assemble Hopper Assemble hopper by lining up the sides of the hopper and firmly pressing them together until both sides are fully touching and no gaps appear on the sides. After correct assembly the hopper should fit snug on the top of the grain mill. If the hopper doesn’t fit on the top of the grain mill, the halves have not been pressed far enough together. 3 Setup Instructions Mount firmly on a sturdy table or counter top and secure with clamp screw. See mounting example diagrams below: Correct Mounting: Incorrect Mounting: 4 Operating Instructions Select desired texture by turning the adjustment knob clockwise for fine milling and counterclockwise for coarser texture. Turn adjustment knob by hand only. For the finest setting possible turn adjustment knob fully clockwise until it stops, then back counter-clockwise 1/4 turn (to prevent over tightening). Then add grain and begin milling. If you desire a more coarse texture turn the adjustment knob counterclockwise a turn or two until output is the desired coarseness. Do not operate mill with adjustment knob tightened all the way clockwise as this may damage milling cones. Tips 1. To get the flour output of the grain mill to be the very finest you must start with the grain mill empty of any grain and the adjustment knob turned fully clockwise until it stops, then adjustment knob back counter clockwise 1/4 turn. 2. The grain mill can only be adjusted coarse after grinding has begun. To adjust fine you need to empty the mill of any grain before turning the adjustment knob to a more fine setting. For this reason we suggest the grain mill always start adjusted to the finest setting when starting. 3. While designed primarily for small grains like wheat or rice. The grain mill can grind most dry non-oily food or grain without damaging the milling cones. Some things grind better than others. If in doubt try it! 4. Some larger items such as corn or beans may need to be chopped into smaller pieces before the grinder will accept them. This can be done easily with a blender or food chopper. 5. The flow into the milling cones is gravity fed. This can be problematic for very light items (rolled oats or rosemary for example). We do not recommend using the grain mill with these types of items. 5 Please note: The adjustment knob has a nylon tip that helps keep the milling cone adjustment accurate. This must be in place for the adjustment settings of the grain mill to work correctly. Under normal conditions the tip should last the life of the grain mill. In the event that the tip receives unforeseen damage or is missing (to prevent this we suggest not loaning the grain mill) please contact customer service for a replacement. Cleaning Disassemble and carefully handle small parts so they don’t get lost. The grain mill can usually be cleaned with a brush or dry cloth. If thorough cleaning is necessary, hand wash in warm (not hot) water and dry all parts thoroughly. Do not allow parts to soak before washing. Do not clean any part of the grain mill in a dishwasher. 6 GRAIN MILL TROUBLESHOOTING GUIDE PROBLEM SOLUTION Grain mill rocks from side to side when the handle is cranked. Grain mill is not properly mounted and clamped. See page 4 for moun ng instruc ons. I am grinding corn, beans or similar sized item and very li le or nothing seems to come out. Larger sized items need to be pre‐ chopped into smaller pieces before mill will accept them. Use a blender or food chopper to cut into smaller pieces. See grinding ps on page 5. The grain mill only grinds coarse no ma er what I do. Make sure the adjustment knob has the nylon p on it (see page 6). For adjustment instruc ons see page 5. If problem persists please contact customer service. I am trying to grind (X) and it doesn’t See page 5 for grinding ps. If prob‐ seem to be working. lem persists please contact customer service. Grain Mill is very hard to turn even with nothing in it. 7 Carefully follow adjustment proce‐ dure on page 5 making certain to turn knob back 1/4 turn a er ghtening all the way. Failure to do so can result in damage to the milling cone. VICTORIO DELUXE GRAIN MILL MOTOR VKP1024-M (optional) Vent Drive Sha Overload Breaker On / Off Switch Motor Latch Vent Cord Designed to be energy efficient and durable; plus it’s easy to install and use. Low speed/low heat milling locks in vital nutrients that are destroyed by high speed and high heat methods. Energy efficient high torque motor combined with all metal gears provide for years of reliable service and keeps your power bill low. Very low power consumption (60 Watts max) allows for worry free use with backup emergency power such as generators or battery powered electrical inverter. It’s also great for use with off-the-grid electrical production or other situations where every watt counts. Motor can be installed or removed in just a few seconds. 8 INSTRUCTIONS FOR ELECTRIC MOTOR VKP1024-M *Electric motor (VKP1024‐M) is an op onal accessory and is sold separately. IMPORTANT SAFETY INSTRUCTIONS PERTAINING TO A RISK OF FIRE, ELECTRIC SHOCK or INJURY TO PERSONS. Read all instrucƟons carefully before using. WARNING Connect to a properly grounded outlet only (grounding instruc ons on page 10). Do not use electrical outlet adapters with this appliance. For household use only. Do not use outdoors. Do not operate if cord or plug is damaged. Do not unplug by pulling on cord. To unplug, grasp the plug, not the cord. Unplug from outlet when not in use and before servicing or cleaning. Do not immerse motor in water or other liquid. Appliance is not intended for use by children close supervision is necessary when appliance is used near children. Do not put hands or foreign objects in grain hopper while motor is installed. Do not cover ven la on holes on top and bo om of motor. Before installing or removing grain mill electric motor turn the switch to the off posi on and remove plug from outlet. Make sure the motor is a ached to the grain mill properly before opera ng (installa on instruc ons on page 11). Only use electric motor (model VKP1024‐M) with Victorio Deluxe Grain Mill (model VKP1024). Do not disassemble. Must be serviced by a qualified technician only. 9 GROUNDING INSTRUCTIONS This appliance must be grounded. In the event of malfunc on or breakdown, grounding provides a path of least resistance for electric current to reduce the risk of electric shock. This appliance is equipped with a cord having an equip‐ ment‐grounding conductor and a grounding plug. The plug must be plugged into an appropriate outlet that is properly installed and grounded in accordance with all local codes and ordinances. DANGER – Improper connec on of the equipment‐grounding conductor can result in a risk of electric shock. The conductor with insula on having an outer surface that is green with or without yellow stripes is the equipment‐grounding conductor. If repair or replacement of the cord or plug is necessary, do not con‐ nect the equipment‐grounding conductor to a live terminal. Check with a quali‐ fied electrician or serviceman if the grounding instruc ons are not completely understood, or if in doubt as to whether the appliance is properly grounded. Do not modify the plug provided with the appliance – if it will not fit the outlet, have a proper outlet installed by a qualified electrician. 10 INSTRUCTIONS FOR USING OPTIONAL MOTOR The Victorio Deluxe Grain Mill has an optional electric motor available for it. Visit our website www.VictorioKitchenProducts.com HOW TO ATTACH MOTOR Use crank handle to position grain mill shaft so motor shaft can fit in. See diagram below Shaft notches should line up with pins. Once shaft is positioned correctly insert motor shaft into grain mill shaft and see diagram below for how to attach motor. Twist Counter Clockwise Make sure the motor latch is secured to the grain mill before operating the motor! 11 HOW TO REMOVE MOTOR See diagram below Twist Clockwise Motor may be tight to remove so you may need to rock it up and down as you pull back. See diagram below. 12 Resettable Circuit Breaker The motor includes a resettable overload breaker to prevent risk of personal injury or grain mill damage. Instructions for resetting overload breaker: Turn switch to off position and unplug motor from outlet. Remove motor from grain mill. Wait 10 minutes for motor to cool and then manually reset breaker by pressing in on the top of breaker until it locks. Important: Before reinstalling motor check grain mill operation by installing the handle and manually operating the grain mill to make sure milling cone isn’t jammed or overly hard to turn. If grain mill is jammed adjustment knob and milling cone and shaft must be removed to inspect and any clear obstruction. Caution: If breaker trips immediately after plugging in or turning on do not bypass breaker and do not use motor. Contact Victorio customer service. Switch ON OFF Overload Breaker Breaker in normal Breaker that has opera ng posi on been tripped Motor specifica ons: 120 VAC, 60Hz, 60 wa . 13 MOTOR TROUBLESHOOTING GUIDE PROBLEM SOLUTION Cannot a ach motor Review page 11 about how to a ach motor, including how to correctly align motor sha with grain mill sha Cannot remove motor Review page 12 about how to remove motor. Some mes motor sha can get stuck or be difficult to remove see diagram on page 12 Motor is turning but grain mill is not Larger sized items need to be pre‐ grinding. chopped into smaller pieces before mill will accept them. Use a blender or food chopper to cut into smaller pieces. See grinding ps on page 5. Some mes grain can become stuck and will not flow into grinding cham‐ ber. Tap on the side of the body be‐ low hopper using the plas c part of the crank handle. Motor stops turning or locks up when Some grains especially popcorn are I am using it. very hard and will be difficult to grind. If the motor is stopping when you are grinding it means it is being overloaded and you will need to pre chop the grain. Motor does not turn on Remove motor from grain mill. Make sure it is plugged into a live power outlet and that the circuit breaker above the switch on the side of the motor is not tripped. See page 13 for details about circuit breaker. Check to see that switch is in the ON posi on. 14 Product Warranty Victorio Kitchen Products warrants the grain mill for two (2) years and the optional motor for one (1) year from the date of original purchase. from defects or failures in the material and workmanship. All warranty claims must be accompanied by a proof of purchase and are only valid if the appliance has been operated and maintained in conformity with the provided instruction manual. Any failed part of the appliance will be repaired or replaced without charge at Victorio Kitchen Products’ discretion. This warranty applies to household use only. This warranty is null and void, as determined solely by Victorio Kitchen Products if the appliance is damaged through accident, misuse, abuse, negligence or if the appliance is altered in any way. THIS WARRANTY IS IN LIEU OF IMPLIED WARRANTIES, INCLUDING WARRANTIES OF MERCHANTABLITY, FITNESS FOR PARTICULAR PURPOSE, PERFORMANCE, OR OTHERWISE, WHICH ARE HEREBY EXCLUDED. IN NO EVENT SHALL VICTORIO KITCHEN PRODUCTS BE LIABLE FOR ANY DAMAGES, WHETHER DIRECT, INDIRECT, INCIDENTAL, FORSEEABLE, CONSEQUENTIAL OR SPECIAL ARISING OUT OF OR IN CONNECTION WITH THIS APPLIANCE. If you think this appliance has failed or requires service within its warranty period please contact: Victorio Kitchen Products Customer Service Department www.VictorioKitchenProducts.com Call 866-257-4741 or E-mail [email protected] Return shipping fees are non-refundable. A receipt proving original purchase date will be required for all warranty claims. Handwritten receipts are not accepted. Victorio Kitchen Products is not responsible for returns lost in transit. © Copyright 2012 Victorio Kitchen Products, Inc. All rights reserved