1
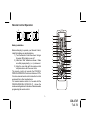
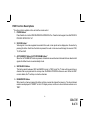
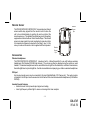
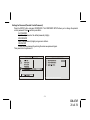
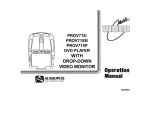
PROV916/
VOD705
AUTO
PROG
CHANNEL
SOURCE
ON OFF AUTO
VOLUME
FM
SELECT
S
L
I NPU T
VID EO
IR
HEA DPH ONES
AUDI O
R
AP
PROV916 S/
PROV916 P
DVD PLAYER
WITH
DROP-DOWN
VIDEO
TV/MONITOR
®
ELECTRONICS CORP .
128-6745
DATE : 21/05/03
128-6745
1 of 31
Important Notice
It is unlawful in most jurisdictions for a person to drive a motor vehicle which is equipped with a screen that is located
in the motor vehicle at any point forward of the back of the driver’s seat, or that is visible, directly or indirectly, to the
driver while operating the vehicle. In the interest of safety, the PROV916/PROV916 S/PROV916 P should never be
installed where it will be visible, directly or indirectly, by the operator of the motor vehicle.
Warnings
Do not use any solvents or cleaning materials when cleaning the video monitor.
Do not use any abrasive cleaners, they may scratch the screen. Use only a lightly dampened lint free cloth to wipe the
screen if it is dirty.
Lock the LCD screen in the fully closed position when not in use.
Before putting on headphones always adjust the volume setting to the lowest position.
Remember to leave the dome light switch in the off or auto positions when the vehicle is unattended, as the dome
lights, if left on, can drain the vehicle’s battery.
Do not put pressure on the screen.
Television Reception
This entertainment system is designed primarily for viewing prerecorded movies or playing video games. Television
reception in a moving vehicle will be limited and in some areas will not be possible due to weak and variable signal
strength. Television viewing in a stationary vehicle will result in an improvement, but may still be marginal due to signal
strength. The quality of the picture will not be consistent with home TV reception. Reception may be affected by
weather and distance from TV station. A weak signal may cause the picture to roll, be snowy, or cause some color
loss.
- 2-
128-6745
2 of 31
Features
Congratulations on your purchase of the Audiovox
PROV916/PROV916 S/PROV916 P DVD Player with
Drop-Down Video TV/Monitor. The PROV916/
PROV916 S/PROV916 P has been designed to give
you and your family many years of video entertainment
in the mobile environment. Please read the directions
that follow to familiarize yourself with the product and
to ensure that you obtain the best results from your
equipment.
Please note: Installation options vary, see the
individual owner’s manuals for each component in
your system to obtain a full understanding of each
component’s operation.
• 9 Inch TFT (Thin Film Transistor) Active Matrix
LCD (Liquid Crystal Display) Monitor
• OSD (On Screen Display) for Control of Picture
Quality and Functions
•
• Full Function Remote Control
• Six Frequency FM Modulator with remote
control and OSD
• Dual Channel Infrared Transmitter for IR
Wireless Headphones (Satellite Radio Ready)
Safety Precaution
For safety reasons, when changing video media it is
recommended that the vehicle is not in motion, and
that you do not allow children to unfasten seat-belts
to change video media or make any adjustments to
the system. System adjustments can be
accomplished using the remote control unit, while
seat-belts remain fastened. Enjoy your Audiovox
entertainment system but remember-safety of all
passengers remains the number one priority.
Built-in TV Tuner
• Two Audio / Video Inputs
• Headphone / Speaker Amplifier
• Two Headphone Jacks
• Forward and Side Remote Sensor
• Dome Lights with Switch
• Backlit Controls for Low Light Operation
- 3- •
Last Position Memory for DVD
128-6745
3 of 31
Controls and Indicators Diagram
1
2
3
POWER
4
5
PLAY
EJECT
STOP
1
6
7
8
23
AUTO
PROG
AP
CHANNEL
ON OFF AUTO
SOURCE
VOLUME
F M
SELECT
21
S
19
18
VI DE O
I NPU T
AUDIO
L
R
HE ADP HO NE S
17
IR
9
10
11
12
13
14
15
16
8
- 4-
128-6745
4 of 31
Main Function Descriptions
1. DVD Disc insertion slot – For loading Disc.
12. CHANNEL( )Button – Use this button to increase the
channel number to the desired number. Note : When TV
function is selected.
2. POWER Button – Bright red when system is on dim when
off.
13. Auxiliary Audio Right Input.
3. EJECT ( ) Button – For ejecting discs from the disc
compartment.
14. Auxiliary Audio Left Input.
4. PLAY ( ) Button – This button is used to enter the play
mode.
15. Auxiliary Video Input.
16. Side Remote Sensor Eye – Allows the remote control to
operate the PROV916/PROV916 S/PROV916 P, control
volume to wired headphone jacks and control the other
accessories.
5. STOP ( ) Button – To stop playing.
6. Infrared Transmitter and Sensor – Use to transmit audio
to wireless headphones. Also allows the remote control to
operate the PROV916/PROV916 S/PROV916 P and to
control other accessories in the system.
17. Drop Down LCD Panel.
18. Headphone Jack – Allow the use of wired headphones
with a 1/8” plug for listening to video program audio.
7. PROV916/PROV916 S/PROV916 P Ventilation Opening.
19. Screen release – Moves in direction of the arrow to release
the drop down screen.
8. Dome Lights – Provide additional interior illumination.
9. SOURCE Select – Used to select one of the four sources
(TV,AV1, AUX, DVD).
20. VOLUME ( ) Button – Use this button to raise the volume
level of the headphone jacks. It is also used to make picture
adjustments in picture select mode. Note : Audiovox
recommends the use of the Audiovox HP275 Headphones
when using wired headphones.
10. CHANNEL ( ) Button – Use this button to decrease the
channel number to the desired number. Note : When TV
function is selected.
11. AUTO PROGRAM Button – Allows the user to scan and
store active TV stations into memory.
- 5-
128-6745
5 of 31
21. FM Select Button – Each time this button is pressed will
switched FMM cycles through (FM OFF – POD AUDIO –
SAT AUDIO) and the frequency of the channel of modulator
will remain same.
22. VOLUME ( ) Button – Use this button to decrease the
volume level of the headphone jacks. It is also used to
make picture adjustments in picture select mode.
Note:These buttons will not affect the volume of wireless
headphones or the wired RF modulator. When using these
devices the volume must be adjusted with the wireless
headphone volume control or with your radio’s volume control
(see page 15, Wireless Headphones, or page 16, Wired
FM Modulator).
23. Three position Dome Light Switch
• Auto – Automatically switches on the dome lights in
conjunction with the vehicle’s interior illumination.
• Off – The dome lights will not turn on in this position.
• On – Turns on the dome lights.
- 6-
128-6745
6 of 31
Remote Control Operation
POWER
EJECT
1
32
SOURCE
2
3
Battery Installation
4
5
Before attempting to operate your Remote Control,
install the batteries as described below.
1) Turn the Remote Control face down. Using a
fingernail, lift the battery cover off.
2) Install two “AAA” batteries as shown. Make
sure that proper polarity (+ or -) is observed.
3) Align the cover tabs with the remote control
and press down until the cover clicks.
The remote control will operate the PROV916/
PROV916 S/PROV916 P and most Audiovox VCP’s.
It is not a universal remote control and will not control
equipment from other manufacturers.
If a universal remote control is to be used with the
PROV916/PROV916 S/PROV916 P , choose the
remote encoding scheme for Audiovox Televisions when
programming the remote control.
31
AUTO
MEMORY
SKIP/
SEARCH
ERASE/
WRITE
–
VOL
+
30
6
29
CH
MUTE
7
8
9
PIX
28
27
Enter
MENU
SETUP
10
11
RETURN
26
25
24
REPEAT
CH
23 21
12
13
34
33
22
35
20
14
19
15
18
16
17
- 7-
128-6745
7 of 31
DVD Function Descriptions
*Function control is available on the unit and the remote control.
1. POWER Button*
Press this button to turn the PROV916/PROV916 S/PROV916 P on. Press the button again to turn the PROV916/
PROV916 S/PROV916 P off.
2. SOURCE Button*
Video signals from video equipment connected to the audio / video inputs can be displayed on the monitor by
pressing this button. Each time the button is pressed, the audio / video source will change the sources: DVD,
TV, AV1 and AUX.
3. AUTO MEMORY Button (AUTO PROGRAM Button)*
When the AUTO MEMORY button is pressed, all channels are searched and channels that are detected with
signals of sufficent levels are automatically stored.
4. SKIP/SEARCH Button
This button selects betweeen SKIP and SEARCH mode. In “SKIP mode” the TV tuner will tune and stop on
channels that are programmed into memory when CHANNEL UP/DOWN buttons are used. When the SKIP
mode is disable, the TV will stop on all active channels.
5. ERASE/WRITE Button
While tuned to a channel, pressing this button will store or erase the channel from memory. The stored channel
numbers are displayed in “GREEN” on the LCD display screen, and the non-stored channel numbers are in
“RED”.
- 8-
128-6745
8 of 31
6. Channel Up ( ) Button*
Use this button to increase the channel number to the desired channel and to scroll upward in menu options.
7. MUTE Button
Press this button to mute the audio.
Pressing the button again restores sound to the previously set level.
8. ENTER Button
Used to implement setting selected.
9. LEFT (
) Button
Allows the user to shift left in the menu options.
10. MENU Button
Allows the user to access the main menu.
11. RETURN Button
Allows the user to return to the menu while PBC on.
Note: This function only present on VCD2.0.
12. TV Mode Select Button
Switches certain function keys on the remote control for TV functions.
- 9-
128-6745
9 of 31
13. DISPLAY Button
Press to display DVD Disc current information.
Press DISPLAY button
Once
Twice
3 times
4 times
5 times
6 times
7 times
DVD Player Perform
Display current TITLE & CHAPTER
Display current SUBTITLE
Display current AUDIO language & channel
Display current ANGLE
Display A-B current status
Display REPEAT current status
Display is turn off
For Title & Chapter, use cursor buttons to do title/chapter selection, then press Enter button to implement the selection.
For Subtitle, Audio, Angle, A to B & Repeat, press Enter key repeatedly to change the options. These options may vary
from disc to disc.
14. PAUSE ( ) Button*
Allows the user to pause the playback.
15. PREVIOUS ( ) Button
Allows the user to return to the previous chapter or track.
16. NEXT ( ) Button
Allows the user to skip to the next chapter or track.
- 10-
128-6745
10 of 31
17. REV (
) Button
Allows the user to search in a backward direction at 2,4, 6 and 8 times the normal speed.
18. FWD (
) Button
Allows the user to search in a forward direction at 2,4, 6 and 8 times the normal speed.
19. PLAY ( )Button*
Press this button to activate the play mode while a disc is loaded into the disc compartment.
20. STOP (n ) Button*
DVD disc play will be stopped.
21. DVD Mode Select button
Switches certain function keys on the remote control for DVD functions.
22. VCP Mode Select button
Switches certain function keys on the remote control for VCP functions.
23. A-B Button
Allows the user to repeat play of a DVD or CD from point A to point B.
24. REPEAT Button
Allows the user to repeat various positions of a DVD, CD or MP3.
25. Channel Down ( ) Button*
Use this button to decrease the channel number to the desired channel and to scroll downward in the menu
options.
- 11-
128-6745
11 of 31
26. SETUP Button
Allows the user to select the DVD player’s options (Display, OSD Language, Defaults, Parental Control, Password,
Exit Setup).
27. RIGHT ( ) Button
Allows the user to shift to the right in the menu options.
28. PIX Button (PICTURE SELECT)
Each time this button is pressed, the on screen picture adjustment display the “adjustment bars” for BRIGHTNESS,
CONTRAST, COLOR or TINT. Once the desired adjustment bar is displayed, use the VOLUME UP/DOWN
buttons to adjust the setting. The display will automatically turn off if no adjustments are made within 6 seconds,
or if any other button is depressed.
29. VOLUME DOWN (-) Button*
Use these buttons to decrease the volume level of the headphone jacks. They are also used to make picture adjustments
in picture select mode.
30. VOLUME UP (+) Button*
Use these buttons to raise the volume level of the headphone jacks, They are also used to make picture adjustments
in picture select mode.
Note: The volume buttons will not affect the volume of wireless headphones or a wired RF modulator. When
using these devices the volume must be adjusted with the wireless headphone volume control or with your
radio’s volume control (see page 15, Headphones, or page 16, Wired FM Modulator).
31. NUMBER Buttons
Allows the user to enter the numbers 0 to 9 for selection of CD tracks, DVD chapters, and password setting.
- 12-
128-6745
12 of 31
32. EJECT ( )Button*
The disc will be ejected from disc compartment.
33. FM TRANSMITTER ON/OFF Button
Turns FM Modulator power on/off.
34. SOURCE SELECT Button*
With FM ON, used to selects the POD Audio (DVD and POD audio) or SAT Audio (Second IR input).
With FM OFF, used to select SAT Audio or Car Audio.
35. CHANNEL SELECT Button
Selects the FM modulator Frequency (Frequency 1, 88.3MHz, Frequency 2, 88.7MHz, Frequency 3, 89.1MHz,
Frequency 4, 89.5MHz, Frequency 5, 89.9MHz, Frequency 6, 90.3MHz).
- 13-
128-6745
13 of 31
Turning the PROV916/PROV916 S/PROV916 P On or Off
1. Sliding the screen release lock forward will unlock the LCD screen and it will drop down slightly. Pivot the screen
downward until a comfortable viewing angle is reached. The internal friction will hold the screen in position while
the system is in use.
2. Pressing the power button on the unit or the remote control will turn the system on or off alternately. When in use
the internal backlighting will illuminate the controls.
3. After the unit has been turned on and is displaying a picture, adjust the viewing angle by pivoting the screen to
optimize the picture quality.
4. Remember to turn the unit off and pivot the LCD to the locked position when not in use.
Overhead Dome Lights
The lights integrated into the PROV916/PROV916 S/
PROV916 P are controlled by a three position slide
switch. Sliding the switch to the on position will turn
the lights on. The off position will prevent the lights
from turning on at all times, and the auto position will
allow the lights to turn on and off with the vehicle’s
interior lighting. Refer to the Installation Manual for the
wire connections. Do not leave the vehicle unattended
with the dome light switch in the on position, as this
could result in a discharged battery.
AUTO
PROG
AP
CHANNEL
SOURCE
ON OFF AUTO
FM
VOLUME SELECT
S
I NPUT
IR
VID E O
E ADPH ONE S
AUDI O
L R
H
Dome
Light
Switch
- 14-
128-6745
14 of 31
Remote Sensor
Remote
Sensor
Eye
AUTO
PROG
SOURCE
ON OFF AUTO
FM
V O L U M E SELECT
S
VID E O
CHANNEL
I R
Remote
Sensor
Eye
INPUT
AUD
I O
L
R
AP
HE ADPHONES
The PROV916/PROV916 S/PROV916 P incorporates two Infrared
sensors which relay signals from the remote control to allow the
unit to be controlled simply by pointing its remote control at the
remote sensor eye. The repeater function allows control of auxiliary
equipment such as an Audiovox Video Cassette Player. The infrared
sensor can relay signals from most manufacturer’s remote controls
to its respective component connected to the Video 1 input. In this
case you must use the remote control supplied with the component.
Accessories
Wireless Headphones
The PROV916/PROV916 S/PROV916 P includes a built-in infrared transmitter for use with Audiovox wireless
headphones (Part Number IR2CHS-Dual channel). The volume can then be adjusted using the controls on each
headset. The wireless headphones must be used within a line of sight from the transmitter, as infrared transmissions,
like visible light travel only in a straight line. See the documentation accompanying your Audiovox wireless headphones.
IR2 Input
Any line level audio source may be connected to this input (Satellite Radio, CD Changer etc). The audio program
connected to the IR2 input can be received on the B channel of the dual channel wireless headphones (Part Number
IR2CHS).
Headset Special Features
• Automatic Level Control prevents input signal over loading.
• Uses high frequency infrared light to assure a clean signal for clear reception.
- 15-
128-6745
15 of 31
Wired Headphones
There are two 1/8” headphone jacks on the PROV916/PROV916 S/PROV916 P that can be used with any standard
wired stereo headphones. These jacks are controlled by the volume up / down buttons on the PROV916/PROV916 S/
PROV916 P remote control.
Wired FM Modulator
The PROV916/PROV916 S/PROV916 P is equipped with an RF modulator, that allows you to listen to the PROV916/
PROV916 S/PROV916 P audio signal by tuning your vehicle’s radio to the selected frequency, (88.3, 88.7, 89.1, 89.5,
89.9, 90.3MHz). This feature is accessed by using either the FM transmitter buttons on the remote (On/Off, Source
Select, Channel Select) or the FM Select button on the unit. Whenever the RF modulator is on, broadcast reception
on the vehicles radio will be poor. Switching off the FM modulator will allow normal radio reception.
AV1 Input
The video inputs may be connected to a Video cassette Player (VCP), video game system, or other audio / video
devices. To access the A/V inputs, turn the PROV916/PROV916 S/PROV916 P on and press the source button on
the PROV916/PROV916 S/PROV916 P or the Source button on the remote control until “AV1” is displayed on the
screen. Turn the video source component on with its power button or remote control. The PROV916/PROV916 S/
PROV916 P is now ready to play the audio and video signals from the source connected to AV1 input.
AUX A/V Input
The PROV916/PROV916 S/PROV916 P will accept an audio/video input through the RCA jacks located on the side of
the unit. The audio / video device could be a video game system, video camera, or other input device.
Video Out
The PROV916/PROV916 S/PROV916 P provides a video output for an optional video monitor(s). (Refer to page 6 of
the Installation Guide for more details.) This output will provide a video signal that duplicates the signal displayed by
the PROV916/PROV916 S/PROV916 P to an additional monitor or video display. Please see your installer for more
information.
- 16-
128-6745
16 of 31
DVD Basics
To get the optimum use out of the DVD section, make sure you read this section completely.
Regional Coding
Both the DVD player and disc are coded by region. These regional codes must match in order for the disc to play. If
the codes don’t match, the disc won’t play. This unit’s code is region 1. Other regional codes cannot be played in
this unit. The unit will display “WRONG REGION.”
Types of Discs your DVD will play
• DVD discs – DVD discs which contain video.
• Audio discs – Audio CDs contain musical or sound content only.
• MP3 discs – A disc that contains audio files (for example, a CD-R with downloaded MP3 files).
• VCD discs –VCD discs which contain video.
Loading and Playing Discs
Before you load a disc, make sure that it is compatible with the player.
Note: the following Discs CANNOT be used with this player :
• MiniDisc
•
•
Laserdisc
CD-I, CD-ROM, DVD-ROM
To load and Play a Disc
Press the Power button to turn the unit ON. Select DVD mode and insert the disc (Label Up) into the disc compartment.
- 17-
128-6745
17 of 31
Settings and Adjustments
This chapter describes how to set and how to adjust using the on-screen SETUP menu.
Using the Setup Menu
Using the setup display, you can do the initial setup, adjust the picture quality, and set the various outputs. You can
also set a language for the on-screen display and the setup display and limit playback by children.
1) Press the SETUP button to display the “setup menu” on the display screen.
2) Select the main item you want using the cursor (▼▲) buttons, and then press the ENTER button.
To Cancel Using the Setup Display
Press the SETUP button on the remote.
Setting the Language for On-Screen Display
Press the SETUP button and using the
(▼▲)buttons select “OSD LANGUAGE”.
OSD (On-Screen Display) Language Menu
The OSD Language Menu allows the user to select
the language for the on-screen display. Presstu
and then use the ( ▼▲) buttons to select the desired
language. The user can select either English, French
or Spanish for the OSD language.
- 18-
128-6745
18 of 31
Settings for Display
Press the SETUP button and select Display. The DISPLAY
SETUP allows you to adjust screen setting (aspect ratio) Press
and then use the (▼▲)buttons to select the appropriate
settings.
4:3 / PS
This displays the wide picture on the screen with a
portion of the left & right side removed.
4:3 / LB
This displays the wide picture with black bands on the
upper and lower portions of the screen.
16:9
This displays a picture with black bands on the upper
and lower portion of the screen.
Then press ENTER to confirm your selection.
Defaults Settings
Press the SETUP button and select Defaults. The DEFAULTS
SETUP allows you to reset ALL options to factory defaults.
Press and then press Enter to implement the reset.
Note : This function will not effect the Parental setting.
- 19-
128-6745
19 of 31
Settings for Parental (Parental Control)
This section of the SETUP Menu allows user to control the content of movie playback from G to Adult.
The Parental Control function allows you to limit viewing to your preference.
1. Use the ▼▲ buttons to select from:
G (Children)
PG
PG 13
R
NC-17
ADULT (Adult)
Note:The lower the value, the more strict the limitation.
Press the Enter button to confirm the selection.
2. Input a password in 4 digits using the numeric buttons then press the Enter button.
The Default password is 3308.
- 20-
128-6745
20 of 31
Settings for Password (Parental Control Password)
Press the SETUP button and select PASSWORD. The PASSWORD SETUP allows you to change the parental
control password. Press and then press Enter..
OLD PASSWORD
Input the old password or the default password (4 digits)
NEW PASSWORD
Input a new password (4 digits) using numeric buttons
CONFIRM PWD
Confirm the new password by entering the same new password again.
Then press Enter to implement it.
- 21-
128-6745
21 of 31
Playing Audio CDs
When playing an audio CD, the DISPLAY Banner appears automatically. It displays the current track and the amount of the
time for that track playing, the total amount of time on the disc and the current time running on the disc. Press the DISPLAY
button on the remote to display the DISPLAY Banner. The options below show you what happens when you press the
DISPLAY button.
Press DISPLAY 1x
SINGLE ELAPSED appears along with the current track playing and the time of that track.
Press DISPLAY 2x
Press DISPLAY 3x
SINGLE REMAIN appears along with the current track playing the and the amount of time left.
TOTAL ELAPSED appears along with the current track playing the total time playing on the
CD.
TOTAL REMAIN appears along with the current track playing and the amount of time left on
the CD.
Turns off the DISPLAY Banner.
Press DISPLAY 4x
Press DISPLAY 5x
Using the REPEAT Feature
The default mode for the Repeat feature is OFF. Pressing REPEAT consecutively changes the repeat options:
• REP-ONE- repeats the track that is playing.
• REP-ALL- repeats the disc that is playing.
• REPEAT OFF
As you toggle through the options, the repeat option changes at that time. The tracks, for example, repeats once that tracks
has ended. The selected repeat option loops repeatedly until you turn it off.
- 22-
128-6745
22 of 31
Playing MP3 Discs
MP3 is a format for storing digital audio. An audio CD-quality song can be compressed into the MP3 format with very little
loss of quality, while taking up much less space. CD-R discs that have been encoded in MP3 format can be played on your
DVD player.
Press the DISPLAY button on the remote to DISPLAY Banner. The options below show you what happens when you press
the DISPLAY button.
Press DISPLAY 1x
TIME REMAIN appears along with the amount of time left in the song that is playing.
TIME REMAIN and the time that is left remain on-screen until you press DISPLAY again.
Press DISPLAY 2x
TIME ELAPSED appears along with the amount of time the song has played. TIME ELAPSED
and the time will remain on-screen until you press DISPLAY again.
Press DISPLAY 3x
OFF appears along with the amount of time the song has played. The time remains on-screen
until you press DISPLAY again to see the time left in the song that is playing or you press STOP.
..
MP3
MP3
MP3
MP3
MP3
- 23-
128-6745
23 of 31
Selecting Folders and Songs
When an MP3 disc is inserted in the player, the Smart Nav screen appears automatically. You can change folders and
songs through Smart Nav. The DVD player plays the songs in order they were burned on to the disc.
1. If a disc is playing, press STOP. Press the up or down arrow button to go through the folder list on the right side of the
Smart Nav screen.
2. Once the folder you want is highlighted, press Enter (the folder list shifts to the left side of the screen and the songs in
the folder appear on the right).
3. Press the up or down arrow button to go through the song list and highlight the song you want. Press Enter to begin
playback of the highlighted song.
Skipping Songs
Use the Next (
) button on the remote control to move to the next song. Use the Previous (
) button to move to the
beginning of the currently playing song. Press the
button 2 times to move to the previous song.
Using The Repeat Feature
The default mode for the Repeat feature is OFF. Pressing REPEAT consecutively changes the repeat options:
• REP-ONE- repeats the songs that is playing.
•
FOLDER REP- repeats the folder that is playing.
•
FOLDER- turns off repeat and returns to regular play mode.
- 24-
128-6745
24 of 31
Selecting a Play Mode
You can choose what order the songs will play on a disc temporarily. The FOLDER play mode is the default. To access the
play mode options, press STOP if the disc is playing. Press the right arrow button until the PLAY MODE option is highlighted.
Use the up or down arrow to choose an option. The play mode options are:
• SINGLE: Play a selected song.
•
REP_ONE: Repeats the song that is playing.
•
FOLDER: Plays the folder in the order the songs were recorded.
•
FOLDER REP: Repeats the folder that is playing.
•
DISC SCAN : Plays the song for 10 second for each song in the disc.
•
DISC: Plays the entire disc.
•
DISC REP : Repeats the disc that is playing.
•
RANDOM: Plays the songs in the random order.
•
SHUFFLE ON: Plays the songs in random order (from within the selected folder)
•
PROG-END (Program End): Plays the songs on the disc in the order you have programmed (you must create a
playlist to set the order you want the tracks on the disc to play). When you are creating a playlist, this option changes
to PROGRAM PO.
- 25-
128-6745
25 of 31
Program Play
To use the program play option, you must create a playlist of songs in the order you want them to play.
Note: Once you begin adding songs from a folder to create your play list, you cannot add songs from a different folder.
1. Choose the PROG-END option for PLAY MODE.
2. Highlight and enter the folder you want to program.
3. Add songs to the program list by pressing ENTER once the song is highlighted. The song you have chosen and the
number of songs you have chosen appear at the top of the screen. For example, if you choose the number five song
within the folder and it is the first song you have chosen, PROGRAM P01:05 appears.
4. You can continue to add songs to the list from within the same folder by using the up or down arrow button and then
pressing ENTER to add it to the list.
5. When you are done creating the list, press STOP to end the programming. Then press PLAY to begin the program play
mode.
Deleting the Playlist
To delete the entire playlist, press STOP while the disc is playing and change to other play mode.
- 26-
128-6745
26 of 31
Troubleshooting
PROBLEM
SOLUTION
Poor in vehicle
radio reception
(FM modulator
installed)
• Check the condition of the vehicle’s
IR sensor
inoperative
• Verify that the batteries in the remote
PROBLEM
SOLUTION
No sound or
distorted sound
radio antenna.
• Verify that the antenna is fully raised.
• If a wired RF modulator has been
installed, verify that it is turned OFF
by using remote.
•
•
are fresh.
• Verify that the remote sensor eye is
Can’t advance
through a movie
not obstructed.
• Verify that the infrared transmitter is
affixed over the sensor eye of the
component to be controlled.
Disc won’t play
Play starts, but
then stops
immediately
• Make sure your DVD player is
• Insert a disc with the label side facing
up.
• Check the type of disc you put into
disc tray. This DVD player only plays
DVD’s, audio CDs and MP3s.
• Both the unit and the disc are coded
by region. If the regional codes don’t
match, the disc can’t be played. This
DVD player is Region Number 1.
The icon (
appears on
screen
• The disc is dirty. Clean it.
• Condensation has formed. Allow
player to dry out.
)
connected properly. Make sure all
cables are securely inserted into the
appropriate jacks.
If you are using the IR headphones,
make sure you turn on the IR power.
Make sure Modulator is ON and the
proper Frequency has been
selected.
• You can’t advance through the
opening credits and warning
information that appears at the
beginning of movies because the
disc is programmed to prohibit that
action.
The feature or action cannot be
completed at this time because:
1. The disc’s software restricts it.
2. The disc’s software doesn’t support
the feature (e.g., angles)
3. The feature is not available at the
moment.
4. You’ve requested a title or chapter
number that is out of range.
- 27-
128-6745
27 of 31
PROBLEM
Picture is
distorted
SOLUTION
• The disc might be damaged. Try
another disc.
• It is normal for some distortion to
appear during forward or reverse
scan.
No forward or
reverse scan
• Some discs have sections that
prohibit rapid scanning or title and
chapter skip.
• If you try to skip through the warning
information and credits at the
beginning of a movie, you won’t be
able to. This part of the movie is often
programmed to prohibit skipping
through it.
- 28-
128-6745
28 of 31
Replacement Parts
Remote Control
136B3447
Specifications
LCD Backlighting
Edge Light Tube
Resolution
1440 x 234
Pixels
336,960
Operation Temperature
32 -140º F (0 - 60º C)
Storage Temperature
-4 - 176º F (-20 - 80º C)
Backlight life
10,000 Hours
Video Display System
NTSC
Headphone Audio Output
0.03W @ 32 ohms
Video Output
1.0Vp-p @ 75 ohms
Power Source
12V DC
- 29-
128-6745
29 of 31
36 MONTH LIMITED WARRANTY
Applies to Audiovox Mobile Video Products
AUDIOVOX ELECTRONICS CORP. (the Company) warrants to the original retail p urchaser of this product that should this product or any part
thereof, under normal use and conditions, be proven defective in material or workmanship within 36 months from the date of original purchase,
such defect(s) will be repaired or replaced with reconditioned product (at the Company's option) without charge for parts and repair labor.
To obtain repair or replacement within the terms of this Warranty, the product is to be delivered with proof of warranty coverage (e.g. dated
bill of sale), specification of defect(s), transportation prepaid, to the Company at the address shown below.
This Warranty does not extend to the elimination of externally generated static or noise, to correction of antenna problems, to costs incurred
for installation, removal or reinstallation of the product, or to damage to tapes, discs, speakers, accessories, or vehicle electrical systems.
This Warranty does not apply to any product or part thereof which, in the opinion of the Company, has suffered or been damaged through
alteration, improper installation, mishandling, misuse, neglect, accident, or by removal or defacement of the factory serial number/bar code
label(s). THE EXTENT OF THE COMPANY'S LIABILITY UNDER THIS WARRANTY IS LIMITED TO THE REPAIR OR REPLACEMENT
PROVIDED ABOVE AND, IN NO EVENT, SHALL THE COMPANY'S LIABILITY EXCEED THE PURCHASE PRICE PAID BY PURCHASER FOR
THE PRODUCT.
This Warranty is in lieu of all other express warranties or liabilities. ANY IMPLIED WARRANTIES, INCLUDING ANY IMPLIED WARRANTY
OF MERCHANTABILITY, SHALL BE LIMITED TO THE DURATION OF THIS WRITTEN WARRANTY. ANY ACTION FOR BREACH OF ANY
WARRANTY HEREUNDER INCLUDING ANY IMPLIED WARRANTY OF MERCHANTABILITY MUST BE BROUGHT WITHIN A PERIOD OF 48
MONTHS FROM DATE OF ORIGINAL PURCHASE. IN NO CASE SHALL THE COMPANY BE LIABLE FOR ANY CONSEQUENTIAL OR
INCIDENTAL DAMAGES FOR BREACH OF THIS OR ANY OTHER WARRANTY, EXPRESS OR IMPLIED, WHATSOEVER. No person or
representative is authorized to assume for the Company any liability other than expressed herein in connection with the sale of this product.
Some states do not allow limitations on how long an implied warranty lasts or the exclusion or limitation of incidental or consequential damage
so the above limitations or exclusions may not apply to you. This Warranty gives you specific legal rights and you may also have other rights
which vary from state to state.
U.S.A. : AUDIOVOX ELECTRONICS CORPORATION, 150 MARCUS BLVD., HAUPPAUGE, NEW YORK 11788 l 1-800-645-4994
CANADA : CALL 1-800-645-4994 FOR LOCATION OF WARRANTY STATION SERVING YOUR AREA
© Copyright 2002 Audiovox Electronics Corp. 150 Marcus Blvd. Hauppauge, NY 11788
128-6745
30 of 31
For Customer Service
Visit Our Website At
WWW.audiovox.com
Product Information, Photos,
FAQ’s Owner’s Manuals
© 2003 Audiovox Electronics Corp., Hauppauge, NY 11788
128-6745
128-6745
31 of 31