1
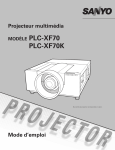
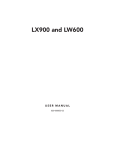
LX900 Lamp/Filter Replacement
Instruction Sheet
INTRODUCTION
These instructions outline the details for Lamp and Filter replacement in the LX900 projector (Model
No. 103-014101-01). The lamps are located at the rear of the projector and are accessed by lifting the
lamp cover.
KITS REQUIRED
003-120394-01 (Replacement Lamp Type No.: POA-LMP104)
003-002003-01 (Replacement Air Filter)
INSTRUCTIONS
DANGER
Do not drop the lamp assembly or touch a glass bulb! The glass can shatter and may cause injury.
DANGER
Disconnect all power sources to the projector before opening lamp cover.
WARNING
Allow a projector to cool, for at least 45 minutes before you open Lamp Cover. The inside of a
projector can become very hot.
NOTICE
Use only a Christie approved Lamp and Filter Kit for your specific projector model.
LX900 Lamp/Filter Replacement Instruction Sheet
020-000029-01 Rev. 1 (01/08)
1 of 6
DANGER
This projector uses a high-pressure lamp which must be handled carefully and properly. Improper
handling may result in accidents, injury, or create a fire hazard.
•Lamp life will differ from lamp to lamp. The environment in which the lamp is used is also a
factor.
•If the LAMP 1 REPLACE/LAMP 2 REPLACE indicators light up, replace the lamp with a new one
IMMEDIATELY after the projector has cooled down. There is a risk of lamp explosion if the lamp
is used beyond this point.
•Lamp may explode due to vibration, shock or degradation as a result of hours of use as its
lifetime draws to an end. Risk of explosion may differ according to the environment or
conditions in which the projector and lamp are being used.
LAMP REPLACEMENT PROCEDURE
When the projector’s lamp reaches its end of life, the Lamp
Replacement icon
appears on the screen and LAMP 1
REPLACE / LAMP 2 REPLACE indicator illuminates
orange (Figure 1). Replace the lamp with a new one
promptly. The timing when the LAMP REPLACE indicator
should light is dependent on the lamp mode. NOTE: The
Lamp replacement icon will not appear when the Display
function is set to “Off” or during “Freeze”.
Lamp 1 & 2 Indicators
Figure 1 Lamp Indicators
2 of 6
LX900 Lamp/Filter Replacement Instruction Sheet
020-000029-01 Rev. 1 (01/08)
1. Turn off the projector and unplug the AC Power
Cord. Let the projector cool for at least 45 minutes.
CAUTION: The inside of the projector can become
very hot.
2. Loosen a screw on the Lamp Cover. Slide and open
the Lamp Cover until it makes a clicking sound.
3. Loosen the 2 screws that secure the lamp. Lift the
lamp out of the projector.
4. Replace the lamp with a new one and secure the 2
screws. Make sure the lamp is properly seated.
5. Replace the lamp cover and secure the screw.
6. Connect the AC power cord to the projector and turn
on the projector.
7. Reset the lamp counter. See “Resetting the Lamp
Counter” below.
Lamp Cover
Screw
Lamp 2
Screws
Lamp 1
Figure 2 Lamp Replacement
DANGER
Do not operate a projector while any lamp is removed. This may result in malfunctions, fire hazard,
or other accidents.
RESETTING THE LAMP COUNTER
Be sure to reset the Lamp counter after the lamp is
replaced. When the Lamp counter is reset, the
LAMP REPLACE indicator will turn off and the
Lamp Replacement icon disappears.
1. Press the MENU button to display the OnScreen Menu. Use the Point
buttons to
move the red frame pointer to the Setting
Menu icon
2. Use the Point
buttons to move the red
frame pointer to Lamp counter and then press
the SELECT button. A dialog box appears.
Select a lamp and the “Lamp replacement
counter Reset?” appears. Select [Yes] to
continue.
3. Another confirmation dialog box appears.
Select [Yes] to reset the Lamp counter. NOTE:
Do not reset the Lamp counter before
replacing the lamp.
LX900 Lamp/Filter Replacement Instruction Sheet
020-000029-01 Rev. 1 (01/08)
Select a lamp and the “Lamp
replacement counter Reset?”
appears.
Select [Yes], then another
confirmation box appears.
Select [Yes] again
to reset the lamp
counter
Figure 3 Reset Lamp Counter
3 of 6
FILTER CARE/REPLACEMENT PROCEDURE
The filter prevents dust from accumulating on the optical elements inside the projector. Should the
filter become clogged with dust particles, the effectiveness of the cooling fans will be reduced and may
result in internal heat buildup which will adversely affect the life of the projector. If the projector
reaches a time set in the timer setting, a Filter replacement icon
appears on the screen and the
WARNING FILTER indicator on the top panel lights up (refer to Figure 1). When you see this icon,
replace the filter as soon as possible. If the filter is out of scroll and the projector reaches a time set in
the timer setting,
appears on the screen indicating filter cartridge replacement is necessary.
When the filter scroll is counted down to 1, the Last scroll icon
there is one scroll left in the filter cartridge.
appears on the screen, indicating
If the projector detects that the filter is clogged and no scroll is left in the filter cartridge, a Filter
cartridge replacement icon
appears on the screen and the WARNING FILTER indicator on the top
panel lights up (refer to Figure 1). When you see this icon, replace the filter cartridge and reset the
Filter counter and the Scroll counter.
When the filter is being scrolled by the remote control or the Filter control function in the setting
menu, a Filter replacement icon and “Please wait...” message
appear on the screen and the
WARNING FILTER indicator blinks slow (approx. 2 seconds ON, 2 seconds OFF).
The WARNING FILTER indicator blinks fast when the projector detects an abnormal condition, the
filter cartridge is not installed properly, or the filter scroll is not working properly.
NOTICES
• The icons will not appear when the Display function is set to “Off”, or during “Freeze” .
• The filter cannot be rewound; it can be scrolled 9 times since the filter cartridge has 10 scrolls.
• The filter cartridge is disposable. Do not clean and reuse the filter cartridge; Do not expose the
filter cartridge to water or liquid, or it may cause a malfunction.
• Replace the filter cartridge after all the scroll is used up. If you replace the filter cartridge when
there are scrolls remaining in the filter cartridge, the filter counter and the scroll counter do not
recognize the correct number of remaining scrolls and the reset function cannot work properly. It
may cause a malfunction.
• The used part of the filter can be seen on the edge of the Filter cartridge after scrolling the filter,
but there is no problem for the use of the projector.
• Do not use the filter cartridge with other projectors. The filter counter and the scroll counter do
not recognize the correct number of remaining scrolls of the used filter cartridge and the reset
function cannot work properly. It may cause a malfunction.
• Make sure that the projection lamps are turned off when you are replacing the filter cartridge. If
you replace the filter cartridge when the projection lamps are turned on, the projector will be shut
down automatically for safety purposes.
• Do not forget to reset the filter counter and the scroll counter after replacing the filter cartridge.
If you do not reset the filter counter and the scroll counter, the projector cannot recognize the
correct number of remaining scrolls and it may cause a malfunction.
• When the projector is in use for 3 minutes without a new filter cartridge replacement following
display “Filter Cartridge Replament” icon, the projector is turned off automatically to prevent
damage to the optical components.
4 of 6
LX900 Lamp/Filter Replacement Instruction Sheet
020-000029-01 Rev. 1 (01/08)
1. Turn off the projector, and unplug the AC Line Cord
from the AC outlet.
2. First, clean up any dust on the projector and around the
air vents.
3. Slide and open the filter cover (see Figure 4).
4. Pull out the filter cartridge by holding the finger grip.
5. Insert a new Filter and close the filter cover. Make sure
that the filter cartridge is properly and fully inserted.
6. Connect the AC Line Cord to the projector and turn
ON the projector.
7. Reset the Filter counter and the Scroll Counter .
Filter Cover
Filter Cartridge
NOTICES
1) The projector will not turn ON if the filter cartridge is not
fully and properly inserted into the projector.
2) Do not put anything into the air intake vents. Doing so may
result in a malfunction of the projector.
Figure 4 Replace Filter
RESETTING THE FILTER COUNTER
Be sure to reset the Filter counter replacing the filter.
1. Press the MENU button to display the On-Screen
Menu. Use the
buttons to move the red frame
pointer to the Setting Menu icon.
2. Use the
buttons to move the red frame pointer
to Filter counter and then press the SELECT
button. A dialog box appears showing the Used
Time option you can scroll to view the remaining
Time options. Use the
buttons to select Used
time.
3. Used time shows the total accumulated time of the
filter use, a timer setting option, and the Reset
option. Select Reset and the “Filter counter
Reset?” appears. Select [Yes] to continue.
4. Another confirmation dialog box appears, select
[Yes] to reset the Filter counter.
LX900 Lamp/Filter Replacement Instruction Sheet
020-000029-01 Rev. 1 (01/08)
Select “Used time”
to display the
following dialogue box.
Select [Reset] to display the
“Filter counter Reset?”
dialogue box.
Select [Yes] to display the
final confirmation box.
Select [Yes] to reset
the Filter counter.
Figure 5 Reset Filter Counter
5 of 6
RESETTING THE SCROLL COUNTER
Be sure to reset the Scroll counter after replacing the
filter cartridge.
1. Press the MENU button to display the On-Screen
Menu. Use the
buttons to move the red frame
pointer to the Setting Menu icon.
2. Use the
buttons to move the red frame pointer
to Filter counter and then press the SELECT button.
A dialog box appears showing the Used Time option
and the Scrolls remaining option. Use the
buttons to select Scroll(s) remaining.
3. Scroll(s) remaining shows the number of the
remaining scrolls and the Reset option. Select Reset
and the “Scroll counter Reset?” appears. Select
[Yes] to continue.
4. Another confirmation dialog box appears; select
[Yes] to reset the Scroll counter.
6 of 6
Select “Scrolls remaining”
to display the following
dialogue box.
Select [Reset] to display the
“Scroll counter Reset?”
dialogue box.
Select [Yes] to display the
final confirmation box.
Select [Yes] to reset
the Scroll counter.
Figure 6 Reset Scroll Counter
LX900 Lamp/Filter Replacement Instruction Sheet
020-000029-01 Rev. 1 (01/08)