1
i
EP2010
Thank you for choosing Minolta.
This operator’s manual explains how to operate the copier and replenish its supplies. It also gives
some troubleshooting tips as well as general precautions to be observed when operating the copier.
To ensure the best performance and effective use of your copier, read this manual carefully until yo u
familiarize yourself thoroughly with its operation and features. After you have read through the
manual, keep it for ready reference.
Please use this manual as a quick and handy reference tool for immediately clarifying any questions
which may arise.
CE Marking (Declaration of Conformity)
We declare under our sole responsibility that the copier and options to which this declaration
relates is in conformity with the specifications below.
This declaration is valid for the area of the European Union (EU) only.
Product Type
Product Name
Options
Standards
EC Directives
Copying Machine
EP2010
PF-204, PF-104, PF-4D, AFR-12, AF-5, ST-104, S-106, AD-8
Plug-In Counter
Safety EN 60 950 / 1992
:
(Safety of information technology equipment, including electrical
business equipment)
EMC EN 55 022 (Class B) / 1995
:
(Limits and method for measurement of radio disturbance
characteristics of information technology equipment (ITE))
EN 55 082-1 / 1992
(Electromagnetic compatibility - Generic immunity standard Part1:
Residential, commercial and light industry)
IEC 801-2 / 1991 (Electrostatic discharge requirement)
IEC 801-3 / 1984 and IEC 801-3 / 1992 (draft) (Radiated
electromagnetic field requirement)
IEC 801-4 / 1988 (Electrical fast transient / burst requirement)
Safety : 73 / 23 / EEC and 93 / 68 / EEC art. 13
EMC : 89 / 336 / EEC and 93 / 68 / EEC art. 5
ii
Contents
Chapters 1 through 3 contain the basic information for making copies.
Be sure to read these chapters before attempting to use your copier.
Chapter 1 Safety Notes
p. 1
1. Installing The Copier p. 2
Installation Site
Power Source
Space Requirements
2. Precautions for Use p. 3
Operating Environment
Using the Copier Properly
Moving
Care of Copier Supplies
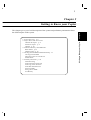
Chapter 2 Getting to Know your Copier
1. System Overview p. 6
2. Copier Parts and Accessories
Outside the Copier p. 8
Inside the Copier p. 9
Options p. 10
3. Control Panel Keys and Indicators
Basic Panel p. 12
Display Panel p. 14
4. Turning ON and OFF and Initial Mode p. 15
Turning ON and OFF
When the Copier is Turned ON
Initial Mode
5. Auxiliary Functions p. 16
Panel Resetting
Auto Panel Reset Function
Auto Copy Start Function
Auto Shut OFF Function
Interrupt Mode
Energy Saver Mode
Job Memory
p. 5
iii
Contents
Chapter 3 Making Copies
p. 19
1. Basic Copying Overview p. 20
2. Placing Originals
• Placing on the Original Glass p. 22
• Using the Automatic/Duplexing Document Feeder p. 24
• Using the Mixed Original Detection Mode p. 25
• Using the Single Automatic Document Feeding Mode
(SADF Mode) p. 26
▲ ▲▲▲▲
3. Manual Bypass Copying p. 28
4. Copy Paper Size p. 30
5. Zoom Ratio p. 32
6. Image Density p. 34
7. Original Copy Type p. 36
▲▲
• 1-sided 1-sided
• 1-sided
1-sided (2in1)
• 1-sided
2-sided (2in1)
• 1-sided 2-sided
• Book
1-sided
• 2-sided 1-sided
• Book
2-sided
• 2-sided 2-sided
• Selecting Original Copy Type p. 38
• Instructions for Loading Originals p. 39
Chapter 1
Safety Notes
Chapter 2
Getting to
Know your
Copier
Chapter 3
Making Copies
▲▲
Chapter 4
▲
Special Functions
8. Finishing Mode p. 40
• Non-Sort
• Sort
• Sort-and-Staple
• Group
• Manual Staple
• Selecting the Finishing Mode p. 42
• Using the Manual Staple Mode p. 43
• Instructions for Loading Originals for Finishing Mode
p.44
• Auto Dual Function p.45
9. File Margin Mode p. 46
10. Cover Mode p. 47
Chapter 5
When an Indicator
Lights Up
Chapter 6
Troubleshooting
Chapter 7
Miscellaneous
iv
Contents
Chapter 4 Special Functions
p. 49
1. Meter Count p. 50
2. Toner Replenisher/Drum Dehumidifier p. 51
3. User’s Choice
Description of Each User’s Choice Functions p. 52
Making the User’s Choice Settings p. 58
Chapter 5 When an Indicator Lights Up
1.
2.
3.
4.
5.
p. 59
When the Add Paper Indicator Lights Up p. 60
When the Add Toner Indicator Lights Up p. 63
When the Add Staple Indicator Lights Up p. 64
When the Closure Failure Indicator Lights Up p. 66
When the Misfeed Indicator Lights Up
• Misfeed Indicator and Monitor Display p. 68
• Misfeed Clearing Procedures
:
:
:
:
:
:
Copier p. 69
Paper Feed Cabinet p. 72
Duplex Unit p. 73
Duplexing Document Feeder p. 74
Automatic Document Feeder p. 75
Sorter/Staple Sorter p. 76
6.
When the Call-Tech.-Rep. Indicator Lights Up p. 77
7.
When the I. U. Service Life Indicator Lights Up p78
8. Quick Reference for Other Indicators p. 84
v
Contents
Chapter 6 Troubleshooting
p. 85
1. When this Type of Copy is Produced p. 86
• The image is too light
• The image is too dark
• The copy is blurry
• The copy has dark specks or spots
• The edge of the copy is dirty
• The image on the copy is not aligned properly
• The copy has lines
Safety Notes
Chapter 2
2. The Copier is not functioning as designed p. 88
• The Control Panel shows nothing
• No copies are fed out when the Start Key is pressed
• Control Panel Keys do not respond
• The Copier is not activated when the Power Switch is
turned ON
Chapter 7 Miscellaneous
Chapter 1
Getting to
Know your
Copier
Chapter 3
Making Copies
p. 89
Chapter 4
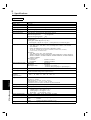
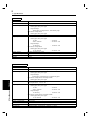
1. Specifications p. 90
•
•
•
•
•
•
•
Copier
Duplexing Document Feeder
Automatic Document Feeder
Sorter
Staple Sorter
Paper Feed Cabinet
Duplex Unit
Special Functions
Chapter 5
When an Indicator
Lights Up
2. Care of the Copier p.94
• Cleaning
3. Function Combination Matrix p. 96
4. Description of Copy Paper Size
and Zoom Ratio Table p. 98
(Original Size to Copy Paper Size)
5. Index p. 99
Chapter 6
Troubleshooting
Chapter 7
Miscellaneous
1
Safety Notes
Chapter 1
Chapter 1
1. Installing the Copier p. 2
Installation Site
Power Source
Space Requirements
2. Precautions for Use p. 3
Operating Environment
Using the Copier Properly
Moving
Care of Copier Supplies
Safety Notes
This chapter explains about the operating environment, conditions, and precautions for use.
2
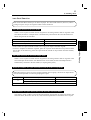
1. Installing the Copier
Installation Site
A place away from a curtain or the like that
may catch fire and burn easily.
◆ An area where there is no possibility of
being splashed with water or other types of
liquid.
◆ An area free from direct sunlight.
◆ A place out of the direct air stream of an air
conditioner, heater, or ventilator.
◆A
well-ventilated place.
dry place.
◆ A dust-free location.
◆ An area not subject to undue vibration.
◆ A stable and level location.
◆
◆A
Power Source
The power source voltage requirements are as follows.
◆
Use a power source with little voltage fluctuation.
Voltage Fluctuation
Frequency Fluctuation
:
:
Within ±10%
Within ±0.3%
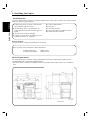
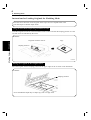
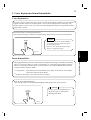
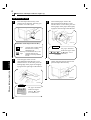
Space Requirements
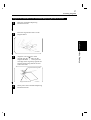
To ensure easy copier operation, supply replacements and service maintenance, adhere to the
recommended space requirements detailed below.
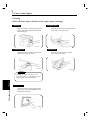
* Be sure to allow a clearance of 150mm or more at the back of the copier as there is a ventilation
duct.
1,138
1,632
671
467
1,359
1,055
650
304
918
405
1,400
230
1,043
Safety Notes
Chapter 1
To ensure utmost safety and prevent possible malfunctions of the copier, install it in a location which
meets the following requirements.
1151O002AB
1151O001AB
Scale: mm
3
2. Precautions for Use
Operating Environment
Temperature
Humidity
: 10°C to 35°C (50°F to 86°F) with a fluctuation of 10°C (50°F) per hour.
: 15% to 85% with a fluctuation of 20% per hour.
Using the Copier Properly
Chapter 1
The operating environmental requirements of the copier are as follows.
NEVER place a heavy object on the copier or subject the copier to shocks.
NEVER open any Doors, or turn OFF the copier while the copier is making copies.
◆ NEVER bring any magnetized object or use flammable sprays near the copier.
◆ ALWAYS insert the Power Plug all the way into the outlet.
◆ ALWAYS make sure that the outlet is visible, clear of the copier or copier cabinet.
◆ ALWAYS provide good ventilation when making a large number of continuous copies.
◆
◆
NOTE
= Locate the Copier in a Well Ventilated Room =
A negligible amount of ozone is generated during normal operation of this copier. An
unpleasant odor may, however, be created in poorly ventilated rooms during extensive copier
operations. For a comfortable, healthy, and safe operating environment, it is recommended that
the room be well ventilated.
REMARQUE
= Placer le copieur dans une pièce largement ventilée =
Une quantité d’ozone négligable est dégagée pendant le fonctionnement du copieur quand
celui-ci est utilisé normalement. Cependant, une odeur désagréable peut être ressentie dans les
pièces dont l’aération est insuffisante et lorsque une utilisation prolongée du copieur est
effectuée. Pour avoir la certitude de travailler dans un environnement réunissant des conditions
de confort, santé et de sécurité, il est préférable de bien aérer la pièce ou se trouve le copieur.
Moving
If you need to transport the copier over a long distance, consult your Technical Representative.
Care of Copier Supplies
Use the following precautions when handling the copier supplies (toner, paper, etc.).
◆ Store
the paper, toner, and other supplies in a place free from direct sunlight and away from any
heating apparatus. Keep them in a dry, clean environment.
◆ Store paper, which has been removed from its wrapper but not loaded into the Drawer, in a
sealed plastic bag in a cool, dark place.
◆ Keep supplies out of the reach of children.
◆ If your hands become soiled with toner, wash them with soap and water immediately.
Safety Notes
To ensure the optimum performance of the copier, follow the precautions listed below.
4
Safety Notes
Chapter 1
2. Precautions for Use
5
Chapter 2
1. System Overview p. 6
2. Copier Parts and Accessories
Outside the Copier p. 8
Inside the Copier p. 9
Options p. 10
3. Control Panel Keys and Indicators
Basic Panel p.12
Display Panel p. 14
4. Turning ON and OFF and Initial Mode p. 15
Turning ON and OFF
When the Copier is Turned ON
Initial Mode
5. Auxiliary Functions p. 16
Panel Resetting
Auto Panel Reset Function
Auto Copy Start Function
Auto Shut OFF Function
Interrupt Mode
Energy Saver Mode
Job Memory
Getting to Know your Copier
This chapter gives you a brief description of the system and preliminary information about
the different parts of the system.
Chapter 2
Getting to Know your Copier
6
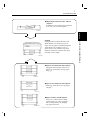
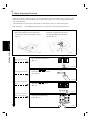
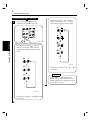
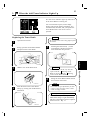
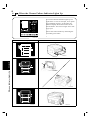
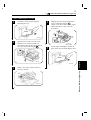
1. System Overview
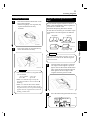
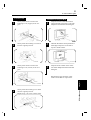
◆Automatic Document Feeder AF-5 <Option>
Permits automatic feeding of multiple originals.
Getting to Know your Copier
Chapter 2
1151O006AA
◆10-Bin Sorter S-106 <Option>
Permits sorting or grouping copies into up
to 10 copy sets or stacks.
1139O0020A
◆Staple Sorter ST-104 <Option>
Automatically staples copy sets or stacks
that are sorted or grouped the same as with
the ST-104
1139O0020A
◆ Duplex Unit AD-8 <Option>
Turns over 1-sided copies to make
2-sided copies.
1139O0030A
7
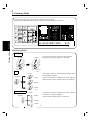
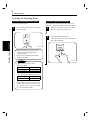
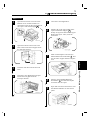
1. System Overview
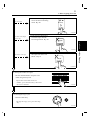
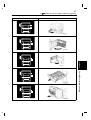
◆Duplexing Document Feeder AFR-12
<Option>
In addition to the function of the AFR-12,
it can turn over 2-sided originals.
EP2010
Equipped with two Paper Drawers and
Multi Bypass Tray to hold up to 550
sheets of copy paper. The Manual Bypass
Table allows you to make a copy on
paper which is not loaded in any of the
Drawers and which is fed into the copier
manually via this Table.
1139O2020A
◆Paper Feed Cabinet PF-204<Option>
Equipped with two paper Drawers to
hold up to 1,000 sheets of copy paper
(80 g/ m 2).
1139O0180A
◆Paper Feed Cabinet PF-104<Option>
Hold up to 2,500 sheets of copy paper
(80 g/m 2).
1139O1212A
◆Duplex Cabinet PF-4D<Option>
Turns over 1-sided copies to make
2-sided copiers. It is also equipped
with a storage drawer for keeping
copy paper and toner.
1139O1222A
Getting to Know your Copier
Chapter 2
1151O007AA
8
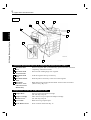
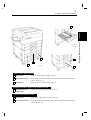
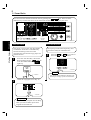
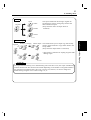
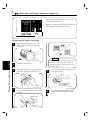
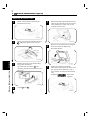
2. Copier Parts and Accessories
Outside the Copier
6
2
8
9
Chapter 2
3
4
5
1
Getting to Know your Copier
7
10
1139O1010A
12
11
1139O2030A
: Slide this Extender out when making copies on large-size paper.
2
Copy Tray
Extender
Copy Tray
3
Front Door
: Open for the following purposes:
• Replacing the Toner Bottle.➭ p. 63
• Clearing a paper misfeed.➭ p. 68
• Cleaning the Corona Units. ➭ p. 95
4
1st Drawer
5
2nd Drawer
: Holds up to 250 sheets of paper.➭ p. 60
The Edge Guide and Trailing Edge Stop are movable, allowing you to
load paper of different sizes.
: Holds up to 250 sheets of paper. ➭ p. 61
6
Control Panel
: Use to start a copy cycle or make various copy-job settings. ➭ p. 12
7
Original Cover
: Holds the original placed on the Original Glass in position.
8
Power Switch
: Use to turn ON and OFF the copier . ➭ p. 15
1
: Holds copies fed out of the copier.
Multi Bypass
: Holds up to 50 sheets of standard paper which is not loaded in any of
Tray
the Drawers. ➭ p. 28
Multi
Bypass
Tray
:
Slide
this Extender out when using large-size copy paper. ➭ p. 28
10
Extender
: Open to clear a paper misfeed. ➭ pp. 72, 73
11 Right Door
9
12 Total Counter
: Shows the total number of copies made so far.
9
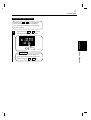
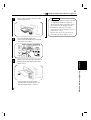
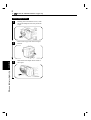
2. Copier Parts and Accessories
Inside the Copier
3
6
1
7
1139O2040A
8
5
1139O1030A
3
Lock Release Lever : Turn clockwise to swing up the Upper Half of the copier to clear a
paper misfeed.
Toner Bottle
: Swing open to replace the Toner Bottle.
➭ p. 63
Holder
Original Pad
: Holds the original in position on the Original Glass.
4
Original Glass
5
Corona Unit
: Operate the Lever to clean the corresponding Corona Unit if unwanted
Cleaning Lever
lines are produced on the copy. ➭ p. 95
(Upper/Lower)
Imaging Unit Lock : Operate when replacing the Imaging Unit.
Release Lever
Dehumidifier
: Turn ON to prevent condensation from forming on the PC Drum when
Switch
power is turned OFF.
(For Technical Representative only
Fusing Unit Handle : Hold onto this Lever when lifting the Upper Half of the Fusing Unit.
➭ p. 69
1
2
6
7
8
: Place the original face down on this Glass.
Getting to Know your Copier
2
Chapter 2
4
10
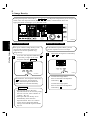
2. Copier Parts and Accessories
Options
1
2
3
9
8
Chapter 2
4
Getting to Know your Copier
5
7
1151O012AB
6
Automatic Document Feeder AF-5 / Duplexing Document Feeder AFR-12
1
2
3
4
5
Document Exit
Tray
Document Feed
Tray Extender
Document Feed
Tray
Document Guide
Plate
Document
Turnover / Exit
Unit Door Lock
Release Key
: Receives originals that are automatically ejected from the Automatic
/ Duplexing Document Feeder.
: Pull out when loading large-size originals.
: Load the originals face up on this tray.
: Slide the plate as necessary to the size of the originals.
: Hold down when opening the Document Turnover/Exit Unit Door.
(AFR-12 only) ➭ p. 74
Staple Sorter ST-104 and 10-Bin Sorter S-106
6
Stapler Door
7
8
Staple Cartridge
Release Lever
Sorter Bins
: Open to replace the Staple Cartridge.
(ST-104 only) ➭ p. 64
: Move the Lever up to replace the Staple Cartridge.
(ST-104 only) ➭ p. 64
: Hold sorted or grouped copies.
9
Lock Release Lever
: Press to unlock the Sorter.➭ p. 76
11
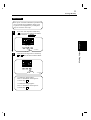
2. Copier Parts and Accessories
1151O009AA
3
5
2
1
1151O103AA
6
1151O010AA
Paper Feed Cabinet PF-204
: Holds up to 500 sheets of paper. ➭ p. 61
1
3rd Drawer
2
Paper Descent Key : Press before sliding the Drawer out or after sliding the Drawer into the
copier. ➭ pp. 61, 72
4th Drawer
: Holds up to 500 sheets of paper. ➭ p. 61
3
Duplex Unit AD-8 / Paper Feed Cabinet PF-4D
4
Misfeed Removal
Guide Plate
: Open to clearing a paper misfeed. ➭ p. 73
Paper Feed Cabinet PF-104
: Holds up to 2,500 sheets of paper. ➭ p. 62
5
3rd Drawer
6
Paper Descent Key : Press before sliding the Drawer out or after sliding the Drawer into the
copier. ➭ p. 62, 72
Getting to Know your Copier
Chapter 2
4
12
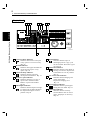
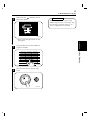
3. Control Panel Keys and Indicators
Basic Panel
1
Getting to Know your Copier
Chapter 2
Meter
Count
Auto
Size
Manual
Staple
Mixed Orig. Det.
0.5~2.0
Toner
Drum
Dehumidify
Margin
Sort
1
Sort &
Staple
2
1
2
3
5
6
7
8
1 2 2in1
1
2
Auto
Photo
1
2
Book
Job
Memory
Lighter
2
Darker
Auto / Photo
20 19 18 17 16 15
Display Panel
See the other pages in this manual.
➭ p. 14
Key Pad
Use to enter the number of copies to be
made and other numeric data.
Clear Key
Press to :
• Reset the multi-copy entry to 1.
4
Auto
Book
Finishing
24 23 22 21
1 1 2in1
Cover
Group
Input
2
Energy Saving Key
Press to set the copier into the Energy
Saver Mode. ➭ p. 17
Interrupt Key
Press once to interrupt a current job with
a more urgent one. Press it again to
return to the previous job.
➭ p. 16
Panel Reset Key
Press to set the copier into the initial
mode, clearing all settings made
previously on the control panel. ➭ p. 16
* It does not, however, clear the contents
of the copying job program memory and
the Interrupt Mode.
Stop Key
Press to stop a multi-copy cycle.
Start Key
Press to start a copy cycle.
Orig.
A3
B4
13
12
A3
A3
B
A4
F
B4
A4
A4
I
A3
A4
A5
Full Size
11
10
Paper Select Key
Press to select the desired paper size or
the Paper Select Mode, either Auto or
Manual.
➭ p. 30
Zoom
Ratio Select Key
10
9
:Press to select a desired fixed
zoom ratio. ➭ p. 32
:Press
to select full size(100%).
Full Size
11 Zoom Up / Down Keys
:Press as necessary to change
the zoom ratio in 0.001
increments between the range
of ✕0.500 and ✕2.000. ➭ p. 33
12 Exposure Control Keys
A
Auto
Full Size
A
Copy
14
A4
:Press as necessary to vary the
exposure level in the Manual
Exposure Mode.
:Press to select either the Auto
Exposure Mode, Manual
Exposure Mode, or Photo
Mode. ➭ p. 34
Paper
13
3. Control Panel Keys and Indicators
2
Auto
Darker
Photo
A4
A3
B4
A3
A3
B4
Full Size
A4
FLS.
B4
A4
A4
Inch
A3
A4
A5
Full Size
2
3
4
5
6
7
8
9
0
C
S
Auto
Paper
1151O041DA
1151O041DA
10
9
8
13 Mixed Original Detection Key
Press when making copies using the
Automatic / Duplexing Document Feeder
in which originals of assorted sizes are
loaded together. ➭ p. 25
Copy Key
14 Orig
Press to select the type of copying job
you wish to make. ➭ p. 36
15 Manual Staple Key
Press to staple copy sets or stacks already
made. ➭ p. 42
16 Finishing Key
Press to select the finishing type you
want. ➭ p. 42
17 Auto Size Key
Press as necessary to select the Auto Size
Mode. ➭ p. 32
18 File Margin Key
Press to set the copier into the File
Margin Mode.➭ p. 46
19 Cover Key
Press to set the copier into the Cover
Mode. ➭ p. 47
▼
uto
hoto
1
4
Chapter 2
0.5~2.0
3
7
6
5
20 Job Memory Select Key
Press to call up a copy job program
previously stored in the program memory.
➭ p. 17
Job
Memory Input Key
21
Press to store a copy job program in the
program memory. ➭ p. 17
22 Drum Dehumidify Key
Press to remove condensation formed on
the surface of the PC Drum. ➭ p. 51
23 Auxiliary Toner Replenishing Key
Press when the image on the copy
becomes too light. ➭ p. 51
24 Meter Count Key
Press to check for each of the current
counts of different electronic counters of
the copier.
➭ p. 50
Getting to Know your Copier
1
14
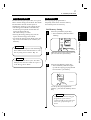
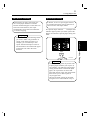
3. Control Panel Keys and Indicators
Display Panel
1
3
4
5
6
7
8
0.5~2.0
Chapter 2
Getting to Know your Copier
2
Auto
Auto
Photo
Lighter
Darker
Auto / Photo
A4
A3
B4
2
3
4
5
6
7
8
9
0
C
S
Auto
A3
A3
B4
Full Size
A4
FLS.
B4
A4
A4
Inch
A3
A4
A5
Full Size
1
Paper
A
1151O041DA
1151O041DA
10
1
2
3
4
5
Closure Failure Indicator
Indicates that a Door is left open
or any option is not set correctly.
➭ p. 66
Misfeed Indicator
Indicates that a paper misfeed has
occurred in the copier or any
option. ➭ p. 68
Call-Tech.-Rep. Indicator
Indicates that the copier has
developed a malfunction. ➭ p. 77
Remove Copies Indicator
Indicates that there is a copy or
copies left in the Sorter Bins.
Remove copies from all Bins.
➭ p.84
Add Staples Indicator
Indicates that the Staple Cartridge
is running out of staples. Replace
the Staple Cartridge as soon as
possible. ➭ p. 64
9
Wait Indicator
Indicates that the copier is
warming up and no copy cycle
can be initiated. Wait until it goes
out. ➭ p. 84
7 Add Toner Indicator
Indicates that the Toner Bottle is
running out of toner. Replace the
Toner Bottle as soon as possible.
➭ p. 63
8 I.U. Service Life Indicator
Indicates that the Imaging Unit
needs replacement.
Replace the Imaging Unit.
➭ p. 78
9 Special Paper Indicator
Indicates that the special paper
S
setting has been made. ➭ p. 31
10 Add Paper Indicator
Indicates that the currently
selected Drawer has run out of
paper. Add paper as necessary.
➭ p. 60
6
15
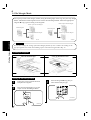
4. Turning ON and OFF and Initial Mode
Turning ON and OFF
●
Turning Copier ON
Press the Power Switch to the I (ON) position.
●
Turning Copier OFF
Press the Power Switch to the
When Copier is Turned ON
The Wait Indicator
lights up on the
control panel and the Start Key turns orange,
indicating that the copier is now warming up.
Loading the originals onto the Automatic /
Duplexing Document Feeder and pressing the
Start Key can set the copier into the Auto Copy
Start Function.➭ p. 16
1
2
In about 30 seconds, the Wait Indicator goes
out, and the Start Key turns green. Now, the
copier is ready to make copies.
3
1
2
3
4
5
6
7
8
9
0
C
4
5
6
7
8
9
A3
B4
A4
B5
A4
FLS.
A5
Inch
S
Auto
S
Auto
0
C
Start
Stop
A3
B4
A4
B5
A4
FLS.
A5
Inch
Start
Stop
Paper
Paper
1139O4722A
1139O4702A
1139O4722A
1139O4702A
Start Key : Green Light
Start Key : Orange Light
Initial Mode
When the Power Switch is turned ON, the initial settings are indicated on the control panel.
* The initial settings serve as the reference for all control panel settings to be later made.
Exposure
: ✕1.000
Orig.
Paper
: Auto Paper
Finishing
: Auto Exposure
Copy
* The initial setting of the Orig. Copy Mode is 1-sided original
equipped with a Duplex Unit.
▼
▼
:1
▼
No. of copies
selected
Zoom Ratio
: From 1-sided
original to 1-sided
copy
: Non-Sort
2-sided copy if your copier is
Useful Tip
The initial mode can be changed. For details, see User’s Choice. ➭ p. 52
Chapter 2
NOTE
The Auto Shut OFF function will automatically
shut down the copier a given period of time
after the last activity (See p. 16).
Getting to Know your Copier
1139O2060A
(OFF) position.
Getting to Know your Copier
Chapter 2
16
5. Auxiliary Functions
Panel Resetting
Auto Shut OFF Function
The Panel Reset Key resets all control panel
settings to default settings including the
number of copies and zoom ratio.
* If an Automatic / Duplexing Document
Feeder is used, the original present on
the Original Glass will be ejected out of
the unit.
The Auto Shut OFF Function shuts down the
copier a given period of time after the copier
has been used last. The initial setting is 60 min.
Useful Tip
The Panel Reset Key enables you to cancel
all previous settings efficiently. To avoid
miscopy, try to press this Key before
making any setting for your own copy job.
Useful Tip
The time for the copier to enter the Auto
Shut OFF Mode can be selected from 1 to
120 min. by using the User’s Choice.
➭ p. 57
NOTE
Consult your Technical Representative if
you do not want to activate this function.
Auto Panel Reset Function
Interrupt Mode
If no key on the Control Panel is pressed
within about 60 sec. after a copy cycle has
been completed or copy settings made, the
Auto Panel Reset Function is activated to
return the copier to the default settings.
The Interrupt Mode allows you to interrupt a
current job and run a different one. Pressing
the Interrupt Key once sets the copier into the
Interrupt Mode. Pressing the Key again
cancels the Interrupt Mode and returns to the
previous settings.
Useful Tip
The time for the copier to enter the Auto
Panel Reset Function can be changed to 30
sec.
Also, the Auto Panel Reset function can be
enabled or disabled by the User’s Choice.
➭ p. 56
Auto Copy Start Function
Even during warm-up, the copier can be set
into the Auto Copy Start Function by loading
the originals onto the Automatic / Duplexing
Document Feeder and pressing the Start Key.
This function allows a copy process to be
started as soon as the copier completes
warming up.
Useful Tips
• If the current job involves 2-sided
copying or Cover Mode, the copier
rejects an Interrupt Mode.
• If the current job involves Sort,
Sort-and-Staple or Group, Non-Sort is
automatically selected at the same time
when the copier is set into the Interrupt
Mode.
17
5. Auxiliary Functions
One copying job program that is
frequently used can be stored in memory
and called up later as necessary.
Job Memory Setting
1
Press the job Memory Input Key.
* The Job Memory Indicator Starts
blinking.
Input
Job
Memory
Useful Tip
The time for the copier to enter the Energy
Saver Mode can be selected from 1 to 120
min. by using User’s Choice. ➭ p. 56
1139O8032A
2
Make the control panel settings for the
job to be stored in job memory.
3
Press the Job Memory Select Key.
* The Job Memory Indicator lights
up and the copying job program has
been stored in job memory.
NOTE
The copier is shut down if the Auto Shut
OFF function activates while the copier is
in the Energy Saver Mode.
Job
Memory
1139O2572A
To call up the job program from
memory, press the Job Memory Select
Key.
NOTE
If you have stored a wrong job
program or if you want to
replace an old job program with
a new one, perform steps 1, 2,
and 3.
Chapter 2
Instead of turning the copier OFF, it’s a good
idea to use the Energy Saver Mode. This mode
will minimize the time for the copier to
complete the warm-up cycle to about 20 sec.
• The Energy Saver Mode is automatically
activated a given period of time after the
copier has been used last.
The initial setting is 15 min.
• Pressing the Energy Saving Key sets the
copier into the Energy Saver Mode.
• To cancel the Energy Saver Mode, press any
key on the Control Panel, for instance, the
Start Key.
Job Memory
Getting to Know your Copier
Energy Saver Mode
Getting to Know your Copier
Chapter 2
18
19
Chapter 3
Making Copies
▲
Making Copies
1. Basic Copying Overview p. 20
2. Placing Originals
• Placing on the Original Glass p. 22
• Using the Automatic/Duplexing Document Feeder p. 24
• Using the Mixed Original Detection Mode p. 25
• Using the Single Automatic Document Feeding Mode
(SADF Mode) p. 26
3. Manual Bypass Copying p. 28
4. Copy Paper Size p. 30
5. Zoom Ratio p. 32
6. Image Density p. 34
• Auto Exposure Mode
• Manual Exposure Mode
• Photo Mode
7. Original Copy Type p. 36
• 1-sided 1-sided
• 1-sided 2-sided
• 2-sided 1-sided
• 2-sided 2-sided
• 1-sided 1-sided (2in1)
• 1-sided 2-sided (2in1)
• Book 1-sided
• Book 2-sided
• Selecting Original Copy Type p. 38
• Instructions for Loading Originals p. 39
8. Finishing Mode p. 40
• Non-Sort
• Sort
• Sort-and-Staple
• Group
• Manual Staple
• Selecting the Finishing Mode p. 42
• Using the Manual Staple Mode p. 43
• Instructions for Loading Originals for Finishing Mode p. 44
• Auto Dual Function p. 45
9. File Margin Mode p. 46
10. Cover Mode p. 47
Chapter 3
This chapter shows you how to make copies.
The "Basic Copying Overview" offers quick, at-a-glance instructions for making copies.
Each step is keyed to a page number with a more detailed description.
▲ ▲ ▲ ▲ ▲ ▲
▲ ▲
▲
20
1. Basic Copying Overview
• Place
the original in position (step 1), set the number of copies to be made (step 9), and press the
Start Key (step 10). This will allow you to make a full-size copy or copies on paper of the same
size as the original.
*Automatically selected in the initial mode are Auto Paper, full size, and Auto Exposure.
• The
selections
will change the exposure level, zoom ratio, the type of copy and so on.
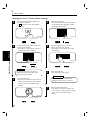
1. Placing the Original
• Raise the Original Cover and place the
original face down on the Original Glass.
➭ p. 22
• Load
Making Copies
Chapter 3
the originals face up on the
Automatic/Duplexing Document
Feeder. ➭ p. 25
1151O016AA
1151O013AA
To change the copy paper
size
2. Press the Paper Select Key to
select the desired paper size.
➭ p. 30
S
Auto
A3
B4
A4
B5
A4
FLS.
Inch
A5
Paper
1139O0082A
To change the zoom ratio
3. Press the
Key to
select the desired fixed zoom
ratio. ➭ p. 32
1139O0082A
Full Size
1139O2652A
1139O2652A
To change the exposure
level
4. Press the <
> Key to
adjust the exposure level.
➭ p. 34
Lighter
Darker
Auto / Photo
A
1151O081CA
5. Press the Orig. Copy Key
to select the 2-sided copy
mode. ➭ p. 36
▲
To make 2-sided copies
from 1-sided originals
2
1
2
2
Orig.
Book
1
Book
2
Copy
1151O086CA
21
1. Basic Copying Overview
To sort copies
Staple
6. Press the Finishing Key to
select the desired finishing
mode. ➭ p. 40
Group
Finishing
1151O087CA
To make a file margin
on the copy
7. Press the File Margin Key
to set the copier into the
File Margin Mode. ➭ p. 46
Chapter 3
Margin
To make a cover copy
Making Copies
1139O2552A
8. Press the Cover Key to set
the copier into the Cover
Mode. ➭ p. 47
Cover
1139O2562CA
9. Setting the number of copies.
• Set
the desired number of copies to be
made using the Key Pad.
*If you have entered an incorrect
number, press the Clear Key, then enter
the correct number.
1
2
3
4
5
6
7
8
9
0
C
1139O2640A
1139O2640A
10. Starting the copy cycle.
• Press
the Start Key.
*To stop the copy cycle, press the Stop
Key.
1134P342DA
22
2. Placing Originals
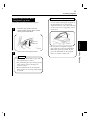
Placing on the Original Glass
Sheet Originals
Highly Transparent Originals
(Using plain paper or thick paper)
(Using transparencies and translucent paper for
the original)
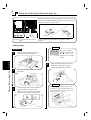
1
Raise the Original Cover.
1
Place the original in the same way as
the sheet originals.
2
Place the original face down on the
Original Glass.
2
Place a blank sheet of paper of the
same size over the original.
Making Copies
Chapter 3
Different methods are used to place the original depending on its type. Use the appropriate
procedure.
1139O0070A
1151O0103AA
Align the rear left corner of the
original with the marker on the
Original Width Scale.
▼
3
3
Gently lower the Original Cover.
NOTE
The original sizes that can be detected
in the Auto Paper Select Mode are
A3, B4, A4L, A4C, A5L.
When making copies from originals
other than the above, select the copy
paper size.
1151O014AA
4
Gently lower the Original Cover.
When using wrinkled or curled
originals, the original size might not be
detected correctly. So, select the copy
paper size and do not use the Auto
Paper Select Mode.
Copy Paper Size ➭ p. 30
23
2. Placing Originals
Instructions for Original Placement
Making Copies from A Book
Using Book Copy Mode
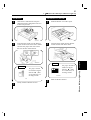
• Be sure to raise the Original Cover 15°
("Book" refers to an open bound original.)
1
Place the open book so that the
higher-numbered page faces toward
the Original Width Scale.
or more before placing the original. If
the Original Cover is raised to an
angle less than 15°, the copier may fail
to select the correct copy paper size or
zoom ratio.
1139O080AA
• Do not place an original weighing
more than 3kg on the Original Glass.
2
Gently lower the Original Cover.
NOTES
• If the book is thick, make a copy with
the Original Cover raised.
• Not positioning the open book properly
will result in copies with pages in
incorrect order.
• Do not look directly at the Original
Glass surface as a strong beam of light
is emitted.
• When placing an open book, do not
press the book hard on the Original
Glass, as trouble could result.
Making Copies
1134O037AA
Chapter 3
15°
24
2. Placing Originals
Using the Automatic/Depleting Document Feeder
Automatic/Depleting Document Feeder automatically feeds in sheet originals placed on the
Document Feed Tray one by one. After the copy cycle has been completed, it automatically
ejects the original out onto the Document Exit Tray.
Some originals may not be suitable for reliable operation of the Document Feeder. Here is a
guideline.
Making Copies
Chapter 3
Originals Suitable for the Automatic/Depleting Document Feeder
Type of Originals: Sheets (Plain paper)
Normal mode
2
2
• 1-Sided Original (weighing 50g/m to 110g/m )
2
2
• 2-Sided Original (weighing 60g/m to 90g/m )
2
2
• Mixed Original Detection mode (weighing 60g/m to 90g/m )
Lightweight Original Mode (40g/m2 to 110g/m2 )
Original Size: 1-Sided Original, 2-Sided Original, Mixed Original Detection Mode
A3L, B4L, A4L, A4C, 210mm ×330mm
A5L (Except for Mixed Original Detection Mode)
2-in-1 (Dual Original Scanning) mode : A4C
∗ Lightweight Original
Be sure to use the User’s Choice to turn ON the Lightweight Original Mode when making copies
from the lightweight originals.
For a Lightweight original(40g/m2 to 50g/m2 ), it is recommended to place it directly onto the
Original Glass or to make copies using the SADF Mode. (Single Automatic Document Feeding
Mode). ➭ p. 26
Originals Not Suitable
• Typing
paper, paraffin paper, and other thin paper
paper
• Originals greater than A3 or smaller than A5L
• Transparencies, translucent paper
• Wrinkled, dog-eared, curled, or torn originals
• Clipped or stapled originals
• Carbon-backed originals
• Thick
Typing paper,
paraffin paper,
and other thin
paper
Thick paper
Continuous
forms
Stapled
originals
Wrinkled or
dog-eared
original
1134O073AA
∗ For any of these types of originals, place the original manually on the Original Glass to make a
copy. ➭ p. 27
25
2. Placing Originals
Slide the Document Guide Plate to the
size of the originals.
∗When using large size originals, flip
up the Document Feed Tray
Extender.
Use the Mixed Original Detection mode to
make copies automatically from originals of
assorted sizes loaded in the
Automatic/Duplexing Document Feeder.
If Auto Size is selected, you can make copies
of the same size from originals of different
sizes.
Originals
Copies
Mixed Original Mode
1151O015AA
1138O537AA
2
Load a neat stack of originals face up
on the Document Feed Tray.
Auto Size Mode
Copy Paper: A4
1138O537AA
NOTE
The copier cannot staple together copies of
different sizes made in the Mixed Original
Detection mode.
1
1151O016AA
NOTE
• The maximum number of originals that
Load the stack of originals so that the
rear edge of each original is pressed
against the rear Document Guide Plate.
Then, slide the front Document Guide
Plate against the front edges of the
originals with the greatest width.
can be loaded
A4 or smaller : Up to 50
A3 or B4
: Up to 30
• Make sure that the top level of the
original stack does not exceed the ▼
marking.
• Make sure that the Document Guide
Plate is in touch with the edges of the
original stack. If it’s not pressed snugly
against the the original stack, skewed
feeding could result.
1151O017AA
2
Press the Mixed Original Detection Key.
Manual
Staple
Sort
Mixed Orig. Det.
1
2
1 1 2in1
1139O2632A
Chapter 3
1
Using the Mixed Original Detection
Mode
Making Copies
Loading the Originals
26
2. Placing Originals
Using the Single Automatic Document Feeding Mode (SADF Mode)
This is the mode in which you load your originals one by one onto the Automatic/Duplexing
Document Feeder to make a copy or copies from it. When you load the original, the copier
automatically starts the copy cycle.
NOTES
Making Copies
Type
: Plain paper
Thickness : 35g/m 2 to 200g/m2 .
S ize
: A3 to A5L
• The following features cannot be selected in the SADF Mode.
2-sided original
1-sided copy
2-sided original
2-sided copy
Dual Original Scanning Mode (2 in 1 Mode)
Cover Mode
▼▼
Chapter 3
• Originals available for the SADF Mode.
1
Open the Document Feed Table and
slide the Guide Plate to the size of the
original.
1151O018AA
2
Make sure that the Start Key is lit
green and place the original face down
on the Document Feed Table.
1151O019AA
NOTES
sure to place one original at a time.
• Be sure to correct any fold or curl in
the original.
• Be
3
The original is automatically taken up
and the copy cycle is started.
4
Making sure that the Start Key lights
up green again, load the next original.
27
2. Placing Originals
Originals Not Suitable for the Automatic/Duplexing Document Feeder
Raise the Automatic/Duplexing
Document Feeder.
2
Place the original face down on the
Original Glass.
1151O020AA
3
Align the rear left corner of the
original with the
marker on the
Original Width Scale. Then press the
rear edge of the original up against the
Original Positioning Plate at the rear
side of the Glass.
Original Positioning Plate
Original Width Scale
4
1151O021AA
Gently lower the Automatic/Duplexing
Document Feeder.
Making Copies
Chapter 3
1
28
3. Manual Bypass Copying
Use the Manual Bypass to make copies on paper not loaded in any Drawer, or to copy onto
transparencies, translucent paper, or any other special paper.
When using the Multi Bypass Tray, you can load multiple sheets of copy paper.
Making Copies
Chapter 3
Copy Paper That Can be Used for Manual Bypass
◆Types of Paper
2
2
• Plain paper (weighing 60g/m to 90g/m )
2
2
• Thick paper (weighing 90g/m to 157g/m )
• Transparencies, translucent paper
◆Paper Size
• Max. Size: 297mm × 432mm
• Minimum Size: 100mm × 140mm
◆Capacity of the Multi Bypass Tray
• Plain paper ... Up to 50 sheets
• Plain paper (once-copied paper) ... Up to 20 sheets
• Thick paper, transparencies, translucent paper ... Up to 20 sheets.
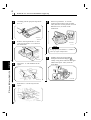
Using the Multi Bypass Tray
1
Place the original on the Original
Glass and make the control panel
settings.
3
Load a neat stack of copy paper on the
Tray and insert it until it stops.
NOTE
The following functions cannot be
selected for Manual Bypass:
Auto Paper, Auto Size, Book Copy, any
of the Finishing Modes, 2-Sided
Copying, and File Margin Mode.
1139O0140A
2
Swing down the Multi Bypass Tray.
Slide the Guide Plate to the size of
the copy paper.
∗ Slide the Multi Bypass Tray Extender out
when using large-size copy paper.
1139O0130A
NOTE
• The paper should be loaded no higher than
the ▼ (Max. Level Indicator).
• Before inserting, fan the paper stack well if
you are using transparencies or translucent
paper.
• Correct any curl if you are using thick paper.
29
3. Manual Bypass Copying
4
Ensure that the
the Control Panel.
Indicator is lit on
IMPORTANT
When making multiple copies using
OHP transparencies, set the Copy Tray
into the upper position if there is no
Sorter or Staple Sorter mounted.
1139O3690A
1139O3690A
Using the Key Pad, set the number of
copies to be made.
1
2
3
4
5
6
7
8
9
0
C
Making Copies
5
1139O2640A
6
Chapter 3
* If not, insert the paper stack on the
Tray again.
Press the Start Key to start the copy
cycle.
1134P342DA
30
4. Copy Paper Size
The selected copy paper size and the paper source loaded with that paper are indicated on the
control panel.
0.5~2.0
Auto
Auto
Photo
Lighter
Darker
Auto / Photo
2
3
4
5
6
7
8
9
0
C
S
Auto
A4
A3
B4
A3
A3
B4
Full Size
A4
FLS.
B4
A4
A4
Inch
A3
A4
A5
Full Size
1
Paper
Making Copies
Chapter 3
A
1151O068DA
1151O068DA
Auto Paper Mode
Manual Selection
The Auto Paper Mode automatically
selects the copy paper according to the size
of the original being used and the zoom
ratio selected for use.
The copy paper size can be set manually
according to your need.
1
1
Press the Paper Select Key until the
arrow indicates the copy paper size of
your choice.
Press the Paper Select Key to set the
copier into the Auto Paper mode.
S
Auto
A3
B4
A4
B5
A4
FLS.
A5
Inch
A3
B4
A4
B5
A4
FLS.
A5
Inch
Paper
Paper
1139O0172A
1139O0172A
1139O0072A
1139O0072A
Paper Source Indicator
Useful Tip
This mode is efficient when you want to
make copies on paper of the same size as
your originals automatically.
Each time the Paper Select Key is pressed,
the Paper Source Indicator cycles through
the different source locations.
Multi Bypass Tray
1st Drawer
2nd Drawer
3rd Drawer (Option)
4th Drawer (Option)
1139O3690A
1139O3690A
31
4. Copy Paper Size
Useful Tip
A Drawer, if set as a special paper drawer,
is excluded from paper sources that can be
selected in the Auto Paper Mode.
The Special Paper Indicator S and Paper Size
Indicator light up when you select a particular
Drawer for which the special paper setting was
made.
This feature is a great advantage when
you need to make a large number of
copies on the same size paper. For
example, you can make up to 500
copies without interruption if the 1st
and 2nd drawers are loaded with paper
of the same size and in the same
direction.
S
A3
B4
A4
B5
A4
FLS.
A5
Inch
Chapter 3
If the Drawer currently selected for use
runs out of paper and there is another
Drawer loaded with paper of the same size
and in the same direction, the copier
automatically selects that second Drawer
to continue copying.
Special Paper Setting
Paper
1139O5402A
1139O5402A
Useful Tips
• You
may be using both recycled as well
as plain paper loaded in your copier. If,
for example, you make the special paper
setting for the drawer loaded with plain
paper, the copier does not select that
particular drawer in the Auto paper mode.
This allows you to make copies on
recycle paper first.
• The special paper setting can be made
using the User’s Choice Mode. ➭ p. 57
Making Copies
Auto Drawer Switching
32
5. Zoom Raito
You can select the desired fixed zoom ratio by pressing the
keys. There are three
different ways to choose from to set the zoom ratio. Select one according to your need.
0.5~2.0
Auto
Auto
Photo
Lighter
Darker
Auto / Photo
A4
A3
B4
2
3
4
5
6
7
8
9
0
C
S
Auto
A3
A3
B4
Full Size
A4
FLS.
B4
A4
A4
Inch
A3
A4
A5
Full Size
1
Paper
A
Making Copies
Chapter 3
1151O068DA
Auto Size Mode
Fixed Zoom Ratios
The copier is set into the Auto Size Mode
in which the zoom ratio is automatically
selected according to the size of the
original being used and the copy paper size
selected for use.
1
The copier provides most frequently used
zoom ratios ready for immediate use.
1
Press the
or
Key to select a
fixed zoom ratio of your choice.
Press the Auto Size Key. The Zoom
Ratio Indicator shows
and the
Auto Size Mode Indicator Auto
lights up.
A4
A3
B4
A3
Full Size
B4
A4
A3
A4
Full Size
Auto
Size
1151O069DA
NOTE
1139O2662A
1139O2662A
2
Select the copy paper size. ➭ p. 30
A3
B4
A4
B5
A4
FLS.
A5
Inch
Paper
1139O2200A
1139O2200A
Useful Tip
This mode is very helpful for neat filing
when you need to make copies from
originals of assorted size.
The Zoom Ratio Indicator displays the
actual percentage of the selected ratio.
33
5. Zoom Raito
Using Zoom Up/Down Keys
Pressing the
or
key changes the
zoom ratio shown in 0.001 increments.
You can keep touching the key to change
the ratio quickly.
Hold down the
or
key until
the desired zoom raito is reached
Chapter 3
0.5~2.0
1151O050AA
1151O050AA
Useful Tip
To save time, first select the fixed
zoom ratio nearest to the target ratio
or
Key.
before using the
Making Copies
1
34
6. Image Density
Pressing the Exposure Control Keys < A > can adjust the image density level of copie s
either in the Auto Exposure Mode, Manual Exposure Mode, or Photo Mode. Select the
appropriate mode according to your particular needs.
0.5~2.0
Auto
Auto
Photo
Lighter
Darker
Auto / Photo
A4
A3
B4
2
3
4
5
6
7
8
9
0
C
S
Auto
A3
A3
B4
Full Size
A4
FLS.
B4
A4
A4
Inch
A3
A4
A5
Full Size
1
Paper
A
Making Copies
Chapter 3
1151O068DA
Manual Exposure Mode
Auto Exposure Mode
The copier reads the image density of the
original and automatically adjusts the
exposure level for the optimum copy
image density.
1
Press the Auto Exposure Mode Key A
as necessary to light up the Auto
Exposure Indicator ❍ Auto .
In the Manual Exposure Mode, you can
vary the exposure level in nine steps.
1
Hold down the Exposure Control Key
< or > .
Auto
Lighter
Lighter
Darker
Darker
Auto / Photo
A
Auto / Photo
A
1151O081
1151O082AA
Each time the Auto Exposure Mode Key
A is pressed, the Auto Exposure
Mode, Manual Exposure Mode and
Photo Mode are selected alternately.
Useful Tips
• The exposure level in the Auto
Exposure Mode can be varied by using
the User’s Choice, either "Darker" or
"Lighter." ➭ p. 54
• The copier has been factory-set to
automatically select the Auto
Exposure Mode. The User’s Choice
can be used to change this default
setting to the Manual Exposure Mode.
➭ p. 54
To make the image darker:
Press or hold down the Exposure
Control Key > .
To make the image lighter:
Press or hold down the Exposure
Control Key < .
35
6. Image Density
Photo Mode
The copier can make a faithful reproduction
of an original having halftone image such
as photos. The image density of the photo
may be varied in nine steps.
1
Press the Auto Exposure Mode Key
A as necessary to light up the Photo
Mode Indicator ❍ Photo
Lighter
Chapter 3
Photo
Darker
Auto / Photo
A
2
Hold down the Exposure Control Key
< or > until the desired Photo Mode
level
Lighter
Darker
Auto / Photo
A
1151O081CA
To make the image darker:
Press or hold down the Exposure
Control Key > .
To make the image lighter:
Press or hold down the Exposure
Control Key < .
Making Copies
1151O080CA
▲
36
7. Original
Copy Type
▲
Pressing the Orig. Copy Keys can select the setting for the type of copy you want to make
from the type of original you have.
There are eight different modes available. Select one according to your need.
Auto
Size
Meter
Count
Manual
Staple
Mixed Orig. Det.
0.5~2.0
Margin
Toner
Drum
Dehumidify
Sort
1
2
Sort &
Staple
2
1
1 2 2in1
Book
2
Book
2
Lighter
Darker
Auto / Photo
Finishing
Orig.
Copy
Auto
A4
A3
B4
A3
A3
B4
Full Size
A4
FLS.
B4
A4
A4
Inch
A3
A4
A5
Full Size
Paper
A
1151O070DA
1151O070DA
Original
▲
1-sided
▲
Chapter 3
1
2
Job
Memory
Input
Auto
Photo
Cover
Group
Copy Types
1-sided
• Select
Originals
Copies
this mode to make 1-sided copies from
1-sided originals.
* The [1-sided
1-sided] type is the default
setting in the initial mode.
▲
Making Copies
1 1 2in1
1139O0280A
▲
1-sided 2-sided
Original
Copies
• Select
this mode to make 2-sided copies from
1-sided originals.
(Only when the Duplex Unit is mounted.)
* Two originals can be copied onto one copy.
1139O0290A
▲
2-sided 1-sided
Original
Copies
1139O0310A
• Select
this mode to make 1-sided copies from
2-sided originals.
(Only when the Duplexing Document Feeder
is mounted.)
37
▲
2-sided
▲
7. Original
Copy Type
2-sided
Original
• Select
this mode to make 2-sided copies from
2-sided originals.
(Only when the Duplexing Document Feeder
and Duplex Unit are mounted.)
Copy
1139O0300A
1-sided [2 in 1]
• Select
Copy
1140O273
this mode to make a 1-sided copy,
through reduction, from two 1-sided originals
side-by-side.
(Only when the Automatic/Duplexing
Document Feeder is mounted.)
* You need half as many sheets of copy
paper as required otherwise.
NOTE
The size of the original should be A4
crosswise for 2-in-1.
• Select
2-sided [2 in 1]
▲
1-sided
Originals
this mode to make a 2-sided copy,
through reduction, from four 1-sided
originals. Each pair of originals will be placed
side-by-side on either side of the copy.
(Only when the Automatic/Duplexing
Document Feeder is mounted.)
* You need 1/4 as many sheets of copy paper
as required otherwise.
Copy
1139O0320A
NOTE
The size of the original should be A4
crosswise for 2-in-1.
1-sided
▲
Book
Original
• Select
Copies
this mode to make a 1-sided copy of
each page of an open book.
1139O1990A
▲
Book
2-sided
Original
Copies
1139O0330A
• Select
this mode to make a 2-sided copy of
an open book. Each page of the open book
will be copied onto one side of the copy.
(Only when the Duplex Unit is mounted.)
Chapter 3
Originals
Making Copies
▲
1-sided
38
Copy Type
▲
7. Original
▲
Selecting Original
Copy Type
Each time the Original Copy Key
(right) is pressed, the newly selected
type indicator lights as shown below.
▲
▲▲
1
Press the Original Copy key to
select the Original Copy type.
2
2
1
1 1 2in1
Book
1
Book
2
2
1 2 2in1
Orig.
Copy
Making Copies
Each time the Original Copy Key
(left) is pressed, the newly selected
original type indicator lights as shown
below.
Book
1
Book
2
1
1
▲
Chapter 3
1151O086CA
1
2
1151O084CA
1151O084CA
1
* If there are no lights, 1-sided
▲
2
1-sided
is selected.
2
Useful Tip
2
▲
The [1-sided 1-sided] type is the
default setting in the initial mode. This
default setting can be changed using the
User’s choice. ➭ p. 55
1
1
1151O083CA
1151O083CA
is selected.
▲
* If there are no lights, 1-sided
1-sided
39
▲
7. Original
Copy Type
Instructions for Loading Originals
Use the following procedure for loading originals to make 1-sided copies from 2-sided originals.
Procedure
Load the originals crosswise.
If the originals are loaded lengthwise, the directions of the copy images will be mixed up.
Correct:
Incorrect:
2-Sided Originals
Loaded Lengthwise
1-Sided Copies
1-Sided Copies
1151O023AA
1151O022AB
Notes for 2-sided Copy Mode/2in1 Mode
▲
▲
1-sided (2in1),
▲
When making copies from 1-sided originals in the 1-sided 2-sided, 1-sided
or 1-sided 2-sided (2in1) Mode, check the number of originals.
If an odd number of 1-sided originals are used, add one blank sheet of paper at the end of the
original set.
Originals
12
34
5
2-Sided Copies
2 In 1 Copies
1
2
or
3
4
5
Blank Sheet of Paper
12
34
5
1151O059AA
Making Copies
Chapter 3
2-Sided Originals
Loaded Crosswise
40
8. Finishing Mode
Pressing the Finishing Key can select the desired finishing mode.
There are five different finishing modes. Select the one according to your needs.
Meter
Count
Manual
Staple
Auto
Size
Mixed Orig. Det.
0.5~2.0
Margin
Toner
Drum
Dehumidify
Sort
1
2
Sort &
Staple
2
1
1 2 2in1
Auto
Photo
Cover
1
Book
Group
2
2
Lighter
2
Book
Job
Memory
Chapter 3
Input
1 1 2in1
Darker
Auto / Photo
Finishing
Orig.
A4
A3
B4
Auto
A3
A3
B4
Full Size
A4
FLS.
B4
A4
A4
Inch
A3
A4
A5
Full Size
Paper
A
Copy
1151O070DA
1151O070DA
Making Copies
Finishing Modes
Non-Sort
Originals
Copies
All copies are fed out onto the 1st Bin, without
being sorted, grouped, stapled, or punched.
1076O145
Sort
Copies
Originals
1st Bin
This mode is effective when making multiple copies
from multiple originals.
Copies are sorted into complete sets of the originals.
(Only when the Sorter or Staple Sorter is mounted.)
2nd Bin
3rd Bin
1076O146
Sort-and-Staple
Copies
Originals
1st Bin
2nd Bin
3rd Bin
1151O108AA
Copies are sorted into complete sets of the originals
and each set is stapled together.
(Only when the Staple Sorter is mounted.)
41
8. Finishing Mode
Group
Copies
1st Bin
Originals
2nd Bin
The copies made from each single original are
separated into groups. Each group contains the
same number of copies.
(Only when the Sorter or Staple Sorter is
mounted)
3rd Bin
1076O147
Manual Staple This mode allows you to staple copy sets already
made in the Sort Mode or copy stacks made in the
Group Mode.
(Only when the Staple Sorter is mounted.)
* This feature is efficient for stapling originals after
making copies.
1051O109AA
Useful Tip
The copier has been factory-set to automatically select Non-Sort. Also, the copier automatically
switches between the Sort and Non-Sort mode depending on the number of originals loaded in
the Automatic Document Feeder. The User’s Choice can, however, be used to change this
default setting using the User’s Choice. ➭ pp. 55, 57
Making Copies
Sorting or Grouping
Originals
Chapter 3
Manual Staple
42
8. Finishing Mode
Selecting the Finishing Mode
Sort/Sort-and-Staple/Group Mode
Using the Manual Staple Mode
(To sort or group copies)
(To staple copy sets already made in the Sort
Mode or copy stacks made in the Group Mode.)
1
Press the Finishing Key to select the
desired mode.
1
Make sure that each copy set or stack
has been fed into the Sorter Bin.
2
Press the Manual Staple Key.
Then the copy set or stack in the Sorter
Bin will be stapled.
Sort &
Staple
Chapter 3
Group
Finishing
1151O087CA
Manual
Staple
Making Copies
• Each
time the Key is pressed, the
newly selected finishing mode
indicator lights.
• If there are no lights, the Non-Sort
Mode is selected.
NOTE
1139O2732A
1139O2732A
• Capacity of each Sorter Bin
(Non-Sort Mode)
Sorter Bin
Capacity
1st Bin
Up to 50 sheets
2nd to 10th Bin
Up to 25 sheets
(Sort/Group/Sort-and-Staple Mode)
Sorter Bin
Capacity
1st to 10th Bin
Up to 25 sheets
• Thick paper, translucent paper, and
OHP transparencies cannot be used
for making copies in the Sort, Group,
or Sort-and-Staple Mode.
43
8. Finishing Mode
Using the Manual Staple Mode
(To use as a stapler)
1
Align the sheets of paper neatly.
3
Press the Manual Staple Key.
The paper stack will be stapled.
Manual
Staple
Insert the paper stack onto the 1st
Bin with its front surface facing up.
1139O2732A
Useful Tip
This feature is efficient for stapling
originals after making copies.
1139O1320A
Stapling Position
1151O110AA
NOTES
sure of the stapling position and
press the paper stack against the
bracket.
• Up to 50 sheets of (plain) paper can be
stapled.
• Never attempt to reach for the stapling
position. This can be dangerous.
• Make
Making Copies
2
Chapter 3
1139O2732A
1134O039AA
44
8. Finishing Mode
Instructions for Loading Originals for Finishing Mode
Note the correct direction of the originals if the copies are to be stapled either in the
Sort-and-Staple or Manual Staple mode.
Using the Automatic/Duplexing Document Feeder
Load the originals crosswise in the Document Feeder. Ensure also that the stapling position is at the
rear left corner as indicated by the arrow.
Correct:
Copy
Stapling Position
Making Copies
Chapter 3
Originals loaded crosswise
1151O024AB
Placing the original on the Original Glass
Place the original, with its stapling position at the upper right corner as shown in the illustration.
Correct:
Stapling Position
1039O2230A
* Press the Manual Staple Key to staple copy sets or a copy stack.
45
8. Finishing Mode
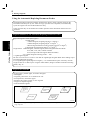
Auto Dual Function
Each of the Sort Bins holds up to 25 sheets of paper. The Auto Dual Function, however, allows
sorting of copies of up to 50 originals under certain conditions.
Auto Dual Function in the Sort Mode
When 5 or less copies are made from an original set consisting of more than 25 originals in the
Sort Mode, the Sorter or Staple Sorter is automatically switched into the Auto Dual Function
Mode using the 6th to 10th Bins.
* If the number of copies selected exceeds 5, the copy cycle stops at the 26th original.
* To have a complete set from the originals, place the copies from the 6th Bin on top of those from
the 1st Bin. In the same way, place the copies from the 7th Bin on top of those from the 2nd Bin,
and so on.
Auto Dual Function in Sort-and-Staple Mode
When 5 or less copies are made from an original set consisting of more than 25 originals in the
Sort-and-Staple mode and the Auto Dual function is activated, the Sort-and-Staple Mode is
automatically switched to the Sort Mode (no stapling takes place).
When the Number of Copies Selected Exceeds 25 in the Group Mode
When more than 25 copies are to be grouped together into one group, the Sorter or Staple Sorter
uses the subsequent Bin to continue grouping the copies.
Original
1st
Copies
1st to 25th copies
26st and subsequent copies
Bins Used
1st Bin
2nd Bin
3rd to Nth: Same way up to 10th
If the Number of Copies Selected Exceeds 50 in the Non-Sort Mode
The capacity of the 1st Bin is 50 in the Non-Sort Mode. If more than 50 copies are made in the
Non-Sort mode, the Sorter uses the 1st, 2nd, and subsequent Bins to hold those excess copies.
Chapter 3
Bins Used
1st to 5th Bins
6th to 10th Bins
Making Copies
Copies
1st to 25th sorted copies
26st to 50th sorted copies
46
9. File Margin Mode
▲
The copier provides a file margin (10mm) along the leading edge of the copy for your easy filing.
Both 1-sided and 2-sided originals can be used in the File Margin Mode. Select the appropriate
Original Copy type according to the originals.
1-Sided Copies with File Margins
1-Sided Copies with File Margins
1-Sided Originals
2-Sided Original
2-Sided Copy with File Margins
2-Sided Copy with File Margins
1076O170
Making Copies
Chapter 3
1076O169
NOTE
You need to change the setting of the File Margin function of User’s Choice according to the
type of originals to be used when making copies in the File margin mode. ➭ p. 53
Loading the Originals
Using the Original Glass
Using the Document Feeder
1151O025AA
Position the file margin side to the right.
1151O026AA
Position the file margin side to the left.
Setting the File Margin Mode
2
Ensure the correct original direction
and place the original.
Press the File Margin Key to set the
copier into the File Margin Mode.
Margin
3
▲
1
Press the Original Copy Key to
select the desired job type.
2
1
2
2
Orig.
Book
1
Book
2
Copy
1151O086CA
1139O2552A
47
10. Cover Mode
The Cover Mode lets you make a front cover for a copy set by copying the first page of an
original set on a different type of paper, such as color paper. It may be used to differentiate
the cover of a copy set from other pages.
Original Set
Copy Set
Special paper,
such as colored
one
NOTES
• This mode can only be selected when the copier is equipped with the Automatic/Duplexing
Document Feeder and the Multi Bypass Tray.
2-sided Mode is Selected.
Using the Cover Mode
1
Place the paper stack for the cover
sheet on the Multi Bypass Tray.
2
Load the originals into
Automatic/Duplexing Document
Feeder.
1139O0140A
1151O016AA
NOTES
• Be sure to place the paper stack for the
cover sheet on the Multi Bypass Tray.
• Capacity of the Multi Bypass Tray
Plain paper. . . . . . . . .Up to 50 sheets
Thick paper, transparencies,
translucent paper . . . .Up to 20 sheets
3
Press the Cover Key to set the Cover
Mode.
Cover
1139O2562A
1139O2562A
Making Copies
2-sided (2in1), Book
▲
2-sided, 1-sided
▲
▲
1-sided, or Book
▲
• This mode cannot be selected when 1-sided
Chapter 3
1076O181
Making Copies
Chapter 3
48
49
Chapter 4
Special Functions
This chapter explains about the special functions that can be used for specific purposes.
Special Functions
Chapter 4
1. Meter Count p. 50
2. Toner Replenisher/Drum Dehumidifier p. 51
3. User’s Choice
Description of Each User’s Choice Functions p. 52
Making the User’s Choice Settings p. 58
50
1. Meter Count
This function allows you to check the total count of each of the four different counters.
Total
2-Sided Total
Shows the number of 2-sided copies
made.
Shows the total number of copies made
since the installation of the copier.
Size
2-Sided Size
Shows the number of copies made on
the copy paper of a preset size. (The
size will be set by your Technical
Representative.)
Shows the number of 2-sided copies
made on the copy paper of a preset size
(the same size as set for "Size").
Counter Display
The Zoom Ratio Indicator shows the upper 3 digits of the count and the Multi-Copy Display
shows the lower 2 digits of the count.
Chapter 4
Example : The count is 12,345(copies).
Special Functions
0.5~2.0
1151O60AA
Using the Meter Count Function
1
Press the Meter Count Key once.
*The count of the Total Counter is
shown across the Zoom Ratio Indicator
and Multi-Copy Display.
Meter
Count
Toner
Auto
Size
Margin
1139o2492A
Each time the Meter Count Key is pressed, the
counts of the four counters will be shown in the
following order.
Total Size 2-sided Total
2-sided Size
2
With the count of the 2-Sided Size
Counter displayed, press the Meter
Count Key.
*This restores the copier to the state
before entering the Meter Count Mode.
51
2. Toner Replenisher/Drum Dehumidifier
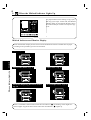
Toner Replenisher
The copier tends to exhaust the supply of toner rapidly when making a number of copies from an
original with dark solid areas such as a photo. As a result, the image density of the copy will
become lighter. In such a case, you can use the Toner Replenisher function to regain the normal
image density quickly.
Press the Auxiliary Toner Replenishing Key.
*This causes the copier to initiate toner replenishing, which lasts for 90 seconds at maximum.
NOTE
Toner
• Do
not turn the Power Switch OFF or
open the Front Door while the copier
is replenishing toner.
• Toner is not replenished if the image
density is sufficiently high
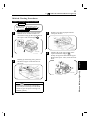
Drum Dehumidifier
During high humidity periods or when there are sudden rapid changes in humidity (especially
when you are using a heater in winter), condensation *1 could form on the surface of the PC
Drum *2, resulting in blotchy copies. In such instances, use the Drum Dehumidifier function
to dry the surface of the PC Drum.
*1
Condensation : A phenomenon in which small drops of water are formed on cold surfaces,
such as the surface of the PC Drum.
*2 PC Drum : Functions in the copier as film in a camera.
Press the Drum Dehumidify Key .
*This sets the copier into the Drum Dehumidifier Mode which lasts for 90 seconds.
Useful Tip
• A copy
cycle can be initiated even
while the copier is in the Drum
Dehumidifier Mode.
Drum
Dehumidify
1139O2472A
Special Functions
Chapter 4
1139O2478A
1139O2482A
52
3. User’s Choice
The copier has been set so that the most frequently used setting are automatically selected in the
initial mode. The User’s Choice allows you to select the default setting which are automatically
selected in the initial mode according to your own needs.
By setting defaults for the paper size, zoom raito, and other settings that are most frequently
used, time and effort to make extra setting will be eliminated that are otherwise to be spent
when the copier is turned ON or when the auto reset function is activated.
*For more details, consult your Technical Representative. Functions Available from User’s
Choice
Functions Available from User’s Choice
U- 9
File Margin
U-10
Priority Paper Size/Source
U-12
AP/AS/Manual Priority
U-13
Default Auto Exposure Level
U-14
Default Exposure Mode/Level
U-15
Default Finishing Mode
U-18
Priority Orig.
▼
Special Functions
Chapter 4
Choice Code
Function
U- 0
Mixed Original Detection
U- 4
Lightweight Original
Copy Type
Choice Code
Function
U-20
Auot Panel Reset ON/OFF
U-21
Energy Saver ON Timing
Auto Panel Reset for Plug-In
U-23
Counter
Sort/Non-Sort Auto Switching
U-24
ON/OFF
U-28
Auto Shut OFF Timing
Special Paper setting
U-51
(1st Drawer)
Special Paper setting
U-52
(2nd Drawer)
Special Paper setting
U-53
(3rd Drawer)
Special Paper setting
U-54
(4th Drawer)
1151H07OBA
Description of Each User’s Choice Function
U-0 Mixed Original Detection
Select whether to enable the Mixed Original Detection function or not when power
is turned ON or panel reset on the copier equipped with an Automatic/Duplexing Document Feeder.
Setting Value
Description
0
Mixed Original Detection function ON
Mixed Original Detection function OFF
1
Initial Setting
1151H08OBA
U-4 Lightweight Original
Select the type of originals used on the ADF. Set "1" (Lightweight Original mode ON) if originals
lighter in weight than standard (weighing 40 to 50 g/m2 ) are used with the ADF.
Setting Value
Description
0
Lightweight Original mode OFF
Lightweight Original mode ON
1
Initial Setting
1151H09OBA
53
3. User’s Choice
U-9 File Margin
Select whether the original has file margin or not for the File Margin mode.
If "1" (original does not have a file margin") is set and you attempt to make a copy from an original
which has a file margin on it, the copier is very likely to produce a copy with a margin on an
incorrect position.
Setting Value
Description
0
The original has a file margin
1
The original does not have a file margin
Initial Setting
1151H11OBA
U-10 Priority Paper Size/Source
Select the priority paper size or paper source selected when the copier is set into the Auto Size or
Manual mode.
A3 (L)
B4 (L)
A4 (L)
B5 (L)
A5 (L)
FLS (L)
A4 (C)
B5 (C)
11" ✕ 17" (L)
11" ✕ 14" (L)
8-1/2" ✕ 14" (L)
Initial Setting
Setting Value
13
14
15
20
21
22
23
Description
Initial
Setting
8-1/2" ✕ 11" (L)
5-1/2" ✕ 8-1/2" (L)
8-1/2" ✕ 11" (C)
1st Drawer
2nd Drawer
3rd Drawer
*Only when the Paper Feed
Cabinet is mounted
Chapter 4
0
1
2
3
4
5
6
7
10
11
12
Description
4th Drawer
*Only when the Paper Feed
Cabinet is mounted
1151H12OBA
Special Functions
Setting
Value
54
3. User’s Choice
U-12 AP/AS/Manual Priority
Select the priority copying mode that is automatically selected when the Power Switch is turned ON
or Panel Reset key is pressed
Setting Value
Initial
Setting
Description
Auto Paper (AP)
Auto Size (AS)
Manual
0
1
2
1151H13BA
U-13 Default Auto Exposure Level
Determine the optimum exposure level in the Auto Exposure mode, variable in seven steps.
Setting Value
Special Functions
Chapter 4
46
47
48
49
50
51
52
Description
Initial
Setting
Low (level 4)
Low (level 3)
Low (level 2)
Low (level 1)
Standard
High (level 1)
High (level 2)
1151H14OBA
When the exposure level is "Low," the greater level number is, the lower the exposure level.
When the exposure level is "High," the greater level number is, the higher the exposure level.
U-14 Default Exposure Mode/Level
Determine the default exposure mode, either Auto or Manual, selected when the Power Switch is
turned ON or Panel Reset key is pressed.
If Auto is selected, this function also allows you to set the default exposure level in the Manual
Exposure mode, variable in 9 steps, after the Auto Exposure mode has been canceled.
If Manual is selected, the function also allows you to set the default exposure level in the Manual
Exposure mode.
Auto Exposure Mode as Default
Setting
Value
0
1
2
3
4
5
6
7
8
Default Mode
Auto
Auto
Auto
Auto
Auto
Auto
Auto
Auto
Auto
Description
Exposure Setting in Manual Mode
Manual EXP1
Manual EXP2
Manual EXP3
Manual EXP4
Manual EXP5
Manual EXP6
Manual EXP7
Manual EXP8
Manual EXP9
Initial
Setting
1151H15OBA
55
3. User’s Choice
Manual Exposure Mode as Default
Setting Value
10
11
12
13
14
15
16
17
18
Description
Manual Exposure Mode / EXP1
Manual Exposure Mode / EXP2
Manual Exposure Mode / EXP3
Manual Exposure Mode / EXP4
Manual Exposure Mode / EXP5
Manual Exposure Mode / EXP6
Manual Exposure Mode / EXP7
Manual Exposure Mode / EXP8
Manual Exposure Mode / EXP9
Initial Setting
1151H16OBA
EXP Level
* With EXP5 at the central level, the exposure
level will be lower as the number becomes
smaller, and it is higher as the number becomes
greater.
1 2 3 4 5 6 7 8 9
Darker
1139O5282A
Chapter 4
Lighter
U-15 Default Finishing Mode
Setting Value
0
1
2
3
Description
Initial Setting
Non-Sort
Sort
Group
Sort-and-Staple
U-18 Priority Orig.
▼
1151H18OBA
Copy Type
▼
Determine the orig. copy type automatically a selected when the Power Switch is turned ON or
Panel Reset key is pressed.
0
1
2
3
4
Description
1
1
2
1
1
▼ ▼ ▼ ▼ ▼
Setting Value
Initial Setting
1
2
2
1 (2in1)
2 (2in1)
▼
1151H19OBA
▼
*The initial setting is 1 2 if your copier is equipped with a Duplex Unit. Consult your Technical
Representative if you want to select 1 1 when your copier is equipped a Duplex Unit.
Special Functions
Determine the priority finishing mode selected when the copier is equipped with a finishing option.
56
3. User’s Choice
U-20 Auto Panel Reset ON/OFF
Select whether or not to activate the auto clear function after the lapse of a given period of
time a after copy cycle has been completed or a key on the control panel has been operated.
Setting Value
0
Disabled
1
Enabled : 30 sec.
2
Enabled : 1 min.
Description
Initial Setting
1151H19OBA
U-21 Energy Saver ON Timing
Special Functions
Chapter 4
Select whether or not to set the copier into the Energy Saver mode after the lapse of a given period
of time after a copy cycle has been completed or a key on the control panel has been operated.
The period of time can fall within the range 1 to 120 min.
*The initial setting is 15 min.
Setting Value
1
2
3
:
:
98
99
Description
Initial Setting
Enabled : 1min.
Enabled : 2min.
Enabled : 3min.
:
:
Enabled : 98min.
Enabled : 120min.
1151H20OBA
U-23 Auto Panel Reset for Plug-In Counter
Select whether to set the copier into the initial mode when the Plug-In Counter is pulled out.
Setting Value
Description
0
Copier is not initialized.
Copier is initialized when the Plug-In Counter is pulled out.
1
Initial Setting
1151H22OBA
57
3. User’s Choice
U-24 Sort/Non-Sort Auto Switching ON/OFF
Select whether to enable or disable the function that automatically switches between the Sort and
Non-Sort mode depending on the number of originals loaded in the ADF when the copier is equipped
with an ADF and finishing option. If "ON" is selected, Non-Sort is selected if only one original is
loaded in the ADF and Sort is selected if two or more originals are loaded in the ADF.
Setting Value
Description
0
Sort/Non-Sort switching OFF (disabled)
Sort/Non-Sort switching ON (enabled)
1
Initial Setting
1151H22OBA
U-28 Auto Shut OFF Timing
Select whether or not to enable the Auto Shut OFF Function that turns power off automatically
after the lapse of a given period of time after a copy cycle has been completed or a key on the
control panel has been operated.
*In the initial setting, the Auto Shut OFF Function is activated 60 min. after the above-said event.
Description
Initial Setting
Chapter 4
Disabled
Enabled : 1min.
Enabled : 2min.
Enabled : 3min.
:
:
Enabled : 98min.
Enabled : 120min.
1151H23OBA
U-51 to 54 Special Paper Setting
Designates each drawer of the copier for special paper.
See p. 31 for more details on the special paper setting.
U-51 : 1st Drawer
U-52 : 2nd Drawer
U-53 : 3rd Drawer (Setting is possible only when the Paper Feed Cabinet is mounted)
U-54 : 4th Drawer (Setting is possible only when the Paper Feed Cabinet is mounted)
Setting Value
Description
Special paper setting is not made.
0
1
Special paper setting is made for the drawer.
Initial Setting
1151H24OBA
Special Functions
Setting Value
0
1
2
3
:
:
98
99
58
3. User’s Choice
Making the User’s Choice Mode Settings
1
Keep pressing the Panel Reset Key
for about 3 seconds.
* U is shown on the Zoom Ratio
Indicator.
4
Press the Clear Key.
*This clears the current setting (shown
on the Multi-Copy Display) of that
particular choice code.
Panel Reset
1
2
3
4
5
6
7
8
9
0
C
1139O4782A
1139O4782A
Zoom Ratio Indicator
Multi-Copy Display
Chapter 4
Using the Key Pad, enter the desired
Choice Code number.
*The Choice Code number is shown
on the Zoom Raito Indicator.
2
3
4
5
6
7
8
0
5
Special Functions
1139O3870A
1139O3870A
1
2
3
9
4
5
6
C
7
8
0
Multi-Copy Display
Zoom Ratio Indicator
1139O3880A
1139O3870A
1139O3880A
NOTE
If you have pressed an incorrect
number, press the Clear Key, then
enter the correct number.
3
1139O3870A
6
7
1139O2360A
Multi-Copy Display
1139O3870A
1139O3880A
1139O3870A
1139O3880A
9
1139O4870A
C
1139O4870A
Multi-Copy Display
1139O3890A
1139O3890A
Press the Start Key.
*This enters the new setting.
Useful Tip
Repeat steps 2 to 6 to make new
settings for other User’s Choices.
Press the Start Key.
*This enters the choice code selection
and the current setting of the choice
code is shown on the Multi-Copy
Display.
Zoom Ratio Indicator
1139O3860A
Press the appropriate Key Pad or
Pads to enter the new setting.
*The Multi-Copy Display shows the
new setting.
1139O4860A
Zoom Ratio Indicator
1139O3860A
1139O3870A
1139O3870A
1139O3860A
1
Multi-Copy Display
Zoom Ratio Indicator
1139O3860A
1139O3850A
1139O3850A
2
1139O2620A
Press the Panel Reset Key.
*This allows the copier to leave the
User’s Choice Mode, and the control
panel shows the initial settings
again.
59
Chapter 5
When an Indicator Lights Up
(Replenishing Supplies, Clearing Misfeeds,
and Correcting a Closure Failure)
This chapter explains about the details of the various warning indications given on the
control panel, including those that entail inhibition of the initiation of a copy cycle. It also
shows action to be taken for each case.
When an Indicator Lights Up
When the Add Paper Indicator Lights Up p. 60
When the Add Toner Indicator Lights Up p. 63
When the Add Staple Indicator Lights Up p. 64
When the Closure Failure Indicator Lights Up p. 66
When the Misfeed Indicator Lights Up
• Misfeed Indicator and Monitor Display p. 68
• Misfeed Clearing Procedures
: Copier p. 69
: Paper Feed Cabinet p. 72
: Duplex Unit p. 73
: Duplexing Document Feeder p. 74
: Automatic Document Feeder p. 75
: Sorter/Staple Sorter p. 76
6.
When the Call-Tech.-Rep. Indicator Lights Up p. 77
7.
When the I. U. Service Life Indicator Lights Up p. 78
8. Quick Reference for Other Indicators p. 84
Chapter 5
1.
2.
3.
4.
5.
60
1.
When the Add Paper Indicator Lights Up
When the Drawer currently selected for use has run out of
paper, the Add Paper Indicator lights up. At this time, you
cannot start any new copy cycle.
Fan the paper thoroughly.
Auto
Auto
Photo
Lighter
Darker
Auto / Photo
A3
B4
A4
FLS.
A4
Inch
A5
Paper
A
front side
1139O1370A
1151O071DA
1151O071DA
Example: 1st Drawer has run out of
paper.
Use the following procedure to load paper into the
Drawer.
Adding Paper
NOTE
1st Drawer
When an Indicator Lights Up
Chapter 5
1
The paper should be
loaded no higher than
the ▼ (Max. Level
Indicator) on the Edge
Guide.
Slide out the 1st Drawer and press
down the Paper Lifting Plate.
4
1139O0400A
2
Slide the Edge Guide and Trailing
Edge Stop up against the paper.
Gently slide the Drawer back in.
Slide out the Edge Guide and Trailing
Edge Stop.
1039O0420A
NOTE
1139O0390A
3
Load the paper stack into the Drawer
so that its front side faces down.
Make sure that the paper stack rests
under the two catches of the Drawer.
1139O0410A
When loading Inch Size paper into
the Drawer, flip the Marketing Area
Switch, located in the rear left corner
of the Drawer to "Inch".
61
1.
2nd Drawer
1
When the Add Paper Indicator Lights Up
3rd/4th Drawer (PF-204)
Slide out the 2nd Drawer and press
down the Paper Lifting Plate until it is
locked into position.
1
Slide the drawer out of the copier.
1139O0460A
2
Load the paper stack into the Drawer
so that its front side faces down. Make
sure that the paper stack rests under
the two catches of the Drawer.
2
Load the paper stack into the Drawer
so that its front side faces down.
NOTE
The paper should
be loaded no higher
than the ▼ (Max.
Level Indicator) on
the Edge Guide.
Max.
1145O555KA
The paper should be
loaded no higher
than the ▼ (Max.
Level Indicator) on
the Edge Guide.
1145O555KA
1039O0450A
3
Gently slide the Drawer back in.
3
Slide the Drawer back in.
When an Indicator Lights Up
NOTE
1039O0430A
Chapter 5
1139O1340A
62
1.
When the Add Paper Indicator Lights Up
3rd Drawer (PF-104)
1
Press the Paper Descent Key. This
releases the 3rd Drawer, allowing you
to slide it out of the copier.
3
Load another paper stack in the
left-hand half of the Drawer, front
side face down. At this time, press the
trailing edge of the paper stack tightly
up against the left edge of the Drawer.
1139O1552A
1151O112AA
Indication of the Paper Descent Key
1136O146AA
When an Indicator Lights Up
Chapter 5
1136O145AA
2
Steady : The 3rd Drawer has run out
Light
of paper when a drawer other
than the 3rd is currently
selected for use.
Blinking: The 3rd Drawer has run out
of paper when the 3rd
Light
Drawer is currently selected
for use.
Load the paper stack into the
right-hand half of the Drawer, front
side face down. At this time, press the
leading edge of the paper stack tightly
up against the right edge of the Drawer.
NOTE
The paper should be
loaded no higher than
the ▼ (Max. Level
Indicator).
4
Gently slide the Drawer back in and
press the Paper Descent Key.
1139O1542A
1139O1532A
NOTE
The paper should be
loaded no higher
than the ▼ (Max.
Level Indicator).
63
2.
When the Add Toner Indicator Lights Up
The Add Toner Indicator lights up when toner
in the Toner Bottle is running out.
0.5~2.0
Auto
Auto
Photo
Darker
uto / Photo
Auto
A4
A3
B4
A3
A3
B4
Full Size
A4
FLS.
B4
A4
A4
Inch
A3
A4
A5
Full Size
Paper
A
You can still make copies, but the image
density will become lighter and lighter. It is
recommended, therefore, that you replace the
Toner Bottle with a new one as soon as
possible.
1151O072DA
1151O072DA
NOTE
Replacing the Toner Bottle
Be careful, some toner may puff out from
the bottle.
5
Ensuring that the arrow ( ) on the
Toner Bottle is facing toward you,
insert the Bottle into position.
1139O1380A
3
1139O1420A
NOTE
Shake a new Toner Bottle well.
Insert the Bottle all the way into the
copier until the
marking on the
Bottle is aligned with the
marking
on the Toner Bottle Holder.
6
1139O1410A
4
With the Seal on the Toner Bottle
facing up, slowly peel off the Seal as
illustrated.
Swing the Toner Bottle Holder closed
and close the Front Door.
NOTE
• Use ONLY the specified toner for this
copier. Using any other toner could
result in image trouble.
Auxiliary Toner Replenisher Mode
Use the Auxiliary Toner Replenisher
Mode if the image is light immediately
after the Toner Bottle has been replaced
with a new one. ➭ p. 51
1139O1420A
1139O1390A
Chapter 5
2
Swing open the Toner Bottle Holder
and pull out the Toner Bottle.
When an Indicator Lights Up
1
Open the Front Door.
64
3.
When the Add Staple Indicator Lights Up
When the staples will soon run out, the Add
Staple Indicator lights up.
0.5~2.0
Auto
Auto
Photo
Darker
/ Photo
A4
A3
B4
Auto
A3
A3
B4
Full Size
A4
FLS.
B4
A4
A4
Inch
A3
A4
A5
Full Size
Replace the Staple Cartridge with a new one by
following the procedure given below.
Paper
A
1151O073DA
1151O073DA
Replacing the Staple Cartridge
1
Press the Lock Release Lever of the
Staple Sorter and slide it away from
the copier.
1139O1350A
NOTE
Check that no portion of the staple belt
hangs out of the Cartridge. Break off
any portion of the belt that hangs out of
the Cartridge.
When an Indicator Lights Up
Chapter 5
1139O0490A
2
Open the Stapler Door.
3
While lifting the Lever upward, pull
the Staple Cartridge out of its port.
5
Insert the new Staple Cartridge until it
clicks into position.
1139O2190A
1139O1440A
4
Pull the staple belt about 1" out of the
new Staple Cartridge and break off that
portion.
1139O0970A
6
Close the Stapler Door and slide the
Staple Sorter back against the copier.
65
3.
Place a sheet of paper into the 1st Bin
of the Staple Sorter.
1139O1320A
the Add Staple Indicator lights up.
Removing the Staple Cartridge before
then will result in stapling trouble.
• Immediately after the new Staple
Cartridge has been loaded, be sure to
follow steps 7 to 9.
• Do not turn the green gear near the
Cartridge inside the Stapler Unit.
Press the Manual Staple Key.
* The copier automatically test-staples
the paper 2 to 3 times.
Meter
Count
Toner
Auto
Size
Margin
Manual
Staple
Sort
Sort &
Staple
Drum
Dehumidify
9
• Replace the Staple Cartridge only after
Mixed Orig. De
1
2
1 1
1 2
1
Cover
1139O2512A
Remove the sheet of paper from the 1st
Bin and check that staples have been
driven into it.
1151O111AA
* If no staples are evident, place
another sheet of paper into the 1st
Bin and repeat steps 7, 8 and 9.
Chapter 5
8
NOTES
When an Indicator Lights Up
7
When the Add Staple Indicator Lights Up
66
4.
When the Closure Failure Indicator Lights Up
Full Size
A4
The Closure Failure Indicator lights up if a
copier door or cover is left open, or an option
is not attached properly. At this time, the
Monitor Display shows the location of the
closure failure. You can no longer start a new
B4
copy cycle.
FL
B4
A4
A4
Inc
A3
A4
A5
0.5~2.0
Auto
Photo
Lighter
Darker
Auto / Photo
Auto
A4
A3
B4
A3
A3
Full Size
A
Paper
Correct the closure failure by following the
procedure given below.
1151O074DA
Monitor Display
Check Location
Check that the Front Door is closed.
1139O0570A
1151O063AA
When an Indicator Lights Up
Chapter 5
Check the Automatic/Duplexing Document Feeder.
1139O0600A
1139O4000A
1151O028AA
Check that the Right Door is closed.
1139O3230A
1139O2100A
67
4.
Monitor Display
When the Closure Failure Indicator Lights Up
Check Location
Check that the Left Door is closed.
1139O4010A
Check that the Lower Right Door is closed.
1139O4020A
Check that the Duplex Unit is locked into position.
1139O4040A
Check that the Sorter or Staple Sorter is in position.
1139O4050A
When an Indicator Lights Up
1139O4030A
Chapter 5
Check that the Lower Left Door is closed.
68
5.
When the Misfeed Indicator Lights Up
0.5~2.0
Auto
Photo
Lighter
Darker
Auto / Photo
Auto
If a paper misfeed occurs during a copy cycle,
that copy cycle stops. At this time, the Misfeed
Indicator lights up, the Monitor Display shows
the location and you cannot start any new copy
cycle.
A4
A3
B4
A3
A3
B4
Full Size
A4
FL
B4
A4
A4
Inc
A3
A4
A5
Full Size
Paper
A
1151O075DA
Misfeed Indicator and Monitor Display
Check the Monitor Display for the location of the misfeed and clear the misfed sheet of paper
according to the procedure given for each location.
When an Indicator Lights Up
Chapter 5
Copier ➭ p. 69
1139O4120A
Paper Feed Cabinet ➭ p. 72
1139O4130A
Duplex Unit ➭ p. 73
1139O4100A
1139O4080A
Automatic/Duplexing Document Feeder
➭ p. 74
Sorter/Staple Sorter ➭ p. 76
1139O4090A
1139O4110A
There is a misfeed at that location where the red indicator ( ● ) is blinking. There might be a
sheet of paper stopped at that location where the red indicator ( ● ) lights up.
69
5.
When the Misfeed Indicator Lights Up
Misfeed Clearing Procedures
Copier (Fusing/Transport Section)
NOTE
Be careful not to touch the areas
marked with
High Voltage and
Caution: HOT with bare hands.
1151O113AA
2
Holding up the Fusing Unit, pull out
the sheet of paper in the direction of
the arrow.
3
Remove any sheet of paper from the
Transport Section.
4
Slightly lift up the Upper Half of the
copier and unlock Stopper M2 .
Gently swing down and lock the Upper
Half of the copier. Then, close the Front
Door.
Chapter 5
Open the Front Door. Turn the Lock
Release Lever counterclockwise to
unlock and swing up the Upper Half of
the copier. Then lock Stopper M2 .
1151O144AB
CAUTION : HOT
The Fusing Unit and its surrounding
areas may be extremely hot. DO NOT
touch any part except the Fusing Unit
Handle (yellow).
When an Indicator Lights Up
1
70
5.
When the Misfeed Indicator Lights Up
Copier (Paper Take-Up Section)
1
4
Open the Front Door. Turn the Lock
Release Lever counterclockwise to
unlock and swing up the Upper Half of
the copier.Then lock Stopper M2 .
Slightly lift up the Upper Half of the
copier and unlock Stopper M2 .
Gently swing down and lock the Upper
Half of the copier. Then, close the
Front Door.
1151O114AB
1151O113AA
When an Indicator Lights Up
Chapter 5
2
Open the Right Door and pull out the
sheet of paper from the Multi Bypass
Port.
5
Slide out the Drawer and unload the
paper from the Drawer. Next, push
down the Paper Lifting Plate.
6
Fan the paper and reload it.
1139O2140A
3
Pull out the sheet of paper from the
Paper Take-Up Section and close the
Right Door.
NOTE
1139O2150A
Make sure that the paper stack rests
under the two catches of the Drawer.
7
Gently slide the Drawer back in.
71
5.
When the Misfeed Indicator Lights Up
Copier (Multi Bypass Section)
1
Unload the stack of paper from the
Multi Bypass Tray.
4
Slightly lift up the Upper Half of the
copier and unlock Stopper M2 .
Gently swing down and lock the Upper
Half of the copier. Then, close the
Front Door.
1139O2160A
1151O114AB
5
Fan the paper thoroughly. Reload the
paper stack onto the Multi Bypass Tray.
1151O113AA
1139O2090A
3
Remove any sheet of paper from the
Transport Section.
1139O0670A
Chapter 5
Open the Front Door. Turn the Lock
Release Lever counterclockwise to
unlock and swing up the Upper Half of
the copier.Then lock Stopper M2 .
When an Indicator Lights Up
2
72
5.
When the Misfeed Indicator Lights Up
Paper Feed Cabinet (PF-104)
When an Indicator Lights Up
Chapter 5
Paper Feed Cabinet (PF-204)
1
Open the Lower Right Door and pull
out the sheet of paper.
1
Open the Lower Right Door and pull
out the sheet of paper.
2
Close the Lower Right Door.
2
Close the Lower Right Door.
3
Slide the Drawer out of the copier.
3
Press the Paper Descent Key. This
releases the Drawer, allowing you to
slide it out of the copier.
1139O0640A
4
Unload the paper from the Drawer.
1139O1552A
4
Unload the paper from the Drawer. Fan
the paper thoroughly and reload it.
5
Slide the Drawer back in and press the
Paper Descent Key.
1151O101CA
5
Fan the paper thoroughly and reload it.
1151O106CA
6
Slide the Drawer back in.
1139O1542A
73
5.
When the Misfeed Indicator Lights Up
Duplex Unit
1
Open the Front Door. Turn the Lock
Release Lever counterclockwise to
unlock and swing up the Upper Half of
the copier. Then lock Stopper M2 .
5
Close the Lower Right Door.
6
Slightly lift up the Upper Half of the
copier and unlock Stopper M2 .
Gently swing down and lock the Upper
Half of the copier. Then, close the
Front Door.
7
Slide out the Duplex Unit and open
Misfeed Removal Guide Plate D . Pull
out the sheet of paper from the Duplex
Unit.
8
Securely close Misfeed Removal
Guide Plate D and slide the Duplex
Unit back into the copier.
9
Open and close the Front Door to reset
the Misfeed Indicator on the control
panel.
1151O113AA
3
Close the Left Door and Lower Left
Door.
4
Open the Lower Right Door and pull
out the sheet of paper from the
Transport Section.
Chapter 5
Open the Left Door and Lower Left
Door. Pull out the sheet of paper from
the Transport Section.
When an Indicator Lights Up
2
74
5.
When the Misfeed Indicator Lights Up
Duplexing Document Feeder
1
Remove the original stack from the
Document Feed Tray.
5
Raise the Duplexing Document Feeder.
Opening the Document Turnover/Feed
Unit Guide Plate, gently pull out the
original from the Unit.
1151O097AA
2
Swing open Document Feed Unit Door
F1 and gently pull out the original.
1151O033AA
6
Remove the original from the Original
Glass and lower the Duplexing
Document Feeder.
7
Return the number of originals
indicated on the Display at the back of
the original stack removed in step 1
and reload it onto the Document Feed
Tray.
Example
: Return two
originals.
When an Indicator Lights Up
Chapter 5
1151O031AA
3
Holding down the Lock Release Key,
swing open Document
Turnover/Exit Unit Door F2 and
carefully pull out the original from the
Exit Unit.
1151O032AA
4
Close F1 and F2.
1151O098AA
75
5.
When the Misfeed Indicator Lights Up
Automatic Document Feeder
1
Remove the original stack from the
Document Feed Tray.
6
Remove the original from the Original
Glass and lower the Automatic
Document Feeder.
7
Return the number of originals
indicated on the Display at the back of
the original stack removed in step 1
and reload it onto the Document Feed
Tray.
Example
: Return two
originals.
1151O097AA
2
Swing open Document Feed Unit Door
F1 , and gently pull out the original.
Close F1 .
4
Carefully pull out the original from the
Document Exit Unit.
1151O034AA
5
Raise the Automatic Document Feeder.
Opening the Document Feed Unit
Guide Plate, gently pull out the
original from the Unit.
1151O033AA
1151O098AA
When an Indicator Lights Up
3
Chapter 5
1151O031AA
76
5.
When the Misfeed Indicator Lights Up
When an Indicator Lights Up
Chapter 5
Sorter/Staple Sorter
1
Holding the Lock Release Lever, slide
the Sorter/Staple Sorter away from the
copier.
2
Pull out the copy from the Transport
Section.
3
Slide the Sorter/Staple Sorter back to
the copier.
77
6.
When the Call-Tech.-Rep. Indicator Lights Up
0.5~2.0
Auto
Photo
Lighter
Darker
Auto / Photo
Auto
A4
A3
B4
A3
A3
Full Size
A4
B4
A4
A4
A3
A4
A5
Full Size
A
Paper
When a malfunction occurs in the copier, the
Call-Tech.-Rep. Indicator lights up and the
corresponding malfunction code appears across
the Zoom Ratio Indicator and Multi-Copy
Display. At this time, the Start Key turns to
orange and you cannot start a new copy cycle.
Try to clear the Call-Tech.-Rep. Indicator by
following the instructions below.
1151O076DA
Resetting the Call-Tech.-Rep. Indicator
Open the Front Door, then close it.
This will reset the Call-Tech.-Rep.
Indicator.
NOTES
• When calling your Technical
Representative, give him or her the
malfunction code shown across the
Zoom Ratio Indicator and Multi-Copy
Display.
<Example> Malfunction Code: C0010
1151O066AA
1151O066AA
NOTE
Carry out this procedure with the
Power Switch turned ON.
◆If the Call-Tech.-Rep. Indicator lights up
again, call your Technical Representative
immediately.
• After calling your Technical
Representative, turn OFF the Power
Switch and unplug the power cord.
Chapter 5
0.5~2.0
When an Indicator Lights up
1
78
7.
When the I. U. Service Life Indicator Light Up
When time is about to come when the Imaging Unit needs
replacement, the I. U. Service Life Indicator starts blinking
to prompt you to replace it with a new one.
Replace the Imaging Unit by following the procedure given
below.
0.5~2.0
Auto
Auto
A4
A3
B4
A3
A3
B4
Full Size
A4
FLS.
B4
A4
A4
Inch
A4
A5
A3
1151O100DA
1151O100DA
When 2,500 more copies are made with Add Toner Indicator lighting up, or 7,500 more copies are
made, after the I. U. Service Life Indicator has started blinking, the I. U. Service Life Indicator lights
up steadily and the copier inhibits the initiation of a new copy cycle. See the diagram below.
1139O5301A
Add Toner
Indicator lights up
After 2.500
Vopies
Whichever occurs first
1139O5301A
1139O5300A
No new copy cycle
Blinking
5.000 cpoies made
can be initiated
When an Indicator Lights Up
Chapter 5
Useful Tip
Replace the Imaging Unit as soon as possible once the I. U. Service Life Indicator has started
blinking.
Precautions for Handling
• Do
not leave the I. U. in a bright place.
1139O6032A
• Do
not store th I. U. in a hot place of
40°C (104°F) or more.
1139O6042A
• Do
not store the I. U. in a humid place or
subject to water splash.
1139O6052A
• Do
not store the I. U. upside down or titled.
Do not subject the I. U. to vibration.
1139O6062A
79
7.
Remove the I. U. from copier
1
When the I. U. Service Life Indicator Lights Up
Unpacking / Setting up the I. U.
Open the Front Door. Turn the Lock
Release Lever counterclockwise to
unlock and swing up the Upper Half
ofthe copier. Then lock Stopper M2 .
1
Peel off the piece of tape and open the
Carton Box.
Take the Starter Bottle out from the
Carton Box.
Take the I. U. with its bag out of the
Carton Box.
Starter Bottle
1151O113AA
2
Turn the I. U. Lock Release Lever and,
while holding it down, pull the I. U.
halfway out from the copier.
I. U.
1139O0250A
3
Firmly grasp the I. U. with both hands
and pull it all the way out of the copier.
2
Take the I. U. out of the bag.
4445U002AA
1139O0510A
3
Peel off the three pieces of tape and
packing materials.
4445U003AA
When an Indicator Lights Up
Chapter 5
4445U001AA
80
7.
When the I. U. Service Life Indicator Lights Up
4
Carefully pull the polyester tape from
the I. U..
8
Be sure to push the I. U. into the
locked position until a click is heard.
Then, check to see the position of Lock
Release Lever, as shown in the
illustration.
4445U011AA
5
Remove the Cap from the I. U. and
re-fit it to the used I. U. as shown in
the illustration.
4445U005AA
NOTE
An improperly installed I. U. could be a
cause of copier malfunction.
When an Indicator Lights Up
Chapter 5
4445U004AA
6
Align the I. U. with the Rails in the
copier.
9
Slightly lift up the Upper Half of
thecopier and unlock Stopper M2 .
Gently swing down and lock the Upper
Half of the copier. Then, close the
Front Door.
1151O144AB
4488O001AA
7
Slide the I. U. all the way into the
copier.
1139O0540A
81
7.
When the I. U. Service Life Indicator Light Up
Charging the Copier with Starter and Toner
1
Swing out the Bottle Holder.
4
Align the
markings on the Starter
Bottle with the upper side of the Bottle
Holder and slide the Bottle into
position.
4445U006AA
2
Hold the Starter Bottle so that its tab is
on the upper side, shake it well.
4445U008AA
NOTE
3
5
Then, swing in the Bottle Holder until
it locks into position.
Close the Front Door.
6
Plug the Power Cord into the Wall
Outlet and turn ON the Power Switch.
This with cause the wait indicator to be
shown on the control panel.
Peel off the tape from the Starter
Bottle.
4445U007A
1139O6012A
When an Indicator Lights Up
1139O1410A
Chapter 5
Insert the Bottle all the way into the
copier until the marking on the Bottle
is aligned with the marking on the
Bottle Holder.
82
7.
7
When the I. U. Service Life Indicator Lights Up
The copier automatically start the
charging cycle for approximately
5 minutes.
8
During this cycles, do not open the
Front Door.
During this cycle, six segments of the
ones digit LED on the Magnification
Ratio Indicator forming a "0" light up
and go out one after another,
indicating that the copier is being
charged with starter.
When the copier has been completely
charged with Starter, the indication on
the Magnification Ratio Indicator
changes to "100" and the cycle stops.
If "E1" or "E2" is indicated on the
Magnification Ratio Indicator, the tape
has not been removed from the Starter
Bottle. Swing down the Front Door
and remove the tape and perform the
starter charging procedure again.
If "E1" or "E2" is indicated again call
your Technical Representative.
1139O012AA
Swing down the Front Door, swing out
the Bottle Holder, and remove the
Starter Bottle.
When an Indicator Lights Up
Chapter 5
9
4445U009AA
10
1151O099DA
1151O099DA
Hold the Toner Bottle so that its tab is
on the upper side, shake it well, and
peel off the tape.
Once the tape has been removed, hold
the Bottle so that its Toner Port faces
up.
83
7.
11
When the I. U. Service Life Indicator Lights Up
Align the
markings on the Toner
Bottle with the upper side of the Bottle
Holder and slide the Bottle into
position.
1139O1420A
NOTE
Insert the Bottle all the way into the
copier until the marking on the Bottle
is aligned with the marking on the
Bottle Holder.
Chapter 5
Then, swing in the Bottle Holder until
it locks into position and close the
Front Door.
1139O1400A
When an Indicator Lights Up
12
84
8. Quick Reference for Other Indicators
Indicator
Copier State
Action
Wait until the Wait Indicator goes
The copier is warming up.
out and the Start Key turns green.
A copy cycle cannot be initiated
while the Wait Indicator remains lit.
Wait Indicator
1139O3260A
Remove Copies Indicator
There is a copy or copies left in the Remove the copy or copies from
Sorter Bin(s).
the Sorter Bin(s).
1139O3400A
Paper Size Display
S
Auto
A3
B4
A4
B5
A4
FLS.
A5
Inch
No Drawers contain paper of the
Load the right size paper into a
right size to run a copy cycle in the Drawer or select the appropriate
Auto Paper mode.
copy paper.
1139O0262A
1139O0262A
The zoom ratio calculated based on Cancel the Auto Size mode and
select the appropriate zoom ratio.
the original size and copy paper
size is outside the range between
×0.500 and ×2.000 to run a copy
cycle in the Auto Size mode.
Chapter 5
Zoom Ratio Display
Auto
A4
A3
B4
A3
When an Indicator Lights Up
Full Size
1139O5452A
1139O5452A
Multi-Copy Display
You have entered 51 or more for
If you press the Start Key, the
the number of copies to be made in copier starts the copy cycle to
a 2-sided copying cycle.
make only 50 copies.
1139O4990A
85
Chapter 6
Troubleshooting
This chapter gives you instructions on how to troubleshoot copier malfunctions.
Troubleshooting
Chapter 6
1. When this Type of Copy is Produced p. 86
• The image is too light
• The image is too dark
• The copy is blurry
• The copy has dark specks or spots
• The edge of the copy is dirty
• The image on the copy is not aligned properly
• The copy has lines
2. The Copier is not functioning as designed p. 88
• The Control Panel shows nothing
• No copies are fed out when the Start Key is pressed
• Control Panel Keys do not respond
• The Copier is not activated when the Power Switch is turned ON
86
1. When This Type of Copy is Produced
Symptom
Possible Cause
The image is too light.
Change the setting of the User’s
Choice (Exposure Priority).
➭ p. 54
Cancel the Auto Exposure Mode
and select the Manual Exposure
Mode to adjust the exposure level
to obtain a darker image.
➭ p . 34
The manual exposure level is set
Press the Exposure Control Key as
on the lighter side.
necessary to obtain a darker image.
➭ p. 34
You have been making copies from The copier needs more toner.
a photo or an original with a large Replenish toner by using the Toner
Replenisher Function. ➭ p. 51
dark area.
The Toner has just been
The copier needs more toner.
replenished.
Replenish toner by using the Toner
Replenisher Function . ➭ p. 51
The Add Toner Indicator is lit up
Replace the Toner Bottle with a
on the Control Panel.
new one. ➭ p. 63
The paper is damp.
Replace the paper. ➭ p. 60
Change the setting of the User’s
The exposure level for the Auto
Exposure Mode is set at one of the Choice (Exposure Priority).
"Dark" levels.
➭ p. 54
Cancel the Auto Exposure Mode
and select the Manual Exposure
Mode to adjust the exposure level
to obtain a lighter image.
➭ p. 34
The exposure level for the Auto
Exposure Mode is set at one of the
"Light" levels.
1074O108
The image is too dark.
1074O109
The manual exposure level is set
on the darker side.
The entire surface of the Original
Glass is dirty.
Chapter 6
Troubleshooting
Action
The copy is blurry.
1074O110
Press the Exposure Control Key as
necessary to obtain a lighter image.
➭ p. 34
Wipe the Original Glass clean with
a soft dry cloth. ➭ p. 94
The original is not held tightly
against the Original Glass.
Place the original in position so
that it is held tightly against the
Original Glass.
The paper is damp.
Replace the paper.
87
1. When This Type of Copy is Produced
Symptom
Possible Cause
The copy has dark specks or spots.
The Original Glass is dirty.
Action
Wipe the Original Glass clean with
a soft dry cloth. ➭ p. 94
The edge of the copy is dirty.
1074O112
The image on the copy is not
aligned properly.
The original is not placed in the
correct position.
The originals may not be suitable
for use in the Document Feeder.
Place the original correctly on the
Original Glass. ➭ p. 22
Or, load it onto the Document
Feeder correctly along the
Document Guide Plates. ➭ p. 25
Raise the Document Feeder and
place the originals on the Original
Glass one at a time. ➭ p. 22
1074O113
The copy has lines.
The Corona Units are dirty.
Using the Corona Unit Cleaning
Levers, clean the Corona Units.
➭ p. 95
Troubleshooting
1074O111
Wipe the Original Pad or
Document Feed Belt clean with a
soft cloth dampened with mild
detergent. ➭ pp. 94, 95
The original is very thin or highly Place a blank sheet of paper over
transparent.
the original. ➭ p. 22
Set the copier into the Manual
The information on the back side
Exposure Mode and make the
of a two-sided, thin original may
be slightly reproduced on the copy. exposure level lighter. ➭ p. 34
The Original Pad or Document
Wipe the Original Pad or
Feed Belt is dirty.
Document Feed Belt clean with a
soft cloth dampened with mild
detergent. ➭ pp. 94, 95
Select the same copy paper size as
You have selected a paper size
the original. ➭ p. 30
larger than the original.
(Zoom Ratio is set at full size
Or, use the Auto Size Mode to
100%.)
enlarge the copy to the appropriate
size. ➭ p. 32
Select the paper drawer that is
The original is not placed in the
correct position. (Zoom Ratio is set loaded in the same direction as the
original. ➭ p. 30
at full size 100%.)
Or, reload the paper in the same
direction as the original.
The reduction ratio selected is not Select the zoom ratio according to
in accord with the copy paper size. the copy paper size. ➭ p. 32
(When doing manual reduction
Or, use the Auto Size Mode to
copying.)
reduce the copy to the appropriate
size. ➭ p. 32
Chapter 6
The Original Pad or Document
Feed Belt is dirty.
88
2. The Copier is not functioning as designed
Symptom
The Control Panel shows nothing.
Check for:
Is only the Start Key lit up green?
Action
The copier is in the Energy Saver
Mode.
Press any key on the Control Panel
to cancel the Energy Saver Mode.
➭ p. 17
The copier is in the Auto Shut OFF Turn the Power Switch ON.
Mode. ➭ p. 16
No copies are fed out when the
Start Key is pressed.
The Wait Indicator is lit up.
The copier was just turned ON and
is warming up. Please wait.
The Warning Indicator is lit up.
Check the Control Panel and take
action according to the particular
Indicator. ➭ p. 59
Control Panel Keys do not respond. The Interrupt Key LED is lit up.
Interrupt
The copier is in the interrupt mode.
Press the Interrupt Key to cancel
the interrupt mode. ➭ p. 16
1139O2602A
The copier is not activated when
the Power Switch is turned ON.
The power cord is left unplugged
from the power outlet.
Plug the power cord into the power
outlet.
The room circuit breaker is open.
Close the room circuit breaker.
* If these procedures do not correct the problem, turn OFF the Power Switch, unplug the power cord
Troubleshooting
Chapter 6
from the power outlet and contact your Technical Representative.
89
Chapter 7
Miscellaneous
This chapter gives complete specifications of the copier system and options,
plus care and reference information to facilitate your use of the copier.
Miscellaneous
Chapter 7
1. Specifications p. 90
• Copier
• Duplexing Document Feeder
• Automatic Document Feeder
• Sorter
• Staple Sorter
• Paper Feed Cabinet
• Duplex Unit
2. Care of the Copier p. 94
• Cleaning
3. Function Combination Matrix p. 96
4. Description of Copy Paper Size and Zoom Ratio Table p. 98
5. Index p. 99
90
1. Specifications
Copier EP2010
Type
Platen Type
Photoconductor
Copying System
Developing System
Fusing System
Types of Original
Kinds of Paper
Copy Paper Size
Paper Feeding System
Warm-up Time
First Copy
Miscellaneous
Chapter 7
Copy Speed
(Approx.
copies/minute)
Magnification Ratios
Multiple Copies
Exposure Control
Lost Image
Power Requirements
Power Consumption
Dimensions
Weight
Desk Top Copier
Stationary
OPC
Electrostatic Dry Powdered Image Transfer to Plain Paper
Micro-Toning System
Lamp-Heated Roller
Sheets, Books, and other three-dimensional objects
Maximum Original Size
: A3 Lengthwise
Maximum Original Weight : 3kg.
Plain paper ( 60g/m2 to 90g/m 2 )
Recycled paper
Special paper (Multi Bypass Tray only)
Thick paper ( 90g/m2 to 157g/m2 ), Transparencies, Translucent paper
First Drawer
A3L, B4L, A4L, A4C, B5C, A5L, FoolscapL(203×330mm, 216×330mm,
210 ×330mm)
(When the Marketing Area Switch is flipped to "Inch")
11" ✕17"L, LegalL (8-1/2"✕14"), LetterL, 8-1/4"✕13"L, 8"✕13"L,
8-1/2" ✕13"L, 5-1/2"✕8-1/2"L
2nd Drawer
A3L, B4L, A4L, A4C, A5L, FoolscapL
254mm ✕203mmC, 203mm✕330mmL, 210mm✕280mmL, 216mm×297mmL,
297mm ✕216mmC, 216mm✕320mmL, 220mm✕280mmL, 297mm✕430mmL,
210mm ✕330mmL
Multi Bypass Tray
Crosswise
: 100mm to 297mm
Lengthwise
: 140mm to 432mm
First Drawer
: 250 sheets
2nd Drawer
: 250 sheets
Multi Bypass Tray
:
50 sheets ( 21-1/4 lbs .)
:
20 sheets ( Recycled paper or Special Paper )
30 seconds or less
A4C = 7.2 seconds or less
(in Full Size Mode using First Copier Drawer)
Full size (×1.000)
A3L : 12 B4L : 13 A4L : 16 A4C : 21
Fixed ratios
Full size: 1:1 ±0.005
Reduction ratios: ×0.500, ×0.707, ×0.816
Enlargement ratios: ×1.154, ×1.414, ×2.000
Zoom ratios: From ×0.500 to ×2.000 in ×0.001 increments
Up to 99 copies (count-down system)
Auto Exposure Mode, Manual Exposure Mode and Photo Mode
1-sided copy in the full size mode
Leading edge: 3 mm (approx. 1/8")
Trailing edge: 3 mm (approx. 1/8")
Front edge : 1 mm (approx. 1/25")
AC 110V, 115V, 120V, 127V, 200V-240V; 50/60Hz
1.3 kW (Max.)
Width
: 650mm (Excluding Copy Tray)
Depth
: 633mm
Height
: 480mm (Including Original Cover)
57.5 kg (Excluding Copy Tray, Starter, Toner, Copy Paper)
91
1. Specifications
Duplexing Document Feeder AFR-12
Document Feeding
System
Standard Mode : 1-sided original, 2-sided original, 2-in-1, Single Feeding
Mixed Original Detection Mode:
1-sided Mixed Original Detection
2-sided Mixed Original Detection
Lightweight Original Mode
Kinds of Original
Original Weight
Plain paper
1-sided original Mode, 2-in-1 Mode
2-sided original Mode
: 50g/m2 to 110g/m 2
: 60g/m2 to 90g/m2.
Single Feeding Mode
: 35g/m2 to 200g/m 2.
Lightweight Original Mode
: 40g/m2 to 110g/m 2
Original Size
1-sided/2-sided original Mode: A3L, B4L, A4L, A4C, A5L, 210mm×330mm
2-in-1 Mode
: A4C
Capacity of Document
Feed Tray
Copy Productivity
First Copy with ADF
Power Source
Power Consumption
A4 or Smaller
: 50 sheets (80g/m 2 )
A3, B4
: 30 sheets (80g/m 2 )
100%
A4C = 11 seconds or less
DC24V supplied from copier
48W or less
Dimensions
Weight
Width: 610mm
13 kg
Depth: 505mm
Height: 125mm
Automatic Document Feeder AF-5
Original Weight
Mixed original Detection Mode
Original Size
Single Feeding Mode
: 35g/m2 to 200g/m 2
Lightweight Original Mode
: 40g/m2 to 110g/m 2
1-sided original Mode: A3L, B4L, A4L, A4C, A5L, 210mm×330mm
2-in-1 Mode
Capacity of Document
Feed Tray
Copy Productivity
: 60g/m2 to 90g/m2
: A4C
A4 or Smaller
A3, B4
100%
11
: 50 sheets (80g/m 2 )
: 30 sheets (80g/m 2 )
First Copy with ADF
A4C =
Power Source
Power Consumption
DC24V supplied from copier
48W or less
seconds or less
Dimensions
Weight
Width: 587mm
12 kg
Depth: 505mm
Height: 125mm
Chapter 7
Kinds of Original
Standard Mode : 1-sided original, 2-in-1, Single Feeding
Mixed Original Detection Mode: 1-sided Mixed Original Detection
Lightweight Original Mode
Plain paper
1-sided original Mode, 2-in-1 Mode
: 50g/m2 to 110g/m 2
Miscellaneous
Document Feeding
System
92
1. Specifications
Sorter S-106
No. of Bins
Modes
Kinds of Paper
Paper Size
Capacity of Bins
Power Source
Power Consumption
Dimensions
Weight
Sort Bins : 10
Non-Sort Mode, Sort Mode, Group Mode
Non-Sort Mode
• Plain paper, Recycled paper
• Special Paper
T
Thick paper, Transparencies, Translucent paper
Sort Mode, Group Mode
• Plain paper, Recycled paper
Non-Sort Mode, Sort Mode, Group Mode : A5L to A3L
Non-Sort Mode
• Plain paper, Recycled paper
1st bin
: 50 sheets
2nd to 10th bin
: 25 sheets / bin
• Special Paper
1st bin only
: 10 sheets / bin
Sort Mode, Group Mode
• Plain paper, Recycled paper
1st to 10th bin
: 25 sheets / bin
DC24V supplied from copier
72W or less
Width : 400mm
Depth : 562m
Height :
15.8 kg
404mm
Staple Sorter ST-104
Miscellaneous
Chapter 7
No. of Bins
Modes
Kinds of Paper
Paper Size
Capacity of Bins
Power Source
Power Consumption
Dimensions
Weight
Accessories
Sort Bins : 10
Non-Sort Mode, Sort Mode, Group Mode, Sort-Staple Mode
Non-Sort Mode
• Plain paper, Recycled paper
• Special Paper
T Thick paper, Transparencies, Translucent paper
Sort Mode, Group Mode, Sort-Staple Mode
• Plain paper, Recycled paper
Non-Sort Mode, Sort Mode, Group Mode : A5L to A3L
Sort-Staple Mode : A4L to A3L
Non-Sort Mode
• Plain paper, Recycled paper
1st bin
: 50 sheets
2nd to 10th bin
: 25 sheets / bin
• Special Paper
1st bin only
: 10 sheets / bin
Sort Mode, Group Mode, Sort-Staple Mode
• Plain paper, Recycled paper
1st to 10th bin
: 25 sheets / bin
DC24V supplied from copier
72W or less
Width : 400mm
Depth : 562mm
Height :
18.1 kg
Staple Cartridge, 5,000 staples / cartridge ✕ 1 piece
404mm
93
1. Specifications
Paper Feed Cabinet PF-204
Kinds of Paper
Copy Paper Size
Paper Feeding System
Power Source
Dimensions
Weight
Plain paper, Recycled paper : Weighing 60g/m 2 to 90g/m 2
3rd Drawer : A5L to A3L
4th Drawer : 210mm×280mmL to A3L
Automatic feeding from drawer
Total Drawer Capacity : 1,000 sheets (500sheets ✕ 2)
DC24V supplied from copier
Width : 610mm
Depth : 595mm
Height :
35.2 kg
472mm
Paper Feed Cabinet PF-104
Kinds of Paper
Copy Paper Size
Paper Feeding System
Power Source
Dimensions
Weight
Plain paper, Recycled paper : Weighing 60 g/m 2 to 90g/m 2
3rd Drawer : A4C
Automatic feeding from drawer
Drawer Capacity : 2,500 sheets (80g/m 2 )
DC24V supplied from copier
Width : 610mm
Depth : 595mm
Height :
36.5 kg
472mm
Paper Feed Cabinet PF-4D
Kinds of Paper
Copy Paper Size
Multiple Copies
Power Source
Dimensions
Weight
Plain paper, Recycled paper : Weighing 60g/m 2 to 90g/m 2
A5L to A3L
2-Sided Copies : 50 sheets
DC24V supplied from copier
Width : 610mm
Depth : 595mm
Height :
39.7 kg
472mm
Capacity
Power Source
Weight
Dimensions
Plain paper, Recycled paper : Weighing 60g/m2 to 90g/m 2
Size : A5L to A3L
Up to 50 sheets (60g/m2 to 90g/m2 )
Up to 20 sheets (90g/m2 to 157g/m 2 )
DC24V supplied from copier
14.2 kg
Stored in the Paper Feed Cabinet
Miscellaneous
Kinds of paper
Chapter 7
Duplex Unit AD-8
94
2. Care of the Copier
Cleaning
(Turn OFF the Power Switch of the copier when cleaning.)
Original Glass
Housing
Wipe the surface of the Housing clean
with a soft cloth dampened with mild
home detergent.
Wipe the surface of the Original Glass
clean with a soft, dry cloth.
1139O1820A
Control Panel
Front Door
Wipe the surface of the Control Panel
clean with a soft, dry cloth.
1139O1850A
NOTE
Chapter 7
NEVER use a glass cleaner or any
other detergent to avoid damage to the
control panel keys and Display.
Miscellaneous
1139O1840A
Original Pad
Wipe the surface of the Original Pad
clean with a soft cloth dampened with
mild home detergent
1139O1830A
Wipe the inside of the Front Door
clean with a soft cloth.
1139O1860A
95
2. Care of the Copier
Corona Units
1
Document Transport Belt
Gently slide out the Corona Unit
Cleaning Lever (Upper) as far as it
goes.
1
1139O1910A
1139O1870A
2
Gently slide the Cleaning Lever back
into the original position.
2
Gently slide out the Corona Unit
Cleaning Lever (Lower) as far as it
goes.
Hold the Document Transport Belt at
both edges and pull it to the left to
expose a fresh surface.
1151O1920A
1139O1880A
3
Wipe the surface of the Document
Transport Belt clean with a soft cloth
dampened with mild home detergent.
3
Wipe the fresh surface clean with a
soft cloth dampened with mild home
detergent.
4
Gently slide the Cleaning Lever back
into the original position.
Repeat steps 1 to 4 two to three times.
1139O1900A
Miscellaneous
1139O1890A
Chapter 7
Repeat these steps until the entire
surface of the Belt is wiped clean.
●
1
FinishNon-Sort
ing
Manual Exposure
● ● O O O O O O O O O O O O O O O O O O O O
O O O ●
● O O O O O O O O O O O O O O O O O O O O
O O O ● ●
O O O O O O O O O O O O O O O O O O O O
● ●l O O O O O O O O O O O X O O O O ●
Auto Size
Zoom
Ratio Full Size(100%)
Reduc., Enlg.
O X O O O O ● O
Margin
O O O O O O O O ● ●
l
● O O O O O O O O O O O O O O
O O O O O O O O O O O O O O
O O O O O O O O O O O O O
K X ● X ●l X X ● ● ● ● ●
● ●
l ● ● ● ● ● ● ● ● ● ● ● X
● ● ● ● ● ● ● ● ● ● ●
L
● ● ● ● ● O O O ● X
A
● ●
l O O O O O O O O O O O O O
1[2 in 1]
● ●
l O O O O O ● ● ● ● ● O O O ● ● ●
2[2 in 1]
● ●
l O O O O O ● ● ● ● ● O X O ● ● ● ●
● ●
l O O O O O O O O O O O O O ●
l
● ● ● ● O O O O O
● ●
l O O O O O O O O O O O O O ● ●
▼
▼ ▼ ▼ ▼ ▼
●l ● O O O O O O O O O O O O O O
2
1
2
Book
2
Sort
Finishing Sort-Staple
Group
Cover
● ● ● O O O O X
● ● O O O O ●
B
AB
B
● O O O ● ●
AB
O M O ● X
AH
l ● O X
●
DE
● O X
EJI
O X
DE
● ●
l O O O O ● O ● O O O O X O ● ● ● ● ●
O O ● O O O O O O O O O O X O O O O O O O
l
O M ● O O O O O O O O O O X O O O O O O M ●
O O ● O O O O O O O O O O X O O O O O O O ●
l ●
O X O O O O O O O O O O O O O X O O O X X O O O
Multi Bypass
●
BCJG
O X O O O O ● l ●
l O O O O O O X O X O X X ● ● ● X
*SADF Mode
O ● O O O O O O O O O O O O O O ●
l ● ● ● ● O O O ● O
BC
Manual Staple
O O X O O O O O O O O O O X O O O O O O O O O O O X
E
* SADF Mode
O
A-M
●
●l ● ● O O O O O O O O X O O O O X
O O O O O O O O ●
● ● ● ● ● ●
l ● ● ● ● ● ● ●
Job Program
X
O O O O O O O O O O O O O O O O O ●
l
O O O O O O O O O O O O
Interrupt
Functions
to be set
Last
Only
O O O O O O ●
O O O O O O O O ● ●
l ●
Zoom
Chapter 7
O O O
O X O O O O
Manual Paper
Miscellaneous
O O O O O O O O O O O O O O O O O O ● ●l ● O O
Paper Auto Paper
Size
1
Finishing
O O O O ● O ● O O O O O O ● ● ● ● ● ● O M O ● X
O O
Image Auto Exposure
Den- Photo Mode
sity
1
Orig. 2
2
▼
Copy 1
Copy
Non-Sort
Auto Exposure
Photo Mode
Manual Exposure
Auto Paper
Manual Paper Sel.
Auto Size
Full Size(100%)
Reduc., Enlg.
Zoom
Margin
Interrupt
Job Program
1
2
2
1
2
2
1
1[2 in 1]
1
2[2 in 1]
Book
2
Sort
Sort-Staple
Group
Cover
Multi Bypass
Remarks
1
1
▼
Book
Orig.
● O O O O O O O O O O O O O ● ● ● ● ● ● O O O O O
1
▼
▼
Copy
Book
▼
Orig. 1
▼
Function Set Last
Zoom
Ratio
▼ ▼ ▼ ▼ ▼
1
Orig.
Fin▼ ish- Image Paper
Copy ing Density Size
▼
Function Set First
▼
96
3. Function Combination Matrix
: Single Automatic Document Feeding Mode.
: The functions can be combined.
: The functions can be combined conditionally. ( See the conditions given below. )
: The functions cannot be combined. ( The function set first takes precedence. )
: The functions cannot be combined. ( The function set last takes precedence. )
97
3. Function Combination Matrix
Combinations for Combined Functions
•1
2
2[2 in1]
• Book
• Book
▼ ▼
•1
▼ ▼
▼
A to F : The settings can be made only when the copier is equipped with the following options.
A : Duplex Unit
B : Duplexing Document Feeder
C : Automatic Document Feeder
D : 10-Bin Sorter
E : Staple Sorter
G : The Cover mode cannot be selected when any of the following settings has been made for
Org. Copy. If any of them is selected after the Cover Mode has been selected, it cancels the
Cover Mode.
1
2
▼
▼
▼
▼
H : You cannot select Book 1 if you have previously loaded an original into the Automatic/
Duplexing Document Feeder.
If you load an original into the Automatic/Duplexing Document Feeder after you have selected
Book 1, the copier cancels Book 1 and selects 1 1.
I : The Sort-and-Staple mode can be used only when you load two or more originals into the
Automatic/Duplexing Document Feeder.
▼
▼
J : The Cover mode can be used only when the Automatic/Duplexing Document Feeder and Multi
Bypass Tray are used.
▼
▼
K : The Interrupt mode takes precedence. The Interrupt mode cannot be used if 1 2, 2 2,
1 2[2in1], or Book 2 has been set in the copy-job program previously called up.
Chapter 7
M : Book 1 or Book 2 can be combined with the Sort-and-Staple mode, but no stapling action
takes place. (The copier performs only book copying and sorting of copies, but not stapling. )
Miscellaneous
▼
▼
L : A zoom ratio or a copy-job program set in the Interrupt mode cannot be stored in memory.
98
4. Description of Paper Size and Zoom Ratio Table
Paper Size
Name
Size (Metric)
Size (Inch)
A3
B4
A4
297 mm × 420 mm
257 mm × 364 mm
210 mm × 297 mm
11-3/4" × 16-1/2"
10" × 14-1/4"
8-1/4" × 11-3/4"
B5
A5
182 mm × 257 mm
148 mm × 210 mm
7-1/4" × 10"
5-3/4" × 8-1/4"
B6
A6
POST CARD
128 mm × 182 mm
105 mm × 148 mm
100 mm × 148 mm
5" × 7-1/4"
4-1/4" × 5-3/4"
4" × 5-3/4"
Name
Size (Inch)
11" × 17"
Size (Metric)
279 mm × 432 mm
11" × 14"
COMPUTER
10" × 14"
11" × 14"
10-1/8" × 14"
10" × 14"
279 mm × 356 mm
257 mm × 356 mm
254 mm × 356 mm
9-1/4" × 14"
LEGAL
FOOLSCAP
GOVERNMENT LEGAL
9-1/4" × 14"
8-1/2" × 14"
8-1/2" × 13"
236 mm × 356 mm
216 mm × 356 mm
216 mm × 330 mm
FOLIO
8" × 13"
8-2/3" × 13"
8-1/4" × 13"
203 mm × 330 mm
220 mm × 330 mm
210 mm × 330 mm
8-1/4" × 11-3/4"
LETTER
8-1/4" × 11-3/4"
8-1/2" × 11"
210 mm × 301 mm
216 mm × 279 mm
GOVERNMENT LETTER
QUARTO
STATEMENT
INVOICE
8" × 10-1/2"
8" × 10"
5-1/2" × 8-1/2"
203 mm × 267 mm
203 mm × 254 mm
140 mm × 216 mm
LEDGER
FOOLSCAP
FOOLSCAP
FOOLSCAP
Zoom Ratio Table (Original Size to Copy Paper Size)
Metric Areas
Original Size
A3
297 × 420 mm
11-3/4" ×16-1/2"
A4
210 × 297 mm
8-1/4" × 11-3/4"
Miscellaneous
A5
148 × 210 mm
5-3/4" × 8-1/4"
A6
105 × 148 mm
4-1/4" × 5-3/4"
B4
Chapter 7
257 × 364 mm
10" × 14-1/4"
B5
182 × 257 mm
7-1/4" × 10"
B6
128 × 182 mm
5" × 7-1/4"
Inch Areas
Copy Paper Size
A4
A5
Zoom Ratio
×0.707
×0.500
B4
B5
A5
×0.866
×0.610
×0.707
A6
B5
B6
×0.500
×0.866
×0.610
A3
B4
A6
×1.414
×1.224
×0.707
B6
A4
A3
×0.866
×1.414
×2.000
B4
B5
A4
×1.733
×1.224
×2.000
A5
B5
B6
×1.414
×1.733
×1.224
A4
A5
B5
×0.816
×0.577
×0.707
B6
A3
A5
×0.500
×1.154
×0.816
A6
B6
×0.577
×0.707
A3
A4
B4
×1.640
×1.154
×1.414
A6
A4
A5
×0.816
×1.640
×1.154
B4
B5
×2.000
×1.414
Original Size
Copy Paper Size
11" × 14"
Legal
Zoom Ratio
×0.823
×0.772
Foolscap
Letter
Invoice
×0.764
×0.647
×0.500
11" × 14"
Legal
Foolscap
×0.933
×0.772
×0.772
Letter
Invoice
Legal
×0.733
×0.500
×0.772
Foolscap
Letter
Invoice
×0.772
×0.772
×0.500
Foolscap
Letter
Invoice
×0.928
×0.785
×0.607
11" × 17"
Letter
Invoice
×1.214
×0.846
×0.647
11" × 17"
11" × 14"
Invoice
×1.294
×1.076
×0.647
8-1/2" × 11"
215.9 × 279.4 mm
11" × 17"
11" × 14"
×1.294
×1.272
Invoice
11" × 17"
11" × 14"
×2.000
×1.647
Legal
Foolscap
Letter
×1.545
×1.529
×1.294
11" × 17"
279.4 × 431.8 mm
11" × 15"
279.4 × 381 mm
11" × 14"
279.4 × 355.6 mm
Legal
8-1/2" × 14"
215.9 × 355.6 mm
Foolscap
8-1/2" × 13"
215.9 × 330.2 mm
Letter
5-1/2" × 8-1/2"
139.7 × 215.9 mm
Zoom Ratio = Copy Paper Size ÷ Original Size
1" (inch) = 25.4 mm
1 mm = 0.0394" (inch)
99
▼ ▼▼ ▼▼ ▼
5. Index
1-sided 1-sided P.36
1-sided 1-sided(2in1) P.37
1-sided 2-sided P.36
1-sided 2-sided(2in1) P.37
2-sided 1-sided P.36
2-sided 2-sided P.37
2-sided Size Counter P.50
2-sided Total Counter P.50
A
Basic Panel P.12
Book 1-sided P.37
Book 2-sided P.37
D
Call-Tech.-Rep.Indicator P.77
Care of the Copier P.94
Cleaning P.94
Clear Key P.12
Closure Failure Indicator P.66
Control Panel P.12
Copy Paper Size P.30
Corona Unit Cleaning Lever P.9
Cover Mode P.47
Default Auto Exposure Level P.54
Default Exposure Mode/Level P.54
Default Finishing Mode P.55
Description of Copy Paper Size P.98
Display Panel P.14
Drum Dehumidifier Function P.51
Chapter 8
C
Miscellaneous
▼▼
B
Add Paper Indicator P.60
Add Staple Indicator P.64
Add Toner Indicator P.63
AP/AS/Manual Priority P.54
Auto Copy Start Function P.16
Auto Drawer Switching P.31
Auto Dual Function P.45
Auto Exposure Mode P.34
Auto Panel Reset for Plug-In Counter P.56
Auto Panel Reset Function P.16
Auto Panel Reset ON/OFF p.56
Auto Paper Mode P.30
Auto Shut OFF Function P.16
Auto Shut OFF Timing P.57
Auto Size Mode P.32
100
5. Index
E
F
G
I
Group Mode P.41
Image Density P.34
Initial Mode P.15
Interrupt Mode P.16
I. U. Service Life Indicator P.78
Job Memory P.17
L
Lightweight Original P. 52
Manual Bypass Copying P.28
Manual Exposure Mode P.34
Manual Staple Mode P.41
Meter Count P.50
Misfeed Clearing Procedures P.69
Misfeedf Indicator PP.14,68
Mixed Original Detection Mode P.25
Mixed Original Detection P.52
N
Non-Sort Mode P.40
O
Original
Copy Type P.36
Panel Reset Key P.16
Panel Resetting P.16
Paper Source Indicator P.14
Photo Mode P.35
Placing Originals P.22
Power Switch P.8
Priority Orig. Copy Type P.55
Priority Paper Size/Source P.53
▼
P
▼
Miscellaneous
File Margin Mode P.46
File Margin P.53
Finishing Mode P.40
Fixed Zoom Ratio P.32
Function Combination Matrix P.96
J
M
Chapter 8
Energy Saver Mode P.17
Energy Saver ON Timing P.56
R
Remove Copies Indicator P.84
101
5. Index
Toner Replenisher Function P.51
Total Counter P.50
Turning ON and OFF P.15
U
User’s Choice P.52
W
Wait Indicator PP.14,15,84
Z
Zoom Ratio P.33
Zoom Ratio Table P.98
Miscellaneous
T
Single Automatic Document Feeding Mode P.26
Size Counter P.50
Sort Mode P.40
Sort/Non-Sort Auto Switching ON/OFF P.57
Sort-and-Staple Mode P.40
Special Paper Setting P.31
Special Paper Setting P.57
Start Key P.12
Stop Key P.12
System Overview P.6
Chapter 8
S