1
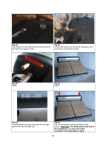
ENGLISH
Remote auxiliary Air conditioning and air
distribution systems for volvo l-5 chassis
INSTALLATION GUIDELINES
For Volvo Truck Models VN 770, 780, 830, 880
Dometic Corporation
Rev. 20090220
L-2485
WARNING:
Only trained technicians should perform these checks and tests. These units contain voltage
of 12VDC, 24VDC, 115VAC and/or 230VAC. Some of these voltages can be lethal. These units
also contain refrigerant under high pressure. Refrigerant circuits should only be accessed by
licensed technicians.
COPYRIGHT © 2009 Dometic Corporation, Environmental Division, All Rights Reserved.
No part of this publication may be reproduced, translated, stored in a retrieval system, or transmitted in any form or by any means electronic, mechanical, photocopying,
recording or otherwise without prior written consent by Dometic Corporation, Environmental Division. Every precaution has been taken in the preparation of this
manual to insure its accuracy. However, Dometic Corporation, Environmental Division assumes no responsibility for errors and omission. Neither is any liability
assumed for damages resulting from the use of this product and information contained herein.
Volvo L-5 Chassis Installation Guidelines
Contents
INTRODUCTION
4
LOCATING THE COMPONENTS
5
INSTALLING THE CONTROL/DISPLAY PANEL
6
INSTALLING THE RETURN AIR VENT
7–8
INSTALLING THE SUPPLY AIR DISTRIBUTION
9–11
INSTALLING THE CHEB
TESTING THE INSTALLATION
3
10–12
13
ENGLISH
Volvo L-5 Chassis Installation Guidelines
INTRODUCTION
This document contains supplemental guidelines for installing the Qt-series control and air distribution for the Dometic
auxiliary air conditioning system for Volvo L-5 truck chassis. It is intended to be used in conjunction with the standard
installation manual, which covers all other aspects of installing, testing and operating this system.
The instructions that follow represent years of development of parts and procedures to not only make the system
perform well, but to also look “factory installed.”
Do not attempt to install any components until you read and understand the instruction in both manuals.
ENGLISH
4
Volvo L-5 Chassis Installation Guidelines
LOCATING THE COMPONENTS
The Dometic remote auxiliary air conditioning system
consists of two basic components: an outside
condenser/fan unit (CF), which contains the condenser
and an exhaust fan, and an inside unit, which contains
the compressor, heater, evaporator and blower (CHEB).
The two units are connected by pre-charged refrigerant
lines with quick-connect fittings.
Determine where best to install the CHEB (Fig. 1).
Refer to the manual that came with the CHEB for more
information. Keep in mind that the driver’s side luggage
box is probably one of the most used storage areas.
Consider the passenger-side luggage box, then the
center storage area, and lastly the driver’s side box. Use
the CHEB template to determine the best place to mount
the unit.
The Dometic CF may be installed either under or behind
the sleeper (Figs. 2a-2b). If you plan to install on a
truck that has full fairings, and the generator is installed
under the fairings, it is recommended that the CF be
mounted on the rear of the truck. For rear cab mounting,
order Part 710035048 which contains the proper blind
threaded fasteners.
Figure 1 – CHEB installed in luggage compartment
IMPORTANT!
Refer to the Dometic installation manual for details
on installing and connecting the CHEB and CF.
Figure 2a – CF mounted under truck
Figure 2b – CF mounted on back of sleeper
5
ENGLISH
Volvo L-5 Chassis Installation Guidelines
INSTALLING THE CONTROL
Installing the Qt Control/Display Panel
Mount the control in such a location as to give the driver
good access. The suggested location would be near the
current HVAC controls (Fig. 3). Route the interconnect
cable (CXP) through the wall and into the luggage
compartment. Remove the factory HVAC control panel to
do this. Route the CXP cable to the rear of the bunk for
later connection.
Installing the Power Logic Box
The Power Logic Box (PLB) will be mounted in the
driver's side compartment, on the interior bunk wall
(Fig. 4a). To accomplish this, you will have to drill holes
through the bunk wall to match the holes in the PLB
mounting plate. Use four #10 machine screws with
locking nuts to secure the box (Fig. 4b).
Figure 3 – Qt Control/Display panel mounted
Replacing the TSEP
The TSEP (Temperature Sensor) that is pre-installed
near the air intake of the CHEB is too short (5') for this
model truck. There is a longer cable (10') supplied in the
kit. Replace the TSEP5 with the new TSEP10. Run this
sensor cable to the PLB you just installed and plug it into
the plug marked TSEP.
Routing Cables
The box has a couple of different types of cables:
• Wires enclosed in split loom
• Flexible power cables
• Phone-type cables
Figure 4a – PLB mounted under the bunk
The "wires in split loom" will go toward the CHEB unit.
The flexible power cord(s) will go toward the power
distribution panel. The phone cable mounted on the
CHEB unit plugs into the hole marked "TSEP". The
phone cable from the Qt Control/Display plugs into the
hole marked "Display".
We suggest directing the cables in the direction you wish
them to go before mounting the box. All cables should
be neatly routed and clipped, to prevent chaffing.
IMPORTANT!
Refer to the Dometic installation manual for details
on routing and connecting cables from the Qt
Control/Display panel to the PLB and CHEB.
ENGLISH
Figure 4b – Fastener locations on PLB
6
Volvo L-5 Chassis Installation Guidelines
INSTALLING THE RETURN AIR VENT
The return air vent supplied should be installed under
the bunk in the side panel, either on the passenger's
or driver's side. The passenger's side is suggested, as
there is less of a chance that it will get blocked by something in the luggage compartment. To install, locate the
area shown (Fig. 5).
The grille will just fit between the panel supports on the
backside of the kick panel. Locate the supports and cut
out for the grille (Figs. 6-8). Dometic recommends using
a hole saw and reciprocating saw to cut out the hole. If
you have been given the 12.5” x 5.5” grilles instead of
the one large grille, use a 4” hole saw to cut at least two
holes behind each grille. Use of the reciprocating saw is
optional for those grilles.
Remember, good air flow from the return air grille
to the CHEB evaporator coil is critical for your air
conditioning system to perform correctly. Do not
allow anything to block this air flow.
Figure 6 – Location for cutting return air vent
Return air vent
Figure 7 – Return air vent hole cut
Figure 5 – Return air vent location
Figure 8 – Return air grille flange installed
7
ENGLISH
Volvo L-5 Chassis Installation Guidelines
INSTALLING THE SUPPLY AIR DISTRIBUTION
For this installation, you will need to install a custom
air plenum, as well as use the Volvo ductwork. A 4"
duct will feed the Volvo ductwork, and a 6" (for the 14K
system) or 4" (for the 10K system) will feed the custom
air plenum.
Star screw
Volvo Ductwork
To feed the Volvo ductwork, you will have to remove the
passenger's side window footwell and a section of the
duct, as shown (Figs. 9 and 10). The duct is secured
from the top by “star” screws (Fig. 10). Below, there is
a sensor which must be removed (Fig. 11). Remove the
duct from the truck, and cut a 4" hole into it as shown
(Fig. 12).
Find the V4 RND BLACK 4" grille. Use two cable ties to
secure the vanes so that they will not turn. Use a piece
of the weather stripping supplied under the lip of the
grille, so that once installed, no air will leak. Install the
grille from the inside of the duct, with the vanes pointing
upward. Push the duct and grille back into the hole
from which it came. Have someone operating from the
outside of the truck reach into the luggage compartment
and push the length of the 4" duct and one hose clamp
over the grille. Push the duct over the grille until the grille
is tight against the duct, then tighten the clamp. Replace
the duct and tighten the screws.
Figure 10 – Star screws
Window footwell
Figure 11 – Sensor removed
Figure 9 – Remove window footwell
Figure 12 – 4" hole cut into duct
ENGLISH
8
Volvo L-5 Chassis Installation Guidelines
Custom Air Distribution Plenum
First, find the metal custom plenum and the passenger's
side window footwell. Find the four V4 RND BLACK
grilles. Line the grilles up on the window footwell and
mark the holes for cutting. Use a 4” hole saw to cut the
holes (Fig. 13).
Trim carpet cover
Custom plenum
Find the four (or three for a 7,000 or 10,000 BTU/hr
system) round black grilles, part number 717650005.
Surface for grilles
Preparing to Mount the Footwell and Air Plenum
Before mounting the footwell back into the truck, first cut
out for the duct to extend below the bunk surface. Use
a 1/8" bit to drill the locator holes from under the bunk.
Go to the passenger's side luggage door and look up to
the rear corner of the bunk. Find the metal support that
holds the bunk and drill right at the edge of the side of
the truck towards the rear. Use the supplied template to
cut the holes.
Figure 13 – Grilles lined up for hole cutting
(Full size template supplied. See insert.)
Reinstalling the Footwell
Weather stripping
Gently insert the duct into the hole. Direct it down-ward,
while pushing the footwell toward the window. Once it
is all the way down, put the top flange of the footwell
behind the window fascia. Fasten the foot-well to the wall
and floor.
Installing the Plenum on the Front of the CHEB
Using a 1/4" nut driver, remove the plastic 7" oval hose
adaptor. Find the 4" x 6" (or 4" x 4") distribution plenum.
Install weather stripping on the contact surfaces and
place over the hole on the unit (Fig. 15). Reinstall the
screws into the new plenum.
Figure 14 – Weather stripping on plenum
Weather stripping
IMPORTANT!
Refer to the Dometic installation manual for details
in connecting ductwork to the discharge grilles.
Figure 15 – Plenum
9
ENGLISH
Volvo L-5 Chassis Installation Guidelines
INSTALLING THE CHEB
Install the CHEB on the passenger's side of the truck.
First, get out the CHEB template. Place the template
with the “edge of the unit” 1" to 1-½" from the factory
HVAC unit mounting foot. The “edge of the unit” line
with the notations for the quick connections should be
nearest the bunk wall (Fig.16). The line of the “edge of
the unit” should be approximately 5" from the bunk wall.
Mark for the two quick connect holes 3-½" off the “edge
of the unit” using the construction lines. Drill through
the rubber mat with a 2-½" hole saw (DO NOT DRILL
THROUGH THE METAL.) Then drill through the metal
with a 1-7/8" holesaw.
Bunk wall
Dometic
HVAC unit
washer from the top. Secure underneath the truck with
one large washer, and one nylok nut. Snug all bolts, to
the point where the bracket just starts to bend, then stop.
Push the condenser fan cord down through one of the
grey grommets. Then insert the refrigerant lines into their
respective grommets. Lightly lubricate one side of each
coupling with light oil or refrigerant oil. Be sure to get the
face and the threads. Hand tighten the quick connects,
making sure they thread up correctly. Tighten with the
correct wrenches (13/16", ¾", and 15/16") Tighten to
10-12 ft-lbs. If any hissing is heard during the tightening
process, DO NOT STOP TIGHTENING. It is because the
fittings are not quite in line correctly. Keep tightening, and
the hissing will stop.
Connect the TSEP (temperature sensor cord located on
CHEB) to the PLB. Connect the electrical connectors
between the CHEB and PLB (ones in the split loom.)
Route and clip to prevent chafing.
Refrigerant lines
Connect the ductwork to the CHEB, use the hose
clamps to secure. It may be tough to get the 6" duct on,
but it will go. Use only as much duct as you have to, as
extra duct will impede air flow (Fig. 17).
Factory
HVAC unit
Figure 16 – CHEB installed under bunk
Drill the drain hole with a 1-5/8" hole saw.
Drill for mounting brackets for the CHEB, these
suggestions work well:
• One inboard on the CHEB at the corner nearest the
rear of the truck
• One on the front, outboard
• One on the outboard near the air distribution plenum
• One on the front of the CHEB, inboard (near the
factory HVAC unit)
Use the “edge of unit” line to situate one of the mounting
brackets for hole marking. Be sure your bracket is
located in an area noted by “xxxxx”, which gives locations
available for mounting.
Install the watertight grommets (grey) into the two 1-7/8"
holes. Push in until they lock in the hole.
Insert the CHEB unit into the truck. Make sure that the
drain fitting is lined up with the hole. Install the brackets
by using one ¼"-20 x 2-½" bolt (provided) and one small
ENGLISH
Figure 17 – Ductwork conected to the CHEB
Install the 3/8” drain fitting into the bottom of the CHEB
from the under side of the truck, finger tighten. Place the
hose clamp over the end of the P-trap. Push the end of
the P-trap over the drain fitting, and tighten clamp.
Installing the Condenser
The Dometic condenser may be installed either under
or behind the sleeper. These installations (and the parts
in the kit) are for an installation underneath the sleeper.
10
Volvo L-5 Chassis Installation Guidelines
If you plan on mounting the generator and/or generator
radiator underneath the sleeper fairings, we recommend
mount the HVAC condenser on the rear of the sleeper.
Three refrigerant lines will pass over the exhaust pipe,
then over top of the condenser mounting plate, and
then back around to the quick connects. Connect the
quick connects in the manner described previously.
Secure the refrigerant lines as shown, with one cushion
clamp on the mounting plate side extension, and one
on the opposite side to prevent movement and chafing
(Fig. 20). Use cable ties to secure the refrigerant lines
to each other and to the condenser power cable. After
connecting the condenser power cable, secure power
cord in such a manner that the connections are pulled in
a linear fashion, not to the side.
Install the heat shield as shown, using two 6" hose
clamps (Figs. 21-23).
Rear of truck
Screws
Cab support
First, mount the condenser to the mounting plate
provided (Fig 18). The quick connects should be on the
end of the mounting plate with the side extension (Fig.
19).Use the nylok nuts provided and snug all bolts. This
mounting plate is specially designed to fit under the
Volvo L-5 chassis. It mounts midline of the truck, just
behind the transmission and in front of the exhaust pipe.
The “fingers” of the plate fit up under a cab support. The
rear flange slips over another support. Mount with the
four SS self-tapping screws provided.
Routing the Refrigerant Lines and Condenser Power
Cable
Cushion
clamp
Figure 18 – Condenser mounted on mounting plate
Figure 20 – R
efrigerant lines secured with cushion
clamp to prevent chafing on mounting side
Refrigerant
lines
Heat shield
Hose clamp
Figure 19 – Quick connects on end of mounting plate
with side extension
Exhaust split
Figure 21 – Heat shield installed
11
ENGLISH
Volvo L-5 Chassis Installation Guidelines
Cushion
clamp
Heat shield
Figure 22 – Cushion clamps securing refrigerant lines
from movement and chafing
Figure 23 – 6" hose clamps securing heat shield
ENGLISH
12
Volvo L-5 Chassis Installation Guidelines
TESTING THE INSTALLATION
Supply power to the power distribution panel with either
shorepower or generator power. Look at the display
panel, and confirm that the display is lit up. Press the
FAN button to activate the fan in manual mode. Check for
airflow from all vents. Next, press the HEAT button, and
run the SETpoint up sufficiently for the unit to come on
in heat mode. The HEATING LED should illuminate. The
air should start warming up. To confirm heating quicker.
Next, check the cooling mode. Press the COOL button,
then run the SETpoint down sufficiently for the unit to
come on in the cool mode. The COOLING LED should
illuminate. The air should start cooling down soon.
Check to make sure the condenser fan is running. If it is
cool, it may take a few minutes for the condenser fan to
come on. This is normal. Shut down the unit by pressing
OFF. You are now finished with the installation.
13
ENGLISH
Volvo L-5 Chassis Installation Guidelines
HOLE FOR 6" DUCT FOR 14K UNIT
3.50"
Cut with 4.0"
hole saw
Ø
"
00
4.
Cut with receiprocating saw
ENGLISH
14
Volvo L-5 Chassis Installation Guidelines
HOLE FOR 4" DUCT FOR 10K UNIT
2.00"
Cut with 3.5"
hole saw
Ø
"
50
3.
Cut with receiprocating saw
15
ENGLISH
Dometic Corporation, Environmental Division
P.O. Box 15299 I Richmond, VA 23227 USA
804-746-1313 I Fax 804-746-7248
www.dometictruck.com I [email protected]
UNITED STATES & CANADA SERVICE ONLY
Weekdays 8:00 am to 5:00 pm (Eastern Time) 804-746-1313
All other times 888-440-4494
ISO 9001:2000
L–2485
Rev. 20090220
For all other areas visit our website to find your nearest distributor.