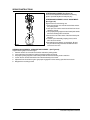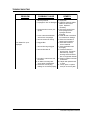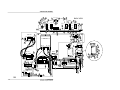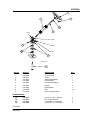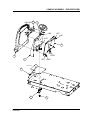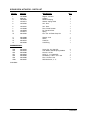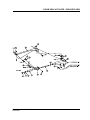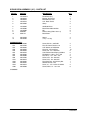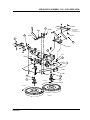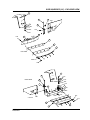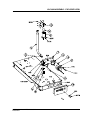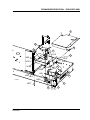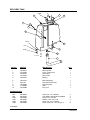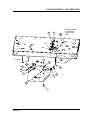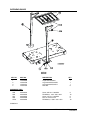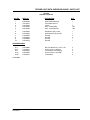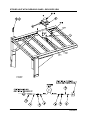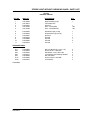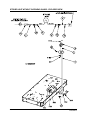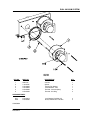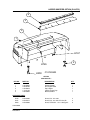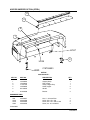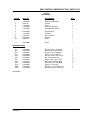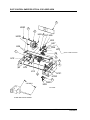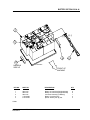
1
E
AMERICAN-LINCOLN
TECHNOLOGY
Operator's
Manual
ENCORE R
SCRUBBER
Beginning with Serial No. 178575
READ THIS BOOK!
This book has important information for the use and safe operation of this machine. Failure to read this book
prior to operating or attempting any service or maintenance procedure to your machine could result in injury
to you or to other personnel; damage to the machine or to other property could occur as well. You must have
training in the operation of this machine before using it. If you or your operator (s) cannot read English, have
this manual fully explained before attempting to operate this machine.
Si Ud. O sus operadores no pueden leer el Ingés, se hagen explicar este manual completamente antes de
tratar el manejo o servicio de esta máquina.
All directions given in this book are as seen from the operator's position at the rear of the machine.
For new books, write to: Alto U.S., Inc.,1100 Haskins Road, Bowling Green, Ohio 43402.
Part No. 2-86-00207
022800.
1998 American-Lincoln Technology®
ISO 9001
UL
®
#
FILE A2287
Printed in the U.S.A
TABLE OF CONTENTS
Chapter 1 (INSTRUCTIONS)
Specifications ....................................................................................................................................... 1-4
Safety Precautions ............................................................................................................................... 1-6
Machine Preparation ............................................................................................................................ 1-8
Machine Controls ................................................................................................................................. 1-9
Solution Control Knob ...................................................................................................................... 1-9
Battery Condition Meter .................................................................................................................... 1-9
Horn Button ...................................................................................................................................... 1-9
Light Switch (Option) ........................................................................................................................ 1-9
Squeegee Blade Switch ................................................................................................................... 1-10
High Recovery Light ......................................................................................................................... 1-10
Low Solution Light ............................................................................................................................ 1-10
Key Switch ....................................................................................................................................... 1-10
Scrub Brush Switch .......................................................................................................................... 1-11
ESP Option ...................................................................................................................................... 1-11
Hour Meter ....................................................................................................................................... 1-11
Pre Sweep Option ............................................................................................................................ 1-12
Brake ............................................................................................................................................... 1-12
Accelerator & Directional Control Pedal ........................................................................................... 1-13
Operating Instructions ......................................................................................................................... 1-14
Seat Adjustment ............................................................................................................................... 1-14
Pre-Start Checklist ........................................................................................................................... 1-14
Fill Solution Tank .............................................................................................................................. 1-14
To Start Machine .............................................................................................................................. 1-14
Post Start Checklist .......................................................................................................................... 1-14
To Transport Machine ...................................................................................................................... 1-14
To Begin The Cleaning Operation ................................................................................................... 1-15
To Stop The Cleaning Operation ...................................................................................................... 1-15
Post Operation Checklist .................................................................................................................. 1-16
To Drain Recovery Tank ................................................................................................................... 1-16
Helpful Hints For Cleaning ................................................................................................................... 1-17
Service Chart ........................................................................................................................................ 1-18
Service Instructions ............................................................................................................................. 1-20
Scrub Deck-Splash Skirt/Side Squeegee Adjustment ...................................................................... 1-20
Replacing Scrub Brushes ................................................................................................................. 1-20
Replacing Pads On A Pad Driver ..................................................................................................... 1-20
Maintenance For The Rear Squeegee ............................................................................................. 1-20
Squeegee Wheel Adjustment ........................................................................................................... 1-21
Squeegee Blade Replacement ......................................................................................................... 1-21
Squeegee Angle Adjustment ............................................................................................................ 1-21
Parking Brake Adjustment ................................................................................................................ 1-22
Setting The Reverse Delay Adjustment ............................................................................................ 1-22
Foot Pedal Neutral Adjustment ........................................................................................................ 1-22
Steering Adjustment-Pivot Adjustment ............................................................................................. 1-22
Steering Adjustment-Sprocket Adjustment ....................................................................................... 1-23
Solution Feed Hoses ........................................................................................................................ 1-23
Sweeper Option-Drive Belt Adjustments .......................................................................................... 1-24
Battery Removal ............................................................................................................................... 1-24
Battery Charging Instructions ........................................................................................................... 1-24
Trouble Shooting .................................................................................................................................. 1-26
AMERICAN LINCOLN TECHNOLOGY
ENCORE R Operator’s Manual
1-2
TABLE OF CONTENTS
Ordering Parts ...................................................................................................................................... 1-29
Hardware Abbreviations ...................................................................................................................... 1-30
Hardware Legend ................................................................................................................................. 1-31
Machine Connection & Harness Routing ........................................................................................... 1-37
Connection Drawing ............................................................................................................................. 1-39
Electrical Schematic ............................................................................................................................. 1-40
Chapter 2 (PARTS/ASSEMBLIES)
Table of Contents ................................................................................................................................. 2-1
Frame Assembly .............................................................................................................................. 2-2
Front Wheel Drive ............................................................................................................................ 2-3
Rear Assembly ................................................................................................................................. 2-4
Steering ............................................................................................................................................ 2-5
Brake ............................................................................................................................................... 2-6
Console ............................................................................................................................................ 2-8
Scrub Deck Actuator ........................................................................................................................ 2-10
Scrub Deck Assembly ...................................................................................................................... 2-12
Brushes & Pad Drivers ..................................................................................................................... 2-16
Squeegee Lift ................................................................................................................................... 2-18
Side Squeegee ................................................................................................................................. 2-20
Rear Squeegee (34” & 38”) .............................................................................................................. 2-24
Seat Assembly ................................................................................................................................. 2-26
Vacuum Assembly ............................................................................................................................ 2-28
Forward/Reverse Pedal .................................................................................................................... 2-30
Recovery Tank ................................................................................................................................. 2-32
Solution Tank ................................................................................................................................... 2-33
Solution Control ................................................................................................................................ 2-34
Instrument Panel .............................................................................................................................. 2-36
Decals .............................................................................................................................................. 2-40
Chapter 3 (OPTIONS)
Table of Contents ................................................................................................................................. 3-1
Back-Up Alarm ................................................................................................................................. 3-2
Light Package .................................................................................................................................. 3-3
Overhead Guard .............................................................................................................................. 3-4
Strobe Light With Overhead Guard .................................................................................................. 3-5
Strobe Light Without Overhead Guard ............................................................................................. 3-7
Dual Vacuum System ....................................................................................................................... 3-9
Arm Rest Option .............................................................................................................................. 3-10
Main Broom Sweeper Option ........................................................................................................... 3-11
Broom Drive Sweeper ...................................................................................................................... 3-13
Fire Extinguisher .............................................................................................................................. 3-15
Seat Switch Kit ................................................................................................................................. 3-16
Frame & Flaps Option ...................................................................................................................... 3-17
ESP Recovery Option ...................................................................................................................... 3-19
Hopper Sweeper Option ................................................................................................................... 3-20
Dust Control Option .......................................................................................................................... 3-23
Spray Wand Option .......................................................................................................................... 3-25
Squeegee Wand Option ................................................................................................................... 3-27
Battery Options ................................................................................................................................ 3-28
Connection Drawing Sweeper Option ............................................................................................... 3-31
Spare Parts Kits 34”, 38”, & CE Kit ................................................................................................... 3-33
Index .................................................................................................................................................. 3-34
Warranty ................................................................................................................................................ 3-37
1-3
AMERICAN LINCOLN TECHNOLOGY
ENCORE R Operators’s Manual
SPECIFICATIONS
SPECIFICATION FOR THE ENCORE R 34” AND 38”
POWER SUPPLY
Encore R (34”)
Encore R (38”)
36 volt (3-12 volt batteries) 228 AH
36 volt (6-6 volt batteries) 340 AH or 370 AH
CHARGER
Encore R (34” & 38”)
36 Volt output, 115V/60Hz or 230V/50Hz Input
MOTORS, VACUUM
1 HP. (.74 kw), 3 stage, tangential discharge
MOTORS, BRUSH
1.5 hp (1.11kw)
MOTOR, DRIVE
1.5 hp (1.11kw)
WHEELS
(1) Front 12.0” (31.75 cm) (2) rear 12.0” (31.75 cm)
BRUSH SIZE
Encore R (34”)
Encore R (38”)
2-17” (43.18 cm) DIA.
2-19” (48.26 cm) DIA.
CLEANING PATH
Encore R (34 “)
Encore R (38”)
34”(86.36 cm)
38” (96.52 cm)
BRUSH SPEED
300 RPM
SOLUTION TANK
45 gallon (171 liter)
RECOVERY TANK
45 gallon (171 liter)
SPEED, TRANSPORT
5 MPH
SPEED, SCRUBBING
3.5 MPH
TURN RADIUS
56” (142.24 cm)
U-TURN AISLE WIDTH
80” (203.2 cm)
CLEANING RATE
Encore R (34”)
Encore R (38”)
37000 sq. ft/hr (3426
sq. m/hr)
42000 sq. ft/hr (3901 sq. m/hr)
GRADE CLEANING
3°
GRADE TRANSPORT
6°
LENGTH
71.5” (181.61 cm)
WIDTH
Encore R (34”) Machine
Brush Housings
Squeegee
33.5” (85 cm)
38.0” (96.52 cm)
42.0” (106.68cm)
AMERICAN LINCOLN TECHNOLOGY
ENCORE R Operator’s Manual
1-4
SPECIFICATIONS
Encore R (38”) Machine
Brush Housings
Squeegee
33.5” (85 cm)
41.0” (104.14 cm)
42.0” (106.68 cm)
HEIGHT
51” (129.54 cm)
HEIGHT W/OHG
80” (203.2 cm)
WEIGHT
Encore R (34”)
Encore R (38”)
1800 lb. (817.25 kg)
1820 lb. (826.33 kg)
WARRANTY
Machine
Polydur® tanks
Batteries
2 year
8 years
18 months, prorated
1-5
AMERICAN LINCOLN TECHNOLOGY
ENCORE R Operators’s Manual
SAFETY PRECAUTIONS
WARNINGS
THE FOLLOWING STATEMENTS ARE USED THROUGHOUT THIS MANUAL AS INDICATED IN THEIR DESCRIPTIONS
DANGER
To warn of immediate hazards which will result in severe personal injury or death.
WARNING
To warn of hazard or unsafe practices which could result in severe personal injury.
CAUTION
To warn of hazards or unsafe practices which could result in minor personal injury.
ATTENTION
To warn of unsafe practices which could result in extensive equipment damage.
NOTE
To give important information or to warn of unsafe practices which could result in equipment damage.
Read this manual carefully. The following information signals potentially dangerous
conditions to the operator or equipment. Know when these conditions can exist then,
take necessary steps to train machine operating personnel.
For the safe operation of this machine, read and understand all WARNINGS, CAUTIONS AND NOTES.
Water solutions or cleaning materials used with this type of machine can leave wet areas on the floor surface.
These areas can cause a dangerous condition for the operator or other persons. Always put CAUTION signs near the
area you are cleaning.
DO NOT put gasoline, combustible or flammable material in the solution or recovery tanks.
DO NOT operate the machine near flammable materials and vapors, it can ignite and cause an explosion. Do not
use with or near flammable materials such as: gasoline, grain dust, solvents and thinners. Only use a cleaning
concentrate recommended by the chemical manufacturer.
Improper use of heavy machinery can cause personal injury. Operate only when lids, doors, and access panels
are securely closed.
Use care when reversing machine in confined area.
Unplug the battery first to prevent possible injury when servicing a machine.
When working with the machine on its side, empty tanks, remove batteries, clear area of people and obstructions, and use additional people and proper procedures when lighting the machine.
Always empty the solution tank and recovery tank before doing maintenance.
You must have training in the operation of this machine before using it. READ THE OPERATORS MANUAL.
Do not operate this machine unless it is completely assembled.
Do not use this machine as a step or furniture.
Be careful when operating the machine on a ramp or incline. Do not operate machine on incline greater than 6°
or longer than 100’. Always move slowly on a ramp. Do not turn this machine on a ramp. Do not stop and leave this
machine on a ramp.
Always stop the machine on a level surface, put the power switch in the “O” position. Engage the parking brake.
To prevent injury, and damage to the machine, do not lift the machine or move it to an edge of a stair or loading
dock.
AMERICAN LINCOLN TECHNOLOGY
ENCORE R Operator’s Manual
1-6
SAFETY PRECAUTIONS
Lead acid batteries generate gases, which can cause an explosion. Keep sparks and flames away from
batteries. NO SMOKING. Charge batteries only in area with good ventilation.
Always wear eye protection and protective clothing when working near batteries. Remove all jewelry. Do not put
tools or other metal objects across the battery terminals, or the tops of batteries.
Maintenance and repairs must be done by authorized personnel only. Tighten all fasteners. Keep adjustments
according to the specifications given in the operator’s manual for the machine. Keep the electrical parts of the machine dry. For storage, keep the machine in a building.
Make sure that all labels, decals, warnings, cautions and instructions are fastened to the machine. Get new
labels and decals from
American-Lincoln.
Your ENCORE R battery machine has been shipped complete, but do not attempt to operate without reading
the following instructions:
1-7
AMERICAN LINCOLN TECHNOLOGY
ENCORE R Operators’s Manual
MACHINE PREPARATION
C1836
FIGURE 1
Your ENCORE R battery machine has been shipped complete, but do not attempt to operate without reading the
following instructions:
1. Uncrate machine
2. Install scrub brushes, as outlined in the Maintenance section of this manual.
3. Install batteries as follows
A. Turn the key to the “O” position
B. Lift the hinged seat and cover, then engage safety arm.
C. Use a battery lifting device with a 150 LB. (68KG) capacity to place the batteries in the battery
compartment.
D. Install Battery wires, as shown on page 1-23
E. Plug the polarized connector from the battery on into the 36 Volt plug provided.
F. Lower seat and cover assembly.
WARNING
Hydrogen gas is formed during the charging operation and is explosive. Only charge batteries in a well ventilated
area with the lid open. Avoid any smoking, open flame, or electrical sparks. Pulling out the charger plug, with the
timer on, will cause an arc and must be avoided.
AMERICAN LINCOLN TECHNOLOGY
ENCORE R Operator’s Manual
1-8
MACHINE CONTROLS
SOLUTION CONTROL KNOB - (See Figure 1)
The solution control knob is located to the left-hand side of
the steering wheel. Turning the knob clockwise will increase
the flow of solution and water. The farther the solution
control knob is turned the heavier the flow of water and
solution will be. Turning the knob counter clockwise will
decrease the flow of the solution and water. To turn the
water and solution off, turn the knob all the way counterclockwise.
C1879
FIGURE 2
BATTERY CONDITION METER - (See Figure 2)
The meter shows the condition of the battery, while the
machine is running, under load. When battery voltage falls
below 31.5 volts for longer than 60 seconds, the low voltage
light will come on. Also the Brush/Water solenoids will be
locked out regardless of the previous conditions or commands. This is a permanent lockout until power is turned off
to module. The low voltage lock out can be reset almost
immediately by turning off all power to the module for 3-5
seconds. Upon reapplying power, the lockout will be off and
will have to go through the 60 second delay before again
locking-out the Brush/Water solenoid. In a permanent lowbattery-voltage-condition, the machine can be functional
only for one-minute periods, and then only by repeating the
Ignition - “O” reset routine.
NOTE
C1839 FIGURE 3
Continual discharge of the battery below the “Red Zone” will
shorten battery life.
HORN BUTTON - (See Figure 3)
The horn button is located on the floor of the ENCORE R
operator’s compartment to the left of the pedals.
Light Switch (OPTION)
The light switch will activate any of the light options. The
switch is active at all times.
C1840
1-9
FIGURE 4
AMERICAN LINCOLN TECHNOLOGY
ENCORE R Operators’s Manual
MACHINE CONTROLS
SQUEEGEE BLADE SWITCH (See Figure 4)
The squeegee blade switch is located on the console to
the left of the steering wheel. Pressing the squeegee
switch in the forward position turns the vacuum-motor off
and the squeegee blades are up. When the switch is in the
middle, the vacuum motor is on and the squeegee blade is
down. Pressing the squeegee switch in the downward
position, will raise the blade and keep the vacuum on.
C1880
FIGURE 5
1
2
HIGH RECOVERY LIGHT - (See Figure 5)
The High Recovery Warning Light is located on the
console. The recovery warning light will illuminate and
stay on approximately five minutes before the recovery
tank is full, giving ample time to complete the scrubbing
cycle before the mechanical float shuts off the vacuum to
the recovery tank.
LOW SOLUTION LIGHT - (See Figure 5)
The Low Solution Warning Light is located on the console.
The Solution Warning Light will illuminate when the solution
tank is empty, marking the end of the scrubbing cycle.
C1878
C1843
FIGURE 6
KEY SWITCH - (See Figure 6)
The Key Switch turned to the right, the “I” position, will
activate all machine systems. The optional lights can be
activated in the “O” position.
FIGURE 7
AMERICAN LINCOLN TECHNOLOGY
ENCORE R Operator’s Manual
1-10
MACHINE CONTROLS
1`
2
3
C1837
FIGURE 8
SCRUB BRUSH SWITCH - (See Figure 7)
The Scrub Brush Switch is located to the far left of the
steering wheel on the control panel. The Scrub Brush
indicator lights are located to the left of the Scrub Brush
switch.
With brushes up & the key switch is turned on the red
indicator will automatically be on. This indicates that the
scrub brushes are in the up position. Press and hold the
scrub brush switch down until the yellow indicator light
illuminates. This indicates that the scrub brushes are in the
normal scrub position. Press and hold the scrub brush
switch down until the green indicator light illuminates. This
indicates that the scrub brushes are in the heavy scrub
position. The lights will flash between the three positions.
To raise the scrub brushes press and hold forward the
Scrub Brush Switch until the red indicator light is illuminated.
ESP OPTION - (See Figure 8)
The ESP Option transfers water from the recovery tank
through a filter and into the solution tank. When the switch
is in the “on” position the pump should operate when the
High Recovery light is illuminated. Clean the filter in the
recovery tank whenever the tank is emptied.
NOTE
C1845
FIGURE 9
Do not place clean water in the recovery tank when using
the ESP option, the solution tank could become overfilled
during operation.
HOUR METER - (See Figure 9)
The hour meter is activated when the key switch is in the
“on” position. The meter indicates the time, in Hours that
the machine has been operated. This is useful for determining service intervals.
C1847
1-11
FIGURE 10
AMERICAN LINCOLN TECHNOLOGY
ENCORE R Operators’s Manual
MACHINE CONTROLS
PRE SWEEP OPTION
Operation
The sweeper is designed to turn the broom on as it is
lowered. To lower the broom release hand lever on right
side. To remove the hopper, grasp each end of the hopper
and lift it up and out of the frame.
Adjustment
The main broom on this sweeper is free floating and has
no adjustment for wear. If your broom pattern is wide on
one side, place the broom in the down position, turn the
key off and loosen the mounting bolt on the left end of the
broom, then retighten.
FIGURE 11
Replace the main broom when it is either worn of damaged. To replace the main broom: first remove the hopper.
Then remove the idler screw, through the hole in the
frame. Remove the idler bracket then pull the broom off the
drive and out the hopper opening.
Adjustment Side Broom
Adjust side flaps so they clear the ground by 1/16 of an
inch. As the side broom wears, adjustment is required to
keep proper broom pattern on the floor. Remove the
hopper and loosen the stop at lower right hand side,
reposition and tighten.
BRAKE - (See Figure 10)
Never leave operator’s seat without engaging the parking
brake. The parking brake is used on the rear wheels of the
mechanical system and is located on the floor of the
machine left of the directional control pedal. To set parking
brake, press foot pedal to set lock. To unlock the parking
brake, push the upper portion of the brake pedal. The foot
brake is not a method for slowing machine travel or for
stopping under normal conditions. This is accomplished
with the accelerator and directional control pedal.
C1848
FIGURE 12
AMERICAN LINCOLN TECHNOLOGY
ENCORE R Operator’s Manual
1-12
MACHINE CONTROLS
NEUTRAL
FORWARD
NEUTRAL
REVERSE
P4066
FIGURE 13
ACCELERATOR and DIRECTIONAL CONTROL PEDAL - (See Figure 11)
The Accelerator and Directional Control Pedal is located on the floor of the operator’s area. This pedal controls
the machine direction and travel speed. If the machine stops due to an electrical system overload in the power
panel controller, place the forward/reverse pedal in neutral to reset the controller.
1.
2.
3.
4.
5.
Put foot pressure on the upper portion of the pedal. The machine will move forward.
Increase the foot pressure on the upper portion of the pedal to increase the forward speed.
Put foot pressure on the lower portion of the pedal. The machine will move in reverse.
Increase the foot pressure on the lower portion of the pedal to increase the reverse speed.
To stop the machine,
A. Allow directional control pedal to return to neutral (center position). Pedal will automatically
return to neutral when foot pedal is released. Neutral braking will engage to slow down the machine.
B. If neutral braking does not engage or disengages after slowing the machine to a crawl, reset the neutral
brake by briefly depressing the accelerator and directional control pedal according to the direction of
travel. If the machine is moving forward, briefly depress the upper portion of the pedal. If the machine is
moving in reverse, briefly depress the lower portion of the pedal.
1-13
AMERICAN LINCOLN TECHNOLOGY
ENCORE R Operators’s Manual
OPERATING INSTRUCTIONS
SEAT ADJUSTMENT- (See Figure 12)
This lever is located on front of the seat and allows the
seat to be adjusted.
Note
Before starting, perform the pre-start checks.
C1851
FIGURE 14
PRE-START CHECKLIST
1. Check controls for proper operation.
2. Make sure all controls are in the “O” position
3. Be sure accelerator/directional control pedal is in the
neutral position
4. Check all flaps for damage or wear
5. Check scrub brushes
6. Fill tank with water and detergent
TO FILL SOLUTION TANK
Remove the solution lid located on the back right side of the machine. Fill tank with 40 gallons of water and the
correct mixture of American Lincoln Commercial cleaner for the job on hand, first making sure that the solution
control knob is “OFF.” Place the lid back on the solution tank.
TO START MACHINE
1. Release parking brake
2. Turn key to “I” position
TO TRANSPORT MACHINE
1. Be sure the brushes and squeegee are in the “UP” or “RAISED” position with all other
controls in the “O” position.
2. Release parking brake.
3. Push forward on the directional control pedal to place the machine in motion.
4. Vary your foot pressure on the directional control pedal to obtain desired travel speed.
5. To stop, allow directional control pedal to return to neutral (centered) position. (Pedal will
automatically return to neutral when foot pressure is released).
6. Set parking brake.
AMERICAN LINCOLN TECHNOLOGY
ENCORE R Operator’s Manual
1-14
OPERATING INSTRUCTIONS
RECOVERY
TANK
SOLUTION
TANK
C1832
FIGURE 15
TO BEGIN THE CLEANING OPERATION
1. Lower brushes to the desired position.
SCRUB DECK = NORMAL RANGE OR HEAVY
2. Place the squeegee switch in the lower position.
SQUEEGEE BLADE = LOWER
3. Move solution control knob to the desired setting and begin operation.
SCRUBBING THE AVERAGE FLOOR WITH LIGHT TO MEDIUM SOILAGE
In this operation, cleaning is accomplished in one pass, with simultaneous solution feed, scrubbing and dirty
water pick up. The rate of solution feed and the speed of travel required will vary with floor condition. This
knowledge will come with operator experience.
TO STOP THE CLEANING OPERATION
Discontinue the cleaning operation whenever a solution tank is empty or a recovery tank is full. At this time,
discontinue the scrubbing cycle, put all controls in the forward position for transport and drive to the drain area.
1-15
AMERICAN LINCOLN TECHNOLOGY
ENCORE R Operators’s Manual
OPERATING INSTRUCTIONS
NOTE
After stopping, perform these post operation checks.
POST OPERATION CHECKLIST
Check Battery Condition and recharge, if necessary.
1.
2.
3.
4.
5.
Check all flaps for wear, damage and adjustment.
Drain and clean recovery tank.
Clean recovery tank screen and float.
Check scrub brushes for wear or damage.
Check rear and side squeegee for wear, damage and adjustment.
TO DRAIN RECOVERY TANK
A drain hose for the recovery tank is located underneath the right side of the machine. To drain the tank,
remove and lower the hose and place in a suitable floor drain. Open Recovery Tank Lid and remove Drain
Plug to allow the soiled water to drain. When the draining operation is completed, Flush and Clean the recovery tank, Install Drain Plug, close Recovery Tank Lid and replace the drain hose.
IMPORTANT
Always flush the recovery tank with clean water at the end of each cleaning cycle. Never let debris accumulate,
settle and harden in the tank or on associated hardware.
WARNING
Improper discharge of wastewater will damage the environment and is illegal. The U.S. Environmental Protection
Agency has established certain regulations regarding discharge of wastewater. Also, local city and state regulations regarding wastewater discharge may be in effect in your area. Understand and follow the regulations in
your area. Be aware of the environmental hazards associated with the substances you dispose of.
NOTE
Replace disc brushes when bristles are reduced to 3/4 inch length. To order replacement brushes, see scrub
brush options in this manual. Replace squeegee rubbers when all usable edges have become rounded with wear,
impairing the wiping action. To order replacement squeegee rubbers, see the parts list in this manual.
AMERICAN LINCOLN TECHNOLOGY
ENCORE R Operator’s Manual
1-16
HELPFUL HINTS FOR CLEANING
P4134
FIGURE 16
-
WARNING
Do not turn the steering wheel sharply when the machine is in motion. The sweeper is very
responsive to movement of the steering wheel. Do not make sudden turns.
-
Scrub in straight paths. Do not bump posts. Do not scrape the sides of the machine.
-
When the machine is in motion, do not push the directional/speed control pedal all the way
forward. This is the same as starting in “high” and will put a strain on the motor and drive system.
-
-
Plan your sweeping and scrubbing in advance. Try to arrange long runs with minimum stopping
and starting. Sweep debris from narrow aisles out into main aisle ahead of time. Do an entire floor,
or section at on time.
Pick up oversize debris before sweeping.
-
Allow a few inches of overlap of sweep and scrub paths. This will eliminate leaving dirty patches.
-
Don’t turn steering wheel to sharply when machine is in motion. The machine is very responsive to
movement of the steering wheel; so avoid sudden turns.
-
Try to follow as straight a path as possible. Avoid bumping into posts or scraping the sides of the
machine.
-
When placing the machine in motion, avoid slamming the directional control pedal all the way
forward suddenly. This is equivalent to starting out in “HIGH” and puts needless strain on the
drive system. Periodically, turn the sweeping broom end for end to prevent the bristles from
“settling” in one direction.
1-17
AMERICAN LINCOLN TECHNOLOGY
ENCORE R Operators’s Manual
SERVICE CHART
C1833
FIGURE 17
EVERY 8 HOURS or DAILY operation check and clean/adjust if necessary - (Figure 15):
1. All flaps for wear or damage
2. Parking brake
3. Clean recovery tank
4. Scrub brushes for wear or damage
5. Rear squeegee for wear or damage
6. Charge and check batteries
50 HOUR MAINTENANCE CHECKLIST:
7. Check battery electrolyte level
8. Lubricate front wheel bearing and pivot
100 HOUR MAINTENANCE CHECKLIST:
9. Lubricate drive chain, use motorcycle chain lube
10. Clean solution tank
11. Inspect chain sprockets and alignment
For service assistance, consult your local American-Lincoln Distributor, For best performance, replace worn
parts with genuine American-Lincoln parts.
Refer all Maintenance and Service Requirements to Qualified Maintenance Personnel.
Do not attempt to service this machine until you have read and understood all Safety Warnings associated with
the equipment you are working on.
AMERICAN LINCOLN TECHNOLOGY
ENCORE R Operator’s Manual
1-18
SERVICE CHART
WARNING
Maintenance and repairs must be done by authorized personnel only.
WARNING
Electrical repairs must be done by authorized personnel only. Consult your American-Lincoln Authorized Service
Person to do service procedures. Use only genuine American-Lincoln parts.
WARNING
Always park on a level surface, turn key off, and engage parking brake before working on the machine to keep it
from creeping or rolling.
IMPORTANT
If towing or pushing is required, disconnect motor lead located on the terminal block on the bottom of the
machine.
WARNING
Maintenance and repairs must be done by authorized personnel only. Always empty the solution tank and the
recovery tank before doing any maintenance. Keep all fasteners tight. Keep adjustments according to the
specifications as shown in the Service Manual for this machine.
WARNING
Always wear eye protection and protective clothing when working near batteries. Do not put tools or other metal
objects across the topes of the batteries.
WARNING
To prevent damage to the machine, and discharge across the tops of the batteries, do not fill the batteries above
the bottom of the tube in each cell. Wipe any acid from the machine or the tops of the batteries. Do not add acid
to a battery after installation.
WARNING
Always wear eye protection and protective clothing when working near batteries. NO SMOKING.
1-19
AMERICAN LINCOLN TECHNOLOGY
ENCORE R Operators’s Manual
SERVICE INSTRUCTIONS
REPLACING THE SCRUB BRUSHES
(See Figure 18)
Replace Scrub Brushes when the bristles become worn to
¾”.
1. Lower scrub brushes.
2. Swing open side squeegees
3. Lift scrub brushes
4. The scrub brush is held in place by a ring. Pull the
brush straight down to remove it.
5. Push a new brush onto the scrub brush driver until
it clicks in place.
6. Lower Scrub Deck to the NORMAL position and
check the brush for proper floor contact.
7. Replace side squeegees.
C1834
FIGURE 18
REPLACING PADS ON A PAD DRIVER-(See Figure 19)
Install a new pad when the old pad is worn or dirty. The pad driver assembly is removed and installed the
same way a standard scrub brush is. (See REPLACING THE SCRUB BRUSHES)
To change pad follow this procedure.
1. The pad driver is held in place by a ring. Pull the pad driver straight down to remove it.
3. Remove the pad holder using the spring wire retainer.
4. Replace the worn pad
MAINTENANCE FOR THE REAR SQUEEGEE
(See Figure 20)
To remove the squeegee, follow this procedure:
1. Remove the squeegee assembly by loosening the
two knobs that attach the squeegee to the
machine. Pull the squeegee assembly off.
2. Inspect the squeegee blade.
3. If the blade is worn, turn the blade so that a new
edge is in the wiping position.
4. Reinstall squeegee assembly on the machine.
C1877
FIGURE 19
AMERICAN LINCOLN TECHNOLOGY
ENCORE R Operator’s Manual
1-20
SERVICE INSTRUCTIONS
Note
Toothed lock washers must be on top of support plate
SQUEEGEE WHEEL ADJUSTMENT - (See Figure 20)
Adjust if squeegee leaves water on floor. The wheels
must be 3/16” (.476 cm) above the floor.
1. Set the parking brake.
2. Turn the key switch to the “I” position.
3. Put the Squeegee Blade Switch in the “LOWER”
position.
4. Turn the key switch to the “O” position. This will turn
off the vacuum fans.
5. Loosen the wheel brackets by turning the adjustment
handles.
6. Adjust the wheels to 3/16” (.476 cm) above the floor.
7. Tighten the wheel brackets with the adjustment
handles.
C1852
FIGURE 20
SQUEEGEE BLADE REPLACEMENT - (See Figure 21)
Replace if front or rear blades are worn or damaged.
1. Set the parking brake.
2. Turn the key to the “I” position.
3. Put the Squeegee Blade Switch in the “LOWER” position.
4. Turn the key switch to the “O” position.
5. Remove the rear squeegee assembly.
6. Loosen the strap clamp.
7. Remove the old blades.
8. Push the new blades in until they are against the top of the squeegee. Retighten clamp.
SQUEEGEE ANGLE ADJUSTMENT - (See Figure 21)
If the rear squeegee blade is not bent evenly along its full length as it is working the squeegee angle needs to
be adjusted.
1. Park the machine on a smooth level surface.
2. Lower the squeegee and turn the key off.
3. Loosen the jam nut located above the squeegee tool.
4. Adjust the screw to correct the angle of the squeegee tool.
5. Tighten the jam nut. Tighten the screw and nut below the jam nut if required.
1-21
AMERICAN LINCOLN TECHNOLOGY
ENCORE R Operators’s Manual
SERVICE INSTRUCTIONS
SETTING THE PARKING BRAKE (See figure 21)
Set the brakes using the following steps;
1. Park the machine on a smooth level surface.
2. Press down on the brake pedal.
3. With your toes, press down on the upper part of
the brake pedal. (This will set the parking brake)
4. To release press down on the brake pedal again
(This will release the parking brake).
C1848
FIGURE 21
Rev. Delay
Adjustment
EFP Relay
C1857
FIGURE 22
SETTING THE REVERSE DELAY ADJUSTMENT(See figure 22)
If the squeegee does not clear the floor before the
machine moves in reverse, it may be necessary to
increase the reverse delay on the E.F.P. Relay.
1. Gain access to the E.F.P. Relay by removing the
two bolts from the sides of the control panel and
pulling the panel off.
2. Locate the reverse delay potentiometer, which is
located on the E.F.P. Relay
3. Turning the potentiometer clockwise (turn only
slightly) increases the reverse delay, allowing
more time for the squeegee to clear the floor.
4. Set the reverse delay so the squeegee just clears
the floor before the machine starts to travel in
reverse.
FOOT PEDAL NEUTRAL ADJUSTMENT(See Figure 23)
Adjust if machine creeps in neutral.
1. Engage Clevis thread fully with 2 threads showing
inside of clevis.
2. Adjust the centering control, clevis and threaded
rod to 9 inches. However, leave locknut loose.
3. Plug potentiometer into harness.
4. With the key switch ”on” and drive wheel clear of
floor adjust large nut in the centering control to
stop wheel rotation.
5. Lock nut into centering control.
C1858
FIGURE 23
AMERICAN LINCOLN TECHNOLOGY
ENCORE R Operator’s Manual
1-22
SERVICE INSTRUCTIONS
STEERING ADJUSTMENT-(See Figure 24)
There are two adjustments available on the steering
system: sprocket adjustment and pivot play.
C1859
FIGURE 24
STEERING ADJUSTMENTS - PIVOT ADJUSTMENT (See Figure 24)
Adjust if front tire rocks during use.
1. Park the machine on a smooth level surface and set
the parking brake.
2. Jack up the front of the machine until the front wheel
clears the ground.
3. Use proper jacking equipment and install jack stands
whenever working under a machine.
4. Remove the nut at the center of the front wheel pivot
sprocket.
5. Lower the pivot assembly, keeping it level, until a
shim can be removed.
6. Reinstall pivot and tighten nut completely. Be sure
the pivot turns freely, otherwise reinstall shim and
remove a thinner one.
STEERING ADJUSTMENTS - SPROCKET ADJUSTMENT - (See Figure 24)
Adjust if steering slips or becomes tight.
1. Park the machine on a smooth level surface and set the parking brake.
2. Jack up the front of the machine until the front wheel clears the ground.
3. Use proper jacking equipment and install jack stands whenever working under a machine.
4. Loosen the four screws that hold the front wheel assembly to the frame.
5. Adjust the front wheel left or right to get proper engagement of the steering sprocket into the chain.
6. Retighten the mounting screws.
1-23
AMERICAN LINCOLN TECHNOLOGY
ENCORE R Operators’s Manual
SERVICE INSTRUCTIONS
SWEEPER OPTION-DRIVE BELT ADJUSTMENTS
Motor Drive Belt
1. Loosen idler pulley
2. Move in slot in main frame
3. Retighten
Main Broom Belt
1. Loosen broom lift arm with bolt and nut.
2. Tension belt by inserting a flat blade screwdriver in the adjusting slot in support bracket and pry arm
forward.
3. Tighten nut.
Side Broom Belt
1. Loosen pulley and broom with screw and nut
2. Force pulley and broom forward
3. Retighten
BATTERY REMOVAL
1.
Lift seat cover, make sure the safety latch is secure in the notch.
2.
Unplug the battery.
3.
Use 1000 lb. (454 KG) lifting mechanism to lift and remove battery.
-
+
-
+
+
+
+
-
BATTERY CHARGING INSTRUCTION
When the batteries are disconnected (i.e. charging,
replacement), the microprocessor needs to be reset by
turning the key switch on and raising the brush deck.
When the red light comes on steady the batteries can be
charged.
1. Lift seat cover, make sure safety latch is secure in
notch.
2. Insert charging plug into battery receptacle.
3. Plug power cord into proper AC source.
4. Follow the charging instructions provided on the
charger.
5. Maintain electrolyte level in batteries, check after
charging. Add distilled water as needed.
-
+
-
+
- +
-
BATTERY
CHARGER
C1865
WARNING
Do not remove the battery from the machine if there is
waste in the solution tank.
FIGURE 24
AMERICAN LINCOLN TECHNOLOGY
ENCORE R Operator’s Manual
1-24
SERVICE INSTRUCTIONS
WARNING
Hydrogen gas is formed during the charging operation and is explosive! Only charge batteries in a well-ventilated
area with the lid open. Avoid any open flame or electrical sparks. Pulling out the charger plug, with the charger still
on, will cause an arc and must be avoided.
WARNING
Batteries are heavy. Get help to lift the batteries.
WARNING
Always remove jewelry, wear protective clothing, and face protection when working near batteries.
WARNING
Lead acid batteries generate gases, which cause explosions. Keep sparks and flames away from batteries charge
the batteries only in area with good ventilation. NO SMOKING!
WARNING
To prevent an explosion, disconnect the AC plug from the receptacle before connection or disconnection the DC
plug on the charger.
WARNING
The battery box can slide off a forklift and cause severe personal injury or damage to equipment. Ensure that the
battery box is properly secured to the forks of the forklift during transport, drive and stop with caution!
1-25
AMERICAN LINCOLN TECHNOLOGY
ENCORE R Operators’s Manual
TROUBLE SHOOTING
PROBLEM
PROBABLE CAUSE
1. Worn scrubbing brushes
2. Incorrect method of operation
Poor Scrubbing
3. Wrong cleaning agent or
mixture
4. Poor solution distribution
5. Brushes won't turn
Water Splashes From Sides
Of Scrub Deck
1. Scrub deck bumpers, poor
contact with floor.
2. Squeegee blades worn or
damaged.
3. Too much solution
1. Circuit breaker #4 is tripped
Machine Does Not Move
2. Battery Unplugged.
AMERICAN LINCOLN TECHNOLOGY
ENCORE R Operator’s Manual
REMEDY
1. Replace brushes when scrub
reaches "WORN" zome.
Brushes should be replaced
when bristles become worn
to ¾" in length.
2. Check scrubbing procedure,
brush pressure, type of
cleaning agent and solution flow
are important to the scrubbing
process.
3. Use American Lincoln
recommended cleaning material
4. Check solution strainer and
clean as necessary. Check
solution feed hoses for
obstructions. Check valve
control for proper operation.
5. Check wire connections
1. Readjust blades for proper
contact.
2. Replace and adjust
3. Shut off solution flow 5' to 10'
before making turns
1. Reset breaker. In
approximately one minute
2. Plug in battery
1-26
TROUBLE SHOOTING
PROBLEM
Poor Water Pick up at
Squeegee
1-27
PROBABLE CAUSE
REMEDY
1. Recovery tank full.
1. Empty tank
2. Squeegee is worn or damaged 2. Examine squeegee rubber
blade for cuts or worn
spots. Replace if
necessary.
3. Clogged suction hose or pick
3. Disconnect suction hose
up tool.
from squeegee, flush
squeegee & hoses
throughly.
4. Losse connections between
4. Check all hose connections
suction hose & squeegee
for looseness or damage
5. Reset circuit breaker or
5. Vacuum motors not running
repair loose connection
6. Plugged filter
6. Clean filter element in
vacuum manifold
7. Vacuum float cage clogged
7. Clean perforated metal
thoroughly
8. Vacuum float shut off
8. Excessive solution in
recovery tank. Excessive
foam build up, change
cleaning chemical mixture.
Use A-L approved material
9. Air leaks in suction hose and
9. Repair or replace hose and
connection.
connections
10. Air leaks at recovery tank
10. Repair and replaced seal
cover and/or manifold hose.
or hose
11. Drain hose or drian plug
11. Close, repair or replace
drain plu in recovery tank
leakage or not closed properly
AMERICAN LINCOLN TECHNOLOGY
ENCORE R Operators’s Manual
TROUBLE SHOOTING
PROBLEM
Squeegee leaves Wet Spots
Squeegee Makes Excessive
Noise
PROBABLE CAUSE
1. Lift actuator out of adjustment
2. Squeegee wheels out of
adjustment
3. Incorrect spring pressure
1. Adjust
2. Adjust
1. Blades worn or damaged
2. Incorrect spring pressure
1. Replace
2. Adjust
1. Broom Jammed
2. Hopper full
3. Broom does not turn
4. Hopper not installed correctly
5. Poor broom pattern
6. Flaps worn
1. Remove obstruction
2. Empty
3. Adjust or replace broom belts
Reset circuit breakers adjust
broom microswitches. Repair
loose wire connections.
4. Reinstall
5. Adjust sweep pattern
6. Repair or replace
1.
2.
3.
4.
1.
2.
3.
4.
Poor Swweping (Option)
Machine moves Slow or
Erratically
Battery charge low
Brakes dragging
Loose connection at foot pedal
Overload of drive circuit
5. Control Pot. out of adjustment
AMERICAN LINCOLN TECHNOLOGY
ENCORE R Operator’s Manual
REMEDY
3. Adjust
Charge
Adjust
Repair
Remove obstruction, put
drive pedal in neutral.
5. Adjust
1-28
ORDERING PARTS
Parts may be ordered from American-Lincoln authorized distributors. Inspect the Alto U.S. serial plate
to avoid delays in filling you orders:
MODEL NO.
SERIAL NO.
Manufactured By
American Lincoln Technology ®
Bowling Green, Ohio
1. Use the model number, catalog number, and serial number when ordering.
2. Give the part number, description, and quantity of parts needed.
3. Give shipping instructions for either freight, UPS, or parcel post.
Parts and supplies listed in this manual can be ordered from the following address:
Alto U.S., Inc.
American Lincoln Technologies
Alto U.S., Inc.
Distributor
1100 Haskins Road
Bowling Green, Ohio 43402
(800) 331-7692
MACHINE CATALOG NUMBER
505-901
505-902
1-29
ENCORE R (34”) SCRUBBER
ENCORE R (38”) SCRUBBER
AMERICAN LINCOLN TECHNOLOGY
ENCORE R Operators’s Manual
HARDWARE ABBREVIATIONS
ABBREVIATIONS - SCREWS
ADJ
ADJ.SP
BHM
BHS
CAPT.SL
CAPT.WG
FHM
FIL.HM
HHC
HHM
HIHD
HSHC
HSFHC
KNH
MHHC
PHM
RHD
RHM
RHW
SHC
SHTB
SQ
TB
THM
WELD
WG
=
=
=
=
=
=
=
=
=
=
=
=
=
=
=
=
=
=
=
=
=
=
=
=
=
=
Adjusting Screw
Adjusting Plunger Screw
Binding Head Machine Screw
Button Head Socket Screw
Captivated Slotted Screw
Captivated Wing Screw
Flat Head Machine Screw
Filister Head Machine Screw
Hexagon Head Cap Screw
Hexagon Head Machine Screw
1/2 High Head Screw
Hexagonal Socket Head Cap Screw
Hexagonal Socket Flat Head Cap Screw
Knurled Head Screw
Metric Hexagon Head Cap Screw
Pan Head Machine Screw
Round Head Drive Screw
Round Head Machine Screw
Round Head Wood Screw
Shiny Crown Cap Screw
Shoulder Thumb Screw
Square Head Screw
Thumb Screw
Truss Head Machine Screw
Weld Stud
Wing Screw
ABBREVIATIONS - SETSCREWS
HS
S
SH
-KCP
-CP
-OP
-FDP
-HDP
-FP
-COP
=
=
=
=
=
=
=
=
=
=
Hexagonal Socket Setscrew
Slotted Setscrew
Square Head Setscrew
Knurled Cup Point Setscrew
Cup Point Setscrew
Oval Point Setscrew
Full Dog Point Setscrew
Half Dog Point Setscrew
Flat Point Setscrew
Cone Point Setscrew
C-2004
AMERICAN LINCOLN TECHNOLOGY
ENCORE R Operator’s Manual
1-30
HARDWARE LEGEND
1-31
Key No.
Part Number
Description
H1
H2
H3
H4
H5
H6
H7
H8
H9
H10
H11
H12
H13
H14
H15
H16
H17
H18
H19
H20
H21
H22
H23
H24
H25
H26
H27
H28
H29
H30
H31
H32
H33
H34
H35
H36
H37
H38
H39
H40
H41
H42
H43
H44
H45
H46
H47
H48
H49
H50
H51
H52
H53
H54
H55
H56
H57
H58
H59
H60
H61
2-00-05060
2-00-00455
2-00-01499
2-00-00624
2-00-00645
2-00-00049
2-00-00056
2-00-00039
2-00-00426
2-00-00519
2-00-00605
2-00-01246
2-00-00054
2-00-00219
2-00-00221
2-00-03051
2-00-00205
2-00-00060
2-00-02587
2-00-00203
2-00-01769
2-00-02589
2-00-01980
2-00-00220
2-00-00594
2-00-00641
2-00-03702
2-00-04685
2-00-04966
2-00-04687
2-00-04695
2-00-04688
2-00-00224
2-00-00208
2-00-02708
2-00-00196
2-00-00207
2-00-00225
2-00-00218
2-00-01770
2-00-02597
2-00-02655
2-00-00409
2-00-00530
2-00-00585
2-00-00644
2-00-00232
2-00-00233
2-00-00209
2-00-00234
2-00-00216
2-00-00402
2-00-02310
2-00-02360
2-00-00643
2-00-00239
2-00-00240
2-00-00241
2-00-00242
2-00-02682
2-00-02616
Screw, #6-32 x 1.250 RHM
Flat Washer, .375 x .156 x .047
Lock Washer, #6 Med. Helical Spring
Nut, #6-32 Hex
Nut, Hex Fiber Insert #6-32
Screw, # 10-24 x .500 RHM
Screw, # 10-24 x .750 RHM
Screw, 10-24 x 1.000 RHM
Flat Washer, .500 x .219 x .063
Lock Washer, # 10 Med HS
Nut, Hex MS # 10-24 x .375 x .125
Nut, Hex Fiber Insert #10-24
Screw, 1/4-20 x .500 RHM
Screw, 1/4-20 x .500 HHC
Screw, 1/4-20 x .750 HHC
Screw, 1/4-20 x .750 HSHC
Screw, 1/4-20 x 1.000 HHC
Screw, 1/4-20 x 1.250 RHM
Screw, 1/4-20 x 1.250 HHC
Screw, 1/4-20 x 1.500 HHC
Screw, 1/4-20 x 1.750 HHC
Screw, 1/4-20 x 2.000 HHC
Screw, 1/4-20 x 2.500 HHC
Screw, 1/4-20 x .625 HHC
Nut, Hex 1/4-20 x .437 x .218
Nut, 1/4-20 Insert Fiber
Washer, .625 x .281 x .063
Screw, 1/4-20 x .750 HHC
Screw, 1/4-20 x 1.500 HHM
Lock Washer, Hel. Spring 1/4 Med.
Screw, # 10-32 x .630 RHM
Nut, 1/4-20 Hex.
Screw, 5/16-18 x .500 HHC
Screw, 5/16-18 x .750 HHC
Screw, 5/16-18 x 1.000 HHM
Carriage Bolt, 5/16-18 x 1.000
Screw, 5/16-18 x 1.250 HHC
Screw, 5/16-18 x 1.500 HHC
Screw, 5/16-18 x 2.000 HHC
Screw, 5/16-18 x 2.750 HHC
Screw, 5/16-18 x 3.250 HHC
Screw, 5/16-18 x 4.500 HHC
Flat Washer, .687 x .344 x .062
Lock Washer, 5/16 HS Med.
Nut, Hex. 5/16-18 x .500 x .265
Nut, 5/16-18, Insert Fiber
Screw, 3/8-16 x .750 HHC
Screw, 3/8-16 x 1.000 HHC
Screw, 3/8-16 x 1.250 HHC
Screw, 3/8-16 x 1.500 HHC
Screw, 3/8-16 x 2.000 HHC
Flat Washer, .750 x .390 x .094
Lock Washer, Helical Spring 3/8
Nut, 3/8-16 Hex.
Nut, 3/8-16 Stop
Screw, 1/2-13 x 1.000 HHC
Screw, 1/2-13 x 1.250 HHC
Screw, 1/2-13 x 1.750 HHC
Screw, 1/2-13 x 2.250 HHC
Screw, 1/2-13 x 2.750 HHC
Screw, 1/2-13 x 3.000 HHC
AMERICAN LINCOLN TECHNOLOGY
ENCORE R Operators’s Manual
HARDWARE LEGEND
Key No.
Part Number
H62
H63
H64
H65
H66
H67
H68
H69
H70
H71
H72
H73
H74
H75
H76
H77
H78
H79
H80
H81
H82
H83
H84
H85
H86
H87
H88
H89
H90
H91
H92
H93
H94
H95
H96
H97
H98
H99
H100
H101
H102
H103
H104
H105
H106
H107
H108
H109
H110
H111
H112
H113
H114
H115
H116
H117
H118
H119
H120
H121
H122
2-00-00405
2-00-02312
2-00-00596
2-00-04936
2-00-02689
2-00-00614
2-00-00640
2-00-01255
2-00-05254
2-00-05255
2-00-00518
2-00-00247
2-00-03170
2-00-00618
2-00-00632
2-00-00484
2-00-05187
2-00-01676
2-00-02196
2-00-05276
2-00-00505
2-00-04877
2-00-00228
2-00-00650
2-00-03575
2-00-00263
2-00-05258
2-00-01372
2-00-03569
2-00-05279
2-00-04801
2-00-00222
2-00-00410
2-00-03382
2-00-02605
2-00-04677
2-00-05277
2-00-02810
2-00-03062
2-00-04897
2-00-04795
2-00-00089
2-00-03541
2-00-05260
2-00-04886
2-00-04887
2-00-04888
2-00-00522
2-00-03039
2-00-03296
2-00-02603
2-00-03333
2-00-00633
2-00-03063
2-00-01951
2-00-05067
2-00-02618
2-00-05005
2-00-03829
2-00-00090
2-00-05216
AMERICAN LINCOLN TECHNOLOGY
ENCORE R Operator’s Manual
Description
Flat Washer, 1.063 x .531 x .094
Lock Washer, 1/2 HS Med.
Nut, Hex. 1/2-13 x .750 x .437
Nut, 1/2-13 Fibre Lock
Screw, 1/2-20 x 1.000 HHC
Nut, Hex 1/2-20
Nut, Hex Fiber Insert 1/2-20
Screw, 5/16-18 x .875 HHC
Screw, 3/4-10 x 2.250 HHC
Nut, 3/4-10 Nylon Lock
Lock Washer, Helical Spring
Screw, 1/2-13 x 2.500 HHC
Flat Washer, 1.500 x .750 x .125
Nut, Hex Jam 3/8-16
Nut, Fiber Insert 3/8-24 Steel
Flat Washer, .625 x .375 x .046
Carriage Bolt, 3/8-16 x 1.250
Flat Washer, 1.062 x .265 x .062'
Carriage Bolt, 1/4-20 x 1.000 RHM
Screw, 3/8-16 x 5.500
Lock Washer, 3/8 Int. Tooth
Screw, 1/4-20 x 1.000 BHS
Screw, 5/16-18 x 2.250 HHC
Nut, Cap 3/8-16 Low Crown
Carriage Bolt, 1/4-20 x .750
Set Screw, 1/4-20 x .250 HSKCP
Screw, #8-325 x .750 BHS
Nut, Fiber Insert #8-32 Steel
Carriage Bolt, 5/16-18 x .750
Screw, M6 x 1.0 x 20 mm MHHC
Flat Washer, .875 x .375 x .125
Screw, 1/4-20 x 1.250 HHM
Flat Washer, .875 x .375 x .060
Spring Washer, .875 x .500 x .015
Screw, 3/8-16 x 4.500 HHC
Screw, 1/4-20 x .750 HSC
Screw, 1/2-13 x .750 HSHC
Screw. 1/4-20 x 1.000 FHM
Screw, #10-24 x .625 THM
Screw, #10-24 x 1.250 THM
Screw, #10-24 x .750 BHS
Screw, 10-24 x 1.500 RHM
Screw, 1/4-20 x 1.500 FHSCH
Nut, Jam #8-32
Screw, 3/8-16 x .500 HSHC
Screw, Main Broom Control
Washer, Main Broom Control
Lock Washer, 3/4 Helical Spring
Screw, 1/4-20 x .625 HSHC
Screw, 3/8-16 x 4.000 HHC
Screw, 3/8-16 x 3.500 HHC
Screw, 3/8-16 x 3.750 HHC
Nut, Fiber 1/4-28
Screw, #10-24 x .750 THM
Carriage Bolt, 1/4-20 x 1.250
Flat Washer, 1.750 x .531 x .100
Screw, 1/2-13 x 3.500 HHC
Screw, M10 x 1.500 30 mm MHHC
Lock Washer, 3/8 Bolt
Screw, #8-32 x 1.500 RHM
Screw, 1/4-20 x 5.000 HHC
1-32
HARDWARE LEGEND
1-33
Key No.
Part Number
Description
H123
H124
H125
H126
H127
H128
H129
H130
H131
H132
H133
H134
H135
H136
H137
H138
H139
H140
H141
H142
H143
H144
H145
H146
H147
H148
H149
H150
H151
H152
H153
H154
H155
H156
H157
H158
H159
H160
H161
H162
H163
H164
H165
H166
H167
H168
H169
H170
H171
H172
H173
H174
H175
H176
H177
H178
H179
H180
H181
H182
2-00-00204
2-00-02296
2-00-00418
2-00-03466
2-00-03522
2-00-04681
2-00-02311
2-00-03334
2-00-03855
2-00-00503
2-00-00006
2-00-03032
2-00-05298
2-00-03940
2-00-05299
2-00-00504
2-00-00611
2-00-00447
2-00-00501
2-00-05244
2-00-00432
2-00-02303
2-00-04180
2-00-00420
2-00-00642
2-00-01778
2-00-01803
2-00-00211
2-00-00213
2-00-01562
2-00-03266
2-00-04363
2-00-05044
2-00-05079
2-00-00217
2-00-05306
2-00-00512
2-00-00441
2-00-00153
2-00-03961
2-00-03570
2-00-00107
2-00-00589
2-00-00066
2-00-04312
2-00-05261
2-00-02637
2-00-03061
2-00-02371
2-00-04986
2-00-02709
2-00-00183
2-00-01252
2-00-05337
2-00-05324
2-00-00206
2-00-04948
2-00-04378
2-00-05078
2-00-00236
Screw, 1/4-20 x 1.500 HHC
Lock Washer, #10 Ext. Shakeproof
Flat Washer, .984 x .627 x .063
Screw, #10-16 x .500
Washer, 5/16 x 1.250 x .050
Carriage Bolt, 5/16-18 x 1.250
Lock Washer, 4.38 Split
Screw, .44-20 x 1.000 HHC
Carriage Bolt, 3/8-16 x 1.000
Lock Washer, 1/4 Ext.
Screw, #10-24 x .675 FHM
Screw, 3/8-16 x .750 FHS
Flat Washer, .344 x 2.000 x .062
Screw, #10-24 x .500 T/C HH
Screw, #10-24 x 1.250 HSHC
Lock Washer, Int.
Nut, Hex Jam, 3/8-24
Flat Washer, 1.250 x .280 x .090
Lock Washer, Int.
Carriage Bolt, 1/2-13 x 2.000
Flat Washer, 1.13 x .770 x .063
Lock Washer, Int.
Setscrew, 1/4-20 x .500
Flat Washer, 1.000 x .516 x .063
Nut, Fibre Insert 5/18-18
Screw, 1/2-13 x 2.000 HHC
Washer, 1.063 x .031 x .063
Screw, 5/16-18 x 1.750 HHC
Screw, 5/16-18 x .625 HHC
Carriage Bolt, 5/16-18 x 2.250
Washer
Screw, M8-1.250 x .750
Lock Washer, M14 Split
Screw, M14 x 1.500 x 25 mm HHC
Screw, 5/16-18 x 2.000 HHC
Screw, M14 x 35 mm HHC
Lock Washer
Flat Washer, .438 x .200 x .036
Screw, #8-24 x .875 OHM
Screw, 5/16-24 x 1.000 HHC
Carriage Bolt, 3/8-16 x .750
Screw, 10-24 x 4.50 RD. HD.
Nut, Hex Jam, .25-20
Screw, 6-32 x .50 RHM
Screw, 10-24 x .625 T/C Hex HD.
Insert, 1/4-20
Screw, 1/4-20 x 2.750 HHC
Screw, # 10-24 x .500 THM
Nut, Hex Jam .50-13 STL.
Screw, 1/4-20 x 4.500
Screw, 5/16-18 x 1.500
Screw, 1/4-20 x .750 THM
Screw, 10-24 x 2.750 RDH
Screw, #8-32 x .750 BHS SS
Threaded Insert, #8-32
Screw, 5/16-18 x 1.000 HHC
Screw, 25mm - M8 x 1.250
Clip, Water Line
Screw, M6 x 1.000 x 10mm HHC
Screw, 5/8-16 x 2.500 HHC
AMERICAN LINCOLN TECHNOLOGY
ENCORE R Operators’s Manual
HARDWARE LEGEND
Key No.
Part Number
Description
H185
H186
H187
H188
H189
H190
H191
H192
H193
H194
H195
H196
H197
H198
H199
H200
H201
H202
H203
H204
H205
H206
H207
H208
H209
H210
H211
H212
H213
H214
H215
H216
H217
H218
H219
H220
H221
H222
H223
H224
H225
H226
H227
H228
H229
H230
H231
H232
H233
H234
H235
H236
H237
H238
H239
H240
H241
H242
H243
H244
H245
2-00-02588
2-00-03041
2-00-00071
2-00-01987
2-00-00460
2-00-00529
2-00-00602
2-00-04841
2-00-03412
2-00-03537
2-00-04210
2-00-05350
2-00-03979
2-00-03808
2-00-04603
2-00-00626
2-00-02011
2-00-04514
2-00-04794
2-00-04873
2-00-04721
2-00-00407
2-00-02227
2-00-00772
2-00-00586
2-00-00776
2-00-02728
2-00-00566
2-00-01254
2-00-00462
2-00-02558
2-00-04378
2-00-00511
2-00-05345
2-00-05359
2-00-02617
2-00-03335
2-00-02848
2-00-00631
2-00-04686
2-00-04851
2-00-04689
2-00-04596
2-00-02606
2-00-01490
2-00-00466
2-00-02933
2-00-04909
2-00-02638
2-00-00064
2-00-00197
2-00-02369
2-00-05356
2-00-03750
2-00-02814
2-00-05398
2-00-05395
2-00-05370
2-00-00591
2-00-05297
2-00-05401
Screw, 1/4-20 x 1.125 HHC Cad. Pl.
Screw, 1/4 x 1.250 HSC-SS
Screw, #10-24 x 1.250 RHM
Flat Washer, .438 x .200 x .036 sst
Flat Washer, .437 x .192 x .031-s
Lock Washer - helical sps, 8 MDM
Nut, MSCR - Hex, 8-32
Nut 3/4 - 16 Slotted Hex head
Lock Nut, .375 - 24, sps 21 FK
Screw - 1/4 - 20 x2.000
Clamp
Screw 1/4 - 28 x .63 HHC
Washer 1.00 x .391 x .06
Wahser 1.50 x .750 x .06
Clamp
Nut, Hex MS #10 - 32 x .375 x .125
Plastic Plug, .440 Dia (Diesel)
Plastic Plug, .562 Dia ( LP & Gas)
Screw, #10 - 24 x .625 BHS
Clamp
Grommet, 1.750 x1.125 x .500 x.125
Washer, Flat .562 x.265
Key, .125 x .750 SQ
Cotterpin .093 x 1.000
Nut Hex Jam 5/16 - 18x .500 x .187
Cotterpin .125x1.500
Screw 10 - 32 x .375 BHM
Fitting-Grease
Screw - 1/2 - 13 x 1.500 HHCS
Flat Washer, .562 x .250 x .031
Grease Zerk
Harness Clamp
Internal Washer, #6
Screw, Hex Head Cap
Nut, Serrated Flange 5/16-18
Screw, 50-13 x 3.25 HHC
Screw, Hex SOC Cap, .312 -18 x .50
Screw, 10-32 x .50 Cad PL,STL RHM
Nut, .31 - 24 Fiber Insert
Lock Washer-helical#10Scr.Med. SS
Washer, Engine Mount
Washer, 11/16 OD x .260 ID x .050
Screw, Hex Head 1/4 - 20 x 3.5
Screw, .375 - 24 x 1.00, STL HHC
Screw, .25 - 20 x .875 HHC STL
Flat Washer, .625 x .203 x .031
Screw, Mach 10 - 24 x 3.50
Yoke, Pin Assy.
Screw, HHC .25-20 x 3.00
Screw- RHM #10-24 x .88
Carriage Bolt, .38-16 x 2.75
Nut, Hex Jam, .38-16
Screw, 5/16 - 18 X 1.25 Grade 8
Carriage Bolt, .38-16 x 1.50
Screw-FHM .25-20x1.75
Screw, HSHC 3/8-16 x .50
Screw, RHM .25-20 x 4.00 Zinc
Screw, M12 - 16 x 1.75 x 40mm HHC
Nut, Hex-Jam .50-20
Nut, Insert Fiber, .38-16 Heavy Nut
Shoulder Screw, 1/2-3/4
AMERICAN LINCOLN TECHNOLOGY
ENCORE R Operator’s Manual
1-34
HARDWARE LEGEND
1-35
Key No.
Part Number
Description
H246
H247
H248
H249
H250
H251
H252
H253
H254
H255
H256
H257
H258
H259
H260
H261
H262
H263
H264
H265
H266
H267
H268
H269
H270
H271
H272
H273
H274
H275
H276
H277
H278
H279
H280
H281
H282
H283
H284
H285
H286
H287
H288
H289
H290
H291
H292
H293
H294
H295
H296
H297
H298
H299
H300
H301
H302
H303
H304
H307
H308
2-00-05122
2-00-04590
2-00-05236
2-00-00004
2-00-04968
2-00-02602
2-00-00600
2-00-05120
2-00-04625
2-00-00227
2-00-02354
2-00-00093
2-00-04062
2-00-05343
2-00-00615
2-00-05344
2-00-00617
2-00-02313
2-00-02622
2-00-00506
2-00-05371
2-00-00068
2-00-00051
2-00-00118
2-00-05341
2-00-03293
2-00-04563
2-00-03214
2-00-02676
2-00-00237
2-00-00223
2-00-05164
2-00-03044
2-00-04914
2-00-00187
2-00-00415
2-00-02562
2-00-03842
2-00-04845
2-00-05153
2-00-05383
2-00-00264
2-00-00668
2-00-00532
2-00-02049
2-00-02243
2-00-02293
2-00-03151
2-00-03158
2-00-03306
2-00-03413
2-00-04345
2-00-04708
2-00-05183
2-00-00767
2-00-04159
2-00-00490
2-00-05103
2-00-00246
2-00-02963
2-00-05388
Screw-HHC, .25-20 x 2.00
Washer
Flat Washer, 2.000 x .281 x .063
Screw-FHM #10-24 x 1.25
Screw-T/FRH #14-10 x 1.00 Type A
Screw, 3/8-16 x 2.750 HHC Cad. Pl
Nut, Hex Heavy 3/8-16
Nut, .75-Hex Nyloc Jam
Screw-HHM .375-24 x .75
Screw-HHC .313-18 x 2.25
Nut-Hex-Jam .50-20
Screw-RHM 6-32 x .75
Screw-T/FFH #6-20 x .50
Bolt Carriage , .38-16 x 3.50 sstl
Nut, Hex Fin .63 - 22
Screw - HHM .313 - 18 x 1.75 Stl
Nut, Hex, Finish .75-16
Lock Washer, HS .63 Scr. Med.
Screw, 5/16 - 18 x 1.000 HHM
Lock Washer, Int Tooth #8 Dia Screw
Screw-RHM #8-32 x 2.38
Screw-RHM #8-32 x .63
Screw-RH, .25 - 20 x .75
Screw - RHM #10 - 24 x .625
Screw-HHC .75-10 x 2.00
Nut-Hex-Fin .75-10
Screw, Shoulder #10-24
Screw, .31-18 x .75 Zinc PL HSHC
Screw, .50 - 13 x .75 HHM
Screw, HHC .375 - 16 x 3.00
Screw, HHC .25-20 x 1.25 nickel
Screw, HHM 5/16 - 18 x 3.50
Screw, .38 -16 .75 HSHC
Screw, .50 - 13 x 4.50 HHC
Bolt Carriage, .38 - 16 x 2.50
Flat Washer, .9375 x .468 x .0625SS
Fitting
Roll Pin, 1/4 x 1.00
Screw, 3/8-16 x 1.00 FHSC
Screw, 1/4 x 20 1.50 HHC
Washer, Special
Set Screw, 1/4-20 x .313 HSKCP
Wing Nut, 5/16-18
Snap Ring
Bearing - Double Seal
Square Key, .188 - .187 x 1.250
Lockwasher, 5/8 Int.
Spacer, 1/2 ID 3/4 .625 Lg.
Spacer, 1/2 ID 3/4 .3/8 Lg.
Bearing
Flat Washer, 1.125 x .765 x .062
Tye - Wrap
Terminal
Terminal, 1/4 x .03 12-10
Cotter Pin, .063 x.500
Flat Washer, 1.375 x .563 x .109 SS
Washer, Spring, Shakeproof
Flat Washer, .750 x .343 x .050 SS
Screw, .25 - 20 x 2.25 HHC
Screw, RHM #10-32 1/4 PL. (Steel)
Sealing Washer 46/53 ESP OPT
AMERICAN LINCOLN TECHNOLOGY
ENCORE R Operators’s Manual
HARDWARE LEGEND
Key No.
Part Number
Description
H309
H311
H312
H313
H314
H315
H316
H317
H318
H319
H320
H321
H322
H323
H324
H325
H326
H327
H328
H329
H330
H331
H332
H333
H334
H335
H336
2-00-01081
2-00-05024
2-00-05227
2-00-04652
2-00-03836
2-00-00593
2-00-00044
2-00-00252
2-00-04750
2-00-02352
2-00-05424
2-00-04699
2-00-03993
2-00-00244
2-00-05329
2-00-00092
2-00-00235
2-00-05444
2-00-03994
2-00-00036
2-00-00397
2-00-02779
2-00-05433
2-00-00451
2-00-05450
2-00-03404
2-00-04620
Screw - T/C RH #8-32x.50type 2
Washer Flat, 2 x 1.06
Screw, HHC M14 x 1.50 x 45mmgr10
Screw, HHC .438 - 20 x 1.50
Bolt Carriage, .31 - 18 x 1.75
Nut, .38-16 Hex heavy Jam
Screw, RHM #8-32 x .50
Screw, .313-18 x 4.00 HHC
Screw, BTN HD SKT
Nut, Hex Hvy, .50-13 stl-zn.
Screw, Shoulder 1/2-1/2
Screw, HHC, .375-16 x 2.75
Screw, HHM 3/4-16 x 3.000
Screw, HHC .25-20 x 1.000
Screw, HHC M10 x 1.50 x 40MM SS
Screw, Ph. RHM #8-32 x 1.75 Zn.
Screw HHC .375-16 x 1.75
#10-24 BHCS 1.00 Black Oxide
Carriage Bolt, .31-18 x 1.50
Screw, RHM #10-24 x .25** NLS
Flatwasher .875 x .516 x .031 ss
Fhms #10-32 x .312
M16 x 1.50 Hex Nut (Metric) Gr 10.9
Flatwasher .750 x .312 x .065 ss-zn
Shoulder Screw, 5/16-18 x 3/8
Clamp - Witteck - C24P
O-Ring
AMERICAN LINCOLN TECHNOLOGY
ENCORE R Operator’s Manual
1-36
CONNECTION & HARNESS ROUTING
KEY NO.
PART NO.
DESCRIPTION
QTY.
1
2
3
4
5
0795-127-1
2-00-04345
7-13-07096
2-00-04588
2-00-04203
Harness - Mach.
Tye-Rap
Clamp
Wire Nut
Boots - Black
1
12
5
2
4
6
7
8
9
10
7-72-03031
2-00-05416
7-90-07424
7-90-07410
7-90-07411
Sleeve
Boots - Black
Wire #1E
Wire A1
Wire A2
1
4
1
1
1
11
12
7-90-07408
7-90-07409
Wire S1
Wire S2
1
1
C1861-a/0103
1-37
AMERICAN LINCOLN TECHNOLOGY
ENCORE R Operators’s Manual
AMERICAN LINCOLN TECHNOLOGY
ENCORE R Operator’s Manual
HORN
2
6
7
4
C1861-A/9906
1E
9
77
D
G
F
E
C
B
A
10
HORN
BUTTON
11
12
10
12
11
9
DO NOT TIE
WIRES 1D&1E
TO HARNESS
1D
1E
17
19
18
TIE HARNESS
TO BKT. WITH
ITEM #2
A
5
77
B
K
J
RT.BRUSH
MOTOR
LT.BRUSH
MOTOR
5
77
A
LT.BRUSH
MOTOR
(+) TOP
TERM.
77
B
K
TIE HARNESS
TO MOTOR
ITEM #2
ROUTE HARNESS
THROUGH 1 IN.
HOLE
TIE HARNESS
TO BKT. WITH
ITEM #2
77
77 B
C
77
A
B
2
TIE HARNESS
TO MOTOR
WITH ITEM #2
J
77
A
77Z
1
WIRE #32 CONNECTS
TO BAND OF DIODE
8
32
25 34 25 35 25
H
J
33 G
25
25
J
H
5.00 +/-.13
YEL
RED
8.00 +.25-.13
TIE HARNESS
TO BKT. WITH
ITEM #2
WATER
SOLENOID
WIRE TIE ALL
SWITCH WIRES
TO ACTUATOR MTR.
WITH ITEM #3
BRUSH DECK
ACTUATOR
3.00+/-.25
27
28
ROUTE HARNESS
THROUGH 1 IN.
HOLE
(+) TOP
TERM.
21
20
B
A
B
A
SQUEEGEE
ACTUATOR
RED
YEL
3
4
3E 5
FILL WITH
SILICONE
4
RECOVERY
TANK
SWITCH
3D
SOLUTION
TANK
SWITCH
L
TIE VAC WIRES
TO VAC. SPACER
WITH ITEM#2
77
C
CONNECTION & HARNESS ROUTING
1-38
CONNECTION DRAWING
4
5A
CONDITION METER
8
5
14
23
7L
23A
24
BACK VIEW
70
3
36
31
1A 1B
1
OPTION
26
7G
TOM PUHL IS GOOD!!!
ESP
BRUSH DECK
UP
OPTION
RECOVERY HIGH
77Z
77
LIGHTS
BRUSH DECK
DOWN
44308A
SOL. FLOW
MODULE
ST.
1A
BATTERY LOW
KEY SWITCH
5A
7F
70
22
7P
37
7R
D
C
22
C
20
20
A
21
A
M- B-
C
B+ A2
22A
SOL 3A
3C
27 28 26 36
35
23
5
REV.
25
W
25
Z 25
25
25
Y
9
9A
REV.
25
X
19
17
39
17
CB-5
12
18
S1
D
CB-4
CB-3
CB-2
CB-1
1 1T
1D
25A
25F
25G
J
9 9A
9B
10A
11
S2
c1820/0001
American-Lincoln Technology®
ENCORE R Operator’s Manual
7C
77D
A
K
L
D
B
K
25
Z
10
17
16
15
11
12
F
J
A2
31
9
7
8
9
8
18
25
A 25
V 25
W
10 10A
CB-6
11
11A
7D
77
ACK-7O
E
H
ET-103
7K
E
M
7
7H
2
CB-7
A1
38
W/BRN.
GRN.
ORG.
BLK.
BLK./WHT
WHT
3B
V
3D
9
1
8
3B 3C 3
3A 3A
FWD.
33
30
29
10
7 7A
G
25
25X
SOL. 6
PLUG IN
SEAT SWITCH
HERE
10
16
1-39
14
13
FWD.
SOL. 5
25
V
19
SOL.
1A
13
C
SOL. #6
C
SOL 2A
14
D
7J 7K
7H
250 OHM
5 WATT
S1
SOL. #5
L
6
A2
17
16
15
S2
7B
H
4
1
2
3
A1
TOP VIEW
34
5
24
12
BOTTOM VIEW
21
6
1207-1141
A2
B+
7P
7C
7
7M
A2
25F
11
B-
7E
7F
8
22A
1
2
3
7J
7L
16 PIN
M-
32A
7D
7E
29
4
11A
7M
A1
7G
32
7N
13
7N
BRUSH DECK
SWITCH
14
2
1207-1141
BRUSH DECK
LOADED
DOWN
SQUEEGEE
SWITCH
M+
IGN.
B+
30
HOUR METER
SOLUTION LOW
M-
ACC.
B-
BAT.
12
32A
13
7A
7B
1T
1-40
C1819/0001
1
A
50AMP. IF DUAL
VAC
MTRS.
CC
2A
G
F
CB-1
25 AMP.
H
1T
CB-2
45 AMP.
J
E
K
E
CB-3
45 AMP.
L
NEW MODULE
12
4 3
11
(B+) 12
7
6
5
77B
77A
CB-4
10 AMP
1
16
35
RED
YEL
28 27
28
11A(+)
27
(B+) (M+)
32
American-Lincoln Technology®
ENCORE R
11
16
7,7C,7D,7H
77,77C,77D
7K,7J,7H
RECOVERY HIGH SW.
SOLUTION LOW SW.
LOW VOLTAGE
OPENS IN
NEUTRAL ONLY
17
9A
9
1
25V8
9A
25X
19
17
18
6
FWD.
7K
C
A1
FIELD
S1
A2
S2
5B
C
19
6A
5A
ARM
A2
A2
B+
REV.
5
25Y
9 10
10A
9B
7K
38
39
10 10A
B-
2A
7L,7M
7D,7E
25
25Y
SW.
25X
C
M-
ELECTRIC SCHEMATIC
25W 25A
25V SEAT
25
25X
WATER
SHUT OFF
SOL.
77Z
13
SCRUB BRUSH
SOL.
(-)
BRUSH DECK ACTUATOR
25Z
25W
25A
25Z
W/BRN.
GRN.
ORG.
BLK.
BLK./WHT
WHT
250 OHM
50 WATT
1A
M
M
2+ HP
A1
DRIVE MTR.
16 PIN
22,22A
1A
VAC. ON
LOWER
B
OPTION
77C
L
5,5A
7O
31 UP
7G
Y
Y
8
7F,7G 7O,7N
30 DOWN
4
Y
9
LOADED Y
7E,7F
7N,7M
10 29 DOWN Y
Y 14
17 14
7A,7B
13 7A,7B
15 14 (B-)
11
34
32A
BRUSH
RAISE
DECK
SWITCH
36
OFF
25F
7D,7E
25G
25F OFF
25A
26
CC
VACUUM
MOTOR(S)
SCRUB BRUSH
MOTORS
300 RPM
2
26
36
33
25G,H,J
(B-) (M-)
1,1A,1B
BATT.
IGN. 2
3
ACC
CB-5
10 AMP
3
3A
ET-103
25
A
1207-1141
FU-1
70 AMP
3C
2 AMP SB
FU-3
6B
D
C
VAC. OFF
RAISE
VAC. ON 24
SQUEEGEE
SWITCH 22A
7P
21
23
23A
22
RED
SQUEEGEE
ACTUATOR
20
OPEN IN REVERSE
(C) (NC)
7C,7P,7R
37
23A
24
23
8M
7R
7B
3A
D-100
SPRAY WAND SWITCH
SPRAY WAND PUMP
MTR.
OPTION
7-60-05017
CB-6
10 AMP.
3A
3B
3C
8
8 (+)
1D
7L
(-)
77D
1E
HORN SW.
HORN
SL-SW
3D
4
TO SOLUTION LIGHT
RH-SW
3E
3D,
3E
5,5A
5
TO RECOVERY LIGHT
ESP-SW
CB-7
10 AMP.
3B
MTR.
ESP-SW
3D
7-60-05013
ESP-MOTOR
BEACON LIGHT
BACK UP ALARM
1B
1A
OPTIONS
BACK UP SWITCH
HEAD LIGHT
TAIL LIGHT
LIGHT
SWITCH
CB-8
25 AMP.
9A
SWEEP
OPTION
BROOM MOTOR
A1
A2
CB-9
25 AMP.
VAC MTR.
9A
(C)
TO K-SW
IGN. TERMINAL
(NO)
LIMIT SW.
TABLE OF CONTENTS - CHAPTER 2
Frame Assembly ..................................................................................................................................... 2-2
Front Wheel Drive .................................................................................................................................... 2-3
Rear Assembly ....................................................................................................................................... 2-4
Steering .................................................................................................................................................. 2-5
Brake Assembly ..................................................................................................................................... 2-6
Console Assembly .................................................................................................................................. 2-8
Scrub Deck Actuator ............................................................................................................................... 2-10
Scrub Deck Assembly (34”) .................................................................................................................... 2-12
Scrub Deck Assembly (38”) .................................................................................................................... 2-14
Brushes and Pad Drivers(34”) .................................................................................................................. 2-16
Brushes and Pad Drivers(38”) .................................................................................................................. 2-17
Squeegee Lift Assembly ......................................................................................................................... 2-18
Side Squeegee (34”) ................................................................................................................................ 2-20
Side Squeegee (38”) ................................................................................................................................ 2-22
Rear Squeegee (34” & 38”) ...................................................................................................................... 2-24
Seat Assembly ....................................................................................................................................... 2-26
Vacuum Assembly .................................................................................................................................. 2-28
Forward/Reverse ..................................................................................................................................... 2-30
Recovery Tank ......................................................................................................................................... 2-32
Solution Tank .......................................................................................................................................... 2-33
Solution Control ...................................................................................................................................... 2-34
Instrument Power Panel .......................................................................................................................... 2-36
Decals .................................................................................................................................................. 2-40
AMERICAN LINCOLN TECHNOLOGY
ENCORE R
2-1
FRAME ASSEMBLY
KEY NO.
1
2
3
4
5
6
7
8
9
10
11
PART NO.
7-27-07190
7-66-05011-1
7-70-05175
7-77-00122
7-13-07184
7-58-05287
DESCRIPTION
Main Frame Weldment
Roller - Bumper
Pin - Roller Bumper
Rubber - Front Splash
Clamp - Front Splash
Plate - Decal
8-79-00030
2-00-00540
7-58-05291
Ground Strap
Retaining Ring
Support - Drain Hose
1
8
1
Lock Washer, #10 Med. HS
Nut Hex MS #10 - 24 x .375 x 1.25
Screw, ¼ - 20 x .750 HHC
Nut ¼ - 20 Insert Fiber
Screw, 5/16 - 18 x .750 HHC
Nut, 5/16 - 18 Insert Fiber
Lock Washer, 3/8 Bolt
Flat Washer, 1.250 x .280 x .090
Screw, HHC .25-20 x 1.25 (Nickel)
Screw RHM #10 - 24 x .625
2
2
5
5
2
2
1
2
1
2
HARDWARE USED:
H10
2-00-00519
H11
2-00-00605
H15
2-00-00221
H26
2-00-00641
H34
2-00-00208
H46
2-00-00644
H120
2-00-03829
H140
2-00-00447
H276
2-00-00223
H269
2-00-00118
C1800/0108
2-2
QTY.
1
4
4
1
1
1
AMERICAN LINCOLN TECHNOLOGY
ENCORE R
FRONT WHEEL DRIVE
5
H50
H52
H153
7
8
6
H44
H35
4
H253
H48
H53
3
H48
7
H53
H52
H48
H254
2
C1811/0003
1
9
KEY NO.
PART NO.
DESCRIPTION
1
2
3
4
5
0785-083
7-58-05280-1
7-58-05281
8-57-05022
7-57-05032
Drive Assembly
Plate, Drive MTG.
Dive Mounting Bracket
Sprocket
Pivot Caster
1
1
1
1
1
6
7
8
9
7-13-05065
2-95-04182
7-30-08017
7-30-05105
Steering Chain
Fiber Nut
Guide - Motor Wires
Guard, Wheel
1
8
1
1
Screw, 5/16 - 18 x 1.000 HHM
Lock Washer, 5/16 HS Med.
Screw, 3/8 - 16 x 1.000 HHC
Screw, 3/8 -16 x 1.50 HHC
Flat Washer, .750 x .390 x .094
Lock Washer, Helical Spring 3/8 Med.
Washer
Nut .75-Hex Nyloc Jam
Screw-HHM .375-24 x .75
2
2
8
4
10
8
4
1
4
HARDWARE USED:
H35
2-00-02708
H44
2-00-00530
H48
2-00-00233
H50
2-00-00234
H52
2-00-00402
H53
2-00-02310
H153
2-00-03266
H253
2-00-05120
H254
2-00-04625
QTY.
C1811/0003
AMERICAN LINCOLN TECHNOLOGY
ENCORE R
2-3
REAR ASSEMBLY
1
4
H53
USE LOCTITE
609 ON BEARINGS
H46
H52
H69
H47
H153
3
REMOVE SELF ADJUSTING
SPRING FROM ASSY
5
C1801/0001
KEY NO.
1
2
3
4
5
PART NO.
DESCRIPTION
QTY.
7-70-05184
7-89-08096
0860-636
34711B
2-00-04636
Shaft - Rear Axle
Wheel - Rear (Polyurethane)
Brake - LH
Wheel Cover
Bearing
1
2
1
2
4
Nut, 5/16-18 Fiber Insert
Screw, 3/8-16 x .750 HHC
Flat Washer, .750 x .390 x .094
Lock Washer, Helical Spring 3/8 Med.
Screw, 5/16-18 x .875 HHC
Washer
4
2
8
2
4
2
HARDWARE USED
H46
H47
H52
H53
H69
H153
2-00-00644
2-00-00232
2-00-00402
2-00-02310
2-00-01255
2-00-03266
C1801/0001
2-4
AMERICAN LINCOLN TECHNOLOGY
ENCORE R
STEERING
1
2
8
9
3
H26
H84
4
H20
6
H44
5
C1812/0002
7
KEY NO.
PART NO.
DESCRIPTION
QTY.
1
2
3
4
5
7-89-08083
2-00-05417
7-70-05176
7-37-00001
7-25-06031
Steering Wheel
Roll Pin
Shaft-Steering Wheel
Universal Joint
Flange-Steering Mount
1
1
1
1
2
6
7
8
9
2-00-05159
7-70-05182
7-33-02393
7-75-01196
Bearing
Steering Shaft
Hose
Spacer, Steering Wheel
2
1
10”
1
Screw, 1/4 x 20 x 1.500 HHC
Nut, 1/4-20 Insert Fiber
Lock Washer, 5/16 HS Med.
Screw, 5/16 - 18 x 2.250 HHC
2
2
3
3
HARDWARE USED:
H20
H26
H44
H84
2-00-00203
2-00-00641
2-00-00530
2-00-00228
C1812/0002
AMERICAN LINCOLN TECHNOLOGY
ENCORE R
2-5
BRAKE ASSEMBLY - PARTS LIST
KEY NO.
PART NO.
DESCRIPTION
QTY.
1
2
3
4
5
7-57-05051
7-55-00032
7-57-05050
7-55-00019-1
7-50-05145
Pivot - Brake Pedal
Arm - Brake Pedal Weldment
Pivot Brake Pedal
Arm - Parking Brake Pedal
Pad - Brake Pedal
1
1
1
1
1
6
7
8
9
10
8-13-07067
8-09-01069
7-76-00013
7-66-00187
8-14-01006
Parking Bake Clip
Bushing
Spring
Rod - Brake LH
Clevis
1
1
1
1
1
11
12
13
14
15
7-76-00102
2-00-04909
2-00-03635
2-00-00767
0860-636
Spring
Yoke Pin Assy
Spring Pin
Cotter Pin
Brake - LH
1
1
1
1
Ref.
Screw, 1/4-20 X 1.500 HHC
Nut, 1/4-20 Fiber Insert
Washer, .625 x .281 x .063
Screw, 3/8-16 x 1.000 HHC
Screw, 3/8-16 x 1.500 HHC
Flat Washer, .750 x .390 x .094
Nut, 3/8-16 Stop
Screw, HHC .25 - 20 x 3.00
1
4
5
1
2
2
3
1
HARDWARE USED:
H20
H26
H27
H48
H50
H52
H55
H233
2-00-00203
2-00-00641
2-00-03702
2-00-00233
2-00-00234
2-00-00402
2-00-00643
2-00-02638
C1802/0004
2-6
AMERICAN LINCOLN TECHNOLOGY
ENCORE R
BRAKE ASSEMBLY - EXPLODED VIEW
H20
8
5
7
6
H48
H27
11
H27
H86
12
9
H26
10
H233
13
4
3
FRAME (REF)
H52
TEMPORARY REPLACE
WITH HARDWARE
MTG KICK PANEL (ASSY 71210)
2
15
H27
H55
C1802/0004
14
H27
1
H55
AMERICAN LINCOLN TECHNOLOGY
ENCORE R
H50 H26
2-7
CONSOLE ASSEMBLY - PARTS LIST
KEY NO.
PART NO.
DESCRIPTION
QTY.
1
2
3
4
5
7-52-00164
7-52-00165-1
8-06-01084
7-52-00167
2-95-04182
Panel - Kick (Welded)
Panel - Dash
Bearing
Panel - Steering
Nut - 3/8 - 16 Elastic Stop Nut
1
1
1
1
6
6
7
8
9
7-33-05121
8-82-00030
8-32-09008
7-90-07424
Console
Switch - Push Button Lid
Horn
Wire - IE
1
1
1
1
Flat Washer, .500 x .219 x .063
Screw, 1/4-20 x .625 HHC
Nut, 1/4-20 Fiber Insert
Washer, .625 x .281 x .063
Lock Washer, Helical Spring
Carriage Bolt, ¼ - 20 x .750
Carriage Bolt, 3/8 - 16 x 1.000
Screw, #10 - 24 x .500 T/C HHC
Screw, 1/4-20 x 1.125 HHC Cad. Pl.
1
2
2
6
4
2
6
1
2
HARDWARE USED:
H9
H24
H26
H27
H72
H86
H131
H136
H185
2-00-00426
2-00-00220
2-00-00641
2-00-03702
2-00-00518
2-00-03575
2-00-03855
2-00-03940
2-00-02588
C1817/0108
2-8
AMERICAN LINCOLN TECHNOLOGY
ENCORE R
CONSOLE ASSEMBLY - EXPLODED VIEW
H26 H27 2
3
H86
H27
H24
H131
4
H9
H136
6
1
H72
H185
C1817/0108
7
8
AMERICAN LINCOLN TECHNOLOGY
ENCORE R
5
2-9
SCRUB DECK ACTUATOR - PARTS LIST
KEY NO.
PART NO.
DESCRIPTION
QTY.
1
2
3
4
5
7-81-00208
0782-140
7-66-00189
7-23-03117
7-03-04160
Support - Actuator
Actuator
Rod-Brush Spring
Washer - Spring Guide
Arm - Pivot
1
1
1
1
1
6
7
8
9
10
7-03-04161
7-57-05048
7-55-08158
7-76-00117
2-95-04182
Arm - Deck
Pivot - Brush Actuator
Pin - Brush lift Pivot
Spring
Nut - 3/8 - 16 Elastic Stop Nut
1
1
1
1
3
11
12
13
14
2-95-04689
7-82-00043
2-00-00772
2-00-05293
Washer - Axle
Switch
Cotter Pin
Lube Fitting
1
3
1
1
Screw, 3/8 - 16 1.000 HHC
Lock Washer, Helical Spring 3/8 Med.
Nut, 3/8 - 16 Hex
Screw, ½ - 13 x 3.000HHC
Flat Washer, 1.063 x .531 x .094
Nut, ½-13 Fiber Lock
Shoulder Screw, ½ - ¾
3
1
1
1
4
1
1
HARDWARE USED:
H48
H53
H54
H61
H62
H65
H245
2-00-00233
2-00-02310
2-00-02360
2-00-02616
2-00-00405
2-00-04936
2-00-05401
C1821/9807
2-10
AMERICAN LINCOLN TECHNOLOGY
ENCORE R
SCRUB DECK ACTUATOR - EXPLODED VIEW
AMERICAN LINCOLN TECHNOLOGY
ENCORE R
2-11
SCRUB DECK ASSEMBLY (34”) - PARTS LIST
KEY NO.
PART NO.
DESCRIPTION
1
2
3
4
5
7-27-07191-1
7-08-00913
7-08-00914
7-03-04176
2-00-04602
Scrub Deck (34”)
Bracket - Brush Arm
Bracket Brush Load
Link - Brush Frame
Clamp
1
4
1
4
2
6
7
8
9
10
7-33-09034
7-20-00006
7-23-03056
0785-088
0782-144
Hub Brush Driver
Brush Driver-Male with Hub
Nut
Reducer Assy (Ratio 18.5 to 1)
Brush Motor
2
2
8
2
2
11
12
2-00-03169
2-00-00706
Spacer
¼ sq x 1 ¼ Key
4
2
Screw, #10-24 x .750 RHM
Nut, Hex Insert Fiber #10 - 24
Lock Washer, 5/16 HS Med.
Nut, 5/16 - 18 Insert Fiber
Screw, 3/8 - 16 x 1.000 HHC
Lock Washer Helical Spring 3/8 Med.
Flat Washer, 1.063 x .531 x .094
Nut, Hex ½ - 13 x .750 x .437
Screw, 5/16 - 18 x .875 HHC
Screw, 5/16 - 18 x .625 HHC
Nut, Insert Fiber, .38-16 Heavy Nut
Shoulder Screw, ½-3/4
Screw, .31 - 18 x .75 Zinc PL HSHC
Screw, HSHC .31 - 18 x 1.00
2
2
8
10
6
6
3
6
10
8
1
1
2
8
HARDWARE USED:
H7
2-00-00056
H12
2-00-01246
H44
2-00-00530
H46
2-00-00644
H48
2-00-00233
H53
2-00-02310
H62
2-00-00405
H64
2-00-00596
H69
2-00-01255
H151
2-00-00213
H244
2-00-05297
H245
2-00-05401
H273
2-00-03214
H305
2-00-00809
QTY.
C1809/9906
2-12
AMERICAN LINCOLN TECHNOLOGY
ENCORE R
SCRUB DECK ASSEMBLY (34”) - EXPLODED VIEW
H46
3
4
MTG BRACKETS
TO TOP SIDE
OF FRAME FLANGE
H244
H62
H69
H245
2
8
H151
9
10
H305
H7
H44
5
H64
1
H12
H53
H48
H69
11
12
7
6
R. H. BRUSH
H273
L.H. BRUSH
C1809/9906
AMERICAN LINCOLN TECHNOLOGY
ENCORE R
2-13
SCRUB DECK ASSEMBLY (38”) - PARTS LIST
KEY NO.
PART NO.
DESCRIPTION
QTY.
1
2
3
4
5
7-27-07192-1
7-08-00913
7-08-00914
7-03-04176
2-00-04602
Scrub Deck (38”)
Bracket - Brush Arm
Bracket Brush Load
Link - Brush Frame
Clamp
1
4
1
4
1
6
7
8
9
10
7-33-09034
7-20-00006
7-23-03056
8-13-07091
2-00-03169
Hub Brush Driver
Brush Driver-Male with Hub
Nut
Clamp
Spacer
2
2
8
1
4
11
12
13
0785-088
0782-144
2-00-00706
Reducer Assy (Ratio 18.5 to 1)
Brush Motor
¼ sq x 1 ¼ Key
2
2
2
Screw, #10-24 x .750 RHM
Nut, Hex Insert Fiber #10 - 24
Lock Washer, 5/16 HS Med.
Nut, 5/16 - 18 Insert Fiber
Screw, 3/8 - 16 x 1.000 HHC
Lock Washer Helical Spring 3/8 Med.
Flatwasher, 1.063 x .531 x .094
Nut, Hex ½ - 13 x .750 x .437
Screw, 5/16 - 18 x .875 HHC
Screw, 5/16 - 18 x .625 HHC
Nut, Insert Fiber, .38-16 Heavy Nut
Shoulder Screw, ½-3/4
Screw, .31 - 18 x .75 Zinc PL HSHC
Screw, HSHC .31 - 18 x 1.00
1
1
8
10
6
6
3
6
10
8
1
1
2
8
HARDWARE USED:
H7
H12
H44
H46
H48
H53
H62
H64
H69
H151
H244
H245
H273
H305
2-00-00056
2-00-01246
2-00-00530
2-00-00644
2-00-00233
2-00-02310
2-00-00405
2-00-00596
2-00-01255
2-00-00213
2-00-05297
2-00-05401
2-00-03214
2-00-00809
C1893/9906
2-14
AMERICAN LINCOLN TECHNOLOGY
ENCORE R
SCRUB DECK ASSEMBLY (38”) - EXPLODED VIEW
H46
3
H244
H62
H69
H245
2
4
9
12
11
H151
H7
8
5
H305
H64
H44
H46
H53
1
H48
10
C1893/9906
H69
13
6
R.H. BRUSH
7
H273
L.H. BRUSH
AMERICAN LINCOLN TECHNOLOGY
ENCORE R
2-15
BRUSHES AND PAD DRIVERS(34”)
PAD ASSEMBLY 17” (17520C)
PART NO.
53135B
833802
838301
962495
56949A
962737
DESCRIPTION
Pad Driver, Molded Face 17” OD
Gimbal, Brush
Spring, Brush Holder
Screw, ¼ - 20 x 1
Center - Lok 3
Screw, #8 x 5/8 pan HD. Phillips, Sheet Metal
QTY.
1
1
1
6
1
3
BRUSH ASSEMBLY GRIT 17” (11425B)
PART NO.
51462B
833802
838301
962495
DESCRIPTION
Brush, Grit 17” OD
Gimbal, Brush
Spring, Brush Holder
Screw, ¼ - 20 x 1
QTY.
1
1
1
6
BRUSH ASSEMBLY POLY 17” (11424B)
PART NO.
51461B
833802
838301
962495
2-16
DESCRIPTION
Brush, Polypropylene 17” OD
Gimbal, Brush
Spring, Brush Holder
Screw, ¼ - 20 x 1
QTY.
1
1
1
6
AMERICAN LINCOLN TECHNOLOGY
ENCORE R
BRUSHES AND PAD DRIVERS(38”)
PAD ASSEMBLY 19” (17524B)
PART NO.
DESCRIPTION
QTY.
53143B
833802
838301
962495
56949A
962737
Pad Driver, Molded Face 19” OD
Gimbal, Brush
Spring, Brush Holder
Screw, ¼ - 20 x 1
Center - Lok 3
Screw, #8 x 5/8 pan HD. Phillips, Sheet Metal
1
1
1
6
1
3
BRUSH ASSEMBLY 19” (11433B)
PART NO.
DESCRIPTION
QTY.
51477B
833802
838301
962495
Brush, Grit 19” OD
Gimbal, Brush
Spring, Brush Holder
Screw, ¼ - 20 x 1
1
1
1
6
BRUSH ASSEMBLY 19” (11433B)
PART NO.
DESCRIPTION
QTY.
51478B
833802
838301
962495
Brush, Polypropylene 19” OD
Gimbal, Brush
Spring, Brush Holder
Screw, ¼ - 20 x 1
1
1
1
6
AMERICAN LINCOLN TECHNOLOGY
ENCORE R
2-17
SQUEEGEE LIFT ASSEMBLY - PARTS LIST
KEY NO.
PART NO.
DESCRIPTION
QTY.
1
2
2
3
4
5
7-25-02096
0760-537
0760-538
7-33-02377
2-00-02216
7-03-04171
Fitting
Kit Squeegee, 41” Encore R (34”)
Kit Squeegee, 47” Encore R (38”)
Hose
Hose Clamp
Arm - Squeegee Lift
1
1
1
1
1
1
6
7
8
9
10
7-08-00908
7-23-03056
7-80-05081
0782-139
8-76-00045
Bracket-Squeegee Lift
Nut
Threaded Rod
Actuator
Spring
1
2
1
1
1
11
12
13
7-76-00102
2-00-04321
7-08-02021
Spring
Clamp Collar
Bracket, Squeegee Actuator
2
3
1
Screw, 1/4-20 x 1.500 HHC
Nut, Hex 1/4-2- x .437 x .218
Nut, ½-20 Fiber Insert
Washer, .625 x .281 x .063
Screw, 5/16 - x 1.000 HHM
Carriage Bolt, 5/16 - 18 x 1.000
Screw, 5/16 - 18 x 2.000 HHC
Nut, Hex 5/16 - 18 x .500 x .265
Nut, 5/16 - 18 Insert Fiber
Flat Washer, .344 x 2.000 x .062
Flat Washer, 1.000 x ..516 x .063
Nut, Hex MS #10 - 32 x .375 x .125
Screw, 5/16 - 18 x 1.25 Grade 8
3
2
5
4
1
2
1
1
2
2
2
1
1
HARDWARE USED:
H20
H25
H26
H27
H35
H36
H39
H45
H46
H135
H146
H200
H237
2-00-00203
2-00-00594
2-00-00641
2-00-03702
2-00-02708
2-00-00196
2-00-00218
2-00-00585
2-00-00644
2-00-05298
2-00-00420
2-00-00626
2-00-05356
C1803/9909
2-18
AMERICAN LINCOLN TECHNOLOGY
ENCORE R
SQUEEGEE LIFT ACTUATOR - EXPLODED VIEW
H26 H25
H20
H39
10
11
12
4
9
H27
H26
H200
7
13
8
3
H146
H27
6
H26
H135
1
5
H237
H36
H35
H45
C1803/9909
H26
2
AMERICAN LINCOLN TECHNOLOGY
ENCORE R
2-19
SIDE SQUEEGEE (34”) - PARTS LIST
KEY NO.
PART NO.
DESCRIPTION
QTY.
1
2
3
3
4
5
5
7-57-05047
7-55-08153
7-86-08054
7-86-08052
7-55-08154
7-77-00118
7-77-00119
Pivot-Side Squeegee
Pin-Side Squeegee
Tool-RH Side Squeegee (Weldment)
Tool-LH Side Squeegee (Weldment)
Pin-Side Squeegee Lock
Rubber-RH Side Squeegee (Inner)
Rubber-LH Side Squeegee (Inner)
2
2
1
1
2
1
1
6
6
7
7
8
9
7-77-00121
7-77-00120
7-13-07182
7-13-07183
7-89-08023
2-00-05249
Rubber-RH Side Squeegee (Outer)
Rubber-LH Side Squeegee (Outer)
Clamp-RH Side Squeegee
Clamp-LH Side Squeegee
Roller
Hair Pin (Cotter)
1
1
1
1
1
4
Screw, ¼ - 20 x 1.000 HHC
Nut, Hex 1/4-20 x .437 x .218
Washer, .625 x .281 x .063
Screw, 5/16-18 x .750 HHC
Flat Washer, .687 x .344 x .062
Lock Washer, 5/16 HS Med
Nut, 5/16-18 Insert Fiber
Screw, 3/8 - 16 x 2.000 HHC
Flat Washer, .750 x .390 x .094
Lock Washer, HS 3/8 Med.
Nut, 3/8 - 16 Hex
Nut, Hex Jam .38 - 16
5
1
12
2
2
1
2
1
2
1
1
1
HARDWARE USED:
H17
H25
H27
H34
H43
H44
H46
H51
H52
H53
H54
H236
2-00-00205
2-00-00594
2-00-03702
2-00-00208
2-00-00409
2-00-00530
2-00-00644
2-00-00216
2-00-00402
2-00-02310
2-00-02360
2-00-02369
C1805/9807
2-20
AMERICAN LINCOLN TECHNOLOGY
ENCORE R
SIDE SQUEEGEE (34”) - EXPLODED VIEW
4
2
9
H46
1
H63
H44
H34
H34
H25
3
5
6
7
LEFT SIDE
H27
H17
4
2
RIGHT SIDE
H43
H44
9
H34
H51
1
8
3
H25
H52
H236
C1805/9807
H46
H34
H53
H54
H27
H17
5
7
6
AMERICAN LINCOLN TECHNOLOGY
ENCORE R
2-21
SIDE SQUEEGEE (38”) - PARTS LIST
KEY NO.
PART NO.
DESCRIPTION
QTY.
1
2
3
3
4
5
7-57-05047
7-55-08153
7-86-08053
7-86-08055
7-55-08154
7-77-00118
Pivot - Side Squeegee
Pin Side Squeegee
Tool - RH Side Squeegee (Weldment 38”)
Tool - LH Side Squeegee (Weldment 38”)
Pin - Side Squeegee Lock
Rubber - Side Squeegee (Inner)
2
2
1
1
2
2
6
7
7
8
9
7-77-00121
7-13-07182
7-13-07183
7-89-08023
2-00-05249
Rubber - Side Squeegee (Outer)
Clamp RH Side Squeegee
Clamp LH Side Squeegee
Wheel
Hair Pin - Cotter
2
1
1
2
2
Screw, ¼ - 20 x 1.000 HHC
Nut, Hex 1/4-20 x .437 x .218
Washer, .625 x .281 x .063
Screw, 5/16-18 x .750 HHC
Flat Washer, .687 x .344 x .062
Lock Washer, 5/16 HS Med
Nut, 5/16-18 Insert Fiber
Screw, 3/8 - 16 x 2.000 HHC
Flat Washer, .750 x .390 x .094
Lock Washer, Helical Spring 3/8 Med.
Nut, 3/8 - 16 Hex
Nut, Hex Jam .38 - 16
5
1
12
2
2
1
2
1
2
1
1
1
HARDWARE USED:
H17
H25
H27
H34
H43
H44
H46
H51
H52
H53
H54
H236
2-00-00205
2-00-00594
2-00-03702
2-00-00208
2-00-00409
2-00-00530
2-00-00644
2-00-00216
2-00-00402
2-00-02310
2-00-02360
2-00-02369
C1868/9807
2-22
AMERICAN LINCOLN TECHNOLOGY
ENCORE R
SIDE SQUEEGEE (38”) - EXPLODED VIEW
4
H43
2
RIGHT SIDE
H44
9
H34
H51
1
H34
H52
8
3
H236
H25
H53
H54
H46
H27
5
H17
6
7
5
3
4
1
H43
LEFT SIDE
H44
H51
H25
H34
H52
H46
9
2
6
H34
H53
H236
7
8
H54
H27
C1868/9807
AMERICAN LINCOLN TECHNOLOGY
ENCORE R
H17
2-23
REAR SQUEEGEE (34” & 38”) - PARTS LIST
KEY NO.
PART NO.
DESCRIPTION
QTY.
1
1*
2
3
4*
5
7-77-00116
7-77-00123
7-77-00096
7-13-07195
7-29-00243
7-13-07192
Rubber - Inner Squeegee (38)
Rubber - Inner Squeegee (34)
Blade - Outer Squeegee
Clamp - Squeegee
Gasket - Tool Inlet
Clamp - End, Squeegee (LH)
1
1
1
1
1
1
6
7
8*
9*
2-00-01116
7-13-07191
2-00-04962
18816K
Weld Nut (Elongated)
Clamp - End, Squeegee (RH)
O-Ring
Squeegee
2
1
2
1
*These are the only parts used for the 34” Rear Squeegee Kit, they (all but 1*)
are also used on 38”.
HARDWARE USED:
H20*
H120
2-00-00203
2-00-03829
Screw, ¼ - 20 x 1.500HHC
Lock Washer, 3/8 Bolt
2
2
C1866/9903
2-24
AMERICAN LINCOLN TECHNOLOGY
ENCORE R
REAR SQUEEGEE (34” & 38”) - EXPLODED VIEW
8
4
H120
9
3
H20
1
7
5
2
6
AMERICAN LINCOLN TECHNOLOGY
ENCORE R
2-25
SEAT ASSEMBLY - PARTS LIST
KEY NO.
PART NO.
DESCRIPTION
QTY.
1
2
3
4
5
7-52-00168
7-16-07406
7-72-05005
7-69-00004
8-51-05016
Panel-Seat Pedestal(Weldment)
Seat Deck (Weldment)
Seat Adjuster Kit
Seat
Pan-Battery
1
1
1
1
1
6
7
8
9
10
7-66-00186
0875-101
7-16-07405
7-16-07404
8-06-05004
Rod-Seat Panel
Power Cable
Cover - Side
Cover - Side
Terminal Block
1
1
1
1
2
11
12
13
14
8-21-04016
8-21-04050
7-39-00006
8-75-01205
Edging
Edging
Knob
Spacer, Blower Mounting
1
1
1
2
Screw, #10 - 24 x .750 RHM
Nut, Hex MS #10 - 24 x .375 x .25
Screw, 1/4-20 x 1.500 HHC
Nut, Hex ¼ - 20 x .437 x .218
Nut, 1/4-20 Fiber Insert
Washer, .625 x .281 x .063
Screw, 5/16-18 x 1.000 HHM
Flat Washer, .687 x .344 x .062
Nut, 5/16-18 Fiber Insert
Lock Washer
Screw, ¼ - 20 x 1.125 HHC Cad Pl
Screw, .25 - 20 x .875 HHC STL
2
2
2
4
4
8
5
8
10
2
2
2
HARDWARE USED:
H7
H11
H20
H25
H26
H27
H35
H43
H46
H159
H185
H229
2-00-00056
2-00-00605
2-00-00203
2-00-00594
2-00-00641
2-00-03702
2-00-02702
2-00-00409
2-00-00644
2-00-00512
2-00-02588
2-00-01490
C1816/0003
2-26
AMERICAN LINCOLN TECHNOLOGY
ENCORE R
SEAT ASSEMBLY - EXPLODED VIEW
4
3
2
12
H43
H185
8
H46
7
1
H27
H46
5
6
H35
13
H43
11
H46
H11
10
SEE DETAIL A
H159
H7
H27
H25
9
H26
14
H20
C1816/0003
ATTACH HARNESS
WIRES HERE
ATTACH POWER
CABLE HERE
DETAIL A
SCALE .25
AMERICAN LINCOLN TECHNOLOGY
ENCORE R
2-27
VACUUM ASSEMBLY - PARTS LIST
KEY NO.
PART NO.
DESCRIPTION
QTY.
1
2
3
4
5
7-48-00033-1
7-33-02373
0782-124
8-88-00016
2-00-02220
Vac Manifold
Flexible Hose
Vac Fan
Dust Unloader Valve
Hose Clamp
1
1
1
1
1
6
7
8
9
10
7-10-04008
Float Cage
1
7-26-04012
Float Ball
1
11
12
13
14
15
2-95-04182
Nut
2
7-75-01184
2-22-00003
Spacer
Vac Fan Gasket
3
1
16
17
18
19
2-00-02216
2-00-04431
7-58-05285-1
7-30-05103-1
Hose Clamp
Cover
Plate-Vac Inlet
Guard-Vac Motor
3
1
1
1
Screw, 1/4-20 x 2.000 HHC
Lock Washer, 5/16 HS Med
Nut, Hex 5/16 - 18 x .500 x .265
Screw, 3/8-16 x 1.000 HHC
Flat Washer, .750 x .390 x .094
Lock Washer, Helical Spring
Screw, #10 - 16 x .500
Screw, #10-24 x .500 T/C HHC
Screw, 5/16 - 18 x 1.000 HHC
Flat Washer, .625 x .203 x .031
3
2
2
2
2
6
8
4
2
4
HARDWARE USED:
H14
H44
H45
H48
H52
H72
H126
H136
H178
H230
2-00-00219
2-00-00530
2-00-00585
2-00-00233
2-00-00402
2-00-00518
2-00-03466
2-00-03940
2-00-00206
2-00-00466
C1815/9807
2-28
AMERICAN LINCOLN TECHNOLOGY
ENCORE R
VACUUM ASSEMBLY - EXPLODED VIEW
AMERICAN LINCOLN TECHNOLOGY
ENCORE R
2-29
FORWARD/REVERSE PEDAL - PARTS LIST
KEY NO.
PART NO.
DESCRIPTION
QTY.
1
2
3
4
5
7-81-00222
7-52-00166
7-57-05049
7-55-00027-1
7-42-05165
Support - FWD/REV Pedal
Panel - Floor
Pivot - FWD/REV Pedal
Pedal - FWD/REV
Link - Potentiometer
1
1
1
1
1
6
7
8
9
10
8-14-01006
2-00-05249
2-00-04909
2-00-05408
2-95-04182
Clevis
Hair Pin-Cotter
Pin-Clevis
Pin - Foot Pedal
Nut, 3/8 - 16 Elastic Stop
1
3
1
1
1
11
12
13
0775-230
7-03-04196
8-82-00058
Controller - FWD/REV
Arm - FWD/REV Controller
Switch
1
1
1
Screw ¼ - 20 x .750 HHC
Nut, 1/4-20 Fiber Insert
Washer, .625 x .281 x .063
Lock Washer, 5/16 HS Med.
Nut, Hex 5/16 - 18 x .500 x .265
Screw, 3/8 - 16 x .750 HHC
Nut, Fiber Insert #8-32 Steel
Screw, #8-32 x 1.500 RHM
Lock Washer
Nut, Hex Jam, .25-20
Flat Washer, .437 x .192 x .031-s
Screw, HHM 5/16 - 18 3.50
Screw, RHM #10-32 ¼ Pl. (Steel)
2
2
3
2
6
1
2
2
2
2
2
2
2
HARDWARE USED:
H15
H26
H27
H44
H45
H47
H89
H121
H159
H165
H189
H277
H307
2-00-00221
2-00-00641
2-00-03702
2-00-00530
2-00-00585
2-00-00232
2-00-01372
2-00-00090
2-00-00512
2-00-00589
2-00-00460
2-00-05164
2-00-02963
C1818/9906
2-30
AMERICAN LINCOLN TECHNOLOGY
ENCORE R
FORWARD/REVERSE PEDAL - EXPLODED VIEW
2
4
10
9
3
H15
1
H45
H159
H121
H307
H189
H48
H27
H26
6
H45
H45 H44
12
H89
C1818/9906
11
H277
13
AMERICAN LINCOLN TECHNOLOGY
ENCORE R
7
5
8
2-31
RECOVERY TANK
H126
H328
2
10
9
7
5
6
H197
1
H53
8
H278
3
C1810/0002
4
KEY NO.
PART NO.
DESCRIPTION
QTY.
1
2
3
4
5
7-83-04173
7-16-07399
2-00-02217
7-33-02378
7-09-01122
Recovery Tank
Cover - Tank Access
Hose Clamp
Hose - Drain
Bushing
1
1
1
1
1
6
7
8
9
10
7-09-01124
0775-164
7-25-02095
7-13-05064
7-25-02098
Bulk Head Fitting
Float Switch (Rev Gray)
Drain Plug Assy.
Chain
Plug - Pull
1
1
1
1
1
Screw, 3/8 - 16 x .750 HHC
Lock Washer, Helical Spring 3/8 Med.
Screw, #10 - 16 x .500
Washer, 1.00 x .391 x .06
Screw, .38 - 16 x .75 HSHC
Screw, T/FFH #8 - 15 x .75 Type A
2
3
2
3
1
6
HARDWARE USED:
H47
H53
H126
H197
H278
H328
2-00-00232
2-00-02310
2-00-03466
2-00-03979
2-00-03044
2-00-04062
C1810/0002
2-32
AMERICAN LINCOLN TECHNOLOGY
ENCORE R
SOLUTION TANK
2
9
6
H126
H328
5
4
1
8
3
H197
H53
BACK AND RIGHT
FRONT MTG HOLES
7
H47
LEFT FRONT MTG HOLE H278
10
C-1813/0002
KEY NO.
PART NO.
DESCRIPTION
1
2
3
4
5
7-83-04174
7-16-07399
7-09-01124
7-09-01122
7-87-02191
Solution Tank
Cover-Tank Access
Bulk Head Fitting
Bushing
Tube-Float Switch
1
1
1
1
1
6
7
8
9
10
0775-217
7-24-04053
7-25-02095
2-00-05064
7-33-02374
Float Switch
Filter-Solution
Drain Plug Assembly
Chain
Hose-Solution
1
1
1
1
Ref.
Screw, 3/8-16 x .750 HHC
Lockwasher, Helical Spring 3/8 Med.
Screw, #10-16 x .500
Washer 1.00 x .391 x .06
Screw, .38 - 16 x .75 HSHC
Screw, TF/PRH #8 - 15 x .75 Type A
2
3
2
3
1
6
HARDWARE USED:
H47
2-00-00232
H53
2-00-02310
H126
2-00-03466
H197
2-00-03979
H278
2-00-03044
H328
2-00-01994
QTY.
C1813/0002
AMERICAN LINCOLN TECHNOLOGY
ENCORE R
2-33
SOLUTION CONTROL - PARTS LIST
KEY NO.
PART NO.
DESCRIPTION
QTY.
1
2
3
4
5
8-13-07003
7-88-00073
7-25-02053
7-25-02037
2-00-05406
Clamp
Valve-Solution
Fitting-Straight
Fitting-Tee
Fitting-Elbow
1
1
1
1
2
6
7
8
9
10
2-00-02220
2-95-04388
7-33-02374
7-33-02376
7-33-02379-1
Hose Clamp
Hose Clamp
Hose-Solution Feed
Hose-Solution Feed (RH)
Hose-Solution Feed (LH)
6
2
2
1
1
11
12
13
7-33-02394
2-00-05380
8-21-04016
Hose
Elbow
Bumper
3”
1
1
Nut, 1/4-20 Fiber Insert
Washer, .625 x .281 x .063
4
2
HARDWARE USED:
H26
H27
2-00-00641
2-00-03702
C1822/9906
2-34
AMERICAN LINCOLN TECHNOLOGY
ENCORE R
SOLUTION CONTROL - EXPLODED VIEW
11
12
8
OVER SQUEEGEE
LIFT BRACKET
TO SOLUTION
TANK
H27
H26
2
C1822/9906
9
1
4
5
8
13
7
3
6
10
H26
AMERICAN LINCOLN TECHNOLOGY
ENCORE R
2-35
INSTRUMENT POWER PANEL - PARTS LIST
KEY NO.
PART NO.
DESCRIPTION
QTY.
1
2
3
4
5
7-52-00165-1
8-82-00041
0775-231
8-74-00014
2-00-04825
Panel-Dash
Key-Switch
Controller
Solenoid-Power Panel
Solenoid
Ref.
1
1
1
3
6
7
8
9
10
8-06-05004
8-28-05019
7-64-00035
46309A
7-82-00042
Fuse Block
Fuse-70 Amp
Module
Relay
Switch-Squeegee
3
1
1
1
1
11
12
13
14
15
7-82-00041
2-00-04942
7-48-05029
7-48-05024
2-00-05375
Switch-Brush Deck
Hole Plug
Hour Meter
Condition Meter
Switch-Blank
1
1
1
1
1
16
17
18
7-32-03018
8-08-00539
7-28-05013
0760-536
Fuse Holder
Bracket
Fuse-2 Amp SB
Wire & Harness Kit (Not Shown)
1
1
1
Screw, #10-24 x .500 RHM
Screw, #10-24 x .750 RHM
Lock Washer, #10 Med HS
Nut, Hex MS #10-24x .375 x .125
Nut, Hex Fiber Insert #10-24
Screw, 1/4-20 x .750 HHC
Screw, 1/4-20 x .625 HHC
Nut, Hex 1/4-20 x .437 x .218
Nut, 1/4-20 Insert Fiber
Washer, .625 x .281 x .063
Flat Washer, 1.063 x .531 x .094
Lock Washer, #10 Ext. Shaker proof
Lock Washer
Screw, #10-24 x 1.250 RHM
Flat Washer, .438 x .200 x .036 SST
Screw, 10-32 x .50 Cad Pl. STL RHM
4
3
2
2
6
3
6
3
12
12
1
2
3
2
2
2
HARDWARE USED:
H6
H7
H10
H11
H12
H15
H24
H25
H26
H27
H62
H124
H159
H187
H188
H222
2-00-00049
2-00-00056
2-00-00519
2-00-00605
2-00-01246
2-00-00221
2-00-00220
2-00-00594
2-00-00641
2-00-03702
2-00-00405
2-00-02296
2-00-00512
2-00-00071
2-00-01987
2-00-02848
C1830/9909
2-36
AMERICAN LINCOLN TECHNOLOGY
ENCORE R
INSTRUMENT POWER PANEL - EXPLODED VIEW
13
14
15
12
1
11
10
H124
2
H26
H159
3
H10
SEE DETAIL A
H15
H6
H222
H24
H187
4
H188
H11
H24
H27
H26
5
H6
H12
6
H26
H27
7
H12
H25 H27 H7
18
17
16
9
8
H12
C1830/9906
5
H62
H26
H27
DETAIL VIEW A
AMERICAN LINCOLN TECHNOLOGY
ENCORE R
2-37
INSTRUMENT POWER PANEL (cont.) - PARTS LIST
KEY NO.
PART NO.
DESCRIPTION
QTY.
1
2
3
4
5
7-40-05038
Light-Amber
6
6
7
8
9
10
8-64-00007
7-64-00020
7-64-00025
8-11-00044
Circuit Breaker-10A
Circuit Breaker-45A
Circuit Breaker-25A
Boot-Circuit Breaker
4
2
1
6
11
12
13
14
8-11-00051
7-18-00260-1
7-39-00028
7-64-00034
Boot-Circuit Breaker
Decal
Knob-Solution Flow Module
Module-Solution Flow
1
1
1
1
Nut, 3/8-32 NEF2A
1
HARDWARE USED:
H52
2-00-05405
C1829/9909
2-38
AMERICAN LINCOLN TECHNOLOGY
ENCORE R
INSTRUMENT POWER PANEL (cont.) - EXPLODED VIEW
12
13
H306
5
14
10
8
11
7
C1829/9906
9
AMERICAN LINCOLN TECHNOLOGY
ENCORE R
2-39
DECALS - PARTS LIST
KEY NO.
PART NO.
DESCRIPTION
QTY.
1
2
3
4
5
8-18-00396
Decal-General
1
7-18-00227
8-18-00395
8-50-05022
Decal-Electrical Hazard
Decal-Key Switch Warning
Pad, Non Skid
2
1
4
6
7
8
9
10
7-18-00261
7-18-00236
2-00-04115
8-18-00392
8-18-00402
Decal - Circuit Breaker
Decal - No Step
Pop Rivets
Decal Safety Latch
Decal-Pinch Point
1
2
2
1
2
11
12
13
14
15
7-18-00228
8-50-00014
7-18-00260-1
7-18-00262
8-50-05055
Decal-Patent
Serial Number Plate
Decal-Instrument Panel
Decal-Horn
Pad, Non-Skid FWD/REV
1
1
Ref.
1
1
16
17
7-50-05145
8-50-05030
Pad, Brake Pedal
Pad, Brake Lock
1
1
C1831/9907
2-40
AMERICAN LINCOLN TECHNOLOGY
ENCORE R
DECALS - EXPLODED VIEW
4
A
A
14
17
16
23.50
2.00
5.00
VIEW A-A
(FRONT OF SEAT)
3.00
3.00
WARNING
VIEW B-B
WARNING
Electrical hazard. Shocks could cause
severe personal injury and property
damage.
Disconnect battery before removing
this power panel cover.
To avoid personal injury or property
damage, read the operator's manual
before using this machine.
Maintenance and repairs must be
performed by authorized personnel only.
1
3
.38
4.00
MODEL NO.
SERIAL NO.
8
12
This Product is manufactured under
one or more of the following Patents,
or other Patents which may be pending.
U.S.- 4,006,506, 4,173,052,4,317,246,
4,317,252, 4,327,455, 4,328,014,
4,363,151, 4,363,152, 4,459,719,
4,369,540,4,429,433, 4,464,810,
5,194,077
10
11
2.00
B
B
10
.38
15
5
7
10
13
16
C1831/9807
5
10
AMERICAN LINCOLN TECHNOLOGY
ENCORE R
2-41
TABLE OF CONTENTS – CHAPTER 3
OPTIONS
Back-Up Alarm ....................................................................................................................................... 3-2
Light Package ......................................................................................................................................... 3-3
Overhead Guard ..................................................................................................................................... 3-4
Strobe Light With Overhead Guard ......................................................................................................... 3-5
Strobe Light Without Overhead Guard .................................................................................................... 3-7
Dual Vacuum System ............................................................................................................................. 3-9
Arm Rest Option ..................................................................................................................................... 3-10
Main Broom Sweeper Option .................................................................................................................. 3-11
Broom Drive Sweeper Option ................................................................................................................. 3-13
Fire Extinguisher ..................................................................................................................................... 3-15
Seat Switch Kit ....................................................................................................................................... 3-16
Frame and Flaps Option ......................................................................................................................... 3-17
ESP Recovery Option ............................................................................................................................. 3-19
Hopper Sweeper Option (Plastic) ........................................................................................................... 3-20
Hopper Sweeper Option (Steel) .............................................................................................................. 3-21
Dust Control Sweeper Option ................................................................................................................. 3-23
Spray Wand Option ................................................................................................................................ 3-25
Squeegee Wand Option ......................................................................................................................... 3-27
Battery Option 228 A. H. ......................................................................................................................... 3-28
Battery Option 330 A. H. ......................................................................................................................... 3-29
Battery Option 370 A. H. ......................................................................................................................... 3-30
Conncection Drawing Sweeper Option ................................................................................................... 3-31
Spare Parts Kits 34” & 38” & CE Kit ........................................................................................................ 3-33
Index
.................................................................................................................................................. 3-34
Warranty ................................................................................................................................................. 3-37
AMERICAN LINCOLN TECHNOLOGY
ENCORE R
3-1
BACK-UP ALARM
H121
H9
H165
7
H27
1
H89
EXISTING DECK MTG HARDWARE
TIE ALL WIRES TO
HARNESS USING ITEM #9
EXISTING
WIRE
BACK UP
ALARM SW
1B
2
EXISTING
( -) POST
2
5
BLK
3
6
8
RED
BACK UP
ALARM
4
C1823
KEY NO.
5
OPTION
0780-422
PART NO.
DESCRIPTION
QTY.
1
2
3
4
5
8-32-09009
2-00-04578
2-00-04282
3-61-00193
2-00-04626
Back-Up Alarm
Terminal-Bullet (Male)
Terminal- Ring
Wire 16 AWG Red
Terminal-Female Bullet
1
2
2
10’
2
6
7
8
9
3-61-00189
8-82-00058
2-00-04742
2-00-04345
Wire 16 AWG Black
Switch
Terminal #6SS
Tye-Raps
10’
1
1
10
Flat Washer, .500 x .219 x .063
Washer, .625 x .281 x .063
Nut, Fiber Insert 38-32 Steel
Screw, #8-32 x 1.500 RHM
Nut, Hex Jam, .25-20
2
1
2
2
2
HARDWARE USED:
H9
H27
H89
H121
H165
2-00-00426
2-00-03702
2-00-01372
2-00-00090
2-00-00589
C1823/9905
3-2
AMERICAN LINCOLN TECHNOLOGY
ENCORE R
LIGHT PACKAGE
H126
10 TO (-) ON CONDITION
METER WITH WIRE 7L
6
13
12
1
5
7
6
CONNECT EXISTING WIRE 5A
12
TO (-) ON
11
POWER PANEL
C1827/9810
H231
GREEN
3
BLACK
2
4
9
H12
8
OPTION
0780-428
KEY NO.
PART NO.
DESCRIPTION
QTY.
1
2
3
4
5
8-40-05052
8-40-05053
2-00-04210
8-75-01207
8-82-00027
Head Light
Tail Light
Clamp
Spacer-Tail Light MTG
Light Switch
1
1
1
2
1
6
7
8
9
10
2-00-03418
2-00-04479
2-00-04578
2-00-04626
2-00-01862
Term- .25 FISO
Term- 3 Way
Term- .156 Male Bullet
Term- .156 Female Bullet
Term- #10 Ring
3
1
2
2
1
11
12
13
2-00-04282
3-61-00189
3-61-00193
Term- Ring
Wire- 16 AWG BLACK
Wire - 16 AWG RED
1
10’
12’
Nut, Hex Fiber Insert #10-24
Screw, #10-16 x .500
Screw, Mach 10-24 x 3.50
2
4
2
HARDWARE USED:
H12
H126
H231
2-00-01246
2-00-03466
2-00-02933
C1827/9810
AMERICAN LINCOLN TECHNOLOGY
ENCORE R
3-3
OVERHEAD GUARD
OPTION
0780-432
KEY NO.
1
2
3
4
PART NO.
DESCRIPTION
QTY.
7-30-05086
7-30-05100
7-30-05101
7-30-04182
Top-Overhead Guard
Leg-Overhead Guard RH
Leg-Overhead Guard LH
Fibre Nut
1
1
1
8
Screw, 3/8-16 x 1.000 HHC
Flat Washer, .750 x .390 x .094
Screw, 1/2-13 x 1.250 HHC
Nut, 1/2-13 Fibre Lock
Flat Washer, 1.000 x .516 x .063
8
16
8
8
16
HARDWARE USED:
H48
H52
H57
H65
H146
2-00-00233
2-00-00402
2-00-00240
2-00-04936
2-00-00420
C1828/9712
3-4
AMERICAN LINCOLN TECHNOLOGY
ENCORE R
STROBE LIGHT WITH OVERHEAD GUARD - PARTS LIST
OPTION
0780-423 or 0780-459
KEY NO.
PART NO.
DESCRIPTION
QTY.
1
2
3
4
5
8-58-05228
3-61-02014
2-00-04345
3-61-00193
3-61-00189
Plate-Flasher Mounting
Convoluted Tube 40”
Ty-Rap
Wire - 16 GA (RED)
Wire - 16 GA (BLACK)
1
4
10ft.
10ft.
6
6
7
8
9
10
8-40-05020
8-40-05036
2-00-04626
2-00-04578
2-00-00828
2-00-04479
Red Strobe Light (12-48)
Amber Strobe Light (12-48)
Terminal
Terminal
Terminal
Terminal
1
1
2
2
1
1
Nut, Hex MS #10-24 x .375 x .125
Screw, 1/4-20 x .750 HHC
Lock Washer, Helical Spring
Screw, #10-24 x .750 THM
Lock Washer
2
4
4
2
2
HARDWARE USED:
H11
H15
H72
H115
H159
2-00-00605
2-00-00221
2-00-00518
2-00-03063
2-00-00512
C1824/9807
AMERICAN LINCOLN TECHNOLOGY
ENCORE R
3-5
STROBE LIGHT WITH OVERHEAD GUARD - EXPLODED VIEW
3-6
AMERICAN LINCOLN TECHNOLOGY
ENCORE R
STROBE LIGHT WITHOUT OVERHEAD GUARD - PARTS LIST
OPTION
0780-424or 0780-460
KEY NO.
PART NO.
DESCRIPTION
QTY.
1
2
3
4
5
7-81-00203
3-61-02014
2-00-03261
3-61-00193
3-61-00189
Support-Warning Light
Convoluted Tube
Grommet
Wire - 16 GA (RED)
Wire - 16 GA (BLACK)
1
10ft.
10ft.
6
6
7
8
9
10
11
8-40-05020
8-40-05036
2-00-00491
2-00-04578
2-00-00828
2-00-04626
2-00-04479
Red Strobe Light (12-48)
Amber Strobe Light (12-48)
Grommet
Terminal
Terminal
Terminal
Terminal
1
1
1
2
1
2
1
Nut, Hex MS #10-24 x .375 x .125
Screw, 3/8-16 x 1.000 HHC
Flat Washer, .750 x .390 x .094
Lock Washer, Helical Spring 3/8 Med.
Nut, 3/8-16 Hex
Screw, #10-24 x .750 THM
Lock Washer
2
4
8
4
4
2
2
1
HARDWARE USED:
H11
H48
H52
H53
H54
H115
H159
2-00-00605
2-00-00233
2-00-00402
2-00-02310
2-00-02360
2-00-03063
2-00-00512
C1825/9807
AMERICAN LINCOLN TECHNOLOGY
ENCORE R
3-7
STROBE LIGHT WITHOUT OVERHEAD GUARD - EXPLODED VIEW
3-8
AMERICAN LINCOLN TECHNOLOGY
ENCORE R
DUAL VACUUM SYSTEM
OPTION
0780-427
KEY NO.
1
2
3
4
5
6
PART NO.
DESCRIPTION
QTY.
0782-124
7-75-01184
2-22-00003
7-64-00032
2-00-05065
2-00-01862
Vac Fan
Spacer
Vacuum Fan Gasket
Circuit Breaker - 50A
Terminal - Wire Nut (Blue)
Terminal - #10 Ring
1
3
1
1
2
2
Lock Washer, #10 Med. HS
Screw, RHM 25-20 x 4.00 Zinc
3
3
HARDWARE USED:
H10
H241
2-00-00519
2-00-05395
C1826/9807
AMERICAN LINCOLN TECHNOLOGY
ENCORE R
3-9
ARM REST OPTION
3
5
1
6
C1883/9809
7
2
8
4
OPTION
0780-470
KEY NO.
PART NO.
DESCRIPTION
QTY.
1
2
3
4
5
*
*
*
*
*
Left Arm Bracket
Right Arm Bracket
Molded Arm Bracket
3/8 - 16 x 1.50 LG BHSCS
3/8 - 16 x .50 LG FHSCS
1
1
2
2
2
6
7
8
*
*
*
3/8 - 16 Center Lock Acorn Nut
5/16 - 18 x .63 LG BHSCS
Nylon Spacer
2
6
4
* Items Make Up Arm Rest Kit #7-69-00005
C1883/9809
3-10
AMERICAN LINCOLN TECHNOLOGY
ENCORE R
MAIN BROOM SWEEPER OPTION - PARTS LIST
OPTION
0780-468 (3 OF 7 and 7 of 7)
KEY NO.
PART NO.
DESCRIPTION
QTY.
1
2
3
4
5
7-81-00166
7-03-04185
7-81-00167
2-00-03382
8-15-01016
Support, Main Broom (LH)
Arm, Broom Lift (LH)
Yoke, Main Broom
Spring Washer
Collar
1
1
1
1
1
6
7
8
9
10
7-30-05104
7-03-04186
7-11-04011
2-00-00875
7-23-03056
Guard, Main Broom
Arm, Broom Lift (RH)
Cap, Broom End
Roll Pin
Nut
1
1
1
1
1
11
12
13
14
15
7-60-00156
7-08-03229
2-00-03842
2-00-03306
2-00-05365
Pulley, Main Broom
Broom, Main
Pin, Roll ¼ x 1.000
Bearing, Ball
V Belt
1
1
3
3
1
16
17
2-95-04689
2-95-04182
Washer, Axle
Nut, 3/8 - 16 Elastic Stop Nut
2
2
Screw, 5/16-18 x .750 HHC
Flat Washer, .687 x .344 x .062
Lock Washer, 5/16 HS Med.
Screw, 3/8-16 x .750 HHC
Screw, 3/8-16 x 1.000 HHC
Screw, 3/8-16 x 1.250 HHC
Flat Washer, .750 x .390 x .094
Lock Washer, Helical Spring 3/8 Med.
Nut, 3/8-16 Hex.
Flat Washer, 1.063 x .531 x .094
Bolt Carriage, .38 - 16 x 2.50
2
1
1
2
1
2
1
6
1
2
1
HARDWARE USED:
H34
H43
H44
H47
H48
H49
H52
H53
H54
H62
H280
2-00-00208
2-00-00409
2-00-00530
2-00-00232
2-00-00233
2-00-00209
2-00-00402
2-00-02310
2-00-02360
2-00-00405
2-00-00187
C1873/9906
AMERICAN LINCOLN TECHNOLOGY
ENCORE R
3-11
MAIN BROOM SWEEPER OPTION - EXPLODED VIEW
8
H53 H52
10
9
14
H62
H34
H48
12
2
15
11
14
5
4
H62
3
1
H53
H54
H280
H47
H49
H34
H53
H44
H43
13
6
7
17
C1873/9906
16
3-12
AMERICAN LINCOLN TECHNOLOGY
ENCORE R
BROOM DRIVE SWEEPER OPTION - PARTS LIST
OPTION
0780-468 2 OF 7
KEY NO.
PART NO.
DESCRIPTION
QTY.
1
2
3
4
5
0782-110
7-60-00158
8-60-00161
2-00-03306
2-00-00532
Motor - 36 VDC ½ HP 1200RPM
Pulley, Motor
Idler Pulley, Reverse
Bearing, Ball
Ring, Bearing Retainer
1
1
1
4
2
6
7
8
9
10
7-03-04184
8-15-01002
7-41-05111
7-08-00223
8-30-08021
Arm, Side Broom (Sweeper Option)
Collar, Setscrew
Lever, Brush Lift (Sweeper Option)
Bracket
Plate, Belt Guide
1
2
1
1
1
11
12
13
14
15
7-25-06030
7-60-00155
7-08-03230
7-75-01139
7-60-00157-1
Flange, Side Broom Pulley
Pulley, Side Broom
Side Broom
Spacer, Pulley Shaft
Pulley, Counter Shaft
1
1
1
3
1
16
17
18
19
20
7-81-00145
8-75-01044
7-78-05027
7-75-01189
7-29-00245
Support, Main Broom (RH)
Spacer
Stop, Side Broom
Spacer, Idler
Gasket (6.0”)
1
1
1
1
Ref.
21
22
23
7-31-06065
2-00-02111
2-00-05066
Handel
V Belt (Side Broom)
V Belt (Motor)
1
1
1
Screw, 1/4-20 x .750 HHC
Screw, 1/4-20 x .625 HHC
Nut, Hex 1/4-20 x .437 x .218
Screw, 5/16-18 x .500 HHC
Lock Washer, 5/16 HS Med.
Flat Washer, 1.063 x .531 x .094
Lock Washer, 1/2 HS Med.
Nut, Hex. 1/2-13 x .750 x .437
Lock Washer, Helical Spring
Flat Washer, 1.500 x .750 x .125
Carriage Bolt, 1/2-13 x 2.000
Lock Washer Int.
Flat Washer, 1.00 x .516 x .063
Screw, 1/2-13 x 2.000 HHC
Nut, Hex Jam .50-13 STL.
Screw, 1/4-20 x 1.125 HHC Cad. Pl.
Screw, .50 - 13 x 4.50 HHC
5
1
4
1
1
6
3
2
10
1
1
1
1
1
1
3
1
HARDWARE USED:
H15
H24
H25
H33
H44
H62
H63
H64
H72
H74
H142
H144
H146
H148
H171
H185
H279
2-00-00221
2-00-00220
2-00-00594
2-00-00224
2-00-00530
2-00-00405
2-00-02312
2-00-00596
2-00-00518
2-00-03170
2-00-05244
2-00-02303
2-00-00420
2-00-01778
2-00-02371
2-00-02588
2-00-04914
C1872/9906
AMERICAN LINCOLN TECHNOLOGY
ENCORE R
3-13
BROOM DRIVE SWEEPER OPTION - EXPLODED VIEW
20
1
H142 H74 H72
H15
2
19 H146
5
H144
3
18
H279
4
H63
H171
H44
23
21
15 H33
14
17
H63
H64
H64
16
H62
H62
4
H24
H72
14
6
H25
7
8
H72
9
7
H62
10
H185
11
H72
C1872/9903
H15
4
22
12
13
H72
H63
H25
H148
3-14
AMERICAN LINCOLN TECHNOLOGY
ENCORE R
FIRE EXTINGUISHER
OPTION
0780-462
KEY NO.
1
2
PART NO.
DESCRIPTION
2-95-01998
8-83-04033
Screw #14-10 x .75 T/F RH
Fire Extinguisher
QTY.
4
1
C1864/9807
AMERICAN LINCOLN TECHNOLOGY
ENCORE R
3-15
SEAT SWITCH KIT
NOTE: TIE AROUND SWITCH
UNDER TERMINALS
FRONT OF
MACHINE
7
2
DETAIL A
(BOTTOM VIEW)
SEE DETAIL A
NOTE: 1. SLIDE SEAT ALL THE
WAY TO THE REAR
2. PULL ITEM #3 TIGHT
THRU GROMMET
8
HARNESS 0795-132
USE EXISTING HARDWARE
TO FASTEN CLAMP.
TAP LIGHTLY WITH HAMMER
TO COMPRESS CLAMP.
COPPER PIN
BLACK WIRE
NOTE: WIRE FEMALE-HALF
TO MATCH MALE
WIRING
6
25V
25A
4
3
SEE DETAIL B
9
SEE
DETAIL C
EXISTING WIRE
WHITE WIRE
DETAIL B
(MALE-HALF FROM SEAT)
5
SOL 5
SOL 6
25Y
DETAIL C
ATTACH WIRE ASSY INSIDE
BATTERY COMPARTMENT USING
ADJUSTABLE CLAMPS (ITEM 10)
AS SHOWN
ROUTE AND ATTACH TO EXISTING
HARNESS USING TYE-RAPS (ITEM 2).
NOTE: COIL EXTRA CABLE UNDER FLOOR
PANEL COVER AND TIE WITH
TYE-RAP (ITEM 2).
C1863/0007
OPTION
0780-461
KEY NO.
PART NO.
DESCRIPTION
QTY.
1
2
3
4
5
2-00-04345
0875-126
2-00-04532
2-00-04531
Tye-Raps
Assy-Wire, Seat Switch
Term- .25 FISO Female
Term- .25 FISO Male
10
1
1
1
6
7
8
9
10
2-00-00491
8-82-00064
2-00-04873
2-00-03856
7-13-07096
Grommet
Seat Switch
Clamp
Plug Assy - Electric
Clamp - Adjustable
1
1
1
2
2
C1863/0007
3-16
AMERICAN LINCOLN TECHNOLOGY
ENCORE R
FRAME AND FLAPS OPTION - PARTS LIST
OPTION
0780-468 1 OF 6
KEY NO.
PART NO.
DESCRIPTION
QTY.
1
2
3
4
5
7-27-07193
7-25-08080
7-13-07126
7-25-08081
7-13-07194
Broom Housing
Flap, Rear
Clamp, Flap (Rear)
Flap, Side
Clamp, Side Sq.
1
1
1
2
2
6
7
8
9
9
7-29-00253
7-29-00252
2-00-04341
7-29-00251
7-29-00254
Gasket, Hopper
Gasket, Hopper
Grommet
Gasket, Plastic Hopper
Gasket, Steel Hopper
1
1
1
1
1
Screw, #10-24 x .500 RHM
Nut, Hex #10-24 Fiber Insert
Screw, ¼ - 20 x .750 HHC
Nut, ¼ - 20 Fiber Insert
Carriage Bolt, ¼ - 20 x .750
5
5
1
6
5
HARDWARE USED:
H6
H12
H15
H26
H86
2-00-00049
2-00-01246
2-00-00221
2-00-00641
2-00-03575
C1871/9906
AMERICAN LINCOLN TECHNOLOGY
ENCORE R
3-17
FRAME AND FLAPS OPTION - EXPLODED VIEW
8
1
5
4
H6
H26
H15
3
H12
2
H26
H86
9
6
7
C1871/0004
3-18
AMERICAN LINCOLN TECHNOLOGY
ENCORE R
ESP RECOVERY OPTION - PARTS LIST
OPTION
0780-426
KEY NO.
PART NO.
DESCRIPTION
QTY.
1
2
3
4
5
7-60-05013
2-00-05132
7-25-02062
2-00-03407
7-25-02061
Pump - Recycling (36 VDC)
Fitting - Elbow
Fitting - Reducer Nipple
Hose Clamp, Witteck #10P
Fitting
1
2
1
4
2
6
7
8
9
10
2-00-05131
2-00-05083
7-24-04038
0775-164
7-89-02191
Fitting, Nipple
Fitting, 90° ¾ NPT Elbow
Filter, Pump Inlet
Float Switch
Tube, Float Switch
2
1
1
1
1
11
12
13
14
15
7-09-01124
8-82-00059
7-18-00263
7-33-02384
7-87-02159
Bulkhead Fitting
Switch, Rocker (SPST)
Decal
Hose, ½ ID
Hose, ¾ ID
1
1
1
1
1
16
17
18
19
20
2-00-04479
2-00-04626
2-00-04578
2-00-03418
2-00-04284
Terminal, 3 Way
Terminal, .156 Female Bullet
Terminal, .156 Male Bullet
Terminal, .25 FISO Female
Terminal, Ring
1
4
4
2
1
21
3-61-00189
Wore. 16 AWG Black
15’
Screw, #10-24 x 1.000 RHM
Flat Washer, .500 x .219 x .063
Nut, Hex #10-24 Fiber Insert
4
8
4
HARDWARE USED:
H8
H9
H12
2-00-00039
2-00-00426
2-00-01246
C1869/9907
AMERICAN LINCOLN TECHNOLOGY
ENCORE R
3-19
ESP RECOVERY OPTION - EXPLODED VIEW
5
13
12
9
10
11
8
14
16
6
7
6
2
5
C1869/9907
H8
15
1
3
H9
H12
2
3-20
4
AMERICAN LINCOLN TECHNOLOGY
ENCORE R
HOPPER SWEEPER OPTION (PLASTIC)
4
3
5
1
H167
H126
H250
2
C1875/9903
OPTION
0780-468 5 OF 7
KEY NO.
1
2
3
4
5
PART NO.
DESCRIPTION
QTY.
7-32-06022
7-55-08160
7-25-08079
7-13-07193
7-08-00950
Hopper (Plastic)
Pin, Hopper Guide
Flap, Hopper
Clamp, Hopper Flap
Bracket, Stiffner
1
2
1
1
1
Screw, #10 - 24 x .500
Screw, #10 - 24 x .625 T/C Hex HD.
Screw, T/FRH #14 - 10 x 1.000 Type A
3
5
6
HARDWARE USED:
H126
H167
H250
2-00-03466
2-00-04312
2-00-04968
C1875/9903
AMERICAN LINCOLN TECHNOLOGY
ENCORE R
3-21
HOPPER SWEEPER OPTION (STEEL)
4
3
5
1
H167
2
H126
H250
C1875/9903
OPTION
0780-468 5A OF 7
KEY NO.
PART NO.
DESCRIPTION
QTY.
1
2
3
4
5
7-32-06023
7-25-08079
7-13-07193
7-30-08020
8-31-06078
Hopper (Steel)
Flap, Hopper
Clamp, Hopper Flap
Guide, Hopper
Handle
1
1
1
2
2
6
8-79-00098
Bracket
2
Nut, ¼ - 20 Insert Fiber
Screw, #10 - 24 x .500
Screw, #10 - 24 x .500 T/C HH
Screw, .25 - 20 x 2.25HHC
2
4
5
2
HARDWARE USED:
H26
H126
H136
H304
2-00-00641
2-00-03466
2-00-03940
2-00-00246
C1875/9903
3-22
AMERICAN LINCOLN TECHNOLOGY
ENCORE R
DUST CONTROL SWEEPER OPTION - PARTS LIST
OPTION
0780-468 4OF 7
KEY NO.
PART NO.
DESCRIPTION
QTY.
1
2
3
4
5
7-08-00924
0782-124
7-75-01128
7-16-07408
7-64-00025
Bracket, Vac Mounting
Vac Fan
Spacer
Cover, C.B. Mounting
Circuit Breaker, 25 Amp
1
1
1
1
2
6
7
8
9
10
8-06-05004
7-24-04052
8-11-00051
2-00-04825
0795-159
Terminal Block
Filter Bag
Cap, Clear Boot
Solenoid
Diode
1
1
2
1
1
11
8-82-00058
Switch
1
Screw, # 10-24 x .750 RHM
Nut, Hex Fiber Insert #10-24
Screw, 1/4-20 x .500 RHM
Screw, 1/4-20 x .500 HHC
Nut, Hex 1/4-20 x .437 x .218
Nut, 1/4-20 Insert Fiber
Washer, .625 x .281 x .063
Nut, Fiber Insert #8-32 Steel
Screw, #8 - 32 x 1.500 RHM
Screw, ¼ - 20 x 4.500
Screw, ¼ - 20 x .875 HHC STL
Flat Washer, .625 x .203 x .031
1
1
2
2
1
6
4
2
2
1
1
4
HARDWARE USED:
H7
H12
H13
H14
H25
H26
H27
H89
H121
H172
H229
H230
2-00-00056
2-00-01246
2-00-00054
2-00-00219
2-00-00594
2-00-00641
2-00-03702
2-00-01372
2-00-00090
2-00-04986
2-00-01490
2-00-00466
C1874/9903
AMERICAN LINCOLN TECHNOLOGY
ENCORE R
3-23
DUST CONTROL SWEEPER OPTION - EXPLODED VIEW
7
H250
3
2
H26 6 H7
H26
H229
H25
H27
H26
H26
H27
1
(NOTE: BAND THIS END
10
9
H12
8
4
H14
H13
H121
5
H230
3.62 MAX
11
H230
H89
C1874/9906
ALTER SWITCH AS SHOWN
3-24
AMERICAN LINCOLN TECHNOLOGY
ENCORE R
SPRAY WAND OPTION - PARTS LIST
OPTION
0780-466
KEY NO.
1
2
3
4
5
6
7
8
9
10
11
12
13
14
15
16
17
18
19
20
21
22
23
24
25
26
27
28
29
30
31
32
33
34
34
36
37
PART NO.
0261-025
7-13-07140
0261-024
0261-029
7-33-02306
7-13-07139
7-88-00058
8-56-05026
2-00-05206
7-16-05028
2-00-05207
2-00-05208
7-50-01002
7-03-00044
7-60-05017
8-82-00059
7-03-00047
7-25-02073
2-95-04388
7-25-02037
7-25-02012
2-00-04655
7-08-00769
2-00-05211
2-00-03875
3-71-03025
3-71-00081
7-18-00217
7-18-00121
8-82-00059
2-00-04479
2-00-03418
2-00-04626
2-00-04578
2-00-00828
3-61-00189
3-61-00193
DESCRIPTION
Wand Assembly
Clamp, Hose
Tool Assembly
Hose Assembly
Hose, Solution Feed
Clamp, Valve
Valve, Solution ¼ NPT
45° Street Elbow
Reducer, Male Pipe 1/4x1/8
Coupling, Quick Disconnect
Adapter, ¼ Hose x 1/8 NPT
Adapter, 1/8 Pipe, Brass
Spray Nozzle
Adapter, Transition
Pump, Water 36 VDC
Switch, Rocker (SPST)
Adapter, Plastic 3/8 - 1/2NPT
Fitting, 90° Elbow ½ NPT x 3/8 BARB
Hose Clamp
Fitting, Plastic (tee)
Fitting, ¾ I.D. Hose STR BARB
Fitting, 90° Elbow (Nylon)
Bracket, Hose Connection
Adapter, 3/8 Hose BARB x 1/8 NPT (F)
Close Nipple, (BRASS)
Hose
Hose
Spray Wand Decal
Wraning Decal
Switch, Rocker (SPST)
Terminal, 3-Way
Terminal, .25 FISO Female
Terminal, .156 Female Bullet
Terminal, .156 Male Bullet
Terminal, .25 Ring
Wire, 16 AWG
Wire - 16 AWG RED
QTY.
1
5
1
1
1
2
1
1
2
1
2
1
1
1
1
1
2
2
4
1
2
1
1
1
1
4ft.
1 ft.
1
1
Ref.
1
2
2
2
1
** Cut To Fit
**Cut To Fit
HARDWARE USED:
H8
H11
H12
H15
H25
H103
H132
H189
H224
H281
2-00-00039
2-00-00605
2-00-01246
2-00-00221
2-00-00594
2-00-00089
2-00-00503
2-00-00460
2-00-04686
2-00-00415
C1870/0004
AMERICAN LINCOLN TECHNOLOGY
ENCORE R
Screw #10 -24 x 1.000 RHM
Nut, Hex #10-24 x .375 x .125
Nut, Hex #10-24 Fiber Insert
Screw, 1/4-20 x .750 HHC
Nut, Hex 1/4-20 x .437 x .218
Screw, #10-24 x 1.5000 RHM
Lock Washer, ¼ Ext.
Flat Washer, .437 x .192 x .031
Lock Washer, Helical #10 Scr Med. SST
Flat Washer, STL
4
2
4
1
1
2
2
4
2
2
3-25
SPRAY WAND OPTION - EXPLODED VIEW
H224 H11
6
11
H103
7
8
1
3
4
9
9
10
13
12
14
2
11
5
16
19
REF SOLUTION TANK
29
26
22
21
20
REF INSTRUMENT
PANEL
21
H8
H15
28
TO SOLUTION
VALVE
H132
23
25
10
REF MAIN FRAME
19
18
H281 H132 H25 24
H189
27
REF 0261-029
HOSE ASSY
27
17
19
H12
15
32
30
32
31
17
18
15
36
EXISTING #8 WIRE
AS CB-6
BACK VIEW
OF SWITCH
36
37
RED ( + )
33
C1870/0004
34
BLACK ( - )
( - ) ISOLATION POST
ON POWER PANEL
35 36
3-26
34
33
AMERICAN LINCOLN TECHNOLOGY
ENCORE R
SQUEEGEE WAND OPTION
3
1
2
C1882/9809
4
KEY NO.
1
2
3
4
PART NO.
DESCRIPTION
0261-025
0261-024
7-33-02213
7-03-00044
Wand Assembly
Tool Assembly
Hose - Vac
Adapter - Transition
QTY.
1
1
1
1
C1882/9809
AMERICAN LINCOLN TECHNOLOGY
ENCORE R
3-27
BATTERY OPTION 228 A. H.
1
3
2
(+)
4
(-)
C1886/9809
KEY NO.
1
1
2
3
4
FRONT OF
MACHINE
PART NO.
DESCRIPTION
QTY.
0875-105
0875-106
0875-102
7-90-07286
8-75-01206
Battery 6v Lead Acid (Wet)(0780-207)
Battery 6v Lead Acid (Wet)(0780-208)
Connector Assembly (To Battery)
Battery Connector Wire
Spacer - Battery Pan (6) Volt
6
6
1
5
2
C1886
3-28
AMERICAN LINCOLN TECHNOLOGY
ENCORE R
BATTERY OPTION 330 A. H.
1
(-)
(+)
3
4
2
4
NARROW
SIDE UP
KEY NO.
1
1
2
3
4
C1885/9809
FRONT OF
MACHINE
PART NO.
DESCRIPTION
0875-103
0875-104
0875-102
7-90-07286
8-75-01206
Battery 6v Lead Acid (Wet)(0780-205)
Battery 6v Lead Acid (Wet)(0780-206)
Connector Assembly (To Battery)
Battery Connector Wire
Spacer - Battery Pan (6) Volt
QTY.
6
6
1
5
2
C1885
AMERICAN LINCOLN TECHNOLOGY
ENCORE R
3-29
BATTERY OPTION 370 A. H.
1
(+)
(-)
3
4
2
4
NARROW
SIDE UP
KEY NO.
1
1
2
3
4
C1884/9809
FRONT OF
MACHINE
PART NO.
DESCRIPTION
QTY.
0875-071-2
0875-072-2
0875-102
7-90-07286
8-75-01206
Battery 6v Lead Acid (Wet)(0780-203)
Battery 6v Lead Acid (Wet)(0780-204)
Connector Assembly (To Battery)
Battery Connector Wire
Spacer - Battery Pan (6) Volt
6
6
1
5
2
C1884
3-30
AMERICAN LINCOLN TECHNOLOGY
ENCORE R
CONNCECTION DRAWING SWEEPER OPTION - PARTS LIST
OPTION
0780-468 6 OF 7
KEY NO.
1
2
3
4
5
PART NO.
DESCRIPTION
QTY.
2-00-04626
2-00-04578
2-00-04281
2-00-04859
Terminal, .156 Female Bullet
Terminal, .156 Male Bullet
Terminal, #10 Ring
Terminal, .25 Ring
2
2
3
5
6
7
8
9
10
2-00-04714
2-00-04284
Terminla, #6SS
Terminal, .31 Ring
4
3
2-00-02010
2-00-05411
Terminal, .25 Ring
SB - 50 Connectors
1
2
11
12
13
3-61-00043
3-61-00189
2-00-04808
Wire, 10 AWG
Wire, 16 AWG
Terminal, #8 SS
18’
10’
2
C1876/9903
AMERICAN LINCOLN TECHNOLOGY
ENCORE R
3-31
CONNCECTION DRAWING SWEEPER OPTION - EXPLODED VIEW
5
4
48in. LENGTH
11
2
12
10
60in. LENGTH
TO KEY SW IGN. TERMINAL
48in. LENGTH
TO (+) TERMINAL ON POWER PANEL
NO
C
3
13
12
2
10in. LENGTH
12
3
45in. LENGTH
11
10in. LENGTH
10in. LENGTH
A1
A2
NOTE: INSERT PINS INTO GREY
SB-50 CONNECTOR AFTER ROUTING
THROUGH GROMMET
BROOM
MOTOR
45in. LENGTH
6
10in. LENGTH
CB-9
11
28in. LENGTH
10in. LENGTH
CB-8
25
12
25
6
7
SOL 9A
4
6in. LENGTH
USE LENGTH AS IS
20in. LENGTH
9
5
USE LENGTH AS IS
36V VAC
MOTOR
5
AMERICAN LINCOLN TECHNOLOGY
ENCORE R
3-32
TO (-) TERMINAL ON POWER PANEL
SPARE PARTS KITS 34” & 38” & CE KIT
OPTION
0760-531
34”
PART NO.
DESCRIPTION
7-77-00120
7-77-00121
7-77-00118
7-77-00119
7-77-00123
7-77-00117
7-33-02377
59971A
7-33-02378
Side Squeegee LH, Outer
Side Squeegee RH, Outer
Side Squeegee RH, Inner
Side Squeegee LH, Inner
Rear Squeegee, Inner
Rear Squeegee, Outer
Squeegee Hose
Wheel, Squeegee Adjustment
Drain Hose
QTY.
1
1
1
1
1
1
1
2
1
OPTION
0760-532
38”
PART NO.
7-77-00121
7-77-00118
7-77-00116
7-77-00096
7-33-02377
59971A
7-33-02378
DESCRIPTION
Side Squeegee RH, Outer
Side Squeegee RH, Inner
Rear Squeegee, Inner
Rear Squeegee, Outer
Squeegee Hose
Wheel, Squeegee Adjustment
Drain Hose
QTY.
2
2
1
1
1
2
1
OPTION
0760-425
CE Kit
PART NO.
DESCRIPTION
0780-422
0780-462
0875-102
7-90-07286
Back-up AlarmOption
Fire Extinguisher
Connector Assembly (To Battery)
Wire, battery Jumper
AMERICAN LINCOLN TECHNOLOGY
ENCORE R
QTY.
1
1
1
5
3-33
INDEX
A
Accelerator & Directional Control Pedal .................................................................................................. 1-13
Arm Rest Option ..................................................................................................................................... 3-10
B
Back-Up Alarm ....................................................................................................................................... 3-2
Battery Charging Instructions.................................................................................................................. 1-24
Battery Condition Meter .......................................................................................................................... 1-9
Battery Option 228 A. H. ......................................................................................................................... 3-28
Battery Option 330 A. H. ......................................................................................................................... 3-29
Battery Option 370 A. H. ......................................................................................................................... 3-30
Battery Removal ..................................................................................................................................... 1-24
Brake .................................................................................................................................................. 1-12
Brake Assembly ...................................................................................................................................... 2-6
Broom Drive Sweeper Option ................................................................................................................. 3-13
Brushes and Pad Drivers (34”) ............................................................................................................... 2-16
Brushes and Pad Drivers (38”) ............................................................................................................... 2-17
C
CE Kit .................................................................................................................................................. 3-33
Connection Drawing Sweeper Option ..................................................................................................... 3-31
Connection Drawing ............................................................................................................................... 1-39
Console Assembly .................................................................................................................................. 2-8
D
Decals .................................................................................................................................................. 2-40
Dual Vacuum System ............................................................................................................................. 3-9
Dust Control Sweeper Option ................................................................................................................. 3-23
E
Electrical Schematic ............................................................................................................................... 1-40
ESP Option ............................................................................................................................................. 1-11
ESP Recovery Option ............................................................................................................................. 3-19
F
Fill Solution Tank .................................................................................................................................... 1-14
Fire Extinguisher ..................................................................................................................................... 3-15
Foot Pedal Neutral Adjustment ............................................................................................................... 1-22
Forward/Reverse Pedal .......................................................................................................................... 2-30
Frame and Flaps Option ......................................................................................................................... 3-17
Frame Assembly ..................................................................................................................................... 2-2
Front Wheel Drive .................................................................................................................................. 2-3
H
Hardware Abbreviations .......................................................................................................................... 1-30
Hardware Legend ................................................................................................................................... 1-31
Helpful Hints For Cleaning ...................................................................................................................... 1-17
High Recovery Light ............................................................................................................................... 1-10
Hopper Sweeper Option (Plastic) ........................................................................................................... 3-20
Hopper Sweeper Option (Steel) .............................................................................................................. 3-21
Horn Button ............................................................................................................................................ 1-9
Hour Meter ............................................................................................................................................. 1-11
I
Index .................................................................................................................................................. 3-34
Instrument Power Panel ......................................................................................................................... 2-36
3-34
AMERICAN LINCOLN TECHNOLOGY
ENCORE R
INDEX
K
Key Switch .............................................................................................................................................. 1-10
L
Light Package ......................................................................................................................................... 3-3
Light Switch (Option) .............................................................................................................................. 1-9
Low Solution Light .................................................................................................................................. 1-10
M
Machine Connection & Harness Routing ................................................................................................ 1-37
Machine Controls .................................................................................................................................... 1-9
Machine Preparation ............................................................................................................................... 1-8
Main Broom Sweeper Option .................................................................................................................. 3-11
Maintenance For The Rear Squeegee .................................................................................................... 1-20
O
Operating Instructions ............................................................................................................................ 1-14
Ordering Parts ........................................................................................................................................ 1-29
Overhead Guard ..................................................................................................................................... 3-4
P
Parking Brake Adjustment ...................................................................................................................... 1-22
Post Operation Checklist ........................................................................................................................ 1-16
Pre Sweep Option .................................................................................................................................. 1-12
Pre-Start Checklist .................................................................................................................................. 1-14
R
Rear Assembly ....................................................................................................................................... 2-4
Rear Squeegee (34” & 38”) .................................................................................................................... 2-24
Recovery Tank ........................................................................................................................................ 2-32
Replacing Pads on a Pad Driver ............................................................................................................. 1-20
Replacing Scrub Brushes ....................................................................................................................... 1-20
S
Safety Precautions ................................................................................................................................. 1-6
Scrub Brush Switch ................................................................................................................................ 1-11
Scrub Deck Actuator ............................................................................................................................... 2-10
Scrub Deck Assembly (34”) .................................................................................................................... 2-12
Scrub Deck Assembly (38”) .................................................................................................................... 2-14
Seat Adjustment ..................................................................................................................................... 1-14
Seat Assembly ........................................................................................................................................ 2-26
Seat Switch Kit ....................................................................................................................................... 3-16
Service Chart .......................................................................................................................................... 1-18
Service Instructions ................................................................................................................................ 1-20
Setting the Reverse Delay Adjustment .................................................................................................... 1-22
Side Squeegee (34”) .............................................................................................................................. 2-20
Side Squeegee (38”) .............................................................................................................................. 2-22
Solution Control ...................................................................................................................................... 2-34
Solution Control Knob ............................................................................................................................. 1-9
Solution Feed Hoses .............................................................................................................................. 1-23
Solution Tank .......................................................................................................................................... 2-33
Spare Parts Kits 34” & 38” ...................................................................................................................... 3-33
Specifications ......................................................................................................................................... 1-4
Spray Wand Option ................................................................................................................................ 3-27
Squeegee Angle Adjustment ................................................................................................................... 1-21
Squeegee Blade Replacement ............................................................................................................... 1-21
AMERICAN LINCOLN TECHNOLOGY
3-35
ENCORE R
INDEX
Squeegee Blade Switch .......................................................................................................................... 1-10
Squeegee Lift Assembly ......................................................................................................................... 2-18
Squeegee Wand Option ......................................................................................................................... 3-25
Squeegee Wheel Adjustment ................................................................................................................. 1-21
Steering .................................................................................................................................................. 2-5
Steering Adjustment-Pivot Adjustment .................................................................................................... 1-22
Steering Adjustment-Sprocket Adjustment .............................................................................................. 1-23
Strobe Light With Overhead Guard ......................................................................................................... 3-5
Strobe Light Without Overhead Guard .................................................................................................... 3-7
Sweeper Option-Drive Belt Adjustments ................................................................................................. 1-24
T
To Begin The Cleaning Operation ........................................................................................................... 1-15
To Drain Recovery Tank ......................................................................................................................... 1-16
To Start Machine ..................................................................................................................................... 1-14
To Stop the Cleaning Operation .............................................................................................................. 1-15
To Transport Machine ............................................................................................................................. 1-14
Trouble Shooting .................................................................................................................................... 1-26
V
Vacuum Assembly .................................................................................................................................. 2-28
W
Warranty ................................................................................................................................................. 3-37
3-36
AMERICAN LINCOLN TECHNOLOGY
ENCORE R
WARRANTY
AMERICAN-LINCOLN TECHNOLOGY
RIDER SWEEPER / SCRUBBER
"BUMPER-TO-BUMPER" LIMITED WARRANTY
I. COVERAGE
A. Subject to the terms and limitations stated herein, American-Lincoln warrants, to the original purchaser only, to repair or replace, at its option
and upon the terms set out below, this product or any parts thereof (excluding normal maintenance items) which are defective in materials or
workmanship, for a period of (2) two years or 2,000 hours of normal operation from the date of purchase, whichever comes first, provided that the
product is operated and maintained in accordance with American-Lincoln's Maintenance and Operations Instruction.
1. (a) During the first (90) ninety days from the date of purchase, American-Lincoln will provide, without charge, parts and on-site labor
(including up to three (3) hours total round-trip travel time) to remedy a defective product or part.
(b) During the next (9) nine months or 1,000 hours (whichever come first) American-Lincoln will provide, without charge, parts and labor to
remedy a defective product or part; however all travel time for on-site remedy and all shipping and freight charges for off-site remedy of the
product or parts thereof shall be the sole responsibility of the purchaser.
(c) During the next (12) twelve months or a total of 2000 hours (whichever comes first) American Lincoln will provide, without charge, parts to
remedy a defective product or part, however all labor, travel time for on-site remedy and all shipping and freight charges for off-site remedy of the
product or parts thereof shall be the sole responsibility of the purchaser.
B. In addition to the terms listed above, if applicable, the following additional warranty coverage is applied.
1. (a) American-Lincoln warrants to the original purchaser only, to repair or replace, at its option and upon the terms set out below, the drive line
electrical components including the electric drive propulsion motor, electric wheel drive motor and electronic drive controller, and all hydraulic
pumps and motors, to provide replacement parts which are defective in material or workmanship, for a period of (3) years or 3000 hours
(whichever comes first) provided that the product is operated and maintained in accordance with American-Lincoln's Maintenance and
Operations Instruction.
(b) American Lincoln warrants to the original purchaser only, to repair or replace, at its option and upon the terms set out below, the internal
combustion liquid cooled engine, to provide replacement parts which are defective in material or workmanship, for a period of (5) five years or
unlimited hours of normal operation. All labor, travel time, shipping and freight charges shall be the sole responsibility of the purchaser.
(c) American-Lincoln, warrants to the original purchaser only, to repair or replace, at its option and upon the terms set out below, the main
frame, debris hopper, solution tank, and the recovery tank, for the life of the machine against failure caused by defects in workmanship or total
rust through. For purposes of this coverage, cosmetic deterioration or surface rust does not constitute a failure.
(d) American-Lincoln, warrants to the original purchaser only, to repair or replace, at its option and upon the terms set out below, the batteries
which becomes unserviceable under normal use within a period of ninety (90) days from date of sale to the original user with new batteries of
equal value. After expiration of the above ninety (90) day period, any battery which fails under normal use will be adjusted to the original user
with a new battery of equal specifications on an eighteen (18) months pro rate basis from the date of purchase. Adjustment will be determined
using the then current list price, plus transportation costs. Warranty is rendered NULL and Void if battery is not kept filled to the proper level with
DISTILLED WATER.
II. EXCLUSIONS
This warranty does not cover normal maintenance parts and labor, including but not limited to, rubber parts, seals, flaps, brushes, engine
maintenance parts, hoses, carbon motor brushes, fluids and routine adjustments.
This warranty does not cover damage or failure of the product or any parts thereof which is the result of misuse, negligent operation, handling
or repair, or which is the result of modification by any person other than an authorized American-Lincoln service representative.
III. LIMITATIONS
A. AMERICAN-LINCOLN MAKES NO WARRANTIES OTHER THAN THOSE SPECIFIED HEREIN. ALL IMPLIED WARRANTIES OF
MERCHANTABILITY AND OF FITNESS FOR A PARTICULAR PURPOSE ARE EXPRESSLY EXCLUDED. AMERICAN-LINCOLN LIABILITY
UNDER THIS WARRANTY IS LIMITED TO REPAIR AND/OR REPLACEMENT OF PRODUCTS OR PARTS AS SET OUT HEREIN.
AMERICAN-LINCOLN SHALL NOT BE LIABLE FOR ANY INCIDENTAL OF CONSEQUENTIAL DAMAGES WHICH MAY RESULT FROM A
PRODUCT OR PART DEFECT OR FAILURE. ANY EXTENSIONS OF OR MODIFICATIONS MADE TO THIS WARRANTY BY A
DISTRIBUTOR OF AMERICAN-LINCOLN ARE THE SOLE RESPONSIBILITY OF THE DISTRIBUTOR.
IV. PROCEDURES AND CONDITIONS FOR WARRANTY CLAIMSAMERICAN-LINCOLN SHALL NOT BE LIABLE FOR REPAIR OR
REPLACEMENT OF ANY DEFECTIVE PRODUCT OR PART THEREOF UNLESS AND UNTIL THE ORIGINAL PURCHASER FULFILLS THE
FOLLOWING CONDITIONS PRECEDENT TO RECOVERY UNDER THIS WARRANTY:
The original purchaser shall promptly complete and return the warranty and installation registration form included with the product at the time
of the purchase;
Upon product or part failure, the original purchaser shall promptly provide notice thereof to his nearest authorized American-Lincoln Service
Representative; and
The original purchaser shall permit the product or part to be inspected by American-Lincoln or its authorized representatives, as necessary
and expenses for shipping or travel time shall be borne by the parties itemized in paragraph I herein above.
American-Lincoln Technology reserves the right to make changes and improvements to its machines without notice. For best results, use only
the correct American-Lincoln Service parts.
AMERICAN-LINCOLN TECHNOLOGY
1100 HASKINS ROAD
BOWLING GREEN, OHIO 43402
AMERICAN LINCOLN TECHNOLOGY
ENCORE R
3-37