1
RSA SecurID Software Token 4.1
Administrator’s Guide
Contact Information
See the RSA corporate web site for regional Customer Support telephone and fax numbers: www.rsa.com
Trademarks
RSA and the RSA logo are registered trademarks of RSA Security Inc. in the United States and/or other countries. For the
most up-to-date listing of RSA trademarks, go to www.rsa.com/legal/trademarks_list.pdf. EMC is a registered trademark of
EMC Corporation. All other goods and/or services mentioned are trademarks of their respective companies.
License agreement
This software and the associated documentation are proprietary and confidential to RSA, are furnished under license, and may
be used and copied only in accordance with the terms of such license and with the inclusion of the copyright notice below.
This software and the documentation, and any copies thereof, may not be provided or otherwise made available to any other
person.
No title to or ownership of the software or documentation or any intellectual property rights thereto is hereby transferred. Any
unauthorized use or reproduction of this software and the documentation may be subject to civil and/or criminal liability.
This software is subject to change without notice and should not be construed as a commitment by RSA.
Note on encryption technologies
This product may contain encryption technology. Many countries prohibit or restrict the use, import, or export of encryption
technologies, and current use, import, and export regulations should be followed when using, importing or exporting this
product.
Distribution
Limit distribution of this document to trusted personnel.
© 2009 RSA Security Inc. All rights reserved.
November 2009
RSA SecurID Software Token 4.1 Administrator’s Guide
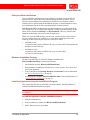
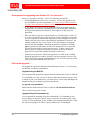
Contents
Preface................................................................................................................................... 7
About This Guide................................................................................................................ 7
RSA SecurID Software Token 4.1 Documentation ............................................................ 7
Related Documentation....................................................................................................... 7
Getting Support and Service ............................................................................................... 8
Before You Call Customer Support............................................................................. 8
Chapter 1: Overview and Requirements .......................................................... 9
About RSA SecurID Software Token ................................................................................ 9
System Requirements.......................................................................................................... 9
Windows System Requirements ................................................................................. 9
Mac OS X System Requirements .............................................................................. 10
Supported Provisioning Servers........................................................................................ 10
Supported Software Token Configurations....................................................................... 10
Token Storage Devices ......................................................................................................11
Support for Visually Impaired Users (Windows Only) .....................................................11
Coexistence with RSA SecurID Toolbar 1.4 or Later .......................................................11
Virtualized Environments ................................................................................................. 12
Clock Settings ................................................................................................................... 12
Chapter 2: Installing the Application ................................................................ 13
Before You Begin ............................................................................................................. 13
Web Browser Plug-Ins (Windows Only) .......................................................................... 13
Configuration of the Web Agent ............................................................................... 14
Using a Connected RSA SecurID 800 Authenticator (Windows Only) ........................... 14
Customization Policies...................................................................................................... 15
Token Storage Database Options for VPN Client Applications (Windows Only) ........... 16
Token Database Copy Protection...................................................................................... 18
Installing RSA SecurID Software Token for Windows.................................................... 18
Enterprise-Wide Installations .................................................................................... 19
Windows Installation Package................................................................................... 19
Install the Application Using the InstallShield Program ........................................... 19
Command Line Installation ....................................................................................... 22
Command Line Examples.......................................................................................... 25
Modify an Installation................................................................................................ 27
Repair an Installation ................................................................................................. 28
Upgrading RSA SecurID Software Token for Windows.................................................. 29
Restrictions on Upgrading from Version 3.0.7.......................................................... 29
Prerequisites for Upgrading from Version 3.0.7 or Version 4.0................................ 30
Perform the Upgrade.................................................................................................. 30
Transferring Tokens from a Previous Version.................................................................. 31
Token Transfer from Version 4.0 to Version 4.1 ...................................................... 31
Token Transfer from Version 3.0.7 to Version 4.1 ................................................... 32
Contents
3
RSA SecurID Software Token 4.1 Administrator’s Guide
Uninstalling RSA SecurID Software Token for Windows ............................................... 34
Uninstall the Application Using the Program List..................................................... 34
Uninstall the Application Using the Command Line................................................. 34
Installing RSA SecurID Software Token for Mac OS X ................................................. 35
Mac OS X Installation Package ................................................................................ 35
Customize the Token Database Location (Optional)................................................. 35
Install the Application................................................................................................ 36
Upgrading RSA SecurID Software Token for Mac OS X ............................................... 38
Perform the Upgrade.................................................................................................. 38
Transfer Tokens Used with Version 4.0 ........................................................................... 38
Uninstall RSA SecurID Software Token for Mac OS X .................................................. 39
Chapter 3: Provisioning Software Tokens .................................................... 41
Prerequisites ...................................................................................................................... 41
Planning the RSA SecurID Authentication Requirement ................................................. 41
PINPad-Style Software Tokens ................................................................................. 42
Fob-Style Software Tokens ....................................................................................... 43
Tokens That Do Not Require a PIN........................................................................... 44
Token Storage Devices and Device Binding .................................................................... 44
Device Type............................................................................................................... 45
Device Serial Number................................................................................................ 46
Windows User SID ................................................................................................... 47
Provisioning Overview ..................................................................................................... 48
Provisioning Tokens Using Dynamic Seed Provisioning ................................................. 48
Device Definition Files .............................................................................................. 49
Add the Device Definition File.................................................................................. 49
Configure the Software Token Record Using RSA Authentication Manager 7.1..... 50
Distribute the Token .................................................................................................. 53
Provisioning Tokens Using RSA Authentication Manager 6.1 ........................................ 54
Configure the Software Token Record ...................................................................... 55
Bind the Token........................................................................................................... 58
Assign a Token Nickname......................................................................................... 60
Distribute the SDTID File.......................................................................................... 60
Using File-Based Provisioning in RSA Authentication Manager 7.1 .............................. 60
Select the Distribution Method and Assign a Password ............................................ 60
Provisioning Tokens Using RSA Credential Manager ..................................................... 61
Before You Begin ...................................................................................................... 62
Configure RSA Credential Manager.......................................................................... 62
Request a Token Using the RSA Self-Service Console ............................................ 64
Approve the Request.................................................................................................. 66
Next Steps .................................................................................................................. 66
4
Contents
RSA SecurID Software Token 4.1 Administrator’s Guide
Chapter 4: User Options for Managing Tokens and Devices ............ 67
Importing Tokens.............................................................................................................. 67
Import a Token Automatically Using CT-KIP (Windows Only) .............................. 68
Import a Token from the Web Using the Desktop Application................................. 68
Import a Token from an E-mail Attachment ............................................................. 69
Import a Token Automatically from a Default Directory.......................................... 70
Import a Token from a Non-Default Directory ......................................................... 71
Change a Token Name...................................................................................................... 72
Select a Token ................................................................................................................... 73
Device Passwords ............................................................................................................ 73
Set a Device Password ............................................................................................... 74
Change a Device Password........................................................................................ 74
Remove a Device Password....................................................................................... 74
Reset the Device (Local Hard Drive) ........................................................................ 75
Device Passwords for Third-Party Plug-Ins .............................................................. 76
View Token Information................................................................................................... 77
View Token Storage Device Information ......................................................................... 78
Delete a Token .................................................................................................................. 79
Obtaining the Next Tokencode ......................................................................................... 80
Enter the Next Tokencode ......................................................................................... 80
Disable Next Tokencode Mode ................................................................................. 80
Chapter 5: Troubleshooting ................................................................................... 81
Platform-Independent Issues............................................................................................. 81
Appendix A: Customizing the Application ................................................... 83
Customization Policies...................................................................................................... 83
Policies for RSA SecurID Software Token for Windows ......................................... 83
Policies for RSA SecurID Software Token for Mac OS X ....................................... 85
Policy Details .................................................................................................................... 86
ActivationCode (Windows Only) .............................................................................. 86
CtkipUrl ..................................................................................................................... 87
DisableDeleteToken................................................................................................... 88
DisableSetDevicePassword ....................................................................................... 88
OnlyOneToken........................................................................................................... 88
TokenExpirationNotification ..................................................................................... 88
TokenRenewalURL ................................................................................................... 88
ValidDevices.............................................................................................................. 89
VpnMode ................................................................................................................... 90
Customizing RSA SecurID Software Token for Windows .............................................. 90
Add the RSA Administrative Template..................................................................... 90
Configure Group Policy Settings............................................................................... 91
Customizing RSA SecurID Software Token for Mac OS X............................................. 92
Contents
5
RSA SecurID Software Token 4.1 Administrator’s Guide
Appendix B: Logging ................................................................................................. 93
Setting the Logging Level................................................................................................. 93
Location of Log Output Files............................................................................................ 94
Log Message Format......................................................................................................... 95
Sample Log Messages....................................................................................................... 96
Index ..................................................................................................................................... 99
6
Contents
RSA SecurID Software Token 4.1 Administrator’s Guide
Preface
About This Guide
This guide describes how to prepare for and deploy RSA SecurID Software Token 4.1
(the SecurID desktop application) and software tokens to Windows and Mac OS X
desktops and laptops. This guide is intended for RSA Authentication Manager
administrators and other personnel who are responsible for deploying and
administering the SecurID desktop application. It assumes that these personnel have
experience using RSA Authentication Manager. Do not make this guide available to
the general user population.
RSA SecurID Software Token 4.1 Documentation
For more information about the SecurID desktop application, see the following
documentation:
Administrator’s Guide. (This guide.) Provides information for security administrators
on deploying and provisioning the application.
Release Notes. Provides information about what is new and changed in this release, as
well as workarounds for known issues. The latest version of the Release Notes is
available on RSA SecurCare Online at https://knowledge.rsasecurity.com.
Help. Contains user topics associated with the application screens. It is installed
automatically with the SecurID desktop application.
Quick Start. Helps users install the SecurID desktop application and import a software
token. Also describes how to use the token to access resources protected by
RSA SecurID.
Related Documentation
For more information related to the SecurID desktop application or software tokens,
see the following:
RSA SecurID Token Import Utility Readme. Describes how to import software
tokens to a device by using a command line executable.
RSA Secured Partner Solutions directory. RSA has worked with a number of
manufacturers to qualify products that work with RSA products. Qualified third-party
products include virtual private network (VPN) and remote access servers (RAS),
routers, web servers, and many more. To access the directory, including
implementation guides and other information, go to http://www.rsasecured.com.
RSA Authentication Manager 7.1 Administrator’s Guide. Provides information
about how to administer users and security policy in RSA Authentication
Manager 7.1.
Preface
7
RSA SecurID Software Token 4.1 Administrator’s Guide
RSA Security Console Help. Describes day-to-day administration tasks performed in
the RSA Security Console (RSA Authentication Manager 7.1 user interface). To view
Help, click the Help tab in the Security Console.
RSA Authentication Manager 6.1 Administrator’s Guide. Provides information
about how to administer users and security policy in RSA Authentication Manager
6.1.
Database Administration application Help. Describes day-to-day administration
tasks performed in the Database Administration application used with
RSA Authentication Manager 6.1.
Getting Support and Service
RSA SecurCare Online
https://knowledge.rsasecurity.com
Customer Support Information
www.rsa.com/support
RSA Secured Partner Solutions Directory
www.rsasecured.com
RSA SecurCare Online offers a knowledgebase that contains answers to common
questions and solutions to known problems. It also offers information on new releases,
important technical news and software downloads.
The RSA Secured Partner Solutions Directory provides information about third-party
hardware and software products that have been certified to work with RSA products.
The directory includes Implementation Guides with step-by-step instructions and
other information about interoperation of RSA products with these third-party
products.
Before You Call Customer Support
Make sure that you have direct access to the computer running the RSA SecurID
Software Token software.
Please have the following information available when you call:
Your RSA Customer/License ID.
RSA SecurID Software Token software version number.
The make and model of the machine on which the problem occurs.
The name and version of the operating system under which the problem occurs.
8
Preface
RSA SecurID Software Token 4.1 Administrator’s Guide
1
Overview and Requirements
This chapter introduces RSA SecurID Software Token (the SecurID desktop
application) and provides system requirements and other general information.
About RSA SecurID Software Token
RSA SecurID Software Token is authentication software that allows users to verify
their identity to resources protected by RSA SecurID. The application runs on
desktops and laptops and requires a software-based security token. SecurID software
tokens generate one-time passwords (OTPs) at regular intervals. With the SecurID
desktop application, users can enter the current OTP, along with other security
information, to gain access to Virtual Private Networks (VPNs) and web applications.
The application ensures strong security and eliminates the need for the user to carry a
separate hardware token.
System Requirements
The SecurID desktop application runs on Microsoft Windows and Mac OS X
operating systems.
Windows System Requirements
Operating system
One of the following:
•
•
•
•
•
Browser for optional web browser
plug-in
Windows 7 Enterprise 32-bit and 64-bit
Windows 7 Professional 32-bit and 64-bit
Windows Vista Business SP1 and SP2 32-bit and 64-bit
Windows Vista Enterprise SP1 and SP2 32-bit and 64-bit
Windows XP Professional SP3
One of the following:
• Internet Explorer 7.0 or 8.0.
• Mozilla Firefox 3.x
Note: The web browser plug-in is compatible only with the 32-bit
versions of Internet Explorer and Firefox on Windows 64-bit
machines.
Disk space
1: Overview and Requirements
1 KB available space for each software token installed
9
RSA SecurID Software Token 4.1 Administrator’s Guide
Mac OS X System Requirements
Operating system
Mac OS X 10.5.x or 10.6.x (Intel)
Disk space
1 KB available space for each software token installed
Supported Provisioning Servers
You can provision software tokens for use with the SecurID desktop application using:
•
RSA Authentication Manager 7.1
•
RSA SecurID Appliance 3.0
•
RSA Credential Manager (the self-service and provisioning component of
RSA Authentication Manager 7.1)
•
RSA Authentication Manager 6.1
Supported Software Token Configurations
The SecurID desktop application is designed to support a maximum of 20 software
tokens for each user. With the software token API, however, you can import a
substantially larger number of tokens.
The following table lists the token attributes that are supported with the SecurID
desktop application. A blue check mark indicates that the provisioning server supports
the attribute. A red X indicates that the provisioning server does not support the
attribute. For more information on configuring software token attributes, see
Chapter 3, “Provisioning Software Tokens.”
Token Attributes
RSA Authentication RSA Authentication
Manager 7.1
Manager 6.1
RSA Credential
Manager
X
X
X
X
X
X
X
128-bit tokens
64-bit tokens
Time-based
8-digit tokencode
6-digit tokencode
60-second tokencode duration
30-second tokencode duration
10
1: Overview and Requirements
RSA SecurID Software Token 4.1 Administrator’s Guide
Token Attributes
RSA Authentication RSA Authentication
Manager 7.1
Manager 6.1
RSA Credential
Manager
PINPad style tokens (PIN entry in the
desktop application)
Fob-style tokens (PIN entry in the
protected resource)
X
X
Tokens that do not require a PIN (user
authenticates with user name and
tokencode)
Token file password
Device serial number used to bind a
token to a device
Device GUID used to bind a token to
a device
User security identifier (SID) used to
bind a token to a device. Windows
only.
X
Token Storage Devices
A token storage “device” is a logical storage container for tokens. The SecurID
desktop application can store tokens on the user's hard drive, a Trusted Platform
Module (TPM), a biometric device, a flash drive, or another supported device. By
default, the application stores tokens on the user’s local hard drive. For more
information, see “Token Storage Devices and Device Binding” on page 44.
Support for Visually Impaired Users (Windows Only)
RSA SecurID Software Token for Windows supports the use of screen readers for
visually impaired users. RSA has tested the application with the JAWS for Windows
Screen Reading Software. You can download JAWS from the Freedom Scientific web
site. Once you install JAWS, no additional configuration is required to use the
software with the SecurID desktop application.
1: Overview and Requirements
11
RSA SecurID Software Token 4.1 Administrator’s Guide
Coexistence with RSA SecurID Toolbar 1.4 or Later
RSA SecurID Software Token for Windows can coexist with RSA SecurID
Toolbar 1.4, a web add-on and software-based security token installed into a user’s
web browser. The two products work independently and do not share the same RSA
token database. However, both applications support automatic token import from
either the Desktop or My Documents folder.
If a user copies a token file (SDTID file) to either folder, as long as the token file is not
bound to a specific device, the first application that is started imports the token. For
example, if the user opens Internet Explorer before starting the desktop application, a
token stored in Desktop or My Documents is imported to the token database
associated with the Toolbar application and can be used only with the Toolbar. If a
user imports a token by double-clicking a token file located in a directory other than
Desktop or My Documents, the token is always imported to the desktop application.
The optional web browser plug-in feature of the desktop application is incompatible
with RSA SecurID Toolbar. If the browser plug-in and the Toolbar are installed on the
same computer, the browser plug-in takes precedence. When you access a web site
that requires authentication with a Toolbar token, the browser plug-in authentication
window opens, and you must use a token associated with the desktop application to
authenticate.
Virtualized Environments
The SecurID desktop application has not been fully tested and qualified in virtualized
environments. RSA Customer Support will initially assist you with issues that occur
on virtualized machines, but may eventually request that you reproduce the issue on a
supported physical machine before they proceed further with the case.
Clock Settings
The application and RSA Authentication Manager rely on Coordinated Universal
Time (UTC). The time, date, and time zone settings on the local computer and on the
computer running Authentication Manager must always be correct in relation to UTC.
If the time settings on a user’s computer change significantly, they will no longer be
synchronized with the time settings on the Authentication Manager host, and the user
may not be able to authenticate. If this happens, the user must contact the server
administrator to have the token resynchronized.
Instruct users to verify that the time, time zone, and Daylight Saving Time (DST)
settings on their computer are correct before they use the SecurID desktop application.
Users crossing time zones with their computer need to change only the time zone in
order to reflect the correct local time.
12
1: Overview and Requirements
RSA SecurID Software Token 4.1 Administrator’s Guide
2
Installing the Application
This chapter describes installing RSA SecurID Software Token (the SecurID desktop
application), upgrading from a previous version, and transferring tokens from a
previous version.
Important: You must have administrator privileges to install or uninstall the
application.
Before You Begin
Before you install the SecurID desktop application, use the information in the
following sections to help you decide whether to:
•
Install an optional web browser plug-in
•
Customize the behavior of the application using policy settings
•
Change the database that contains tokens stored on the local hard drive from the
default per-user database to a single database (Windows only)
•
Disable the default copy protection on the token database
Web Browser Plug-Ins (Windows Only)
RSA SecurID Software Token for Windows provides optional web browser plug-ins
for Microsoft Internet Explorer and Mozilla Firefox that allow users to authenticate to
protected web pages without manually entering a one-time password.
Note: RSA SecurID Software Token for Mac OS X does not support web browser
plug-ins.
To authenticate with the web browser plug-in, the user opens the browser and enters
the URL of the protected web page. The page displays an RSA SecurID authentication
dialog box. The user selects the token nickname, enters the user name, and enters a
PIN, if one is required. (If no PIN is required, the PIN field is unavailable.) The
SecurID desktop application then transparently submits the tokencode.
Note: The SecurID desktop application does not support running multiple instances of
a supported web browser plug-in within the same browser process. As a result, you
cannot use a browser plug-in to authenticate simultaneously to multiple sites that are
protected by SecurID.
2: Installing the Application
13
RSA SecurID Software Token 4.1 Administrator’s Guide
The web browser plug-in is a custom feature of the desktop application installation
program. To install a web browser plug-in for Windows, see “Install the Application
Using the InstallShield Program” on page 19.
Configuration of the Web Agent
The web browser plug-in feature works with the RSA Authentication Agent for Web.
The Authentication Agent for Web includes template pages—HTML pages containing
HTML and JavaScript that allow authentication using the web browser plug-in. By
default, the Authentication Agent for Web is configured to work with the web browser
plug-in for Internet Explorer. If you want to use the web browser plug-in for Mozilla
Firefox, you must replace the template pages in your existing Authentication Agent
for Web installation with new template pages that support the plug-in for Firefox. The
new template pages have been qualified with RSA Authentication Agent for Web for
Internet Information Services, versions 5.3 and 7.0.
You can download the new template pages from http://rsa.com/node.aspx?id=3663.
The download package includes documentation.
Using a Connected RSA SecurID 800 Authenticator (Windows Only)
You can use an RSA SecurID 800 authenticator (SecurID 800) connected to a USB
port with RSA SecurID Software Token for Windows for automatic tokencode
retrieval by a VPN client application. You can also use a connected SecurID 800 with
the optional Internet Explorer and Firefox web browser plug-ins for automatic
tokencode retrieval by web resources that are protected by RSA SecurID.
To use a connected SecurID 800 with the SecurID desktop application, you must
install both of the following:
•
RSA SecurID Software Token 4.1. This application automatically installs the
RSA Hardware Authenticator Plug-In 4.1 for the SecurID 800.
•
RSA Smart Card Middleware 3.5. The Hardware Authenticator Plug-In allows
Middleware and the desktop application to communicate with the SecurID 800.
You can install the Middleware from the RSA Authentication Client 3.5 product kit at
https://knowledge.rsasecurity.com/scolcms/sets.aspx?product=hardware_token
&_v=download. To install Middleware, follow the instructions in the
RSA Authentication Client 3.5 Installation and Administration Guide.
Optionally, you can install both the Middleware and RSA SecurID Software Token 4.1
for Windows from the RSA Authentication Client 3.5 product kit.
If the SecurID 800 is the only token used with the desktop application, it is
automatically the active token (the token from which tokencodes are retrieved).
However, if software tokens have been imported to the desktop application, the
SecurID 800 does not become the active token until the user opens the application and
selects the SecurID 800 serial number (or nickname) from the list of tokens. For
details, see the SecurID desktop application Help.
Note: You cannot import software tokens to a SecurID 800. Only the built-in token
can be used to generate tokencodes.
14
2: Installing the Application
RSA SecurID Software Token 4.1 Administrator’s Guide
Customization Policies
You can set policies to customize the behavior of the SecurID desktop application on
users’ computers.
The following table summarizes the customization policies. For details and
instructions, see Appendix A, “Customizing the Application.”
Important: RSA recommends that you set customization policies before you install
the application.
Policy
Description
Platform Support
ActivationCode
Specifies that the Windows user
security identifier (user SID) should
be used as the activation code for a
token provisioned using Dynamic
Seed Provisioning (CT-KIP). To
allow a token to be imported
automatically the first time that the
user launches the application, you
must set both ActivationCode and
CtkipUrl.
Windows systems.
CtkipUrl
Prefills the Enter URL field in the
application so that the user does not
have to enter the URL when
importing a token provisioned using
Dynamic Seed Provisioning
(CT-KIP).
Windows and
Mac OS X systems.
DisableChangeTokenName
Specifies whether or not users can
change the nicknames assigned to
their tokens.
Windows and
Mac OS X systems.
DisableDeleteToken
Specifies whether or not users can
delete their tokens.
Windows and
Mac OS X systems.
DisableSetDevicePassword
Windows and
Specifies whether or not users are
Mac OS X systems.
permitted to set a device password.
Applies only to the Local Hard Drive
(RSA) plug-in.
OnlyOneToken
Specifies that users can have only
one token installed.
2: Installing the Application
The CtkipUrl policy
can be used with the
ActivationCode policy
to auto-import a token
on Windows systems
only.
Windows and
Mac OS X systems.
15
RSA SecurID Software Token 4.1 Administrator’s Guide
Policy
Description
Platform Support
Windows and
TokenExpirationNotification Changes the number of days before
the application displays a notification Mac OS X systems.
informing the user that a token is
nearing its expiration date. If you do
not set this policy, the notification is
displayed 30 days before the token
expires.
If used with TokenRenewalURL, this
policy adds a link in the token
expiration notification to a URL
where the user can request a
replacement token.
TokenRenewalURL
Windows and
Used with the
TokenExpirationNotification policy. Mac OS X systems.
Specifies a URL link to display in the
token expiration notification. For
example, the link could be the URL
of the RSA Credential Manager
portal where the user can request a
replacement token.
ValidDevices
Specifies a whitelist of storage
devices to which tokens can be
imported.
VpnMode
Sets the VPN mode to ensure that the Windows systems.
Cisco VPN Client can function
properly on Windows XP when users
log on to the VPN client application
with tokens stored on a TPM or
biometric device.
Windows and
Mac OS X systems.
Token Storage Database Options for VPN Client Applications
(Windows Only)
The first time that a user runs the SecurID desktop application, a token storage
database is created on the user’s computer. This database is a container for the tokens
imported to the local hard drive. When a user performs a SecurID authentication, the
application retrieves the tokencode from the token in the database.
The default token storage database is a per-user database, meaning that it contains
only those tokens that belong to a specific user of the computer. The per-user database
is intended to be used by VPN client applications that are running in the user context.
(To run in the user context, the user must start the VPN client application.)
16
2: Installing the Application
RSA SecurID Software Token 4.1 Administrator’s Guide
If your users log on to the VPN client before logging on to Windows (referred to as
“prelogon” or “start before logon”) or you run your VPN client as a service, you
cannot use the default per-user database. You must instead configure your installation
to create a single database that contains all of the tokens stored on the hard drive.
This is required for the following reasons:
•
When a user logs on to the VPN client before logging on to Windows, the user
context is not known (the user cannot be identified), because the user has not yet
logged on to Windows. Therefore, the SecurID desktop application cannot locate
the user’s token.
•
When a VPN client is running as a service, a specific user cannot be identified and
that user’s token cannot be located because the VPN client is running as System
instead of as a user.
Important: Due to the user context issues, the RSA SecurID Software Token for
Windows supports prelogon VPN authentication and running the VPN client as a
service for only one user who has been issued only one software token. However, the
application supports a single user with multiple tokens if the VPN client application
provides the option of selecting a token from a list.
To create a single database, you must install the desktop application from the msiexec
command line, using the SETSINGLEDATABASE property. This property creates a
single database in the All Users directory. When the user starts prelogon to the VPN
client, for example, the VPN client retrieves a token from All Users.
If necessary, you can create the single database in a location other than the default
location. For more information, see “Command Line Properties” on page 23.
Important: Use the SETSINGLEDATABASE property only on single-user machines.
Do not use this property if multiple users share a computer, because doing so gives all
users access to all tokens stored in the single database.
The following table lists the VPN clients that have been qualified with RSA SecurID
Software Token for Windows and identifies the scenarios that require installing a
single token database or installing either a per-user database or a single database.
VPN Client Used
After Windows
Logon (not running
as a service)
VPN Client
Prelogon
VPN Client
Running as a
Service
Check Point
Single database
Single database
Single database
Cisco
Single database
Single database
Either per-user or single VpnMode policy
database
must be set. See
“Customization
Policies” on
page 15.
Juniper Odyssey
Single database
Single database
Single database
2: Installing the Application
Comments
17
RSA SecurID Software Token 4.1 Administrator’s Guide
VPN Client Used
After Windows
Logon (not running
as a service)
VPN Client
Prelogon
VPN Client
Running as a
Service
Juniper SSL
Not applicable
Not applicable
Either per-user or single
database
Nortel
Single database
Single database
Either per-user or single
database
Comments
Token Database Copy Protection
RSA SecurID Software Token for Windows uses the following data protection
mechanisms to tie the token database to a specific computer:
•
Binding the database to the computer’s primary hard disk drive
•
Implementing the Windows Data Protection API (DPAPI)
These mechanisms ensure that an intruder cannot move the token database to another
computer and access the tokens.
If you replace a hard disk drive on a computer, the token database installed on that
computer cannot be recovered, and you must issue new tokens to users of that
computer. If you back up users’ hard disk drives on a daily basis, and you are
concerned about possibly having to replace hard disk drives, you can preserve users’
software tokens by disabling copy protection when you install the SecurID desktop
application. To do so, you must install the application from the command line and set
the SETCOPYPROTECTION property to FALSE. This disables binding the database
to the hard disk drive on all computers on which you install the application. (For a
command example, see “Command Line Examples” on page 25.)
Even if you disable copy protection, the database is still protected by DPAPI. You can
further protect the database by having the user set a device password, as described in
“Set a Device Password” on page 74.
Installing RSA SecurID Software Token for Windows
RSA SecurID Software Token for Windows uses a Windows Installer MSI file. The
MSI file contains a database of information on the elements of the installation,
uninstallation, and upgrades for the application and its components. If you do not need
to make changes to the product installation, you can double-click the MSI file to start
an interactive installation. If you need to make changes to the installation, you must
invoke the MSI file from the command line, specifying the features and properties that
you want to install.
Note: RSA recommends that you set any customization policies before you install the
application. For more information, see “Customizing the Application” on page 83.
18
2: Installing the Application
RSA SecurID Software Token 4.1 Administrator’s Guide
Enterprise-Wide Installations
You can install the application on a large number of computers using a third-party
deployment tool, such as Microsoft Systems Management Server (SMS). If you
specify a silent installation, the application is installed on all computers without
requiring users to interact with the installation program. A silent installation is ideal
for organizations that do not allow nonadministrators to install software.
With Microsoft SMS or another third-party deployment tool, you can include token
files (SDTID files) in your deployment package. Configure the SMS package so that
tokens will be installed to Desktop or to My Documents. This way, tokens will be
imported automatically when a user starts the application.
When you create the SMS package, you must use a specific script so that each user
receives a unique token. For example, use a script that contains logic such as the
following to ensure that only the target user receives the token.
•
On Windows XP:
“if systemresource.name=LAPTOP-LAP, copy username.sdtid c:\Documents and
Settings\username\Desktop”
•
On Windows Vista:
“if systemresource.name=LAPTOP-LAP, copy username.sdtid
c:\Users\username\Desktop
Windows Installation Package
The RSA SecurID Software Token for Windows installation kit,
RSASecurIDToken410.zip, contains the following:
•
An installation package, RSASecurIDToken410.msi.
•
Documentation, including this Administrator’s Guide, Release Notes, and a user
Quick Start document.
•
A device definition file, Desktop-Windows-4.x-swtd.xml. For more information,
see “Device Definition Files” on page 49.
•
An administrative template, RSASecurIDToken.adm. For more information, see
“Customizing the Application” on page 83.
Install the Application Using the InstallShield Program
This section describes how to install RSA SecurID Software Token for Windows
using the InstallShield installation program.
Note: You must have administrator privileges to install RSA SecurID Software Token
for Windows.
To install the application using the InstallShield program:
1. Open the installation kit.
2. In the root directory, double-click RSASecurIDToken410.msi.
3. On the Welcome screen, click Next.
2: Installing the Application
19
RSA SecurID Software Token 4.1 Administrator’s Guide
4. On the Place of Purchase screen, select the region where you ordered the software,
and click Next.
5. On the License Agreement screen, read the terms of the license agreement, and
then select I accept the terms in the license agreement. You must accept the
terms in the license agreement to continue the installation. To print the license
agreement, click Print. Click Next.
The Setup Type screen is displayed.
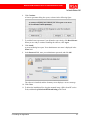
6. Do one of the following.
20
•
To install the application to the default location without installing a web
browser plug-in, select Typical, click Next, and click Install. When the
installation is complete, select the option to launch the application or click
Finish.
•
To install one or both web browser plug-ins, or to install the application to a
location other than the default, select Custom.
The Custom Setup screen is displayed. The RSA SecurID Token Library is
installed by default. You cannot remove this feature.
2: Installing the Application
RSA SecurID Software Token 4.1 Administrator’s Guide
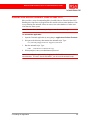
7. Do one of the following:
•
To install the application to a directory other than the default, click Change.
Change the destination directory, and click OK.
•
To install a web browser plug-in, select the plug-in, and select This feature
will be installed on local hard drive. Repeat this process if you want to
install both plug-ins.
8. Click Next.
Note: If you select the Internet Explorer Plug-in feature on Windows Vista, a
screen is displayed notifying you that the installer will close any running
Internet Explorer browsers or related programs.
9. On the Ready to Install the Program screen, click Install.
When the installation is complete, you are prompted to launch the application.
10. Do one of the following:
•
To start the application, select Launch RSA SecurID Token, and click
Finish.
•
If you do not want to start the application, click Finish.
You do not need to restart your computer.
2: Installing the Application
21
RSA SecurID Software Token 4.1 Administrator’s Guide
Command Line Installation
A Windows Installer command line installation allows you to install product features
to meet your specific requirements. For example, if you use the software token library
with a supported third-party plug-in that has its own user interface, you can exclude
the desktop application executable (“DesktopClient”) from the installation. The
installation package also provides command line properties that allow you to change
the location where specific components are installed on the user’s system.
Important: To run a command line installation on Windows Vista, you must run the
command shell as Administrator.
Features That Can Be Installed or Uninstalled from the Command Line
The following table describes the product features that you can install or uninstall
from the command line.
Installed by
Default?
Feature Name
Description
DesktopClient
The client components of the application,
including the application user interface and the
Token Transfer utility. This utility is used to
transfer tokens from a previous version of the
application.
Yes
Important: If you plan to upgrade from a
previous version, and you do not want to install
the user interface, first make sure that you do not
need to use the Token Transfer utility to transfer
existing tokens to version 4.1. For more
information, see “Transferring Tokens from a
Previous Version” on page 31.
InternetExplorerPlugin
Web browser plug-in for Internet Explorer
No
FirefoxPlugin
Web browser plug-in for Firefox
No
HDDPlugin
Local Hard Drive (RSA) plug-in. This is the
default storage device plug-in.
Yes
HWAuthenticatorPlugin
RSA Hardware Authenticator Plug-In 4.1,
Yes
which supports using a connected SecurID 800
authenticator with the desktop application. For
more information, see “Using a Connected RSA
SecurID 800 Authenticator (Windows Only)” on
page 14.
Note: You do not need to uninstall this plug-in if
you do not use a connected SecurID 800.
22
2: Installing the Application
RSA SecurID Software Token 4.1 Administrator’s Guide
Command Line Properties
The following table describes the properties that you can set using the command line.
Once you set a command property, you cannot change it unless you first uninstall the
application.
Property
Description
Values
COPYTOSYSTEM32
Installs a copy of the software token library,
stauto32.dll, and its dependent DLLs
(QtCore4.dll and QtGui4.dll) into the
system32 directory. Does not add the
application path to the system PATH
environment variable, because the application
will find stauto32.dll in the system32
directory.
TRUE or FALSE. If set to TRUE, the installation
program does not modify the system PATH
environment variable, and copies DLLs to the
system32 directory. Default is FALSE.
You may want to use this option if adding the
application path to the System path causes the
System path to exceed the Windows length
limit.
SETCOPYPROTECTION Sets copy protection on the token database by TRUE or FALSE. If set to TRUE, copy
binding the token database to the primary
protection is enabled. If set to FALSE, copy
hard disk drive on the computer. For more
protection is disabled. Default is TRUE.
information, see “Token Database Copy
Protection” on page 18.
SETDATABASEDIR
Installs the database containing the user’s
software tokens (token database) to a location
other than the default directory. Allows
enterprises that do not allow Write access to
the default installation directory, or that have
other drives that are set up for encryption, to
configure the location of the token database
directory during a silent installation.
Set the database directory path as follows.
For a Per-User Database:
The path must begin with ~/ or ~\, making it
relative to the user directory and applicable to
multiple users.
• The user directory on Windows XP is
C:\Documents and Settings\username.
• The user directory on Windows Vista is
The total length of the database name
C:\Users\username.
combined with the database directory cannot
For
a Single Database:
exceed the maximum pathname length for the
You must specify an absolute path beginning
platform.
with the drive letter and a backslash: drive:\. The
Important: You must give nonadministrative database will be owned by the first user to use
users Read, Write, and Modify privileges to
the application.
the database directory. Otherwise, they might
• The default Windows XP directory is ~\Local
not be able to use the application. The
Settings\Application Data\RSA\RSA
database should not be installed in protected
SecurID Software Token Library.
directories in Windows Vista such as
• The default Windows Vista directory is
Program Files and the C:\ root directory.
~\AppData\Local\RSA\
RSASecurID Software Token Library.
Directory path elements are created if they do
not exist. The /../ characters are not allowed.
2: Installing the Application
23
RSA SecurID Software Token 4.1 Administrator’s Guide
Property
Description
Values
SETSINGLEDATABASE
Creates a single token database. Set this
property to TRUE to allow prelogon to a
VPN client application. Because the VPN
client cannot identify the user prior to
Windows logon, the user’s tokens must be
stored in a single database that is not
associated with the specific user. This
property is intended for users who do not
share a computer. This property is not
supported if multiple SecurID users share a
computer.
TRUE or FALSE. If set to TRUE, changes the
default database location from the specific user
location to All Users on Windows XP or
C:\ProgramData\RSA\… on Windows Vista or
Windows 7. Default is FALSE.
STOPVISTABROWSER
Closes the Internet Explorer browser on
computers running Windows Vista before
performing a silent installation. Set this
property to TRUE if you want to use the web
browser plug-in for Windows Explorer on
Vista systems. This ensures that the web
browser plug-in can be registered so that it
can operate on Vista systems.
TRUE or FALSE. If set to TRUE, the installer
stops Internet Explorer and all Internet Explorer
processes before the installation can continue.
Default is FALSE.
Command Line Syntax
To install RSA SecurID Software Token for Windows from the command line, use the
Windows Installer command, msiexec, with appropriate options.
Follow these guidelines for a command line installation:
24
•
All properties entered on the command line are interpreted as uppercase, but the
value retains case sensitivity. For example, you can enter the
SETSINGLEDATABASE property in uppercase or lowercase, but you must enter
the value (TRUE or FALSE) in uppercase.
•
By default, the application is installed to the Program Files directory. To change
the location of the destination directory, use the Windows Installer INSTALLDIR
property.
•
To install specific features, and exclude others, you must use the msiexec
command with the ADDLOCAL property. You must specify each feature that you
want to install. The ADDLOCAL property takes the form
ADDLOCAL=PropertyValue. Separate each value with a comma. See “Command
Line Examples” on page 25.
•
To add or remove a feature after performing an installation, you must reinstall the
software. To remove a feature, use the REMOVE property. To add a feature that
you did not initially install, use the ADDLOCAL property. See “Modify an
Installation Using the Command Line” on page 27.
•
If you pathnames or properties contain spaces, enclose the entire path in quotation
marks.
2: Installing the Application
RSA SecurID Software Token 4.1 Administrator’s Guide
•
Enter command line options (for example, /i) in either lowercase or uppercase.
Windows Installer command line options are case insensitive.
•
To review the results of the installation, use the /lv option (verbose logging). Store
the log file, for example, install.log, in a known location, such as
%USERPROFILE%.
Note: For more information on Windows Installer command line options, open a
command line, and type msiexec. This displays msiexec command options. For
additional details, access the Microsoft Developer Network Library and search on
“Windows Installer Command Line Options.”
Command Line Examples
The following sections contain examples of installations performed using the
Windows Installer msiexec command line. The /i option, with the MSI filename,
installs the application. The examples use the /qn option, which specifies a silent, or
quiet installation (no user prompts), and the /lv option, which creates a verbose
installation log.
Install the Application Silently
The following command installs the application, the default storage device plug-in
(hard drive plug-in), and the RSA Hardware Authenticator Plug-In.
msiexec /qn /i “pathname\RSASecurIDToken410.msi” /lv c:\install.log
Install the Application, Web Browser Plug-In, and Hard Drive Plug-In
The following command uses the ADDLOCAL property to silently install the
application, the web browser plug-in for Internet Explorer, and the default storage
device plug-in (HDDPlugin).
msiexec /qn /i “pathname\RSASecurIDToken410.msi” /lv c:\install.log
ADDLOCAL=DesktopClient,InternetExplorerPlugin,HDDPlugin
Install a Copy of the Software Token API to the system32 Directory
The following command uses the COPYTOSYSTEM32 property to install a copy of
the software token API into the system32 directory. Use a command similar to this
one if adding the application path to the System path will cause the System path to
exceed the Windows length limit.
msiexec /qn /i “pathname\RSASecurIDToken410.msi” /lv c:\install.log
COPYTOSYSTEM32=TRUE
Set Copy Protection
The following command uses the SETCOPYPROTECTION property to remove token
binding from the local hard drive. Use a command similar to this one to avoid having
to reissue new tokens if you replace users’ hard disk drives. This command does not
affect copy protection provided by the DPAPI implementation.
msiexec /qn /i “pathname\RSASecurIDToken410.msi” /lv c:\install.log
SETCOPYPROTECTION=FALSE
2: Installing the Application
25
RSA SecurID Software Token 4.1 Administrator’s Guide
Install the Token Database to a Non-Default Location
The following command silently installs the application and installs the token storage
database to a non-default location. Use a command similar to this one to install the
token database in a custom directory if your company does not allow Write access to
the default installation directory or if you have other drives that are set up for
encryption.
msiexec /qn /i “pathname\RSASecurIDToken410.msi” /lv c:\install.log
SETDATABASEDIR=~\rsatokens
Install a Single Token Database to the Default Location
The following command silently installs the application and creates a single token
storage database that is not associated with a specific user. The database resides in the
All Users directory. Use a command similar to this one if you are using an application
that has integrated SecurID functionality.
msiexec /qn /i “pathname\RSASecurIDToken410.msi” /lv c:\install.log
SETSINGLEDATABASE=TRUE
Install a Single Token Database to a Non-Default Location
The following command silently installs the application and creates a single token
storage database that is not associated with a specific user. Using an absolute path with
the SETDATABASEDIR property creates a single database instance that is owned by
the first user to use the application.
msiexec /qn /i “pathname\RSASecurIDToken410.msi” /lv c:\install.log
SETSINGLEDATABASE=TRUE SETDATABASEDIR=c:\LocalDir
Note: You cannot install a single database specifying a relative path, as a relative path
assumes multiple databases.
Close Internet Explorer on Windows Vista Before Installing the
Application
The following command closes the Internet Explorer browser on Windows Vista
before silently installing the application and the web browser plug-in for Internet
Explorer.
msiexec /qn /i “pathname\RSASecurIDToken410.msi” /lv c:\install.log
ADDLOCAL=DesktopClient,InternetExplorerPlugin
STOPVISTABROWSER=TRUE
26
2: Installing the Application
RSA SecurID Software Token 4.1 Administrator’s Guide
Modify an Installation
You can modify an existing installation to add or remove installable features.
Modify a Single Installation Using the Program List
You can add or remove web browser plug-ins from a single installation using the
Windows program list.
Note: You cannot use the program list to install or remove the hard drive plug-in
(HDDPlugin) or the RSA Hardware Authenticator Plug-In (HWAuthenticatorPlugin).
You must use the msiexec command line.
To add or remove a web browser plug-in using the program list:
1. In the Windows Control Panel, click the program list (for example, Add or
Remove Programs).
2. Click Next.
3. Click Modify, and click Next.
4. Do one of the following:
•
To install a web browser-plug-in, click the plus sign to expand the Browser
Plug-Ins feature, and click the down-arrow next to the plug-in that you want.
Select This feature will be installed on local hard drive.
•
To remove a web browser plug-in, click the plus sign to expand the Browser
Plug-Ins feature, and click the down-arrow next to the plug-in that you want
to remove. Select This feature will not be available.
5. Click Next, and click Install.
6. Click Finish.
Modify an Installation Using the Command Line
You can modify an installation on multiple computers using the msiexec command.
You can use the msiexec command to add or remove web browser plug-ins or to
remove the local hard drive plug-in or the Hardware Authenticator Plug-In.
To add web browser plug-ins using the command line:
Use the msiexec command with the ADDLOCAL property, and specify the value of
the web browser plug-in.
This example silently installs the application and default device plug-in, adds the web
browser plug-ins for Internet Explorer and Firefox, and logs the results to a file.
msiexec /qn /i “pathname\RSASecurIDToken410.msi” /lv c:\install.log
ADDLOCAL=DesktopClient,HDDPlugin,InternetExplorerPlugin,FirefoxPlugin
2: Installing the Application
27
RSA SecurID Software Token 4.1 Administrator’s Guide
To remove web browser plug-ins using the command line:
Use the msiexec command with the REMOVE property, and specify the value of the
browser plug-in.
This example silently removes the web browser plug-ins for Internet Explorer and
Firefox and logs the results to a file.
msiexec /qn /i “pathname\RSASecurIDToken410.msi” /lv c:\install.log
REMOVE=InternetExplorerPlugin,FirefoxPlugin
To remove the local hard drive plug-in using the command line:
Use the msiexec command with the REMOVE property, and specify the value of the
local hard drive plug-in.
This example silently removes the local hard drive plug-in and logs the results to a
file.
msiexec /qn /i “pathname\RSASecurIDToken410.msi” /lv c:\install.log
REMOVE=HDDPlugin
To remove the RSA Hardware Authenticator Plug-In using the command line:
Use the msiexec command with the REMOVE property, and specify the value of the
Hardware Authenticator Plug-In.
This example silently removes the Hardware Authenticator Plug-In and logs the
results to a file.
msiexec /qn /i “pathname\RSASecurIDToken410.msi” /lv c:\install.log
REMOVE=HWAuthenticatorPlugin
Repair an Installation
You can repair errors in the existing installation. The repair process rewrites required
registry entries, reinstalls missing files, replaces files that are an older version, and
reinstalls shortcuts. Repairing the installation does not affect tokens that you have
imported unless the token database has become corrupted. In that case, you must
import new tokens.
Repair a Single Installation Using the Program List
You can repair a single installation using the program list.
To repair a single installation using the program list:
1. In the Windows Control Panel, click the program list (for example, Add or
Remove Programs).
2. Click Next.
3. Click Repair, and click Next.
4. On the Ready to Repair the Program screen, click Install.
5. When the repair is complete, click Finish.
28
2: Installing the Application
RSA SecurID Software Token 4.1 Administrator’s Guide
Repair an Installation on Multiple Computers Using the Command Line
You can repair an installation on multiple computers using the msiexec command line.
To repair an installation using the command line:
Use the msiexec command with the /f option. The following command silently repairs
an installation and logs the results to a file.
msiexec /qn /f “pathname\RSASecurIDToken410.msi” /lv c:\install.log
Upgrading RSA SecurID Software Token for Windows
You can upgrade to RSA SecurID Software Token 4.1 for Windows from
RSA SecurID Software Token 3.0.7 or from RSA SecurID Software Token 4.0. After
an upgrade, users can continue using their existing 128-bit tokens. For more
information, see “Transferring Tokens from a Previous Version” on page 31.
Restrictions on Upgrading from Version 3.0.7
Observe the following restrictions when upgrading your software from version 3.0.7:
•
Upgrades from version 3.0.7 are not supported on Windows Vista.
•
The following features are not carried over after an upgrade from version 3.0.7:
–
Login Automation
–
Transfer of tokens stored on smart cards
–
Administration Tool
Delete 64-Bit Tokens
If you attempt to upgrade from version 3.0.7, and the version 4.1 installation program
detects 64-bit tokens on the computer, the installation fails.
In an interactive upgrade, a message is displayed stating that the system has not been
modified because the application does not support 64-bit tokens. A silent upgrade
exits without sending a message to the screen. RSA recommends using the /lv option
(log verbose) in silent upgrades so that you can review the event log to determine if
the installation failed due to the presence of 64-bit tokens.
To identify and delete 64-bit tokens:
1. Instruct the user to start the SecurID desktop application and provide you with the
serial numbers of all installed tokens.
2. After you obtain the token serial numbers, access the Edit Token screen in
RSA Authentication Manager to determine the algorithm for the tokens (SID or
AES).
3. Delete all 64-bit tokens from the affected desktops, and then rerun the installation
program.
2: Installing the Application
29
RSA SecurID Software Token 4.1 Administrator’s Guide
Prerequisites for Upgrading from Version 3.0.7 or Version 4.0
Before you upgrade to version 4.1, observe the following prerequisites:
•
When upgrading from version 4.0 to version 4.1, you can only upgrade to the
per-user database. For more information, see “Token Storage Database Options
for VPN Client Applications (Windows Only)” on page 16.
•
If you change the location of the token database when you upgrade using the
command line, you must give nonadministrative users Read, Write, and Modify
privileges to the database file. Otherwise, they might not be able to use the
application.
•
If the web browser plug-in for Internet Explorer was installed with version 3.0.7
or version 4.0, instruct users to close the browser before upgrading to version 4.1.
If a user completes an authentication using the web browser plug-in for Internet
Explorer and leaves the browser open during the installation of version 4.1, the
installer prompts the user to retry, ignore, or exit the installation. Closing the
browser and selecting Retry successfully upgrades the application. Selecting
Ignore upgrades the application, but if the user attempts to access a protected
resource using the browser plug-in with version 4.1, an older version of the
browser plug-in is displayed. To display the current version of the browser
plug-in, the user must close and then reopen the web browser.
•
Instruct users to close their VPN client application. If a VPN client is running
during the upgrade (for example, sleeping), and a user attempts to log on to the
VPN client after the upgrade, authentication may fail. To restore proper operation,
the user must stop and restart the VPN client.
Perform the Upgrade
You upgrade the application from RSA SecurID Software Token 3.0.7 or later using
the MSI file or using the command line.
Upgrade Using the MSI File
You can upgrade the application using the RSA SecurID Software Token 4.1 MSI file.
If you installed a previous version to a directory other than the default, and you want
to install version 4.1 to that directory, you must select a Custom setup and change the
destination directory to match your previous installation.
To upgrade using the MSI file:
Run the RSA SecurID Software Token 4.1 MSI file, RSASecurIDToken410.msi.
This overwrites the previous version.
Upgrade Using the Command Line
You can upgrade an installation using the command line. If you installed the web
browser plug-in for Internet Explorer, and you want users to continue using it with
version 4.1 of the application, specify ADDLOCAL=InternetExplorerPlugin. To add
the web browser plug-in for Firefox, specify ADDLOCAL=FirefoxPlugin.
30
2: Installing the Application
RSA SecurID Software Token 4.1 Administrator’s Guide
To upgrade using the command line:
Enter the msiexec installation command with your preferred options.
For example, the following command silently upgrades to RSA SecurID Software
Token 4.1, installs the default per-user token database, reinstalls the default features,
and adds the web browser plug-ins.
msiexec /qn /i “pathname\RSASecurIDToken410.msi” /lv c:\install.log
ADDLOCAL=DesktopClient,HDDPlugin,InternetExplorerPlugin,FirefoxPlugin
Transferring Tokens from a Previous Version
After an upgrade, users can use their existing 128-bit tokens (AES algorithm) with
version 4.1. Version 4.1 attempts to automatically and silently transfer users’ existing
tokens to the version 4.1 token database. If applicable, the user must enter a token
passphrase (version 3.0.7) or a device password (version 4.0) in order to complete the
transfer.
In some cases, a user may need to transfer tokens used with version 3.0.7 manually,
using the Token Transfer utility. For more information, see “Token Transfer from
Version 3.0.7 to Version 4.1” on page 32.
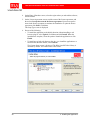
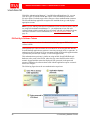
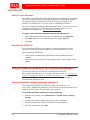
Token Transfer from Version 4.0 to Version 4.1
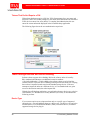
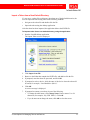
The first time that a user runs version 4.1, the application automatically and silently
transfers all tokens from version 4.0 to the version 4.1 per-user token database. If the
version 4.0 token storage device is password protected, the user is prompted for the
device password before the tokens are transferred, as shown in the following figure.
If the user cancels the operation, the dialog box opens every time the user starts the
application, until the user enters the device password or clicks Do not transfer. If the
user cannot remember the device password and clicks Do not transfer, the device
password dialog box does not open again. Instead, the Import Token dialog box opens
to allow the user to import a new token.
2: Installing the Application
31
RSA SecurID Software Token 4.1 Administrator’s Guide
Token Transfer from Version 3.0.7 to Version 4.1
Version 4.1 automatically and silently transfers one 128-bit token that is not
passphrase (password) protected from the version 3.0.7 single token database to the
version 4.1 per-user token database. Multiple tokens must be transferred manually
unless you set the SETSINGLEDATABASE property to TRUE before you ran the
installation program. In that case, multiple tokens are silently migrated as long as none
of the tokens are password protected.
The following table summarizes token transfer from version 3.0.7 to version 4.1.
One Token
Multiple
Tokens
Token
Password
Transfer Method
The token of the first user who runs the
application is transferred automatically to the
version 4.1 token database.
Token Transfer utility
Token Transfer utility
Token Transfer utility. The user’s tokens are
transferred to the version 4.1 per-user token
database (default). If multiple users share a
computer, each user can transfer his or her
tokens to the per-user database.
Tokens are transferred automatically to the
version 4.1 single token database if the
application is installed using the
SETSINGLEDATABASE=TRUE property.
32
2: Installing the Application
RSA SecurID Software Token 4.1 Administrator’s Guide
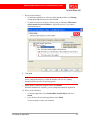
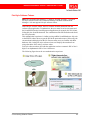
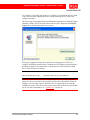
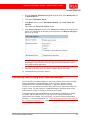
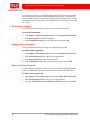
Transfer Tokens Manually from Version 3.0.7
To transfer tokens manually from version 3.0.7, you must run the Token Transfer
utility. This utility is installed with version 4.1.
To run the Token Transfer utility:
1. Click Start > All Programs > RSA > RSA SecurID Token > Token Transfer
Utility.
The Transfer RSA SecurID Tokens dialog box opens, as shown in the following
figure.
2. Do one of the following:
•
To transfer a specific token, select the checkbox for that token.
•
To transfer all tokens, click Select All.
3. Click OK.
If the tokens are not password protected, the transfer occurs immediately. If the
tokens are password protected, you are prompted for the password before each
protected token is transferred.
4. If prompted, enter the token password. Click OK.
2: Installing the Application
33
RSA SecurID Software Token 4.1 Administrator’s Guide
Uninstalling RSA SecurID Software Token for Windows
You can uninstall RSA SecurID Software Token for Windows using the program list
or from the command line. Uninstalling the application also removes the software
token database of the user performing the uninstall. It does not remove the token
databases of other users who share the same system.
Note: You must have administrator privileges to uninstall the application on
Windows.
Uninstall the Application Using the Program List
Use the following procedure to uninstall the application using the program list.
To uninstall the application using the program list:
1. In the Windows Control Panel, click the program list (for example, Add or
Remove Programs).
2. Click RSA SecurID Software Token for Windows, and click Remove.
3. When prompted to verify that you want to remove the program, click the
appropriate removal option.
Uninstall the Application Using the Command Line
Use the following procedure to uninstall the application using the command line.
To uninstall the application using the msiexec command:
Use the msiexec command with the /x (uninstall) option. The following example
uninstalls the application silently and logs the results to a file.
msiexec /qn /x “pathname\RSASecurIDToken410.msi” /lv c:\install.log
34
2: Installing the Application
RSA SecurID Software Token 4.1 Administrator’s Guide
Installing RSA SecurID Software Token for Mac OS X
You can deploy RSA SecurID Software Token for Mac OS X from the RSA web site
or stage the application on your own web site. Alternatively, you can use deployment
tools provided by Apple Computer or third-party vendors.
Note: RSA recommends that you set any customization policies before you install the
application. For more information, see “Customizing the Application” on page 83.
Mac OS X Installation Package
The RSA SecurID Software Token for Mac OS X installation package,
RSASecurIDToken410.dmg, contains the following:
•
An installation file, RSASecurIDSoftwareToken410.mpkg.
•
Documentation, including this Administrator’s Guide, Release Notes, and a user
Quick Start document. After the application is installed, users can access the
Quick Start from /Library/Documentation/Applications/SecurID/
SecurID_Token_quickstart.pdf.
•
A device definition file, def/Desktop-Mac-4.x-swtd.xml. For more information,
see “Device Definition Files” on page 49.
Customize the Token Database Location (Optional)
By default, software tokens used with the application are stored in ~/.RSA/RSA/RSA
SecurID Software Token Library. To change the storage location, you must modify
a configuration file before installing the software. The configuration file,
RSA_DB_Config.txt, is located within the installation package in the
RSASecurIDToken410.mkpg /Contents/Resource/ directory.
The configuration file contains the following placeholder for the path of the custom
database:
dbPath=~[CUSTOM_DB_PATH_PLACEHOLDER]
Configuration Requirements
Observe the following requirements when modifying the configuration file:
•
Specify a database path that is relative to the user’s home directory. The specified
path must start with a tilde (~). Otherwise, the installer displays an error message
and quits.
•
Do not include /../ in the custom database path.
Edit the Configuration File and Install the Application
Use the following procedure to customize the database location and install the custom
installation package.
Important: You must give nonadministrative users Read, Write, and Modify
privileges to the database file. Otherwise, they may not be able to use the application.
2: Installing the Application
35
RSA SecurID Software Token 4.1 Administrator’s Guide
To edit the database configuration file and install the software:
1. Move the installation package (mpkg file) from the dmg file to a local directory.
2. Open the RSA_DB_Config.txt file, and replace the placeholder text with the
name of your custom database path. For example:
dbPath=~myCustomDatabasePath
3. Save the configuration file.
4. Do one of the following:
•
Install the application using the dmg file, as described in the following
section, “Install the Application.”
•
Open a terminal, and enter an installation command similar to the following:
sudo installer -pkg RSASecurIDMac410.mpkg/ -target
/Volumes/MySystemVolume
where MySystemVolume is the name of your target volume. When prompted,
enter your administrator password.
Install the Application
This section describes how to install RSA SecurID Software Token for Mac OS X.
The following instructions assume that you have downloaded the dmg file to your
computer.
Note: You must have administrator privileges to install the application.
To install the application on Mac OS X:
1. On the Dock, click the Downloads icon.
2. Click RSASecurIDToken410.dmg.
The Finder opens and displays the RSA SecurID Software Token installer.
3. Double-click RSASecurIDSoftwareToken410.mpkg.
When prompted whether you want to continue, click Continue.
4. On the Welcome screen, click Continue.
5. On the Software License Agreement screen, do one of the following:
36
•
Use the scroll bar to scroll through the contents of the license agreement.
•
To print the license agreement, click Print.
•
To save the license agreement to a file, click Save.
2: Installing the Application
RSA SecurID Software Token 4.1 Administrator’s Guide
6. Click Continue.
A license agreement dialog box opens, as shown in the following figure.
7. To read the license agreement if you did not do so previously, click Read License.
When you are ready to continue installing the software, click Agree.
8. Click Install.
A password dialog box opens. Your administrator user name is displayed in the
Name field.
9. In the Password field, enter your administrator password, and click OK.
The software is installed, and the Summary screen displays a success message.
10. Click Close.
11. To delete the installation files, drag the mounted image (“RSA SecurID”) to the
Trash, and then drag RSASecurIDToken410.dmg to the Trash.
2: Installing the Application
37
RSA SecurID Software Token 4.1 Administrator’s Guide
Upgrading RSA SecurID Software Token for Mac OS X
Use the RSA SecurID Software Token 4.1 for Mac OS X installation file to upgrade
from RSA SecurID Software Token 4.0. Users can continue using the tokens that they
used with the version 4.0 application.
Perform the Upgrade
Use the following procedure to upgrade the application.
To upgrade from version 4.0:
Run the RSA SecurID Software Token 4.1 installation file,
RSASecurIDToken410.dmg. This overwrites the previous version.
Transfer Tokens Used with Version 4.0
The first time that a user runs the version 4.1 application, the application automatically
and silently transfers all tokens from version 4.0 that do not have a device password to
the version 4.1 per-user token database. If the version 4.0 token database is password
protected, the user is prompted for the device password before the tokens are
transferred, as shown in the following figure.
If the user cancels, the dialog box opens every time the user starts the application,
until the user enters the device password or clicks Do not transfer. If the user cannot
remember the device password and clicks Do not transfer, the device password
dialog box does not open again. Instead, the Import Token dialog box opens to allow
the user to import a new token.
38
2: Installing the Application
RSA SecurID Software Token 4.1 Administrator’s Guide
Uninstall RSA SecurID Software Token for Mac OS X
RSA provides a script for uninstalling RSA SecurID Software Token for Mac OS X.
Running the script removes all application files and the software token database of the
user performing the uninstall. It does not remove the token databases of other users
who share the same system.
Note: You must have administrator privileges to run the uninstall script.
To uninstall the application:
1. Open the Terminal application by navigating to Applications/Utilities/Terminal.
2. Navigate to the directory that contains the uninstall script. Type:
cd /Library/Application Support/SecurID
3. Run the uninstall script. Type:
sudo ./uninstall-rsasecurid.py
4. When prompted, enter your administrator password.
Note: Uninstalling the application by dragging it to the Trash does not remove the
token database. To remove the token database, you must run the uninstall script.
2: Installing the Application
39
RSA SecurID Software Token 4.1 Administrator’s Guide
3
Provisioning Software Tokens
This chapter provides the key steps for issuing software tokens in RSA Authentication
Manager and describes the supported methods for provisioning tokens to use with
RSA SecurID Software Token (the SecurID desktop application).
Prerequisites
Before provisioning tokens for use with the SecurID desktop application, you must:
•
Understand how to issue software tokens in RSA Authentication Manager:
–
To provision tokens using RSA Authentication Manager 7.1 or RSA SecurID
Appliance 3.0, use the RSA Security Console. For detailed instructions, see
the RSA Security Console Help.
–
To provision tokens using RSA Authentication Manager 6.1, use the Database
Administration application. For detailed instructions, see the Database
Administration application Help.
–
To configure RSA Credential Manager so that users can obtain tokens through
the RSA Self-Service Console, use the Security Console. For detailed
instructions, see the Security Console Help.
•
Issue 128-bit (AES) tokens. The application does not support 64-bit (SID) tokens.
•
Plan your authentication requirement, as described in the following section.
For supported token configurations, see “Supported Provisioning Servers” on page 10.
Planning the RSA SecurID Authentication Requirement
RSA SecurID authentication normally requires using a PIN with the software token.
The PIN and the tokencode displayed on the device form a passcode, which serves as
the user’s one-time password (OTP). Entering a PIN in addition to the tokencode is
known as two-factor authentication. The two factors are something you have (the
token) and something you know (the PIN). Using two factors delivers a higher level of
authentication assurance than using a single factor.
RSA Authentication Manager also supports tokens that do not require entering a PIN.
If you issue this token type, the user authenticates with the currently displayed
tokencode (something you have). This option is best used when a system other than
RSA SecurID is responsible for managing the second factor (something you know),
such as an existing user name and password. In this scenario, the first factor (user
name/password) is validated by the external system and the second factor (tokencode)
is validated by Authentication Manager.
3: Provisioning Software Tokens
41
RSA SecurID Software Token 4.1 Administrator’s Guide
With RSA Authentication Manager 7.1 and RSA SecurID Appliance 3.0, you can
issue two types of software tokens that require a PIN: PINPad-style tokens and
fob-style tokens. Each token type offers strong two-factor authentication assurance.
The SecurID desktop application recognizes the installed token type and displays
appropriate screens.
Note: If you are making a transition from hardware tokens to software tokens, and you
are using RSA Authentication Manager 7.1, you might want to issue fob-style
software tokens, which resemble the user experience with fob-style hardware tokens,
such as the SID700. For more information, see “Fob-Style Software Tokens” on
page 43.
PINPad-Style Software Tokens
Note: All supported versions of Authentication Manager support PINPad-style
software tokens.
With PINPad-style software tokens, the user enters his or her SecurID PIN into the
SecurID desktop application to generate a one-time password (OTP), or passcode. To
authenticate, the user enters his or her user name and the OTP into the application that
is protected by SecurID (for example, a VPN client application).
This authentication experience is similar to using an RSA SecurID PINPad-style
hardware token, such as the SD520, where the user enters the PIN on the token’s
numeric keypad and then enters the displayed OTP (passcode) in the protected
resource. PINPad-style software tokens used with the application require a numeric
PIN of 4 to 8 digits.
The following figure shows the user authentication experience.
42
3: Provisioning Software Tokens
RSA SecurID Software Token 4.1 Administrator’s Guide
Fob-Style Software Tokens
Note: RSA Authentication Manager 7.1 and RSA SecurID Appliance 3.0 support
fob-style software tokens. RSA Credential Manager and RSA Authentication
Manager 6.1 do not support fob-style software tokens.
With fob-style software tokens, the user reads the SecurID tokencode from the
software token application. To authenticate, the user enters his or her user name and
the SecurID PIN into the SecurID protected application (for example, the VPN client),
followed by the SecurID tokencode. The combination of the PIN and tokencode forms
the OTP (passcode).
This authentication experience is similar to using an RSA SecurID hardware fob, such
as the SID700, where the user types the PIN in the protected resource, followed by the
current tokencode displayed on the fob. Because many users are familiar with RSA
hardware fobs, issuing fob-style software tokens can simplify the transition from
using a hardware fob to using a software token.
Fob-style software tokens used with the application can have a numeric PIN of 4 to 8
digits or an alphanumeric PIN of 4 to 8 characters.
The following figure shows the user authentication experience.
3: Provisioning Software Tokens
43
RSA SecurID Software Token 4.1 Administrator’s Guide
Tokens That Do Not Require a PIN
With tokens that do not require a PIN, the VPN client prompts for a user name and
passcode. (Some VPN clients prompt for a user name, PIN, and tokencode.) Instead of
a PIN, the user enters four zeros (0000). To complete the authentication, the user
enters the current tokencode displayed in the SecurID desktop application
The following figure shows the user authentication experience.
Token Storage Devices and Device Binding
Software tokens support device binding. Before the software token is issued by
RSA Authentication Manager, an additional extension attribute
(<DeviceSerialNumber/>) can be added to the software token record to bind the
software token to a specific device. Binding a token provides the means for verifying
that a token is imported to and stored on the intended storage device. If the user
attempts to import the token to a different device, or if an unauthorized user gains
access to the token in transit, the token import fails.
With the SecurID desktop application, you can bind a token to a device type, a device
serial number, or a Windows user security identifier (user SID), as described in the
following sections.
Device Type
If you want to require users to import tokens only to a specific type of supported
storage device, you can bind their tokens to a device type. The device type can be the
local hard drive, a Trusted Platform Module (TPM), a biometric device, or another
supported storage device plug-in.
44
3: Provisioning Software Tokens
RSA SecurID Software Token 4.1 Administrator’s Guide
For example, if your token storage device is a TPM, you can bind tokens to the TPM
to prevent users from importing a token to a different storage device, such as the
computer hard drive.
The device type is represented in the SecurID desktop application as a globally unique
identifier (GUID). The GUID of the selected device type is displayed in the Device
Type field on the Token Storage Devices screen.
Each type of supported storage device plug-in has a unique device GUID. For
example, all Windows systems share a common device GUID for the local hard drive.
Similarly, all Mac OS X systems share a common device GUID for the local hard
drive. These GUIDs are as follows:
Windows hard drive GUID
{8f94b226-d362-4204-ac52-3b21fa333b6f}
Mac OS X hard drive GUID
{d0955a53-569b-4ecc-9cf7-6c2a59d4e775}
Note: If you plan to deploy tokens to a large number of users, binding individual
tokens to a device type may be inconvenient. For RSA SecurID Software Token for
Windows, you can create a device whitelist (a list of supported devices) using the
ValidDevices policy. This allows users to store tokens only on the devices specified in
the list. For more information, see “ValidDevices” on page 89.
3: Provisioning Software Tokens
45
RSA SecurID Software Token 4.1 Administrator’s Guide
For instructions on binding a token to a device type, see one of the following sections:
•
For RSA Authentication Manager 7.1, see “Step 4: Bind the Token” on page 51.
•
For RSA Authentication Manager 6.1, see “Bind the Token” on page 58.
Device Serial Number
A device serial number uniquely identifies a specific device rather than a class of
devices. Every instance of the installed SecurID desktop application contains a hard
drive plug-in that has a unique device serial number. You can use the device serial
number to bind a token to a specific device. If the same user installs the application on
a different computer, the user cannot import software tokens into the application
because the hard drive plug-in on the second computer has a different device serial
number from the one to which the user’s tokens are bound.
Obtain a Device Serial Number
Before you bind a token to a device serial number, the desktop application must be
installed on the user’s computer, and the user must launch the application and provide
you with the device serial number. The device serial number is displayed on the Token
Storage Devices screen. Instruct the user to obtain the device serial number as follows.
To obtain a device serial number:
1. Start the SecurID desktop application.
The Import Token screen is displayed.
2. Click the Token Storage Device link just below the middle of the screen.
46
3: Provisioning Software Tokens
RSA SecurID Software Token 4.1 Administrator’s Guide
3. On the left side of the Token Storage Devices screen, click the name of the device.
In this example, there is only one storage device, “Local Hard Drive (RSA).”
4. Copy or record the value displayed next to Device Serial Number.
5. Click OK.
For instructions on binding a token to a device serial number, see one of the following
sections:
•
For RSA Authentication Manager 7.1, see step 4 of “Step 4: Bind the Token” on
page 51.
•
For RSA Authentication Manager 6.1, see “Bind the Token” on page 58.
Windows User SID
With RSA SecurID Software Token for Windows, you can bind a token to a Windows
user security identifier (user SID). This allows the user to import a token to a
supported token storage device on any computer in the domain. Unlike binding a
token to a device serial number, no interaction with the desktop application is required
to obtain the binding information.
You can use a third-party utility to obtain the SIDs of user accounts. For example, the
free Microsoft PsTools suite includes the PsGetSid utility, which allows you to display
the SIDs of user accounts. To download the PsTools suite, access Microsoft TechNet
and search on “PsTools.”
For instructions on binding a token to a user SID, see one of the following sections:
•
For RSA Authentication Manager 7.1, see “Step 4: Bind the Token” on page 51.
•
For RSA Authentication Manager 6.1, see “Bind the Token” on page 58.
3: Provisioning Software Tokens
47
RSA SecurID Software Token 4.1 Administrator’s Guide
Provisioning Overview
You can provision tokens for the SecurID desktop application using Dynamic Seed
Provisioning or file-based provisioning.
Use the information in the following table to become familiar with authentication
server requirements for token provisioning, and then click the link to see more
information on the provisioning method that you plan to use.
Provisioning
Method
Server Requirement
Reference
Dynamic Seed
Provisioning
RSA Authentication Manager 7.1
“Provisioning Tokens Using Dynamic Seed
Provisioning” on page 48
File-Based
Provisioning
(SDTID files)
RSA Authentication Manager 6.1
Dynamic Seed
Provisioning or
File-Based
Provisioning
RSA Credential Manager
RSA SecurID Appliance 3.0
RSA Authentication Manager 7.1
RSA SecurID Appliance 3.0
“Provisioning Tokens Using RSA Authentication
Manager 6.1” on page 54
“Using File-Based Provisioning in RSA
Authentication Manager 7.1” on page 60
“Provisioning Tokens Using RSA Credential
Manager” on page 61
Provisioning Tokens Using Dynamic Seed Provisioning
Dynamic Seed Provisioning (also called Remote Token Key Generation) uses the
RSA Cryptographic Token Key Initialization Protocol (CT-KIP) for the secure
initialization and configuration of cryptographic tokens. When the protocol is
executed, it results in the generation of the same shared secret on both the server and
the token. You do not need to send a token file over the network to the remote user.
To use Dynamic Seed Provisioning, you configure and issue a token in
RSA Authentication Manager 7.1, selecting CT-KIP as the method used to distribute
the token. You must also specify a special code, called an activation code, that the user
must enter to activate the token. The activation code can contain up to 25 characters.
For more information, see “Distribute the Token” on page 53.
48
3: Provisioning Software Tokens
RSA SecurID Software Token 4.1 Administrator’s Guide
The following table lists the provisioning steps and the following sections describe
each step.
Task
Reference
1. Add the desktop device definition file “Add the Device Definition File” in the following
to the Authentication Manager server. section.
2. Configure the software token record.
“Configure the Software Token Record Using
RSA Authentication Manager 7.1” on page 50
3. Distribute the token.
“Distribute the Token” on page 53
Device Definition Files
Software tokens issued using RSA Authentication Manager 7.1 or RSA SecurID
Appliance 3.0 must be associated with a device definition file. This is an XML file
that specifies the supported capabilities and attributes of tokens used with a specific
software token application. The device definition file specifies the supported
tokencode length, type, and duration, as well as the attributes that you can use to bind
a software token to a device attribute.
RSA provides the following device definition files for RSA SecurID Software Token
4.1 in the /def folder of the installation kit for your platform:
•
Desktop-Windows-4.x-swtd.xml
•
Desktop-Mac-4.x-swtd.xml.
Add the Device Definition File
Note: If you used the desktop device definition file with RSA SecurID Software
Token 4.0, you do not need to install the version 4.x file. You can continue to use the
version 4.0 file with RSA SecurID Software Token 4.1.
Before you issue software tokens to use with the SecurID desktop application, you
must add the device definition file to RSA Authentication Manager 7.1. This adds the
Desktop PC 4.x or Desktop Mac 4.x entry to the Software Token Device Type
drop-down list on the Edit Token page. When you select the entry from the device
type list, the page displays the software token attributes that you can configure.
To add the device definition file:
1. Save the device definition file provided in the installation kit for your platform to
a folder on your computer.
2. In the RSA Security Console, click Authentication > Software Token Device
Types > Import Token Device Type.
3. Click Browse to locate the desktop device definition file for your platform. Select
the file, and click Submit.
3: Provisioning Software Tokens
49
RSA SecurID Software Token 4.1 Administrator’s Guide
Configure the Software Token Record Using RSA Authentication Manager 7.1
This guide assumes that you have imported software tokens into Authentication
Manager, assigned them to users, and are ready to configure them in the Security
Console. The following sections highlight key steps for configuring token records for
use with the SecurID desktop application. For more information, see the Security
Console Help.
Step 1: Access the Edit Token page
1. Log on to the Security Console.
2. Click Authentication > SecurID Tokens > Manage Existing.
3. Select the token that you want to edit.
4. Click the drop-down arrow next to the token serial number, and select Edit.
Step 2: Select the User Authentication Requirement
In the SecurID PIN Management section, do one of the following:
•
Select Require PIN during authentication if you want the user to authenticate
with a passcode (PIN plus tokencode).
•
Select Do not require PIN (only tokencode) if you want the user to authenticate
with a tokencode only (no PIN).
Step 3: Select the Software Token Device Type
From the Software Token Device Type drop-down list, select one of the following:
•
For the Windows application, select Desktop PC 4.x.
•
For the Mac OS X application, select Desktop Mac 4.x.
Selecting the device type displays the Device Specific Attributes section, which
contains the DeviceSerialNumber field and the Nickname field.
50
3: Provisioning Software Tokens
RSA SecurID Software Token 4.1 Administrator’s Guide
Step 4: Bind the Token
In the DeviceSerialNumber field, do one of the following:
•
To bind the token to the local hard drive, leave the default entry.
•
To bind the token to a device serial number, clear the DeviceSerialNumber field,
and enter the device serial number that you obtained from the user.
•
To bind the token to a Windows user SID, use a utility such as PsGetSid to obtain
the user SID. For example:
psgetsid.exe user1
S-1-5-21-876543210-1234567890-987654321-765432
Note: To download the PsGetSid utility, access Microsoft TechNet and search
on “PsTools.”
Clear the DeviceSerialNumber field, and enter the user SID.
Step 5: Assign a Nickname
You can optionally assign the token a user-friendly name by entering a name in the
Nickname field. The nickname can contain 1 to 24 case-sensitive, alphanumeric
characters. By default, the user can change the nickname after importing the token. If
you do not enter a nickname, the SecurID desktop application displays the token serial
number.
If you do not want users to change the nickname that you assign, you can set the
DisableChangeTokenName policy. For more information, see Appendix A,
“Customizing the Application.”
3: Provisioning Software Tokens
51
RSA SecurID Software Token 4.1 Administrator’s Guide
Step 6: Select the Software Token Settings
In the Software Token Settings section, select the software token settings. The
following figure shows the settings available for the SecurID desktop application, and
the table explains each setting.
Option
Explanation
Displayed Value
Displayed Value options are available if you selected “Require
PIN during authentication” as the user authentication requirement.
Select Passcode (PIN incorporated into tokencode) to issue a
PINPad-style software token.
Select Tokencode (PIN entered followed by tokencode during
authentication) to issue a fob-style software token. For more
information on these token types, see “Planning the RSA SecurID
Authentication Requirement” on page 41.
If you selected Do not require PIN (only tokencode) as the user
authentication requirement, the default displayed value is always
set to Tokencode. The displayed value options do not affect the
behavior of tokens that do not require a PIN.
52
Tokencode Length
Select either 6 Digits or 8 Digits.
Tokencode Type
Time Based is automatically selected, indicating that the
tokencode changes at a regular interval. The application does not
support event-based tokens.
Tokencode Duration
Select either Display next tokencode every 30 seconds or
Display next tokencode every 60 seconds.
3: Provisioning Software Tokens
RSA SecurID Software Token 4.1 Administrator’s Guide
Distribute the Token
To use Dynamic Seed Provisioning to distribute tokens, you must specify CT-KIP as
the distribution method, and select the option that you want to use as the activation
code.
To distribute the token:
1. In the Security Console, click Authentication > SecurID Tokens > Manage
Existing.
2. Use the search fields to find the token that you want to distribute.
3. From the search results, click the token that you want to distribute.
4. From the Context menu, click Edit.
5. From the Software Token Device Type drop-down menu, select Desktop PC 4.x
or Desktop Mac 4.x.
6. Click Save & Distribute Token.
7. In the Basics section, next to Distribution Method, select Generate CT-KIP
Credentials for Web Download.
A list of options from which you can select an activation code is displayed. If you
bound the token and assigned a token nickname, the list contains the options
shown in the following figure.
3: Provisioning Software Tokens
53
RSA SecurID Software Token 4.1 Administrator’s Guide
8. Do one of the following:
•
If you did not bind the token to the user SID, select System Generated Code.
The user will be prompted to enter the system-generated code in the SecurID
desktop application when importing the token.
•
If you bound the token to the user SID, and you want to use the user SID as
the activation code, select DeviceSerialNumber. You must also set the
ActivationCode policy to 1 (true) and the CtkipUrl policy to the CT-KIP URL
to allow auto-import of the token. Auto-import is required because the user
SID exceeds the maximum number of characters that can be entered in the
application’s Enter Activation Code field. To set the ActivationCode policy,
see Appendix A, “Customizing the Application.”
9. Click Next to view the token delivery details.
The Service Address field lists the URL of the CT-KIP provisioning server.
10. Do one of the following:
•
If you selected a system-generated activation code, communicate the code to
the assigned user.
•
If you did not set the CtkipUrl policy, communicate the URL listed in the
Service Address field to the assigned user.
Provisioning Tokens Using RSA Authentication Manager 6.1
RSA Authentication Manager 6.1 supports file-based provisioning. With file-based
provisioning, an XML file (SDTID file) containing token data is generated by
Authentication Manager when a software token is issued for an end user. RSA
recommends assigning a password to each SDTID file to protect the file in transit.
Password protection prevents an unauthorized person from using the token even if that
person is able to intercept the token file. You can distribute token files as attachments
to e-mail messages, or make the files available on a network directory or web site.
You can optionally use file-based provisioning in RSA Authentication Manager 7.1.
See “Using File-Based Provisioning in RSA Authentication Manager 7.1” on page 60.
To use RSA Credential Manager for file-based provisioning, see “Provisioning Tokens
Using RSA Credential Manager” on page 61.
54
3: Provisioning Software Tokens
RSA SecurID Software Token 4.1 Administrator’s Guide
The following table lists the provisioning steps, and the following sections describe
each step.
Task
Reference
1. Configure the software token record.
“Configure the Software Token Record” on
page 55
2. Bind the token.
“Bind the Token” on page 58
3. (Optional) Assign a token nickname.
“Assign a Token Nickname” on page 60
4. Distribute the SDTID file.
“Distribute the SDTID File” on page 60
Configure the Software Token Record
This guide assumes that you have imported software token records into Authentication
Manager, assigned them to users, and are ready to configure them using the Database
Administration application.
This section highlights key steps in using RSA Authentication Manager 6.1 to
configure token records for use with the SecurID desktop application. For more
information, see the Database Administration application Help.
Supported Token Attributes
RSA Authentication Manager 6.1 supports the following software token attributes:
•
8-digit tokencode length
•
60-second, time-based tokencode
•
Passcode authentication (PIN plus tokencode)
•
Tokencode authentication (no PIN required)
Note: RSA Authentication Manager 6.1 does not support fob-style tokens (PIN entry
in protected resource).
3: Provisioning Software Tokens
55
RSA SecurID Software Token 4.1 Administrator’s Guide
To configure a token record in RSA Authentication Manager 6.1:
1. Open the Database Administration application, and select Tokens > Issue
Software Tokens.
2. Accept the default algorithm (AES SDTID 3.0).
3. Under Options, leave Enable Copy Protection selected, and select Edit
Extension Data.
4. If you want to protect the SDTID file with a password, select Password Protect,
and then enter and confirm a static password of 1 to 24 case-sensitive characters,
or select another password protection option. For information on other password
protection options, click the Help button at the bottom right of the screen.
Note: The user must enter the password when importing the token. The
password is not used again.
56
3: Provisioning Software Tokens
RSA SecurID Software Token 4.1 Administrator’s Guide
5. Under Output, in the Target Directory field, browse to the directory on your
system to which you want the token file to be exported.
6. Under Output, select One Token Per File.
7. Click Next, and select One user.
8. Click Next, and select the user for whom you want to issue the token. Click OK,
and click Next.
9. Do one of the following:
•
To require passcode authentication, leave Do not change selected or select
User authenticates with passcode.
•
To issue a token that does not require a PIN, select User authenticates with
tokencode only.
10. Click Next, and then click Yes.
The Edit Token Extension Data screen is displayed. Use the instructions in the
following section to bind the token to a device attribute.
3: Provisioning Software Tokens
57
RSA SecurID Software Token 4.1 Administrator’s Guide
Bind the Token
To bind a token using RSA Authentication Manager 6.1, you must create token
extension data. You can bind the token to a device type, a device serial number, or a
user SID (Windows systems only). For details of these device binding options, see
“Token Storage Devices and Device Binding” on page 44.
Bind a Token to a Device Type
Use the following procedure to bind a token to a device type.
To bind a token to a device type:
1. Open the SecurID desktop application and access the Token Storage Devices
screen.
2. Click a token storage device in the left pane to display device information, and
copy the device type (GUID) from the Device Type field.
3. On the Edit Token Extension Data page, in the Key field, enter
DeviceSerialNumber.
58
3: Provisioning Software Tokens
RSA SecurID Software Token 4.1 Administrator’s Guide
4. In the Data field, paste the GUID, enclosed in brackets.
Bind a Token to a Device Serial Number
Use the following procedure to bind a token to a device serial number.
To bind a token to a device serial number:
1. Obtain the device serial number from the user, as described in “Obtain a Device
Serial Number” on page 46.
2. On the Edit Token Extension Data page, in the Key field, enter
DeviceSerialNumber.
3. In the Data field, paste the device serial number. Click Save.
Bind a Token to a User SID
Use the following procedure to bind a token to a user SID. This option is supported
only with RSA SecurID Software Token for Windows.
To bind a token to a user SID:
1. Use a third-party utility such as PsGetSid.exe to obtain the user SID. For
example:
psgetsid.exe user1
S-1-5-21-876543210-1234567890-987654321-765432
To download the PsGetSid utility, access Microsoft TechNet and search on
“PsTools.”
2. On the Edit Token Extension Data page, in the Key field, enter
DeviceSerialNumber.
3. In the Data field, paste the user SID. Click Save.
3: Provisioning Software Tokens
59
RSA SecurID Software Token 4.1 Administrator’s Guide
Assign a Token Nickname
By default, the SecurID desktop application displays the serial number of an installed
token. If you assign the token a user-friendly nickname in Authentication Manager,
the application displays the nickname instead of the token serial number. The
nickname can contain from 1 to 24 case-sensitive, alphanumeric characters.
The user can change the nickname after importing the token. If you do not want users
to change the nickname, set the DisableChangeTokenName policy. For more
information, see Appendix A, “Customizing the Application.”
To assign a token nickname using RSA Authentication Manager 6.1:
1. On the Edit Token Extension Data page, in the Key field, enter Nickname.
2. In the Data field, enter a user-friendly name, for example, MyVPN1.
3. Click Save.
Distribute the SDTID File
You can distribute SDTID files through secure e-mail as attachments to e-mail
messages, or make the token files available on a network directory or web site.
Before distributing SDTID files:
•
Verify that the SecurID desktop application has been installed on the user’s
computer.
•
Deliver the token file password, if any, through secure e-mail or another secure
method.
Using File-Based Provisioning in RSA Authentication Manager 7.1
You can issue XML files (STDID files) containing token data using
RSA Authentication Manager 7.1. To configure the token record, see “Configure the
Software Token Record Using RSA Authentication Manager 7.1” on page 50. You can
then issue an SDTID file and, optionally, protect it with a token password, as
described in the following section.
Select the Distribution Method and Assign a Password
You can protect the SDTID file in transit by setting a password of 1 to 24
case-sensitive, alphanumeric characters. The user must enter the password in order to
complete the token import. The password is not used again.
To select the distribution method and assign a password:
1. In the Security Console, click Authentication > SecurID Tokens > Manage
Existing.
2. Use the search fields to find the token that you want to distribute.
3. From the search results, click the token that you want to distribute.
4. From the Context menu, click Edit.
60
3: Provisioning Software Tokens
RSA SecurID Software Token 4.1 Administrator’s Guide
5. From the Software Token Device Type drop-down menu, select Desktop PC 4.x
or Desktop Mac 4.x.
6. Click Save & Distribute Token.
7. In the Basics section, next to Distribution Method, select Issue Token File
(SDTID).
This enables the Token File Options section.
8. In the Password Protect section, select Password or another password protection
option. For information on the other password options, click Help on this page at
the top of the screen.
Note: The Enable copy protection field is automatically enabled. However,
disabling this setting does not affect the copy protection mechanisms used in
the SecurID desktop application.
9. Enter and confirm the password, and click Next to display the results.
10. Communicate the password to the user.
Provisioning Tokens Using RSA Credential Manager
You can use RSA Credential Manager to provision software tokens for the SecurID
desktop application. Credential Manager is the self-service and provisioning
component of RSA Authentication Manager 7.1 and shares the RSA Security
Console. Users must request an account in the Self-Service Console before they can
request a token. You can configure Credential Manager to distribute tokens using
either Dynamic Seed Provisioning or file-based provisioning.
Credential Manager supports standard token configurations (PINPad-style, 8-digit,
60-second, with or without a PIN). If you want to issue tokens with different
configurations (for example, fob-style tokens), you must use RSA Authentication
Manager 7.1. For more information, see “Configure the Software Token Record Using
RSA Authentication Manager 7.1” on page 50.
3: Provisioning Software Tokens
61
RSA SecurID Software Token 4.1 Administrator’s Guide
Before You Begin
Before you provision tokens using Credential Manager, a device definition file for the
SecurID desktop application must be installed. If you used the device definition file
for RSA SecurID Software Token 4.0, you do not need to add the version 4.1 file. To
install the version 4.1 file for your platform, see “Add the Device Definition File” on
page 49.
You can allow users to bind a token to their device serial number when they fill out the
token request form. Before they initiate a request using the Self-Service Console, they
must obtain the device serial number from the Token Storage Devices screen in the
SecurID desktop application.
Important: RSA does not recommend allowing users to use Credential Manager to
bind a token to a device GUID or a user SID. If the user enters the characters
incorrectly during the request, the token will not be imported.
Configure RSA Credential Manager
The following figure shows sample Console configuration settings for the SecurID
desktop application in RSA Credential Manager. Use the following procedure to
configure the software token settings that you want.
62
3: Provisioning Software Tokens
RSA SecurID Software Token 4.1 Administrator’s Guide
To configure Credential Manager to allow users to request a token:
1. On the Credential Manager Home page, under Token Provisioning, click
Manage Tokens.
2. On the Manage Tokens page, under Software Token Types Available for
Request, do one of the following:
•
If you installed a device definition file for RSA SecurID Software Token 4.1,
click Allow users to request Desktop PC 4.x software tokens or Allow
users to request Desktop Mac 4.x software tokens, as needed.
•
If you are using a device definition file for RSA SecurID Software Token 4.0,
click Allow users to request Desktop PC 4.0 software tokens or Allow
users to request Desktop Mac 4.0 software tokens, as needed.
The Display Name, Image location, and Description fields are automatically
populated with the application name, device image, and application description
that will be displayed to the user in the Self-Service Console.
3. In the Require User to Authenticate With field, do one of the following:
•
Click Passcode (PIN + tokencode) to require passcode authentication.
•
Click Tokencode only (PIN-less) to require tokencode authentication (no
PIN entry).
4. In the Supported Token Distribution Methods field, do one of the following:
•
To distribute tokens using Dynamic Seed Provisioning, click Generate
CT-KIP Credentials for Web Download. Leave the Client Application
URL field blank. Credential Manager automatically uses the CT-KIP URL
associated with RSA Authentication Manager 7.1.
•
To distribute tokens using SDTID files, click Issue Token File (SDTID).
5. (Optional) In the Make Default field, click Make this token type the default
option for token requests.
6. Leave the Device Help Document URL field blank.
The SecurID desktop application contains a built-in Help file.
7. (Optional) If you want the user to bind the token to a device attribute when the
user requests a token, in the Attribute Details field, select Allow users to edit
token attribute details.
If you selected the option to distribute tokens using SDTID files, you can require
the user to create a password to protect the token file.
8. (Optional) In the Token File Password field, select The user needs to provide
the password, to protect the token file.
If you select this option, when requesting a token using the Self-Service Console,
the user must create a password to protect the token file. e
3: Provisioning Software Tokens
63
RSA SecurID Software Token 4.1 Administrator’s Guide
9. In the File Format of Software Token field, do one of the following:
•
Select SDTID to have the token file delivered by your e-mail server as an
e-mail attachment with the .sdtid extension (for example,
000000293958.sdtid).
•
Select ZIP to have the token file delivered by your e-mail server within a ZIP
file attachment.
Note: If your corporate e-mail server does not allow sending certain file types
as e-mail attachments, you must select ZIP.
10. At the bottom of the screen, click Save.
Request a Token Using the RSA Self-Service Console
To allow a user to request a token using the RSA Self-Service Console, provide a URL
link to the Self-Service Console, and instruct the user to request an account. Approve
the account request, and instruct the user to create an account. When the user is ready
to request a token, provide the following instructions.
To request a software token using the RSA Self-Service Console:
1. Log on to the Self-Service Console URL.
2. In the My SecurID Tokens section, click Request a Token.
3. From the Request a Token drop-down menu, select Software, and then select I
need a specific software token.
The Token Type section is displayed.
4. Scroll to and select Desktop PC_4.x or Desktop Mac_4.x, as appropriate.
Note: If you do not see an option for Desktop 4.x, select Desktop PC_4.0 or
Desktop Mac_4.0, as appropriate.
64
3: Provisioning Software Tokens
RSA SecurID Software Token 4.1 Administrator’s Guide
5. Under Provide Your Token Details, in the DeviceSerialNumber field, do one of
the following, as instructed by your administrator:
•
Leave the default setting.
•
Clear the DeviceSerialNumber field. Launch the SecurID desktop
application, and obtain your device serial number from the Token Storage
Devices screen. Enter your serial number in the DeviceSerialNumber field.
6. (Optional) In the Nickname field, enter a user-friendly name for your token. The
nickname can contain up to 24 alphanumeric characters.
If you do not enter a nickname, your token will be identified by its serial number
in the SecurID desktop application.
If your token requires a PIN, the Create Your PIN section is displayed.
7. Under Create Your PIN, create and confirm a PIN containing 4 to 8 digits.
Be sure to create a PIN that you can remember. If you forget your PIN, you will
need to access the Self-Service Console to reset it before you can continue using
your token.
8. Do one of the following:
•
If the Create Your Token File Password section is displayed, enter and
confirm a password to protect the token file. The password can contain 1 to 24
case-sensitive, alphanumeric characters. Memorize the password. You will be
prompted for your token password when you import your token into the
SecurID desktop application.
•
If the Create Your Token File Password section is not displayed, continue to
the next step.
9. In the Reason for Token Request field, enter the reason for your request. For
example: “To access the corporate VPN client.”
10. Click Submit Request.
3: Provisioning Software Tokens
65
RSA SecurID Software Token 4.1 Administrator’s Guide
Approve the Request
Before the user can import the token, you must approve the token request.
To approve the token request:
1. In the Security Console, click Administration > Provisioning.
2. Click Approve Requests.
Next Steps
If you provision tokens in Credential Manager using Dynamic Seed Provisioning,
after you approve the user’s token request, the user receives an approval notification
by e-mail. The CT-KIP URL is displayed in the Link field. The token activation code
that the user must enter in order to import the token is displayed in the Activation
Code field. Instruct the user to copy the URL and activation code from the e-mail and
paste this information into the required fields in the desktop application.
Note: If you have set the CtkipUrl policy, when the user imports the token, the Enter
URL field is prefilled, and the user only needs to enter the activation code to complete
the token import. For more information, see Appendix A, “Customizing the
Application.”
.
66
3: Provisioning Software Tokens
RSA SecurID Software Token 4.1 Administrator’s Guide
4
User Options for Managing Tokens and
Devices
This chapter provides an overview of how users can manage tokens stored on their
hard drive or on another supported device plug-in. Use the information in this chapter
to familiarize yourself with the RSA SecurID Software Token (the SecurID desktop
application) user interface.
From the application user interface, users can:
•
Import tokens
•
Change a token name
•
Select a token if multiple tokens have been imported
•
Set a password to protect tokens stored on the local hard drive
•
Set a password or enter other credentials to protect tokens stored on a supported
third-party device
•
View information about a token
•
View information about installed token storage devices
•
Delete a token
•
Obtain the next tokencode
Importing Tokens
RSA provides the following mechanisms for importing tokens to the application:
•
(Windows only) Import a token automatically using CT-KIP. (The administrator
must have set the ActivationCode policy to 1 and the CtkipUrl policy to the URL
of the CT-KIP server.)
•
Import a token from the web (CT-KIP) using the SecurID desktop application.
•
Import a token from an e-mail attachment.
•
Import a token automatically from a default directory.
•
Import a token from a non-default directory.
When importing a token, the user is prompted to select the device that will store the
token if more than one supported device plug-in is installed (for example, a biometric
device and the local hard drive) and you did not bind the token to a device.
4: User Options for Managing Tokens and Devices
67
RSA SecurID Software Token 4.1 Administrator’s Guide
Import a Token Automatically Using CT-KIP (Windows Only)
If you provision tokens using Dynamic Seed Provisioning (CT-KIP), you can
customize RSA SecurID Software Token for Windows to automatically import a token
the first time the user starts the application, as long as either of the following
conditions is met:
•
The user does not already have a token.
•
All of the tokens in the user’s token database have expired.
Auto-import requires setting the ActivationCode and CtkipUrl policies. For more
information, see “Customizing the Application” on page 83.
Note: You cannot automatically import a token using CT-KIP to RSA SecurID
Software Token for Mac OS X.
Import a Token from the Web Using the Desktop Application
If you provisioned a token using CT-KIP, the user must import it using the SecurID
desktop application if you did not set policies to auto-import the token or if the user
already has a token.
To import a token from the web:
1. Start the SecurID desktop application.
The Import Token screen is displayed.
68
4: User Options for Managing Tokens and Devices
RSA SecurID Software Token 4.1 Administrator’s Guide
2. Click Import from Web.
The Import from Web screen is displayed.
3. In the Enter URL field, enter the CT-KIP URL.
Note: If you configured the CtkipUrl policy, the Enter URL field is prefilled.
4. In the Enter Activation Code field, enter the activation code. Click OK.
5. If prompted to select a device, click the name of the device where the token will
be stored, for example, “Local hard drive (RSA).”
6. Click OK.
A success message is displayed.
7. If prompted to rename your token, do one of the following:
•
To change the token name, click Change Name. Enter a name of 1 to 24
characters (for example, “VPN Token”). Click OK.
•
If you do not want to change the name, click OK to close the screen.
Import a Token from an E-mail Attachment
If you distribute a token as an SDTID file, a user can import the token from an e-mail
attachment. After the token has been imported, the application deletes the SDTID file.
To import a token from an e-mail attachment:
1. Double-click the file attachment, for example, “token1.sdtid.”
2. When prompted to open or save the attachment, click Open.
The SecurID desktop application detects the token file and starts up.
4: User Options for Managing Tokens and Devices
69
RSA SecurID Software Token 4.1 Administrator’s Guide
Note: On some Windows machines, you may be prompted to select the application
that you want to use to open the file. In that case, you must manually select the
SecurID desktop application.
3. If prompted, enter the file password, and click OK.
4. If prompted to select a device, click the name of the device where the token will
be stored, for example, “Local hard drive (RSA).”
5. Click OK.
A success message is displayed.
6. If prompted to rename your token, do one of the following:
•
To change the token name, click Change Name. Enter a name of 1 to 24
characters (for example, “My VPN Token”). Click OK.
•
If you do not want to change the name, click OK to close the screen.
Import a Token Automatically from a Default Directory
If you distribute a token as an SDTID file, a user can save it to a default directory
where the application can automatically locate it. You can optionally use a deployment
tool to push the file to a default directory. If you provision multiple tokens to a single
user, the application imports the files, one by one. The application then deletes each
token file, as long as the file is not marked read-only or otherwise protected.
The default directories are:
•
On Windows: Desktop or My Documents
•
On Mac OS X: Desktop or Documents
To import a token from a default directory:
1. Save the SDTID file attachment to one of the default directories.
2. Start the application.
The application automatically detects the token file and imports the token.
If you, as administrator, use a deployment tool to push the file to one of the default
directories, the token is imported automatically the next time the user starts the
application.
3. If prompted, enter the file password, and click OK.
4. If prompted to select a device, click the name of the device where the token will
be stored, for example, “Local hard drive (RSA).”
5. Click OK.
A success message is displayed.
6. If prompted to rename your token, do one of the following:
70
•
To change the token name, click Change Name. Enter a name of 1 to 24
characters (for example, “My VPN Token”). Click OK.
•
If you do not want to change the name, click OK to close the screen.
4: User Options for Managing Tokens and Devices
RSA SecurID Software Token 4.1 Administrator’s Guide
Import a Token from a Non-Default Directory
If a user saves a token file to a directory other than one of the default directories, the
user can import the token using either of the following methods:
•
Navigate to the token file and double-click the file.
•
Import the token using the desktop application.
After the token has been imported, the application deletes the SDTID file.
To import a token from a non-default directory, using the application:
1. Start the SecurID desktop application.
The Import Token screen is displayed.
2. Click Import from File.
3. Browse to the folder that contains the SDTID file, and double-click the file.
4. If prompted, enter the token file password, and click OK.
5. If prompted to select a device, click the name of the device where the token will
be stored, for example, “Local hard drive (RSA).”
6. Click OK.
A success message is displayed.
7. If prompted to rename your token, do one of the following:
•
To change the token name, click Change Name. Enter a name of 1 to 24
characters (for example, “My VPN Token”). Click OK.
•
If you do not want to change the name, click OK to close the screen.
4: User Options for Managing Tokens and Devices
71
RSA SecurID Software Token 4.1 Administrator’s Guide
Change a Token Name
If you assign a nickname to a token in Authentication Manager, the token is imported
with that nickname. Otherwise, the application displays the token serial number, for
example, 000027874079. When a user imports a token, the application prompts the
user to change the token name.
The user can change the token name immediately, dismiss the dialog box and retain
the existing name, or change the name later.
Note: If you do not want users to change the nickname that you assigned, you can set
the DisableChangeTokenName policy. For more information, see Appendix A,
“Customizing the Application.”
To change a token name:
1. Click Options > Manage Token, and select Change Token Name from the list.
2. In the Change Name field, type the new name.
The token name can contain from 1 to 24 characters and must be unique.
3. Click OK.
4. If prompted, enter the device password.
5. Click OK.
72
4: User Options for Managing Tokens and Devices
RSA SecurID Software Token 4.1 Administrator’s Guide
Select a Token
The application displays the name of the active token, which is the token that a user is
currently using to obtain tokencodes or the last token imported to the application. A
user who has more than one token can select a different token, if required.
To select a token:
Click the down arrow to the right of the active token name and select a different token.
The selected token becomes the active token.
Device Passwords
Users can set a device password to protect all tokens stored on the local hard drive.
The device password can contain from 1 to 20 characters. Setting a device password
helps ensure that only the user for whom the tokens are intended can access the
tokens. The following figure shows the Change Device Password screen.
4: User Options for Managing Tokens and Devices
73
RSA SecurID Software Token 4.1 Administrator’s Guide
Once a device password is set, the application prompts for the device password the
first time that a user performs a protected operation with a token. For example, the
user must enter the device password after entering a PIN, renaming a token, or when
attempting to delete a token. The user is prompted for the device password only once
per session.
Set a Device Password
Use the following instructions to set a device password for the first time.
To set a device password:
1. Click Options > Token Storage Devices, and click Change Device Password.
2. In the New Password field, enter a password.
3. In the Confirm Password field, reenter the password, and click OK.
Change a Device Password
Use the following instructions to change an existing device password.
To change a device password:
1. Click Options > Token Storage Devices, and click Change Device Password.
2. In the Current Password field, enter the existing password.
3. In the New Password field, enter a new password.
4. In the Confirm Password field, reenter the new password, and click OK.
Remove a Device Password
Use the following instructions to remove a device password. Keep in mind that this
removes the additional protection from the tokens stored on the local hard drive.
To remove a device password:
1. Click Options > Token Storage Devices, and then Change Device Password.
2. In the Current Password field, enter your existing password.
3. Leave the New Password and Confirm Password fields empty, and click OK.
74
4: User Options for Managing Tokens and Devices
RSA SecurID Software Token 4.1 Administrator’s Guide
Reset the Device (Local Hard Drive)
If a user forgets the device password, the user must reset the device. Resetting the
device causes the existing tokens to be deleted. After resetting the device, the user
must request new tokens.
To reset the device:
1. Click Options > Token Storage Devices.
2. In the left pane of the Token Storage Devices screen, click Local Hard Drive
(RSA).
3. Click Change Device Password.
4: User Options for Managing Tokens and Devices
75
RSA SecurID Software Token 4.1 Administrator’s Guide
4. In the Forgot your password? section, click Reset Device.
The following warning is displayed:
Warning: By proceeding, all tokens on the selected device
will be deleted and the device password will be reset.
5. Click OK.
The following message is displayed:
Successfully deleted tokens and removed password.
6. Click OK.
Device Passwords for Third-Party Plug-Ins
Depending on your implementation, users can import tokens to a supported third-party
device, for example, a TPM or biometric device. If the device supports passwords, the
user can set a device password or enter other credentials.
To set a device password for a third-party device plug-in:
1. Click Options > Token Storage Devices.
2. Select the device on which your tokens are stored.
If the device supports passwords, the Change Device Password button is
displayed.
3. Click Change Device Password, and follow the instructions in the third-party
plug-in.
76
4: User Options for Managing Tokens and Devices
RSA SecurID Software Token 4.1 Administrator’s Guide
View Token Information
Users can view information about the active token.
To view token information:
Click Options > Manage Token, and select Token Information.
The Token Information dialog box opens.
The following table lists the token information that is displayed.
Field
Description
Token Name
The user-friendly name of the token, if one has been assigned.
For example, “VPN Token.”
Token Serial Number
The serial number that identifies the token to Authentication
Manager.
Expiration Date
The date when the installed token will expire. Software
tokens expire on the expiration date at 00:00:01 GMT.
Device Name
The device on which the token is stored. This can be the local
hard drive, a supported biometric device, a supported TPM, or
another supported device plug-in.
Device Serial Number
The serial number of the device on which the token is stored.
4: User Options for Managing Tokens and Devices
77
RSA SecurID Software Token 4.1 Administrator’s Guide
View Token Storage Device Information
Users can view information about the device on which they have stored their tokens.
To view storage device information:
Click Options > Manage Token, and select Token Storage Devices.
The Token Storage Devices dialog box opens.
The following table lists the storage device information that is displayed.
78
Field
Description
Device Name
The name of the storage device on which the token is stored.
The default device is the local hard drive of the computer,
which is labeled Local Hard Drive (RSA).
Device Serial Number
The serial number of the token storage device.
Device Type
A globally unique identifier (GUID) that identifies the
specific type of device. Each type of storage device has a
unique GUID.
Token Name
The user-friendly name of the token, if it exists. Otherwise,
the column displays the token’s serial number.
Token Serial Number
The serial number of the token.
4: User Options for Managing Tokens and Devices
RSA SecurID Software Token 4.1 Administrator’s Guide
Delete a Token
A user does not need to delete a token unless it has expired or the user is instructed to
do so by the administrator. If a user deletes the last remaining token, the application
prompts the user to import a new token.
When deleting tokens from a password-protected database, the user is prompted for
the password if the user has not entered it previously during the session. If the user has
forgotten the password, the user must delete all of the tokens and contact the
administrator to request replacement tokens. For more information, see “Reset the
Device (Local Hard Drive)” on page 75.
Note: You can set the DisableDeleteToken policy to prevent users from deleting
tokens. For more information, see Appendix A, “Customizing the Application.”
To delete a token:
1. Click Options > Manage Token, and select Delete Token from the drop-down
list.
You are prompted to confirm that you want to delete the token.
2. Click Yes.
If prompted, enter the device password.
3. Click OK.
4: User Options for Managing Tokens and Devices
79
RSA SecurID Software Token 4.1 Administrator’s Guide
Obtaining the Next Tokencode
Under some conditions, an application that is protected by RSA SecurID may prompt
the user to enter the next tokencode to provide additional verification. The user can
obtain the next tokencode from the SecurID desktop application.
Enter the Next Tokencode
Use the following procedure to obtain and enter the next tokencode.
To enter the next tokencode:
1. Click Options, and click Next Tokencode.
The next tokencode is displayed.
2. Click the Copy button beneath the tokencode display.
3. Paste the tokencode into the required field in the requesting application.
Disable Next Tokencode Mode
After a user submits the next tokencode, the desktop application remains in Next
Tokencode mode until the user closes the application, selects a different token, or
disables Next Tokencode mode.
To disable Next Tokencode mode:
Click Options, and click Next Tokencode.
80
4: User Options for Managing Tokens and Devices
RSA SecurID Software Token 4.1 Administrator’s Guide
5
Troubleshooting
The following tables describes possible issues that might occur with RSA SecurID
Software Token (the SecurID desktop application), their possible causes, and
corresponding solutions.
Platform-Independent Issues
Issue
Description
Token import failed.
The cause is likely to be one of the following. In most cases the user receives
an error message indicating the reason for the failure and the action to take.
Failure when importing a token from a file
• The user specified the wrong file path and clicked OK, or did not specify a
file path and clicked OK.
• If the user is attempting to import a token to the RSA token database on the
local hard drive, verify that the user has Write permission to the directory
where the SecurID desktop application is installed. If not, grant Write
permission to the directory.
Failure when downloading a token from the web
• The user typed the URL incorrectly or did not enter the URL.
• The user entered a URL that does not start with http:// or https://.
• The user entered a blank or invalid activation code. For example, the user
omitted or mistyped characters.
• The web service cannot access the Internet resource.
Other Possible Causes
• The user provided an incorrect device serial number for binding the token,
or the administrator bound the token to an incorrect value.
• The user tried to import a token that had already been imported.
• The user already imported the maximum number of tokens that the
enterprise allows.
• The user entered an incorrect token file password. If the user forgot the
password, communicate the password again.
• The token is not intended to be used on the selected device.
• The token is invalid.
User cannot be
authenticated by RSA
Authentication Manager.
5: Troubleshooting
• Verify that the time, date, and time zone settings on the user’s computer are
accurate.
• Check the Authentication Manager logs to determine whether the user’s
token has been disabled because of failed logon attempts. If the token is not
disabled (or expired), ask the user for the tokencode being displayed and
resynchronize the token with the Authentication Manager server.
• The user may have entered an incorrect PIN. Instruct the user to enter the
PIN again and retry the authentication.
81
RSA SecurID Software Token 4.1 Administrator’s Guide
A
Customizing the Application
Use the information in this appendix to customize RSA SecurID Software Token (the
SecurID desktop application).
Customization Policies
You can set customization policies to change default behaviors of the application.
RSA recommends that you set any customization policies before you deploy the
application to users.
Policies for RSA SecurID Software Token for Windows
Note the following when setting policies for RSA SecurID Software Token for
Windows:
•
The value for TokenRenewalURL must be a complete URL that contains the
protocol identifier “http” or “https.”
•
For Boolean policies, 0 (zero) is interpreted as “false,” and 1 (one) or any other
nonzero value is interpreted as “true.”
Registry Location: HKEY_LOCAL_MACHINE\SOFTWARE\Policies\RSA\Software Token
Name
Type
Values
Description
ActivationCode
DWORD
0x00000000
(default)
0x00000001
Specifies that the user SID should be used as
the CT-KIP activation code. To auto-import
a token, you must set ActivationCode to 1,
and you must also set a URL link for
CtkipUrl.
CtkipUrl
REG_SZ
URL link
Empty by default.
Prefills the Enter URL field in the
application so that the user does not have to
enter the URL when manually importing a
token provisioned using Dynamic Seed
Provisioning (CT-KIP).
To auto-import a token, you must set both
CtkipUrl and ActivationCode.
DisableChangeTokenName
DWORD
0x00000000
(default)
0x00000001
Prevents users from changing a token
nickname assigned in Authentication
Manager.
DisableDeleteToken
DWORD
0x00000000
(default)
0x00000001
Prevents users from deleting their tokens.
Removes the Delete Token option from the
Options menu.
A: Customizing the Application
83
RSA SecurID Software Token 4.1 Administrator’s Guide
Registry Location: HKEY_LOCAL_MACHINE\SOFTWARE\Policies\RSA\Software Token
Name
Type
Values
Description
DisableSetDevicePassword
DWORD
0x00000000
(default)
0x00000001
Prevents users from setting a device
password on tokens stored on the local hard
drive. Removes the Change Device
Password option from the Token Storage
Devices screen.
OnlyOneToken
DWORD
0x00000000
(default)
0x00000001
Prevents users from having more than one
token.
TokenExpirationNotification
DWORD
0x0000001e
(default)
Changes the number of days before the
application displays a notification informing
the user that a token is nearing its expiration
date. If you do not set this policy, the
notification is displayed 30 days before the
token expires.
Maximum of
0x0000003c (60)
or 0x000000000
If used with TokenRenewalURL, adds a link
in the notification to a URL where the user
can request a replacement token.
TokenRenewalURL
REG_SZ
URL link. Default
is empty string.
Used with TokenExpirationNotification.
Displays a URL link in the Token Expiration
Notification dialog box. For example, this
could be the URL of the RSA Credential
Manager portal where the user can request a
replacement token.
ValidDevices
REG_MU
LTI_SZ
Comma-separated
string list of valid
device GUIDs.
Default is empty
string.
Specifies a whitelist of devices to which
tokens can be imported.
VpnMode
DWORD
0x00000000
0x00000001
(default)
Sets the VPN mode to ensure that the Cisco
VPN Client can function properly on
Windows XP when users log on to the VPN
client application with tokens stored on a
TPM or biometric device. Must be set to 0
(disabled) if you use Cisco VPN client.
84
A: Customizing the Application
RSA SecurID Software Token 4.1 Administrator’s Guide
Policies for RSA SecurID Software Token for Mac OS X
Note the following when setting policies for RSA SecurID Software Token for
Mac OS X:
•
The value for TokenRenewalURL must be a complete URL that contains the
protocol identifier “http” or “https.”
•
For Boolean policies, 0 (zero) is interpreted as “false,” and 1 (one) or any other
nonzero value is interpreted as “true.”
•
Policy names are case sensitive.
•
You cannot set the following policies on Mac OS X desktops:
–
ActivationCode. Automatic token import using CT-KIP is not supported. You
can prefill the CT-KIP URL field in the application, using the CtkipUrl policy,
but the user must still enter the activation code to complete the import.
–
VPNmode. Currently there is no VPN integration with the application on
Mac OS X desktops.
Mac OS X Location: /Library/Preferences/com.rsa.Software Token.Policies.plist
Name
Type
Values
Description
CtkipUrl
string
URL link
Default should be
empty string.
Prefills the Enter URL field in the
application.
DisableChangeTokenName
number
1 or 0
Default should be 0
Prevents users from changing a token
nickname assigned in Authentication
Manager.
DisableDeleteToken
number
1 or 0
Default should be 0
Prevents users from deleting their tokens.
Removes the Delete Token option from the
Options menu.
DisableSetDevicePassword
number
1 or 0
Default should be 0
Prevents users from setting a device
password on tokens stored on the local hard
drive. Removes the Change Device
Password option from the Token Storage
Devices screen.
OnlyOneToken
number
1 or 0
Default should be 0
Prevents users from having more than one
token.
A: Customizing the Application
85
RSA SecurID Software Token 4.1 Administrator’s Guide
Mac OS X Location: /Library/Preferences/com.rsa.Software Token.Policies.plist
Name
Type
Values
Description
TokenExpirationNotification
number
0 to 60.
Default is 30.
Changes the number of days before the
application displays a notification
informing the user that a token is nearing its
expiration date. If you do not set this policy,
the notification is displayed 30 days before
the token expires.
If used with TokenRenewalURL, adds a
link in the notification to a URL where the
user can request a replacement token.
TokenRenewalURL
string
URL link. Default is Used with TokenExpirationNotification.
empty string.
Displays a URL link in the Token
Expiration Notification dialog box. For
example, this could be the URL of the
RSA Credential Manager portal where the
user can request a replacement token.
ValidDevices
string
Comma-separated
string list of valid
device GUIDs.
Default should be
empty string.
Specifies a whitelist of devices to which
tokens can be imported.
Policy Details
The following sections provide additional details about the customization policies.
ActivationCode (Windows Only)
With RSA SecurID Software Token for Windows, the ActivationCode policy allows
you to import or replace tokens using Dynamic Seed Provisioning (CT-KIP) without
requiring the user to manually enter an activation code. Before setting this policy, you
must bind the user’s token to the user SID in RSA Authentication Manager 7.1, as
described in “Step 4: Bind the Token” on page 51.
86
A: Customizing the Application
RSA SecurID Software Token 4.1 Administrator’s Guide
You can automate the provisioning of one token to a user using CT-KIP by setting
both the ActivationCode and the CtkipUrl policies. Set ActivationCode to 1, and set
CtkipUrl to the URL of your CT-KIP server. The first time that the user starts the
desktop application, the token is automatically imported, as long as one of the
following conditions is met:
•
The user does not already have a token.
•
All of the tokens in the user’s token database have expired.
Note: Because the ActivationCode policy does not apply to Mac OS X desktops, you
cannot automatically import a token using CT-KIP in a Mac OS X implementation.
CtkipUrl
By default, when importing a token using CT-KIP, the user must enter the URL of the
CT-KIP server and must enter the activation code on the Import from Web screen. If
you do not want the user to have to enter the URL, set the CtkipUrl policy. This
prefills the Enter URL field, and the user then needs to enter only the activation code.
On Windows desktops, you can automate the provisioning of one token to a user by
setting both the CtkipUrl policy and the ActivationCode policy, as described in the
previous section.
DisableChangeTokenName
By default, users can change the nicknames of their tokens. If you set nicknames on
users’ tokens when you issue them in Authentication Manager, and you do not want
users to change the nicknames, set the DisableChangeTokenName policy. This
removes the Change Name option from application user interface.
A: Customizing the Application
87
RSA SecurID Software Token 4.1 Administrator’s Guide
DisableDeleteToken
By default, all users can delete their tokens. However, users normally do not need to
delete a token unless the token has expired or you instruct them to delete a token. If
you do not want users to be able to delete tokens, set the DisableDeleteToken policy.
This removes the Delete Token option from the application user interface.
DisableSetDevicePassword
By default, users can set a device password to protect all tokens stored in the token
database on the local hard drive. This provides added protection for the tokens. If a
user forgets the device password, the user must reset the device, which deletes all of
the tokens in the database. The user must then request replacement tokens, which can
increase administrative overhead. If you want to prevent users from setting a device
password, set the DisableSetDevicePassword policy. This removes the Change Device
Password option from the Token Storage Devices screen.
OnlyOneToken
By default, users can have multiple tokens. If your implementation does not require
users to have multiple tokens, you can use the OnlyOneToken policy to allow each
user to import only one token. If you set this policy and a user attempts to import a
second token, the application informs the user that only one taken can be installed. If
the user chooses to import the new token, the application overwrites the existing
token. If the user has stored more than one token when you enable the policy,
importing a new token overwrites all of the user’s tokens.
TokenExpirationNotification
The TokenExpirationNotification policy allows you to change the number of days
before the application displays a notification informing the user that a token is nearing
its expiration date. By default, the user is notified 30 days before token expiration.
You can set the policy to display the notification 1 to 60 days before token expiration.
If the active token has already expired, the notification is not displayed. Instead, the
Tokencode or Passcode screen displays “Token Expired.”
If you set the TokenRenewalURL policy with the TokenExpirationNotification policy,
the notification dialog box displays a link that the user can click to request a
replacement token. This opens a web URL, for example, the RSA Credential Manager
portal, where the user can request a replacement token.
TokenRenewalURL
The TokenRenewalURL policy is used with the TokenExpirationNotification policy.
To set the TokenRenewalURL policy, you enter a URL link that will be displayed in
the token expiration notification. The user can click the link to open a URL, such as
the RSA Credential Manager portal, where the user can request a replacement token.
If you do not set this policy, the token expiration notification does not display a URL
link, and the user must contact the administrator to request a replacement token.
88
A: Customizing the Application
RSA SecurID Software Token 4.1 Administrator’s Guide
ValidDevices
The SecurID desktop application supports storing tokens in the RSA token database
on the local hard drive or on a supported TPM, biometric device, or another supported
device plug-in.
To control which devices users can access, you can create a device whitelist (a list of
supported devices). Using a whitelist ensures that users can import, view, change the
name of, and delete only those tokens that are stored in the devices specified in the
whitelist. If a user connects a device that is not in the whitelist, the device is not
displayed in the Token Storage Devices screen.
If you do not use a device whitelist, the user can import tokens to any device that is
recognized by the system and allowed by the token’s device binding settings.
Create a Device Whitelist
Use the ValidDevices policy to create a device whitelist. The values must be
comma-separated Globally Unique Identifiers (GUIDs), as shown in the following
example. Angle brackets are not required.
8f94b026-d362-4554-ac52-3b01fa33b6f,7484g337...
Obtain the device GUIDs from the application.
To obtain device GUIDs:
1. Click Options > Token Storage Devices.
2. In the left pane, click the device icon for the first device that you want to include
in the whitelist.
For example, the following figure shows two installed devices. The Local Hard
Drive (RSA) device is selected, and the associated GUID is displayed in the
Device Type field.
A: Customizing the Application
89
RSA SecurID Software Token 4.1 Administrator’s Guide
3. Click the device icon for the next device that you want to add to the whitelist.
4. Click OK.
VpnMode
Note: This policy is currently used only with RSA SecurID Software Token for
Windows.
The Cisco VPN Client requires a Group Policy setting to ensure that it can function
properly on Windows XP when users log on to the VPN client with tokens stored on a
TPM or biometric device. By default, the VpnMode policy is enabled (1). If you use
Cisco VPN Client, set the value to 0 (disabled). If you use a VPN client other than
Cisco, leave the default setting.
Customizing RSA SecurID Software Token for Windows
You customize RSA SecurID Software Token for Windows using Windows Group
Policy. Setting Group Policy for the SecurID desktop application adds registry keys
under HKEY_LOCAL_MACHINE\Software\Policies\RSA\Software Token.
RSA provides an administrative template (RSASecurIDToken.adm) in the
installation kit (RSASecurIDToken410.zip). The template describes where the
registry-based policy settings are stored in the Windows registry. SecurID desktop
application policies are applied on a per computer (per-machine) basis. That is, the
policies that you set apply to all users of a particular computer rather than to
individual users.
You create Group Policy settings on a domain controller using the Microsoft
Management Console (MMC). The groups that you want the policies to affect must
exist in Active Directory. For more information, go to www.microsoft.com and
search on “Group Policy.”
Add the RSA Administrative Template
Before you configure Group Policy settings for the desktop application, you must add
the RSA administrative template to the Microsoft Management Console (MMC).
To add the RSASecurIDToken.adm policy template to MMC:
1. From the Start menu, click Run.
2. In the Open dialog box, type gpedit.msc, and click OK to start the Microsoft
Management Console (MMC).
3. Under Computer Configuration, click Administrative Templates.
4. In the Console menu bar, click Action > Add/Remove Templates.
5. Click Add, and browse to the location of the RSASecurIDToken.adm file.
6. Click the RSASecurIDToken.adm file, and click Open.
The template is added to the Add/Remove templates dialog box.
7. Click Close.
90
A: Customizing the Application
RSA SecurID Software Token 4.1 Administrator’s Guide
Configure Group Policy Settings
You can configure Group Policy settings for the desktop application using the RSA
administrative template.
To configure RSA SecurID Token policy settings:
1. From the Start menu, click Run.
2. In the Open dialog box, type gpedit.msc, and click OK to start the Microsoft
Management Console (MMC).
3. Navigate to the RSA administrative template:
•
On Windows Vista, click Computer Configuration > Administrative
Templates > Classic Administrative Templates (ADM) > Software
Settings > RSA SecurID Token.
•
On Windows XP, click Computer Configuration > Administrative
Templates > Software Settings > RSA SecurID Token.
4. In the right pane, double-click the name of the setting that you want to configure.
5. To configure all settings, double-click the first setting. After configuring the first
policy, click Next Setting to continue.
The following figure shows the CtkipUrl policy enabled.
A: Customizing the Application
91
RSA SecurID Software Token 4.1 Administrator’s Guide
Customizing RSA SecurID Software Token for Mac OS X
You customize RSA SecurID Software Token for Mac OS X using a property list
(plist) file. RSA provides a plist template (com.rsa.Software Token.Policies.plist) in
the template folder of the installation kit (RSASecurIDToken410.dmg). The
template contains the customization policies with their default settings.
Copy the plist file to /Library/Preferences/, and set the values according to your
requirements. The following figure shows the property list with all customization
settings enabled.
92
A: Customizing the Application
RSA SecurID Software Token 4.1 Administrator’s Guide
B
Logging
This appendix describes logging in RSA SecurID Software Token (the SecurID
desktop application), including how to control the amount of information logged,
where to find log output files, the log message format, and sample log messages.
Setting the Logging Level
You can control the amount of information logged by the SecurID desktop application
by setting a registry key (Windows) or creating a plist (Mac OS X) in the following
location:
•
HKLM/RSA/Software Token/Library/LogLevel (Windows)
•
/Library/Preferences/com.rsa.SoftwareToken/Library.plist/LogLevel
(Mac OS X)
The following table lists the possible string values.
Note: If you specify any other string value, the logger uses the default value (INFO).
B: Logging
Value
Meaning
DEBUG
Logs messages that are useful for debugging purposes.
INFO
Logs important application information, in addition to
errors. (Default)
ERROR
Logs only application errors.
OFF
No information is logged.
93
RSA SecurID Software Token 4.1 Administrator’s Guide
Location of Log Output Files
The logger is configured programmatically to output a rolling file named
RSA_Software_Token_Log.txt in the following location:
•
Documents and Settings\All Users\Application Data\RSA (Windows XP)
•
Drive:\ProgramData\RSA (Windows Vista)
•
~/Library/Logs/RSA (Mac OS X)
The maximum size of the log file is set to 1 MB. When this size limit is reached, a
backup log file named filename.1 (for example, “RSA_Software_token_log.txt.1”) is
created, and messages are once again logged to the original log file. When the log file
again reaches its size limit, the backup log file is replaced.
Note: Under some circumstances, an additional All Users folder named All
Users.WINDOWS might be created on Windows XP. For example, this can occur
with a second installation of Windows on the same partition of the drive. When more
than one All Users folder exists, the log file is stored in the most recent folder.
94
B: Logging
RSA SecurID Software Token 4.1 Administrator’s Guide
Log Message Format
The format of the output log file is as follows:
[time stamp] [severity level] [thread name] [logging
component] - [message]
Format Component
Meaning
Time stamp
The date and time that the message was logged. The
date and time are displayed in 24-hour format. The time
stamp format is dd mmm yyyy hh::mm::ss, for example,
10 Feb 2010 09:14:21.
Severity level
Indicates whether the message has been logged as an
error that occurred in the application (ERROR), as an
informational message (INFO), or as a message to aid in
debugging (DEBUG).
Thread name
Identifies the thread that was responsible for logging the
message.
Logging component
The SecurID desktop application specifies numerous
components that have the capability of logging
messages. These components are designated by their
architectural significance within the application, and
include the following:
Desktop Client. Represents a log message
generated from the main application, but not from
within the stauto32 library or the Local Hard Drive
(RSA) Plug-In.
Software Token Library. Represents a log message
generated from within the stauto32 library. The
stauto32 library integrates third-party applications,
such as VPN clients, and facilitates seamless
integration with RSA SecurID.
Local Hard Drive (RSA) Plug-in. Represents a log
message generated from within the local hard drive
plug-in. The user’s tokens are stored on the local
hard drive (unless you use a third-party plug-in,
such as a TPM).
Software Token Migrator. Represents a log
message generated during migration of tokens from
a previous version of the application. Migration
occurs when users upgrade to a newer version of the
application.
Message
B: Logging
The logged message.
95
RSA SecurID Software Token 4.1 Administrator’s Guide
Sample Log Messages
This section contains examples and explanations of messages logged by the SecurID
desktop application.
05 Sep 2010 10:14:21 ERROR 0x0000c754 RSA Plugin - 217 RSA database
corruption detected
Explanation (this is not logged):
Severity Level = ERROR
Thread Name = 0x0000c754
Logging Component = Local Hard Drive Plug-in
Message = 217 RSA database corruption detected
17 Jul 2010 13:23:42 ERROR 0x00005733 Software Token Library - 57 General
Error
Explanation:
Severity Level = ERROR
Thread Name = 0x00005733
Logging Component = Software Token Library
Message = 57 General Error
29 May 2010 02:30:54 ERROR 0x0000a537 Software Token Migrator - 217 Old
password incorrect
Explanation:
Severity Level = ERROR
Thread Name = 0x0000a537
Logging Component = Software Token Migrator
Message = 217 Error: Old password incorrect
96
B: Logging
RSA SecurID Software Token 4.1 Administrator’s Guide
25 Aug 2010 16:16:05 INFO 0x0000161c Software Token Client - Application
Settings:
<key>\HKEY_LOCAL_MACHINE\Software\RSA\Software
Token\Desktop/InstallDir
<value>C:\p4\dev\sw-authenticators\src\softwaretokenlib\debug\
Explanation:
Severity Level = INFO
Thread Name = 0x0000161c
Logging Component = Software Token Client
Message = Application Settings:
<key>\HKEY_LOCAL_MACHINE\Software\RSA\Software
Token\Desktop/InstallDir
<value>C:\p4\dev\sw-authenticators\src\softwaretokenlib\debug\
B: Logging
97
RSA SecurID Software Token 4.1 Administrator’s Guide
Index
A
activation code
generating 53
maximum length 48
ActivationCode policy 83, 86
administrative template 90, 92
approving a self-service token request 66
authentication requirement
planning 41
setting in RSA Authentication Manager 6.1 57
setting in RSA Authentication Manager 7.1 50
setting in RSA Credential Manager 63
automatic token import 69
B
binding a token
in RSA Authentication Manager 6.1 58
in RSA Authentication Manager 7.1 51
in RSA Credential Manager 63
in RSA Self-Service Console 65
biometric devices 11
C
changing device password 74
changing token name 72
command line
feature names 22
installation 22
installation examples 25
properties 23
configuring
RSA Credential Manager 61
token record in RSA Authentication Manager 6.1
56
copy protection 61
disabling 18
CtkipUrl policy 83, 85, 87
customer support, contacting 8
customization policies 15
customizing application 83
on Mac 92
on Windows 90
customizing token database location on Mac 35
D
Database Administration application 41, 56
default token import directories 70
deleting 64-bit tokens 29
deleting token 79
deployment tools, third-party 19
device binding attributes 44
device definition file 49, 62
device GUID 45
device password
changing 74
removing 74
setting 73, 74
setting for third-party device 76
device serial number 46
device type 45, 50
device whitelist 45, 89
device-specific attributes 50
DisableChangeTokenName policy 83, 85, 87
DisableDeleteToken policy 83, 85, 88
DisableSetDevicePassword policy 84, 85, 88
Displayed Value field 52
documentation, list of 7
Dynamic Seed Provisioning 48
F
features installable from command line 22
file-based provisioning 54, 60
fob-style software token 43
G
generating activation code 53
getting support 8
I
importing tokens 67
automatically, from e-mail attachment 69
automatically, using CT-KIP 68
from a default directory 70
from non-default directory 71
from web, using SecurID desktop application 68
installation
command line, Windows 24
local, on Windows 19
modifying, on Windows 27
on Mac OS X 35, 36
on Windows 13
repairing, on Windows 28
installation package
Mac 35
Windows 19
installing from command line 22
99
RSA SecurID Software Token 4.1 Administrator’s Guide
Internet Explorer browser plug-in 13
L
log message
format 95
samples 96
log output files 94
logging 93
M
Mac OS X installer package 35
manual token import 71
Microsoft Management Console 90
Microsoft SMS 19
modifying installation on Windows 27
MSI file 18
MSI installation command examples 25
N
next tokencode 80
nickname
assigning in RSA Authentication Manager 6.1 60
assigning in RSA Authentication Manager 7.1 51
entering in RSA Self-Service Console 65
O
one-time password 9
one-time password (OTP) 41
OnlyOneToken policy 84, 85, 88
overview, token provisioning 48
P
passcode 41, 42, 50, 52
per-user token storage database 16
PINPad-style software token 42, 52
planning authentication requirement 41
plist template 92
policies
ActivationCode 83, 86
CtkipUrl 83, 85, 87
customization 15
DisableChangeTokenName 83, 85, 87
DisableDeleteToken 83, 85, 88
DisableSetDevicePassword 84, 85, 88
for application running on Mac 85
for application running on Windows 83
OnlyOneToken 84, 85, 88
TokenExpirationNotification 84, 86
TokenRenewalURL 84, 86, 88
ValidDevices 84, 86, 89
VpnMode 84, 90
prelogon, VPN client 17
property list 92
protecting tokens stored on third-party device 76
provisioning prerequisites 41
provisioning SDTID files in RSA Authentication
Manager 6.1 55
provisioning servers 10, 41
provisioning tokens
using Dynamic Seed Provisioning 48
using RSA Authentication Manager 6.1 54
using RSA Credential Manager 61
XML format using RSA Authentication Manager
7.1 60
R
removing device password 74
repairing installation on Windows 28
requesting a token using RSA Self-Service Console 64
resetting the local hard drive device 75
RSA Authentication Client 14
RSA Credential Manager 61
configuring 61
RSA Hardware Authenticator Plug-In 14
RSA SecurID 800 authenticator, using with SecurID
desktop application 14
RSA SecurID Toolbar, coexistence with 11
RSA Security Console 41
RSA Self-Service Console 64
RSA Smart Card Middleware 14
RSASecurIDToken.adm policy template 90
S
screen reader support 11
selecting a token 73
selecting user authentication requirement
in RSA Authentication Manager 6.1 57
in RSA Authentication Manager 7.1 50
100
RSA SecurID Software Token 4.1 Administrator’s Guide
self-service token, approving request for 66
service, getting support 8
set device password 74
SETSINGLEDATABASE property 17
SID, obtaining 47
single token storage database 17
64-bit tokens, deleting 29
software token
device type 50
fob style 43
no PIN 44
PINPad style 42, 52
selecting 73
software token attributes
supported in RSA Authentication Manager 7.1 52
software token settings
configuring in RSA Authentication Manager 7.1
50
software tokens
importing 67
supported configurations 10
storing tokens 44
support and service 8
syntax, Windows Installer command line 24
system clock settings, verifying 12
system requirements 9
T
third-party deployment tools 19
time settings, verifying 12
token attributes
supported in RSA Authentication Manager 6.1 55
supported in RSA Authentication Manager 7.1 52
token database location, customizing on Mac 35
token file password
assigning in RSA Authentication Manager 6.1 56
assigning in RSA Authentication Manager 7.1 60
token files, including in SMS package 19
token information, viewing 77
token name, changing 72
token provisioning overview 48
token provisioning servers 10
token record
configuring in RSA Authentication Manager 6.1
56
token storage 44
token storage database 16
per user 16
single 17
token storage database options 16
token storage devices 11
token transfer on Mac 38
Token Transfer utility, running 33
tokencode 52
type 52
tokencode setting in RSA Authentication Manager 6.1
57
TokenExpirationNotification policy 84, 86
TokenRenewalURL policy 84, 86, 88
tokens
deleting 79
importing 67
selecting 73
transferring 31
TPM 11
transferring existing tokens to local hard drive 31
troubleshooting 81
U
uninstalling application
from Mac 39
from Windows 34
upgrading application
on Mac 38
on Windows 29
user authentication requirement
in RSA Authentication Manager 6.1 55
user security identifier (SID) 47
V
ValidDevices policy 84, 86, 89
verifying system clock settings 12
viewing token information 77
virtualized environments, running the application in
12
VPN client running as service 17
VPN clients, qualified with application 17
VpnMode policy 84, 90
W
web browser plug-in 13
Windows Installer command line syntax 24
Windows Installer MSI file 18
Windows policy template 90
101