1
Administrators Guide
Wyse ThinOS
TM
Products: C10LE, S10, V10L, V10LE
Issue: 020810
PN: 883682-08 Rev. T
ii
Copyright Notices
© 2010, Wyse Technology Inc. All rights reserved.
This manual and the software and firmware described in it are copyrighted. You may not reproduce, transmit,
transcribe, store in a retrieval system, or translate into any language or computer language, in any form or by any
means, electronic, mechanical, magnetic, optical, chemical, manual or otherwise, any part of this publication
without express written permission.
End User License Agreement (“License”)
A copy of the Wyse Technology End User License Agreement is included in the software and provided for your
reference only. The License at http://www.wyse.com/license as of the purchase date is the controlling licensing
agreement. By copying, using, or installing the software or the product, you agree to be bound by those terms.
Trademarks
The Wyse logo and Wyse are trademarks of Wyse Technology Inc. Other product names mentioned herein are
for identification purposes only and may be trademarks and/or registered trademarks of their respective
companies. Specifications subject to change without notice.
Patents
This product and/or associated software are protected by copyright, international treaties, and various patents,
including the following U.S. patents: 6,836,885 and 5,918,039.
Restricted Rights Legend
You acknowledge that the Software is of U.S. origin. You agree to comply with all applicable international and
national laws that apply to the Software, including the U.S. Export Administration Regulations, as well as
end-user, end-use and country destination restrictions issued by U.S. and other governments. For additional
information on exporting the Software, see http://www.microsoft.com/exporting.
Ordering Information
For availability, pricing, and ordering information in the United States and Canada, call 1-800-GET-WYSE
(1-800-438-9973) or visit us at http://www.wyse.com. In all other countries, contact your sales representative.
FCC Statement
This equipment has been tested and found to comply with the limits for either Class A or Class B digital devices,
pursuant to Part 15 of the FCC Rules. These limits are designed to provide reasonable protection against
harmful interference in a residential installation. This equipment generates, uses, and can radiate radio
frequency energy and, if not installed and used in accordance with the instructions, may cause harmful
interference to radio communications. However, there is no guarantee that interference will not occur in a
particular installation. If this equipment does cause harmful interference to radio or television reception, which
can be determined by turning the equipment off and on, the user is encouraged to try to correct the interference
by one or more of the following measures:
•
•
•
•
Reorient or relocate the receiving antenna.
Increase the separation between the equipment and the receiver.
Connect the equipment into an outlet on a circuit different from that to which the receiver is connected.
Consult the dealer or an experienced radio/TV technician for help.
Shielded interconnect cables and shielded AC power cable must be employed with this equipment to insure
compliance with the pertinent RF emission limits governing this device. Changes or modifications not expressly
approved by the system’s manufacturer could void the user’s authority to operate the equipment.
Caution
Modifications made to the product, unless expressly approved by Wyse Technology, could void
the user’s authority to operate the equipment.
iii
Regulatory Compliance for Thin Clients
Basic EMC and Safety Requirements
Wyse thin clients are compliant with the regulatory requirements in the regions listed below.
U.S.A. - FCC Part 15 (class B), cUL 60950
Canada - IC ICES-003, CAN/CSA-C22 No. 60950
Europe - EN 55022 (class B), EN 55024
Canadian DOC Notices
Class A - This digital apparatus does not exceed the Class A limits for radio noise emissions from digital apparatus
set out in the Radio Interference Regulations of the Canadian Department of Communications.
Le présent appareil numérique n’émet pas de bruits radioélectriques dépassant les limites applicables aux
appareils numériques de la classe A prescrites dans le Réglement sur le brouillage radioélectrique édicté par le
Ministère des Communications du Canada.
Class B - This digital apparatus does not exceed the Class B limits for radio noise emissions from digital apparatus
set out in the Radio Interference Regulations of the Canadian Department of Communications.
Le présent appareil numérique n’émet pas de bruits radioélectriques dépassant les limites applicables aux
appareils numériques de la classe B prescrites dans le Réglement sur le brouillage radioélectrique édicté par le
Ministère des Communications du Canada.
Device Power Supply
For use with external power supply included in the shipping carton.
Caution
Replace power adapter with the same or a certified equivalent model supplied by the
manufacturer.
Model Cx0 Thin Client, Product C10LE
For use with External Power Supply Model PA-1031-0, or DA-30E12 or certified equivalent model supplied by the
manufacturer, output rated 12Vdc, 2.5A.
Model SX0 Thin Client, Product S10
For use with External Power Supply Model DSA-0421S-12 3 30, or certified equivalent model supplied by the
manufacturer, output rated 12Vdc, 2.5A.
Model VX0 Thin Client, Products V10L and V10LE
For Use with External Power Supply Model PA-1051-01, or certified equivalent model supplied by the
manufacturer, output rated 12Vdc, 4.16A or minimum 4.0A.
Battery Information
Models Cx0 and VX0 contain an internal button cell battery replaceable by Wyse or one of our Authorized Service
Centers. For service, visit http://www.wyse.com/serviceandsupport/service/service.asp.
Warning
There is a risk of explosion if the battery is replaced by an incorrect type. Always dispose of used
batteries according to the instructions accompanying the battery.
Warning
Perchlorate Materials – Special Handling May Be Required under California Code of Regulations,
title 22. (Only required within the U.S.A.)
iv
This page intentionally blank.
Contents
Summary of Revisions vii
1
Introduction 1
About this Guide 1
Organization of this Guide 1
Wyse Technical Support 2
Related Documentation and Services
Wyse Online Community 2
2
2
Establishing a Server Environment 3
Setting Up Access to Enterprise Servers 3
Understanding How to Configure Your Network Services 5
DHCP and FTP Servers Available 6
FTP Server Available (DHCP Server Unavailable) 7
DHCP and Virtual Desktop Servers Available 8
Virtual Desktop Server Available (DHCP Server Unavailable) 9
FTP and Virtual Desktop Servers Unavailable (Stand-alone User or PNAgent/
PNLite-only User) 10
Configuring Network Services 10
Configuring FTP Servers 11
Configuring Virtual Desktop Infrastructure Servers 14
Configuring XenDesktop Support 14
Configuring DHCP 14
Configuring DNS 19
Configuring WINS 19
Configuring Wyse Device Manager Servers 19
Configuring Wireless Access 19
Configuring for Transport Layer Security (TLS) Connections Over a LAN 20
Configuring Session Services 21
About Wyse TCX Software 22
About Wyse Virtual Desktop Accelerator Software 22
Configuring ICA Session Services 23
PNAgent/PNLite Installation Guidelines 23
Configuring RDP Session Services 24
3
Remote System Administration 25
Using Wyse Device Manager Software For Remote Administration 25
Updating Software 25
Managing Icons and Logos 27
Understanding and Using System Lockdown Operations 27
Configuring Virtual Access Suite Support 28
Installing the VAS Hotfix 28
Enabling HTTP and HTTPS Support on the Connection Brokers (VAS Support) 29
Installing Connection Broker Web Server Certificates (VAS Support) 29
Configuring the Connection Broker HTTP and HTTPS Ports (VAS Support) 29
vi
Contents
Configuring {username}.ini Files and RDP Connection Parameters (VAS
Support) 29
Updating the Wyse ThinOS Firmware (VAS Support) 30
4
Local System Administration 31
Resetting to Factory Defaults Using G-Key Reset 31
Resetting to Factory Defaults Using Shutdown Reset 31
Resetting Display Settings Using V-Key Reset 32
Accessing Thin Client BIOS Settings 32
Enabling a Disabled Network Setup Dialog Box 32
Configuring ThinPrint 33
Figures 35
Tables 37
Summary of Revisions
Wyse Technology Inc. 883682-08 Rev. T
The following changes were made to this document since revision S
Reference
Description
Model Cx0 Thin
Client, Product
C10LE
Addition of Model Cx0 Thin Client, Product C10LE to the guide.
Model VX0 Thin
Client, Product
V10LE
Addition of Model VX0 Thin Client, Product V10LE to the guide.
Wyse Technology Inc. 883682-08 Rev. S
The following changes were made to this document since revision R
Reference
Description
New
documentation
references
General rewrite of the guide to include references to the new titles
of the Wyse ThinOS documentation (1 Series is no longer used).
Windows Server
2008
Addition of Windows Server 2008 support and information to the
guide.
802.11n wireless
support
Addition of 802.11n wireless support and information to the guide.
"Accessing Thin
Client BIOS
Settings"
Addition of new section to provide instructions on accessing the
BIOS settings of a thin client.
viii
Summary of Revisions
This page intentionally blank.
1
Introduction
Wyse® thin clients running Wyse ThinOS™ are highly optimized thin clients that provide
ultra-fast access to applications, files, and network resources made available on machines
hosting Citrix™ ICA and Microsoft™ RDP session services. Locally installed software
permits remote administration of the thin clients and provides local maintenance functions.
Session and network services available on enterprise networks may be accessed through
a direct intranet connection, a dial-up server, or an ISP which provides access to the
Internet and thus permits the thin client to connect to an enterprise virtual private network
(VPN) server.
About this Guide
This guide is intended for administrators of Wyse thin clients running Wyse ThinOS. It
provides information and detailed system configurations to help you design and manage a
Wyse ThinOS environment.
The information and instructions in this guide are intended to be used in conjunction with
other documentation for Wyse ThinOS and for future reference. For example, while you
are following the Getting Started Guide: Wyse ThinOSTM to set up and configure your
Wyse ThinOS system, you can use the detailed instructions in this guide (as well as the
Users Guide: Wyse ThinOSTM and the Reference Guide: Wyse ThinOSTM INI Files) to
help you get your Wyse ThinOS environment up and running quickly and easily.
Although this guide discusses similar information to that contained in the Users Guide:
Wyse ThinOSTM, refer to the Users Guide: Wyse ThinOSTM for detailed information on
configuring the thin client (locally) to manage the connections and applications available to
users.
Organization of this Guide
This guide is organized as follows:
Chapter 2, "Establishing a Server Environment," contains information on the network
architecture and enterprise server environment needed to provide network and session
services for Wyse thin clients running Wyse ThinOS. It also includes information to help
you address important considerations when configuring access to the server environment
and when configuring the services to be provided by the server environment.
Chapter 3, "Remote System Administration," provides remote system administration
information to help you perform the routine tasks needed to maintain your Wyse ThinOS
environment.
Chapter 4, "Local System Administration," provides local system administration
information to help you perform the routine tasks needed to maintain your Wyse ThinOS
environment.
2
Chapter 1
Wyse Technical Support
To access Wyse technical resources, visit http://www.wyse.com/support. If you still have
questions, you can submit your questions using the Wyse Self-Service Center (on the
Wyse.com home page, go to Support | Knowledge Base | Home tab) or call Customer
Support at 1-800-800-WYSE (toll free in U.S. and Canada). Hours of operation are from
6:00 A.M. to 5:00 P.M. Pacific Time, Monday through Friday.
To access international support, visit http://www.wyse.com/global.
Related Documentation and Services
Wyse thin client features can be found in the datasheet for your specific thin client model.
Datasheets are available on the Wyse Web site. Go to http://www.wyse.com/products,
click the Wyse Thin Clients link, click the link for your thin client, and then click the
Download Datasheet link.
Sample User INI files are intended for administrators of Wyse thin clients running Wyse
ThinOS. These files are available from the Wyse Web site (go to
http://www.wyse.com/manuals, search for sample.ini, click the reference guide link, and
then click the sample ini link to open and use the file download dialog box to save the
compressed file to a folder you want). These sample files are annotated to allow you to
use them as a “starter set” (that you can modify for your users needs) to quickly get your
file server up and running. For information on using the sample files, refer to the
Reference Guide: Wyse ThinOSTM INI Files.
Reference Guide: Wyse ThinOSTM INI Files is intended for administrators of Wyse thin
clients running Wyse ThinOS. It provides the detailed information you need to help you
understand and use the Wyse ThinOS INI files. It contains information on the different
Wyse ThinOS INI files you can use and the rules for constructing the files. It also provides
the parameter details you need (with working examples) to get the most out of your Wyse
ThinOS INI files. In addition, this guide also includes an appendix that contains all of the
supported connect parameters you can use for ICA and RDP connections. It is available
at: http://www.wyse.com/manuals.
Getting Started Guide: Wyse ThinOSTM is intended for administrators of the Wyse ThinOS
system. It provides a setup and configuration overview of the entire Wyse ThinOS system
to help you get your Wyse ThinOS environment up and running quickly and easily. It is
available at: http://www.wyse.com/manuals.
Users Guide: Wyse ThinOSTM is intended for users of Wyse thin clients running Wyse
ThinOS. It provides detailed instructions on using the thin client to manage the
connections and applications available to users from a network server. It is available at:
http://www.wyse.com/manuals.
Wyse Thin Computing Software is available on the Wyse Web site at:
http://www.wyse.com/products/software.
Wyse Online Community
Wyse maintains an online community where users of our products can seek and exchange
information on user forums. Visit the Wyse Online Community forums at:
http://community.wyse.com/forums/.
2
Establishing a Server Environment
This chapter contains information on the network architecture and enterprise server
environment needed to provide network and session services for Wyse thin clients running
Wyse ThinOS. It also includes information to help you address important considerations
when configuring access to the server environment and when configuring the services to
be provided by the server environment. Use this chapter in conjunction with the Getting
Started Guide: Wyse ThinOSTM and the Reference Guide: Wyse ThinOSTM INI Files to
set up and configure your Wyse ThinOS server environment.
Setting Up Access to Enterprise Servers
There are five basic methods of access to the enterprise server environment available to
the thin client. Except for Ethernet Direct, all of the access methods require that some
local settings be made on the thin client. These settings cannot be automated because the
thin client has not yet accessed user profiles. For certain privileges, these local settings
are retained and are available for the next thin client system start. Activating these local
settings and the defined connections can also be automated at thin client system start.
Methods of access include:
•
Ethernet Direct - This is a connection from the thin client Ethernet port directly to the
enterprise intranet. No additional hardware is required. In this configuration all network
services can be used, including an enterprise DHCP server. A DHCP server on the
network can provide not only the thin client IP address, but also the location of the file
server containing the user profiles and software updates
•
Wireless Direct - An 802.11b/g/n USB Wireless Adapter can be used to access the
enterprise intranet. The adapter connects to a USB port on the thin client and uses
short-range wide-band radio to communicate with a wireless access point. Typically,
wireless access points are located at several locations in the enterprise within range of
the 802.11b/g/n USB Wireless Adapters and directly connected to the enterprise
intranet. Contact Wyse for available wireless network devices.
Service Set Identification (SSID), channel, authentication, and encryption
configurations must be entered in the Wireless Setup dialog box on the thin client.
Corresponding entries must also be made in the enterprise access point.
•
PPPoE - Thin client support for PPPoE is intended for devices which connect to the
Internet directly from remote locations. PPPoE is used as an alternative to providing
DHCP support or static IP addresses on all high speed lines. PPPoE is compatible with
the use of PPTP, FTP, and/or PNAgent/PNLite.
To enable the PPPoE Manager, the No local LAN, invoke PPPoE only option must
be selected in the Network Setup dialog box (for information on the Network Setup
dialog box, refer to the Users Guide: Wyse ThinOSTM). After being enabled, the
PPPoE Manager can then be used and is available from the desktop to configure and
invoke a PPPoE connection to WAN. Once connected, all WAN packets go though a
4
Chapter 2
PPP connection over Ethernet to the DSL modem. The PPPoE Manager is not
accessible for users with privileges set to None. However, access to the PPPoE
Manager is not necessary if the connection is to be established at startup. And unless
the unit is locked down, establishing the PPPoE connection would take place before
reading an INI file. Therefore any thin client which is not locked down would have the
default privilege (high) at this boot stage.
Open the PPPoE Manager by selecting it from the desktop menu. The PPPoE
Manager can also be set to open automatically on system start-up. For information on
the PPPoE Manager, refer to the Users Guide: Wyse ThinOSTM.
The PPPoE Manager allows configuration for the following ISP login properties:
•
•
Login Username - A login username up to 43 characters.
•
Login Password - A login password up to 15 characters.
•
Auto-Connect - A check box to allow an automatic connection on system startup.
•
Use default gateway on remote (PPPoE) network - A check box to use the
default gateway on system startup.
Dial-up Modem - A USB dial-up modem or a USB-to-Serial adapter connected to a
serial modem can be used with the thin client to access a dial-up server.
The dial-up server can provide either of two methods of access to the enterprise
intranet:
•
An enterprise dial-up server will directly connect to the enterprise intranet.
•
An Internet Service Provider (ISP) dial-up server simply provides access to the
Internet, from which the thin client must access an enterprise PPTP VPN server
that connects to the enterprise intranet.
Note
The dial-up server must be a Microsoft Remote Access Server or another
server that supports industry-standard protocols.
•
PPTP VPN - PPTP (Point-to-Point Tunneling Protocol) is a network protocol that
enables the secure transfer of data between a remote client (in this case the thin client)
and an enterprise server environment by creating a virtual private network (VPN)
across TCP/IP-based data networks such as the Internet. It provides a
password-protected path through the enterprise firewall to the enterprise server
environment in which the network and session services required by thin clients reside.
An Internet Service Provider (ISP) must be available to provide access to the Internet.
Any of the standard means of connecting to the ISP may be used, such as a dial-up
modem, cable modem, and DSL modem. The connection to the ISP must be
established first, before contacting the enterprise PPTP VPN server. This includes
dial-up access as well as direct access through the cable modem and DSL modem
paths.
Note
For more information on these methods of access (and configuring the thin
client locally), refer to the Users Guide: Wyse ThinOSTM.
Establishing a Server Environment
5
Understanding How to Configure Your Network Services
Network services used by the thin client can include DHCP, FTP file services, Virtual
Desktop file services, DNS, and so on. How you configure your network services depends
on what you have available in your Wyse ThinOS environment and how you want to
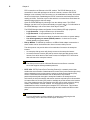
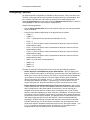
design and manage it. To help you understand how a thin client can “fit” into an
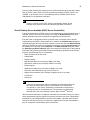
environment, Figure 1 shows the thin client boot flow process.
Figure 1
Boot flow process
6
Chapter 2
The following topics in this section provide important overview information on the
supported service situations you may have when configuring the network services for your
Wyse ThinOS environment (after becoming familiar with your environment requirements,
refer to "Configuring Network Services" for detailed instructions):
•
"DHCP and FTP Servers Available"
•
"FTP Server Available (DHCP Server Unavailable)"
•
"DHCP and Virtual Desktop Servers Available"
•
"Virtual Desktop Server Available (DHCP Server Unavailable)"
•
"FTP and Virtual Desktop Servers Unavailable (Stand-alone User or PNAgent/
PNLite-only User)"
Caution
If a thin client accesses the enterprise intranet through Dial-up, PPPoE, or
PPTP VPN and the thin client is locked-down, a non-privileged or
low-privileged user attempting to reboot to Stand-alone user mode will
disable the Network Setup dialog box and system reset capabilities. The
user will not be able to re-access the enterprise intranet through this path. If
this happens, the thin client must be moved to a location where it can access
the enterprise intranet directly (Ethernet cable) and reboot so that you as an
administrator can make any required changes to the thin client operating
configurations through the user profiles (for example, set the user profile to
unlock the thin client).
If the thin client is configured for Dial-up access, there must be an RAS
server answering the configured telephone number. Otherwise, the thin client
will require factory attention to recover it.
DHCP and FTP Servers Available
As a network administrator in an environment where DHCP and FTP servers are
available, you can set up both DHCP and FTP network services and create “global” and
“user” INI files as described in the Reference Guide: Wyse ThinOSTM INI Files.
Note
A thin client is initially (new-thin client or reset thin client to default
configurations) configured to obtain its IP address and the location of the
FTP server from a DHCP server. DHCP can only be used for the Ethernet
Direct access and Wireless Direct access configurations.
A wnos.ini file contains the “global” parameters you want that will affect all
thin clients accessing the file server. A {username}.ini file contains the
user-specific or “user profile” parameters you want that will comprise the
connection profile for an individual user. For information on constructing
these INI files, refer to the Reference Guide: Wyse ThinOSTM INI Files.
If Wireless Direct access is used, the Wireless Setup dialog box must also be configured
locally (see the Users Guide: Wyse ThinOSTM for wireless configuration instructions).
After DHCP and FTP servers are configured and available, simply connect the thin client
to the network (either directly through a network cable or through a wireless network
device), turn it on, and begin using the thin client. A sign-on name and password may be
required for access to the session services. If applications (published by Citrix PNAgent/
PNLite services) are available, a Domain name must be entered or selected from the list.
Connections or applications may start automatically if they are configured to automatically
start in the INI files.
Establishing a Server Environment
7
Note
If session connections or published applications are designated to open
automatically on start-up, upon accessing the enterprise server environment
you will see a session server log-in or server application window instead of
the thin client desktop. Use CTRL+ALT+UPARROW to toggle between
window display modes. Use CTRL+ALT+DOWNARROW to open a selection
box for toggling between the desktop, the Connect Manager, and
currently-active connections.
If the thin client accesses the enterprise server environment through a manually initiated
Dial-up, PPPoE, and/or PPTP VPN, the automation provided by a DHCP server is not
available. In such cases, refer to "FTP Server Available (DHCP Server Unavailable)" and
"FTP and Virtual Desktop Servers Unavailable (Stand-alone User or PNAgent/PNLite-only
User)" for configuration information.
Note
If Dial-up, PPPoE, and/or PPTP VPN are automatically started, FTP server
services can be accessed through these connections.
FTP Server Available (DHCP Server Unavailable)
In an environment where a DHCP server is not available but an FTP server is available,
the thin client user must locally enter (using the Network Setup dialog box) network
information that would otherwise be supplied by the DHCP server.
If the thin client is configured for DHCP (new-thin client or reset thin client to default
configurations) but DHCP is not detected on the network, the Network Setup dialog box
automatically opens when the thin client is started. You can also open the Network Setup
dialog box manually by clicking on the desktop background, selecting System Setup from
the desktop menu, and then clicking Network. In the Network Setup dialog box, select
the Statically specified IP Address option and configure the dialog box for the following
information (any remaining information will be automatically populated from the INI files
when the FTP server is contacted):
•
Static IP address of the thin client
•
Subnet Mask
•
Default Gateway
•
DNS Domain Name (not necessary if DNS is not used)
•
DNS Server Address (not necessary if DNS is not used)
•
File Server IP address or DNS name of the FTP server on which the INI files reside
and the FTP path on the server to /wnos.
•
PNAgent/PNLite Servers list (If PNAgent/PNLite is deployed on the network
environment, enter the IP address or Host name with optional TCP port number of one
or more PNAgent/PNLite servers that will provide published applications on the
network)
•
Ethernet Speed
•
WINS Server Address (not necessary if WINS is not used)
•
Username and Password for login to the FTP server
•
Rapport Server Address (not necessary if Rapport server is not used)
•
Time Server
8
Chapter 2
Note
A wnos.ini file contains the “global” parameters you want that will affect all
thin clients accessing the file server. A {username}.ini file contains the
user-specific or “user profile” parameters you want that will comprise the
connection profile for an individual user. For information on constructing
these INI files, refer to the Reference Guide: Wyse ThinOSTM INI Files.
After the network settings are configured, reboot the thin client before using it. A sign-on
name and password may be required for access to the session services. If applications
(published by Citrix PNAgent/PNLite services) are available, a Domain name must be
entered or selected from the list. Connections or applications may start automatically if
they are configured to automatically start in the INI files.
DHCP and Virtual Desktop Servers Available
A thin client is initially (new-thin client or reset thin client to default configurations)
configured to obtain its IP address and the location of the Virtual Desktop server from a
DHCP server. DHCP can only be used for the Ethernet Direct access and Wireless Direct
access configurations.
As a network administrator in an environment where DHCP and Virtual Desktop servers
are available, you can set up both DHCP and Virtual Desktop network services and create
“global” and “user” INI files (in the Virtual Desktop Broker) as described in the Reference
Guide: Wyse ThinOSTM INI Files.
Note
A thin client is initially (new-thin client or reset thin client to default
configurations) configured to obtain its IP address and the location of the
Virtual Desktop server from a DHCP server. DHCP can only be used for the
Ethernet Direct access and Wireless Direct access configurations.
A wnos.ini file contains the “global” parameters you want that will affect all
thin clients accessing the file server. A {username}.ini file contains the
user-specific or “user profile” parameters you want that will comprise the
connection profile for an individual user. For information on constructing
these INI files, refer to the Reference Guide: Wyse ThinOSTM INI Files.
If Wireless Direct access is used, the Wireless Setup dialog box must also be configured
locally (see the Users Guide: Wyse ThinOSTM for wireless configuration instructions).
After DHCP and Virtual Desktop servers are configured and available, simply connect the
thin client to the network (either directly through a network cable or through a wireless
network device), turn it on, and begin using the thin client. A sign-on name and password
may be required for access to the session services. If applications (published by Citrix
PNAgent/PNLite services) are available, a Domain name must be entered or selected
from the list. Connections or applications may start automatically if they are configured to
automatically start in the INI files.
Note
If session connections or published applications are designated to open
automatically on start-up, upon accessing the enterprise server environment
you will see a session server log-in or server application window instead of
the thin client desktop. Use CTRL+ALT+UPARROW to toggle between
window display modes. Use CTRL+ALT+DOWNARROW to open a selection
box for toggling between the desktop, the Connect Manager, and
currently-active connections.
Establishing a Server Environment
9
If the thin client accesses the enterprise server environment through a manually initiated
Dial-up, PPPoE, and/or PPTP VPN, the automation provided by a DHCP server is not
available. In such cases, refer to "Virtual Desktop Server Available (DHCP Server
Unavailable)" for configuration information.
Note
If Dial-up, PPPoE, and/or PPTP VPN are automatically started, Virtual
Desktop server services can be accessed through these connections.
Virtual Desktop Server Available (DHCP Server Unavailable)
In an environment where a DHCP server is not available but an Virtual Desktop server is
available, the thin client user must locally enter (using the Network Setup dialog box)
network information that would otherwise be supplied by the DHCP server.
If the thin client is configured for DHCP (new-thin client or reset thin client to default
configurations) but DHCP is not detected on the network, the Network Setup dialog box
automatically opens when the thin client is started. You can also open the Network Setup
dialog box manually by clicking on the desktop background, selecting System Setup from
the desktop menu, and then clicking Network. In the Network Setup dialog box, select
the Statically specified IP Address option and configure the dialog box for the following
information (any remaining information will be automatically populated from the INI files
when the Virtual Desktop server is contacted):
•
Static IP address of the thin client
•
Subnet Mask
•
Default Gateway
•
DNS Domain Name (not necessary if DNS is not used)
•
DNS Server Address (not necessary if DNS is not used)
•
Ethernet Speed
•
WINS Server Address (not necessary if WINS is not used)
•
Username and Password for login to the FTP server
•
Rapport Server Address (not necessary if Rapport server is not used)
•
Time Server
•
VDI Server
Note
A wnos.ini file contains the “global” parameters you want that will affect all
thin clients accessing the file server. A {username}.ini file contains the
user-specific or “user profile” parameters you want that will comprise the
connection profile for an individual user. For information on constructing
these INI files, refer to the Reference Guide: Wyse ThinOSTM INI Files.
After the network settings are configured, reboot the thin client before using it. A sign-on
name and password may be required for access to the session services. If applications
(published by Citrix PNAgent/PNLite services) are available, a Domain name must be
entered or selected from the list. Connections or applications may start automatically if
they are configured to automatically start in the INI files.
10
Chapter 2
FTP and Virtual Desktop Servers Unavailable (Stand-alone User or PNAgent/
PNLite-only User)
In an environment where FTP and Virtual Desktop Broker servers are not available (for
example, Stand-alone User or PNAgent/PNLite-only User situations), configuration files
are not available and network information must be entered locally at the thin client as
follows:
•
Stand-alone User - This user does not access user profiles or PNAgent/
PNLite-published applications. New and Settings command buttons appear in the
Connect Manager for use (if the Connect Manager does not open automatically, open it
from Desktop menu). These command buttons are also available to low-privileged and
non-privileged users. Locally entered connection definitions (using these command
buttons) are preserved for the next thin client use after the thin client is powered off and
restated (automatic software updates, however, are not available when the thin client is
powered on again).
•
PNAgent/PNLite-only User - This user does not access user profiles, but applications
(published by Citrix PNAgent/PNLite services) are available (the IP address of a
PNAgent/PNLite server and Domain are entered into the Network Setup dialog box or
available through DHCP options 181 and 182). A log-on dialog box (similar to the
standard log-on dialog box) opens for logging on to the PNAgent/PNLite server.
Applications published by PNAgent/PNLite are listed in the Connect Manager
(Published applications that add a shortcut to the client desktop will have an icon on
the desktop which you can double-click to open). Locally entered connection
definitions are not preserved for the next thin client use after the thin client is powered
off and restated.
Configuring Network Services
Before you use the information in this section to configure your network services, be sure
you have read "Understanding How to Configure Your Network Services" and remember
the following important issues:
•
Restrictions to Network Services can Exist - Thin client network services reside on
the enterprise intranet. When setting up thin client network services, remember that if
thin clients are to access the enterprise intranet through Dial-up, PPPoE, or PPTP
VPN, restrictions imposed by these access paths must be considered.
•
Know How Your Environment Works - Either the FTP server or the Virtual Desktop
server (depending on your environment) holds the INI files, while the FTP server (if
available) holds the current and upgrade versions of the thin client software.
The thin client software is acquired from either local flash memory or the FTP server.
During the boot process, the local image is transferred to RAM and executed far
enough for the thin client to check the image and the INI files on the file servers. Under
direction of the INI files and the version of the remote image, the image in RAM can be
replaced with the remote image; and separately, the remote image can update the local
flash-memory.
•
Functionality Depends on You - The Wyse ThinOS INI files contain the parameters
and associated values necessary for the various functionality you want. The INI files
(wnos.ini file and {username}.ini file) are constructed and maintained by you and are
stored on the file server for use with thin clients running Wyse ThinOS.
Note
The INI files contain connection definitions and thin client settings. These
text-based files must be created and maintained by using an ASCII text
editor. If the INI files are omitted or they cannot be accessed because a file
Establishing a Server Environment
11
server is not used, the thin client user must enter connection definitions
locally (or for FTP servers, use what is published by PNAgent/PNLite servers
residing on the network).
You can also define connections in the INI files which are to be stored in local
NV-RAM and used in cases where the file server fails.
A wnos.ini file contains the “global” parameters you want that will affect all thin clients
accessing the file server. A {username}.ini file contains the user-specific or “user
profile” parameters you want that will comprise the connection profile for an individual
user. The thin client accesses the wnos.ini file upon thin client initialization and
accesses any individual {username}.ini file when the user logs on (if user logon is
required, the {username}.ini file must exist before that user can log on). For information
on constructing these INI files, refer to the Reference Guide: Wyse ThinOSTM INI Files.
To configure network services, use the information in the following sections:
•
"Configuring FTP Servers"
•
"Configuring Virtual Desktop Infrastructure Servers"
•
"Configuring DHCP"
•
"Configuring DNS"
•
"Configuring WINS"
•
"Configuring Wyse Device Manager Servers"
•
"Configuring Wireless Access"
Configuring FTP Servers
Before you use the information in this section to configure your FTP server, be sure you
understand and use the following guidelines:
•
General Guidelines - When the thin client boots, it accesses the software update
images and INI files from the FTP server. The FTP server and path to the software
update files are available through DHCP vendor options 161 and 162 (see "Configuring
DHCP"). If these are not specified, the default FTP server is the DHCP server from
which the thin client receives its IP address and the default directory (\wyse\wnos for
Windows FTP servers, or /wyse/wnos for Linux FTP servers).
The FTP server and path to the software update files can also be specified locally on
the thin client. DHCP options 184 and 185 can be used to provide the User ID and
Password for non-anonymous access to the FTP server in Wyse ThinOS version 4.3
and later. For Wyse ThinOS versions earlier than 4.3, the file server must have
anonymous login capability and provide at least file read privilege for the anonymous
user (it must also provide file write privilege if users are allowed to change their
passwords).
•
Non-Anonymous Access Guidelines - You must first create a local account (name
the account so that you remember it is a non-anonymous account) on the FTP server
defined between the DHCP vendor options 161 and 162 (DHCP server). Then, add
DHCP options 184 and 185 to provide the User ID and Password for non-anonymous
access to the FTP server. Ensure that option 184 is the account User ID and that
option 185 is the account Password, and that you keep consistency with FTP server
DHCP vendor options (for example, ensure that the 184 and 185 options are string
parameters). Then provide the non-anonymous account with read-only permissions
through the entire FTP server path. Be sure to modify these guidelines according to
your specific security environment and configuration.
•
Windows FTP Server Guidelines - You can use the FTP tools available on the
Windows server. For Wyse ThinOS versions earlier than 4.3, be sure the Windows
server supports the anonymous log-in capability. For Wyse ThinOS version 4.3 and
later, this support is not necessary because of the User Interface (UI)/DHCP feature to
specify the login ID and password.
12
Chapter 2
•
•
Linux FTP Server Guidelines - Be aware of the following:
•
The FTP server must be configured to offer FTP services (by adding the following
line or equivalent to the /etc/inetd.conf file, if it is not already present):
ftp stream tcp nowait root /usr/sbin/tcpd in.proftpd
•
The FTP server must be configured to support anonymous FTP. For most FTP
servers, this requires establishment of an FTP login account by adding the following
line or equivalent to the /etc/password file:
ftp:x:17:1:Anonymous FTP directory:/home/ftp:/dev/null/
ftp-shell
The shell file /dev/null/ftp-shell need not exist, but some FTP servers
require that it be listed in the /etc/shells file to allow FTP connections on this
account.
•
Depending on which Linux distribution you are using, additional modifications to a
central configuration file for the FTP daemon may be necessary to enable
anonymous FTP. You can try man protftp, man wuftpd, or man ftpd to access
information applicable to your particular FTP daemon.
•
A Linux server used for FTP must support passive FTP.
FTP Folder Structure Guidelines - The FTP folder structure that is required by thin
clients running Wyse ThinOS is \wyse\wnos and must be placed under the FTP root
folder (if DHCP option tag 162 is not used) or under the folder which has been
specified by DHCP option 162. For example, if DHCP option tag 162 has been
configured with the name ThinClients and DHCP option tag 161 has been configured
with IP address 192.168.1.1, then the thin client will check the folder
<FTPRoot>\ThinClients\wyse\wnos for a wnos.ini and firmware on the FTP server with
the IP address (192.168.1.1). The sub-folder \bitmap must be placed under the \wnos
folder and can contain graphical images for icons and background images. The
sub-folder \cacerts can be placed under the \wnos folder and can contain your CA
certificates. The sub-folder \inc can be placed under the \wnos folder and can contain
the mac.ini files (note that the use of the parameter Include=$mac.ini will load “/wnos/inc/
mac-address.ini” so that you can use inc in the folder structure and use $MAC.ini). The
sub-folder \trace can be placed under the \wnos folder and can contain the trace files
that you can capture and play back (be sure to enable the parameter,
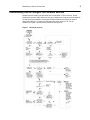
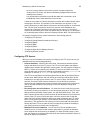
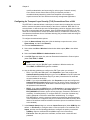
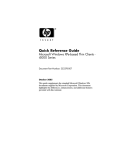
EnableTrace=yes). Figure 2 shows an example of the folder structure of an FTP server
for Wyse ThinOS.
Figure 2
Example of the folder structure of an FTP server for Wyse ThinOS
Establishing a Server Environment
13
To configure an FTP server, complete the following procedures:
1. Create the following directory structure on your FTP server:
<path from anonymous user FTP root>\wyse\wnos\
<path from anonymous user FTP root>\wyse\wnos\bitmap\
<path from anonymous user FTP root>\wyse\wnos\cacerts\
<path from anonymous user FTP root>\wyse\wnos\inc\
<path from anonymous user FTP root>\wyse\wnos\trace\
Note
There is a difference between a path obtained from the DHCP server and a
path entered in the UI. If the path is obtained from DHCP, /wyse/wnos are
appended. If the path is obtained from the UI, the /wyse portion is not
appended; only /wnos is automatically inserted. As written in this first step,
the configuration procedure will only work in conjunction with a DHCP server.
2. If you need to upgrade the firmware for your thin client, you must have a Software
Maintenance agreement to download the files (for details, go to http://www.wyse.com/
products/software/os/index.asp). Copy the RCA_boot and RCA_wnos (if you have an
S10) or V10L_boot and V10L_WNOS (if you have a V10L) and place it in the wnos
subdirectory of your FTP server.
3. Obtain the Sample User INI files (go to http://www.wyse.com/manuals, search for
sample.ini, click the reference guide link, and then click the sample ini link to open and
use the file download dialog box to save the compressed file to a folder you want) and
unpack them into a directory from which they can be examined and modified using an
ASCII text editor. These sample files are annotated to allow you to use them as a
starter set on your FTP server and can be modified to suit your needs. The
compressed file includes:
•
wnos.kiosk - Example wnos.ini file for a kiosk configuration
•
wnos.login - Example wnos.ini file to enable multiple user accounts
•
user.ini - Template for {username}.ini for individual user profiles
4. Determine whether all the thin clients served by this FTP server will be used as kiosks
or will support individual user accounts. You must rename the downloaded files so that
there will be one wnos.ini file available to all users globally; and for a multiple user
account configuration there will be a unique {username}.ini file for each user. In
addition:
•
If the kiosk configuration is to be used - Change the name of wnos.kiosk to
wnos.ini. Otherwise, for multiple user accounts, change the name of
wnos.login to wnos.ini.
•
If the individual user account configuration is to be used - Make a copy of the
user.ini file for each user name as {username}.ini (where {username} is the
name of the user) and place the files in the subdirectory ini of wnos. The files must
have read permission enabled, and if users are to be allowed to change their
passwords, the files also must have write permission enabled (so that the thin
clients can write the encrypted user passwords to them). For Linux servers, use
the chmod command to set the read/write permissions. For Microsoft servers, use
the Properties dialog box to set read/write permissions.
5. If desired, you can customize the INI files to match the local environment using the
instructions in the Reference Guide: Wyse ThinOSTM INI Files. If you modify the INI
files to include icons and logos, be sure to place the images in the FTP server/wnos/
bitmap subdirectory.
14
Chapter 2
Configuring Virtual Desktop Infrastructure Servers
When the thin client boots, it accesses the INI files from a Virtual Desktop Infrastructure
(VDI) server. VDI servers are available through DHCP vendor option 188 (see
"Configuring DHCP").
The thin client communicates with a Virtual Desktop Broker server by the sysinit,
signon, signoff, and shutdown commands. When the thin client boots and
successfully connects in a Virtual Desktop environment, it sends the sysinit command
to the Virtual Desktop Broker, which then sends back the wnos.ini file (if a broker
connection cannot be made, the thin client will attempt to connect to an FTP or PNLite
server). After the thin client successfully receives the wnos.ini from the Virtual Desktop
Broker, a sign-on window displays, prompting the user for username and password
credentials. The thin client then sends the signon command to the Virtual Desktop
Broker with the username and password as its parameter. If the sign-on is successful, the
Virtual Desktop Broker server will send back the {username}.ini file (if the sign-on is
unsuccessful, the user is prompted again for username and password credentials). The
signoff command will be sent when a user disconnects from the connection. The
shutdown command will be sent when a user turns off the thin client power.
Configuring XenDesktop Support
XenDesktop is supported in Wyse ThinOS versions 6.2 and later without the need to use a
Web browser. To connect to XenDesktop, do not use the VDI Broker parameter. Instead,
use the same parameter and configuration that is used when connecting to a PNAgent/
Lite server.
Configuring DHCP
Before you use the information in this section to configure your DHCP server, be sure you
understand and use the following guidelines:
•
General Guidelines - The DHCP service provides all thin clients on the network with
their IP addresses and related network information when the thin clients boot. DHCP
also supplies the IP address and directory path to the thin client software images and
user profiles located on the file servers.
Use of DHCP is recommended. However, if a DHCP server is not available, fixed IP
addresses can be assigned (this does, however, reduce the stateless functionality of
the thin clients) and the fixed IP addresses must be entered locally for each device
using the thin client Network Setup dialog box as described in "FTP Server Available
(DHCP Server Unavailable)" and "Virtual Desktop Server Available (DHCP Server
Unavailable)").
Many DHCP options correspond to places in the network configuration UI where the
thin client user can enter information manually. Be aware that wherever there is
information in the UI and the thin client receives information about the same function
from one or more DHCP options, the information received from the DHCP server will
replace the information contained in the UI. However, if the thin client does not receive
information from the DHCP server about a particular function, the information manually
entered in the UI will remain and will be used.
•
LPD Print Server Guidelines - If a particular thin client is to function as an LPD print
server, it can be assigned a fixed IP address. However, you can also guarantee that an
LPD server will always have the same IP address by making a reservation for that thin
client in the DHCP server. In that way, you can preserve the stateless nature of the thin
client and still guarantee a fixed address for the server. In fact, you can assign a
symbolic name to the reservation address so that other thin clients can reference the
LPD server by name rather than by static IP address (the symbolic name must be
Establishing a Server Environment
15
registered with a DNS server before other thin clients will be able to locate this LPD
server). The thin client does not dynamically register its name and the DNS registration
must be manual.
•
Wyse Device ManagerTM (WDM) Guidelines - If you use WDM, the thin client uses
port 80 as the default to access a WDM server (formerly known as Rapport server). If a
port other than 80 is used to access a WDM server, use option 187 in the list of DHCP
options in Table 1 (option for a WDM server is option 186 in the list of DHCP options in
Table 1). WDM options are the only options used by the thin client that are not in text
form.
•
PNAgent/PNLite Server Guidelines - If you use a a PNAgent/PNLite server, the thin
client uses port 80 as the default to access a PNAgent/PNLite server. If a port other
than 80 is used to access a PNAgent/PNLite server, the port number must be specified
explicitly with the server location in the form IP:port or name:port (option for a
PNAgent/PNLite server is option 181 in the list of DHCP options in Table 1).
•
Windows DHCP Server Guidelines - You can use the DHCP tools available on the
Windows server.
•
Linux DHCP Server Guidelines - For Linux servers, enter DHCP options 161 and 162
(described in Table 1) in /etc/dhcpd.conf (refer to the manual page man
dhcpd.conf for more information on DHCP and the syntax of this file). For example, if
you want the computer to search ftp://132.237.16.157/pub/
serversoftware/wnos, add the following line to /etc/dhcpd.conf:
option option-161 132.237.16.157;option option-162 "pub/
serversoftware$";
As mentioned in Table 1, the /wnos suffix is automatically appended to the FTP path,
so you should not specify it explicitly. In this case, the actual directory searched will be
pub/serversoftware/wnos.
•
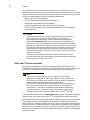
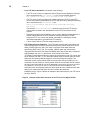
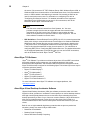
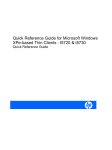
DHCP Options Guidelines - Wyse ThinOS uses several DHCP option tags. These
option tags must be created, activated within the DHCP scope(s), and then added for
the thin clients to use them. Figure 3 shows the Windows DHCP Server Predefined
Options and Values dialog box that is displayed when right-clicking the DHCP server
and selecting Set Predefined Options. The most commonly used tags are 161 and
186. Depending on the Terminal Server environment, more options can be added
using the Predefined Options and Values dialog box.
Figure 3
Predefined Options and Values dialog box
Use the guidelines shown in Table 1 when creating and adding the DHCP option tags you
need for your thin clients.
16
Chapter 2
Note
Ensure that within the DHCP scope these new DHCP option tags you create
are activated (this can be done using the Configure Options command),
before you add them.
Table 1
DHCP Options
Option
Description
Notes
1
Subnet Mask
Required. However, it is not is not required unless
the thin client must interact with servers on a
different subnet (MS DHCP requires a subnet
mask and will always send one).
2
Time Offset
Optional.
3
Router
Optional, but recommended. It is not required
unless the thin client must interact with servers on
a different subnet.
6
Domain Name Server
(DNS)
Optional, but recommended.
15
Domain Name
Optional, but recommended. See Option 6.
28
Broadcast Address
Optional.
44
WINS servers IP
Address
Optional.
51
Lease Time
Optional, but recommended.
52
Option Overload
Optional.
53
DHCP Message Type
Recommended.
54
DHCP Server IP
Address
Recommended.
55
Parameter Request
List
Sent by thin client.
57
Maximum DHCP
Message Size
Optional (always sent by thin client).
58
T1 (renew) Time
Optional, but recommended.
59
T2 (rebind) Time
Optional, but recommended.
61
Client identifier
Always sent.
161
FTP server list
Optional string. Can be either the name or the IP
address of the FTP server. If a name is given, the
name must be resolvable by the DNS server(s)
specified in Option 6. If the option provided by the
server is blank or the server provides no value for
the field, the machine on which the DHCP server
resides is assumed to also be the FTP server.
17
Establishing a Server Environment
Table 1
DHCP Options, Continued
Option
Description
Notes
162
Root path to the FTP
files
Optional string. If the option provided by the
server is blank and the server provides no value
for the field, a null string is used.
\wyse\wnos is automatically appended to the
search path. For example, if you enter
pub\serversoftware, the path searched will
be pub\serversoftware\wyse\wnos.
Note: You can have the \wyse automatic
component of the search path omitted by
appending a dollar sign ($) to the entered path.
For example, if you enter
pub\serversoftware$, the path searched will
be pub\serversoftware\wnos.
Note: The usage or omission of a leading slash
(\) on the path is critical on some servers. Some
servers limit access to the root path of the user
specified at login. For those servers, the usage of
the leading slash is optional. Some *NIX servers
can be configured to allow the FTP user access to
the entire file system. For those servers,
specifying a leading slash specifies that access is
to start at the root file system. Proper matching of
the file specification to the FTP server in use is
critical to ensuring proper operation. A secured
Windows server requires the slash be specified in
order to complete proper access.
181
PNAgent/PNLite server
list
Optional string. The thin client uses the server to
authenticate the Windows credentials of the user
and to obtain a list of ICA published applications
valid for the validated credentials. The user
supplies those credentials when logging in to the
thin client.
182
NT domain list for
PNAgent/PNLite
Optional string. The thin client creates a pull-down
list of domains from the information supplied in
option 182. This list is presented at thin client login
in the order specified in the DHCP option (for
example, the first domain specified becomes the
default). The selected domain is the one which
must authenticate the user ID and password. Only
the selected domain is used in the authentication
process. If the domain list is incomplete and the
user credentials must be verified against a domain
not in the list (assuming that the server in option
181 is capable of authenticating against a domain
not in the list), the user has the option of not using
any of the domains specified in option 182 and
typing a different domain name at the time of
login.
18
Chapter 2
Table 1
DHCP Options, Continued
Option
Description
Notes
184
FTP Username
Optional string. Wyse ThinOS version 4.3 and
later only.
185
FTP Password
Optional string. Wyse ThinOS version 4.3 and
later only.
186
Wyse Device Manager
(WDM) server list
(formerly know as
Rapport)
Optional binary IP addresses of WDM. This option
can specify up to two Wyse Device Manager
servers. If two are specified, at boot time the thin
client will attempt to check-in to the first server. If it
cannot contact the first server it will try to check-in
to the second server. Wyse ThinOS version 4.3
and later only.
187
WDM server port
(formerly know as
Rapport)
Optional number. Byte, word, or two-bytes array.
NOTE: The value of this option tag, when not
embedded in Vendor Class Specific Information
option, is interpreted in reverse order when it is
sent as 2 bytes (for example, the value of 0x0050
was interpreted as 0x5000). This option tag was
used by old Wyse ThinOS releases. New Wyse
ThinOS releases still accept this option tag for
backward compatibility.
188
Virtual Desktop Broker
port
Optional string.
190
WDM secure port
(formerly know as
Rapport)
Optional number. Word, or two-bytes array.
Specifies to use HTTPS to communicate with
WDM instead of HTTP.
192
WDM server port
(formerly know as
Rapport)
Optional number. Word, or two-bytes array.
NOTE: The value of this option tag represents the
same information as option tag 187. The
difference is that Wyse ThinOS interprets the
value of this option tag in correct order (for
example, the value of 0x0050 is interpreted as
0x0050). If the DHCP server provides both option
tag 192 and 187, option tag 192 takes
precedence.
Note
The thin client conforms to both RFC-compliant DHCP servers (RFC
numbers 2131 and 2132) and RFC-noncompliant Microsoft servers (which
NULL terminate strings sent to the thin client). The thin client supports both
infinite leases and leases that expire (per RFC 2131 and others).
Note
Not all options in the range 128-254 are strings. Options 186, 190, and 192
are employed for all Wyse products that use WDM. Their format and content
are determined by the WDM product.
Establishing a Server Environment
19
Configuring DNS
Thin clients accept valid DNS names registered on a DNS server available to the
enterprise intranet. In most cases, DNS is not required but may be used to allow hosts to
be accessed by their registered DNS names rather than their IP addresses. Every
Windows DNS server in Windows 2000 and later includes Dynamic DNS (DDNS) and
every server registers dynamically with the DNS server. There are also DDNS
implementations available for *NIX environments. However, the thin client does not do
dynamic registration, and therefore, requires a static or non-variant IP address and
manual DNS registration in order to provide LPD support by name (for example, in the
case where the thin client is used as an LPD printer server or if DHCP is not available).
For DHCP entry of DNS domain and server location information, refer to "Configuring
DHCP."
Configuring WINS
The thin client does not do dynamic registration and therefore, requires a static or
non-variant IP address and manual Windows Internet Naming Service (WINS)
registration. Use the network address of an available WINS name server. WINS allows the
thin client user to specify remote systems by their host names rather than IP addresses. If
a specific IP address (instead of a name) is entered for a connection, it rather than WINS
will be used to make the connection. These entries are supplied through DHCP, if DHCP is
used.
Note
You may use two WINS server addresses, separated by a semicolon,
comma, or space. The first address is for the primary WINS server and the
second address is for a backup WINS server.
Configuring Wyse Device Manager Servers
Wyse Device ManagerTM (WDM) servers provide network management services to the
thin client (complete user-desktop control—with features such as remote shadow, reboot,
shutdown, boot, rename, automatic device check-in support, Wake-On-LAN, change
device properties, and so on). Use the IP addresses or host names with optional TCP port
number for WDM servers. Each entry with optional port number is specified in the form
IP:port or name:port, where :port is optional (if not specified, port 80 is used).
Configuring Wireless Access
Thin clients running Wyse ThinOS can support 802.11b/g/n wireless connections. WEP is
used as the encryption method in 802.11b wireless access. WEP, WPA-Personal,
WPA2-Personal, WPA-Enterprise and WPA2-Enterprise are used as the encryption and
authentication methods in 802.11g/n wireless access. For a wireless access point, Cisco,
TP-Link, and D-Link products are recommended. For a Radius server used in EAP-TLS,
the IAS, FreeRadius and Cisco ACS are recommended.
Note
Internet Authentication Service (IAS) is the Microsoft implementation of a
Remote Authentication Dial-in User Service (RADIUS) server and proxy. As
a RADIUS server, IAS performs centralized connection authentication,
authorization, and accounting for many types of network access; including
wireless and virtual private network (VPN) connections.
The FreeRADIUS Server is a daemon for unix and unix-like operating
systems which allows you to set up a radius protocol server (which can be
20
Chapter 2
used for authentication and accounting for various types of network access).
Cisco Secure Access Control Server (ACS) for Windows provides a
centralized identity networking solution and simplified user management
experience across all Cisco devices and security management applications.
Configuring for Transport Layer Security (TLS) Connections Over a LAN
The IEEE 802.1x standard allows a switch port to remain wired or enabled but not permit
traffic to traverse the switch until the identity of the client is confirmed. IEEE 802.1x is a
security feature. It defines the process of authenticating a wired or wireless client to allow
the client to communicate with the network. Wyse ThinOS supports IEEE 802.1x for thin
clients to be authenticated to access an Ethernet network. To enable this connection, you
must download certificates from a Certificate Authority (CA), and then install and configure
them for the thin client.
To configure the authentication options:
1. Open the Network Setup dialog box (click the desktop to open the menu, select
System Setup, and then click Network).
2. Click the Authentication tab.
3. Select either the Wire or Wireless Authentication Mode option (Wire is the default
mode).
4. Select the Enable IEEE802.1x Authentication check box.
5. In the EAP Type drop-down list, select an Extensible Authentication Protocol option
(either TLS, LEAP, or PEAP.
Note
In Wire mode, only the TLS EAP type is available; in Wireless mode, the
TLS, LEAP, and PEAP EAP types are available.
6. Use the following guidelines to configure the EAP Type option you selected:
•
TLS - If you select the TLS option, click Properties to open and configure the
Authentication Properties dialog box (you can use Browse to find and select the
Client Certificate file and Private Key file you want). Note that the CA certificate
must be installed in the device.
•
LEAP - If you select the LEAP option, click Properties to open and configure the
Authentication Properties dialog box (be sure to use the correct Username and
Password for authentication). Note that the maximum length for the username or
the password is 64 characters.
•
PEAP - If you select the PEAP option, click Properties to open and configure the
Authentication Properties dialog box (be sure to select either EAP_GTC or
EAP_MSCHAPv2, and then use the correct Username, Password, and Domain, if
necessary, for authentication). To configure EAP-GTC, enter the username only,
and the password or PIN will be asked when authenticating. To configure
EAP-MSCHAPv2, enter the username, password, and domain (domain\username
in the username box is supported, but you must leave the domain box blank). Note
that the CA certificate must be installed in the device (the server certificate is forced
to be validated).
7. In the Network Setup dialog box, select an Import From option (either USB Key -the
default - or File Server) to configure where a user can import a new certificate, click
Import, and then use the following guidelines to configure the option you selected:
·
USB Key: Select a certificate and click OK to import it to local memory.
·
File Server: Enter the path to the certificate, and then enter a username and
password.
Establishing a Server Environment
21
8. (Wireless Networks Only) Click Wireless Setup to open the Wireless Setup dialog
box and use the following guidelines:
Note
The on-board NIC is “favored” if a valid link is detected, and the USB wireless
will not be activated; otherwise, USB wireless becomes the system’s LAN, all
configured network settings apply to the wireless network, and the USB
wireless controls the NIC and functions such as the local Ethernet. Currently,
only the Action Tec USB wireless card is supported.
·
Mode: Select either the Infrastructure or Ad Hoc option.
Infrastructure - Select Infrastructure for access point wireless networks in which
thin clients connect to access points as they move from place to place (for example,
from floor to floor) or require a new access point due to traffic congestion.
Ad Hoc - Select Ad Hoc for computer-to-computer wireless networks in which thin
clients connect to one another directly.
·
SSID: Enter the name of the wireless network to which the thin client will connect
(32 characters maximum).
·
Channel: Select a channel number from 1 to 14.
·
Encryption: Select one of eight user-defined WEP/WPA keys.
·
Algorithms: Select either Open or Shared Key for WEP encryption.
·
Key: Depending on which WEP/WPA key you selected, use the following
guidelines:
None - Enter no characters.
WEP Key 1-4 - Enter 5 or 13 characters for the 64-bit or 128-bit encryption key, or
10 or 26 hex-decimal digits.
WPA_PSK or WPA2_PSK - Enter any value from 8 to 63 characters, or specify the
numbers as 128 hex-decimal digits.
WPA_Enterprise or WPA2_Enterprise - Enter no characters.
Configuring Session Services
Before you use the information in this section to configure your ICA and RDP session
services, be sure you understand and use the following guidelines:
•
•
General Guidelines - Be aware of the following:
•
The Thin-client session services are made available by servers hosting Citrix ICA
and Microsoft RDP software products.
•
A browser must be available through one of the session services to access any
on-line help documentation for users.
•
There can be more connections than desktop space to display them.
•
Connections can be defined in persistent memory (with a statement reading
enablelocal=yes in the wnos.ini file). These connections can be displayed as
desktop icons only in Stand-alone mode with a Non-privileged user.
•
Only the connections defined in an INI file and containing an icon= clause will be
displayed on the desktop (assuming there is adequate desktop space).
•
Connections can be displayed on the desktop without requiring a sign-on (when
you define these connections in a wnos.ini file or when the wnos.ini file does not
contain a SignOn=yes statement).
ICA Guidelines - Independent Computing Architecture (ICA) is a three-tier,
server-based computing technology that separates the logic of an application from its
user interface. The ICA client software installed on the thin client allows the user to
interact with the application GUI, while all of the application processes are executed on
22
Chapter 2
the server. ICA connects to NT TSE, Windows Server 2003, Windows Server 2008, or
Windows 2000 Server hosts that have a Citrix MetaFrame server, Citrix Presentation
server, or CDS installed. Load balancing is included. ICA browsing or DNS can be
used to resolve the server name. For information on configuring ICA, refer to
"Configuring ICA Session Services." For detailed information on the supported
parameters (in the INI files) that you can use for ICA connections, refer to the
Reference Guide: Wyse ThinOSTM INI Files.
Note
The ICA server must be licensed from Citrix Systems, Inc. You must
purchase enough client licenses to support the total concurrent thin client
load placed on the Citrix server farm. A failure to connect when all client
seats are occupied does not represent a failure of Wyse equipment. The ICA
client software is installed on the thin client.
•
RDP Guidelines - Remote Desktop Protocol (RDP), like ICA, is a network protocol that
allows a thin client to communicate with the Terminal Server or Windows 2000/2003/
2008 Server with Terminal Services over the network. This protocol is based on the
T.120 protocol suite, an international standard multi-channel conferencing protocol.
The thin client supports both RDP version 4.x and version 5.x. For information on
configuring RDP, refer to "Configuring RDP Session Services." For detailed information
on the supported parameters (in the INI files) that you can use for RDP connections,
refer to the Reference Guide: Wyse ThinOSTM INI Files.
About Wyse TCX Software
Wyse® TCX Software™ provides an enrichment layer above ICA and RDP connections
that enable multiple monitor awareness, rich multimedia playback, high quality
bidirectional audio capabilities, and seamless USB device access for Wyse thin clients.
Wyse ThinOS has built-in support for the following Wyse TCX solutions (a license may be
required to activate a feature):
•
Wyse® TCX Multi-Display™
•
Wyse® TCX Multimedia™
•
Wyse® TCX Rich Sound™
•
Wyse® TCX USB Virtualizer™
•
Wyse® TCX Flash Redirection™
For more information about Wyse TCX software and support platforms, visit
www.wyse.com/tcx.
About Wyse Virtual Desktop Accelerator Software
Wyse® Virtual Desktop Accelerator (VDA) is a software product that, when used with
Wyse thin clients, provides an “accelerated” user experience on remote desktop sessions
with high round-trip delay between the server and client. By accelerating the remote
desktop protocols by a factor of up to 3 times on certain networks, a Wyse VDA session
with a server located thousands of miles from your thin clients “feels” similar to a
non-accelerated session with a server located just a few hundred miles from your thin
clients.
Built for use on high-bandwidth high-latency networks that are prone to packet loss
situations, primary use cases for Wyse VDA include:
•
Datacenter Consolidation
•
Desktop Cloud Computing
•
Remote Off-Shore Desktop Computing
Establishing a Server Environment
23
Configuring ICA Session Services
Before you use the information in this section to configure your ICA session services, be
sure you have read "Configuring Session Services."
ICA session services can be made available on the network using either Windows 2000,
2003, or 2008 Server with Terminal Services and one of the following installed:
•
Citrix MetaFrame XP
•
Citrix Presentation Server
Note
If PNAgent/PNLite-published application services are to be made available to
the thin clients, refer to "PNAgent/PNLite Installation Guidelines" when
installing Citrix MetaFrame XP.
When using the instructions accompanying these products to install them and make
sessions and applications available to the thin clients sharing the server environment, be
aware of the following:
•
If a Windows 2000, 2003, or 2008 Server is used, a Terminal Services Client Access
License (TSCAL) server must also reside somewhere accessible on the network. The
server will grant a temporary (120-day) license on an individual device basis. Beyond
the temporary (120-day) license, you must purchase TSCALs and install them on the
TSCAL server (you will not be able to make a connection without a temporary or
permanent license).
•
It is recommended that any ICA connection which traverses a Dial-up or WAN
connection have Lowband=yes set in the INI files or the Optimize for low speed link
option selected in the Connection Settings (ICA) dialog box.
•
If an ICA connection is created using the Connect Manager and the Host Names or
Application Name text box is left blank, a message appears prompting the user to
enter the IP Address or Server Name of the ICA server to which to connect.
•
An audio input port is available (Audio can be recorded).
PNAgent/PNLite Installation Guidelines
PNAgent/PNLite is a component of the Citrix XML publishing service. PNAgent/PNLite is
an ICA connection mode that enables the thin client to connect to applications available
(published) on an ICA server without having to configure connections for individual
published applications.
Use the following guidelines during installation:
•
MetaFrame XP - Installing MetaFrame XP supports XML publishing services. During
installation, a series of prompts appear for you to follow. When you are prompted to
install the XML Publishing Service, be aware that clicking Yes to this option allows you
to change the default port (80) used by the service.
•
Citrix Presentation Server - Installing Citrix Presentation Server supports XML
publishing services. During installation, a series of prompts appear for you to follow.
The port to be used for XML publishing services must be known for making appropriate
PNAgent/PNLite server location entries required by the operating mode (for related
information, refer to "Configuring DHCP," the Users Guide: Wyse ThinOSTM (for locally
configuring the thin client using the Network Setup dialog box), and the Reference Guide:
Wyse ThinOSTM INI Files). The thin client uses port 80 as the default port, but if a port
other than 80 is used, the port number must be specified explicitly with the PNAgent/
PNLite server location in the form IP:port or name:port, where :port is optional.
24
Chapter 2
Configuring RDP Session Services
Before you use the information in this section to configure your RDP session services, be
sure you have read "Configuring Session Services."
RDP session services can be made available on the network using any of the following:
•
Windows 2000, 2003, or 2008 Server with Terminal Services installed
•
Windows NT 4.0 Terminal Services (WTS) Edition
•
Windows XP
When using the instructions accompanying these products to install them and make
sessions and applications available to the thin clients sharing the server environment, be
aware of the following:
•
If a Windows 2000, 2003, or 2008 Server is used, a Terminal Services Client Access
License (TSCAL) server must also reside somewhere accessible on the network. The
server will grant a temporary (90-day) license on an individual device basis. Beyond
the temporary (90-day) license, you must purchase TSCALs and install them on the
TSCAL server (you will not be able to make a connection without a temporary or
permanent license).
•
It is recommended that any RDP connection which traverses a Dial-up or WAN
connection have Lowband=yes set in the INI files or the Optimize for low speed link
option selected in the Connection Settings (RDP) dialog box.
•
If an RDP connection is created using the Connect Manager and the Host Names or
Application Name text box is left blank, a message appears prompting the user to
enter the IP Address or Server Name of the RDP server to which to connect.
•
Wyse ThinOS version 4.2 and later supports an RDP connection with no encryption
(found in older versions of Microsoft NT4-TSE servers).
•
Wyse ThinOS version 4.2 and later supports server browsing over Server Message
Block (SMB) when defining an RDP connection. SMB browsing restrictions mean that
the server desired may not be listed, in which case the user will need to know either the
name or IP address of the target server and enter that information into the text box (as
it will not appear in the pull-down list).
3
Remote System Administration
This chapter provides remote system administration information to help you perform the
routine tasks needed to maintain your Wyse ThinOS environment. It includes the following
remote system administration information:
•
"Using Wyse Device Manager Software For Remote Administration"
•
"Updating Software"
•
"Managing Icons and Logos"
•
"Understanding and Using System Lockdown Operations"
•
"Configuring Virtual Access Suite Support"
Using Wyse Device Manager Software For Remote Administration
Wyse Device ManagerTM (WDM) servers provide network management services to the
thin client (complete user-desktop control—with features such as remote shadow, reboot,
shutdown, boot, rename, automatic device check-in support, Wake-On-LAN, change
device properties, and so on).
Note
Ordering information for WDM is available on the Wyse Web site at:
http://www.wyse.com/products/software/rapport.
Updating Software
The software version is embedded in both the RAM and flash memory images. This
version information is used to compare the images on the FTP server to the
currently-loaded flash image on the thin client. A major revision number supersedes a
minor revision number when making the comparison. In turn the minor version number
takes precedence over the build number. The image names and date-time stamps
determine whether or not the update is newer than the version currently installed on the
thin client.
Note
The code identifier is split into 4 parts, the major release identifier, the minor
release identifier, the build number identifier, and the sub-build number
identifier (if the sub-build number is 0, it will not be displayed). Each part is
compared against the current code internal identifier in the same format. If
the file identifier is greater, the update is performed. If the file identifier is less,
the update is abandoned. If the file identifier is equal, the next term is
examined until the build identifiers are found to be equal and the update is
abandoned. This comparison process using the build number can be
important in cases where you are using a beta release, or in cases where
you need to reinstall a release with the same major and minor numbers but
with an updated build.
26
Chapter 3
After obtaining software updates from Wyse, you must replace the existing software
images in the wnos subdirectory on the FTP server to allow the thin clients to
automatically detect and self-install the new software (upon thin client system start). The
FTP server address and exact path to these files are specified in DHCP Options 161 and
162 (if DHCP is not used, the path is specified in the Network Setup dialog box on the
thin client).
Each time a thin client boots, it checks the software images on the FTP server, and if
configured, automatically performs an update if a newer version is detected. Whether or
not an update is performed depends on the AutoLoad parameter setting in the wnos.ini file
as described in the Reference Guide: Wyse ThinOSTM INI Files.
Be aware that there is a significant distinction between using DHCP and not using DHCP
to access the various necessary files as follows:
•
If DHCP is used, thin client software automatically inserts the path command /wyse
following what it receives from the DHCP server (unless the path is terminated by a $);
this is done only if a value is received from DHCP. The dollar sign character ($) acts as
a flag that notifies Wyse ThinOS that the absolute path has been given (that is, where it
expects to find Wyse ThinOS configuration files inside a “wnos” folder) instead of the
relative path (where it expects to find the general “wyse” configuration folder).
•
If DHCP is not used and the configuration is done manually, the full path up to the wnos
component must be inserted; there is no automatic /wyse insertion and no $
processing.
•
For users familiar with Wyse 3 series thin clients, the Wyse 3 series equipment does
processing on both DHCP and manual input, as well as $ processing (as $ is a legal
meta-character in manually entered strings). Wyse ThinOS software does not
recognize a $ terminator as a legal meta-character in a locally entered string.
Note
Citrix does not supply an ICA client for the Wyse thin client platforms. Citrix
ICA Auto-Update does not function for the ICA client installed on the thin
client; the ICA client is fully contained in the thin client system and can only
be updated by changing that entire system. The RDP client is also not
replaceable.
Caution
Interrupting power during the update process can corrupt the FLASH on the
thin client. Thin clients with corrupted FLASH must be shipped to Wyse for
service.
Note
Note the following thin client update processes:
Model SX0: (Step 1) If called for, the thin client first searches in the wnos
directory for RCA_wnos. If this file exists with a different internally encoded
version number than the image currently in flash memory, and depending on
the wnos.ini file AutoLoad parameter setting, the thin client will load this
image into flash and reboot. (Step 2) The thin client will then (regardless of
any circumstance in step 1) check for a file named express.rom and begin
updates, if appropriate. If an update is done, the thin client will again reboot.
Model VX0: (Step 1) If called for, the thin client first searches in the wnos
directory for a file named VL10_wnos. If this file exists with a different
internally encoded version number than the image currently in flash memory,
and depending on the wnos.ini file AutoLoad parameter setting, the thin
client will load this image into flash and reboot. (Step 2) The thin client will
Remote System Administration
27
then (regardless of any circumstance in step 1) check for a file named
express.rom and begin updates if appropriate. If an update is done, the thin
client will again reboot.
Managing Icons and Logos
Icons and logos specified in the INI files must be placed in the file server /wnos/bitmap
subdirectory. Icons are specified in the Icon clause of the connection statement and logos
are specified in the FormURL statement. Supported image file types include .ico (icon),
.bmp (bitmap), .jpg (JPEG), and .gif(GIF). Color depth for logos can be up to 256 colors.
Color depth for icons can be 16 colors. It is recommended that .jpg format not be used for
desktop icons.
Use the following guidelines:
•
Typical desktop icons are 64 x 48 pixels.
•
Typical sign-on logos are 100 x 61 pixels, with transparent background.
•
Maximum size for sign-on logos is 352 x 80 pixels (if smaller than this, it will be
positioned in the upper-left corner).
Understanding and Using System Lockdown Operations
Lockdown status for a thin client is set or removed using the LockDown clause of the
Privilege statement in the INI files. Lockdown establishes the default privilege level
following thin client boot and before any privilege statement is read from an INI file.
Access to many facilities is affected by the privilege level.
•
Non-Lockdown Operation - For normal operation, Low-privileged and Non-privileged
users may access the Network Setup dialog box by temporarily disconnecting the
Ethernet cable from the thin client and rebooting to Stand-alone user mode. The
Network Setup dialog box can also be accessed after resetting the thin client to
factory defaults (by a G-key reset to factory default or using the Reset the system
setting to factory defaults check box in the Sign-off/Shutdown window of any user
with sufficient privilege to the Sign-off/Shutdown window.
•
Lockdown Operation - In most cases, access to the resources available when the
system is not locked down is desirable; however, network environments requiring
maximum security should not permit uncontrolled changes to thin client network
access. Most facilities would include a Privilege with LockDown statement in the
wnos.ini file and might override the privilege in a {username}.ini file without modifying
the lockdown privilege. Thus, an administrator could log into any unit and have
sufficient privilege to modify the configuration of that unit without altering the default
privilege at the next reboot.
Caution
If the unit is configured for Dial-up access, there must be an RAS server
answering the configured telephone number. Otherwise, the unit will require
factory attention to recover it.
28
Chapter 3
Configuring Virtual Access Suite Support
This section explains how to support the Wyse ThinOS with Provision Networks Virtual
Access Suite (VAS). To support Wyse ThinOS with VAS, you must do the following:
•
Download Wyse ThinOS firmware version 5.3.0_14 or later and store it on all
Connection Brokers under the WNOS directory (see “Updating the Wyse ThinOS
Firmware (VAS Support)” ).
•
Download hotfix 5 for VAS 5.8 (Release 8) from the Provision Networks Web site and
install the hotfix on all Connection Brokers.
Installing the VAS Hotfix
Hotfix 5 for VAS 5.8 (Release 8) includes: PNCONSOLE.EXE (5.8.208.15),
PNBRKSVC.EXE (5.8.200.64), and sample INI files. After you download and install the
hotfix, set the DHCP server option tags 161 and 188 to the IP address(es) of the
Connection Broker(s) using the following syntax (see "Configuring DHCP"):
<protocol>://<iplist>:port>
•
protocol: http or https. This parameter is optional. If omitted, http is automatically
used.
•
iplist: The list of IP addresses corresponding to the Connection Brokers. The specified
IP addresses must be separated by commas or semicolons.
•
port: The TCP port that the Connection Broker(s) is/are configured to listen on. This
parameter is optional. If omitted, ports 80 (http) and 443 (https) are automatically used.
Note
Option tag 161 is used to specify the servers from which the Wyse ThinOS
firmware updates can be downloaded to the thin client, while option tag 188
is used to specify VDI brokers. Because the VAS Connection Brokers are
capable of fulfilling both functions, option tags 161 and 188 may be
configured identically.
On each Connection Broker, the hotfix creates a directory named WYSE under the VAS
installation directory, a directory named WNOS under the WYSE directory, and two
directories named bitmap and ini under the WNOS directory., as follows:
•
C:\Program Files\Provision Networks\WYSE
•
C:\Program Files\Provision Networks\WYSE\WNOS
•
C:\Program Files\Provision Networks\WYSE\WNOS\bitmap
•
C:\Program Files\Provision Networks\WYSE\WNOS\ini
The bitmap directory is used to store optional bitmap files (such as a corporate logo to be
displayed on the thin client desktop) referenced in a wnos.ini file.
The wnos.ini file in the WNOS directory contains various WYSE commands and
parameters. It is sent from the Connection Broker to the thin client upon boot-up. For
detailed information on wnos.ini files, refer to the Reference Guide: Wyse ThinOSTM INI
Files.
Remote System Administration
29
Enabling HTTP and HTTPS Support on the Connection Brokers (VAS Support)
The Connection Broker can be configured to accept http and https requests
simultaneously. To support https requests, however, you must first obtain a Web server
certificate for each Connection Broker.
Installing Connection Broker Web Server Certificates (VAS Support)
For https support, obtain a Web server certificate for each Connection Broker. You can
obtain a certificate issued by an external certificate authority (such as Microsoft Certificate
Server) or an external certificate authority (such as VeriSign or Entrust). After obtaining
the certificates, use the following guidelines to install each certificate:
1. Display the left-hand pane in the Provision Management Console.
2. Expand the Connection Brokers node.
3. Right-click the node corresponding to the Connection Broker.
4. On the General tab, click Configuration, and then click Server Certificate.
5. Select the desired certificate from the list for installation.
Configuring the Connection Broker HTTP and HTTPS Ports (VAS
Support)
To configure the Connection Broker http and https ports, use the following guidelines:
1. Display the left-hand pane In the Provision Management Console.
2. Expand the Servers node.
3. Right-click Connection Brokers and select Properties.
4. Select one or both protocol options (http and/or https).
5. Specify the corresponding TCP port numbers.
Warning
If IIS is installed on the same server, be sure to select non-conflicting TCP
ports.
Configuring {username}.ini Files and RDP Connection Parameters (VAS
Support)
After a user is successfully authenticated, the Connection Broker dynamically generates a
user-specific configuration file named {username}.ini and sends it to the thin client. This
file is generated entirely in memory and contains a list of RDP connection parameters
referencing the authorized published desktop of the user.
The dynamically generated {username}.ini file contains the following list of mandatory
RDP connection parameters:
•
Application: Name of published desktop
•
Description: Description of published desktop
•
Icon: The icon displayed on WYSE desktop
•
Username: User account name
•
Password: User password
•
Domainname: Windows domain
30
Chapter 3
To specify additional RDP connection parameters to the dynamically generated
{username}.ini file, you must configure a custom RDP. ini file under the WNOS directory
(for a list of optional RDP connection parameters that can be used, refer to the Reference
Guide: Wyse ThinOSTM INI Files). If an RDP. ini file exists under the WNOS directory, the
Connection Broker automatically merges its contents into the dynamically generated
{username}.ini after authenticating the user. The final {username}.ini file (containing the
merged parameters) is then sent to the thin client for use.
Note
Optionally, additional parameters can be automatically appended to the
dynamically generated {username}.ini. To append additional parameters,
manually create {username}.ini files under the ini directory. If a manually
created {username}.ini file exists in the ini directory, the Connection Broker
merges its contents into the dynamically generated {username}.ini after
authenticating the user. The final {username}.ini file (containing the merged
parameters) is then sent to the thin client for use.
Updating the Wyse ThinOS Firmware (VAS Support)
To update the thin clients to the latest Wyse ThinOS firmware, obtain the latest Wyse
ThinOS firmware file (RCA_wnos) and store it in the WNOS directory. Upon rebooting the
thin clients, the firmware will be automatically updated, if necessary.
Option tag 161 must already be configured for the firmware update process to work (see
"Configuring DHCP").
4
Local System Administration
This chapter provides local system administration information to help you perform the
routine tasks needed to maintain your Wyse ThinOS environment. It includes the following
local (at the thin client) system administration information:
•
"Resetting to Factory Defaults Using G-Key Reset"
•
"Resetting to Factory Defaults Using Shutdown Reset"
•
"Resetting Display Settings Using V-Key Reset"
•
"Accessing Thin Client BIOS Settings"
•
"Enabling a Disabled Network Setup Dialog Box"
•
"Configuring ThinPrint"
Resetting to Factory Defaults Using G-Key Reset
High-privileged or Stand-alone users can reset the thin client to factory default settings
using the G-key reset feature.
To reset the thin client to factory default settings, restart the thin client and continuously
tap the G key during the restart process. G-key reset impacts all configuration items,
including, but not limited to, both network configuration and connections defined in local
NV-RAM.
Note
G-key reset is disabled for Low-privileged and Non-privileged users in
Lockdown mode.
Resetting to Factory Defaults Using Shutdown Reset
A High-privileged or Stand-alone user can reset the thin client to factory default settings
from the Sign-off/Shutdown window as follows:
1. Select either Shutdown and Restart the system or Shutdown the system.
2. Select the Reset the system setting to factory defaults check box.
3. Click OK.
Shutdown reset impacts all configuration items, including, but not limited to, both network
configuration and connections defined in local NV-RAM (Terminal name will not change).
Note
Shutdown reset is disabled for Low-privileged and Non-privileged users,
regardless of lockdown state.
32
Chapter 4
Resetting Display Settings Using V-Key Reset
If the display settings are inappropriate for the particular monitor that is connected, it is
possible that the display will not function properly when the thin client restarts. To correct
this, power-on the thin client while continuously tapping the V key. This will restart the thin
client with a display resolution of 640 x 480 pixels and a 60 Hz refresh rate.
Accessing Thin Client BIOS Settings
While starting a Wyse thin client you will see a Wyse logo for a short period of time. During
this start-up you can press Del to enter the BIOS of the thin client to make your
modifications (enter Fireport as the password).
Enabling a Disabled Network Setup Dialog Box
Although there are privileges and user modes associated with user access to thin client
resources, access to network setup (using the Network Setup dialog box) depends upon
privilege level. A Stand-alone user either is by default a user with High privilege or has a
thin client that is locked down. A Guest user has an implicit privilege of None and all
access is governed by that privilege. A PNAgent/PNLite-only user has whatever privilege
was set in the wnos.ini file at thin client boot, whatever privilege was locked down at the
last access of a wnos.ini file, or High privilege (by default).
If the Privilege parameter is set to Low or None in the INI files, the thin client Network
Setup dialog box will be disabled (the user cannot access it). In such a case, there may be
occasion to access the Network Setup dialog box without wanting to change the INI files.
For example, an occasion when you need to change to another FTP or Virtual Desktop file
server or add to the PNAgent/PNLite servers list. To access the Network Setup dialog
box in such a case, disconnect the network cable and reboot the thin client to Stand-alone
user mode. The Network Setup dialog box displays after the thin client initializes and you
can then make the required entries (be sure to reconnect the network cable and reboot
when finished).
Caution
If a thin client accesses the enterprise intranet through Dial-up, PPPoE, or
PPTP VPN and the thin client is locked-down, a Non-privileged or
Low-privileged user attempting to reboot to Stand-alone User mode will
disable the Network Setup dialog box and System Reset capabilities. The
user will then be unable to re-access the enterprise intranet through this
path. If this happens, the thin client must be moved to a location where it can
access the enterprise intranet directly (Ethernet cable) and reboot so that
you as an administrator can make any required changes to the thin client
operating configurations (for example, set the INI files to unlock the thin
client).
If the thin client is configured for Dial-up access, there must be an RAS
server answering the configured telephone number. Otherwise, the thin client
will require factory attention to recover it.
Local System Administration
33
Configuring ThinPrint
No ThinPrint-specific configuration is available on the thin clients. Thus to be able to use
ThinPrint, users must first set up their printers according to the user documentation, and
then configure ThinPrint on the thin client (by clicking on the desktop background,
selecting System Setup from the menu to open the Network Setup dialog box, and then
clicking Printer to open and use the printer configurations).
Use the following guidelines:
•
Use the Printer Identification field to enter a printer class (you can change the printer
name as needed).
•
Printer IDs are assigned (depending on the physical port) as follows:
•
COM1 = 1
•
COM2 = 2
•
LPT1 = 3 (USB printers are detected automatically on LPT1)
•
LPT2 = 4
•
LPD0 = 5 (The LPD Queue name is transmitted as the printer name; the Printer
Identification as class)
•
LPD1 = 6 (The LPD Queue name is transmitted as the printer name; the Printer
Identification as class)
•
LPD2 = 7 (The LPD Queue name is transmitted as the printer name; the Printer
Identification as class)
•
LPD3 = 8 (The LPD Queue name is transmitted as the printer name; the Printer
Identification as class)
•
SMB1 = 9 (In the form \\host\printershare)
•
SMB2 = 10
•
SMB3 = 11
•
SMB4 = 12
To install the relevant ThinPrint product on the server use the following guidelines:
•
Printer Object(s) Created Manually by the Administrator - After you install .print
Engine, create a printer object on the server to use the native driver and ThinPort as a
printer port. You can use any protocol (TCP, RDP, or ICA) because Wyse ThinOS has
.print clients for all of the protocols. The printer object needs to observe ThinPrint
naming conventions (for example, HPLJ5#_:2, in which case print jobs will be sent to
the local printer that has ID number .2) by referring to .print client port ID. If no ID
number is present, the .print client sends the print job to the printer set as current.
•
Printer Object(s) Created Automatically by ThinPrint AutoConnect - When using
ThinPrint AutoConnect, the thin client identifies with the thin client ID number 84 (and
thus is recognized as a thin client without a local spooler). You can also set up a
template on the server that uses a native driver (for example, HPLJ5) and ThinPort,
and then name this template as you want in the form _#AnyName. You can then make
sure that the rules (on ThinPrint Autoconnect [1]) have been set to assign the desired
local printers to use this server template. The assigned printer will then be shown in the
user session using the HPLJ5 driver and ThinPort; it will be named automatically
according to ThinPrint naming convention with the printer name from the client side
included. Alternatively, you can also define a template name according to the client
printer name (replace .AnyName. with printer name 4. and 5. above [for example, _#HP
Laserjet 5]) so that the local printer object .HP Laserjet 5. will be mapped to this
template without any rules defined on the ThinPrint Autoconnect.
34
Chapter 4
This page intentionally blank.
Figures
1
Boot flow process
5
36
Tables
1
2
3
4
4
DHCP Options 14
System Variables 39
wnos.ini Only 40
wnos.ini and {username}.ini 47
ICA and RDP Connect Parameter List
60
Administrators Guide
Wyse ThinOSTM
Issue: 020810
Written and published by:
Wyse Technology Inc., February 2010
Created using FrameMaker® and Acrobat®