1
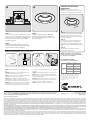
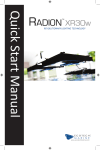
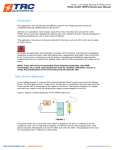
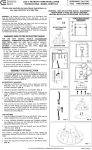
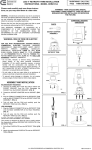
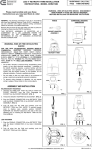
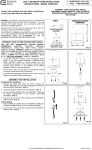
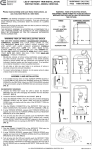
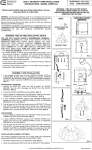
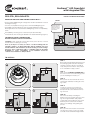
EcoSmartTM LED Downlight
with Integrated Trim
ECO-575L, ECO-GU24-575L
INSTALLATION INSTRUCTIONS
RECESSED HOUSING AND DIMMER COMPATIBILITY
The EcoSmart LED Downlight is designed to install in standard 6” recessed
downlight housings.
For a list of compatible housings, refer to www.CreeLEDlighting.com.
Compatible with most dimmers when used with multiple EcoSmart
Downlight fixtures. Consult www.CreeLEDLighting.com for a compatibility
chart.
FIGURE 1
Minimum distance
between edge of
fixture and top of
housing or other
obstruction.
Compatibility of housings not on this list may be determined by
measurement of the housing as detailed in the attached drawing (Figure 1).
IMPORTANT SAFETY INFORMATION
Read all instructions before installation
6.5”
WARNING - Risk of Electric Shock. Disconnect power at fuse or circuit
breaker before installing or servicing.
Note: (1) It may be necessary to remove a socket mounting plate for
adequate clearance. (2) Each lampholder shall be installed only in its
intended manner and orientation. (3) Not all existing recessed housings
that meet these requirements will be compatible with the EcoSmart
Downlight. To ensure compatibility, a test installation should be
conducted. (4) Suitable for damp locations.
5 3/4”-6 1/2”
Diameter Range
TO INSTALL:
1
4
STEP 1:
Remove EcoSmart Downlight fixture from
the packaging and rotate the “Flip Clips”
clockwise until the clips are oriented directly away from the fixture. This position
is the “installation ready” position.
STEP 2:
Make sure the POWER IS TURNED OFF at
the source to the recessed housing(s) that
you are installing the fixture(s) in.
STEP 3:
Once power has been turned off, remove
existing trim and bulb, revealing the existing socket.
4a
4b
STEP 4:
Locate the socket in your existing recessed housing and remove any screws
that prevent the socket bracket from being removed.
STEP 4a:
Pull socket assembly, including the
bracket, as low as possible given the existing wire length available. (May require
socket plate removal) Remove any excess
bracketry from socket. Care should be
taken not to damage wiring during this
process.
STEP 4b:
Once you have removed the excess bracketry from the socket, you are now ready
to install the EcoSmart Downlight fixture.
7
8
REMOVAL OF ECOSMART
DOWNLIGHT
NOTE: Make sure power to fixture is
disconnected before attempting to remove
EcoSmart Downlight module from fixture.
STEP 5:
If the existing socket is a GU24-style socket,
or if you are converting the existing socket
from an edison-style socket to a GU24-style
socket, proceed to Step A under “GU24
Installation” below.
STEP 7:
Slide EcoSmart Downlight with clips,
in fully-deployed position, up into the
recessed housing firmly until trim ring is
flush with ceiling.
STEP 6:
Attach EcoSmart Downlight to recessed
housing socket. Screw EcoSmart Downlight
into the socket by turning clockwise.
GU24 INSTALLATION (WHERE REQUIRED)
C1
D
G
STEP 1:
To remove EcoSmart Downlight module,
grip firmly on the trim ring and rotate
1/4 turn counterclockwise to unlock clips
from recessed can.
STEP 2:
Continue to turn counterclockwise as
you pull downward on the EcoSmart
Downlight. This will disengage the clips
allowing the EcoSmart Downlight to pull
free.
STEP 3:
Detach EcoSmart Downlight from
recessed housing socket.
NOTE: This device is not intended
for use with emergency exit fixtures
or emergency exit lights.
RECOMMENDED DIMMERS
AVAILABLE AT THE HOME DEPOT
Lutron
GU-24 Socket Whip (Provided with GU24 units only to convert existing edison socket fixtures to GU24)
STEP A: Remove GU-24 connector cable from
box.
STEP B: Follow steps 1-4b of “INSTALLATION
INSTRUCTIONS” shown on page 1.
STEP C: If the recessed housing is provided with
a GU24-style socket, Skip to Step G.
STEP C1: To assemble included GU24 whip
(shown above) cut wires on back side of socket.
No stripping is required from remaining leads.
u-connector until flush with the top of the plastic
insulator.
STEP D: Insert the input wires into the Insulation
Displacement Connectors provided on the GU24 Socket whip and clamp down on the metal
STEP H: Continue to Step 7 shown above.
STEP E: Close plastic hinged cover and snap lock.
STEP F: Place “Original Luminaire Modification
Marking” label inside recessed housing adjacent
to existing relamp label.
STEP G: Attach GU24 socket to the EcoSmart
Downlight by inserting pins into the socket and
twisting socket clockwise until locked.
In compliance with CA Prop 65, Cree provides the following statement due to the customary electronics components
used in this product. WARNING: This product contains a chemical known to the state of California to cause
cancer, birth defects or other reproductive harm.
Leviton
Skylark®
S-600
Diva®
DV-600
Maestro®
MAW-600
Illumatech®
IPI06
Trimatron®
6683
Decora®
6631
The EcoSmart LED Downlight is designed
to work with standard incandescent type
dimmers and should generally be treated
as a 75W load. Results can vary in certain
field applications. Please reference the
dimmer manufacturer’s instructions for
installation.
LPN000046 Rev.E
U.S. Patent # 7,213,940
U.S. & Foreign Patents Pending
Made in China
LIMITED CONSUMER WARRANTY
The limited warranty set forth below is given by The Home Depot (“Seller”) with respect to the lighting product packaged with this limited warranty (the “Product”). Your Product, when delivered to you in new condition in its original packaging, is warranted against defects in materials or workmanship as follows: for a period of three (3) years from the date of original purchase, defective parts or a defective Product returned to
Seller, or its authorized service providers, as applicable, and proven to be defective upon inspection, will be repaired, or exchanged for a new Product, as determined by Seller, or the authorized service provider.
This limited warranty covers all defects encountered in normal use of the Product, and does not apply in the following cases: Loss of or damage to the Product due to abuse, mishandling, alteration, accident, electrical current fluctuations, failure to follow operating, maintenance or environmental instructions prescribed by Seller in writing or services performed by someone other than Seller or its authorized service provider.
WARRANTY IS VOID IF PRODUCT IS NOT USED FOR THE PURPOSE FOR WHICH THIS PRODUCT IS MANUFACTURED. Any complaints you may have regarding the product should be addressed to The
Home Depot [1-877-527-0313].
NO IMPLIED WARRANTY, INCLUDING ANY IMPLIED WARRANTY OF MERCHANTABILITY OR FITNESS FOR A PARTICULAR PURPOSE, APPLIES TO THE PRODUCT AFTER THE APPLICABLE PERIOD
OF THE EXPRESS LIMITED WARRANTY STATED ABOVE, AND NO OTHER EXPRESS WARRANTY OR GUARANTY GIVEN BY ANY PERSON OR ENTITY WITH RESPECT TO THE PRODUCT SHALL BIND
SELLER. (SOME STATES AND PROVINCES DO NOT ALLOW LIMITATIONS ON HOW LONG AN IMPLIED WARRANTY LASTS, SO THE ABOVE LIMITATION MAY NOT APPLY TO YOU.)
NOT INTENDED FOR USE WITH EMERGENCY EXIT FIXTURES OR EMERGENCY EXIT LIGHTS. NOT FOR USE WHERE EXPOSED DIRECTLY TO THE WEATHER OR WATER. NOT FOR USE IN TOTALLY
ENCLOSED RECESSED FIXTURES. CAUTION: Risk of electrical shock, do not open, no user serviceable parts inside. Turn power off before inspection, installation or removal. The lamp is suitable for use in
Damp Locations. Use only on 120 VAC, 60 Hz circuits.
This device complies with Part 15 of the FCC rules and has been tested and found to comply with the limits for a Class B digital device. These limits are designed to provide reasonable protection against harmful
interference in a residential installation. This equipment generates uses and can radiate radio frequency energy and, if not installed and used in accordance with the instructions, may cause harmful interference to
radio communications. Any changes or modifications not expressly approved by the manufacturer could void the user’s authority to operate the equipment. Compatible with Most Dimmer Switches when used with
multiple EcoSmart Downlight fixtures. Call 1-877-527-0313 to address issues with bulbs under warranty.