1
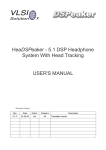
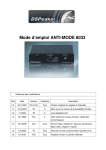
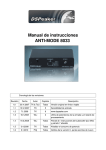
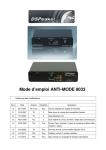
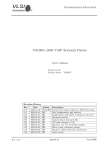
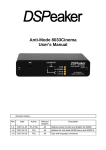
HeaDSPeaker Home User's Manual Revision History Rev. Date Author Affected chapters 1.0 4.10.2010 LM, POj All Description Original version Finnish and English We thank you for your interest in advanced Finnish audio technology and wish you an excellent time with our product! Please read through this manual before use for the easiest transition to the new and more impressive soundscape. Manufactured under license from Dolby Laboratories. ”Dolby” and the ”double-D” symbol are trademarks of Dolby Laboratories. This product contains one or more programs protected under international and U.S. copyright laws as unpublished works. They are confidential and proprietary to Dolby Laboratories. Their reproduction or disclosure, in whole or in part, or the production of derivative works therefrom without the express permission of Dolby Laboratories is prohibited. Copyright 1993-2002 by Dolby Laboratories. All rights reserved. Manufactured under license from DTS Licensing Ltd under U.S. Patent #’s: 5,451,942; 5,956,674; 5,974,380; 5,978,762; 6,487,535 & other U.S. and worldwide patents issued & pending. DTS and the Symbol are registered trademarks & DTS Digital Surround and the DTS logos are trademarks of DTS, Inc. Product includes software. © DTS, Inc. All Rights Reserved. Includes head tracking technology (U.S. patent no. 7'672'809) owned by VLSI Solution Oy. 1.Contents of the Package •DSP unit •USB power supply and cable •Tracker band with hook-and-loop fastener •Tracker cable with 3.5mm plugs •Remote control •Quick start guide 2.Installation Attach the tracker band to your headphones using the hook-and-loop fastener or other suitable fixture. Ensure that the ultrasound receivers point forward and the receivers and tracker band are firmly fixed. Place the DSP unit on top of your display or other suitable location so that the ultrasound transmitter in the middle of the unit has an unobstructed line-of-sight connection to the ultrasound receivers in the tracker band. Fix the tracker band firmly to your headphones (on the left). The spring mechanism makes allows easy fixing of the DSP unit on top of the display. The location of the spring is adjustable with a proper tool, or the spring can be totally removed, if needed. Note! Be careful when making the installation. Although there is a soft tape under the DSP unit, careless handling may scratch your monitor, television or the HeaDSPeaker DSP unit! If for some reason you can't place the DSP unit in the middle line of the display, you can also place it upto ±20° from the middle line. The angle difference must be compensated to prevent the rotation of the sound field by using the adjustment software. The tracker transmitter range is 5 to 6 meters, depending on circumstances. Also note, that you can place the DSP unit behind you as long as you also switch around the tracker band. Attach the tracker signal cable (an ordinary stereo cable with 3.5mm plugs) to the sensor interface at the back of the DSP unit. Headphones are connected to the headphones interface. Connect your headphones directly to the DSP unit – do not connect a headphone amplifier or any other device to the headphone output! An unsuitable device or connection can cause a high-current situation to HeaDSPeaker's own headphone amplifier, and can break it. An external device can be safely connected by using an adapter, which contains the required DC-blocking circuit. Then connect the USB cable to the ”power, USB” interface and to the power adapter, then plug the adapter in to the mains. Now the basic connections are complete. What to connect next depends on which audio source you want to use with HeaDSPeaker. Three audio sources are supported: digital multichannel audio, USB audio device, and analog stereo sound. The following describes these alternatives. 2.1.Digital Multichannel Audio The best way to connect a multichannel audio source is the optical TOSLINK cable1. Connect the cable to the digital input interface. If you have only one audio source, you can connect it directly to the HeaDSPeaker DSP unit. Using the Digital output connection you can chain the digital audio to another HeaDSPeaker unit or to an audio/video receiver. The digital output is active when the unit is turned on, except in the USB Audio mode. Many Audio/Video receivers offer a digital output. It is useful when you want to switch between different program sources: DVD player, television, game console, etc. But note that not all receivers support conversion between different audio formats or connection types. For example analog RCA input may not be converted to optical digital output. You can check the features of your receiver from its manual or from the manufacturer. Connecting the DSP unit to a digital audio source Always use the power adapter with the optical digital input. USB mode will be activated automatically if the unit is connected to a computer. In the USB mode the optical input or remote control are not operable. 1 Optical cable is not included in the package. Affordable TOSLINK-compatible cables are available in many home appliance stores. USB mode is active when the DSP unit is connected to a computer's USB port 2.2.USB Audio Mode HeaDSPeaker operates as an USB sound card when connected to a computer. This mode is activated automatically when a computer is detected. For advanced control you need to install the control software2 . When connected to a computer, the device can be used for upto 8-channel audio output in 7.1 channel configuration. Notice that support for multichannel USB audio is application dependent. Most of the newest games support multichannel USB audio, but DSPeaker can not guarantee compatibility with all software. The ultrasound transmitter is only activated when the computer is sending USB audio data. The control software package has further information about how to use HeaDSPeaker with a computer. 2.3.Analog Input Mode If your audio source does not support a digital output, you can still connect it to the analog ”line in” connection of the DSP unit. This interface receives a line-level signal in stereo when connected using a normal 3.5mm plug cable. HeaDSPeaker is able to decode the simple matrix encoding that are present in many TV broadcasts or CD recordings. Connecting DSP unit to an analog audio source Analog connection can be used in parallel with the digital TOSLINK connection. HeaDSPeaker selects digital audio when it is available, otherwise it switches to analog source automatically. 2 The control software can be downloaded for free from http://www.dspeaker.com/ for Windows XP, Vista and Mac OS X systems. 3.IR Remote Controls The infra-red remote controls the device operation. 1.Power on / off (standby) In standby mode only the bottom red light 1 2 3 5 6 7 8 4 9 remains dimly lit and the power consumption of the DSP unit is as low as 5 mW. The optical digital output is not active in standby mode. 2.Toggle multichannel and stereo mode. In stereo mode all HeaDSPeaker processing is disabled. This can be useful when you listen to some stereo recordings or want to compare audio with and without 13 processing. 10 11 12 3.Toggle LEDs. If the front panel lights disturb you when watching a movie, you can use this button to turn them off. Lights will be turned back on when you turn on the unit the next time, and lights are always on for a while when you make remote control adjustments. 4.Turn off ultra-sound. When you press the key more than 2 seconds the ultra-sound transmitter is turned off. You need this feature only when there are more than one HeaDSPeaker unit active simultaneously. See more information at the end of this manual. 5.Volume control. 6.Mute control. 7.Room render amount. Room rendering adds sense of space to the sound by simulating how the sound is reflected in the room. You can control the amount of room effect. 8.Head tracking on / off. When head tracking is turned off, the sound field is no longer fixed in space, and it moves with your head like in normal heaphone listening. The head-related transforms and room rendering remain active. 9.Ear/head-model selection. The surround sensation depends on how well the HeaDSPeaker ear/head model corresponds to the actual physical attributes of the listener. The device has six built-in ear/head models. The test sound feature helps to select the best model for you. The sixth head model called ”usb” can be replaced by using the control software2, which allows the best matching head model to be selected from a larger database. 10.Test sound activation. Press again to stop the sound. 11.Test sound rotation. You can rotate the test sound between left front, left middle, right front, right back, and left back positions. With the best head model the perceived height of the sound changes the least when you move the sound from front to back. Do not worry if the height sensation is not exact, your brain will slowly learn how the sound should act when you continue to use the device. 12.Automatic rotation of the test sound. This feature automatically rotates the sound. 13.User profile and saving of settings. Keep the button pressed for 2 seconds to save the active settings to the corresponding user profile. Use a short press to recall a profile. Settings that are saved include volume, selected ear/head model, and the amount of room render. User profile A is the default profile, which is loaded automatically when the device is turned on. 4.Front Panel Indicator Lights Transmitter active Head tracking on Audio signal 5.1 Transmitter off Weak signal (orange) Only 2channel sound (orange) Head tracking off Analog sound Processing off (red) The top light of the DSP unit shows the state of the ultra-sound transmitter. It is green whenever the unit is turned on and the transmitter is active. In USB audio mode the transmitter is only active when the computer is sending audio data. The middle light is green when the head-tracking sensors receive good data from the transmitter. If the light is orange, the tracking data quality is low and there may be disturbances in the orientation of the sound field. The head tracking is reliable upto ±45 degrees and at most 5-6 meter distance. When the middle light is off, head tracking is disabled but room rendering and head-related processing remain active. When the middle light is red, HeaDSPeaker sound processing is disabled (bypass mode), and the sound is reproduced like from normal headphones. The bottom light shows the type of the input audio signal. When it is green, HeaDSPeaker receives multichannel audio (5.1 from TOSLINK and 7.1 in USB mode). The light is orange when only two channels are received. When analog input is in use the light is off. If the bottom light is red, the digital audio that is being received is not supported by the device and the audio is muted. The bottom light will be red and dimly lit in standby mode. All three lights should be green whenever the input signal contains multichannel audio. If this is not the case, check that the connections are correct and make sure the audio source has been set to send out the audio in multichannel format. 5.Advanced Adjustments The most advanced adjustments can be made using the control software. You can find it and more detailed instructions from our website http://www.dspeaker.com/ . With the control software you can for example select the ear/head model from a database of 45 heads. 6.Using more than one HeaDSPeaker More than one HeaDSPeaker can be used simultaneously. This requires that each user has a separate DSP unit, and only one of the units have the ultra-sound transmitter active at the same time. The transmitter of other units need to be deactivate using the IR remote control button (4). All DSP units in the same space are operated with the same remote control. A replacement remote control can be purchased as an accessory, and then you can operate two unit independently. You can use more than one HeaDSPeaker in the same room if the ultra-sound transmitters and receivers do not interfere with each other. 7.Contact Details If you have problems with the product or have questions, please [email protected], [email protected], or by phone +358-3-3140-8200. Manufacturer: VLSI Solution Oy Hermiankatu 8B, entrance G, 2nd floor FIN-33720 Tampere, FINLAND Fax: +358-3-3140-8288 Tel: +358-3-3140-8200 http://www.dspeaker.com/ contact us at