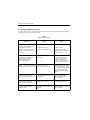
1
GLYCO DOC
GEL IMAGING SYSTEM
INSTRUCTION MANUAL
Catalog Numbers
170-6555
170-6556
170-6557
170-6558
170-6559
Table of Contents
TABLE OF CONTENTS
Safety
Section 1.0 Installation and Startup ...............................................................................................1
1.1 Unpacking.......................................................................................................................2
1.2 Set-up the Computer and Imager...................................................................................2
1.2.1 Installing the Camera Circuit Board in a Computer..............................................2
1.2.2 Setting Up the System..........................................................................................4
1.2.3 Installing the Glyco Doc Software ........................................................................6
1.3 Verify system Operation .................................................................................................7
1.3.1 Starting the Glyco Doc Software ..........................................................................7
1.3.2 Acquire an Image using the Test Plate.................................................................8
1.4 Image Analysis Using the Image Provided with your System........................................10
1.5 Preparing for Gel Imaging ..............................................................................................13
1.6 Example of a Standard Lane Analysis ...........................................................................14
Section 2.0 Software Reference......................................................................................................15
2.1 Files Menu......................................................................................................................15
2.2 Image Menu ...................................................................................................................18
2.3 Bands Menu ...................................................................................................................21
2.4 Options Menu .................................................................................................................24
2.5 Window Menu.................................................................................................................25
Section 3.0 Theory of Operations ...................................................................................................28
Section 4.0 Maintenance And Troubleshooting.............................................................................29
4.1 Replacing the UV Light ..................................................................................................29
4.2 Cleaning the Excitation Filter .........................................................................................31
4.3 Preparing Gel plates.......................................................................................................32
4.4 Creating a New bright field.............................................................................................32
4.5 Imager Troubleshooting..................................................................................................34
4.6 Software Troubleshooting...............................................................................................35
4.6.1 Memory Problems.................................................................................................35
4.6.2 Windows ...............................................................................................................35
Appendix A. Initialization File ...........................................................................................................36
A.1 Window Display Defaults................................................................................................36
A.2 Standard Lane Option Defaults......................................................................................36
A.3 Colors .............................................................................................................................37
A.4 Band Descriptions ..........................................................................................................38
A.5 Last Exposure Time........................................................................................................39
A.6 Bright File Locations.......................................................................................................39
A.7 Default Data Locations ...................................................................................................39
Appendix B. Imager Specifications ..................................................................................................40
Appendix C. Warranty and Ordering Information ...........................................................................41
Table of Contents
Figures
1. Glyco Doc Imaging System ............................................................................................................1
2. Installing the Camera Board in the Computer ................................................................................3
3. Glyco Doc Imaging System Cable Connections ............................................................................4
4. Imager Power and Filter Indicators ................................................................................................5
5. Glyco Doc Icon ...............................................................................................................................7
6. Test Plate........................................................................................................................................8
7. Image Display, Control, and Status Windows ................................................................................11
8. SE1000 Camera Control Panel ......................................................................................................18
9. Imaging System Functional Diagram .............................................................................................28
10. Inside the Imager............................................................................................................................30
Tables
1. Preparing Gels for Imaging ............................................................................................................13
2. Typical Exposure Strategies ...........................................................................................................19
3. Imager Troubleshooting..................................................................................................................34
Safety
SAFETY
!
Warning
Disconnect the Glyco Doc Imager before servicing. Refer servicing to Bio-Rad
service personnel.
This Glyco Doc Imager is certified to meet the I.E.C. 1010* safety standard. Certified products are safe to
use when operated in accordance with the instruction manual. This safety certification does not extend to
other equipment or accessories not I.E.C. 1010 certified, even when connected to this Glyco Doc Imager.
This instrument should not be modified or altered in any way. Alteration of this instrument will void the manufacturer’s warranty and create a potential safety hazard for the user.
Bio-Rad is not responsible for any injury or damage caused by the use of this instrument for purposes other
than for which it is intended or by modifications of the instrument not performed by Bio-Rad or an authorized
agent.
Important: This product conforms to the class A standards for Electromagnetic Emissions, intended for laboratory equipment applications. It is possible that emissions from this product may interfere with some sensitive appliances when placed nearby or on the same circuit as those appliances. The user should be aware
of this potential and take appropriate measures to avoid interference.
* I.E.C. 1010 is an internationally accepted electrical safety standard for laboratory instruments.
Installation and Startup
1.0 INSTALLATION AND STARTUP
The Glyco Doc Imaging System simplifies analysis of small format carbohydrate electrophoresis gels. Its
primary components are the Imager, the Glyco Doc analytical software, and a host computer. The Imager is
suitable for both fluorescent and visible dye applications. The Glyco Doc analytical software features automatic acquisition and analysis of fluorescent labeled oligosaccharide and monosaccharide gels, as well as
DNA and Protein gels and gels stained with visible dyes.
Figure 1. Glyco Doc Imaging System
The Glyco Doc Imaging System provides the following features:
•
Integrated, high resolution CCD camera for gel imaging
•
Emission Filter switch, located on the Imager’s back panel, allows easy selection between Glyco
Doc 500 nm and 600 nm imaging
•
Automatic exposure
•
Automatic band detection
•
Automatic quantitation and migration analysis
•
Support for numerous graphic file formats, including .tiff and .wmf
•
Export data and text for universal spreadsheet and word processing use
•
Report generator, for printing image display, band data, and densitometer readings
1
Installation and Startup
1.1 UNPACKING
Carefully inspect the shipping cartons for any damage which may have occurred in shipping. Severe damage to a carton may indicate damage to its contents. If you suspect damage to the contents may have
occurred, immediately file a claim with the carrier in accordance with their instructions before contacting BioRad Laboratories.
Open each of the shipping cartons and lift each component out of its packing. Check the contents against
the supplied packing list. Inspect each component for external damage. If any part is missing or damaged,
contact Bio-Rad Laboratories immediately.
1.2 SET-UP THE COMPUTER AND IMAGER
The setup procedure is organized into the following sections:
•
Section 1.2.1 is for those who purchased a system without a computer. This section discusses how
to install the imager circuit board in your computer.
•
Section 1.2.2 is for all users. This section discusses how to set up all components in the system.
1.2.1 Installing the Camera Circuit Board in a Computer
Your host computer must be a standard IBM compatible PC, configured with the following minimum hardware and software:
•
386 computer with math co-processor, running at 20 MHz or better, with at least 1 empty 16-bit
expansion bus slot
•
4 megabytes of RAM
•
VGA Display (640 by 480 resolution, 256 colors or shades of gray)
•
MS Windows and a compatible pointing device, such as a mouse
In addition, because each Image file is approximately one half megabyte, the following storage devices are
recommended.
•
A large-capacity hard disk (200MB or greater).
•
An optical disk drive. Although Images can be stored on floppy disks, an optical disk drive provides
much greater storage capacity and provides high reliability. We recommend each user have their
own removable optical disk to be stored in the same manner as other valuable media.
!
Caution/Warning
Turn off and unplug the computer prior to removing its cover.
2
Installation and Startup
To install the camera board, follow the procedure below.
1. Turn off your computer and unplug the power cord.
This procedure assumes the computer was previously set up and used for other applications.
2. Turn off all connected peripheral devices.
Connected devices include printers, monitors, etc.
3. Remove the cover from your computer.
Refer to the documentation supplied with your computer system.
4. Discharge static electricity.
Make sure the computer is turned off and unplugged! Discharge static electricity by touching, with the
back of your hand, a grounded metal surface such as the metal frame of the computer.
5. Locate any unused 16-bit bus expansion slot inside your computer
Expansion slots almost always run from the front of the computer to the back. A 16-bit slot is divided
into two sections. (See Figure 2.)
6. Remove the slot cover, which is located on the back of the computer.
Removing the small slot cover on the back of the computer will allow you to attach a cable to the
Camera board.
Figure 2. Installing the Camera Board in the Computer
3
Installation and Startup
7. Place the Camera board in the slot
The connector on the Camera board must face the back of the computer. Insert the board, pressing
firmly so that it slips into place.
8. Re-mount the screw removed in Step 6.
This screw will hold the board in place.
9. Re-mount the computer cover and its screws.
Proceed to section 1.2.2, Setting up the System.
1.2.2 Setting Up the System
To set up the computer, you will need to make the connections shown below. Be sure to remove the small
metal antistatic plug from the Imager’s computer cable connector. This plug protects the connector during
shipping. Remove and save it for storage or shipment.
Each cable is designed to fit a specific connector; where there is some doubt, note the number and configuration of the pins in the connector. Refer to Figure 3 and to the computer vendor’s documentation that was
shipped with the computer. If you are using any peripheral computer devices with your system, refer to that
device’s separate documentation for connecting to the computer.
MONITOR
IMAGER
PRINTER
COMPUTER
KEYBOARD
MOUSE
Figure 3. Glyco Doc Imaging System Cable Connections
4
Installation and Startup
To set-up the Imager, you need a Phillips head screw driver. Refer to Figure 4.
1. Locate the Filter Lock Screw on the bottom of the Imager and turn it counter clockwise, two complete turns.
The Filter Lock Screw is encircled by an orange marker on the bottom of the Imager. The Filter is
locked in place for shipping.
2. Test to see that the filter is now free by twisting the Filter Switch.
The Filter Switch is the black plastic knob on the back of the Imager. Looking from the back of the
Imager, switch positions are 2 o’clock for 600 nm (Ethidium Bromide) and 10 o’clock for 500 nm (ANTS)
labeled gels. Leave the switch at the 10 o’clock position. When the Imager is turned on, the selected
filter will be indicated in the Imager’s front panel.
Check for proper cabling and general system performance:
1. Turn on the Imager.
2. Turn on the computer and any peripheral devices.
3. Check the Imager’s front panel to see that the Power and Filter Lights are lit.
Rotate the Filter Switch to verify both Filter LEDs are working properly. See Figure 4 for the location of
the Filter Switch.
POWER LED
500 nm FILTER LED
600 nm FILTER LED
BUSY LED
ON/OFF
SWITCH
POWER
OUTLET
CONNECTOR
TO COMPUTER
FILTER
SWITCH
FRONT
VIEW
FILTER
LOCK SCREW
(LOCATED UNDER UNIT)
REAR
VIEW
Figure 4. Imager Power and Filter Indicators
5
Installation and Startup
1.2.3 Installing the Glyco Doc Software
Note
If your purchase included a computer, proceed to section 1.3. Your computer
was shipped with the Glyco Doc software installed.
To install the Glyco Doc software, you need the following items:
•
1 Glyco Doc setup disk
•
1 Glyco Doc image disk
To install the Glyco Doc software, follow the procedure below.
1. Insert the Glyco Doc Setup disk into an available floppy drive.
The computer must be turned on and display the DOS prompt or MS Windows startup screen. You may
place the disk in any available 3.5” floppy disk drive. Typically, this is the a: drive. If you use the b:
drive, substitute b: for a: in the following steps.
2. Start the Install software.
If the DOS prompt is displayed, type:
win a:\setup.
If the MS Windows Program Manager is displayed, select Run... from the File menu and then type:
a:\setup
3. Select the desired directory name where the Glyco Doc software files are to be placed.
The installation routine will prompt for a directory name and location. The default is
c:\glycodoc
If a different directory is desired, enter that name instead. If you are re-installing the Glyco Doc software, the installation routine will overwrite any existing Glyco Doc files in this directory.
4. When prompted, insert the Glyco Doc Image Disk into drive a: .
The installation software will require a data subdirectory where image files will be stored. This will complete the installation.
Note
If you will not be using a large capacity removable media such as an optical
disk drive, each user or project should have a subdirectory within the Glyco Doc
directory. For example, Bob’s files might be stored in c:\glycodoc\bob.
6
Installation and Startup
1.3 VERIFY SYSTEM OPERATION
This section provides a general description of the use of the Glyco Doc system.
1.3.1 Starting the Glyco Doc Software
When you power-up the computer, monitor, and Imager, a series of self-test and configuration status messages is displayed, followed by the C:\>, which is the indication that the system is ready.
Start the Windows 3.1 interface software (by typing win), and then double click on the Glyco Doc icon to
launch the Glyco Doc application. (Refer to the MS Windows User’s Guide for complete information on the
use of MS-Windows 3.1.)
Glyco Doc
Glyco Doc
Carbohydrate
Analysis
Figure 5. Glyco Doc Icon
7
Installation and Startup
1.3.2 Acquire an Image using the Test Plate
To verify system operation, start by acquiring an image of the Test Plate.
Note
If you did not purchase a computer with the Glyco Doc system: Before doing
any imaging, you must first create a Bright Field file. Refer to the chapter on
Maintenance for discussion of the purpose of the Bright Field and the process
for creating a Bright Field file
IMAGE AREA SETUP PATTERN
SE-1085
Place cassette with the long plate down.
Figure 6. Test Plate
8
Installation and Startup
To acquire an image using the text plate, follow the procedure below.
1. Turn on the Imager and set the Filter Switch to 500 nm.
The Power On/Off and Filter Switches are located on the rear of the Imager. The Filter Switch should
be set to Carbohydrate, which uses a 500 nm filter.
The LEDs on the front of the Imager indicate Power ON and the Filter setting.
2. If you have not already done so, start the Glyco Doc software.
Double-click on the Glyco Doc icon to start the software.
3. Acquire an image.
Select Acquire Options from the Image menu, and from the list that is displayed, select Select Image
Rectangle.
Follow the on-screen prompts. The first prompt instructs you to “Place the gel into the tray and slide the
tray closed.” Place the Test Plate in the tray so that the silver strip along the edge faces into the Imager
and the text printed on the test plate is not up-side-down. (See Figure 6.) Then select OK.
The next prompt instructs you to select the area you want to image. To see the complete image, you
may need to enlarge the display window. To do so, move the mouse so that the cursor is over the border of the image area; then hold down the left mouse button and move the mouse to enlarge the window. Then select OK.
4. Acquire an image.
Select Acquire from the Image menu, and from the list that is displayed, select Carbohydrate gel.
5. From the SE1000 Camera Control window,
a. Verify the Percent Saturation... radio button is selected, and it is set to 0.00.
b. Verify the Normal Resolution radio button is selected.
c. Click on the Acquire Image button in the SE1000 Camera Control window.
Use the Up/Down arrows to change the setting.
6. Follow the instructions presented.
a. When prompted, place the Image Area Setup Pattern test plate into the gel holder.
b. Follow the on-screen instructions.
c. The acquired image is displayed. Enlarge the Image window, if necessary.
7. Compare the resulting image with that of the test image printout found in the QC/Shipping packet. This printout was created using the same Image Area Setup Pattern test plate.
If there are radical differences between the image you see and the test image printout provided with
your imager, refer to the Imager Troubleshooting table in Chapter 4 to determine the problem and the
appropriate corrective action.
9
Installation and Startup
1.4 IMAGE ANALYSIS USING THE IMAGE PROVIDED WITH YOUR SYSTEM
The key steps to analyzing an image are:
•
Open the image file (Use the image file demo1.RAW)
•
Adjust the image display
•
Find bands
•
Perform a standard lane analysis
•
Save the data file
To analyze the sample image provided with your system, follow the procedure below.
1. Open an image file.
a. Select the Open command from the Files menu.
b. From the Open File dialog box, select the image file demo1.RAW that has been provided.
c. Press the OK button to open the file.
2. Adjust the Image display’s Contrast and Brightness.
The Image Histogram, shown in Figure 7, offers the following controls:
• Contrast
• Brightness
• Autoscale, for automatically setting Contrast and Brightness.
3. Locate bands using Glyco Doc’s automatic band location functions.
These functions find all bands and mark with a + those bands whose data is displayed in the Band
Tables.
a. From the Bands pull-down menu, select either of the following:
•
To locate bands in a region, create a Marking Rectangle. Then, select Find Bands In Marked
Rectangle.
When defining a region, do not “crowd” the boundaries of a lane; include a small bit of the
region beyond the band’s edge.
• To find bands in the entire image, select Find Bands In Complete Image.
b. Verify the number of lanes in the image area.
Glyco DOC displays the number of lanes it has identified; if this number is not correct, enter the correct number.
Note: When imaging the complete gel, not all lanes may be displayed; to see more lanes, pull the
image window’s border to the right.
c. Bands selected for analysis are automatically indicated by a + marker.
To view all detected bands, select Show Band Outlines from the Options menu.
4. Increase/decrease the number of bands marked for analysis.
a. From the Bands menu, select Find More Find Fewer bands.
b. Using the Find More or Less Bands window, point and click on the appropriate scroll bar arrow to
quickly mark or unmark bands within the entire image.
c. Press OK.
10
Installation and Startup
Files
Image
1
2
Bands
3
Options
4
5
Bio-Rad Glyco Doc Analytical Software
Window
Help
6
7
Mouse
x=200 y=3
Grey=5451
Zoom
Image Histogram
Quan
0AutoScale
Range: 5376 to 18175
Contrast
Brightness
Figure 7. Image Display, Control, and Status Windows
5. Selectively insert and mark a band or remove a marker from a band of no interest:
• To remove a band’s marker, click on the + marker and select Delete in the Bands menu.
When you point and click on a marker, it is highlighted in green.
• To remove the markers from all bands in a selected lane, first select the lane by clicking on its Lane
number. Then, click and drag the mouse to the A Single Lane command in the Delete drop-down
menu of Bands.
• To insert and mark a band, select Insert Band from the Bands menu. The special cursor allows
you to draw a band outline around the band.
6. Perform analysis of the Standard Lane.
a. From the Bands menu, select Standard Lane Analysis and specify the type of gel.
b. Selecting Oligosaccharides displays the Click on Band window, which instructs you to move the
cursor over the band which marks G4 in the standard lane and click on it. In the Quantification
Value window, enter the number of pMols for the selected band.
Selecting Monosaccharide, Protein, or DNA allows you to specify a standard by selecting from a list
of standards or adding a new standard.
11
Installation and Startup
7. Analyze band data as presented in the Band Tables. The following tables are available:
Band Location
Description
Band Location | Total Gray
Rf
Total Gray
Degree of Polymerization
Peak Gray
Base Pairs
Percent Luminance of Selected Bands
Molecular Weight
Quantity
8. Perform other band analysis operations as desired.
Each row in a band table displays bands which the software has determined are associated based on
their location in the image (as measured in Y-axis pixel counts). In the image, associated bands are displayed by selecting a band; the crosshair in the selected band is displayed in green, and, when you
select Show Row associations from the Options menu, the crosshairs for associated bands are displayed in blue.
To change the sensitivity of the setting, select Associations... from the Bands menu and change the
migration distance. The software then automatically re-defines all band associations.
To modify band associations one band at a time, either:
• Click on the band in the image and, while holding down the left mouse button, move the cursor to
promote/demote the band to the next association level.
• Click on the band value in any band table and, while holding down the left mouse button, move the
data to the desired location.
9. Save your work.
Glyco Doc allows you to save both image and image data using the Windows 3.1 interface. When saving files, use the appropriate file extension, as shown below:
Image file
<filename>.RAW
Band data file <filename>.BDF
To
•
•
•
save a file, use either the Save or Save As... command in the Files menu.
To save a new file, select Save and specify the filename.
To save changes to an existing file, select Save and do not change the filename.
To save changes to an existing file and at the same time keep the original file, select Save As... and
enter a new filename. This allows you to save your work without overwriting the original file.
10. Print reports, if you have a printer connected to the computer.
The following printouts are available by selecting Print from the File menu:
• Band Data Reports...
• Densitometer Reports - The Densitometer report can be scaled in two ways:
- Normalized to each Lane
- Normalized to complete Image
• Main Image Window
• Screen
12
Installation and Startup
1.5 PREPARING FOR GEL IMAGING
This section discusses the preparation of gels prior to imaging. The table below provides some examples of
how gels must be prepared before they are placed in the Imager tray.
Table 1.
Preparing Gels for Imaging
FLUORESCENT GELS
CARBOHYDRATE GELS
(TAGGED WITH ANTS)
DNA GELS (STAINED WITH
ETHIDIUM BROMIDE)
GEL IN CASSETTE
GEL
GLASS PLATE
VISIBLE STAINED GELS
(USE PROTEIN SETTINGS)
DNA GELS
( WITH SILVER STAIN)
PROTEIN GELS
(STAINED WITH VISIBLE DYE)
FLUORESCENT PLATE
FLUORESCENT PLATE
GEL
GEL
GLASS PLATE
GLASS PLATE
When preparing DNA and protein gels, follow the guidelines described below:
•
Inspect the glass plate for scratches and cleanliness.
A glass plate is required with DNA and Protein gels. Hold each plate up to a light source while varying
your viewing angle. If there are scratches, do not use the plate. Clean off any pieces of gel, fingerprints, liquids, or lint which will appear as artifacts in the image.
•
Place the gel onto the glass plate.
Gently slide the gel onto the glass plate. Align the gel so that it is square on the plate. Remove bubbles
from under the gel by running your finger across the top of the gel. Smooth out the wells so that the fluorescent plate will lay flat on top of the gel. Cut off any high ridge on the gel such as those found at the
bottom of the gel.
•
Inspect the fluorescent plates for scratches and cleanliness.
The fluorescent plate is required with Protein gels stained with visible dyes and DNA gels with silver
stain. The purpose of the fluorescent bright field plate is to provide a visible (500 nm) light source for
imaging. The UV light excites the fluorophore doped bright field plate wherever there isn’t a stained
band, and it emits a negative image of visible light directly into the camera.
If the fluorescent plate still has a protective coating, remove it while minimizing contact with its surface.
Starting at one end of the gel, gently lower the plate, touching only one end of the plate down first.
Continue to slowly lower the plate onto the gel, pushing out air bubbles as the plate is laid down.
13
Installation and Startup
1.6 EXAMPLE OF A STANDARD LANE ANALYSIS
In the oligosaccharide sample image (demo1.raw) provided with your Glyco Doc system, there must be at
least nine Band Markers in the oligosaccharide standard lane or the analysis will fail and the error dialog box
is displayed. (More than nine markers may be present, as there are more than nine bands in the glucose
ladder standard.) Standard bands G4 through G12 must have Band Markers. G4 is not as bright as the
other bands in the lane and can be identified by this characteristic. It should have a marker since it is a key
reference band in the oligosaccharide standard.
If the number of bands does not agree with the set standard, then the analysis fails and the error dialog box
appears.
A procedure for a standard lane analysis is provided below.
1. Remove any erroneous band markers from the standard lane.
Shadow bands or blotches in the image are sometimes incorrectly marked during automatic band finding. Only the main bands in a standard lane should have band markers.
a. Click on the unwanted band’s marker. The selected marker is displayed in green.
b. Select Delete from the Bands menu or use the Delete key.
2. Select a standard.
a. Select Standard Lane Analysis from the Bands menu.
b. In the Select a Standard dialog box, select Oligosaccharides.
3. Select a band from the standard lane to serve as a reference for the lane.
1. From the Click On Bands dialog box, indicate the band to be selected.
2. Find the corresponding band in the image, and mark it by clicking on it. Then, press the OK button.
For Oligosaccharides, the G4 band identifies the standard lane. (G4 is in the lower half of the standard
lane and appears approximately one quarter as bright as the other bands in the lane.) It is used to indicate a Degree of Polymerization (DP) of 4, and a quantity of 50 pMols. In the default settings G4 is
given an Rf=1, G12 is given an Rf=0.
4. Enter the band’s quantification value.
In the Quantification Value window, enter the number of pMols of sugar for the band selected in step 3.
Then press OK.
For purposes of this demonstration, enter: Oligosaccharide sample: G4 = 50.
A standard lane’s designator is the letter “s”, rather than a number.
14
Software Reference
2.0 SOFTWARE REFERENCE
This chapter discusses each of the software functions. The chapter is organized according to the software’s
menu structure.
2.1 FILES MENU
Each of the Files drop down menu’s selections is discussed below.
Open...
Displays the Open File window, which lists all the files available to Glyco Doc and their location on the computer’s hard disk.
Close
Closes the currently loaded file. If a new image is currently displayed, or the band data has been changed,
the system prompts with a message asking if you first want to save your work. Selecting Yes displays the
Save Files window, which is discussed below.
Save
Allows you to save both the image and the image’s data. Select Save when saving a new file or saving
changes to an existing file. This displays the Save Files window. When saving a new file, use the appropriate file extension, as shown below:
Image file
<filename>.RAW
In the Save Files window, point and click on the Gel Image
(.RAW) checkbox.
Band data file
<filename>.BDF
In the Save Files window, point and click on the Band Data
(.BDF) checkbox.
The Save Files window also indicates whether the disk contains a previous version of either file. To prevent
writing over a previous version of the file, press New Name. This displays the Enter Base Filename To
Save As window (a Save As window), which allows you to give the file a new name.
Since an image file is typically 500,000 bytes in size, save files only as necessary; their large size quickly
consumes disk space. The 230 MB rewritable optical disks provided with some systems are intended for
the storage of image files.
Save As...
Selecting Save As... allows you to enter a new filename, so that you can save your work without overwriting
the original file.
Print
Glyco Doc allows you to print band data and densitometer reports, as well as printing the image and all the
windows displayed on the computer screen.
Band Data Reports...
Includes the data from any of the band tables.
15
Software Reference
Densitometer Reports
A printout is generated for each lane, with the Densitometer positioned next to its corresponding lane.
All quantitative and migration data for that lane is included. The Densitometer report can be scaled in
two ways:
- Normalized to each Lane - This report scales the densitometer output so that the brightest peak in
each lane corresponds to the top of the densitometer scale for that lane’s output.
- Normalized to complete Image - This report scales the densitometer output so that the brightest
peak in the gel corresponds to the top of the densitometer scale.
Main Image Window
Prints out the image using the current contrast and brightness settings. The printout does not include
any band markers or highlighted pixels.
Screen
All windows appearing on the screen are printed. Images printed out by this command use the current
brightness, contrast, and reverse palette settings.
Print Setup
This is an MS-Windows function that lets you specify the printer and print quality.
Import Image
This function allows you to import images from other applications of from other imaging systems such as
Bio-Rad’s Gel Doc systems.
Export
Glyco Doc images and data can be exported to other applications.
Band Data to Spreadsheet...
Band data is exported in a generic, tab separated, text spreadsheet format. The gray values shown in
the Pixel Values window can also be exported in a generic, tab separated, text spreadsheet format. To
export gray values in a marked region, select the Export command’s Marked Rect. Values to
Spreadsheet...option.
Marked Rectangle Values to Spreadsheet...
This function allows you to export the Marked Rectangle gray values to a spreadsheet for analysis.
Copy Marked Rectangle to Clipboard
This function allows you to copy the Image area contained within the Marked Rectangle. That portion of
the image then can be pasted into a paint application.
Copy Band Data to Clipboard
This allows you to export by using MS Windows Clipboard.
16
Software Reference
Image File
To export an image from Glyco Doc, so that it can be incorporated into a report or document created in
a different application. In the Save As window that is displayed,
1. Use the File Name field to change the displayed filename’s extension to .RAW, which is required of
all Image files.
2. From the list of Image files that is displayed, select the file you want to save.
3. From the Save File as Type field, select the file type supported by your software application. The
following file types are available, along with some of the operating systems and software applications which support each file type. (If you are not sure which type to select, refer to your software
application’s technical documentation.)
• TIFF - Tagged Image File Format
• WMF - Windows Meta File
• PCX - ZSoft and Paint Brush
• DCX - Multipage pcx
• BMP - MS Windows and OS/2 Bitmap
• EPS - Postscript
• T&arga - Truevision
• Jpeg - JPEG
• GIF - CompuServe
• PCT - Macintosh Pict
• Wpg - Wordperfect
Exit
This selection quits the Glyco Doc application.
17
Software Reference
2.2 IMAGE MENU
To obtain the best image from which both image and band data files are derived, the Image menu offers a
number of setup controls and options.
Acquire
This selection initiates image acquisition. It requires you to specify the type of gel to be imaged:
Carbohydrate, DNA, or Protein, before bringing up the SE1000 Camera Control window.
SE 1000 Camera Control
Acquire using
Percent Saturation...
0.00
(between 0.0 and 5.0)
Exposure time...
1.00
(0.1 secs to 10.0 sec:)
SE 1000 Camera Control
Acquire using
Normal Resolution
High Resolution
(Takes twice as long)
Acquire Image
Cancel
SE 1000 Camera Control for Carbohydrate and DNA Gels
Background Percent of Saturation
(between 5% and 75%)
Acquire Image
25
Cancel
SE 1000 Camera Control for Protein Gels
Figure 8. SE1000 Camera Control Panel
Percent Saturation and Exposure time
Exposure Time is the length of time that the camera requires to acquire an image. Percent Saturation
sets a limit on the percentage of detectors and corresponding pixels that are saturated within a region.
If this is the first time a gel is being imaged, start by setting the Percent Saturation. Refer to Table 2 for
examples of typical Percent Saturation settings. After you have acquired the image, you may see areas
of yellow. This is an indication that saturation of the corresponding CCD detectors has occurred.
Saturation occurs when the individual cells or pixels in the CCD camera can no longer quantify additional light (they have reached their capacity). You should see little or no yellow in bands to be quantified or
in bands that are being used as a quantification standard. Saturation is a problem only if it affects the
imaging of bands which are to be quantified or are to serve as the basis of measurement. Otherwise,
bands which are not of interest may show signs of saturation without affecting the analysis data.
Continued saturation can lead to “blooming,” an effect in which the CCD detectors surrounding a saturated detector in turn become saturated; when looking at the image, you can see “blooming” where the
yellow indicating saturation seems to spill over beyond the boundary of the band.
If any of the bands of interest was saturated, note the exposure time used to acquire the saturated
image. Use this time as a starting point for a time exposure. Reduce the exposure time to reduce the
saturation. An optimal exposure can take several iterations.
18
Software Reference
The Exposure Time is influenced by how intensely the fluorophore is emitting light. This, in turn, is proportional to the concentration of the substance containing the fluorophore in the gel; greater intensity
means shorter exposure. The Exposure time... setting should prevent overexposure of bands of interest; saturation is acceptable only if it is indicated for bands that will not be quantized.
To see the results of overexposure, select HiLite Saturated Pixels from the Options menu. This selection functions as a toggle: If a checkmark appears next to your selection, saturated areas are displayed
in yellow in the image and the amount of saturation can be read in the Pixel Table. To turn off the display of saturated areas, again select HiLite Saturated Pixels.
To detect underexposure, move the Marking Cursor over the centers of the bands of interest. As you
move the cursor watch the Mouse Table. The Gray pixel values should range between 50,000 and
60,000. If the center of the band shows a value below 50,000, the image may be considered underexposed.
If the image shows lanes of differing intensities, adjust the SE1000 Camera Control window’s Percent
Saturation... to limit the percentage of detectors and corresponding pixels that are saturated within a
region. For example, if your band(s) of interest were averaging a 12,000 pixel value at a .8 second
exposure time, you might want to take a second exposure with the exposure time set to 1.6.
The table below provides guidelines for typical gels, and is intended as a starting point for imaging.
Table 2.
Typical Exposure Strategies
Image Type
Oligosaccharide
Monosaccharide
Protein
DNA
Percent Saturation
0-5
25
0-5
Exposure Time
–
6 seconds
–
–
Note that prolonged or repeated exposure of the gel to UV light can lead to bleaching, which is the result
of exposing a fluorescently tagged gel to the UV light source for a period which causes the fluorophore
to diminish its light output.
Image Resolution
The image may be acquired for display at Normal Resolution or High Resolution. To capture the image
and present it as data, a series of exposures is taken whenever the camera is triggered. The data is
averaged to create the final pixel values which are used for display and analysis. Selecting High
Resolution doubles the number of exposures that are taken. This yields a higher image quality, but risks
bleaching the gel. For this reason, Normal resolution is recommended.
19
Software Reference
Acquire Options
These selections must be made before you acquire the image.
Select Image Rectangle
After you acquire the first image of a gel, you may be able to improve the quality of subsequent images
by drawing an Image Rectangle over your area of interest. (The sensitivity of the camera becomes
greater as you reduce the extremes of intensity in the imaging area.) To mark a region using the Image
Rectangle,
1. Place the cursor where you want the first corner of the Image Rectangle. Note that the cursor
becomes the Marking Cursor when it is in the image area of the screen.
2. Click and drag the cursor to draw a rectangle over the desired area.
3. Release the mouse button when the desired region is enclosed.
4. Notice that the histogram information changes to reflect the marked region.
A previously drawn Marking Rectangle remains in effect until a new one is defined.
Image Size
Image size is selected in the Image Display Options window. The image may be acquired for display in
one of the following sizes:
•
Medium format. This is the most common since it yields an image which is easily viewed and a
manageable file size.
•
Small format. This results in a smaller image on the screen and a smaller image file. (This is
accomplished by the software, which averages the values of four pixels and outputs that averaged
value for a single displayed pixel.) However, the image data available for analysis in the Band
Tables is the same as with other formats.
•
Large format. This provides the largest image display, and results in a larger image file size.
However, the data available in the Band Tables is the same as that for the other formats.
Make New Bright Field File
The Bright Field File serves as a reference image for the subsequent imaging of gels. It allows the software to correct for any imperfections in the optics on the CCD camers. Carbohydrates and Proteins
share the same Bright Field file; DNA imaging requires its own Bright Field file. If any components of
the optical path (such as the lenses, filters, UV light, mirror and camera) are cleaned, moved, replaced,
or altered in some manner, a new Bright Field file must be created. For detailed discussion of the Bright
Field file, refer to Maintenance and Troubleshooting.
Image Information
To enter a description or record notes for any particular image file. In the window that is displayed, enter the
following:
Description: Enter a short description for the information you want to save.
Edit Notes: Click on this button and in the window that is displayed, you can enter and save notes on
the Image.
20
Software Reference
2.3 BANDS MENU
Glyco Doc identifies bands by looking for sudden drop-offs in intensity. Glyco Doc then groups bands
according to the following definitions:
•
Lane: Glyco Doc defines a Lane as all bands in the same column.
•
Row: Glyco Doc assigns a Row Association to all bands appearing at approximately the same distance from the top of the image.
Glyco Doc also allows you to insert a band not automatically located by the software and to change a band’s
row association.
Image data for all bands is displayed in the Band Tables. For a band’s image data to be displayed, that
band must be marked. You can use the software to automatically mark bands (Find Bands), or you can
selectively insert or delete a band’s mark. Band tables provide the most detailed representation of image
data. Band tables are organized into lanes and rows, which correspond to the locations of marked bands.
Find Bands in Complete Image
This function automatically locates and identifies all bands in the image and inserts band markers. A band
must first be marked before its data is displayed in the Band Tables. Bands are marked based on size and
intensity criteria.
Find Bands in Marked Rectangle
This selection differs from finding bands in the complete image only in that it allows you to specify your area
of interest before band finding and band marking. To Find Bands in a Marked Rectangle, start by drawing a
Marking Rectangle over your area of interest before selecting Find Bands in Marked Rectangle. When
defining a region, do not “crowd” the boundaries of a lane.
Prompt for Number of Lanes
This is a toggle function which allows you to confirm the number of lanes that the software will label during
the automated band finding routine. Because the number of lanes detected may not always be correct, you
may want to select this function so that you can confirm - or correct - the number of lanes found.
Number of Wells on Gel: Selecting this function allows you to confirm the number of wells on the gel. The
number of wells may be different than the number of lanes.
21
Software Reference
Insert Band
This selection allows you to insert a band which may otherwise have been overlooked by the automatic
band marking function. Selecting Insert Band causes the Outline cursor to be displayed. By pressing the
left mouse button and dragging, you draw the band’s outline. When you release the left mouse button, the
band’s marker appears and the band data is included in the band tables.
Delete
The three choices under this selection delete band data from the band tables. To return a band’s data to the
band tables after a delete operation, you must use the band finding functions (Find Bands in Complete
Image or Find Bands in Marked Rectangle) or use the Insert Band function.
Band
Use this function to delete a band’s data from the band tables. Click on the + marker to select the band
(the mark is green when selected), and then select Delete - Band. Deleting a Band Marker does not
remove that band’s outline, but it does delete that band’s data from the band data tables.
A Single Lane
To remove all data for a selected lane from the Band Tables. Note that the Lanes are re-numbered.
All Bands and Lanes
Deletes all band and lane data from the band tables.
Find More Find Fewer
This function allows you to adjust the sensitivity of Glyco Doc’s automatic band marking software to automatically increase or decrease the number of marked bands. Note that it affects the number of bands
marked, but not the number of bands found. From the Find More or Less Bands window, use the appropriate scroll bar arrow to quickly mark or unmark bands within the entire image.
Standard Lane Analysis
For standard lane analysis, each band must be associated with a standard band before it can be assigned a
quantity. Glyco DOC supports the following standard lane analyses. An example of a standard lane analysis is provided at the end of the previous chapter.
Oligosaccharide
This uses the glucose ladder standard.
Monosaccharide
This uses the monosaccharide ladder standard.
DNA
This allows you to specify your desired standard.
Protein
This allows you to specify your desired standard.
22
Software Reference
Set Quantitive Standard Band...
This allows you to select a band other than the standard.
Display Standard Plot on Log Scale
This allows you to plot Size versus Rf for Protein and DNA gels.
Band Information
This is the data available for analysis and displayed in the band tables. (For a complete discussion of the
Band Tables, refer to that section later in this chapter.) To display a band’s information, double click on its
marker, or click once and select Band Information....
Lane Information
This contains a description of the lane. To display a lane’s information, double click the lane’s number, or
click once and select Lane Information...
•
Lane Number: The lane number is displayed at the top of the image.
•
Number of Bands: The number of bands in the lane
•
Total pmols: The total of all bands in that lane.
•
Lane Description: Enter any description for the lane.
Associations...
During automatic band marking, bands in different lanes, having similar migration distances (as measured in
Y-axis pixel counts), are automatically grouped into “Row Associations.” Band associations can be observed
in band tables and in the image display.
To change the sensitivity of this setting, select Associations... from the Bands menu. This changes the
pixel count value used by the software to assign associations. The software then automatically re-defines all
band associations.
Band Associations can be manually adjusted one band at a time by clicking on the band value in any band
table and, while holding down the left mouse button, moving the data to the desired location. Band associations can also be manually adjusted in the Image window by clicking and dragging the band to its new association. When a band is clicked on and dragged, a Linking Cursor appears. When you move it, the cursor
changes to an Up or Down arrow until you release the mouse button.
To remove a band from a band association, click on it and drag it from its row. If you drag to the top or bottom of the image, a new row is created in the band table, with the band placed in that row.
23
Software Reference
2.4 OPTIONS MENU
The Options menu provides a number of display selection, each of which is discussed below.
Reverse Palette
When selected, the displayed image is reversed, so that a negative image becomes positive and a positive
image becomes negative.
HiLite Saturated Pixels
When selected, saturated pixels are displayed in yellow.
Autoscale every image update
When this is selected, the software automatically sets the Contrast and Brightness for the entire image or
Image Rectangle. This is the equivalent of clicking the Auto Scale button in the Image Histogram.
Hide Band Marks
Allows you to hide the band markers without removing the band data from the band tables.
Show Lane Center Line
The band finding function includes the identification of lanes. Along with indicating Lanes by a number, you
can also indicate lanes by a line drawn through their centers. Selecting a lane by clicking once on its number changes the lane’s center line to green.
Show Row associations
This allows you to turn on/off the display of band associations. Associated bands are displayed in blue.
(See Associations... under the Band menu.)
Show Band Outlines
This function allows you to see each of the bands found by the software. This allows you to verify that all
bands of interest have been identified. Glyco Doc identifies a band’s edge by determining where there is a
rapid drop-off in intensity. Where a band of interest has not been detected, or two adjacent bands are identified by a single band outline, you can use the Insert Band function in the Band menu to selectively insert
bands.
24
Software Reference
2.5 WINDOW MENU
This menu allows you to specify what type of data you want to display.
Band Table
A band table is a resizable and scrollable window displaying data about each marked band. This selection
is a toggle function for hiding or displaying band tables.
The different band tables are available by clicking on the word “Mode” in any displayed band table. Note the
following:
•
This is selected from the upper left corner of any band table. It is not a menu bar item.
•
Selecting a mode does not display that band table; you must also have Band Table selected.
Band Location
The location of a band is measured in pixels on an X/Y axis. This table displays the Y-axis value of the
center of each marked band (as indicated by its cross-hair). Since the band is associated with a lane,
its X-axis value is not important. The corrected value refers to the value assigned by the software after
it has accounted for any curving up or down of the gel.
Band Location/Total Gray
The Band Location values are the corrected values from the Band Location table. The Total Gray value
for a band is the total intensity for all pixels in that band.
Total Gray
These values are the same as those presented in the Band Location/Total Gray table.
Peak Gray
This is the largest gray value (up to a value of 65,000) in the selected band. (This value does not necessarily correspond to the center of the cross-hair.)
Percent luminance of Selected Bands
This presents the relative intensity (percentage of luminance) for each band in a selected lane. The
total for all bands in a lane is 100%. (The data in this table is similar to that in the Total Gray band
table, which presents the data as the total intensity for all pixels in a selected band.)
Quantity
This is the concentration (in picomols) of the marked bands.
Description
This is any text you might choose to enter. To enter text from the band table, double click on the desired
band’s field or on the desired band in the image. Either method displays the Information about
Selected Band window where you can enter the description.
25
Software Reference
Rf
Rf (Relative mobility) are determined by setting the center point of one band to have an Rf = 1 and that
of another band to have an Rf = 0. All bands between those two points are given a value between 1
and 0 based on a linear scale. Bands above Rf = 0 are given a negative value and those below Rf = 1
are given a value greater than 1. These numbers are based on the same scale as the numbers in the 0
to 1 range. For oligosaccharides, the Rf = 1 band is G4 and the Rf = 0 band is G12.
Degree Polymerization (Dp)
Degree of Polymerization is used during carbohydrate gel analysis to provide positional information for
each band based on glycose units. This information is used by the software to establish band associations.
Base Pair
Base Pair is available when evaluating a DNA gel. This measurement provides migration data based on
a base pair standard.
Molecular Weight
Molecular weight data is provided when evaluating Protein gels.
Mouse Table
This table shows the current location (measured in pixels along an X/Y axis) of the cursor in the image area,
and the grayscale intensity of that pixel.
Pixel Table
Shows the grayscale intensity of every pixel in the image. To view the intensity of a pixel, :
•
Click once on the value in the Pixel Table and watch that pixel flash in the image.
•
Click once on a pixel to display its value in the Pixel Table. Or, you can draw a marking rectangle to
view the pixel values of any number of pixels.
Densitometry Graph
The Densitometer graphically represents changes in intensity across a gel image. Its modes of representation allow you to display different intensity levels within a lane, between lanes, or within a marked region.
These modes are defined below. You can select a lane by clicking on the lane’s number. Select multiple
lanes by clicking on successive lane numbers while holding down the <Ctrl> key.
Densitometry Modes
The densitometer offers two modes:
Show Marked Rectangle
In this mode, the Densitometer displays a graph showing the average intensities in the marked region.
The size of the graph will change to reflect the height and location of the region.
26
Software Reference
Show Selected Lanes
This mode displays the intensity levels within a lane or compares between two or more lanes. Include
the first lane by clicking on the number found at the top of the lane. Include additional lanes by holding
down the <Ctrl> key and clicking on each additional lane number. Each lane will have its fluorescent
intensity plotted in the graph. Each lane number is displayed in a different color at the top of the image
display and matches the color of the lane number in the densitometer graph .
Histogram
Once an image has been acquired, there are a number of adjustments that can be made using the Image
Histogram to improve the quality of the display. Changing the display using the Image Histogram has NO
EFFECT on image data
The Image Histogram window provides the following controls and display information:
•
A curve showing the relationship between the number of pixels in the entire image or the Image
Rectangle versus the intensity of that image area evaluated for 65,535 shades of gray.
•
AutoScale button: Pressing this button automatically sets the Contrast and Brightness for the entire
image or the Image Rectangle. It does this by setting the histogram curve’s cursors (indicated by
red, dashed vertical lines) to the region of greatest activity, which is much narrower than the full
range of 0 to 65,535. This function will provide a good image for most gels; the Brightness and
Contrast controls then can be used to improve the quality of the display.
•
Range: These numbers are the lower and upper limits of the boundary defined by the histogram
cursors.
•
Contrast and Brightness: These can be controlled either by using the sliders or the vertical cursors
(indicated by red, dashed lines) in the histogram curve. Use Contrast to change the distance
between the cursors, as indicated by the difference between the upper and lower range values.
(Note: The difference between the range values cannot be less than 256, since that would degrade
the monitor’s performance.) Use Brightness to shift the cursors left or right.
Click on and drag directly on a slider to increase or decrease a setting, or click on an arrow to move
the box back and forth in incremental steps.
Zoom Window
This window allows you to zoom in on the image under an image rectangle. This function can be considered as a magnifying glass, where magnification is controlled by the size of the Zoom window. To zoom in,
draw an image rectangle over the area of interest and then click on it. You can also zoom in by clicking and
holding down the right mouse button; .
27
Theory of Operation
3.0 THEORY OF OPERATIONS
During exposure, the Imager’s CCD (Charge Coupled Device) detector collects photons emitted by the fluorophore in a prepared gel. The detector is a semiconductor grid of approximately 180,000 cells for collecting
these photons. Each cell in the grid can collect up to 65,535 charge units per exposure. If a cell receives
more than 65,535 charge units, the excess charge units spill into the surrounding grid squares (in a phenomena called “blooming”), and that area of the gel is considered saturated. These values serve as the raw
data for band analysis.
Because computer monitors typically display a maximum of 256 shades of gray, the computer must scale
each grid cell’s value to a value between 0 and 256, where 0 is absolute white, and 256 is absolute black.
Each “pixel” (picture element) on the monitor is illuminated at a corresponding level of brightness. This
value is a pixel’s grayscale value.
UV SOURCE
(350nm to 400 nm)
EXCITATION FILTER
(NOT USER-SELECTABLE)
GEL
EMISSION FILTER
(FILTER TYPE IS SELECTED
USING THE SWITCH ON THE
BACK OF THE IMAGER)
CCD CAMERA/
DETECTOR
Figure 9. Imaging System Functional Diagram
28
Maintenance and Troubleshooting
4.0 MAINTENANCE AND TROUBLESHOOTING
In this chapter, the following Imager hardware maintenance procedures are given:
•
Replacing the UV Light
•
Cleaning the Excitation Filter
•
Creating a New bright field
A trouble-shooting chart for the Imager is provided in Section 4.5. For trouble-shooting computer problems,
consult the appropriate computer vendor’s documentation. For difficulties with memory storage limitations,
see Section 4.6.
!
Warning
Disconnect the Glyco Doc Imager before servicing. Refer servicing to Bio-Rad
service personnel.
4.1 REPLACING THE UV LIGHT
The UV light should be replaced after 6 months of continuous use. For this procedure, you will need a
Phillips head screw driver.
1. Turn off the computer and the Imager.
2. Unplug the power cord from the back of the Imager.
3. Disconnect the Imager Interface Cable.
4. Remove the Imager’s Top Cover.
Slide out the gel holder to reveal two Phillips head screws obscured by the holder’s front panel. Four
more Phillips head screws are located on the outer edges of the rear panel. Remove all six screws and
then lift off the Top Cover. Save the screws.
5. Detach the two Wire Bundles from the Reflector.
Be careful not to bend or distort the Reflector.
6. Remove the Reflector.
Locate and remove the shiny tent-like reflector held in place by two thumb screws. Be careful not to
bend or distort the reflector.
At this time you may wish to inspect the Excitation Filter and clean if necessary.
7. Remove the UV Tube.
Grasp and twist the UV tube 90° to release and remove it from the holder. Applying outward pressure to
the back of the Imager Chassis may help. When inserting a new tube, be sure to align it so that the
manufactures label faces upward toward the top of the reflector.
29
Maintenance and Troubleshooting
8. Perform the previous steps in reverse to install the new tube and close-up the Imager.
9. Create a new Bright Field file.
Refer to Section 4.4.
EXCITATION
FILTER
EMISSION
FILTER
Figure 10. Inside the Imager
30
Maintenance and Troubleshooting
4.2 CLEANING THE EXCITATION FILTER
The Excitation Filter is located immediately above the gel holder and just below the UV lamp. It is a glass
square approximately 3.75” and is a metallic brown color. Follow the procedure below to replace the
Excitation Filter.
Note
Wear lint and powder free gloves while holding the filter.
1. Turn off the Computer and the Imager.
2. Unplug the power cord from the back of the Imager and disconnect the Imager Interface Cable.
3. Remove the Imager’s Top Cover.
Slide out the gel holder to reveal two Phillips head screws obscured by the holder’s front panel. Four
more Phillips head screws are located on the outer edges of the rear panel. Remove all six screws and
then lift off the Top Cover. Save the screws.
4. Detach the two Wire Bundles from the Reflector.
Be careful not to bend or distort the Reflector.
5. Remove the Reflector.
Locate and remove the shiny tent-like reflector held in place by two thumb screws. Be careful not to
bend or distort the reflector. You may wish to inspect the Excitation Filter and clean if necessary.
6. Remove the UV Tube.
Grasp and twist the UV tube 90° to release and remove it from the holder. Applying outward pressure to
the back of the imager chassis may help.
7. Remove the Excitation Filter.
Locate and remove the thumb screws which hold the filter in place. Then, grasp the filter by its edges
and remove it from the Imager.
8. Clean the Excitation Filter.
Use dry oil free compressed gas to blow particulates off the filter.
The filter at this time should be free of any residue. If not, clean with 50% alcohol in water which has
been stored in glass only. Alcohol which has been stored in plastic will leave a fluorescent residue on
the filter.
9. Replace the Excitation Filter with the most blemish free side facing downwards.
10. Insert the new tube and close up the Imager.
11. Create a new Bright Field file to complete this procedure.
Refer to Section 4.4.
31
Maintenance and Troubleshooting
4.3 PREPARING GEL PLATES
The gel plates should be free of smudges, blotches, or any film on both sides. Clean off any pieces of acrylamide, fingerprints or lint which will appear as artifacts in the image. If the glass needs to be cleaned, we
recommend using Kimwipes EX-L Lens Cleaning Station, sold as Kimwipes No. 34662, consisting of two
boxes of Kimwipes EX-L delicate Task Wipers and 1 bottle of Kimwipes EX-L Lens Cleaning Solution. If not
wiped completely dry, this solution leaves a film on the plate.
4.4 CREATING A NEW BRIGHT FIELD
Components of the optical path include the lenses, filters, UV light, mirror and camera. If any of these items
are cleaned, moved, replaced, or altered in some manner, a new Bright Field file must be created. The purpose of the Bright Field File is to obtain a reference image using the current optical path.
Changes to the optical path include:
•
Changing the UV light
•
Cleaning a Filter
•
Cleaning and realigning the mirror
•
Changing the Lens
You will need the following materials:
•
1 Clean, scratch free, Bright Field Plate
•
1 Test Plate
Note
Handle the Bright Field Plate by its edges only. Once finished immediately
place the plate in the supplied bag. Store the plate in a manner which will keep
it free of scratches.
To create a new bright field, follow the procedure below.
1. Inspect the Bright Field Plate. (This is the green glass plate supplied with your system.) To create a new Bright Field file you will need a clean Bright Field Plate with no scratches.
If the plate still has the protective coating, remove it while minimizing contact with its surface. Hold the
plate up to a light source while varying your viewing angle. If scratches are seen, dispose of the plate.
The plate should be free of smudges, blotches, or film . Bio-Rad recommends Kimwipes EX-L Lens
Cleaning Station. Sold as Kimwipes No. 34662, it consists of two boxes of Kimwipes EX-L Delicate Task
Wipers and 1 bottle of Kimwipes EX-L Lens Cleaning Solution. If not wiped completely this solution will
leave a film on the plate.
32
Maintenance and Troubleshooting
2. From the Image menu’s Acquire Options, select Make New Bright Field File.
Follow the on-screen instructions, directing you to insert the Bright Field Plate. After the Bright field
image is acquired, remove the plate.
3. Save the Bright Field file.
After selecting OK at the prompt to save, the file is stored as se1000.brt.
The Bright Field file is stored in the directory specified by the line shown below, written in the glyco.ini
Glyco DOC initialization file:
DefaultBrightFileDir=c:\glycodoc\data\
The text to the right of the equals sign is determined during installation and should not be changed
unless the Bright Field file is moved.
The text to the left of the equal sign should always indicate the location of the Bright Field file. (Refer to
the appendix on the Glyco DOC system file structure.)
4. Inspect the image display for scratches and other artifacts.
Open the Bright Field file, which is stored as the file se1000.brt.
View the entire image.
• If scratches are seen in the bright field image, then a new Bright Field image must be acquired
using a new clean, scratch free Bright Field Plate. Replacement Bright Field Plates can be ordered
from Bio-Rad.
• If blotches, smudges or film are seen, then try to clean the plate.
33
Maintenance and Troubleshooting
4.5 IMAGER TROUBLESHOOTING
Try all appropriate actions in the chart below for the imaging problem you are experiencing, before calling a
Bio-Rad technical representative (Appendix D).
Table 3
Imager Troubleshooting
Indication
Image is solid black in normal
palette and the acquire time is
approximately 4 seconds.
Problem
Action
Imager is turned off.
Turn on imager.
UV light has burned out.
Replace UV light.
Image is solid black in normal
palette and the acquire time is
0 seconds.
Loose or disconnected cable.
Check for secure cable
connections at the computer
and the imager.
Image is mostly black in normal
palette and the acquire time is
approximately 20 seconds.
Neither Filter light is on,
but the power light is.
Filter Switch is between
positions.
Check that the Filter Switch
is at either 10 o’clock or 2
o’clock. The switch should
easily stop at these two
positions. Forcing the switch
should never be necessary.
Image is mostly black in normal
palette, except for saturated areas.
Gel was left in imager
during background acquire.
Remove gel when prompted
by the software during acquire.
Do not select OK in the dialog
box until the gel has been
removed and the compartment
closed.
Acquired image is unusually
bright and of poor quality.
Imager and/or camera board is
not warmed up.
Turn on Imager and PC a
minimum of two minutes
prior to operation.
Acquired image appears to
have a “snowy” background.
Acquire time is too long.
Reduce the acquire time.
Acquired image has bright
blob-like spots.
Gel glass has lint or acrylamide
particles.
Clean gel glass to remove all
lint or acrylamide.
34
Maintenance and Troubleshooting
Table 3 (continued)
Imager Troubleshooting
Indication
Problem
Action
Too little or too much of the
gel is being acquired.
Incorrect Image Rectangle.
Reselect the Image Rectangle
using the Select Image
Rectangle command in the
Image menu’s Acquire
Options.
Unable to acquire one side
of the gel. When selecting the
Image Rectangle, that side of
the gel is also not visible.
Mirror is out of position.
Call for service.
Acquired image is unusually
blurry.
Camera is out of focus.
Call for service.
4.6 SOFTWARE TROUBLESHOOTING
4.6.1Memory Problems
Glyco Doc analytical software works with large image files which take up a lot of hard disk and system memory. Its operations are impaired if there is less than 4MB of system memory available, or if the hard disk is
full. Use About in the Help menu to check for available memory and disk space.
MS Windows’ Virtual Memory -Permanent Swap File is a large hidden file which acts as a buffer for data
storage. It serves the same function as RAM memory. We recommend you have a permanent swap file.
Generally, it needs to be set-up only once. Closely follow the instructions in the MS Windows User’s Guide
to determine if your system has a permanent swap file and, if not, how to create one.
4.6.2Windows
If a particular window can not be located on the screen, check to see if it is toggled off in the Glyco Doc
Windows menu. A window will only be seen if it is toggled on in the menu. A checkmark, next to the
option’s name, indicates the window is toggled on. A Band Table window, however, is only displayed if
bands have been found.
A window may be obscured by the Image Display . For example, if the Zoom Window is placed over the
Image Display, it will be quickly covered by the display. Decrease the size of the image display until the
Zoom Window is found. Then, move the Zoom Window away from the Image Display region by grabbing
and dragging the title bar with the mouse. Because of its size, the Image Display may obscure any other
windows in this way.
35
Initialization File
APPENDIX A.
INITIALIZATION FILE
The GLYCODOC.INI initialization file defines the default options an application automatically selects when it
is first envoked. Because it is a text file, it can be easily edited by the user. The Glyco Doc Imaging initialization file specifies:
•
Window display defaults
•
Standard Lane Options
•
Colors
•
Band descriptions
•
Last Exposure Time
•
Bright File locations
•
Default data locations
Note: The software must be restarted in order for the .INI file changes to take affect.
A.1 WINDOW DISPLAY DEFAULTS
The default settings shown below determine whether various windows appear at startup. Unless otherwise
specified, “0” designates “off” and “1” designates “on” at startup.
Image Histogram
Densitometer
Pixel Table
Mouse Table
IGROn=1
DenOn=1
DenMode=0 ; 0 for Marked region, 1 for Selected Lane
TBVBlockOn=0
TBVMouseOn=1
Band Table
TBVBandsOn=1
TBVBandsMode=0 ; cycles through the various modes 0-8
Zoom Table
ZoomOn=1
A.2 STANDARD LANE OPTION DEFAULTS
Option default are the startup settings for the items in the Options menu:
Reverse Palette
Show Lane Center
Show Saturated Pixels
Autoscale on image update
Show Associations
36
ReversePalette=1
LaneStyle=0
HiliteSaturatedPix=1
AutoScale=1
ShowRows=1
Initialization File
A.3 COLORS
Colors are designated by their Red, Green, and Blue contents. Some common colors are:
•
Red
255 0 0
•
Green
0 255 0
•
Blue
0 0 255
•
Yellow
255 255 0
•
Tourquise
0 255 255
•
Aqua
0 128 128
•
Blueberry
0 0 128
•
Magenta
255 0 255
•
White
255 255 255
•
Black
000
•
SaturatedPixsColor=255 255 0
•
IGRBkColor=0 255 255
•
IGRBorderColor=192 192 192
•
IGRRangeMarkColor=255 0 0
•
ZoomBorderColor=0 128 128
•
DenBkColor=0 255 255
•
DenBorderColor=0 0 255
•
MenuHelpBkColor=0 0 128
•
MenuHelpTextColor=255 255 255
•
BandNormalColor=255 0 0
•
BandSelectColor=0 255 0
•
BandHiLiteColor=0 255 255
•
BandHiSelColor=0 255 0
•
LaneNormalColor=255 0 255
•
LaneSelectColor=0 255 0
•
LaneHiLiteColor=0 255 255
•
LaneHiSelColor=0 255 0
•
LtGrayBackground=1
•
DenSolidBlack=0
37
Initialization File
A.4 BAND DESCRIPTIONS
The value set in the Band Associations Dialog Box is the band association pixel distance. It determines
whether or not two bands are associated.
•
BandLinkOverlap=6
Band description settings are used by the Band Descriptions pulldown item.
•
G2=
•
G3=
•
G4=
•
G5=
•
G6=
•
G7=
•
G8=
•
G9=
•
G10=
•
G11=
•
G12=
•
GalNAc=
•
Glucose=
•
Galactose=
•
Fucose=
•
Mannose=
•
Sialic Acid=
•
GlcNAc=
KeyBand specifies which name(s) will appear in the Standard Lane Analysis Dialog Boxes. It is the only
descriptor needed for Standard Lane Analysis. Dp is the Degree of Polymerization for that band. The RF
descriptors specify which bands to use for setting Rf values. Quantity is the pmol value to assign to the
band named in the QuantBand description.
38
Initialization File
[Monosaccharides]
•
KeyBand=GlcNAc
•
RF0Band=GlcNAc
•
RF1Band=GalNAc
•
BandNames=GlcNAc 50.00,Galactose 50.00,Glucose 50.00,Fucose 50.00,Mannose 50.00,GalNAc
50.00
[Oligosaccharides]
•
KeyBand=G4
•
RF0Band=G12
•
RF1Band=G4
•
DP=4
•
Quantity=50.0
•
QuantBand=G4
•
BandNames=G2,G3,G4,G5,G6,G7,G8,G9,G10,G11,G12,G13,G14
[Lane Descriptions]
•
Monosaccharides=
•
Oligosaccharides=
•
StandardsNames=Monosaccharides,Oligosaccharides
A.5 LAST EXPOSURE TIME
This reflects the last user-entered exposure time.
A.6 BRIGHT FILE LOCATIONS
The location of the Bright Field file (SE1000.brt) is given in the .INI file and therefore, should be placed in
the directory specified in that file. The .INI specification for default Bright Field file is used for the bright field.
A.7 DEFAULT DATA LOCATIONS
File defaults, where files are saved to and important files located are:
•
DefaultDataDir=c:\face\data\
•
DefaultBrightFileDir=c:\face\data\
39
Imager Specifications
APPENDIX B.
IMAGER SPECIFICATIONS
Imaging Type:
Fluorescence, Transmittance
Detector Type:
CCD array, 753 x 244 pixels
Light Source:
UV lamp filtered for maximum output at 368 nm
Imaging Resolution:
Vertical resolution of 320 µm
Excitation:
Wavelength maximum output at 368 nm
Imaging Area:
10 x 10 cm cassette holder, 8 x 8 cm imaging area
Imager Dimensions:
12.25 (H) x 7 (W) x 12 (D) inches
Interface:
ISA PC card (included)
File Formats:
Exports TIFF, WMF, BMP, PCX, GIF, and PICT file formats
Reports Formats:
Image, band data, densitometer, and integrated reports
Minimum Computer &
Display Requirements
Computer: IBM®-compatible 386 25 MHz computer; 256 gray scale or
256 color video output
Display: 800 x 600 pixel resolution
Power requirements
(switch selectable)
120 volt setting:
240 volt setting:
Environmental
Operating Temperature:
Humidity:
40
100-120 V, 50/60 Hz; Fuse*: 250 mA, Time Delay
220-240 V, 50/60 Hz; Fuse*: 160 mA, Time Delay
*Note: User must ensure correct fuse is in place for selected voltage setting.
4° to 40° C
0 to 95%, in the absence of condensation
Warranty and Ordering Information
APPENDIX C.
WARRANTY AND ORDERING INFORMATION
The Glyco Doc Imaging System is warranted for 1 year against defects in materials and workmanship. If
any defects should occur during this warranty period, Bio-Rad Laboratories will replace the defective parts
without charge. However, the following defects are specifically excluded:
1.
2.
3.
4.
5.
6.
Defects caused by improper operation.
Repair or modification done by anyone other than Bio-Rad Laboratories or their authorized agent.
Use with other spare parts not specified by Bio-Rad Laboratories.
Damage caused by deliberate or accidental misuse.
Damage caused by disaster.
Damage due to use of improper solvent or sample.
For inquiry or request for repair service, contact your local Bio-Rad office.
Bio-Rad Laboratories
2000 Alfred Nobel Drive
Hercules, California 94547
Phone: (510) 741-1000
1-(800) 4-BIORAD
1-(800) 424-6723
Fax:
(510) 741-1060 or
1-(800) 879-2289
Telex: 335-358
Belgium
Bio-Rad Laboratories S.A.-N.V.
Begoniastraat 5
B-9810 Nazareth Eke
Phone: 091-85-55-11
Fax:
091-85-65-54
Italy
Bio-Rad Laboratories S.r.l
Via Cellini, 18A
20090 Segrate - Milano
Phone: 02/21609.1
Fax:
02/21609.399
Spain
Bio-Rad Laboratories, S.A.
Avda, Valdelaparra, 3
Poligono Industrial de Alcobendas
E-28100 Alcobendas (Madrid)
Phone: (91) 661 70 85
(900) 100 204
Fax:
(91) 661-96-98
Eastern Regional Office
85A Marcus Drive
Melville, New York 11747
Phone: (516) 756-2575
1-(800) 4-BIORAD
1-(800) 424-6723
Fax:
(516) 756-2594 or
1-(800) 756-4246
Peoples Republic of China
Bio-Rad Pacific (Beijing Office)
Yanshan Hotel Office Tower #1307
138A Haidian Road
Beijing 100086
Phone: 2563146
Fax:
2564308
Japan
Nippon Bio-Rad Laboratories KK
Sumitomo Seimei Kachidoki Bldg.
5-3-6 Kachidoki
Chuo-Ku Tokyo 104
Phone: 03-3534-7515
Fax:
03-3534-8027
Switzerland
Bio-Rad Laboratories, A.G.
Kanalstrasse 17
8152 Glattbrugg
Phone: 01-810-16 77
Fax:
01-810-19 33
Canada
Bio-Rad Laboratories Ltd.
5149 Bradco Boulevard
Mississauga, Ontario L4W 2A6
Phone: (416) 624-0713
1-(800) 268-0213
Fax:
(416) 624-3019
France
Bio-Rad S.A.
94/96 rue Victor Hugo
B.P. 220
94203 Ivry Sur Seine Cedex
Paris
Phone: 01-4960-6834
Fax:
01-4671-2467
Netherlands
Bio-Rad Laboratories B.V.
Fokkerstraat 10
3905 KV Veenendaal
Phone: 08385-40666
Fax:
08385-42216
United Kingdom
Bio-Rad Laboratories, Ltd.
Bio-Rad House
Maylands Avenue
Hemel Hempstead
Hertfordshire HP2 7TD
Phone: 0442-232552
0800-181134
Fax:
0442-259118
Australia
Bio-Rad Laboratories Pty., Ltd.
Unit 11
112-118 Talavera Rd.
P.O. Box 371
North Ryde
New South Wales 2113
Phone: 02-805-5000
008-224-354
Fax:
02-805-1920
Telex: 79070166
Germany
Bio-Rad Laboratories GmbH
Heidemannstrasse 164
Postfach 45 01 33
D-8000 Munchen 45
Phone: 089 318 84-0
Fax:
089 318 84-100
New Zealand
Bio-Rad Laboratories Pty., Ltd.
Unit 15 Poland Court
21 Poland Road
P.O. Box 100-051
North Shore Mail Centre
Glenfield, Auckland 10
Phone: 09-443 3099
0800-805 500
Fax:
09-443 3097
Austria
Bio-Rad Laboratories Ges.m.b.H.
Auhofstrasse 78D
A-1130 Wien
Phone: 0222-877 89 01
Fax:
0222-876-56-29
Telex: 13-6565
Hong Kong
Bio-Rad Pacific Ltd.
Unit 1111, 11/F., New Kowloon Plaza
38 Tai Kok Tsui Road
Tai Kok Tsui , Kowloon
Phone: 7893300
Fax:
7891257
Telex: 42814
Scandinavia
Bio-Rad Laboratories
Kanalvagen 10C
19461 Upplands Vasby
Phone: 46 (0)8 590-734 89
Fax:
46 (0)8 590-717 81
41
Warranty and Ordering Information
WARRANTY INFORMATION
Model: ______________________________________________________________________
Serial Number:________________________________________________________________
Date of Delivery: ______________________________________________________________
Warranty Period: ______________________________________________________________
ORDERING INFORMATION
Prices and part numbers are subject to change. Call for current prices.
Catalog
Number
170-6555
170-6557
170-6559
170-6575
170-6642
170-6641
170-6576
42
Description
Glyco Doc Imager, 100/240 V, includes Glyco Doc imager, Glyco Doc analytical
software, and Glyco Doc imager interface card and cable.
Glyco Doc Imaging System, 100/240 V, includes Glyco Doc imager, Dell 486
computer with 8 MB RAM, 1.08 GB internal hard drive, and 230 MB internal optical
drive, pre-loaded Glyco Doc analytical software, DOS 6.0, MS Windows 3.1, preinstalled Glyco Doc imager interface card, 15: Enhanced Super VGA monitor,
keyboard, MS mouse, and HP Laserjet printer.
Glyco Doc Analytical Software
UV Lamp (1)
Test Plate (1)
Bright Field Plate (1)
Glyco Doc Glass Back Plate
?O2@6K
?O2@6K?
O2@6K?
O2@6K?
O2@6K?
O2@6K?
O2@6K?
O2@6K?
O2@6K?
O2@6K?
O2@6K?
O2@6K?
O2@6K?
O2@6K?
O2@6K?
O2@6K?
O2@6K?
O2@6K?
O2@6K?
O2
@@@@@6K?
O2@@@@@@@@@6K?
O2@@@@@@@@@6K?
O2@@@@@@@@@6K?
O2@@@@@@@@@6K?
O2@@@@@@@@@6K?
O2@@@@@@@@@6K?
O2@@@@@@@@@6K?
O2@@@@@@@@@6K?
O2@@@@@@@@@6K?
O2@@@@@@@@@6K?
O2@@@@@@@@@6K?
O2@@@@@@@@@6K?
O2@@@@@@@@@6K?
O2@@@@@@@@@6K?
O2@@@@@@@@@6K?
O2@@@@@@@@@6K?
O2@@@@@@@@@6K?
O2@@@@
?O2@@@@@@@@@6K
?O2@@@@
?I4@@@@@@6K?
O2@@@@@@0M?I4@@@@@@6K?
O2@@@@@@0M?I4@@@@@@6K?
O2@@@@@@0M?I4@@@@@@6K?
O2@@@@@@0M?I4@@@@@@6K?
O2@@@@@@0M?I4@@@@@@6K?
O2@@@@@@0M?I4@@@@@@6K?
O2@@@@@@0M?I4@@@@@@6K?
O2@@@@@@0M?I4@@@@@@6K?
O2@@@@@@0M?I4@@@@@@6K?
O2@@@@@@0M?I4@@@@@@6K?
O2@@@@@@0M?I4@@@@@@6K?
O2@@@@@@0M?I4@@@@@@6K?
O2@@@@@@0M?I4@@@@@@6K?
O2@@@@@@0M?I4@@@@@@6K?
O2@@@@@@0M?I4@@@@@@6K?
O2@@@@@@0M?I4@@@@@@6K?
O2@@@@@@0M?I4@@@@@@6K?
O2@@@@@@0M
?O2@@@@@@0M?I4@@@@@@6K
?O2@@@@@@0M
?I4@@@@@6K
?O2@@@@@0Mh?I4@@@@@6K
?O2@@@@@0Mh?I4@@@@@6K
?O2@@@@@0Mh?I4@@@@@6K
?O2@@@@@0Mh?I4@@@@@6K
?O2@@@@@0Mh?I4@@@@@6K
?O2@@@@@0Mh?I4@@@@@6K
?O2@@@@@0Mh?I4@@@@@6K
?O2@@@@@0Mh?I4@@@@@6K
?O2@@@@@0Mh?I4@@@@@6K
?O2@@@@@0Mh?I4@@@@@6K
?O2@@@@@0Mh?I4@@@@@6K
?O2@@@@@0Mh?I4@@@@@6K
?O2@@@@@0Mh?I4@@@@@6K
?O2@@@@@0Mh?I4@@@@@6K
?O2@@@@@0Mh?I4@@@@@6K
?O2@@@@@0Mh?I4@@@@@6K
?O2@@@@@0Mh?I4@@@@@6K
?O2@@@@@0Mf
O2@@@@@0M?hI4@@@@@6K?
O2@@@@@0M?e?
O2@@@0M?eO2@@@@@@@6K?eI4@@@@6X
?W2@@@@0M?eO2@@@
@@@@6Ke?I4@@@@6X?
W2@@@@0Me?O2@@@@@@@6Ke?I4@@@@6X?
W2@@@@0Me?O2@@@@@@@6Ke?I4@@@@6X?
W2@@@@0Me?O2@@@@@@@6Ke?I4@@@@6X?
W2@@@@0Me?O2@@@@@@@6Ke?I4@@@@6X?
W2@@@@0Me?O2@@@@@@@6Ke?I4@@@@6X?
W2@@@@0Me?O2@@@@@@@6Ke?I4@@@@6X?
W2@@@@0Me?O2@@@@@@@6Ke?I4@@@@6X?
W2@@@@0Me?O2@@@@@@@6Ke?I4@@@@6X?
W2@@@@0Me?O2@@@@@@@6Ke?I4@@@@6X?
W2@@@@0Me?O2@@@@@@@6Ke?I4@@@@6X?
W2@@@@0Me?O2@@@@@@@6Ke?I4@@@@6X?
W2@@@@0Me?O2@@@@@@@6Ke?I4@@@@6X?
W2@@@@0Me?O2@@@@@@@6Ke?I4@@@@6X?
W2@@@@0Me?O2@@@@@@@6Ke?I4@@@@6X?
W2@@@@0Me?O2@@@@@@@6Ke?I4@@@@6X?
W2@@@@0Me?O2@@@@@@@6Ke?I4@@@@6X?
W2@@@@0Me?O2@@@@@@@6Ke?I4@@@@6X?
W2@@@@0Me?O2@@@
O2@@0MeO2@@@@@@@@@@@@@@@6K??I4@@)K?
O&@@0MeO2@@@@@@@
@@@@@@@@6KeI4@@)K
?O&@@0M??O2@@@@@@@@@@@@@@@6KeI4@@)K
?O&@@0M??O2@@@@@@@@@@@@@@@6KeI4@@)K
?O&@@0M??O2@@@@@@@@@@@@@@@6KeI4@@)K
?O&@@0M??O2@@@@@@@@@@@@@@@6KeI4@@)K
?O&@@0M??O2@@@@@@@@@@@@@@@6KeI4@@)K
?O&@@0M??O2@@@@@@@@@@@@@@@6KeI4@@)K
?O&@@0M??O2@@@@@@@@@@@@@@@6KeI4@@)K
?O&@@0M??O2@@@@@@@@@@@@@@@6KeI4@@)K
?O&@@0M??O2@@@@@@@@@@@@@@@6KeI4@@)K
?O&@@0M??O2@@@@@@@@@@@@@@@6KeI4@@)K
?O&@@0M??O2@@@@@@@@@@@@@@@6KeI4@@)K
?O&@@0M??O2@@@@@@@@@@@@@@@6KeI4@@)K
?O&@@0M??O2@@@@@@@@@@@@@@@6KeI4@@)K
?O&@@0M??O2@@@@@@@@@@@@@@@6KeI4@@)K
?O&@@0M??O2@@@@@@@@@@@@@@@6KeI4@@)K
?O&@@0M??O2@@@@@@@@@@@@@@@6KeI4@@)K
?O&@@0M??O2@@@@@@@@@@@@@@@6KeI4@@)K
?O&@@0M??O2@@@@@@@
?O2@@0M??O2@@@@@@@@0M?I4@@@@@@@@6KeI4@6K?
O2@0M??O2@@@@@@@@0M?I4@@@@@@@@6K??I4@6K
?O2@0MeO2@@@@@@@@0M?I4@@@@@@@@6K??I4@6K
?O2@0MeO2@@@@@@@@0M?I4@@@@@@@@6K??I4@6K
?O2@0MeO2@@@@@@@@0M?I4@@@@@@@@6K??I4@6K
?O2@0MeO2@@@@@@@@0M?I4@@@@@@@@6K??I4@6K
?O2@0MeO2@@@@@@@@0M?I4@@@@@@@@6K??I4@6K
?O2@0MeO2@@@@@@@@0M?I4@@@@@@@@6K??I4@6K
?O2@0MeO2@@@@@@@@0M?I4@@@@@@@@6K??I4@6K
?O2@0MeO2@@@@@@@@0M?I4@@@@@@@@6K??I4@6K
?O2@0MeO2@@@@@@@@0M?I4@@@@@@@@6K??I4@6K
?O2@0MeO2@@@@@@@@0M?I4@@@@@@@@6K??I4@6K
?O2@0MeO2@@@@@@@@0M?I4@@@@@@@@6K??I4@6K
?O2@0MeO2@@@@@@@@0M?I4@@@@@@@@6K??I4@6K
?O2@0MeO2@@@@@@@@0M?I4@@@@@@@@6K??I4@6K
?O2@0MeO2@@@@@@@@0M?I4@@@@@@@@6K??I4@6K
?O2@0MeO2@@@@@@@@0M?I4@@@@@@@@6K??I4@6K
?O2@0MeO2@@@@@@@@0M?I4@@@@@@@@6K??I4@6K
?O2@0MeO2@@@@@@@@0M?I4@@@@@@@@6K??I4@6K
?O2@0MeO2@@@@@@@@0M
?W2@@0M?O2@@0M
?I4@@6K?I4@6X?
W2@0M?O2@@0Mh?
I4@@6K?I4@6X
?W2@0M?O2@@0M?
I4@@6K?I4@6X
?W2@0M?O2@@0M?
I4@@6K?I4@6X
?W2@0M?O2@@0M?
I4@@6K?I4@6X
?W2@0M?O2@@0M?
I4@@6K?I4@6X
?W2@0M?O2@@0M?
I4@@6K?I4@6X
?W2@0M?O2@@0M?
I4@@6K?I4@6X
?W2@0M?O2@@0M?
I4@@6K?I4@6X
?W2@0M?O2@@0M?
I4@@6K?I4@6X
?W2@0M?O2@@0M?
I4@@6K?I4@6X
?W2@0M?O2@@0M?
I4@@6K?I4@6X
?W2@0M?O2@@0M?
I4@@6K?I4@6X
?W2@0M?O2@@0M?
I4@@6K?I4@6X
?W2@0M?O2@@0M?
I4@@6K?I4@6X
?W2@0M?O2@@0M?
I4@@6K?I4@6X
?W2@0M?O2@@0M?
I4@@6K?I4@6X
?W2@0M?O2@@0M?
I4@@6K?I4@6X
?W2@0M?O2@@0M?
I4@@6K?I4@6X
?W2@0M?O2@@0M?h
@6K?e?@@6K??I4@6K?I')X?
W&(M?O2@0MeO2@@fO2@6K?e?@@6K??I4@6K?I')X?
W&(M?O2@0MeO2@@fO2@6K?e?@@6K??I4@6K?I')X?
W&(M?O2@0MeO2@@fO2@6K?e?@@6K??I4@6K?I')X?
W&(M?O2@0MeO2@@fO2@6K?e?@@6K??I4@6K?I')X?
W&(M?O2@0MeO2@@fO2@6K?e?@@6K??I4@6K?I')X?
W&(M?O2@0MeO2@@fO2@6K?e?@@6K??I4@6K?I')X?
W&(M?O2@0MeO2@@fO2@6K?e?@@6K??I4@6K?I')X?
W&(M?O2@0MeO2@@fO2@6K?e?@@6K??I4@6K?I')X?
W&(M?O2@0MeO2@@fO2@6K?e?@@6K??I4@6K?I')X?
W&(M?O2@0MeO2@@fO2@6K?e?@@6K??I4@6K?I')X?
W&(M?O2@0MeO2@@fO2@6K?e?@@6K??I4@6K?I')X?
W&(M?O2@0MeO2@@fO2@6K?e?@@6K??I4@6K?I')X?
W&(M?O2@0MeO2@@fO2@6K?e?@@6K??I4@6K?I')X?
W&(M?O2@0MeO2@@fO2@6K?e?@@6K??I4@6K?I')X?
W&(M?O2@0MeO2@@fO2@6K?e?@@6K??I4@6K?I')X?
W&(M?O2@0MeO2@@fO2@6K?e?@@6K??I4@6K?I')X?
W&(M?O2@0MeO2@@fO2@6K?e?@@6K??I4@6K?I')X?
W&(M?O2@0MeO2@@fO2
W&(MeO2@0M??O2@@?e?O2@6Kf@@6KeI4@6K?I')X
?W&(M?O2@0M??O2@@?e?O2
@@@@@6K?I4@@6KeI46XV')X
?W&(YW20M??O2@@0M?O2@@@@@@@@@6K?I4@@6KeI46XV')X
?W&(YW20M??O2@@0M?O2@@@@@@@@@6K?I4@@6KeI46XV')X
?W&(YW20M??O2@@0M?O2@@@@@@@@@6K?I4@@6KeI46XV')X
?W&(YW20M??O2@@0M?O2@@@@@@@@@6K?I4@@6KeI46XV')X
?W&(YW20M??O2@@0M?O2@@@@@@@@@6K?I4@@6KeI46XV')X
?W&(YW20M??O2@@0M?O2@@@@@@@@@6K?I4@@6KeI46XV')X
?W&(YW20M??O2@@0M?O2@@@@@@@@@6K?I4@@6KeI46XV')X
?W&(YW20M??O2@@0M?O2@@@@@@@@@6K?I4@@6KeI46XV')X
?W&(YW20M??O2@@0M?O2@@@@@@@@@6K?I4@@6KeI46XV')X
?W&(YW20M??O2@@0M?O2@@@@@@@@@6K?I4@@6KeI46XV')X
?W&(YW20M??O2@@0M?O2@@@@@@@@@6K?I4@@6KeI46XV')X
?W&(YW20M??O2@@0M?O2@@@@@@@@@6K?I4@@6KeI46XV')X
?W&(YW20M??O2@@0M?O2@@@@@@@@@6K?I4@@6KeI46XV')X
?W&(YW20M??O2@@0M?O2@@@@@@@@@6K?I4@@6KeI46XV')X
?W&(YW20M??O2@@0M?O2@@@@@@@@@6K?I4@@6KeI46XV')X
?W&(YW20M??O2@@0M?O2@@@@@@@@@6K?I4@@6KeI46XV')X
?W&(YW20M??O2@@0M?O2@@@@@@@@@6K?I4@@6KeI46XV')X
?W&(YW20M??O2@@0M?O2@@@@
?W&(Y?W20MeO2@@0M?O2@@@@@@@@@6K?I4@@6K??I46XV')X?
W&(YW20MeO2@@0M?O2@@@@@@@@@@@@eI4@@@6K?I/XV')K?
O&(YW.M?O2@@@0M??@@@@@@@@@@@@@@@eI4@@@6K?I/XV')K?
O&(YW.M?O2@@@0M??@@@@@@@@@@@@@@@eI4@@@6K?I/XV')K?
O&(YW.M?O2@@@0M??@@@@@@@@@@@@@@@eI4@@@6K?I/XV')K?
O&(YW.M?O2@@@0M??@@@@@@@@@@@@@@@eI4@@@6K?I/XV')K?
O&(YW.M?O2@@@0M??@@@@@@@@@@@@@@@eI4@@@6K?I/XV')K?
O&(YW.M?O2@@@0M??@@@@@@@@@@@@@@@eI4@@@6K?I/XV')K?
O&(YW.M?O2@@@0M??@@@@@@@@@@@@@@@eI4@@@6K?I/XV')K?
O&(YW.M?O2@@@0M??@@@@@@@@@@@@@@@eI4@@@6K?I/XV')K?
O&(YW.M?O2@@@0M??@@@@@@@@@@@@@@@eI4@@@6K?I/XV')K?
O&(YW.M?O2@@@0M??@@@@@@@@@@@@@@@eI4@@@6K?I/XV')K?
O&(YW.M?O2@@@0M??@@@@@@@@@@@@@@@eI4@@@6K?I/XV')K?
O&(YW.M?O2@@@0M??@@@@@@@@@@@@@@@eI4@@@6K?I/XV')K?
O&(YW.M?O2@@@0M??@@@@@@@@@@@@@@@eI4@@@6K?I/XV')K?
O&(YW.M?O2@@@0M??@@@@@@@@@@@@@@@eI4@@@6K?I/XV')K?
O&(YW.M?O2@@@0M??@@@@@@@@@@@@@@@eI4@@@6K?I/XV')K?
O&(YW.M?O2@@@0M??@@@@@@@@@@@@@@@eI4@@@6K?I/XV')K?
O&(YW.M?O2@@@0M??@@@@@@@@@@@@@@@eI4@@@6K?I/XV')K?
O&(YW.M?O2@@@0M??@@@@@@@
W&(Y?W.M?O2@@@0Me@@@@@@@@@@@@@@@??I4@@@6K?I/XV')K
?O&(YW.M?O2@@@0Me@@@@@@@
?W&(Y?W.YW2@@0M?hI4@@@0M?hI4@@6XV/XV4@6X
[email protected]@@0M?hI4@
[email protected]@@0Mh?I4@@@0Mh?I4@@6XV/XV4@6X?
[email protected]@@0Mh?I4@@@0Mh?I4@@6XV/XV4@6X?
[email protected]@@0Mh?I4@@@0Mh?I4@@6XV/XV4@6X?
[email protected]@@0Mh?I4@@@0Mh?I4@@6XV/XV4@6X?
[email protected]@@0Mh?I4@@@0Mh?I4@@6XV/XV4@6X?
[email protected]@@0Mh?I4@@@0Mh?I4@@6XV/XV4@6X?
[email protected]@@0Mh?I4@@@0Mh?I4@@6XV/XV4@6X?
[email protected]@@0Mh?I4@@@0Mh?I4@@6XV/XV4@6X?
[email protected]@@0Mh?I4@@@0Mh?I4@@6XV/XV4@6X?
[email protected]@@0Mh?I4@@@0Mh?I4@@6XV/XV4@6X?
[email protected]@@0Mh?I4@@@0Mh?I4@@6XV/XV4@6X?
[email protected]@@0Mh?I4@@@0Mh?I4@@6XV/XV4@6X?
[email protected]@@0Mh?I4@@@0Mh?I4@@6XV/XV4@6X?
[email protected]@@0Mh?I4@@@0Mh?I4@@6XV/XV4@6X?
[email protected]@@0Mh?I4@@@0Mh?I4@@6XV/XV4@6X?
[email protected]@@0Mh?I4@@@0Mh?I4@@6XV/XV4@6X?
[email protected]@@0Mh?I4@@@0Mh?I4@@6XV/XV4@6X?
[email protected]@@0Mh?I4@
W&(Y?W.YW&(MeO2@@@@@@@@g?@@@@@@@@6K??I')XV/X?I')X?
W&(M?W.YW&(MeO2@@@@@@@@e?@@0Mh?I4@@6XV/XV4@6X?
@@@@@@@@6KeI')XV/X?I')X
?W&(M?W.YW&(M??O2@@@@@@@@?g@@@@@@@@6KeI')XV/X?I')X
?W&(M?W.YW&(M??O2@@@@@@@@?g@@@@@@@@6KeI')XV/X?I')X
?W&(M?W.YW&(M??O2@@@@@@@@?g@@@@@@@@6KeI')XV/X?I')X
?W&(M?W.YW&(M??O2@@@@@@@@?g@@@@@@@@6KeI')XV/X?I')X
?W&(M?W.YW&(M??O2@@@@@@@@?g@@@@@@@@6KeI')XV/X?I')X
?W&(M?W.YW&(M??O2@@@@@@@@?g@@@@@@@@6KeI')XV/X?I')X
?W&(M?W.YW&(M??O2@@@@@@@@?g@@@@@@@@6KeI')XV/X?I')X
?W&(M?W.YW&(M??O2@@@@@@@@?g@@@@@@@@6KeI')XV/X?I')X
?W&(M?W.YW&(M??O2@@@@@@@@?g@@@@@@@@6KeI')XV/X?I')X
?W&(M?W.YW&(M??O2@@@@@@@@?g@@@@@@@@6KeI')XV/X?I')X
?W&(M?W.YW&(M??O2@@@@@@@@?g@@@@@@@@6KeI')XV/X?I')X
?W&(M?W.YW&(M??O2@@@@@@@@?g@@@@@@@@6KeI')XV/X?I')X
?W&(M?W.YW&(M??O2@@@@@@@@?g@@@@@@@@6KeI')XV/X?I')X
?W&(M?W.YW&(M??O2@@@@@@@@?g@@@@@@@@6KeI')XV/X?I')X
?W&(M?W.YW&(M??O2@@@@@@@@?g@@@@@@@@6KeI')XV/X?I')X
?W&(M?W.YW&(M??O2@@@@@@@@?g@@@@@@@@6KeI')XV/X?I')X
?W&(M?W.YW&(M??O2@@@@@@@@?g@@@@@@@@6KeI')XV/X?I')X
?W&(M?W.YW&(M??O2@@@@@@@@?e
?W&(Y?W.YW&0Y?W2@@@@@@@(M??O2@6KeI'@@@@@@@6X?V4)XV/X?V')Xhf?W&(Y?W.YW&0Y?W2@@@@@@@(M??O2
@6K??I'@@@@@@@6X?V4)XV/X?V')X?hfW&(Y?W.YW&0Y?W2@@@@@@@(MeO2@6K??I'@@@@@@@6X?V4)XV/X?V')X?hfW&(Y?W.YW&0Y?W2@@@@@@@(MeO2@6K??I'@@@@@@@6X?V4)XV/X?V')X?hfW&(Y?W.YW&0Y?W2@@@@@@@(MeO2@6K??I'@@@@@@@6X?V4)XV/X?V')X?hfW&(Y?W.YW&0Y?W2@@@@@@@(MeO2@6K??I'@@@@@@@6X?V4)XV/X?V')X?hfW&(Y?W.YW&0Y?W2@@@@@@@(MeO2@6K??I'@@@@@@@6X?V4)XV/X?V')X?hfW&(Y?W.YW&0Y?W2@@@@@@@(MeO2@6K??I'@@@@@@@6X?V4)XV/X?V')X?hfW&(Y?W.YW&0Y?W2@@@@@@@(MeO2@6K??I'@@@@@@@6X?V4)XV/X?V')X?hfW&(Y?W.YW&0Y?W2@@@@@@@(MeO2@6K??I'@@@@@@@6X?V4)XV/X?V')X?hfW&(Y?W.YW&0Y?W2@@@@@@@(MeO2@6K??I'@@@@@@@6X?V4)XV/X?V')X?hfW&(Y?W.YW&0Y?W2@@@@@@@(MeO2@6K??I'@@@@@@@6X?V4)XV/X?V')X?hfW&(Y?W.YW&0Y?W2@@@@@@@(MeO2@6K??I'@@@@@@@6X?V4)XV/X?V')X?hfW&(Y?W.YW&0Y?W2@@@@@@@(MeO2@6K??I'@@@@@@@6X?V4)XV/X?V')X?hfW&(Y?W.YW&0Y?W2@@@@@@@(MeO2@6K??I'@@@@@@@6X?V4)XV/X?V')X?hfW&(Y?W.YW&0Y?W2@@@@@@@(MeO2@6K??I'@@@@@@@6X?V4)XV/X?V')X?hfW&(Y?W.YW&0Y?W2@@@@@@@(MeO2@6K??I'@@@@@@@6X?V4)XV/X?V')X?hfW&(Y?W.YW&0Y?W2@@@@@@@(MeO2@6K??I'@@@@@@@6X?V4)XV/X?V')X?hfW&(Y?W.YW&0Y?W2@@@@@@@(MeO2@6K??I'@@@@@@@6X?V4)XV/X?V')X?hfW&(Y?W.YW&0Y?W2@@@@@@@(MeO2
W&(Y?W.YW.M?e&@@@@@@@0YW2@@@@@@@6XV4@@@@@@@)?eI/XV/X?V')X?heW&(Y?W.YW.M?e&@@@@@@@0YW2@@@
?W&(Y?W.Y?.Y
&@@@@@@@@@)?hf?V/?V/X?V')Xh?W&(Y?W.Y?.Y
&@@@@@@@@6XV4@@@@@@@)e?I/XV/X?V')Xhe?W&(Y?W.YW.Me?&@@@@@@@0YW2@@@@@@@6XV4@@@@@@@)e?I/XV/X?V')Xhe?W&(Y?W.YW.Me?&@@@@@@@0YW2@@@@@@@6XV4@@@@@@@)e?I/XV/X?V')Xhe?W&(Y?W.YW.Me?&@@@@@@@0YW2@@@@@@@6XV4@@@@@@@)e?I/XV/X?V')Xhe?W&(Y?W.YW.Me?&@@@@@@@0YW2@@@@@@@6XV4@@@@@@@)e?I/XV/X?V')Xhe?W&(Y?W.YW.Me?&@@@@@@@0YW2@@@@@@@6XV4@@@@@@@)e?I/XV/X?V')Xhe?W&(Y?W.YW.Me?&@@@@@@@0YW2@@@@@@@6XV4@@@@@@@)e?I/XV/X?V')Xhe?W&(Y?W.YW.Me?&@@@@@@@0YW2@@@@@@@6XV4@@@@@@@)e?I/XV/X?V')Xhe?W&(Y?W.YW.Me?&@@@@@@@0YW2@@@@@@@6XV4@@@@@@@)e?I/XV/X?V')Xhe?W&(Y?W.YW.Me?&@@@@@@@0YW2@@@@@@@6XV4@@@@@@@)e?I/XV/X?V')Xhe?W&(Y?W.YW.Me?&@@@@@@@0YW2@@@@@@@6XV4@@@@@@@)e?I/XV/X?V')Xhe?W&(Y?W.YW.Me?&@@@@@@@0YW2@@@@@@@6XV4@@@@@@@)e?I/XV/X?V')Xhe?W&(Y?W.YW.Me?&@@@@@@@0YW2@@@@@@@6XV4@@@@@@@)e?I/XV/X?V')Xhe?W&(Y?W.YW.Me?&@@@@@@@0YW2@@@@@@@6XV4@@@@@@@)e?I/XV/X?V')Xhe?W&(Y?W.YW.Me?&@@@@@@@0YW2@@@@@@@6XV4@@@@@@@)e?I/XV/X?V')Xhe?W&(Y?W.YW.Me?&@@@@@@@0YW2@@@@@@@6XV4@@@@@@@)e?I/XV/X?V')Xhe?W&(Y?W.YW.Me?&@@@@@@@0YW2@@@@@@@6XV4@@@@@@@)e?I/XV/X?V')Xhe?W&(Y?W.YW.Me?&@@@@@@@0YW2@@@@@@@6XV4@@@@@@@)e?I/XV/X?V')Xhe?W&(Y?W.YW.Me?&@@@@@@@0YW2@@@
@@@@@)
V/?V/X?V')X?hW&(Y?W.Y?.Y?hf?&@@@@@@@@@)
V/?V/X?V')X?hW&(Y?W.Y?.Y?hf?&@@@@@@@@@)
V/?V/X?V')X?hW&(Y?W.Y?.Y?hf?&@@@@@@@@@)
V/?V/X?V')X?hW&(Y?W.Y?.Y?hf?&@@@@@@@@@)
V/?V/X?V')X?hW&(Y?W.Y?.Y?hf?&@@@@@@@@@)
V/?V/X?V')X?hW&(Y?W.Y?.Y?hf?&@@@@@@@@@)
V/?V/X?V')X?hW&(Y?W.Y?.Y?hf?&@@@@@@@@@)
V/?V/X?V')X?hW&(Y?W.Y?.Y?hf?&@@@@@@@@@)
V/?V/X?V')X?hW&(Y?W.Y?.Y?hf?&@@@@@@@@@)
V/?V/X?V')X?hW&(Y?W.Y?.Y?hf?&@@@@@@@@@)
V/?V/X?V')X?hW&(Y?W.Y?.Y?hf?&@@@@@@@@@)
V/?V/X?V')X?hW&(Y?W.Y?.Y?hf?&@@@@@@@@@)
V/?V/X?V')X?hW&(Y?W.Y?.Y?hf?&@@@@@@@@@)O26X?@@@@@@6K?fV/X?V')Xg?W&(Y?W.Y?fO2@@@@@@?W26K??I4@@@0MeO26X?@@@@@@6K?fV/X?V')Xg?W&(Y?W.Y?fO2@@@@@@?W26K??I4@@@0MeO26X?@@@@@@6K?fV/X?V')Xg?W&(Y?W.Y?fO2@@@@@@?W26K??I4@@@0MeO26X?@@@@@@6K?fV/X?V')Xg?W&(Y?W.Y?fO2@@@@@@?W26K??I4@@@0MeO26X?@@@@@@6K?fV/X?V')Xg?W&(Y?W.Y?fO2@@@@@@?W26K??I4@
V/?V/X?V')X?hW&(Y?W.Y?.Y?hf?&@@@@@@@@@)
V/?V/X?V')X?hW&(Y?W.Y?.Y?hf?&@@@@@@@@@)
V/?V/X?V')X?hW&(Y?W.Y?.Y?hf?&@@@@@@@@@)
V/?V/X?V')X?hW&(Y?W.Y?.Y?hf?&@@@@@@@@@)
V/?V/X?V')X?hW&(Y?W.Y?.Y?hf?&@@@@
W&(Y?W.Yf?O2@@@@@@?W26KeI4@@@0M??O26X?@@@@@@6Kf?V/X?V')X?gW&(Y?W.Yf?O2@@@@@@?W26KeI4@
@@0MeO26X?@@@@@@6K?fV/X?V')Xg?W&(Y?W.Y?fO2@@@@@@?W26K??I4@@@0MeO26X?@@@@@@6K?fV/X?V')Xg?W&(Y?W.Y?fO2@@@@@@?W26K??I4@@@0MeO26X?@@@@@@6K?fV/X?V')Xg?W&(Y?W.Y?fO2@@@@@@?W26K??I4@@@0MeO26X?@@@@@@6K?fV/X?V')Xg?W&(Y?W.Y?fO2@@@@@@?W26K??I4@@@0MeO26X?@@@@@@6K?fV/X?V')Xg?W&(Y?W.Y?fO2@@@@@@?W26K??I4@@@0MeO26X?@@@@@@6K?fV/X?V')Xg?W&(Y?W.Y?fO2@@@@@@?W26K??I4@@@0MeO26X?@@@@@@6K?fV/X?V')Xg?W&(Y?W.Y?fO2@@@@@@?W26K??I4@@@0MeO26X?@@@@@@6K?fV/X?V')Xg?W&(Y?W.Y?fO2@@@@@@?W26K??I4@@@0MeO26X?@@@@@@6K?fV/X?V')Xg?W&(Y?W.Y?fO2@@@@@@?W26K??I4@@@0MeO26X?@@@@@@6K?fV/X?V')Xg?W&(Y?W.Y?fO2@@@@@@?W26K??I4@@@0MeO26X?@@@@@@6K?fV/X?V')Xg?W&(Y?W.Y?fO2@@@@@@?W26K??I4@@@0MeO26X?@@@@@@6K?fV/X?V')Xg?W&(Y?W.Y?fO2@@@@@@?W26K??I4@@@0MeO26X?@@@@@@6K?fV/X?V')Xg?W&(Y?W.Y?fO2@@@@@@?W26K??I4@@@0M
?W&(Y?W.Y?e?W2@@@@@(M?O&@@@@@g?@@@@@)K?I'@@@@@6XfV/X?V')Xf?W&(Y?W.Y?e?W2@@@@@(M?O&@@@@@e?
@@@@@)K?I'@@@@@6X?e?V/X?V')X?fW&(Y?W.YfW2@@@@@(M?O&@@@@@?g@@@@@)K?I'@@@@@6X?e?V/X?V')X?fW&(Y?W.YfW2@@@@@(M?O&@@@@@?g@@@@@)K?I'@@@@@6X?e?V/X?V')X?fW&(Y?W.YfW2@@@@@(M?O&@@@@@?g@@@@@)K?I'@@@@@6X?e?V/X?V')X?fW&(Y?W.YfW2@@@@@(M?O&@@@@@?g@@@@@)K?I'@@@@@6X?e?V/X?V')X?fW&(Y?W.YfW2@@@@@(M?O&@@@@@?g@@@@@)K?I'@@@@@6X?e?V/X?V')X?fW&(Y?W.YfW2@@@@@(M?O&@@@@@?g@@@@@)K?I'@@@@@6X?e?V/X?V')X?fW&(Y?W.YfW2@@@@@(M?O&@@@@@?g@@@@@)K?I'@@@@@6X?e?V/X?V')X?fW&(Y?W.YfW2@@@@@(M?O&@@@@@?g@@@@@)K?I'@@@@@6X?e?V/X?V')X?fW&(Y?W.YfW2@@@@@(M?O&@@@@@?g@@@@@)K?I'@@@@@6X?e?V/X?V')X?fW&(Y?W.YfW2@@@@@(M?O&@@@@@?g@@@@@)K?I'@@@@@6X?e?V/X?V')X?fW&(Y?W.YfW2@@@@@(M?O&@@@@@?g@@@@@)K?I'@@@@@6X?e?V/X?V')X?fW&(Y?W.YfW2@@@@@(M?O&@@@@@?g@@@@@)K?I'@@@@@6X?e?V/X?V')X?fW&(Y?W.YfW2@@@@@(M?O&@@@@@?g@@@@@)K?I'@@@@@6X?e?V/X?V')X?fW&(Y?W.YfW2@@@@@(M?O&@@@@@?g@@@@@)K?I'@@@@@6X?e?V/X?V')X?fW&(Y?W.YfW2@@@@@(M?O&@@@@@?g@@@@@)K?I'@@@@@6X?e?V/X?V')X?fW&(Y?W.YfW2@@@@@(M?O&@@@@@?g@@@@@)K?I'@@@@@6X?e?V/X?V')X?fW&(Y?W.YfW2@@@@@(M?O&@@@@@?g@@@@@)K?I'@@@@@6X?e?V/X?V')X?fW&(Y?W.YfW2@@@@@(M?O&@@@@@?e
W&(Y?W.Yf?&@@@@@0Y?'@@@@@@5eO@K??3@@@@@@(?V4@@@@@)f?V/X?V')X?eW&(Y?W.Yf?&@@@@@0Y?'@@@@@@5eO
?W&(Y?W.Y?
V4@@@@(YW2@@@6XV'@@@@0Y?
V/X?V')X?W&(Y?W.Y?
V4@@@@(YW2@@Ke3@@@@@@(?V4@@@@@)?fV/X?V')Xe?W&(Y?W.Y?f&@@@@@0Y?'@@@@@@5??O@Ke3@@@@@@(?V4@@@@@)?fV/X?V')Xe?W&(Y?W.Y?f&@@@@@0Y?'@@@@@@5??O@Ke3@@@@@@(?V4@@@@@)?fV/X?V')Xe?W&(Y?W.Y?f&@@@@@0Y?'@@@@@@5??O@Ke3@@@@@@(?V4@@@@@)?fV/X?V')Xe?W&(Y?W.Y?f&@@@@@0Y?'@@@@@@5??O@Ke3@@@@@@(?V4@@@@@)?fV/X?V')Xe?W&(Y?W.Y?f&@@@@@0Y?'@@@@@@5??O@Ke3@@@@@@(?V4@@@@@)?fV/X?V')Xe?W&(Y?W.Y?f&@@@@@0Y?'@@@@@@5??O@Ke3@@@@@@(?V4@@@@@)?fV/X?V')Xe?W&(Y?W.Y?f&@@@@@0Y?'@@@@@@5??O@Ke3@@@@@@(?V4@@@@@)?fV/X?V')Xe?W&(Y?W.Y?f&@@@@@0Y?'@@@@@@5??O@Ke3@@@@@@(?V4@@@@@)?fV/X?V')Xe?W&(Y?W.Y?f&@@@@@0Y?'@@@@@@5??O@Ke3@@@@@@(?V4@@@@@)?fV/X?V')Xe?W&(Y?W.Y?f&@@@@@0Y?'@@@@@@5??O@Ke3@@@@@@(?V4@@@@@)?fV/X?V')Xe?W&(Y?W.Y?f&@@@@@0Y?'@@@@@@5??O@Ke3@@@@@@(?V4@@@@@)?fV/X?V')Xe?W&(Y?W.Y?f&@@@@@0Y?'@@@@@@5??O@Ke3@@@@@@(?V4@@@@@)?fV/X?V')Xe?W&(Y?W.Y?f&@@@@@0Y?'@@@@@@5??O@Ke3@@@@@@(?V4@@@@@)?fV/X?V')Xe?W&(Y?W.Y?f&@@@@@0Y?'@@@@@@5??O@Ke3@@@@@@(?V4@@@@@)?fV/X?V')Xe?W&(Y?W.Y?f&@@@@@0Y?'@@@@@@5??O@Ke3@@@@@@(?V4@@@@@)?fV/X?V')Xe?W&(Y?W.Y?f&@@@@@0Y?'@@@@@@5??O@Ke3@@@@@@(?V4@@@@@)?fV/X?V')Xe?W&(Y?W.Y?f&@@@@@0Y?'@@@@@@5??O@Ke3@@@@@@(?V4@@@@@)?fV/X?V')Xe?W&(Y?W.Y?f&@@@@@0Y?'@@@@@@5?e
@@6XV'@@@@0Y
?V/X?V')X?W&(Y?W.Y
?V4@@@@(YW2@@@6XV'@@@@0Y
?V/X?V')X?W&(Y?W.Y
?V4@@@@(YW2@@@6XV'@@@@0Y
?V/X?V')X?W&(Y?W.Y
?V4@@@@(YW2@@@6XV'@@@@0Y
?V/X?V')X?W&(Y?W.Y
?V4@@@@(YW2@@@6XV'@@@@0Y
?V/X?V')X?W&(Y?W.Y
?V4@@@@(YW2@@@6XV'@@@@0Y
?V/X?V')X?W&(Y?W.Y
?V4@@@@(YW2@@@6XV'@@@@0Y
?V/X?V')X?W&(Y?W.Y
?V4@@@@(YW2@@@6XV'@@@@0Y
?V/X?V')X?W&(Y?W.Y
?V4@@@@(YW2@@@6XV'@@@@0Y
?V/X?V')X?W&(Y?W.Y
?V4@@@@(YW2@@@6XV'@@@@0Y
?V/X?V')X?W&(Y?W.Y
?V4@@@@(YW2@@@6XV'@@@@0Y
?V/X?V')X?W&(Y?W.Y
?V4@@@@(YW2@@@6XV'@@@@0Y
?V/X?V')X?W&(Y?W.Y
?V4@@@@(YW2@@@6XV'@@@@0Y
?V/X?V')X?W&(Y?W.Y
?V4@@@@(YW2@@@6XV'@@@@0Y
?V/X?V')X?W&(Y?W.Y
?V4@@@@(YW2@@@6XV'@@@@0Y
?V/X?V')X?W&(Y?W.Y
?V4@@@@(YW2@@@6XV'@@@@0Y
?V/X?V')X?W&(Y?W.Y
?V4@@@@(YW2@@@6XV'@@@@0Y
?V/X?V')X?W&(Y?W.Y
?V4@@@@(YW2@@@6XV'@@@@0Y
?V/X?V')X?W&(Y?W.Y
?V4@@@@(YW2@
W&(Y?W.YfO2@@@@@(?@@6K?eI(Y?7@@@@@1?V'M?eO2@@?'@@@@@6K?e?V/X?V')?&(Y?W.YfO2@@@@@(?@@6K?eI(Y?7@@
@@@1?V'Me?O2@@?'@@@@@6KfV/X?V')?&(Y?W.Y?e?O2@@@@@(?@@6Ke?I(Y?7@@@@@1?V'Me?O2@@?'@@@@@6KfV/X?V')?&(Y?W.Y?e?O2@@@@@(?@@6Ke?I(Y?7@@@@@1?V'Me?O2@@?'@@@@@6KfV/X?V')?&(Y?W.Y?e?O2@@@@@(?@@6Ke?I(Y?7@@@@@1?V'Me?O2@@?'@@@@@6KfV/X?V')?&(Y?W.Y?e?O2@@@@@(?@@6Ke?I(Y?7@@@@@1?V'Me?O2@@?'@@@@@6KfV/X?V')?&(Y?W.Y?e?O2@@@@@(?@@6Ke?I(Y?7@@@@@1?V'Me?O2@@?'@@@@@6KfV/X?V')?&(Y?W.Y?e?O2@@@@@(?@@6Ke?I(Y?7@@@@@1?V'Me?O2@@?'@@@@@6KfV/X?V')?&(Y?W.Y?e?O2@@@@@(?@@6Ke?I(Y?7@@@@@1?V'Me?O2@@?'@@@@@6KfV/X?V')?&(Y?W.Y?e?O2@@@@@(?@@6Ke?I(Y?7@@@@@1?V'Me?O2@@?'@@@@@6KfV/X?V')?&(Y?W.Y?e?O2@@@@@(?@@6Ke?I(Y?7@@@@@1?V'Me?O2@@?'@@@@@6KfV/X?V')?&(Y?W.Y?e?O2@@@@@(?@@6Ke?I(Y?7@@@@@1?V'Me?O2@@?'@@@@@6KfV/X?V')?&(Y?W.Y?e?O2@@@@@(?@@6Ke?I(Y?7@@@@@1?V'Me?O2@@?'@@@@@6KfV/X?V')?&(Y?W.Y?e?O2@@@@@(?@@6K
?I(Y?7@@@@@1?V'Me?O2@@?'@@@@@6KfV/X?V')?&(Y?W.Y?e?O2@@@@@(?@@6Ke?I(Y?7@@@@@1?V'Me?O2@@?'@@@@@6KfV/X?V')?&(Y?W.Y?e?O2@@@@@(?@@6Ke?I(Y?7@@@@@1?V'Me?O2@@?'@@@@@6KfV/X?V')?&(Y?W.Y?e?O2@@@@@(?@@6Ke?I(Y?7@@@@@1?V'Me?O2@@?'@@@@@6KfV/X?V')?&(Y?W.Y?e?O2@@@@@(?@@6Ke?I(Y?7@@@@@1?V'Me?O2@@?'@@@@@6KfV/X?V')?&(Y?W.Y?e?O2@@@@@(?@@6Ke?I(Y?7@@@@@1?V'Me?O2@@?'@@@@@6KfV/X?V')?&(Y?W.Y?e?O2@@@@@(?@@6Ke?I(Y?7@@
?W&(Y?W.Y?eW2@@@@@@(YJ@@@@@@(f@@@@@@@?e?'@@@@@@LV'@@@@@@6X?eV/X?V'@(Y?W.Y?eW2@@@@@@(YJ@@@@@@(f@@@
@@@@f'@@@@@@LV'@@@@@@6Xe?V/X?V'@(Y?W.Ye?W2@@@@@@(YJ@@@@@@(?e?@@@@@@@f'@@@@@@LV'@@@@@@6Xe?V/X?V'@(Y?W.Ye?W2@@@@@@(YJ@@@@@@(?e?@@@@@@@f'@@@@@@LV'@@@@@@6Xe?V/X?V'@(Y?W.Ye?W2@@@@@@(YJ@@@@@@(?e?@@@@@@@f'@@@@@@LV'@@@@@@6Xe?V/X?V'@(Y?W.Ye?W2@@@@@@(YJ@@@@@@(?e?@@@@@@@f'@@@@@@LV'@@@@@@6Xe?V/X?V'@(Y?W.Ye?W2@@@@@@(YJ@@@@@@(?e?@@@@@@@f'@@@@@@LV'@@@@@@6Xe?V/X?V'@(Y?W.Ye?W2@@@@@@(YJ@@@@@@(?e?@@@@@@@f'@@@@@@LV'@@@@@@6Xe?V/X?V'@(Y?W.Ye?W2@@@@@@(YJ@@@@@@(?e?@@@@@@@f'@@@@@@LV'@@@@@@6Xe?V/X?V'@(Y?W.Ye?W2@@@@@@(YJ@@@@@@(?
?@@@@@@@f'@@@@@@LV'@@@@@@6Xe?V/X?V'@(Y?W.Ye?W2@@@@@@(YJ@@@@@@(?e?@@@@@@@f'@@@@@@LV'@@@@@@6Xe?V/X?V'@(Y?W.Ye?W2@@@@@@(YJ@@@@@@(?e?@@@@@@@f'@@@@@@LV'@@@@@@6Xe?V/X?V'@(Y?W.Ye?W2@@@@@@(YJ@@@@@@(?e?@@@@@@@f'@@@@@@LV'@@@@@@6Xe?V/X?V'@(Y?W.Ye?W2@@@@@@(YJ@@@@@@(?e?@@@@@@@f'@@@@@@LV'@@@@@@6Xe?V/X?V'@(Y?W.Ye?W2@@@@@@(YJ@@@@@@(?e?@@@@@@@f'@@@@@@LV'@@@@@@6Xe?V/X?V'@(Y?W.Ye?W2@@@@@@(YJ@@@@@@(?e?@@@@@@@f'@@@@@@LV'@@@@@@6Xe?V/X?V'@(Y?W.Ye?W2@@@@@@(YJ@@@@@@(?e?@@@@@@@f'@@@@@@LV'@@@@@@6Xe?V/X?V'@(Y?W.Ye?W2@@@@@@(YJ@@@@@@(?e?@@@@@@@f'@@@@@@LV'@@@@@@6Xe?V/X?V'@(Y?W.Ye?W2@@@@@@(YJ@@@@@@(?e?@@@@@@@f'@@@@@@LV'@@@@@@6Xe?V/X?V'@(Y?W.Ye?W2@@@@@@(YJ@@@@@@(?e?@@@
W&(Y?W.Yf&@@@@@@0Y?'@@@@@0YW26K?I'@(M?O26XV4@@@@@,?V4@@@@@@)?e?V/X?V+Y?W.Yf&@@@@@@0Y?'@@@@@0YW26K?I'
?W&(Y?W.Y?
V4@@0M?O&@@@@?V'Y?@@@@)K?I4@@0Y?
V/X?eW.Y?
V4@@0M?O&@@@@?V@(M?O26XV4@@@@@,?V4@@@@@@)fV/X?V+Y?W.Y?e?&@@@@@@0Y?'@@@@@0YW26K?I'@(M?O26XV4@@@@@,?V4@@@@@@)fV/X?V+Y?W.Y?e?&@@@@@@0Y?'@@@@@0YW26K?I'@(M?O26XV4@@@@@,?V4@@@@@@)fV/X?V+Y?W.Y?e?&@@@@@@0Y?'@@@@@0YW26K?I'@(M?O26XV4@@@@@,?V4@@@@@@)fV/X?V+Y?W.Y?e?&@@@@@@0Y?'@@@@@0YW26K?I'@(M?O26XV4@@@@@,?V4@@@@@@)fV/X?V+Y?W.Y?e?&@@@@@@0Y?'@@@@@0YW26K?I'@(M?O26XV4@@@@@,?V4@@@@@@)fV/X?V+Y?W.Y?e?&@@@@@@0Y?'@@@@@0YW26K?I'@(M?O26XV4@@@@@,?V4@@@@@@)fV/X?V+Y?W.Y?e?&@@@@@@0Y?'@@@@@0YW26K?I'@(M?O26XV4@@@@@,?V4@@@@@@)fV/X?V+Y?W.Y?e?&@@@@@@0Y?'@@@@@0YW26K?I'@(M?O26XV4@@@@@,?V4@@@@@@)fV/X?V+Y?W.Y?e?&@@@@@@0Y?'@@@@@0YW26K?I'@(M?O26XV4@@@@@,?V4@@@@@@)fV/X?V+Y?W.Y?e?&@@@@@@0Y?'@@@@@0YW26K?I'@(M?O26XV4@@@@@,?V4@@@@@@)fV/X?V+Y?W.Y?e?&@@@@@@0Y?'@@@@@0YW26K?I'@(M?O26XV4@@@@@,?V4@@@@@@)fV/X?V+Y?W.Y?e?&@@@@@@0Y?'@@@@@0YW26K?I'@(M?O26XV4@@@@@,?V4@@@@@@)fV/X?V+Y?W.Y?e?&@@@@@@0Y?'@@@@@0YW26K?I'@(M?O26XV4@@@@@,?V4@@@@@@)fV/X?V+Y?W.Y?e?&@@@@@@0Y?'@@@@@0YW26K?I'@(M?O26XV4@@@@@,?V4@@@@@@)fV/X?V+Y?W.Y?e?&@@@@@@0Y?'@@@@@0YW26K?I'@(M?O26XV4@@@@@,?V4@@@@@@)fV/X?V+Y?W.Y?e?&@@@@@@0Y?'@@@@@0YW26K?I'@(M?O26XV4@@@@@,?V4@@@@@@)fV/X?V+Y?W.Y?e?&@@@@@@0Y?'@@@@@0YW26K?I'@(M?O26XV4@@@@@,?V4@@@@@@)fV/X?V+Y?W.Y?e?&@@@@@@0Y?'@@@@@0YW26K?I4
'Y?@@@@)K?I4@@0Y
?V/Xe?W.Y
?V4@@0M?O&@@@@?V'Y?@@@@)K?I4@@0Y
?V/Xe?W.Y
?V4@@0M?O&@@@@?V'Y?@@@@)K?I4@@0Y
?V/Xe?W.Y
?V4@@0M?O&@@@@?V'Y?@@@@)K?I4@@0Y
?V/Xe?W.Y
?V4@@0M?O&@@@@?V'Y?@@@@)K?I4@@0Y
?V/Xe?W.Y
?V4@@0M?O&@@@@?V'Y?@@@@)K?I4@@0Y
?V/Xe?W.Y
?V4@@0M?O&@@@@?V'Y?@@@@)K?I4@@0Y
?V/Xe?W.Y
?V4@@0M?O&@@@@?V'Y?@@@@)K?I4@@0Y
?V/Xe?W.Y
?V4@@0M?O&@@@@?V'Y?@@@@)K?I4@@0Y
?V/Xe?W.Y
?V4@@0M?O&@@@@?V'Y?@@@@)K?I4@@0Y
?V/Xe?W.Y
?V4@@0M?O&@@@@?V'Y?@@@@)K?I4@@0Y
?V/Xe?W.Y
?V4@@0M?O&@@@@?V'Y?@@@@)K?I4@@0Y
?V/Xe?W.Y
?V4@@0M?O&@@@@?V'Y?@@@@)K?I4@@0Y
?V/Xe?W.Y
?V4@@0M?O&@@@@?V'Y?@@@@)K?I4@@0Y
?V/Xe?W.Y
?V4@@0M?O&@@@@?V'Y?@@@@)K?I4@@0Y
?V/Xe?W.Y
?V4@@0M?O&@@@@?V'Y?@@@@)K?I4@@0Y
?V/Xe?W.Y
?V4@@0M?O&@@@@?V'Y?@@@@)K?I4@@0Y
?V/Xe?W.Y
?V4@@0M?O&@@@@?V'Y?@@@@)K?I4@@0Y
?V/Xe?W.Y
?V4@@0M?O&@@@@e
W&(Y?W.Yf?O2@@@@(?@@6K?f'@@@@@5?f3@@@@@(?fO2@@?'@@@@6Kf?V/X?W.Yf?O2@@@@(?@@6K?f'@@@@@5??
?3@@@@@(f?O2@@?'@@@@6K?fV/X?W.Y?fO2@@@@(?@@6Kf?'@@@@@5f?3@@@@@(f?O2@@?'@@@@6K?fV/X?W.Y?fO2@@@@(?@@6Kf?'@@@@@5f?3@@@@@(f?O2@@?'@@@@6K?fV/X?W.Y?fO2@@@@(?@@6Kf?'@@@@@5f?3@@@@@(f?O2@@?'@@@@6K?fV/X?W.Y?fO2@@@@(?@@6Kf?'@@@@@5f?3@@@@@(f?O2@@?'@@@@6K?fV/X?W.Y?
O2@@@@(?@@6Kf?'@@@@@5f?3@@@@@(f?O2@@?'@@@@6K?fV/X?W.Y?fO2@@@@(?@@6Kf?'@@@@@5f?3@@@@@(f?O2@@?'@@@@6K?fV/X?W.Y?fO2@@@@(?@@6Kf?'@@@@@5f?3@@@@@(f?O2@@?'@@@@6K?fV/X?W.Y?fO2@@@@(?@@6Kf?'@@@@@5f?3@@@@@(f?O2@@?'@@@@6K?fV/X?W.Y?fO2@@@@(?@@6Kf?'@@@@@5f?3@@@@@(f?O2@@?'@@@@6K?fV/X?W.Y?fO2@@@@(?@@6Kf?'@@@@@5f?3@@@@@(f?O2@@?'@@@@6K?fV/X?W.Y?fO2@@@@(?@@6Kf?'@@@@@5f?3@@@@@(f?O2@@?'@@@@6K?fV/X?W.Y?fO2@@@@(?@@6Kf?'@@@@@5f?3@@@@@(f?O2@@?'@@@@6K?fV/X?W.Y?fO2@@@@(?@@6Kf?'@@@@@5f?3@@@@@(f?O2@@?'@@@@6K?fV/X?W.Y?fO2@@@@(?@@6Kf?'@@@@@5f?3@@@@@(f?O2@@?'@@@@6K?fV/X?W.Y?fO2@@@@(?@@6Kf?'@@@@@5f?3@@@@@(f?O2@@?'@@@@6K?fV/X?W.Y?fO2@@@@(?@@6Kf?'@@@@@5f?3@@@@@(f?O2@@?'@@@@6K?fV/X?W.Y?fO2@@@@(?@@6Kf?'@@@@@5f?3@@@@@(f?O2@@?'@@@@6K?fV/X?W.Y?fO2@@@@(?@@6Kf?'@@@@@5e
?W&(Y?W.Y?e?W2@@@@@(YJ@@@@@(?eS@@@@(YW2@6XV'@@@@U?e'@@@@@LV'@@@@@6KfV/T.Y?e?W2@@@@@(YJ@@@@@(?eS@@@@(YW2@6XV'@@@@Ue?'@@@@@LV'@@@@@6K?e?V/T.YfW2@@@@@(YJ@@@@@(e?S@@@@(YW2@6XV'@@@@Ue?'@@@@@LV'@@@@@6K?e?V/T.YfW2@@@@@(YJ@@@@@(e?S@@@@(YW2@6XV'@@@@Ue?'@@@@@LV'@@@@@6K?e?V/T.YfW2@@@@@(YJ@@@@@(e?S@@@@(YW2@6XV'@@@@Ue?'@@@@@LV'@@@@@6K?e?V/T.YfW2@@@@@(YJ@@@@@(e?S@@@@(YW2@6XV'@@@@Ue?'@@@@@LV'@@@@@6K?e?V/T.YfW2@@@@@(YJ@@@@@(e?S@@@@(YW2@6XV'@@@@Ue?'@@@@@LV'@@@@@6K?e?V/T.YfW2@@@@@(YJ@@@@@(e?S@@@@(YW2@6XV'@@@@Ue?'@@@@@LV'@@@@@6K?e?V/T.YfW2@@@@@(YJ@@@@@(e?S@@@@(YW2@6XV'@@@@Ue?'@@@@@LV'@@@@@6K?e?V/T.YfW2@@@@@(YJ@@@@@(e?S@@@@(YW2@6XV'@@@@Ue?'@@@@@LV'@@@@@6K?e?V/T.YfW2@@@@@(YJ@@@@@(e?S@@@@(YW2@6XV'@@@@Ue?'@@@@@LV'@@@@@6K?e?V/T.YfW2@@@@@(YJ@@@@@(e?S@@@@(YW2@6XV'@@@@Ue?'@@@@@LV'@@@@@6K?e?V/T.YfW2@@@@@(YJ@@@@@(e?S@@@@(YW2@6XV'@@@@Ue?'@@@@@LV'@@@@@6K?e?V/T.YfW2@@@@@(YJ@@@@@(
?S@@@@(YW2@6XV'@@@@Ue?'@@@@@LV'@@@@@6K?e?V/T.YfW2@@@@@(YJ@@@@@(e?S@@@@(YW2@6XV'@@@@Ue?'@@@@@LV'@@@@@6K?e?V/T.YfW2@@@@@(YJ@@@@@(e?S@@@@(YW2@6XV'@@@@Ue?'@@@@@LV'@@@@@6K?e?V/T.YfW2@@@@@(YJ@@@@@(e?S@@@@(YW2@6XV'@@@@Ue?'@@@@@LV'@@@@@6K?e?V/T.YfW2@@@@@(YJ@@@@@(e?S@@@@(YW2@6XV'@@@@Ue?'@@@@@LV'@@@@@6K?e?V/T.YfW2@@@@@(YJ@@@@@(e?S@@@@(YW2@6XV'@@@@Ue?'@@@@@LV'@@@@@6K?e?V/T.YfW2@@@@@(YJ@@@@@(e?S@@@@(YW2
W&(Y?W.Yf?&@@@@@0Y?'@@@@(YW2@@UI40YW&@@@)XV40MS@@6XV'@@@@,?V4@@@@@@@?e?V+Yf?&@@@@@0Y?'@@@@(YW2@@UI40YW&@
?W&(Y?W.Y?
S@@@0YW&@@@1f&@@@@@(?e?7@@@)XV4@@@U?
S@@@0YW&@@@1f&@@@@)XV40MS@@6XV'@@@@,?V4@@@@@@@fV+Y?f&@@@@@0Y?'@@@@(YW2@@UI40YW&@@@)XV40MS@@6XV'@@@@,?V4@@@@@@@fV+Y?f&@@@@@0Y?'@@@@(YW2@@UI40YW&@@@)XV40MS@@6XV'@@@@,?V4@@@@@@@fV+Y?f&@@@@@0Y?'@@@@(YW2@@UI40YW&@@@)XV40MS@@6XV'@@@@,?V4@@@@@@@fV+Y?f&@@@@@0Y?'@@@@(YW2@@UI40YW&@@@)XV40MS@@6XV'@@@@,?V4@@@@@@@fV+Y?f&@@@@@0Y?'@@@@(YW2@@UI40YW&@@@)XV40MS@@6XV'@@@@,?V4@@@@@@@fV+Y?f&@@@@@0Y?'@@@@(YW2@@UI40YW&@@@)XV40MS@@6XV'@@@@,?V4@@@@@@@fV+Y?f&@@@@@0Y?'@@@@(YW2@@UI40YW&@@@)XV40MS@@6XV'@@@@,?V4@@@@@@@fV+Y?f&@@@@@0Y?'@@@@(YW2@@UI40YW&@@@)XV40MS@@6XV'@@@@,?V4@@@@@@@fV+Y?f&@@@@@0Y?'@@@@(YW2@@UI40YW&@@@)XV40MS@@6XV'@@@@,?V4@@@@@@@fV+Y?f&@@@@@0Y?'@@@@(YW2@@UI40YW&@@@)XV40MS@@6XV'@@@@,?V4@@@@@@@fV+Y?f&@@@@@0Y?'@@@@(YW2@@UI40YW&@@@)XV40MS@@6XV'@@@@,?V4@@@@@@@fV+Y?f&@@@@@0Y?'@@@@(YW2@@UI40YW&@@@)XV40MS@@6XV'@@@@,?V4@@@@@@@fV+Y?f&@@@@@0Y?'@@@@(YW2@@UI40YW&@@@)XV40MS@@6XV'@@@@,?V4@@@@@@@fV+Y?f&@@@@@0Y?'@@@@(YW2@@UI40YW&@@@)XV40MS@@6XV'@@@@,?V4@@@@@@@fV+Y?f&@@@@@0Y?'@@@@(YW2@@UI40YW&@@@)XV40MS@@6XV'@@@@,?V4@@@@@@@fV+Y?f&@@@@@0Y?'@@@@(YW2@@UI40YW&@@@)XV40MS@@6XV'@@@@,?V4@@@@@@@fV+Y?f&@@@@@0Y?'@@@@(YW2@@UI40YW&@@@)XV40MS@@6XV'@@@@,?V4@@@@@@@fV+Y?f&@@@@@0Y?'@@@@(YW2@@UI40YW&@
@@@(f7@@@)XV4@@@U
?S@@@0YW&@@@1?e?&@@@@@(f7@@@)XV4@@@U
?S@@@0YW&@@@1?e?&@@@@@(f7@@@)XV4@@@U
?S@@@0YW&@@@1?e?&@@@@@(f7@@@)XV4@@@U
?S@@@0YW&@@@1?e?&@@@@@(f7@@@)XV4@@@U
?S@@@0YW&@@@1?e?&@@@@@(f7@@@)XV4@@@U
?S@@@0YW&@@@1?e?&@@@@@(f7@@@)XV4@@@U
?S@@@0YW&@@@1?e?&@@@@@(f7@@@)XV4@@@U
?S@@@0YW&@@@1?e?&@@@@@(f7@@@)XV4@@@U
?S@@@0YW&@@@1?e?&@@@@@(f7@@@)XV4@@@U
?S@@@0YW&@@@1?e?&@@@@@(f7@@@)XV4@@@U
?S@@@0YW&@@@1?e?&@@@@@(f7@@@)XV4@@@U
?S@@@0YW&@@@1?e?&@@@@@(f7@@@)XV4@@@U
?S@@@0YW&@@@1?e?&@@@@@(f7@@@)XV4@@@U
?S@@@0YW&@@@1?e?&@@@@@(f7@@@)XV4@@@U
?S@@@0YW&@@@1?e?&@@@@@(f7@@@)XV4@@@U
?S@@@0YW&@@@1?e?&@@@@@(f7@@@)XV4@@@U
?S@@@0YW&@@@1?e?&@@@@@(f7@@@)XV4@@@U
?S@@@0YW&@@@1?e?&@@
W&(Y?W.Yg@@@@@(?@@@@Yf&@@@@5?W-XV'@@@(YW-X?3@@@@,?e?V@@@@?'@@@@@?he@@@@@(?@@@@Yf&@@@@5?W-XV'@
@@(YW-X?3@@@@,fV@@@@?'@@@@@he?@@@@@(?@@@@Y?e?&@@@@5?W-XV'@@@(YW-X?3@@@@,fV@@@@?'@@@@@he?@@@@@(?@@@@Y?e?&@@@@5?W-XV'@@@(YW-X?3@@@@,fV@@@@?'@@@@@he?@@@@@(?@@@@Y?e?&@@@@5?W-XV'@@@(YW-X?3@@@@,fV@@@@?'@@@@@he?@@@@@(?@@@@Y?e?&@@@@5?W-XV'@@@(YW-X?3@@@@,fV@@@@?'@@@@@he?@@@@@(?@@@@Y?e?&@@@@5?W-XV'@@@(YW-X?3@@@@,fV@@@@?'@@@@@he?@@@@@(?@@@@Y?e?&@@@@5?W-XV'@@@(YW-X?3@@@@,fV@@@@?'@@@@@he?@@@@@(?@@@@Y?e?&@@@@5?W-XV'@@@(YW-X?3@@@@,fV@@@@?'@@@@@he?@@@@@(?@@@@Y?e?&@@@@5?W-XV'@@@(YW-X?3@@@@,fV@@@@?'@@@@@he?@@@@@(?@@@@Y?e?&@@@@5?W-XV'@@@(YW-X?3@@@@,fV@@@@?'@@@@@he?@@@@@(?@@@@Y?e?&@@@@5?W-XV'@@@(YW-X?3@@@@,fV@@@@?'@@@@@he?@@@@@(?@@@@Y?e?&@@@@5?W-XV'@@@(YW-X?3@@@@,fV@@@@?'@@@@@he?@@@@@(?@@@@Y?e?&@@@@5?W-XV'@@@(YW-X?3@@@@,fV@@@@?'@@@@@he?@@@@@(?@@@@Y?e?&@@@@5?W-XV'@@@(YW-X?3@@@@,fV@@@@?'@@@@@he?@@@@@(?@@@@Y?e?&@@@@5?W-XV'@@@(YW-X?3@@@@,fV@@@@?'@@@@@he?@@@@@(?@@@@Y?e?&@@@@5?W-XV'@@@(YW-X?3@@@@,fV@@@@?'@@@@@he?@@@@@(?@@@@Y?e?&@@@@5?W-XV'@@@(YW-X?3@@@@,fV@@@@?'@@@@@he?@@@@@(?@@@@Y?e?&@@@@5?W-XV'@@@(YW-X?3@@@@,fV@@@@?'@@@@@he?@@@@@(?@@@@Y?e?&@@@@5?W-XV'@
?W&(Y?W.Y?e?W&?@@@@(YJ@@@@@(?eV4@@(YW&@)XV'@(YW&@)XV'@@0Y?e'@@@@@LV'@@@5?he3@@@(YJ@@@@@(?eV4@@(YW&@)XV'
W&(Y?W.Yf?7@?@@@(Y?'@@@@(YW26K?I(Y?7@@@)XV+YW&@@@1?V'M?O26XV'@@@@,?V'@(Y?e?W-XfV'@(Y?'@@@@(YW26K?I(Y?7@@@)XV@(YW&@)XV'@@0Ye?'@@@@@LV'@@@5he?3@@@(YJ@@@@@(e?V4@@(YW&@)XV'@(YW&@)XV'@@0Ye?'@@@@@LV'@@@5he?3@@@(YJ@@@@@(e?V4@@(YW&@)XV'@(YW&@)XV'@@0Ye?'@@@@@LV'@@@5he?3@@@(YJ@@@@@(e?V4@@(YW&@)XV'@(YW&@)XV'@@0Ye?'@@@@@LV'@@@5he?3@@@(YJ@@@@@(e?V4@@(YW&@)XV'@(YW&@)XV'@@0Ye?'@@@@@LV'@@@5he?3@@@(YJ@@@@@(e?V4@@(YW&@)XV'@(YW&@)XV'@@0Ye?'@@@@@LV'@@@5he?3@@@(YJ@@@@@(e?V4@@(YW&@)XV'@(YW&@)XV'@@0Ye?'@@@@@LV'@@@5he?3@@@(YJ@@@@@(e?V4@@(YW&@)XV'@(YW&@)XV'@@0Ye?'@@@@@LV'@@@5he?3@@@(YJ@@@@@(e?V4@@(YW&@)XV'@(YW&@)XV'@@0Ye?'@@@@@LV'@@@5he?3@@@(YJ@@@@@(e?V4@@(YW&@)XV'@(YW&@)XV'@@0Ye?'@@@@@LV'@@@5he?3@@@(YJ@@@@@(e?V4@@(YW&@)XV'@(YW&@)XV'@@0Ye?'@@@@@LV'@@@5he?3@@@(YJ@@@@@(e?V4@@(YW&@)XV'@(YW&@)XV'@@0Ye?'@@@@@LV'@@@5he?3@@@(YJ@@@@@(e?V4@@(YW&@)XV'@(YW&@)XV'@@0Ye?'@@@@@LV'@@@5he?3@@@(YJ@@@@@(e?V4@@(YW&@)XV'@(YW&@)XV'@@0Ye?'@@@@@LV'@@@5he?3@@@(YJ@@@@@(e?V4@@(YW&@)XV'@(YW&@)XV'@@0Ye?'@@@@@LV'@@@5he?3@@@(YJ@@@@@(e?V4@@(YW&@)XV'@(YW&@)XV'@@0Ye?'@@@@@LV'@@@5he?3@@@(YJ@@@@@(e?V4@@(YW&@)XV'@(YW&@)XV'@@0Ye?'@@@@@LV'@@@5he?3@@@(YJ@@@@@(e?V4@@(YW&@)XV'@(YW&@)XV'@@0Ye?'@@@@@LV'@@@5he?3@@@(YJ@@@@@(e?V4@@(YW&@)XV4
+YW&@@@1?V'M?O26XV'@@@@,?V'@(YfW-X?e?V'@(Y?'@@@@(YW26K?I(Y?7@@@)XV+YW&@@@1?V'M?O26XV'@@@@,?V'@(YfW-X?e?V'@(Y?'@@@@(YW26K?I(Y?7@@@)XV+YW&@@@1?V'M?O26XV'@@@@,?V'@(YfW-X?e?V'@(Y?'@@@@(YW26K?I(Y?7@@@)XV+YW&@@@1?V'M?O26XV'@@@@,?V'@(YfW-X?e?V'@(Y?'@@@@(YW26K?I(Y?7@@@)XV+YW&@@@1?V'M?O26XV'@@@@,?V'@(YfW-X?e?V'@(Y?'@@@@(YW26K?I(Y?7@@@)XV+YW&@@@1?V'M?O26XV'@@@@,?V'@(YfW-X?e?V'@(Y?'@@@@(YW26K?I(Y?7@@@)XV+YW&@@@1?V'M?O26XV'@@@@,?V'@(YfW-X?e?V'@(Y?'@@@@(YW26K?I(Y?7@@@)XV+YW&@@@1?V'M?O26XV'@@@@,?V'@(YfW-X?e?V'@(Y?'@@@@(YW26K?I(Y?7@@@)XV+YW&@@@1?V'M?O26XV'@@@@,?V'@(YfW-X?e?V'@(Y?'@@@@(YW26K?I(Y?7@@@)XV+YW&@@@1?V'M?O26XV'@@@@,?V'@(YfW-X?e?V'@(Y?'@@@@(YW26K?I(Y?7@@@)XV+YW&@@@1?V'M?O26XV'@@@@,?V'@(YfW-X?e?V'@(Y?'@@@@(YW26K?I(Y?7@@@)XV+YW&@@@1?V'M?O26XV'@@@@,?V'@(Y
W-X?e?V'@(Y?'@@@@(YW26K?I(Y?7@@@)XV+YW&@@@1?V'M?O26XV'@@@@,?V'@(YfW-X?e?V'@(Y?'@@@@(YW26K?I(Y?7@@@)XV+YW&@@@1?V'M?O26XV'@@@@,?V'@(YfW-X?e?V'@(Y?'@@@@(YW26K?I(Y?7@@@)XV+YW&@@@1?V'M?O26XV'@@@@,?V'@(YfW-X?e?V'@(Y?'@@@@(YW26K?I(Y?7@@@)XV+YW&@@@1?V'M?O26XV'@@@@,?V'@(YfW-X?e?V'@(Y?'@@@@(YW26K?I(Y?7@@@)XV+YW&@@@1?V'M?O26XV'@@@@,?V'@(YfW-X?e?V'@(Y?'@@@@(YW26K?I(Y?7@@@)XV+YW&@@@1?V'M?O26XV'@@@@,?V'@(YfW-X?e?V'@(Y?'@@@@(YW26K?I(Y?7@@@)X?
?W&(Y?W.Y?fJ@@?@@(YeV4@@@HW&@@@@f3@@@@(e?&@@@@5?e?@@@@)XN@@@0Y??V'YeW&?7@1?)X??V+YeV4@@@HW&@@@@f3@@@@(?
&@@@@5f@@@@)XN@@@0YeV'Y??W&?7@1?)XeV+Y??V4@@@HW&@@@@?e?3@@@@(?e&@@@@5f@@@@)XN@@@0YeV'Y??W&?7@1?)XeV+Y??V4@@@HW&@@@@?e?3@@@@(?e&@@@@5f@@@@)XN@@@0YeV'Y??W&?7@1?)XeV+Y??V4@@@HW&@@@@?e?3@@@@(?e&@@@@5f@@@@)XN@@@0YeV'Y??W&?7@1?)XeV+Y??V4@@@HW&@@@@?e?3@@@@(?e&@@@@5f@@@@)XN@@@0YeV'Y??W&?7@1?)XeV+Y??V4@@@HW&@@@@?e?3@@@@(?e&@@@@5f@@@@)XN@@@0YeV'Y??W&?7@1?)XeV+Y??V4@@@HW&@@@@?e?3@@@@(?e&@@@@5f@@@@)XN@@@0YeV'Y??W&?7@1?)XeV+Y??V4@@@HW&@@@@?e?3@@@@(?e&@@@@5f@@@@)XN@@@0YeV'Y??W&?7@1?)XeV+Y??V4@@@HW&@@@@?e?3@@@@(?e&@@@@5f@@@@)XN@@@0YeV'Y??W&?7@1?)XeV+Y??V4@@@HW&@@@@?e?3@@@@(?e&@@@@5f@@@@)XN@@@0YeV'Y??W&?7@1?)XeV+Y??V4@@@HW&@@@@?e?3@@@@(?e&@@@@5f@@@@)XN@@@0YeV'Y??W&?7@1?)XeV+Y??V4@@@HW&@@@@?e?3@@@@(?e&@@@@5f@@@@)XN@@@0YeV'Y??W&?7@1?)XeV+Y??V4@@@HW&@@@@?e?3@@@@(?e&@@@@5f@@@@)XN@@@0YeV'Y??W&?7@1?)XeV+Y??V4@@@HW&@@@@?e?3@@@@(?e&@@@@5f@@@@)XN@@@0YeV'Y??W&?7@1?)XeV+Y??V4@@@HW&@@@@?e?3@@@@(?e&@@@@5f@@@@)XN@@@0YeV'Y??W&?7@1?)XeV+Y??V4@@@HW&@@@@?e?3@@@@(?e&@@@@5f@@@@)XN@@@0YeV'Y??W&?7@1?)XeV+Y??V4@@@HW&@@@@?e?3@@@@(?e&@@@@5f@@@@)XN@@@0YeV'Y??W&?7@1?)XeV+Y??V4@@@HW&@@@@?e?3@@@@(?e&@@@@5f@@@@)XN@@@0YeV'Y??W&?7@1?)XeV+Y??V4@@@HW&@@@@?e?3@@@@,?
W&(Y?W.Ye?W&?7@@?@(Y?@6K??I@?&@@@@5?W-XV'@@(YW-XV'@@(YW-X?3@@@@,?@MeO26Xf&@?3@5?@)?e?W26K??I@?&@@@@5?W-XV'@@(YW-XV'@@(YW-X?3@@@@,?@M??O26X?e?&@?3@5?@)fW26KeI@?&@@@@5?W-XV'@@(YW-XV'@@(YW-X?3@@@@,?@M??O26X?e?&@?3@5?@)fW26KeI@?&@@@@5?W-XV'@@(YW-XV'@@(YW-X?3@@@@,?@M??O26X?e?&@?3@5?@)fW26KeI@?&@@@@5?W-XV'@@(YW-XV'@@(YW-X?3@@@@,?@M??O26X?e?&@?3@5?@)fW26KeI@?&@@@@5?W-XV'@@(YW-XV'@@(YW-X?3@@@@,?@M??O26X?e?&@?3@5?@)fW26KeI@?&@@@@5?W-XV'@@(YW-XV'@@(YW-X?3@@@@,?@M??O26X?e?&@?3@5?@)fW26KeI@?&@@@@5?W-XV'@@(YW-XV'@@(YW-X?3@@@@,?@M??O26X?e?&@?3@5?@)fW26KeI@?&@@@@5?W-XV'@@(YW-XV'@@(YW-X?3@@@@,?@M??O26X?e?&@?3@5?@)fW26KeI@?&@@@@5?W-XV'@@(YW-XV'@@(YW-X?3@@@@,?@M??O26X?e?&@?3@5?@)fW26KeI@?&@@@@5?W-XV'@@(YW-XV'@@(YW-X?3@@@@,?@M??O26X?e?&@?3@5?@)fW26KeI@?&@@@@5?W-XV'@@(YW-XV'@@(YW-X?3@@@@,?@M??O26X?e?&@?3@5?@)fW26KeI@?&@@@@5?W-XV'@@(YW-XV'@@(YW-X?3@@@@,?@M??O26X?e?&@?3@5?@)fW26KeI@?&@@@@5?W-XV'@@(YW-XV'@@(YW-X?3@@@@,?@M??O26X?e?&@?3@5?@)fW26KeI@?&@@@@5?W-XV'@@(YW-XV'@@(YW-X?3@@@@,?@M??O26X?e?&@?3@5?@)fW26KeI@?&@@@@5?W-XV'@@(YW-XV'@@(YW-X?3@@@@,?@M??O26X?e?&@?3@5?@)fW26KeI@?&@@@@5?W-XV'@@(YW-XV'@@(YW-X?3@@@@,?@M??O26X?e?&@?3@5?@)fW26KeI@?&@@@@5?W-XV'@@(YW-XV'@@(YW-X?3@@@@,?@M??O26X?e?&@?3@5?@)fW26KeI@?&@@@@5?W-XV'@@(YW-XV'@@(YW-X?3@@@@,?@M??O26X?e?&@?3@5?@)fW26KeI@?&@@@@5?W-XV'@@(Y?
?W&(Y?W.Y?e?7@?@@@?(Ye3@@@(?eV4@@(YW&@)XV40YW&@)XV40YW&@)XV'@@0Y?e@@@@@,g?V+Yg?*@@@@@?eV4@@(YW&@)XV40YW&@)XV40YW&@)XV'@@0Ye?@@@@@,?gV+Y?g*@@@@@e?V4@@(YW&@)XV40YW&@)XV40YW&@)XV'@@0Ye?@@@@@,?gV+Y?g*@@@@@e?V4@@(YW&@)XV40YW&@)XV40YW&@)XV'@@0Ye?@@@@@,?gV+Y?g*@@@@@e?V4@@(YW&@)XV40YW&@)XV40YW&@)XV'@@0Ye?@@@@@,?gV+Y?g*@@@@@e?V4@@(YW&@)XV40YW&@)XV40YW&@)XV'@@0Ye?@@@@@,?gV+Y?g*@@@@@e?V4@@(YW&@)XV40YW&@)XV40YW&@)XV'@@0Ye?@@@@@,?gV+Y?g*@@@@@e?V4@@(YW&@)XV40YW&@)XV40YW&@)XV'@@0Ye?@@@@@,?gV+Y?g*@@@@@e?V4@@(YW&@)XV40YW&@)XV40YW&@)XV'@@0Ye?@@@@@,?gV+Y?g*@@@@@e?V4@@(YW&@)XV40YW&@)XV40YW&@)XV'@@0Ye?@@@@@,?gV+Y?g*@@@@@e?V4@@(YW&@)XV40YW&@)XV40YW&@)XV'@@0Ye?@@@@@,?gV+Y?g*@@@@@e?V4@@(YW&@)XV40YW&@)XV40YW&@)XV'@@0Ye?@@@@@,?gV+Y?g*@@@@@e?V4@@(YW&@)XV40YW&@)XV40YW&@)XV'@@0Ye?@@@@@,?gV+Y?g*@@@@@e?V4@@(YW&@)XV40YW&@)XV40YW&@)XV'@@0Ye?@@@@@,?gV+Y?g*@@@@@e?V4@@(YW&@)XV40YW&@)XV40YW&@)XV'@@0Ye?@@@@@,?gV+Y?g*@@@@@e?V4@@(YW&@)XV40YW&@)XV40YW&@)XV'@@0Ye?@@@@@,?gV+Y?g*@@@@@e?V4@@(YW&@)XV40YW&@)XV40YW&@)XV'@@0Ye?@@@@@,?gV+Y?g*@@@@@e?V4@@(YW&@)XV40YW&@)XV40YW&@)XV'@@0Ye?@@@@@,?gV+Y?g*@@@@@e?V4@@(YW&@)XV40YW&@)XV40YW&@)XV'@@0Ye?@@@@@,?gV+Y?g*@@@@@e?V4@@(YW&@)XV40YW2
W&(Y?W.YfJ@@?@@@??O)XN@@(YW26K?I(YW&@@@)XeW&@@@)X??W&@@@)XV+M?O26XN@@@(Ye?O26X?eW26Ke?V'@@@HW26K?I(YW&@@@)XeW&@@@)XeW&@@@)XV+M?O26XN@@@(Y?eO26Xe?W26K?eV'@@@HW26K?I(YW&@@@)X??W&@@@)XeW&@@@)XV+M?O26XN@@@(Y?eO26Xe?W26K?eV'@@@HW26K?I(YW&@@@)X??W&@@@)XeW&@@@)XV+M?O26XN@@@(Y?eO26Xe?W26K?eV'@@@HW26K?I(YW&@@@)X??W&@@@)XeW&@@@)XV+M?O26XN@@@(Y?eO26Xe?W26K?eV'@@@HW26K?I(YW&@@@)X??W&@@@)XeW&@@@)XV+M?O26XN@@@(Y?eO26Xe?W26K?eV'@@@HW26K?I(YW&@@@)X??W&@@@)XeW&@@@)XV+M?O26XN@@@(Y?eO26Xe?W26K?eV'@@@HW26K?I(YW&@@@)X??W&@@@)XeW&@@@)XV+M?O26XN@@@(Y?eO26Xe?W26K?eV'@@@HW26K?I(YW&@@@)X??W&@@@)XeW&@@@)XV+M?O26XN@@@(Y?eO26Xe?W26K?eV'@@@HW26K?I(YW&@@@)X??W&@@@)XeW&@@@)XV+M?O26XN@@@(Y?eO26Xe?W26K?eV'@@@HW26K?I(YW&@@@)X??W&@@@)XeW&@@@)XV+M?O26XN@@@(Y?eO26Xe?W26K?eV'@@@HW26K?I(YW&@@@)X??W&@@@)XeW&@@@)XV+M?O26XN@@@(Y?eO26Xe?W26K?eV'@@@HW26K?I(YW&@@@)X??W&@@@)XeW&@@@)XV+M?O26XN@@@(Y?eO26Xe?W26K?eV'@@@HW26K?I(YW&@@@)X??W&@@@)XeW&@@@)XV+M?O26XN@@@(Y?eO26Xe?W26K?eV'@@@HW26K?I(YW&@@@)X??W&@@@)XeW&@@@)XV+M?O26XN@@@(Y?eO26Xe?W26K?eV'@@@HW26K?I(YW&@@@)X??W&@@@)XeW&@@@)XV+M?O26XN@@@(Y?eO26Xe?W26K?eV'@@@HW26K?I(YW&@@@)X??W&@@@)XeW&@@@)XV+M?O26XN@@@(Y?eO26Xe?W26K?eV'@@@HW26K?I(YW&@@@)X??W&@@@)XeW&@@@)XV+M?O26XN@@@(Y?eO26Xe?W26K?eV'@@@HW26K?I(YW&@@@)X??W&@@@)XeW&@@@)XV+M?O26XN@@@(Y?eO26Xe?W26K?eV'@@@HW26K?I(YW&@@@)X??W&@
?W&(Y?W.Y?f7@@?@@5?@@@1?@(YW&@@@6X??&@@@@@,e*@@@@@,??*@@@@@,eW2@@@1?3@(Y?e@@@@1?e7@@@@?eV'@5?7@@@6X??&@@@@@,e*@@
@@@,e*@@@@@,??W2@@@1?3@(Ye?@@@@1e?7@@@@e?V'@5?7@@@6Xe&@@@@@,??*@@@@@,e*@@@@@,??W2@@@1?3@(Ye?@@@@1e?7@@@@e?V'@5?7@@@6Xe&@@@@@,??*@@@@@,e*@@@@@,??W2@@@1?3@(Ye?@@@@1e?7@@@@e?V'@5?7@@@6Xe&@@@@@,??*@@@@@,e*@@@@@,??W2@@@1?3@(Ye?@@@@1e?7@@@@e?V'@5?7@@@6Xe&@@@@@,??*@@@@@,e*@@@@@,??W2@@@1?3@(Ye?@@@@1e?7@@@@e?V'@5?7@@@6Xe&@@@@@,??*@@@@@,e*@@@@@,??W2@@@1?3@(Ye?@@@@1e?7@@@@e?V'@5?7@@@6Xe&@@@@@,??*@@@@@,e*@@@@@,??W2@@@1?3@(Ye?@@@@1e?7@@@@e?V'@5?7@@@6Xe&@@@@@,??*@@@@@,e*@@@@@,??W2@@@1?3@(Ye?@@@@1e?7@@@@e?V'@5?7@@@6Xe&@@@@@,??*@@@@@,e*@@@@@,??W2@@@1?3@(Ye?@@@@1e?7@@@@e?V'@5?7@@@6Xe&@@@@@,??*@@@@@,e*@@@@@,??W2@@@1?3@(Ye?@@@@1e?7@@@@e?V'@5?7@@@6Xe&@@@@@,??*@@@@@,e*@@@@@,??W2@@@1?3@(Ye?@@@@1e?7@@@@e?V'@5?7@@@6Xe&@@@@@,??*@@@@@,e*@@@@@,??W2@@@1?3@(Ye?@@@@1e?7@@@@e?V'@5?7@@@6Xe&@@@@@,??*@@@@@,e*@@@@@,??W2@@@1?3@(Ye?@@@@1e?7@@@@e?V'@5?7@@@6Xe&@@@@@,??*@@@@@,e*@@@@@,??W2@@@1?3@(Ye?@@@@1e?7@@@@e?V'@5?7@@@6Xe&@@@@@,??*@@@@@,e*@@@@@,??W2@@@1?3@(Ye?@@@@1e?7@@@@e?V'@5?7@@@6Xe&@@@@@,??*@@@@@,e*@@@@@,??W2@@@1?3@(Ye?@@@@1e?7@@@@e?V'@5?7@@@6Xe&@@@@@,??*@@@@@,e*@@@@@,??W2@@@1?3@(Ye?@@@@1e?7@@@@e?V'@5?7@@@6Xe&@@@@@,??*@@@@@,e*@@@@@,??W2@@@1?3@(Ye?@@@@1e?7@@@@e?V'@5?7@@@6Xe&@@@@@,??*@@
?7(Y?W.YW.f@@@?@(Y?@@@@?(YW&@@@@@(??V'@@@(YeV'@@@(Y??V'@@@(Ye*@@@@@LV+YfN@@@5?@?3@@@H?e?V+YJ@@@@@(??V'@@@(YeV'@
@@(YeV'@@@(Y??*@@@@@LV+Y?e?N@@@5?@?3@@@HfV+YJ@@@@@(eV'@@@(Y??V'@@@(YeV'@@@(Y??*@@@@@LV+Y?e?N@@@5?@?3@@@HfV+YJ@@@@@(eV'@@@(Y??V'@@@(YeV'@@@(Y??*@@@@@LV+Y?e?N@@@5?@?3@@@HfV+YJ@@@@@(eV'@@@(Y??V'@@@(YeV'@@@(Y??*@@@@@LV+Y?e?N@@@5?@?3@@@HfV+YJ@@@@@(eV'@@@(Y??V'@@@(YeV'@@@(Y??*@@@@@LV+Y?e?N@@@5?@?3@@@HfV+YJ@@@@@(eV'@@@(Y??V'@@@(YeV'@@@(Y??*@@@@@LV+Y?e?N@@@5?@?3@@@HfV+YJ@@@@@(eV'@@@(Y??V'@@@(YeV'@@@(Y??*@@@@@LV+Y?e?N@@@5?@?3@@@HfV+YJ@@@@@(eV'@@@(Y??V'@@@(YeV'@@@(Y??*@@@@@LV+Y?e?N@@@5?@?3@@@HfV+YJ@@@@@(eV'@@@(Y??V'@@@(YeV'@@@(Y??*@@@@@LV+Y?e?N@@@5?@?3@@@HfV+YJ@@@@@(eV'@@@(Y??V'@@@(YeV'@@@(Y??*@@@@@LV+Y?e?N@@@5?@?3@@@HfV+YJ@@@@@(eV'@@@(Y??V'@@@(YeV'@@@(Y??*@@@@@LV+Y?e?N@@@5?@?3@@@HfV+YJ@@@@@(eV'@@@(Y??V'@@@(YeV'@@@(Y??*@@@@@LV+Y?e?N@@@5?@?3@@@HfV+YJ@@@@@(eV'@@@(Y??V'@@@(YeV'@@@(Y??*@@@@@LV+Y?e?N@@@5?@?3@@@HfV+YJ@@@@@(eV'@@@(Y??V'@@@(YeV'@@@(Y??*@@@@@LV+Y?e?N@@@5?@?3@@@HfV+YJ@@@@@(eV'@@@(Y??V'@@@(YeV'@@@(Y??*@@@@@LV+Y?e?N@@@5?@?3@@@HfV+YJ@@@@@(eV'@@@(Y??V'@@@(YeV'@@@(Y??*@@@@@LV+Y?e?N@@@5?@?3@@@HfV+YJ@@@@@( V'@@@(Y??V'@@@(YeV'@@@(Y??*@@@@@LV+Y?e?N@@@5?@?3@@@HfV+YJ@@@@@(eV'@@@(Y??V'@@@(YeV'@@@(Y??*@@@@@LV+Y?e?N@@@5?@?3@@@HfV+YJ@@@@@(eV'@@@(Y??V'@
J@H?W.YW.Y?W&?@@@?(Ye@@@@L?W&@@@@@(YW-XV'@(YW26XV'@(YW26XV'@(YW-XV'@@@@1?f@@?3@@HJ@LN@@5?@@?f7@@@@(YW-XV'@(YW26XV'
@(YW26XV'@(YW-XV'@@@@1f?@@?3@@HJ@LN@@5?@@f?7@@@@(YW-XV'@(YW26XV'@(YW26XV'@(YW-XV'@@@@1f?@@?3@@HJ@LN@@5?@@f?7@@@@(YW-XV'@(YW26XV'@(YW26XV'@(YW-XV'@@@@1f?@@?3@@HJ@LN@@5?@@f?7@@@@(YW-XV'@(YW26XV'@(YW26XV'@(YW-XV'@@@@1f?@@?3@@HJ@LN@@5?@@f?7@@@@(YW-XV'@(YW26XV'@(YW26XV'@(YW-XV'@@@@1f?@@?3@@HJ@LN@@5?@@f?7@@@@(YW-XV'@(YW26XV'@(YW26XV'@(YW-XV'@@@@1f?@@?3@@HJ@LN@@5?@@f?7@@@@(YW-XV'@(YW26XV'@(YW26XV'@(YW-XV'@@@@1f?@@?3@@HJ@LN@@5?@@f?7@@@@(YW-XV'@(YW26XV'@(YW26XV'@(YW-XV'@@@@1f?@@?3@@HJ@LN@@5?@@f?7@@@@(YW-XV'@(YW26XV'@(YW26XV'@(YW-XV'@@@@1f?@@?3@@HJ@LN@@5?@@f?7@@@@(YW-XV'@(YW26XV'@(YW26XV'@(YW-XV'@@@@1f?@@?3@@HJ@LN@@5?@@f?7@@@@(YW-XV'@(YW26XV'@(YW26XV'@(YW-XV'@@@@1f?@@?3@@HJ@LN@@5?@@f?7@@@@(YW-XV'@(YW26XV'@(YW26XV'@(YW-XV'@@@@1f?@@?3@@HJ@LN@@5?@@f?7@@@@(YW-XV'@(YW26XV'@(YW26XV'@(YW-XV'@@@@1f?@@?3@@HJ@LN@@5?@@f?7@@@@(YW-XV'@(YW26XV'@(YW26XV'@(YW-XV'@@@@1f?@@?3@@HJ@LN@@5?@@f?7@@@@(YW-XV'@(YW26XV'@(YW26XV'@(YW-XV'@@@@1f?@@?3@@HJ@LN@@5?@@f?7@@@@(YW-XV'@(YW26XV'@(YW26XV'@(YW-XV'@@@@1f?@@?3@@HJ@LN@@5?@@f?7@@@@(YW-XV'@(YW26XV'@(YW26XV'@(YW-XV'@@@@1f?@@?3@@HJ@LN@@5?@@f?7@@@@(YW-XV'@(YW26XV'@(YW26XV'@(YW-XV'@@@@1f?@@?3@@HJ@LN@@5?@@f?7@@@@(YW-XV'@(YW26XV4
7@?W.YW&H??7@?@@@??O)T@@@@@?7@@@@@(YW&@)XV+YW&@@)XV+YW&@@)XV+YW&@)XV'@@@5?e?J@@LV4@?7@1?@0YJ@@Lf3@@@(YW&@)XV+YW&@@)XV
+YW&@@)XV+YW&@)XV'@@@5fJ@@LV4@?7@1?@0YJ@@L?e?3@@@(YW&@)XV+YW&@@)XV+YW&@@)XV+YW&@)XV'@@@5fJ@@LV4@?7@1?@0YJ@@L?e?3@@@(YW&@)XV+YW&@@)XV+YW&@@)XV+YW&@)XV'@@@5fJ@@LV4@?7@1?@0YJ@@L?e?3@@@(YW&@)XV+YW&@@)XV+YW&@@)XV+YW&@)XV'@@@5fJ@@LV4@?7@1?@0YJ@@L?e?3@@@(YW&@)XV+YW&@@)XV+YW&@@)XV+YW&@)XV'@@@5fJ@@LV4@?7@1?@0YJ@@L?e?3@@@(YW&@)XV+YW&@@)XV+YW&@@)XV+YW&@)XV'@@@5fJ@@LV4@?7@1?@0YJ@@L?e?3@@@(YW&@)XV+YW&@@)XV+YW&@@)XV+YW&@)XV'@@@5fJ@@LV4@?7@1?@0YJ@@L?e?3@@@(YW&@)XV+YW&@@)XV+YW&@@)XV+YW&@)XV'@@@5fJ@@LV4@?7@1?@0YJ@@L?
?3@@@(YW&@)XV+YW&@@)XV+YW&@@)XV+YW&@)XV'@@@5fJ@@LV4@?7@1?@0YJ@@L?e?3@@@(YW&@)XV+YW&@@)XV+YW&@@)XV+YW&@)XV'@@@5fJ@@LV4@?7@1?@0YJ@@L?e?3@@@(YW&@)XV+YW&@@)XV+YW&@@)XV+YW&@)XV'@@@5fJ@@LV4@?7@1?@0YJ@@L?e?3@@@(YW&@)XV+YW&@@)XV+YW&@@)XV+YW&@)XV'@@@5fJ@@LV4@?7@1?@0YJ@@L?e?3@@@(YW&@)XV+YW&@@)XV+YW&@@)XV+YW&@)XV'@@@5fJ@@LV4@?7@1?@0YJ@@L?e?3@@@(YW&@)XV+YW&@@)XV+YW&@@)XV+YW&@)XV'@@@5fJ@@LV4@?7@1?@0YJ@@L?e?3@@@(YW&@)XV+YW&@@)XV+YW&@@)XV+YW&@)XV'@@@5fJ@@LV4@?7@1?@0YJ@@L?e?3@@@(YW&@)XV+YW&@@)XV+YW&@@)XV+YW&@)XV'@@@5
J@@LV4@?7@1?@0YJ@@L?e?3@@@(YW&@)XV+YW&@@)XV+YW&@@)XV+YW&@)XV'@@@5fJ@@LV4@?7@1?@0YJ@@L?e?3@@@(YW&@)XV+YW&@@)XV+YW&@@)XV+YW&@)XV'@@@5fJ@@LV4@?7@1?@0YJ@@L?e?3@@@(YW&@)XV+YW&@@)X?
@5?7HW&5eJ@@?@@5?@@@@Y@(Me3@@@@(YW&@@@1?e&@@@@1e?7@@@@,?e7@@@)XN@@@H?e?7@@)XeJ@@@L??W&@@1fN@@@HW&@@@1?e&@@@@1? 7@@@@,e?7@@@)XN@@@Hf7@@)X??J@@@LeW&@@1?e?N@@@HW&@@@1e?&@@@@1?e7@@@@,e?7@@@)XN@@@Hf7@@)X??J@@@LeW&@@1?e?N@@@HW&@@@1e?&@@@@1?e7@@@@,e?7@@@)XN@@@Hf7@@)X??J@@@LeW&@@1?e?N@@@HW&@@@1e?&@@@@1?e7@@@@,e?7@@@)XN@@@Hf7@@)X??J@@@LeW&@@1?e?N@@@HW&@@@1e?&@@@@1?e7@@@@,e?7@@@)XN@@@Hf7@@)X??J@@@LeW&@@1?e?N@@@HW&@@@1e?&@@@@1?e7@@@@,e?7@@@)XN@@@Hf7@@)X??J@@@LeW&@@1?e?N@@@HW&@@@1e?&@@@@1?e7@@@@,e?7@@@)XN@@@Hf7@@)X??J@@@LeW&@@1?e?N@@@HW&@@@1e?&@@@@1?e7@@@@,e?7@@@)XN@@@Hf7@@)X??J@@@LeW&@@1?e?N@@@HW&@@@1e?&@@@@1?e7@@@@,e?7@@@)XN@@@Hf7@@)X??J@@@LeW&@@1?e?N@@@HW&@@@1e?&@@@@1?e7@@@@,e?7@@@)XN@@@Hf7@@)X??J@@@LeW&@@1?e?N@@@HW&@@@1e?&@@@@1?e7@@@@,e?7@@@)XN@@@Hf7@@)X??J@@@LeW&@@1?e?N@@@HW&@@@1e?&@@@@1?e7@@@@,e?7@@@)XN@@@Hf7@@)X??J@@@LeW&@@1?e?N@@@HW&@@@1e?&@@@@1?e7@@@@,e?7@@@)XN@@@Hf7@@)X??J@@@LeW&@@1?e?N@@@HW&@@@1e?&@@@@1?e7@@@@,e?7@@@)XN@@@Hf7@@)X??J@@@LeW&@@1?e?N@@@HW&@@@1e?&@@@@1?e7@@@@,e?7@@@)XN@@@Hf7@@)X??J@@@LeW&@@1?e?N@@@HW&@@@1e?&@@@@1?e7@@@@,e?7@@@)XN@@@Hf7@@)X??J@@@LeW&@@1?e?N@@@HW&@@@1e?&@@@@1?e7@@@@,e?7@@@)XN@@@Hf7@@)X??J@@@LeW&@@1?e?N@@@HW&@@@1e?&@@@@1?e7@@@@,e?7@@@)XN@@@Hf7@@)X??J@@@LeW&@@1?e?N@@@HW&@@@1e?&@@@@1?
?J@HJ5?7(Ye7@@?@(Y?@@@@?(YW-XN@@@(YW&@@@@5?eV'@@@5e?3@@@(Y?e3@@@@1?3@5f?@@@@1e7@@@1??7@@@@f?3@5?7@@@@5?eV'@@@5?
3@5?7@@@@5e?V'@@@5?e3@@@(Ye?3@@@@1?3@5?f@@@@1??7@@@1e7@@@@?f3@5?7@@@@5e?V'@@@5?e3@@@(Ye?3@@@@1?3@5?f@@@@1??7@@@1e7@@@@?f3@5?7@@@@5e?V'@@@5?e3@@@(Ye?3@@@@1?3@5?f@@@@1??7@@@1e7@@@@?f3@5?7@@@@5e?V'@@@5?e3@@@(Ye?3
?75?7HJ@H?e@@@?(Ye3@@@eW&@1?3@(YW&@@@@(YW26XV'@(YW-XV'@(YW26XV'@@@@LV+Yf?@@@@5e@@@@@??3@@@@f?V+YJ@@@@(YW26XV'@(YW 3@@@(Ye?3@@@@1?3@5?f@@@@1??7@@@1e7@@@@?f3@5?7@@@@5e?V'@@@5?e3@@@(Ye?3@@@@1?3@5?f@@@@1??7@@@1e7@@@@?f3@5?7@@@@5e?V'@@@5?e3@@@(Ye?3@@@@1?3@5?f@@@@1??7@@@1e7@@@@?f3@5?7@@@@5e?V'@@@5?e3@@@(Ye?3@@@@1?3@5?f@@@@1??7@@@1e7@@@@?f3@5?7@@@@5e?V'@@@5?e3@@@(Ye?3@@@@1?3@5?f@@@@1??7@@@1e7@@@@?f3@5?7@@@@5e?V'@@@5?e3@@@(Ye?3@@@@1?3@5?f@@@@1??7@@@1e7@@@@?f3@5?7@@@@5e?V'@@@5?e3@@@(Ye?3@@@@1?3@5?f@@@@1??7@@@1e7@@@@?f3@5?7@@@@5e?V'@@@5?e3@@@(Ye?3@@@@1?3@5?f@@@@1??7@@@1e7@@@@?f3@5?7@@@@5e?V'@@@5?e3@@@(Ye?3@@@@1?3@5?f@@@@1??7@@@1e7@@@@?f3@5?7@@@@5e?V'@@@5?e3@@@(Ye?3@@@@1?3@5?f@@@@1??7@@@1e7@@@@?f3@5?7@@@@5e?V'@@@5?e3@@@(Ye?3@@@@1?3@5?f@@@@1??7@@@1e7@@@@?f3@5?7@@@@5e?V'@@@5?e3@@@(Ye?3@@@@1?3@5?f@@@@1??7@@@1e7@@@@?f3@5?7@@@@5e?V'@@@5?e3@@@(Ye?3@@@@1?3@5?f@@@@1??7@@@1e7@@@@?
J@HJ@?7@?W&?@@@??O)XN@@5e7@@@LV+YW&@@@@(YW&@@)XV'YW&@)XV+YW&@@)XV'@@@1?g?3@@@He3@@@5??N@@@5h7@@@(YW&@@)XV'YW&
7@?75?@5?7@?@@5?@@@1?@(Ye3@@@,??W&@@@@(YW&@@@@)X??7@@@1eW&@@@@)XV'@@5?f?)XV'@@?)XV'@(YW&?@@(YW&g3@@(YW&@@@@)X??7@
?J@5?@HJ@HJ@@?@(Y?@@@@?(YW-XN@@(Y??*@@@@(YW&@@@@@@,??3@@@5e*@@@@@@)XV40Y?fJ@)XN@5?@)XN@HW&@?3@HW&@L?fV40YW&@@@@@@,??3@
?7@HJ@?7@?7@@?@He3@@@eW&@1?@0YW-XV'@@(YW&@@@@@@(Y??V'@(YeV'@@@@@@)Xh7@@1?(YJ@@1?@?7@@LV'?7@@1?g?W&@@@@@@(Y??V'
?@@?75?@5?@@@?@?)XN@@5e7@@@L??W&@)XV40YW&@@@@@@(YW26XV+YW26XV'@@@@@@)g?J@@@@L?W&@@@L?J@@@)X?J@@@@Lg?*@@@@@@(YW26XV
J@5?@HJ@H?@@@??J@1?@@He@@@@(?W&@@@)X??W&@@@@@@(YW&@@1e?7@@)XV'@@@@@Hg?7@@@@@?*@@@@@?@@@@@)?@@@@@1g?N@@@@@(YW&@@1?
7@HJ@?75e@@@?W&@@?@5?)T@@@(Y?&@@@@@,??7@@@@@@(YW&@@@@e?@@@@)XV'@@@5?g?3@@@@H?N@@@@H?N@@@@H?N@@@@5h3@@@(YW&@@@@?
@@?7@?@He@@@?7@@@?(YJ@@R40YeV'@@@(Y??3@@@@@(YW&@@@@5?@?3@@@@)XV'@@H?g?V'@@@?@?3@@5?@?3@@5?@?@@@(YhN@@(YW&@@@@5?
@@?@@?@?@?@@5?3@@@L?W&@@L??W26XV'@(YW-XV'@@@(YW&@@@@@HJ@LN@@@@@)XV'@h)XN@@5?@LN@@HJ@LN@@HJ@?3@@HW&?g?@(YW&@@@@@HJ
?J@5?@@??J@?@(Y?N@@@(?7@@@1?W&@@)XV+YW&@)XV'@(YW&@@@@@5?7@1?3@@@@@)XV'L?f?J@1?3@HJ@1?3@?7@1?@5?7@LN@5?7@?gJ(YW&@@@@@5?7
?7@HJ@@??7@?@HW&?@@(Y?3@@@5?&@@@@1e?7@@@)XV+YW&@@@@@(YJ@@@LN@@@@@@1?V/XfW&@@LN@?7@@LV'?@@@?(YJ@@1?@HJ@@Lf?W.Y?7@@@@@@HJ@
?@@?7@@??@@?@?7@?@0YeN@@(Y?V'@@@5e?3@@@@,?e7@@@@@(YW&@@@1?3@@@@@@L?V/X?e7@@@1?@?@@@1eJ@@@L??7@@@?@?7@@1fW.Y?J@@@@@@5?7@
?@@?@@@??@@Le@@L??W2@?@0YW-XV'@(YW-XV'@@(Y?e3@@@@0YW&@@@@@LN@@@@@V/X?V/Xe3@@@@L?J@@@@e7@@@1??@@@@L?J@@@@e?W.Y?W.Y@@@@@HJ@@
J@5?@@5?J@@1?J@@1??7@@L??W&@)XV'YW&@)XV40YW26XV4@0M?O&@@@@@@1?3@@@@LV/X?V/X?V'@@@,?@@@@@e3@@@5??@@@@@?@@@@@eW.Y?W.YJ@@@@5?7@@
7@H?@@H?7@@@?7@@@?J@@@)X?7@@@)X?W&@@@)X??W&@@)X?eO2@@@@@@@@@LV'@(R/XV/X?N1??N@@(Y?N@@@@eN@@@H??@@@@H?N@@@5e7H?W.YW.R'@(YJ@@@
@@e@@e@@@@?@@@@?@@@@@(?@@@@@,?*@@@@@,??*@@@@,??@@@@@@@@@@@@)XV'U?V/XV/X?3=e3@H?@?3@@5?@?@@@?@?3@@5?@?3@@H?C5?W.YW.Y?S(YW&@@@
3@L?@@L?3@@@?3@@@?N@@@(Y?3@@@(Y?V'@@@(Y??V'@@(Y?eI4@@@@@@@@@@)XV/X?V/XV/XN@@?N@?J@LN@@HJ@?3@5?@LN@@HJ@LN@5?@@HW.YW.Y?W.YW&@@@@
N@1?@@1?N@@5?N@@5??3@@H??V'@(YW-XV'@(YW26XV40YW2@6K?I4@@@@@@@@@)XV/X?V/XN1?@@L?@?7@1?@@?7@LN@HJ@1?@@?7@1?@HJ@@?7HW.Y?W.YW&@@@@@
?@@?@@@??@@He@@H??V4@?@6XV'YW&@)XV+YW&@@)X?e7@@@@6K?I4@@@@@@@@)XV/X?N1?3X@@1?@?@@@L??J@@1?@?7@@LeJ@@@?@?7@@W5?7H?W.YW&@@@@@@
?@@?3@@??@@?@?3@?@6XeJ@@)X?W&@@@1e?7@@@@(?e3@@@@@@6K?I'@@@@@?I/XV/X?3LN@@@@?@?@@@1?W&@@@L?J@@@)X?7@@@?@?@@@@HJ5?W.YW.M?@@@@@
?3@LN@@??3@?@LV'?@@)X?7@@@1?*@@@@5e?3@@@(YW-XV'@@@@@@@6XV'@@@@??V/XV/XN1?@@@@L?J@@@@?7@@@@1?7@@@@1?@@@@L?J@@@@?7HW.YW.Y?J@@@@@
?N@1?@@??N@?@)X?J@@@)?3@@@5?V'@@(YW-XV'@(YW&@)XV'@@@@@@@)XV'@?fN1?N1?3X@@@@@?@@@@5?3@@@@5?3@@@@5?@@@@@?@@@@@W5?7H?7H?W.Y@@@@
@@?@@?@?@?@@1?7@@@H?V'@@H??V40YW&@)XV'YW&@@@)XV'@@@@@@@)XV'Lf?3L?3LN@@@@@H?N@@@H?V'@@@H?N@@@(Y?3@@@H?N@@@@@HJ5?J5?W.YJ@@@@
@@?3@?@Le@@@?3@@@?)XN@@T26XeW&@@@)X??7@@@@@)XV'@@@@@(R/XV/X?e?V/XN1?@@@@@?@?@@@e?N@@@?@?@@@HeN@@@?@?@@@@@?7HW.YW.YW.Y@@@
3@LN@?31e@@@?V'@@?@1?(R@@@)X?*@@@@@,??3@@@@@@)XV'@@@@U?V/XV/KfN1?39??@@5?@?3@@?@@?3@5?@?3@@?@@?@@5?@?3@@e:5?7HW.YW.YJ@@@
N@1?@LN@L?@@@??N@5?@@Le@@@@)?V'@@@(Y??V'@@@@@@)XV4@XI/X?V/XV46Xe?3LN@@?3@HJ@LN@5?@@?N@HJ@LN@5?@@?3@HJ@LN@5?@@HJ5?7H?7HW.Y@@
?@@?31?@1?@@@?@?(YJ@@1e3@@@H??V'@(YW26XV'@@@@@@)X?I/XV/X?V/X?I/K??N1?@@LN@?7@1?@HJ@@L?@?7@1?@HJ@@LN@?7@1?@HJ@@?7HJ5?J5?7H?@@
?3@LN@?3@?3@@?@Le7@@@eV'@5?@6XV'YW&@@)XV'@@@@@@)X?V/XV/X?V/K?V46K?@?@@1?@?@@@?@?7@@1?@?@@@?@?7@@1?@?@@@?@?7@@?@?7H?7HJ5?J@@
?N@1?@LN@LN@@?@)X?@@@@?)XV'YJ@@)X??&@@@@)XV'@@0M?I/X?V/XV/K?V46K?I4@@?@@@?@?@@@Le@@@@?@?@@@?@?@@@@??J@@@?@?@@@W5?@?J5?7HW.Y@
@@?31?@1?3@?@@1?@@@5?@)Xe7@@@)??V'@@@@)XV+MfV/X?V/XV46K?I46Kf@@@L?J@@@1?J@@@@L?J@@@L?J@@@@L?7@@@L?J@@@@HJ5?7HJ5?7H?@
3@LN@?3@?V'?@@@??I(YJ@@1e3@@@HW-XV'@@@@1?g?V/X?V/K?I46K?;@@@@@@@@1?7@@@@?7@@@@1?7@@@1?7@@@@1?@@@@1?7@@@@?7HJ5?7HJ5?J@
V'1?3LN@L?e@@@?)Xe7@@@eV'@5?7@)XV4@@@5?hV/K?V46K?V@@?@@@@@@@@@?3@@@@?3@@@@5?3@@@5?3@@@@5?@@@@5?@@@@5?@?7HJ5?7HW.Y
?N@LN1?3)Xe3@@?@)X?@@@@?)XV'YJ@@@)K?I40Y?h?V46K?V@@@@@eI4@@@@@@?N@@@5?N@@@@H?N@@@H?N@@@@H?@@@@H?@@@@HJ5?@?7HJ5?7H?
31?3LV'1eN@@?@@1?@@@@X@)Ke7@@@@@6X
?B@@@@@@@@@6K??I4@@@e@@@He3@@@?@?@@@?@?@@@5??3@@@??3@@@?7HJ5?@?7HJ5?J
N@LV/XV'L??3@?@@@??I(R@@@@@?3@@@@@@,heW26Xe@@@@@@@@@@@@@?g3@@?eN@@@?@?@@@?@?@@@H??N@@5??N@@@?@?7HJ5?@?7HW&
?3)XV/XV/X?V'?@@@?)Xe@@@@H?V4@@@@0Yh?O&@@)K??I4@@@@@0Me?O26K?e?@@?@@?@@5?@?@@@?@?3@@?@@?@@HW&?@@5?@?@?7HJ5?@?7Y
?V')XV/XV/f@@@?@)X?@@@@?@K?I40Mhe'@@@@@@6K?eI@M??O2@@@@@@@6?&@@?@@?@@HJ@?3@5?@LN@@?@@?@@?7@?@@HJ@W5?@?7HJ5?@?
V')XV/X?f3@@?@@1?@@@5?@@6X?hO26XV4@@@@@@@@@@e?@@@@@@@@@@@@@@@@?@@?3@?7@LN@HJ@1?@5?@@?@@?@@?3@?7@@HJ5?@?7HJ@?
?V'1?V/XfN@@?@@@??I(YJ@@@,?gO2@@@)K?I4@@(MfO@K??I4@@@@@@@@@@@@?@@LN@?@@1?@?7@@?@HJ@@LeJ@@LN@?@@@?7HJ5?@?75?
N@L?V/X?e?3@?@@@?)Xe7@@(Y?f?'@@@@@@@6K?I(Y?O2@@@@@@6KeI4@@0Mg@@1?@?@@@?@?@@@?@?7@@1e7@@1?@?@@@?@?7HJ5?@HJ
?3)X?V/Xe?V'?3@@?@)X?3@(Yg?V'@@@@@@@@@e?@@@@@@@@@@@@@g?@@@@@@@@L?J@@@?@?@@@L?J@@@@e@@@@eJ@@@W5?@?7HJ@W&
?V')X?V/X?fN@@?@@)XV+Y?eO2@@6XV4@@@@0MeO@K?I4@@@@@@@0M??O26K??@@@@@@@@1?7@@@L?J@@@1?7@@@@?J@@@@L?7@@@@HJ5?@?7@@@
V')X?V/Xf?3@?@@@,f?@@@@@@)K?I@M??O2@@@@6K?I4@0M?eO2@@@@@6K?eI4@@@@?@@@@1?7@@@@?@@@@@?7@@@@1?@@@@@?7HJ5?@?I'
?V')X?V/X?e?N@?@@(Yf?@@@@@@@@(e?@@@@@@@@@@@g@@@@@@@@@@@@@6K?I4@@?@@@@5?3@@@@?3@@@@?3@@@@5?@@@@@?@?7HJ5e?
V')X?V/Xf@?@0Y?e?@K?I'@@@@0YW&K?I4@@@@@@@@?W26X?@@@@@@@@@@@@@@@@f?@@@@H?N@@@5?N@@@@?N@@@@H?@@@@@?@?@?7H?O&
?V')X?V/X?heJ@@6XV40M??O&@@6K?I4@@@0M?O&@@)KeI4@@@@@@@0M?eO2@@@@@@@?@?@@@He@@@@e@@@@e@@@@@?@?@?@W2@@
V')X?V/Xg?W&?7@@@1?e?'@@@@@@@6X?fO2@@@@@@6Ke?I40M?eO2@@@@@@@@@@@?@?@@@?@?@@@5e3@@5e3@@@@W5?@?@@@@@
?V')X?V/X?f?&@?3@@@@?e?V'@@@@@@@)?e?@@@@@@@@@@@@@@?e?@@@@@@@@@@@@@@@@?@?@@@?@?@@@HeN@@HeN@@@@@HJ@T(?4@@
V')X?V/XhV40M?O2@6XV4@@@0M??O26K??I4@@@@@0Me?O26K?e?I4@@@@@@@@@@?@?@@@?@?3@@?@@?@@?@@?@@@@@?7R@H??I'
?V')X?V/X?eW26Xe?O2@@@@)K?I@M?O2@@@@@@6K?I40M??O2@@@@@@@@@6Ke?I40M?f@?3@5?@LN@@?@@?@@?@@?@@@@@?@?@fV
?@,??S,?e*@@,e@@@@@@@@@@e?@@@@@@@@@@@@?e?@@@@@@@@@@@@@@@@@@?e?@@@@@@?N@HJ@1?@5?@@?@@?@@?@@@@@?@?@eO2@
?W&(Y?W.Y?eV40Ye?I4@@@@(M?O@K?I4@@@@@@0M?O26K??I4@@@@@@@@@0Me?O26K?g?@?7@@?@HJ@@?@5?@@?@@@@@?@?@W2@@@
W&(Y?W.YhW26K?I4@0YW2@@@6K??I40M??O2@@@@@6Ke?I40M?e?O2@@@@@@@@@@6K??@?@@@?@?7@@?@HJ@@?@@@@@W5?@@@@@@
?W&(Y?W.Y?f?'@?7@@@@?e?W&@@@@@@@(?e?@@@@@@@@@@@@@@?e?@@@@@@@@@@@@@@@@@@@@@?@@@?@?@@@?@?7@@?3@@@@@HJ(?4@@@
W&(Y?W.Yg?V'?3@@@5?e?&@@@@@@@0Y?fI4@@@@@@@0M??O26K?eI4@@@@@@@@@@@0M?e?@@@?@?@@@L??@@@LN@@@@@?7HeI4@
?W&(Y?W.Y?heN@@0YW26K??I'@@0M?O2@@@6K?I'@@(MeO2@@@@@@@6K?eI4@@0MfO2@@@@@@L??@@@1??@@@1?@@@@@?@?fW
W&(Y?W.Yg@6X?e?@M?O&@@@@6XV+M?O2@@@@@@@@?V40Y?@@@@@@@@@@@@@@@@g@@@@@@@@@@@@1??@@@@??@@@@?@@@@@W5?e?O&
?W&(Y?W.Y?e?W&?@@)Xf?@@@@@@@@)e?@@@@@@@@@@@g@@@@@@@@@@@@@0M?O2@6K?e?I4@@@@@@@@??@@@@??@@@@?@@@@@@H??O2@@
W&(Y?W.Yf?7@?@@@(f?@@@@@@(M?O@K??I4@@@@0M?O2@@6KeI4@@@@@0M?eO2@@@@@@@@6Kf?I4@@??@@@@??@@@@?@@@@@@?O2@@@@
?W&(Y?W.Y?fJ@@?@@(YW-X?eI4@@0YW2@@@@6KeI@M?O2@@@@@@@6K??I40M??@@@@@@@@@@@@@@@@@@@@?f?@@@@??@@@@?@@@@@@@@@@@@@
?7(Y?W.Ye?W&?7@@?@(Y?7@)Xg?W&@@@@@@@@@e?@@@@@@@@@@@@@g?@@@@@@@@@@@@@@@0Mh?@@@@??@@@@?3@@@@@@@@@@@@
J@H?W.Y?e?7@?@@@?(Ye3@@)X?f?&@@@@@@@0M?O@K?I4@@@@@@0MeO2@@@6K?eI4@@@@@@0Me?O2@@@@@@@@@@@@??@@@@?N@@@@@?I4@@@@
?W&5?W.YfJ@@?@@@??O)XN@@@,?gI4@@@(M?O2@@@6K?eI@M??O2@@@@@@@@@@@he@@@@@@@@@@@@@@@@@L?@@@@??@@@@@e?I4@@
W&(YW.Y?f7@@?@@5?@@@1?@@0Y?hI40YW2@@@@@@@@@@e?@@@@@@@@@@@@@@@e?O26K?e@@@@@@@@@@@@@@@@@1?@@@@??@@@@@f?I'
?W&(YW.YW.f@@@?@(Y?@@@@?@M?O26Khe&@@@@@@@0MeO@K??I4@@@@@@@0MeO2@@@@@@6KgI4@@@@@@@@@@?@@@@??@@@@@gV
?7(YW.YW.Y?W&?@@@?(Ye@@@@L?W2@@@@6XheI4@@0M?O2@@@@@6Ke?I40M??W2@@@@@@@@@@@@@@@@@hI4@@@@@@@@@@@@@@@@@@@@@
[email protected]&H??7@?@@@??O)T@@@@@?7@@@@@@,
@@@@@@@@@@@@@?f?&@@@@@@@@@@@@@@@0M?he?@@@@@@@@@@@@@@@@@@@@
75?7HW&5eJ@@?@@5?@@@@Y@(Me3@@@@@0Y
?C@@@@@@@@@0M??O2@@6K?eI4@@@@@@0MfO2@@@@@@@@@@@@@?
?
?J@HJ5?7(Ye7@@?@(Y?@@@@?(YW-XN@@@(M?O26X?h?W20M?W@@@@@eO2@@@@@@@@@6K??I40M?e@@@@@@@@@@@@@@@@@@@?
?
W&5?7HJ@H?e@@@?(Ye3@@@eW&@1?3@(YW2@@@1?hW.M?W20M?W@@?@@@@@@@@@@@@@@@h@@@@@@@@@@@@@@@@@@@?
?
7@HJ@?7@?W&?@@@??O)XN@@5e7@@@LV+YW&@@@@5?g?W.Y?W.M?O20M?:@@@@@@@@@@0M?eO2@@@@6KgI4@@@@@@@@@@@?e@@@@@@@@@@@@@@@
@@?75?@5?7@?@@5?@@@1?@(Ye3@@@,??W&@@@@(YW&KfW.Y?W.YW20M?O20MeW@@0M?eO2@@@@@@@@@@@@@@@6K?h?@@?e@@@@@@@@@@@@@@@
?J@5?@HJ@HJ@@?@(Y?@@@@?(YW-XN@@(Y??*@@@@(YW&@@6K?O.Y?W.YW.M?W20M?O2@0MeO2@@@@@@@@@@@@@@@@@@@@@@@@@@6Ke?@@?e@@@@@@@@@@@@@@@
?7@HJ@?7@?7@@?@He3@@@eW&@1?@0YW-XV'@@(YW&@@@@@@(Y?W.YW.Y?W.M?W20M??O2@0MeW@@@@@@@@@@@@@@@@@@@@@@@@@@@@@@?e@@@?he?
?@@?75?@5?@@@?@?)XN@@5e7@@@L??W&@)XV40YW&@@@@@@(Y?O.YW.Y?W.Y?O.M?O2@0M??O2@0MeW@@@@@@@@@@@@@@@@@@@@@@@@@@?e@@@?he?
J@5?@HJ@H?@@@??J@1?@@He@@@@(?W&@@@)X??W&@@@@@@([email protected]?W.YW20YW20MeO2@0M??O2@0MfW@@@@@@@@@@@@@@@@@@@@?e@@@?he?
7@HJ@?75e@@@?W&@@?@5?)T@@@(Y?&@@@@@,??7@@@@@@(YW&@@@@U?W.YW.M?W.MeO20MeO2@0M??O2@@@0MfW@@@@@@@@@@@@@@?e@@@?he?
@@?7@?@He@@@?7@@@?(YJ@@R40YeV'@@@(Y??3@@@@@(YW&@@@@@)T.YW.Y?W.Y?O20M?O2@0MeO2@0M?e?O2@@@0MeW@@@@@@@@@@?e@@@?he?
@@?@@?@?@?@@5?3@@@L?W&@@L??W26XV'@(YW-XV'@@@(YW&@@@@@@@(YW&H?W.YW20M?O20M??O2@0MeO2@@@@U?e?O2@0M?@@?e?@@?e@@@?he?
?J@5?@@??J@?@(Y?N@@@(?7@@@1?W&@@)XV+YW&@)XV'@(YW&@@@@@@@(YW&@?O.YW.M?O20M?O2@0M??O2@0Me?S@@@@@(M?eJ@@Le?@@?e@@@?he?
?7@HJ@@??7@?@HW&?@@(Y?3@@@5?&@@@@1e?7@@@)XV+YW&@@@@@@@0YW&@@@@YO.YW20M?O20MeO2@0M??O2@@(M??W@?f7@@1e?@@?e@@@?he?
?@@?7@@??@@?@?7@?@0YeN@@(Y?V'@@@5e?3@@@@,?e7@@@@@@0M?O&@@@@@@@YO.M?W20M?O2@0MeO2@0MW@?e?7@1e?J@@@@L??@@?e@@@?he?
?@@?@@@??@@Le@@L??W2@?@0YW-XV'@(YW-XV'@@(Y?e3@@@@0M?O2@@@@@@@@@@@Y?O.M?W20M??O2@@@e?7@1eJ@@@L??7@@@@1??@@?e@@@?he?
J@5?@@5?J@@1?J@@1??7@@L??W&@)XV'YW&@)XV40YW26XV4@0M?O2@@@@@@@@@@@@@@@@Y?O.M?W2@@0MW@L?J@@@L?7@@@1?J@@@@@@L?@@?e@@@?he?
7@H?@@H?7@@@?7@@@?J@@@)X?7@@@)X?W&@@@)X??W&@@)X?eO2@@@@@@@@@@@@@@@@@@@@@Y?O&Ye?O&@)?&@@@)X@@@@@W&@@@@@@)X@@?e@@@?he?
Declaration of Conformity
B o-Rad Laborator es, Inc., 1000 A fred Nobe Dr ve, Hercu es, Ca forn a,
94547, U.S.A., dec ares that the product
G yco Doc Imager
to wh ch th s dec arat on re ates, s n conform ty to the fo ow ng standards or
normat ve documents
EN55011:1991 C ass A
EN50082-2:1994
EN61000-4-2:1995
EN61000-4-4:1995
EN61000-4-8:1995
ENV50140:1994
ENV50141:1994
EN61010-1:1993/A2:1995
IEC1010-1:1990/A1:1992/A2:1995
fo ow ng the prov s ons of the
89/336/EEC & 73/23/EEC
D rect ve.
The product s mported nto the EU by B o-Rad Laborator es Ltd., B o-Rad
House, May ands Avenue, Heme Hempstead (London area), Hertfordsh re
HP2 7TD Eng and.
11 October 1996
date of issue
Burton Zabin
Vice President
DC1706555 Rev C
Bio-Rad
Laboratories, Inc.
Life Science
Group
2000 Alfred Nobel Drive
Hercules, California 94547
Phone: (510) 741-1000
Fax: (510) 741-1060
Bio-Rad Laboratories Main Office, 2000 Alfred Nobel Drive, Hercules, California 94547, Ph. (510) 741-1000, Fx. (510) 741-5800
Also in: Reagents Park, Australia, Ph. 02-9914-2800, Fx. 02-9914-2888 Wien, Austria, Ph. (1) 877 89 01, Fx. (1) 876 56 29 Nazareth, Belgium, Ph. 09-385 55 11, Fx. 09-385 65 54
Mississauga, Canada, Ph. (905) 712-2771, Fx. (905) 712-2990 Beijing, China, Ph. (01) 2046622, Fx. (01) 2051876 Copenhagen, Denmark, Ph. 39 17 9947, Fx. 39 27 1698
Espoo, Finland, Ph. 90 804 2200, Fx. 90 804 1100 Ivry sur Seine Cedex, France, Ph. (1) 49 60 68 34, Fx. (1) 46 71 24 67 München, Germany, Ph. 089 31884-0, Fx. 089 31884-100
New Delhi, India, Ph. 91-11-461-0103, Fx. 91-11-461-0765 Milano, Italy, Ph. 02-21609.1, Fx. 02-21609.399 Tokyo, Japan, Ph. 03-5811-6270 Fx. 03-5811-6272 Veenendaal,
The Netherlands, Ph. 0318-540666, Fx. 0318-542216 Auckland, New Zealand, Ph. 09-443 3099, Fx. 09-443 3097 Kowloon, Hong Kong, Ph. 7893300, Fx. 7891257 Singapore,
Ph. (65) 272-9877, Fx. (65) 273-4835 Solna, Sweden, Ph. 46 (0) 8 735 83 00, Fx 46 (0) 735 54 60 Madrid, Spain, Ph. (91) 661 70 85, Fx. (91) 661 96 98 Glattbrugg, Switzerland,
Ph. 01/809 55 55, Fx. 01/809 55 00 Hemel Hempstead, United Kingdom, Ph. 0800 181134, Fx. 01442 259118
SIG 020996
Printed in USA
400 6059 Rev C