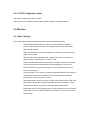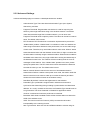
1
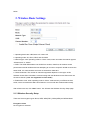
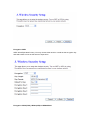
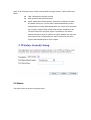
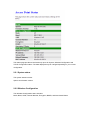
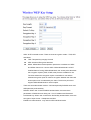
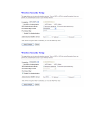
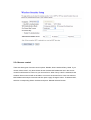
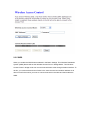
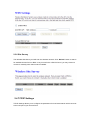
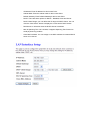
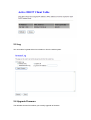
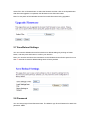
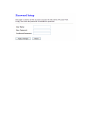
54Mbps Wireless-G
Access Point
User Guide
1 Introduction .........................................................................................................3
1.1 System Requirements ................................................................................3
1.2 Installation Instructions ............................................................................3
2 Configuring this Wireless Assess Point.................................................4
2.1 Setup Wizard ...............................................................................................4
2.1.1 LAN Interface Setup .............................................................................5
2.1.2 Wireless Basic Settings .........................................................................5
2.1.3 Wireless Security Setup ........................................................................6
2.2 Status .............................................................................................................8
2.2.1 System status.........................................................................................9
2.2.2 Wireless Configuration .........................................................................9
2.2.3 TCP/IP Configuration status ...............................................................10
2.3 Wireless ......................................................................................................10
2.3.1 Basic Settings......................................................................................10
2.3.2 Advanced Settings...............................................................................12
2.3.3 Security ...............................................................................................13
2.3.4 Access control .....................................................................................17
2.3.5 WDS....................................................................................................18
2.3.6 Site Survey ..........................................................................................19
2.4 TCP/IP Settings.........................................................................................19
2.5 Log ...............................................................................................................21
2.6 Upgrade Firmware ...................................................................................21
2.7 Save/Reload Settings ...............................................................................22
2.8 Password.....................................................................................................22
1 Introduction
Congratulations on your purchase of this 54Mbps Wireless-G Access Point.
During the design process, we have given much thought to make this device
as convenient to use as possible. The end result is the Wireless Access Point
that can be set up in minutes, allowing network users to access the Internet via
this Wireless Access Point instantly.
1.1 System Requirements
․One or more PCs (desktop or notebook) with Wireless interface
․Ethernet cables
1.2 Installation Instructions
Connecting this Wireless Access Point:
1.
Make sure all systems are turned off, including this Wireless Access Point and
PC(s)
2.
Connect one PC to this Wireless Access Point’s Ethernet port.
3.
Connect its power adapter to the power jack on this Wireless Access Point. Then
plug the power cable into an outlet.
4.
Power on your PC(s).
2 Configuring this Wireless Assess Point
In this chapter, it describes how to use the web management, a web browser-based utility that
allows you to remotely configure and manage this Wireless Access Point.
This Wireless Access Point’s default IP address is 192.168.1.253, you must set a PC’s IP
address in the same domain (e.g. IP:192.168.1.1, subnet mask: 255.255.255.0) and connect
this PC to the Wireless Access Point.
Open your Web browser and type the IP address http://192.168.1.253 and press <ENTER>.
Enter the User name and Password when prompted, the default User name is “root”, and the
default Password is “1234”.
2.1 Setup Wizard
After successfully accessing to the configuration web page, the setup status will be shown as
in the figure below.
This Wireless Access Point has a Setup Wizard to help you easily configure its settings.
2.1.1 LAN Interface Setup
The first step in Setup Wizard is LAN interface Setup. Users can change LAN IP address and
Subnet Mask here. Most Users will not need to change these values.
After typing in the IP Address and Subnet Mask, click “Next” button. You will enter the Wireless
Basic Settings page.
2.1.2 Wireless Basic Settings
Following LAN interface setup is the Wireless basic settings page. Users can setup the items
below:
1. Operating band: 802.11B/G, 802.11G or 802.11B.
2. Operating mode: AP, Client, WDS, and AP+WDS.
3. Network type: when operating mode is “Client” mode, users can select the network type as
“infrastructure” or “Adhoc”.
4. SSID: The SSID differentiates one WLAN from another, therefore, all wireless access
points/routers and all wireless devices attempting to connect to a specific WLAN must use the
same SSID. It is case-sensitive and must not exceed 32 characters.
5. Channel Number: The number of channels supported depends on the region of this
Wireless Access Point. All stations communicating with this Wireless Access Point must use
the same channel. (note: not supported in client mode)
6. Enable Mac clone: when operating mode is “Client” mode and only one Ethernet client
exists, users can enable this Mac clone feature to connect with the wireless station easily.
After all items are set, click “Next” button. You will enter the Wireless Security Setup page.
2.1.3 Wireless Security Setup
There are five encryption types: None, WEP, WPA(TKIP), WPA2(AES) and WPA2 Mixed.
Encryption: None
No encryption is selected.
Encryption: WEP
WEP: Wired Equivalent Privacy. You may choose either 64-bit or 128-bit as the encryption key
and select ASCII or Hex as the format of input value.
Encryption: WPA (TKIP), WPA2 (AES) or WPA2 Mixed
WPA: Wi-Fi Protected Access. There are three WPA encryption modes - TKIP and AES and
Mixed.
TKIP: Temporal Key Integrity Protocol
AES: Advanced Encryption Standard
Mixed: WPA2 Mixed mode operation permits the coexistence of WPA
and WPA2 clients on a common SSID. WPA2 Mixed Mode is a Wi-Fi
Certified feature. During WPA2 Mixed Mode, the access point advertises
the encryption ciphers (TKIP, CCMP, other) that are available for use.
The client selects the encryption cipher it would like to use and the
selected encryption cipher is used for encryption between the client and
access point once it is selected by the client. The access point must
support WPA2 Mixed Mode to use this option.
2.2 Status
The status screen is shown in the figure below.
This status page provides a brief read-only report for System, Wireless Configuration and
TCP/IP Configuration status. The data displayed may be changed depending on your current
configuration.
2.2.1 System status
This system status includes:
Uptime and firmware version.
2.2.2 Wireless Configuration
This Wireless Configuration status includes:
Mode, Band, SSID, Channel Number, Encryption, BSSID, and Associated Clients.
2.2.3 TCP/IP Configuration status
This TCP/IP Configuration status includes:
Attain IP Protocol, IP Address, Subnet Mask, Default Gateway, and MAC Address.
2.3 Wireless
2.3.1 Basic Settings
The wireless basic settings include Band, Mode, SSID and Channel Number.
-
Disable Wireless LAN Interface: check or uncheck (Enable or Disable).
-
Band: This Wireless Access Point can support three RF band: 802.11B/G,
802.11G and 802.11B.
-
Mode: This Wireless Access Point supports four operating modes: AP, client,
WDS, and AP+WDS.
-
Network Type: when operating mode is Client mode, users can select the
network type as “Infrastructure” or “Adhoc” mode.
-
SSID: The SSID differentiates one WLAN from another, therefore, all wireless
access points/routers and all wireless devices attempting to connect to a
specific WLAN must use the same SSID. It is case-sensitive and must not
exceed 32 characters.
-
Channel Number: The number of channels supported depends on the region of
this Wireless Access Point. All stations communicating with this Wireless
Access Point must use the same channel.
-
Associated Clients: When you click the “Show Active Client” button, it will show
all the clients already associating this Wireless Access Point, see the “Active
Wireless Client Table”, only valid for AP mode and AP+WDS mode.
-
Enable Mac clone: when operating mode is Client mode and only one Ethernet
client exists, users can enable this Mac clone feature to connect with wireless
station easily.
Click “Apply Changes” button when you finish your settings or click “Reset” to undo your
changes.
In the figure above, click “Show Active Clients” button while there are wireless clients
connected to this Wireless Access Point. You will see the figure below to show the MAC
address, transmission, reception packet counters and encrypted status for each associated
wireless client. Click “Refresh” button to show the latest information
2.3.2 Advanced Settings
In Advanced Settings page, more 802.11 related parameters are tunable.
-
Authentication Type: There are three Authentication Type- Open System,
Shared Key, and Auto
-
Fragment Threshold: Fragmentation mechanism is used for improving the
efficiency when high traffic flows along in the wireless network. If a wireless
client often transmits large files in wireless network, you can enter new
Fragment Threshold value to split the packet. The value can be set from 256 to
2346. The default value is 2346.
-
RTS Threshold: RTS Threshold is a mechanism implemented to prevent the
“Hidden Node” problem. “Hidden Node” is a situation in which two stations are
within range of the same wireless access point/router, but are not within range
of each other. Therefore, they are hidden nodes for each other. When a station
starts data transmission with the Wireless Access Point, it might not notice that
the other station is already using the wireless medium. When these two stations
send data at the same time, they might collide when arriving simultaneously at
the Wireless Access Point. The collision will most certainly result in a loss of
messages of both stations. If the “Hidden Node” problem is an issue, please
specify the packet size. The RTS mechanism will be activated if the data size
exceeds the value you set. The default value is 2347.
-
Beacon Interval: Beacon interval is the amount of time between beacon
transmissions. Before a station enters power save mode, the station needs the
beacon interval to know when to wake up to receive the beacon (and learn
whether there are buffered frames at the wireless router).
-
Data Rate: By default, it selects the highest rate for transmission.
-
Preamble Type: A preamble is a signal used in wireless environment to
synchronize the transmitting timing including Synchronization and Start frame
delimiter. In a “noisy” network environment, the Preamble Type should be set to
Long Preamble. The Short Preamble is intended for applications where
minimum overhead and maximum performance is desired.
-
Broadcast SSID: Select enabled to allow all the wireless stations to detect the
SSID of this wireless router.
-
IAPP: The Inter-Access Point Protocol (IAPP) can extend multi-vendor
interoperability to the roaming function.
-
802.11g Protection: there are CCK and OFDM modulation scheme using for
802.11b and 802.11g respectively, the packet collision will increase when these
two kind devices exist at the same time. We need to enable the Protection
mode to increase the performance.
2.3.3 Security
Here you can configure the security of your wireless network. Selecting different method will
enable you to have different level of security. Please note that using any encryption may be a
significant degradation of the data throughput on the wireless link.
-
Note: If no encryption is selected, users can enable the 802.1x Authentication
and set the RADIUS server authentication parameters – port, IP address and
Password.
-
WEP: Wired Equivalent Privacy. When you press the “Set WEP Key”, you may
choose either 64-bit or 128-bit as the encryption key and Select ASCII or Hex
as the format of input value. All the four WEP keys are set identical. You can
enable the 802.1x Authentication and set the RADIUS server authentication
parameters – port, IP address and Password.
-
WPA: Wi-Fi Protected Access. There are three encryption modes – TKIP, AES
and Mixed.
TKIP: Temporal Key Integrity Protocol
AES: Advanced Encryption Standard
Mixed: WPA2 Mixed mode operation permits the coexistence of WPA
and WPA2 clients on a common SSID. WPA2 Mixed Mode is a Wi-Fi
Certified feature. During WPA2 Mixed Mode, the access point advertises
the encryption ciphers (TKIP, CCMP, other) that are available for use.
The client selects the encryption cipher it would like to use and the
selected encryption cipher is used for encryption between the client and
access point once it is selected by the client. The access point must
support WPA2 Mixed Mode to use this option.
-
There are two authentication modes – WPA enterprise By RADIUS server and
WPA personal pre-shared key.
-
RADIUS: When user chooses RADIUS authentication, there are three
parameters of RADIUS server being set – Port, IP address and Password.
-
Pre-Shared Key: When user chooses Pre-Shared Key authentication, there are
two types of input format – Passphrase and Hex.
-
Enable Pre-Authentication : only valid for AES and Mixed mode.
2.3.4 Access control
There are three types of access control options: Disable, Allow Listed and Deny Listed. If you
choose “Allow Listed”, only those clients whose wireless MAC addresses are in the access
control list will be able to connect to your Access Point. When “Deny Listed” is selected, these
wireless clients on the list will not be able to connect to the Access Point. Users can add new
MAC address with simple comment and then press “Apply Changes” button. To delete a MAC,
select its corresponding Select checkbox and press “Deleted Selected” button.
2.3.5 WDS
When you enable the WDS feature selected in the Basic Settings. This Wireless Distribution
System (WDS) feature will set this Wireless Access Point in “Bridge Mode”. Two Wireless
Access Points in bridge mode can communicate with each other through wireless interface. To
do this, you must set these Access Points in the same channel and set MAC address of all
other Access Points which you want to communicate with in the table and then enable the
WDS.
2.3.6 Site Survey
This Wireless Site Survey tool will scan the wireless network. Click “Refresh” button to search
for available Access Point or IBSS. If any Access Point or IBSS is found, you may choose to
connect it manually when client mode is enabled.
2.4 TCP/IP Settings
TCP/IP Settings allows you to configure the parameters for local area network which connects
to the LAN port of your Access Point.
-
IP Address: Enter IP address for this Access Point.
-
Subnet Mask: Enter the subnet mask for this Access Point.
-
Default Gateway: Enter Default Gatewayfor this Access Point.
-
DHCP: There are three options for DHCP – Disabled, Client and Server.
-
DHCP Client Range: you can define the IP range for DHCP clients. You can
click the “Show Client” button to display the current active DHCP clients.
-
DNS Server: It will active when the DHCP Server is enabled.
-
802.1d Spanning Tree: On LAN side, it supports Spanning Tree Protocol to
avoid physical loop problem.
-
Clone MAC Address: You can assign a new MAC address for external DHCP
server to be cloned.
2.5 Log
You can enable Log data either from wireless or from the whole system.
2.6 Upgrade Firmware
This Wireless Access Point allows you to easily upgrade its firmware.
Select File: click on Browse button to select the firmware and then click on the Upload button.
After firmware upgrade is completed, this Wireless Access Point will restart.
Note: Do not power off this Wireless Access Point while firmware is being upgraded.
2.7 Save/Reload Settings
You can reset this Wireless Access Point back to its default settings by clicking on Reset
button, and then press OK button to confirm your decision.
Note: you can also hold down the reset button on this Wireless Access Point’s panel for more
than 10 seconds to reset its default settings back to factory default.
2.8 Password
You can change login ID and Password here. The default Login ID and Password is “root” with
password “1234”.