1
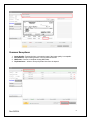
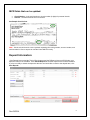
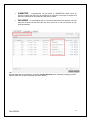
Source Capture Optimization Merchant Daily Procedures This material is proprietary to Information Technology, Inc. and is not to be reproduced, used or disclosed except in accordance w ith program license or upon w ritten authorization of Information Technology, Inc. Information Technology, Inc. cannot accept any responsibility financial or otherw ise as the result of your use of this information including direct, indirect, special or consequential damages. There are no w arranties extended or granted by this document. You should be very careful to ensure that the use of this information complies w ith the law s, rules and regulations of the jurisdictions w ith respect to w hich it is used. The information contained herein is subject to change w ithout notice. Revisions may be issued to advise of such changes and/or additions. Rev 02/2014 1 Table of Contents Web Capture Product ................................................................................................... 3 Access SCO Merchant Capture or WebCapture: .......................................................... 4 How to Capture a Batch or Deposit:.............................................................................. 4 Preparing Documents (or batches) for Scanning:...................................................... 6 View Exceptions: ....................................................................................................... 7 Common Exceptions: ............................................................................................. 8 MICR fields that can be updated:........................................................................... 9 Deposit Information: ...................................................................................................... 9 Common Status Bar : .......................................................................................... 10 How to Correct Jammed Documents: ......................................................................... 11 How to Delete an Item within a Deposit: ..................................................................... 12 To Remove a Batch or Deposit: .................................................................................. 13 Enlarging the Image: ................................................................................................... 14 How to Rescan a Document – Failed Image Quality:.................................................. 15 Duplicates: .................................................................................................................. 17 Deposit Status:............................................................................................................ 18 Reports: ...................................................................................................................... 22 Item Query: ................................................................................................................. 24 Menu Description Keys and functions: ........................................................................ 27 Logout ......................................................................................................................... 28 Tips for a Successful Scanning Experience ................................................................ 29 Web Capture Client Workstation Installation ............................................................... 30 Scanner Driver Installation .......................................................................................... 34 Internet Explorer Versions 10 & 11 ............................................................................. 37 Scanner Maintenance ................................................................................................. 38 Rev 02/2014 2 Web Capture Product Web Capture is a product offered to Fiserv clients to capture items at the branch level rather than by Proof or the Item Processing Center. The process is completed by the client utilizing a scanner as the capture unit. The scanner reads the MICR data printed at the bottom of the documents and this is how the scanner “communicates” with the product to know where to extract numerical and written information; also known as Courtesy Amount Recognition (CAR). Web Capture requires, at a minimum, two primary components: 1) a personal computer to run the Source capture software and, 2) a table-top image capture device or scanner. The scanner works similar to a sorter with a USB cable transmitting data to the Consolidation, DPS and VIE servers. The Image Replacement Documents (IRD’s) and other image files are derived from a specified Server (Virtual Image Exchange “VIE”). Rev 02/2014 3 Access SCO Merchant Capture or WebCapture: 1. Launch Internet Explorer and enter the following address: www.bankcherokee.com click on the Business Plus tab and then click on the link for Remote Deposit. Scanner Drivers are located at www.bankcherokee.com. Go to Business Banking and select Remote Deposit Drivers. Go to page 29 for set-up instructions. 2. On the Login window, enter your User Id and Password and then press the Login button. How to Capture a Batch or Deposit: 1. To begin scanning a deposit, click on Create Deposit located in the upper left hand corner. Rev 02/2014 4 2. Enter the following information when creating a Deposit, then click Continue Fields Deposit Name Select Work Type Deposit Amount Select Account Store Number Rev 02/2014 Description Enter a name for the deposit. Verify 1 - Merchant Capture is selected from the drop down box. Enter the amount of the total deposit. Zeroes automatically populate as cents. For example, if you enter an amount of 5000, this populates as 50.00. Select the account for which this deposit is being created. Enter a store number or location number, if desired. 5 Selecting an account: When you click in the Select Account text area, a drop down list of available deposit accounts displays. To find an account you can scroll through the list using the scroll bar or Up/Down arrow keys. Preparing Documents (or batches) for Scanning: • Check the batch for staples, paper-clips and calculator tape, etc. and remove these items. These items will cause the scanner to jam. • Ensure all documents are facing in the same direction and not upside down. • Jog the documents straight so all documents are stacked together, this will reduce “piggy-backing”, jams and double documents. Get Ready to Scan: 1. Place the documents (straight and even) into the hopper. (See picture at the left) 2. Pull the first item out slightly so the scanner rollers will have something to grab. 3. Always make sure ‘Detect Double-Feed’ is selected before proceeding to scan items. This will ensure any duplicated items scanned will be detected. 4. Click Scan highlighted in green at the bottom left side of the screen to begin scanning the deposit. Rev 02/2014 6 5. While the deposit is scanning, you will see the following message: “Scanning in progress, please wait….” 6. After all items have gone through the scanner, click Fix Errors to begin fixing exceptions within the deposit. View Exceptions: Once you have finished scanning the batch, select Capture Complete, which will indicate to the system no more items will be presented for the current batch. It is now you can view any exceptions that may exist. Exceptions occur when data is missing or was entered improperly in the system. By clicking on “Fix Errors” all items that require correction are presented in light Pink. Update the needed fields and then hit Enter. Rev 02/2014 7 Common Exceptions: 1. 2. 3. 4. Image Quality - Rescan the item or accept the image if the image quality is acceptable. Item Amount – Input missing amount or correct misread amount. MICR data – Correct or complete missing MICR data. Duplicate Items – delete or accept duplicated item from the deposit Rev 02/2014 8 MICR fields that can be updated: • • Check Number - is the serial number or check number (4 digits) for personal checks Amount - The dollar amount found on the item See Sample Check below: Note: Checks should have the correct symbols separating the routing number, account number, and serial number for Source capture to read the Check MICR correctly. Deposit Information: If the Deposit Amount and the Total of Checks agree and the Difference Amount is $0.00 then your deposit is ready to be submitted. Click Submit Deposit to send the deposit to the financial institution. If you’re not ready to submit the deposit at this time and would like to return to the deposit later, click Save Deposit. Rev 02/2014 9 Common Status Bar : A status bar at the bottom of the Scan page displays summary information regarding the current user’s session. This status area is displayed on every Web Capture window The bar contains the following: • • • • Total # of items scanned Total # of items processed (uploaded) Current Batch that is being processed Link to the Upload Monitor that will show summary details for the currently processing batch Common Status Bar on Scan Page: Rev 02/2014 10 How to Correct Jammed Documents: If a document jams during the process, usually the scanner will stop and the message box will display a Device Error Message, as shown below: • Clear the document(s) from the machine making sure not to damage the documents or the scanner, then select OK for the scanner to try to clear the jam. • Retain the documents in the proper order as a rescan may required for the document • Review the Transaction section of the screen (shows all items that were successfully scanned). • Determine the last item that was scanned by taking the last items from the scanner pocket. Turn them upside down in front of you and work backwards until you find the last item that was processed. Remember that an item that is sprayed on the back of the check does not mean that item processed. The jam could have occurred before the item went through the camera. • Reinsert the next item or items that did not scan into the hopper with the remaining documents. • Click the Scan tab to complete processing the batch. Important Note: Only the items with images that the user can see on the monitor were actually scanned. The spray on the back of the item(s) is NOT a confirmation that the image was processed. Rev 02/2014 11 How to Delete an Item within a Deposit: st To delete an item, the item will 1 need to be located on the grid, select the row which will allow the system to display the front image. Verify the item selected is the correct item that needs to be deleted. 1) Highlight the appropriate MICR line, which will display the corresponding image. Then click the Delete Item icon as shown below. 3. Select ‘Yes’ to delete the item out of the batch. If No is selected the current item within the batch will remain. Note: Items scanned upside down or backwards will need to be Deleted and rescanned. Rev 02/2014 12 To Remove a Batch or Deposit: 1. To remove a deposit while currently in the deposit, select the Delete Deposit button. 2. Upon selecting the Remove Deposit button, you will receive the following warning: 3. Select Yes to proceed with the removal of the Batch or No to return to the Deposit Capture window and carry on with the same batch. 4. To remove a batch from the Home screen, place a check next to the appropriate deposit, then click Remove. Rev 02/2014 13 Enlarging the Image: To view the image of an item, click the + sign next along the left for the appropriate item. If the image of the scanned item is difficult to read, the whole item can be enlarged by clicking on the image. Moving the mouse will show different parts of the enlarged image. After clicking the + sign Rev 02/2014 14 How to Rescan a Document – Failed Image Quality: Image Analysis consists of the following components: 1. Image Quality Tests that check for skews, dark bands, missing or folded corners, document framing errors, and partial images. 2. Image Usability Tests detect the presence and usability of the data fields on the image; CAR Amount and the MICR line. 3. Reprocesses are items that fail image analysis and must be rescanned before they can be accepted. If the image is not better, the item may still fail. If a ‘Poor Image Quality’, the captured image had failed the Image Quality test. This will show after you have clicked Fix Errors. 1) 2) 3) 4) 5) This is an image quality suspect, and you need to view the image to ensure that it is acceptable. Examine the images of the front and back of the check to determine if it’s acceptable. If the image of the item is not acceptable then select rescan to replace the current image. To delete item out of the deposit, click Delete To accept the image as is, click Accept to keep the item within the deposit 6) When rescanning the item, find the item within the batch and select Rescan Rev 02/2014 15 7) The system will give the following warning message: 8) Select Yes to continue the rescan process. When rescanning an item, the MICR is compared to that of the original item. If there is a match, the image is overlaid. If there is a discrepancy, you receive the following warning: 9) If Yes is selected, the new item image replaces the original. If you select No, the system defers to the original item. Rev 02/2014 16 Duplicates: Once all items have been scanned within the deposit, all exceptions have been addressed, the program will then display any duplicate items that are detected within the current batch or from any previously scanned batch within 60 days (or whatever length of time the items are retained on the server). ‘Duplicate Item Detected’ will display at the top of the screen. This will display the images of items that our considered duplicate side by side, with the Current Item along the left and the item(s) from previous deposits along the right. The below screen is an example of the check image that were detected by the system as duplicated checks. Note: The information about the item from a previous deposit will display below the image. The system will display the following information when the last similar item was processed: Deposit ID Captured Operator Capture Date Status Rev 02/2014 17 To correct duplicates: At this point you can delete the duplicate(s) by clicking Delete or click Accept to override the exception and accept the duplicate(s) item. Once all duplicates are resolved, the message ‘Success. All Errors Fixed’ message will be displayed. The deposit is then ready to be submitted by clicking Submit Deposit. Deposit Status: Deposit Status is the first page displayed after a successful logon. You can also navigate to this page by selecting Home at the top left hand part of the screen as shown below. Depending on your authority, all of the deposits that you created display or all of the deposits for your business display. Rev 02/2014 18 From this window, you can open a particular deposit by selecting the Open Deposit icon for the appropriate Deposit ID. Also from this window, you can View Deposit Details for a particular batch by selecting the View Details icon for the appropriate batch. Rev 02/2014 19 After selecting the View Details option, a screen similar to the following will be displayed. The following statuses are defined for a Deposit: OPEN - a deposit/batch is placed in “OPEN” status when the batch is newly created or when a capture operator has reopened a batch to add additional items, or to resolve exceptions. SUSPENDED - a deposit/batch is placed in “SUSPENDED” status when a capture operator saves a batch for later capture or exception resolution. This status is functionally the same as “OPEN” but indicates that no one is currently working on the deposit. CAPTURE COMPLETE - a deposit/batch is placed in “CAPTURE COMPLETE” status when the capture operator selects the “CAPTURE COMPLETE” status. This status alerts the operators that there is no more capture work, but there are exceptions to resolve before it will become “READY FOR APPROVAL”. READY FOR APPROVAL - A deposit/batch will be automatically placed in “READY FOR APPROVAL” status when it is in “CAPTURE COMPLETE” status and the operator has resolved or accepted all capture exceptions. Rev 02/2014 20 SUBMITTED - a deposit/batch will be placed in “SUBMITTED” status when an approver submits the batch and all exceptions are resolved or accepted. A deposit that has been submitted can be viewed but cannot be modified. DELIVERED – a batch/deposit will be in delivered status when an approver user has submitted a batch and then the batch has been moved on to the next process at your financial institution On the View Deposits tab, select the All Deposits option if wanting to display all deposits, including deposits that have been submitted. Select the Pending Deposits option if wanting to display on those deposits that have not been submitted. (as shown above) Rev 02/2014 21 Reports: Begin by selecting the Reports tab. To include Search Options, click the and Amount Range. Select Deposit Detail Report for a complete deposit summary. Rev 02/2014 select a Date 22 Rev 02/2014 23 Item Query: Begin by selecting the View Items tab. To include Search Options, click the Amount Range. Rev 02/2014 select a Date and 24 Click the Advanced Search option to make additional search criteria available. Rev 02/2014 25 Click deposit. along the left to display the image of the appropriate item. Click Rev 02/2014 to view the entire 26 Menu Description Keys and functions: When you scan your checks, the fields will automatically populate. If a field fails to populate or populates with data that the system fails to recognize, it will be highlighted. Highlight the line of missing/incorrect data and enter the missing fields at the bottom of the window as follows: Rev 02/2014 27 The following menu items are accessible from all windows in Web Capture. Press this button to return to the Web Capture Home window. The following menu items are accessible from the windows with listed items in Web Capture. For example, the View Customers window displays this menu if there are more than 10 items. Press this button to create a new item. For example, if you are working in the View Customers window, press this button to add a new customer. Press this button to refresh the window with the most current information. Press the single arrow to go to the next page. Press the single arrow with the bar to go to the last page. Press the single arrow to go to the previous page. Press the single arrow with the bar to go to the first page Logout When you select the Logout option from the top, depending on your system’s configuration, one of the following will happen: Rev 02/2014 28 Tips for a Successful Scanning Experience 1) Prep work thoroughly removing all tapes, staples, paper clips and check for folded corners. 2) Jog and fan checks thoroughly before feeding through scanner to avoid piggy-backing. 3) When items scan crooked, check all fields to verify information scanned correctly. 4) If more than one person is using the device, make sure there are no out-of-balance batches prior to beginning new capture. 5) The scanning device may have trouble reading: • • • Rev 02/2014 *Items written in ink other than black *Checks written lightly or illegibly *Checks which have been folded, creased or mutilated 29 Web Capture Client Workstation Installation Please make sure that the ActiveX has been activated before installing SCO software. Please note: remote deposit is only compatible with Internet Explorer browser. Go to the Internet Explorer Browser Settings: The following information will allow you to implement Active X controls at a site with the same level of security as .Net and Java. 1. Open Internet Explorer 2. Click on Tools > Internet Options Rev 02/2014 30 3. Select the Security Tab 4. Select the Trusted Sits 5. Click the Sites button 6. Enter the website for Web Capture (ex: https://secure.bankcherokee.com) 7. Click the ADD button 8. Click Close Rev 02/2014 31 9. Click Custom level button 10. Scroll down and locate the “Automatic Prompting for ActiveX controls” section 11. Check the Radio button next to Enable Rev 02/2014 32 12. Locate the “Download signed ActiveX controls” section 13. Check the radio button next to Enable 14. Click OK 15. Click Yes 16. Click OK Rev 02/2014 33 17. Close Internet Explorer 18. Re-launch the Web Capture web site Scanner Driver Installation Go to www.bankcherokee.com/en/business/scannerdrivers.aspx 1. Download the “Merchant Capture Defaults” and the scanner driver for your particular model. 2. Install “Merchant Capture Defaults” first. Locate where you saved Merchant_Capture_Defaults.zip file and open it. Double click on the file “Merchant Capture Defaults.EXE” Rev 02/2014 34 3. Click Next. 4. Type “na” in the field for Target Server and select Merchant Capture from the drop-down menu for Installation Type. Click Next. Rev 02/2014 35 5. Click Next. 6. Click Install. Rev 02/2014 36 7. Click Finish. Now it is time to install the scanner driver. Locate the scanner driver you downloaded. Make sure the scanner is unplugged from your computer – this is VERY important!!! Open up the file and double click on the “.exe” file and simply accept the default settings. Once installed, plug in the scanner. You should be ready to go. Internet Explorer Versions 10 & 11 If using IE 10 or IE 11 you’ll need to be in compatibility mode. 1. Go to the remote deposit login page: https://secure.bankcherokee.com/WebCaptureWeb/MerchantCapture.do?appId=EBI1450&FI D=096000580 Rev 02/2014 37 2. Open up Tools and select Compatibility View Settings. 3. You should see “bankcherokee.com” in the Add this website: field. If not, go ahead and type it in. Click Add. Then click Close. You are now in compatibiltiy mode. Scanner Maintenance Make sure to blow out the scanner daily and complete a thorough cleaning once a week using cleaning cards. Rev 02/2014 38