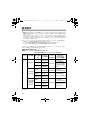
1
1 ページ 2009年10月6日 火曜日 午後6時56分 Operating Instructions/Bedienungsanleitung/ Mode d’emploi/Istruzioni per l’uso/ Instrucciones de funcionamiento/ ENGLISH AG-YA500G(VQT2H48)_EGFISJ.book AG-YA500G Before operating this product, please read the instructions carefully and save this manual for future use. Bitte lesen Sie diese Bedienungsanleitung vor der Inbetriebnahme dieses Produkts aufmerksam durch, und bewahren Sie sie für späteres Nachschlagen auf. Avant d’utiliser l’appareil, lire attentivement ce mode d’emploi, et le conserver à des fins de référence ultérieure. Prima di far funzionare questo prodotto, leggere attentamente le istruzioni e conservare questo manuale per riferimenti futuri. Antes de utilizar este producto, lea cuidadosamente las instrucciones y guarde este manual por si tiene que utilizarlo en el futuro. このたびは、“ パナソニック製品 ” をお買い上げいただき、まことにありがとうございます。 ■ 取扱説明書をよくお読みのうえ、正しく安全にお使いください。 ■ ご使用前に「安全上のご注意」(2 ∼ 3 ページ)を必ずお読みください。 ■ 保証書は「お買い上げ日・販売店名」などの記入を確かめ、取扱説明書とともに大切に 保管してください。 保証書別添付 F0909T0 -F @ Printed in Japan 製造番号は、品質管理上重要なものです。 製品本体と保証書の製造番号をお確かめください。 VQT2H48 FRANÇAIS Model No. ITALIANO VF インターフェースボックス ESPANÕL VF Interface Box/VF Interface Box/ Boîtier d’interface VF/ VF interface box/Interfaz de VF/ DEUTSCH 取扱説明書 日 本 語 AG-YA500G(VQT2H48)_EGFISJ.book 1 ページ 2009年10月6日 火曜日 午後6時56分 English Read this first! WARNING: z To reduce the risk of fire or electric shock, do not expose this equipment to rain or moisture. z To reduce the risk of fire or electric shock, keep this equipment away from all liquids. Use and store only in locations which are not exposed to the risk of dripping or splashing liquids, and do not place any liquid containers on top of the equipment. WARNING: Always keep accessories (screws) out of the reach of babies and small children. CAUTION: Do not remove panel covers by unscrewing them. To reduce the risk of electric shock, do not remove the covers. No user serviceable parts inside. Refer servicing to qualified service personnel. CAUTION: To reduce the risk of fire or electric shock and annoying interference, use the recommended accessories only. CAUTION: The mains plug of the power supply cord shall remain readily operable. The AC receptacle (mains socket outlet) shall be installed near the equipment and shall be easily accessible. To completely disconnect this equipment from the AC mains, disconnect the mains plug from the AC receptacle. indicates safety information. EEE Yönetmeliğine Uygundur. EEE Complies with Directive of Turkey. E-1 AG-YA500G(VQT2H48)_EGFISJ.book 2 ページ 2009年10月6日 火曜日 午後6時56分 FCC Note (USA): This equipment has been tested and found to comply with the limits for a class B digital device, pursuant to Part 15 of the FCC Rules. These limits are designed to provide reasonable protection against harmful interference in a residential installation. This equipment generates, uses, and can radiate radio frequency energy and, if not installed and used in accordance with the instruction manual, may cause harmful interference to radio communications. However, there is no guarantee that interference will not occur in a particular installation. If this equipment does cause harmful interference to radio or television reception, which can be determined by turning the equipment off and on, the user is encouraged to try to correct the interference by one or more of the following measures: z Reorient or relocate the receiving antenna. z Increase the separation between the equipment and receiver. z Connect the equipment into an outlet on a circuit different from that to which the receiver is connected. z Consult the dealer or an experienced radio/TV technician for help. z The user may find the booklet “Something About Interference” available from FCC local regional offices helpful. Warning : To assure continued FCC emission limit compliance, follow the attached installation instructions and the user must use only shielded interface cables when connecting to peripheral devices. Also any unauthorized changes or modifications to this equipment could void the user’s authority to operate this device. NOTIFICATION (Canada) This class B digital apparatus complies with Canadian ICES-003. indicates safety information. E-2 ENGLISH Read this first! (Continued) AG-YA500G(VQT2H48)_EGFISJ.book 3 ページ 2009年10月6日 火曜日 午後6時56分 Read this first ! (continued) EMC NOTICE FOR THE PURCHASER/USER OF THE APPARATUS 1. Applicable standards and operating environment (For Europe) The apparatus is compliant with: z standards EN55103-1 and EN55103-2 1996.11, and z electromagnetic environments E1, E2, E3, and E4. 2. Pre-requisite conditions to achieving compliance with the above standards <1> Peripheral equipment to be connected to the apparatus and special connecting cables z The purchaser/user is urged to use only equipment which has been recommended by us as peripheral equipment to be connected to the apparatus. z The purchaser/user is urged to use only the connecting cables described below. <2> For the connecting cables, use shielded cables which suit the intended purpose of the apparatus. z Video signal connecting cables Use double shielded coaxial cables, which are designed for 75-ohm type highfrequency applications, for SDI (Serial Digital Interface). Coaxial cables, which are designed for 75-ohm type high-frequency applications, are recommended for analog video signals. z Audio signal connecting cables If your apparatus supports AES/EBU serial digital audio signals, use cables designed for AES/EBU. Use shielded cables, which provide quality performance for high-frequency transmission applications, for analog audio signals. z Other connecting cables (IEEE1394, USB) Use shielded cables, which provide quality performance for high-frequency applications, as connecting cables. z When connecting to the DVI signal terminal, use a cable with a ferrite core. z If your apparatus is supplied with ferrite core(s), they must be attached on cable(s) following instructions in this manual. 3. Performance level The performance level of the apparatus is equivalent to or better than the performance level required by these standards. However, the apparatus may be adversely affected by interference if it is being used in an EMC environment, such as an area where strong electromagnetic fields are generated (by the presence of signal transmission towers, cellular phones, etc.). In order to minimize the adverse effects of the interference on the apparatus in cases like this, it is recommended that the following steps be taken with the apparatus being affected and with its operating environment: 1. Place the apparatus at a distance from the source of the interference. 2. Change the direction of the apparatus. 3. Change the connection method used for the apparatus. 4. Connect the apparatus to another power outlet where the power is not shared by any other appliances. E-3 AG-YA500G(VQT2H48)_EGFISJ.book 4 ページ 2009年10月6日 火曜日 午後6時56分 Thank you for purchasing the VF Interface Box AG-YA500G (“this unit” hereafter). Read this first! ................................................................................. E-1 Supplied Accessories ..................................................................... E-4 Features ........................................................................................... E-4 System Diagram .............................................................................. E-5 Parts and their functions ................................................................ E-6 Mounting to the Camera recorder.................................................. E-7 Basic Operations ............................................................................. E-8 Specifications .................................................................................. E-10 Supplied Accessories Mounting bracket a 1 Mounting screws (8 mm) a 4 Mounting screws (12 mm) a 2 Features z This unit switches the video signal output from the VF connector of the camera recorder that is recording with the return video (RET video) output from the camera adapter (AG-CA300G, optional), and supplies it to the viewfinder. z Switching of the signal can be performed by the RET switch on the lens or the RET switch on the camera adapter. z It is possible to turn on the tally of the viewfinder if there is a tally signal output from either the camera recorder or the camera adapter. E-4 ENGLISH Contents AG-YA500G(VQT2H48)_EGFISJ.book 5 ページ 2009年10月6日 火曜日 午後6時56分 System Diagram Viewfinder AJ-VF15BP/E AJ-VF20WBP/E AG-VF11G AJ-HVF21G AJ-CVF100G AG-EC4G AG-BS300P/E Lens AG-CA300G Camera recorder * AG-YA500G CAM VF CA VF LENS CAM LENS * Compatible camera recorders AG-HPX500/502 AJ-HPX3700G AJ-HPX2700G AJ-HPX3000G AJ-HPX2000/2100 AJ-HDX900P/E <Notes> z This unit needs to set the viewfinder type (HD/ LCD SD) connected via the menu of the base station (AG-BS300P/E, option). Refer to the operating Instructions of the AG-BS300P/E. z Connect all the connectors on this unit to the camera recorder, lens, camera adapter and the viewfinder. z When storing the camera recorder into the hard carrying case, remove this unit from the camera recorder before storing. z Only lenses that have a round 12-pin connector interface are compatible with this unit. E-5 AG-YA500G(VQT2H48)_EGFISJ.book 6 ページ 2009年10月6日 火曜日 午後6時56分 ENGLISH Parts and their functions VF CAM VF CA VF 4 LENS 1 CAM LENS 2 3 7 6 5 1. LENS connector (12 pins) This is a connector to input the signal from the lens. Connect with the connector on the lens. 2. CAM LENS cable This is a connector to output the signal from the lens to the camera recorder. Connect with the lens connector of the camera recorder. 3. CAM VF cable This is a connector to input the signal from the camera recorder. Connect with the VF connector of the camera recorder. 4. CA VF cable This is a connector to receive the return video (RET video) and the tally signal from the camera adapter. Connect with the VF OUT connector of the camera adapter. 5. VF connector This is a connector to output the video signal and tally signal switched by this unit. Connect with the viewfinder. 6. Adjustment screw This is used to adjust this unit backward and forward to match the viewfinder in use. 7. Adjustment bracket Attach the included mounting bracket. After checking "Mounting to the Camera recorder" (page 7), attach to the adjustment bracket and the camera recorder. E-6 AG-YA500G(VQT2H48)_EGFISJ.book 7 ページ 2009年10月6日 火曜日 午後6時56分 Mounting to the Camera recorder 1 2 Confirm the supplied accessories. 3 Mount the mounting bracket to the adjustment bracket using the two included mounting screws (8 mm) so that this unit will be horizontal when it is mounted to the camera recorder to be used. Note that the position of the mounting bracket varies as shown below depending on the model of camera recorder in use. Mount the mounting bracket to the camera recorder using the two included (8 mm) mounting screws. When using the microphone holder (AJ-MH800G, optional) together with this unit, use the included mounting screws (12 mm). Mounting screws AJ-HPX2700G/AJ-HPX3700G AJ-HPX2000P/2100E/AJ-HPX3000G AG-HPX500/502 AJ-HDX900P/E 4 E-7 Connect the camera recorder and camera adapter to this unit referring to “Parts and their functions” (page 6). AG-YA500G(VQT2H48)_EGFISJ.book 8 ページ 2009年10月6日 火曜日 午後6時56分 z Switching of the video signals is performed by pressing the RET switch on the lens or the RET switch on the camera adapter. Return video is output from this unit while the RET switch is pressed. Also, if there is a tally signal either from the camera recorder or the base station, it is also output from this unit, and the tally LED on the viewfinder can be turned on. However, the tally LED on the camera adapter is turned on only by the tally signal from the base station. z With the system combining the base station and the camera adapter, it is possible to select the HD or SD video signal as a return video. If the system is HD, either HD or SD return video can be selected. If the system is SD, the return video will only be SD video signal. The camera system (HD/SD), return video (HD/SD), and the viewfinder can be used in the following combinations: RET signal switching when this unit is used (Connected viewfinder: AJ-HVF21G / AJ-VF11G / Viewfinder included with the AG-HPX500/502 / AJ-CVF100G) System Camera model RET input signal format to the AGBS300P/E HD SDI AG-HPX500/ 502 HD AG-CA300G VF OUT connector signal Camera recorder VF connector signal HD COMPONENT Image displayed on the AJ-HVF21G/AG-VF11G/ AJ-CVF100G Cannot be used since HD/SD are mixed. SD SDI SD SDI cannot be transmitted. HD SDI HD COMPONENT HD HD (AJ-HVF21G/AJ-CVF100G COMPONENT COMPONENT can be used) SD COMPONENT SD COMPONENT (AG-VF11G can be used) (Viewfinder included with the AG-HPX500/ SD COMPOSITE 502 can be used) COMPONENT AJ-HPX3000G* AJ-HPX2000P/ SD SDI 2100E* SD SDI cannot be transmitted. SD COMPOSITE COMPONENT HD SDI AJ-HPX3700G AJ-HPX2700G SD SDI AJ-HDX900P/E COMPOSITE SD SD COMPONENT COMPONENT (AG-VF11G can be used) HD COMPONENT (AJ-HVF21G/AJ-CVF100G can be used) HD COMPONENT SD SDI cannot be transmitted. SD COMPONENT HD COMPONENT Cannot be used since HD/SD are mixed. * You can switch between camera recorder VF connector signals using the camera recorder unit menu. E-8 ENGLISH Basic Operations AG-YA500G(VQT2H48)_EGFISJ.book System Camera model RET input signal format to the AGBS300P/E HD SDI AG-HPX500/ 502 9 ページ 2009年10月6日 火曜日 午後6時56分 AG-CA300G VF OUT connector signal HD SDI cannot be transmitted. Camera recorder VF connector signal Image displayed on the AJ-HVF21G/AG-VF11G/ AJ-CVF100G Cannot use since HD video cannot be transmitted. SD SD COMPONENT COMPONENT (AG-VF11G can be used) SD (Viewfinder included COMPOSITE COMPONENT with the AG-HPX500/ 502 can be used) SD SDI SD AJ-HPX3000G* HD SDI AJ-HPX2000P/ 2100E* SD SDI HD SDI cannot be transmitted. Cannot use since HD HD video cannot be COMPONENT transmitted. SD SD SD COMPONENT COMPOSITE COMPONENT COMPONENT (AG-VF11G can be used) AJ-HPX3700G AJ-HPX2700G Cannot use since system cannot be set to SD mode. AJ-HDX900P/E * You can switch between camera recorder VF connector signals using the camera recorder unit menu. <Note> AJ-VF15BP/E and AJ-VF20WBP/E will have same operation as the AG-VF11G. Note that the AJ-VF15BP/E and the AJ-VF20WBP/E do not support automatic switching between field frequencies of 59.94 (60) Hz/50 Hz. Select a viewfinder to match the field frequency that is in use. E-9 AG-YA500G(VQT2H48)_EGFISJ.book 10 ページ 2009年10月6日 火曜日 午後6時56分 Specifications Input DC + 5.6 V, 0.06 A DC - 5.6 V, 0.06 A indicates safety information. Dimensions (W a H a D): 113 mm a 60 mm a 41 mm (4.4 inches a 2.4 inches a 1.6 inches) (excluding protruding parts) Weight: approx. 410 g (approx. 0.9 lb) Operating temperature: 0 °C to 40 °C (32 °F to 104 °F) Storage temperature: -20 °C to 60 °C (-4 °F to 140 °F) Operating humidity: 10 % to 85 % (w/o condensation) [I/O Section] ENGLISH [General] LENS: Round 12 pin CAM LENS: Round 12 pin CAM VF: Round 20 pin VF: Round 20 pin CA VF: D-Sub 15 pin [Accessories] Mounting bracket a 1 Mounting screws (8 mm) a 4 Mounting screws (12 mm) a 2 Weight and dimensions when shown are approximately. Specifications are subject to change without notice. Information on Disposal for Users of Waste Electrical & Electronic Equipment (private households) This symbol on the products and/or accompanying documents means that used electrical and electronic products should not be mixed with general household waste. For proper treatment, recovery and recycling, please take these products to designated collection points,where they will be accepted on a free of charge basis. Alternatively, in some countries you may be able to return your products to your local retailer upon the purchase of an equivalent new product. Disposing of this product correctly will help to save valuable resources and prevent any potential negative effects on human health and the environment which could otherwise arise from inappropriate waste handling. Please contact your local authority for further details of your nearest designated collection point. Penalties may be applicable for incorrect disposal of this waste, in accordance with national legislation. For business users in the European Union If you wish to discard electrical and electronic equipment, please contact your dealer or supplier for further information. Information on Disposal in other Countries outside the European Union This symbol is only valid in the European Union. If you wish to discard this product, please contact your local authorities or dealer and ask for the correct method of disposal. E-10 AG-YA500G(VQT2H48)_EGFISJ.book 1 ページ 2009年10月6日 火曜日 午後6時56分 GERMAN Bitte lesen! WARNUNG: z Zur Reduzierung der Gefahr eines Brands oder elektrischen Schlags dieses Gerät weder Nässe noch Feuchtigkeit aussetzen. z Zur Reduzierung der Gefahr eines Brands oder elektrischen Schlags muss dieses Gerät von allen Flüssigkeiten ferngehalten werden. Vermeiden Sie Gebrauch und Lagerung des Gerätes an orten, an denen die Gefahr besteht, dass es mit Flüssigkeiten betropft oder bespritzt wird, und stellen Sie keine Flüssigkeitsbehälter auf das Gerät. WARNUNG: Halten Sie Zubehörteile (Schrauben) stets fern von Babys und Kleinkindern. WARNUNG: Öffnen Sie nicht das Gerät durch Abschrauben von Gehäuseteilen. Zur Vermeidung von elektrischem Schlag darf das Gehäuse nicht geöffnet werden. Im Geräteinneren befinden sich keine Teile, die vom Benutzer gewartet werden können. Wartungs- und Reparaturarbeiten grundsätzlich autorisiertem Kundendienstpersonal überlassen. VORSICHT: Nur das empfohlene Zubehör verwenden, um die Gefahr von Feuer und elektrischem Schlag sowie Störungen auszuschalten. VORSICHT: Ein unbehinderter zugang zum Netzstecker des Netzkabels muss jederzeit gewährleistet sein. Die Steckdose (Netzsteckdose) sollte in der nähe des Gerätes installiert werden und leicht zugänglich sein. Um dieses Gerät vollständig vom Nets zu trennen, den Netzstecker aus der Netzsteckdose ziehen. ist die Sicherheitsinformation. G-1 AG-YA500G(VQT2H48)_EGFISJ.book 2 ページ 2009年10月6日 火曜日 午後6時56分 Bitte lesen ! (Fortsetzung) EMV-HINWEIS FÜR DEN KÄUFER/ANWENDER DES GERÄTS 1. Anwendbare Standards und Betriebsumgebung (Für Europe) Dieses Gerät entspricht: z Standards EN55103-1 und EN55103-2 1996.11 und <1> An das Gerät angeschlossene Geräte und spezielle Verbindungskabel z Der Käufer/Anwender sollte nur Geräte verwenden, die von uns als Zusatzgeräte für den Anschluss an das Gerät empfohlen wurden. z Der Käufer/Anwender sollte nur die unten aufgeführten Verbindungskabel verwenden. <2> Für den Anschluss abgeschirmte Kabel verwenden, die dem Gerätezweck entsprechen z Videokabel Für SDI (Serial Digital Interface) doppelt abgeschirmte 75-Ohm HF-Koaxialkabel verwenden. Für analoge Videosignale werden 75-Ohm HF-Koaxialkabel empfohlen. z Audiokabel Verwenden Sie Kabel für AES/EBU, wenn Ihr Gerät serielle digitale AES/EBUAudiosignale unterstützt. Verwenden Sie für analoge Audiosignale abgeschirmte Kabel für hochwertige HFÜbertragungen. z Weitere Kabel (IEEE1394, USB) Verwenden Sie abgeschirmte Kabel für hochwertige HF-Anwendungen. z Für die Verbindung zum DVI-Signalanschluss muss ein Kabel mit Ferritkern verwendet werden. z Wird Ihr Gerät mit Ferritkernen geliefert, müssen diese an den Kabeln befestigt werden, siehe Angaben in dieser Anleitung. 3. Leistungsniveau Das Leistungsniveau des Geräts entspricht oder übersteigt das von diesen Standards verlangte Leistungsniveau. Das Gerät kann aber durch Nutzung in einer EMV-Umgebung, wie Bereichen mit starken elektromagnetischen Feldern (durch Sendemasten, Mobiltelefone etc.) störend beeinflusst werden. Um in diesen Situationen die störenden Einflüsse auf das Gerät zu minimieren wird empfohlen, folgende Schritte für betroffene Geräte und Betriebsumgebungen durchzuführen. 1. Positionieren Sie das Gerät von der Störquelle entfernt. 2. Ändern Sie die Geräterichtung. 3. Ändern Sie die Anschlussmethode des Geräts. 4. Schließen Sie das Gerät an eine andere Stromverbindung, die mit keinen weiteren Geräten geteilt wird. G-2 DEUTSCH z elektromagnetische Umgebungen, E1, E2, E3 und E4. 2. Erforderliche Bedingungen zur Einhaltung der oben genannten Standards AG-YA500G(VQT2H48)_EGFISJ.book 3 ページ 2009年10月6日 火曜日 午後6時56分 Vielen Dank, dass Sie die VF Interface Box AG-YA500G gekauft haben (nachfolgend “dieses Gerät”). Inhalt Bitte lesen!........................................................................................G-1 Mitgeliefertes Zubehör.....................................................................G-3 Funktionen........................................................................................G-3 System Diagram ...............................................................................G-4 Teile und ihre Funktionen................................................................G-5 Montage an den Kamerarecorder ...................................................G-6 Basisbetrieb......................................................................................G-7 Spezifikationen.................................................................................G-9 Mitgeliefertes Zubehör Montageklammer a 1 Montageschrauben (8 mm) a 4 Montageschrauben (12 mm) a 2 Funktionen z Dieses Gerät schaltet die Videosignalausgabe vom VF-Anschluss des Kamerarecorders um, welcher mit der Return-Video-Ausgabe (RET Video) vom Kameraadapter (AG-CA300G, optional) aufnimmt, und liefert es an den Sucher. z Das Ausschalten des Signals kann mit dem RET-Schalter am Objektiv oder mit dem RETSchalter am Kameraadapter durchgeführt werden. z Es ist möglich, den Zähler des Suchers einzuschalten, wenn es entweder vom Kamerarecorder oder vom Kameraadapter eine Zählerausgabe gibt. G-3 AG-YA500G(VQT2H48)_EGFISJ.book 4 ページ 2009年10月6日 火曜日 午後6時56分 System Diagram Sucher AJ-VF15BP/E AJ-VF20WBP/E AG-VF11G AJ-HVF21G AJ-CVF100G AG-EC4G DEUTSCH AG-BS300E Objektiv AG-CA300G Kamerarecorder * AG-YA500G CAM VF CA VF LENS CAM LENS * Kompatible Kamerarecorder AG-HPX500E AJ-HPX3700G AJ-HPX2700G AJ-HPX3000G AJ-HPX2100E AJ-HDX900E <Hinweise> z Dieses Gerät muss den Suchertyp (HD/LCD SD) einstellen, der durch das Menü der Basisstation (AG-BS300E, optional) verbunden wird. Siehe Gebrauchsanweisung des AGBS300E. z Verbinden Sie die Anschlüsse dieses Geräts mit dem Kamerarecorder, Objektiv, Kameraadapter und dem Sucher. z Wenn Sie den Kamerarecorder in der Hartschalentragetasche aufbewahren, montieren Sie dieses Gerät vom Kamerarecorder ab, bevor Sie es aufbewahren. z Nur Objektive mit einer runden 12-poligen Anschlussschnittstelle sind mit diesem Gerat kompatibel. G-4 AG-YA500G(VQT2H48)_EGFISJ.book 5 ページ 2009年10月6日 火曜日 午後6時56分 Teile und ihre Funktionen VF CAM VF CA VF 4 LENS 1 CAM LENS 2 1. LENS-Anschluss (12 Kontakte) Dies ist ein Anschluss, um das Signal vom Objektiv einzuspeisen. Schließen Sie ihn an den Anschluss des Objektivs an. 2. CAM LENS-Kabel Dies ist ein Anschluss, um das Signal vom Objektiv an den Kamerarecorder auszugeben. Schließen Sie ihn an den Objektivanschluss des Kamerarecorders an. 3. CAM VF-Kabel Dies ist ein Anschluss, um das Signal vom Kamerarecorder einzuspeisen. Schließen Sie ihn an den VF-Anschluss des Kamerarecorders an. 4. CA VF-Kabel Dies ist ein Anschluss, um das ReturnVideo-Signal (RET Video) und das Zählersignal vom Kameraadapter zu erhalten. Verbinden Sie ihn mit dem VF OUT-Anschluss des Kameraadapters. 5. VF-Anschluss Dies ist ein Anschluss, um das Videosignal und das Zählersignal auszugeben, welches von diesem Gerät umgeschaltet wird. Schließen Sie es an den Sucher an. 6. Justierschraube Diese wird verwendet, um dieses Gerät vorwärts und rückwärts zu justieren, damit es mit dem Sucher, wenn er im Gebrauch ist, übereinstimmt. 7. Justierklammer Bringen Sie die beigelegte Montageklammer an. Nachdem Sie “Montage an den Kamerarecorder” (Seite 6), gelesen haben, bringen Sie sie an der Justierklammer und dem Kamerarecorder an. G-5 3 7 6 5 AG-YA500G(VQT2H48)_EGFISJ.book 6 ページ 2009年10月6日 火曜日 午後6時56分 Montage an den Kamerarecorder 2 Bestätigen Sie das Mitgeliefertes Zubehör. 3 Montieren Sie die Montageklammer an die Justierklammer, indem Sie die zwei mitgelieferten Montageschrauben (8 mm) verwenden, sodass dieses Gerat horizontal ausgerichtet ist, wenn es am Kamerarecorder angebracht wird, der verwendet werden soll. Beachten Sie, dass die Position der Montageklammer, je nachdem welches Modell des Kamerarecorders in Gebrauch ist, variieren kann, wie unten gezeigt wird. Montieren Sie die Montageklammer an den Kamerarecorder, indem Sie die zwei mitgelieferten Montageschrauben (8 mm) verwenden. Wenn Sie den Mikrofonhalter (AJ-MH800G, optional) zusammen mit diesem Gerät verwenden, verwenden Sie die mitgelieferten Montageschrauben (12 mm). Montageschrauben AJ-HPX2700G/AJ-HPX3700G AJ-HPX2100E/AJ-HPX3000G AG-HPX500E AJ-HDX900E 4 Schließen Sie den Kamerarecorder und den Kameraadapter an dieses Gerät an, indem Sie sich “Teile und ihre Funktionen” (Seite 5) ansehen. G-6 DEUTSCH 1 AG-YA500G(VQT2H48)_EGFISJ.book 7 ページ 2009年10月6日 火曜日 午後6時56分 Basisbetrieb z Das Ausschalten des Videosignals wird durch das Drücken des RET-Schalters am Objektiv oder des RET-Schalters am Kameraadapter durchgeführt. Return Video wird von diesem Gerät ausgegeben, während der RET-Schalter gedrückt wird. Es wird auch von diesem Gerät ausgegeben, wenn es ein Zählersignal, entweder vom Kamerarecorder oder der Basisstation, gibt und die Zähler-LED-Anzeige am Sucher eingeschaltet werden kann. Allerdings wird die Zähler-LED-Anzeige am Kameraadapter nur durch das Zählersignal der Basisstation eingeschaltet. z Da das System die Basisstation mit dem Kameraadapter kombiniert, ist es möglich das HD oder das SD-Videosignal als Videorücklauf auszuwählen. Wenn das System HD ist, kann entweder HD oder SD Return Video gewählt werden. Wenn das System SD ist, ist das Return Video nur ein SD-Videosignal. Das Kamerasystem (HD/SD), Return Video (HD/SD) und der Sucher, können in folgenden Kombinationen verwendet werden: RET-Signal umschalten, wenn dieses Gerät verwendet wird (Angeschlossener Sucher: AJ-HVF21G / AJ-VF11G / Mitgelieferter Sucher fur den AG-HPX500E / AJ-CVF100G) System Kameramodul RET AG-CA300G Kamerarecorder Angezeigte Bilder auf dem Eingangssyignalfor VF OUTVFAJ-HVF21G/AG-VF11G/ mat an den AGAnschlusssignal Anschlusssignal AJ-CVF100G BS300E HD SDI HD COMPONENT Kann nicht verwendet werden, da HD/SD vertauscht sind. SD SDI kann SD COMPONENT SD nicht übertragen COMPONENT (AG-VF11G kann werden. verwendet werden) (Mitgelieferter Sucher fur SD den AG-HPX500E kann COMPOSITE COMPONENT verwendet werden) AG-HPX500E SD SDI HD SDI HD HD COMPONENT HD HD (AJ-HVF21G/AJ-CVF100G COMPONENT COMPONENT kann verwendet werden) AJ-HPX3000G* AJ-HPX2100E* SD SDI SD SDI kann nicht übertragen SD COMPONENT SD werden. (AG-VF11G kann COMPONENT verwendet werden) SD COMPOSITE COMPONENT HD SDI AJ-HPX3700G AJ-HPX2700G SD SDI AJ-HDX900E HD COMPONENT HD COMPONENT (AJ-HVF21G/AJ-CVF100G kann verwendet werden) SD SDI kann HD nicht übertragen COMPONENT Kann nicht verwendet werden. werden, da HD/SD vertauscht sind. SD COMPOSITE COMPONENT * Sie konnen zwischen den VF-Anschlusssignalen des Kamerarecorders umschalten, indem Sie das Menu des Kamerarecordergerats verwenden. G-7 AG-YA500G(VQT2H48)_EGFISJ.book System Kameramodul 8 ページ 2009年10月6日 火曜日 午後6時56分 RET AG-CA300G Kamerarecorder Angezeigte Bilder auf dem Eingangssyignalfor VF OUTVFAJ-HVF21G/AG-VF11G/ mat an den AGAnschlusssignal Anschlusssignal AJ-CVF100G BS300E HD SDI HD SDI kann nicht übertragen werden. Kann nicht verwendet werden, da HD-Video nicht übertragen werden kann. SD SD COMPONENT COMPONENT (AG-VF11G kann verwendet werden) SD (Mitgelieferter Sucher fur COMPOSITE COMPONENT den AG-HPX500E kann verwendet werden) SD HD SDI AJ-HPX3000G* AJ-HPX2100E* Kann nicht verwendet HD SDI kann HD werden, da HD-Video nicht übertragen COMPONENT nicht übertragen werden. werden kann. SD SDI SD COMPONENT SD SD (AG-VF11G kann COMPOSITE COMPONENT COMPONENT verwendet werden) AJ-HPX3700G Kann nicht verwendet werden, da das System nicht auf den SDAJ-HPX2700G Modus eingestellt werden kann. AJ-HDX900E * Sie konnen zwischen den VF-Anschlusssignalen des Kamerarecorders umschalten, indem Sie das Menu des Kamerarecordergerats verwenden. <Hinweis> AJ-VF15BP/E und AJ-VF20WBP/E haben den gleichen Betrieb wie AG-VF11G. Beachten Sie, dass der AJ-VF15BP/E und der AJ-VF20WBP/E kein automatisches Umschalten zwischen Feldfrequenzen von 59.94 (60) Hz/50 Hz unterstutzen. Wahlen Sie einen Sucher aus, der zur Feldfrequenz passt, die gerade in Gebrauch ist. G-8 DEUTSCH AG-HPX500E SD SDI AG-YA500G(VQT2H48)_EGFISJ.book 9 ページ Spezifikationen [Allgemein] Eingang DC + 5,6 V, 0,06 A DC - 5,6 V, 0,06 A ist die Sicherheitsinformation. Abmessungen (B a H a T): 113 mm a 60 mm a 41 mm (außer vorstehende Teile) Gewicht: Ca. 410 g Betriebstemperatur: 0 °C bis 40 °C Lagertemperatur: -20 °C bis 60 °C Betriebsfeuchtigkeit: 10 % bis 85 % (ohne Kondensation) [I/O Kapitel] LENS: Rund 12 Kontakte CAM LENS: Rund 12 Kontakte CAM VF: Rund 20 Kontakte VF: Rund 20 Kontakte CA VF: D-Sub 15 Stifte [Zubehör] Montageklammer a 1 Montageschrauben (8 mm) a 4 Montageschrauben (12 mm) a 2 Gewicht und Abmessungen sind ungefähre Werte. Die Spezifikationen können ohne Hinweis verändert werden. G-9 2009年10月6日 火曜日 午後6時56分 10 ページ 2009年10月6日 火曜日 午後6時56分 Benutzerinformationen zur Entsorgung von elektrischen und elektronischen Geräten (private Haushalte) Dieses Symbol auf Produkten und/oder begleitenden Dokumenten bedeutet, dass verbrauchte elektrische und elektronische Produkte nicht mit gewöhnlichem Haushaltsabfall vermischt werden sollen. Bringen Sie zur ordnungsgemäßen Behandlung, Rückgewinnung und Recycling diese Produkte zu den entsprechenden Sammelstellen, wo sie ohne Gebühren entgegengenommen werden. In einigen Ländern kann es auch möglich sein, diese Produkte beim Kauf eines entsprechenden neuen Produkts bei Ihrem örtlichen Einzelhändler abzugeben. Die ordnungsgemäße Entsorgung dieses Produkts dient dem Umweltschutz und verhindert mögliche schädliche Auswirkungen auf Mensch und Umgebung, die aus einer unsachgemäßen Handhabung von Abfall entstehen können. Genauere Informationen zur nächstgelegenen Sammelstelle erhalten Sie bei Ihrer Gemeindeverwaltung. In Übereinstimmung mit der Landesgesetzgebung können für die unsachgemäße Entsorgung dieser Art von Abfall Strafgebühren erhoben werden. Für Geschäftskunden in der Europäischen Union Bitte treten Sie mit Ihrem Händler oder Lieferanten in Kontakt, wenn Sie elektrische und elektronische Geräte entsorgen möchten. Er hält weitere Informationen für sie bereit. Informationen zur Entsorgung in anderen Ländern außerhalb der Europäischen Union Dieses Symbol ist nur in der Europäischen Union gültig. Bitte treten Sie mit Ihrer Gemeindeverwaltung oder Ihrem Händler in Kontakt, wenn Sie dieses Produkt entsorgen möchten, und fragen Sie nach einer Entsorgungsmöglichkeit. G-10 DEUTSCH AG-YA500G(VQT2H48)_EGFISJ.book AG-YA500G(VQT2H48)_EGFISJ.book 1 ページ 2009年10月6日 火曜日 午後6時56分 FRANÇAIS Lire ces informations en premier ! AVERTISSEMENT: z Pour réduire tout risque d’incendie ou de choc électrique, évitez d’exposer cet appareil à la pluie ou à l’humidité. z Pour réduire tout risque d’incendie ou de choc électrique, éloignez l’appareil des liquides. Utiliser et ranger uniquement dans un endroit ne risquant pas de recevoir des gouttes ou d’être aspergé de liquides, et ne pas mettre de récipient renfermant des liquides sur le dessus de l’appareil. AVERTISSEMENT: Rangez toujours les accessoires (vis) hors de portée des bébés et des jeunes enfants. AVERTISSEMENT: Ne pas dévisser le couvercle. Pour réduire tout risque d’électrocution, ne pas retirer le couvercle. Il ne se trouve à l’intérieur aucune pièce qui puisse être réparée par l’utilisateur. Confier toute réparation à un personnel qualifié. ATTENTION: Pour réduire tout risque d’incendie, de choc électrique ou d’interférences, n’utilisez que les accessoires recommandés. ATTENTION: La fiche du cordon d’alimentation doit être facilement accessible. La prise de courant (prise secteur) doit être installée à proximité de l’appareil et facilement accessible. Pour déconnecter complètement cet appareil du secteur, débranchez la fiche du cordon d’alimentation de la prise de courant. NOTIFICATION (Canada) Cet appareil numéique de la classe B est conforme à la norme NMB-003 du Canada. Informations concernant la sécurité. F-1 AG-YA500G(VQT2H48)_EGFISJ.book 2 ページ 2009年10月6日 火曜日 午後6時56分 Lire ces informations en premier ! (suite) NOTE D’INFORMATION SUR LA CEM POUR L’ACHETEUR/ UTILISATEUR DE L’APPAREIL 1. Normes applicables et environnement de fonctionnement (Pour l’Europe) L’appareil est conforme: z aux normes EN55103-1 et EN55103-2 1996.11, et z aux environnements électromagnétiques E1, E2, E3 et E4 2. Conditions requises pour obtenir la conformité aux normes ci-dessus <1> Equipements périphériques à connecter à l’appareil et câbles de connexion spéciaux z L’acheteur/utilisateur est invité à utiliser uniquement des équipements recommandés par notre société comme équipements périphériques à connecter à l’appareil. z L’acheteur/utilisateur est invité à n’utiliser que les câbles de connexion décrits ci-dessous. z Câbles de connexion signal vidéo Utilisez des câbles coaxiaux blindés, conçus pour des applications à haute fréquence du type 75 ohms, pour la SDI (Serial Digital Interface). Les câbles coaxiaux, conçus pour des applications à haute fréquence du type 75 ohms, sont conseillés pour les signaux vidéo analogiques. z Câbles de connexion signal audio Si votre appareil prend en charge les signaux audio numériques série AES/EBU, utilisez des câbles conçus pour AES/EBU. Utilisez des câbles blindés, qui assure des performances de qualité pour les applications de transmission haute fréquence, pour les signaux audio analogiques. z Autres câbles de connexion (IEEE1394, USB) Utilisez des câbles blindés, qui assurent des performances de qualité pour les applications haute fréquence, comme câbles de connexion. z Lors du raccordement à la borne de signal DVI, utilisez un câble avec un noyau de ferrite. z Si votre appareil est fourni avec un ou plusieurs tore(s) magnétique(s), ils doivent être fixés sur le(s) câble(s) selon les instructions figurant dans la présent manuel. 3. Niveau de performance Le niveau de performance de l’appareil est équivalent ou supérieur au niveau de performance requis par les normes en question. Cependant, l’appareil pourrait être affecté de façon négative par des interférences s’il est utilisé dans un environnement CEM, tel qu’une zone où de forts champs électromagnétiques sont générés (par la présence de pylônes de transmission, téléphones portables etc.). Pour réduire au minimum les effets négatifs des interférences sur l’appareil dans des cas de ce genre, il est conseillé d’adopter les mesures suivantes en ce qui concerne l’appareil concerné et son environnement de fonctionnement: 1. Placez l’appareil à une certaine distance de la sources des interférences. 2. Changez la direction de l’appareil. 3. Changez la méthode de connexion utilisée pour l’appareil. 4. Connectez l’appareil à une autre prise électrique sur laquelle l’alimentation n’est partagée par aucun autre appareil. F-2 FRANÇAIS <2> Pour les câbles de connexion, utilisez des câbles blindés appropriés à l’utilisation de l’appareil. AG-YA500G(VQT2H48)_EGFISJ.book 3 ページ 2009年10月6日 火曜日 午後6時56分 Nous vous remercions d’avoir acheté le Boîtier d’interface VF AG-YA500G (appelé “cette unité” ci-après). Contenu Lire ces informations en premier ! .................................................F-1 Accessoires fournis.........................................................................F-3 Caractéristiques ...............................................................................F-3 Diagramme du système...................................................................F-4 Pièces et leurs fonctions.................................................................F-5 Montage sur le caméscope .............................................................F-6 Opérations de base..........................................................................F-7 Spécifications...................................................................................F-9 Accessoires fournis Support de montage a 1 Vis de montage (8 mm) a 4 Vis de montage (12 mm) a 2 Caractéristiques z Cette unité commute la sortie du signal vidéo provenant du connecteur VF du caméscope qui est en cours d’enregistrement avec la sortie vidéo en retour (vidéo RET) provenant de l’adaptateur pour caméra (AG-CA300G, en option), et la fournit au viseur. z La commutation du signal peut être effectuée par le commutateur RET sur l’objectif ou le commutateur RET sur l’adaptateur pour caméra. z Il est possible d’allumer le témoin d’enregistrement du viseur s’il y a une sortie du signal d’enregistrement provenant soit du caméscope, soit de l’adaptateur pour caméra. F-3 AG-YA500G(VQT2H48)_EGFISJ.book 4 ページ 2009年10月6日 火曜日 午後6時56分 Diagramme du système Viseur AJ-VF15BP/E AJ-VF20WBP/E AG-VF11G AJ-HVF21G AJ-CVF100G AG-EC4G AG-BS300P/E Objectif AG-CA300G Caméscope * CAM VF CA VF LENS CAM LENS * Caméscopes compatibles AG-HPX500/502 AJ-HPX3700G AJ-HPX2700G AJ-HPX3000G AJ-HPX2000/2100 AJ-HDX900P/E FRANÇAIS AG-YA500G <Remarques> z Cette unité nécessite le réglage du type de viseur (HD/LCD SD) connecté par l’intermédiaire du menu de la station de base (AG-BS300P/E, en option). Reportez-vous à la fiche d’instructions de l’AG-BS300P/E. z Connectez tous les connecteurs sur cette unité au caméscope, objectif, adaptateur pour caméra et viseur. z Lorsque vous rangez le caméscope dans la mallette de transport rigide, enlevez cette unité du caméscope avant le rangement. z Seuls les objectifs qui ont une interface connecteur a 12 broches sont compatibles avec cette unite. F-4 AG-YA500G(VQT2H48)_EGFISJ.book 5 ページ 2009年10月6日 火曜日 午後6時56分 Pièces et leurs fonctions VF CAM VF CA VF 4 LENS CAM LENS 1 1. Connecteur OBJECTIF (12 broches) Il s’agit d’un connecteur pour entrer le signal provenant de l’objectif. Connectezle au connecteur sur l’objectif. 2. Câble CAM OBJECTIF Il s’agit d’un connecteur pour transmettre le signal provenant de l’objectif au caméscope. Connectez-le au connecteur objectif du caméscope. 3. Câble CAM VF Il s’agit d’un connecteur pour entrer le signal provenant du caméscope. Connectez-le au connecteur VF du caméscope. 4. Câble CA VF Il s’agit d’un connecteur pour recevoir la vidéo en retour (vidéo RET) et le signal d’enregistrement provenant de l’adaptateur pour caméra. Connectez-le au connecteur VF OUT de l’adaptateur pour caméra. 5. Connecteur VF Il s’agit d’un connecteur pour transmettre le signal vidéo et le signal d’enregistrement commutés par cette unité. Connectez-le au viseur. 6. Vis de réglage Elle est utilisée pour ajuster cette unité vers l’arrière et vers l’avant afin de correspondre au viseur en cours d’utilisation. 7. Support de réglage Fixez le support de montage inclus. Apres avoir consulte “Montage sur le caméscope” (page 6), fixez le support de reglage et le camescope. F-5 2 3 7 6 5 AG-YA500G(VQT2H48)_EGFISJ.book 6 ページ 2009年10月6日 火曜日 午後6時56分 Montage sur le caméscope Confirmez les accessoires fournis. 3 Montez le support de montage sur le support de reglage en utilisant les deux vis de montage incluses (8 mm) de maniere a ce que cette unite soit horizontale lorsqu'elle est montee sur le camescope a utiliser. Notez que la position du support de montage varie comme indique cidessous en fonction du modele de camescope en utilisation. Montez le support de montage sur le camescope en utilisant les deux vis de montage incluses (8 mm). Lors de l’utilisation du support pour microphone (AJ-MH800G, en option) conjointement à cette unité, utilisez les vis de montage incluses (12 mm). Vis de montage AJ-HPX2700G/AJ-HPX3700G AJ-HPX2000/2100/AJ-HPX3000G AG-HPX500/502 FRANÇAIS 1 2 AJ-HDX900P/E 4 Connectez le caméscope et l’adaptateur pour caméra à cette unité en vous reportant à “Pièces et leurs fonctions” (page 5). F-6 AG-YA500G(VQT2H48)_EGFISJ.book 7 ページ 2009年10月6日 火曜日 午後6時56分 Opérations de base z La commutation des signaux vidéo peut être effectuée en pressant le commutateur RET sur l’objectif ou le commutateur RET sur l’adaptateur pour caméra. La vidéo en retour est transmise à partir de cette unité pendant que le commutateur RET est pressé. En outre, même s’il y a un signal d’enregistrement provenant soit du caméscope, soit de la station de base, celui-ci est également transmis à partir de cette unité, et le LED d’enregistrement sur le viseur peut être allumé. Cependant, le LED d’enregistrement sur l’adaptateur pour caméra n’est allumé que par le signal d’enregistrement provenant de la station de base. z Avec le système combinant la station de base et l’adaptateur pour caméra, il est possible de sélectionner le signal vidéo HD ou SD comme vidéo en retour. S’il s’agit du système HD, il est possible de sélectionner une vidéo en retour HD ou SD. S’il s’agit du système SD, la vidéo en retour sera uniquement un signal vidéo SD. Le système de caméra (HD/SD), la vidéo en retour (HD/SD) et le viseur peuvent être utilisés dans les combinaisons suivantes: Commutation du signal RET lorsque cette unité est utilisé (Viseur connecté: AJ-HVF21G / AJ-VF11G / Viseur inclus avec l’AG-HPX500/502 / AJ-CVF100G) Système Modèle de caméra Format du signal d’entrée RET à l’AG-BS300P/E HD SDI AG-HPX500/ 502 COMPOSANT HD Signal du Image affichée sur connecteur VF l’AJ-HVF21G/AG-VF11G/ caméscope AJ-CVF100G Ne peut être utilisée car mélange HD/SD. SD SDI ne peut COMPOSANT SD être transmis. COMPOSANT (AG-VF11G peut être SD utilisé) (Le viseur inclus avec COMPOSANT COMPOSITE l’AG-HPX500/502 peut SD etre utilise) SD SDI HD SDI HD AG-CA300G Signal du connecteur VF OUT AJ-HPX3000G* AJ-HPX2000/ SD SDI 2100* COMPOSANT HD COMPOSANT COMPOSANT (AJ-HVF21G/AJ-CVF100G HD HD peut être utilisé) SD SDI ne peut être transmis. COMPOSANT COMPOSANT SD (AG-VF11G peut être COMPOSANT SD utilisé) COMPOSITE SD HD SDI AJ-HPX3700G AJ-HPX2700G SD SDI AJ-HDX900P/E COMPOSANT HD COMPOSANT HD (AJ-HVF21G/AJ-CVF100G peut être utilisé) COMPOSANT SD SDI ne peut HD être transmis. Ne peut être utilisée car mélange HD/SD. COMPOSANT COMPOSITE SD * Vous pouvez commuter les signaux du connecteur VF du camescope en utilisant le menu de l'unite camescope. F-7 AG-YA500G(VQT2H48)_EGFISJ.book Système Modèle de caméra 8 ページ Format du signal d’entrée RET à l’AG-BS300P/E HD SDI AG-HPX500/ 502 SD 2009年10月6日 火曜日 午後6時56分 AG-CA300G Signal du connecteur VF OUT HD SDI ne peut être transmis. Signal du Image affichée sur connecteur VF l’AJ-HVF21G/AG-VF11G/ caméscope AJ-CVF100G Ne peut être utilisée étant donné que la vidéo HD ne peut être transmise. COMPOSANT COMPOSANT SD SD (AG-VF11G peut être utilisé) COMPOSANT (Le viseur inclus avec COMPOSITE SD l’AG-HPX500/502 peut etre utilise) SD SDI HD SDI AJ-HPX3000G* AJ-HPX2000/ 2100* SD SDI Ne peut être utilisée HD SDI ne peut COMPOSANT étant donné que la vidéo HD ne peut être être transmis. HD transmise. AJ-HPX3700G Ne peut être utilisé étant donné que le système ne peut être réglé AJ-HPX2700G sur le mode SD. AJ-HDX900P/E * Vous pouvez commuter les signaux du connecteur VF du camescope en utilisant le menu de l'unite camescope. <Remarque> AJ-VF15BP/E et AJ-VF20WBP/E fonctionneront de la même manière que l’AG-VF11G. Notez que l’AJ-VF15BP/E et l’AJ-VF20WBP/E ne prennent pas en charge la commutation automatique entre les frequences de trames de 59.94 (60) Hz/50 Hz. Selectionnez un viseur correspondant a la frequence de trames en cours d’utilisation. F-8 FRANÇAIS COMPOSANT SD COMPOSANT COMPOSANT (AG-VF11G peut être SD COMPOSITE SD utilisé) AG-YA500G(VQT2H48)_EGFISJ.book 9 ページ Spécifications [Générales] Entrée CC + 5,6 V, 0,06 A CC - 5,6 V, 0,06 A Informations concernant la sécurité. Dimensions (L a H a P): 113 mm a 60 mm a 41 mm (4,4 pouces a 2,4 pouces a 1,6 pouces) (à l’exclusion des parties saillantes) Poids: Environ 410 g (Environ 0,9 lb) Température de service: 0 °C à 40 °C Température de stockage: -20 °C à 60 °C Humidité de service: 10 % à 85 % (sans condensation) [Section E/S] LENS: Rond à 12 broches CAM LENS: Rond à 12 broches CAM VF: Rond à 20 broches VF: Rond à 20 broches CA VF: D-Sub à 15 broches [Accessoires] Support de montage a 1 Vis de montage (8 mm) a 4 Vis de montage (12 mm) a 2 Le poids et les dimensions indiqués sont approximatifs. Les spécifications sont sujettes à des modifications sans préavis. F-9 2009年10月6日 火曜日 午後6時56分 AG-YA500G(VQT2H48)_EGFISJ.book 10 ページ 2009年10月6日 火曜日 午後6時56分 Informations relatives à l’évacuation des déchets, destinées aux utilisateurs d’appareils électriques et électroniques (appareils ménagers domestiques) Lorsque ce symbole figure sur les produits et/ou les documents qui les accompagnent, cela signifie que les appareils électriques et électroniques ne doivent pas être jetés avec les ordures ménagères. Pour que ces produits subissent un traitement, une récupération et un recyclage appropriés, envoyez-les dans les points de pré-collecte désignés, où ils peuvent être déposés gratuitement. Dans certains pays, il est possible de renvoyer les produits au revendeur local en cas d’achat d’un produit équivalent. En éliminant correctement ce produit, vous contriburez à la conservation des ressources vitales et à la prévention des éventuels effets négatifs sur l’environnement et la santé humaine, pouvant être dus à la manipulation inappropriée des déchets. Veuillez contacter les autorités locales pour connaître le point de pré-collecte le plus proche. Des sanctions peuvent être appliquées en cas d’élimination incorrecte de ces déchets, conformément à la législation nationale. Informations sur l’évacuation des déchets dans les pays ne faisant pas partie de l’Union européenne Ce symbole n’est reconnu que dans l’Union européenne. Pour supprimer ce produit, contactez les autorités locales ou votre revendeur afin de connaître la procédure d’élimination à suivre. F-10 FRANÇAIS Utilisateurs professionnels de l’Union européenne Pour en savoir plus sur l’élimination des appareils électriques et électroniques, contactez votre revendeur ou fournisseur. AG-YA500G(VQT2H48)_EGFISJ.book 1 ページ 2009年10月6日 火曜日 午後6時56分 ITALIANO Leggere prima quanto segue! AVVERTIMENTO: z Per ridurre il rischio d’incendio o di folgorazione, non esporre questo prodotto alla pioggia o all’umidità. z Per ridurre il rischio d’incendio o di folgorazione, mantenere questo prodotto lontano da ogni tipo di liquido. Usarlo e conservarlo soltanto in luoghi che non siano esposti a gocciolamenti o spruzzi di liquidi, e non mettervi sopra recipienti di liquidi. ATTENZIONE: Conservare sempre accessori (viti) fuori dalla portata dei bambini. ATTENZIONE: Non togliere il coperchio svitandolo Per ridurre i pericoli di scosse elettriche, non togliere il coperchio. All’interno non ci sono parti riparabili dall’utente. Per le riparazioni, rivolgersi a personale tecnico qualificato. ATTENZIONE: Per ridurre i pericoli d’incendio o di scosse elettriche e di fastidiose interferenze, usare soltanto gli accessori raccomandati. ATTENZIONE: La spina del cavo di alimentazione deve essere sempre a portata di mano. La presa c.a. (pressa di rete) deve essere installata vicino all’apparecchio ed essere facilmente accessibile. Per isolare completamente questo prodotto dalla fonte di alimentazione, staccare la spina del cavo di alimentazione dalla presa di corrente. sono le informazioni sulla sicurezza. I-1 AG-YA500G(VQT2H48)_EGFISJ.book 2 ページ 2009年10月6日 火曜日 午後6時56分 Leggere prima quanto segue! (continua) AVVISO EMC PER L’ACQUIRENTE/UTENTE DELL’APPARATO 1. Standard applicabili e ambiente operativo (Per l’Europa) L’apparato è conforme a: z standard EN55103-1 e EN55103-2 1996.11 e z ambienti elettromagnetici delle classi E1, E2, E3 e E4. 2. Prerequisiti essenziali per la conformità agli standard sopra menzionati <1> Periferiche da collegare all’apparato e cavi di collegamento speciali z Si raccomanda all’acquirente/utente di collegare l’apparato esclusivamente con periferiche da noi approvate. z Si raccomanda all’acquirente/utente di utilizzare esclusivamente i cavi di collegamento descritti in basso. <2> Per i cavi di collegamento, utilizzare cavi schermati idonei per l’utilizzo previsto per l’apparato. z Cavi di collegamento per segnali audio Se l’apparato dell’utente supporta i segnali audio digitali seriali AES/EBU, utilizzare i cavi progettati per segnali AES/EBU. Per i segnali audio analogici, utilizzare cavi schermati che garantiscono prestazioni di qualità per le applicazioni di trasmissione ad alta frequenza. z Altri cavi di collegamento (IEEE1394, USB) Come cavi di collegamento, utilizzare cavi schermati che garantiscono prestazioni di qualità per le applicazioni ad alta frequenza. z Per la connessione al terminale del segnale DVI utilizzare un cavo dotato di anello in ferrite. z Se l’apparato dell’utente dispone di anima/e in ferrite, questa deve essere attaccata al cavo o ai cavi come indicato nelle istruzioni che seguono nel presente manuale. 3. Livello di prestazioni Il livello di prestazioni dell’apparato è equivalente o superiore al livello di prestazioni richiesto da questi standard. Tuttavia, l’apparato potrebbe essere disturbato da interferenze esterne qualora venga utilizzato in un ambiente EMC, come nel caso di un’area con forti campi elettromagnetici (generati dalla presenza di torri per la trasmissione di segnali, telefoni cellulari, ecc.). In casi simili, al fine di minimizzare il disturbo di tali interferenze sull’apparato, si consiglia di intervenire sull’apparato e sul suo ambiente operativo adottando le misure indicate di seguito: 1. Posizionare l’apparato lontano dalla fonte dell’interferenza. 2. Cambiare la direzione dell’apparato. 3. Cambiare il metodo di collegamento utilizzato per l’apparato. 4. Collegare l’apparato a un’altra presa sul muro che non sia condivisa con altri apparecchi. I-2 ITALIANO z Cavi di collegamento per segnali video Utilizzare cavi coassiali con doppia schermatura, progettati per applicazioni in alta frequenza da 75-ohm, per SDI (interfaccia digitale seriale). Per i segnali video analogici sono consigliati cavi coassiali, progettati per applicazioni in alta frequenza da 75-ohm. AG-YA500G(VQT2H48)_EGFISJ.book 3 ページ 2009年10月6日 火曜日 午後6時56分 Grazie per aver acquistato una VF interface box AG-YA500G (nel seguito denominata “l’unità”). Sommario Leggere prima quanto segue!.........................................................I-1 Accessori inclusi..............................................................................I-3 Caratteristiche ..................................................................................I-3 Schema del sistema.........................................................................I-4 Parti e funzioni .................................................................................I-5 Montaggio sulla telecamera ............................................................I-6 Operazioni di base ...........................................................................I-7 Specifiche tecniche..........................................................................I-9 Accessori inclusi Staffa di montaggio a 1 Viti di montaggio (8 mm) a 4 Viti di montaggio (12 mm) a 2 Caratteristiche z L’unità commuta il segnale video trasmesso dal connettore VF della telecamera che sta registrando nel video di ritorno (video RET) trasmesso dall’adattatore della telecamera (AG-CA300G, opzionale) e lo fornisce al mirino. z La commutazione del segnale può essere effettuata mediante l’interruttore RET situato sull’obiettivo o l’interruttore RET situato sull’adattatore della telecamera. z È possibile accendere il tally del mirino, se è presente segnale tally trasmesso dalla telecamera o dall’adattatore della telecamera. I-3 AG-YA500G(VQT2H48)_EGFISJ.book 4 ページ 2009年10月6日 火曜日 午後6時56分 Schema del sistema Mirino AJ-VF15BP/E AJ-VF20WBP/E AG-VF11G AJ-HVF21G AJ-CVF100G AG-EC4G AG-BS300E Obiettivo AG-CA300G Telecamera * CAM VF CA VF LENS CAM LENS * Telecamere compatibili AG-HPX500E AJ-HPX3700G AJ-HPX2700G AJ-HPX3000G AJ-HPX2100E AJ-HDX900E <Note> z L’unità deve impostare il tipo di mirino (HD/LCD SD) montato attraverso il menu della stazione di base (AG-BS300E, opzionale). Vedere il foglio d’istruzioni della AG-BS300E. z Collegare tutti i connettori dell’unità a telecamera, obiettivo, adattatore della telecamera e mirino. z Prima di riporre la telecamera nella custodia di trasporto rigida, togliere l’unità dalla telecamera. z Solo gli obiettivi che hanno un'interfaccia per connettore circolare a 12 pin sono compatibili con questa unita. I-4 ITALIANO AG-YA500G AG-YA500G(VQT2H48)_EGFISJ.book 5 ページ 2009年10月6日 火曜日 午後6時56分 Parti e funzioni VF CAM VF CA VF 4 LENS 1 CAM LENS 2 1. Connettore OBIETTIVO (12 pin) È il connettore di ingresso dei segnali dall’obiettivo. Collegarlo al connettore dell’obiettivo. 2. Cavo OBIETTIVO CAM È il connettore che trasmette il segnale dall’obiettivo alla telecamera. Collegarlo al connettore dell’obiettivo della telecamera. 3. Cavo CAM VF È il connettore che immette il segnale dalla telecamera. Collegarlo al connettore VF della telecamera. 4. Cavo CA VF È il connettore di ricezione del segnale tally e video di ritorno (video RET) dall’adattatore della telecamera. Collegarlo al connettore VF OUT dell’adattatore della telecamera. 5. Connettore VF È il connettore che trasmette il segnale tally e il segnale video commutati dall’unità. Collegarlo al mirino. 6. Vite di regolazione È utilizzata per regolare l’unità in avanti e indietro per adattarla al mirino utilizzato. 7. Staffa di regolazione Fissare la staffa di montaggio fornita. Dopo avere controllato “Montaggio sulla telecamera” (pagina 6), fissare sulla staffa di regolazione e sulla telecamera. I-5 3 7 6 5 AG-YA500G(VQT2H48)_EGFISJ.book 6 ページ 2009年10月6日 火曜日 午後6時56分 Montaggio sulla telecamera 2 Verificare che siano presenti i accessori inclusi. 3 Montare la staffa di montaggio sulla telecamera mediante le due viti di montaggio (8 mm) fornite in modo tale che, una volta montata sulla telecamera da utilizzare, l’unità sia in posizione orizzontale. Si osservi che la posizione della staffa di montaggio varia come mostrato sotto in base al modello di telecamera utilizzata. Montare la staffa di montaggio sulla telecamera mediante le due viti di montaggio (8 mm) fornite. Se si utilizza il supporto microfono (AJ-MH800G, opzionale) insieme all’unità, utilizzare le viti di montaggio (12 mm) fornite. Viti di montaggio AJ-HPX2700G/AJ-HPX3700G AJ-HPX2100E/AJ-HPX3000G AG-HPX500E AJ-HDX900E 4 Collegare la telecamera e l’adattatore della telecamera all’unità facendo riferimento a “Parti e funzioni” (pagina 5). I-6 ITALIANO 1 AG-YA500G(VQT2H48)_EGFISJ.book 7 ページ 2009年10月6日 火曜日 午後6時56分 Operazioni di base z La commutazione dei segnali video viene effettuata premendo l’interruttore RET situato sull’obiettivo o l’interruttore RET situato sull’adattatore della telecamera. Mentre è premuto l’interruttore RET dall’unità viene trasmesso il video di ritorno. Inoltre, se dalla telecamera o dalla stazione di base è trasmesso un segnale tally, quest’ultimo viene trasmesso anche dall’unità, e il LED tally sul mirino può essere acceso. Tuttavia, il LED tally sull’adattatore della telecamera viene acceso solo dal segnale tally trasmesso dalla stazione di base. z Con il sistema che unisce stazione di base e adattatore della telecamera, è possibile selezionare il segnale video HD o SD come video di ritorno. Se il sistema è HD, è possibile selezionare il video di ritorno HD o SD. Se il sistema è SD, il video di ritorno sarà solo un segnale video SD. Il sistema delle telecamera (HD/SD), video di ritorno (HD/SD) e mirino può essere usato nelle seguenti combinazioni: Commutazione del segnale RET quando l’unità viene utilizzata (mirino montato: AJ-HVF21G / AJ-VF11G / Mirino incluso con l’AG-HPX500E / AJ-CVF100G) Sistema Modello telecamera Formato del segnale di ingresso RET all’AG-BS300E HD SDI AG-CA300G Segnale connettore VF OUT HD COMPONENT Segnale Immagine visualizzata connettore sull’AJ-HVF21G/ VF telecamera AG-VF11G/AJ-CVF100G Non utilizzabile poiché HD/SD sono mixati. Non è possibile SD COMPONENT SD trasmettere (può essere utilizzato COMPONENT SD SDI. AG-VF11G) (il mirino incluso con SD l’AG-HPX500E puo COMPOSITE COMPONENT essere utilizzato) AG-HPX500E SD SDI HD SDI HD HD COMPONENT HD HD (può essere utilizzato COMPONENT COMPONENT AJ-HVF21G/AJ-CVF100G) AJ-HPX3000G* AJ-HPX2100E* SD SDI Non è possibile trasmettere SD COMPONENT SD SD SDI. (può essere utilizzato COMPONENT AG-VF11G) SD COMPOSITE COMPONENT HD SDI AJ-HPX3700G AJ-HPX2700G SD SDI AJ-HDX900E HD COMPONENT HD COMPONENT (può essere utilizzato AJ-HVF21G/AJ-CVF100G) Non è possibile HD trasmettere COMPONENT Non utilizzabile poiché SD SDI. HD/SD sono mixati. SD COMPOSITE COMPONENT * E possibile commutare i segnali del connettore VF della telecamera utilizzando il menu dell’unita della telecamera. I-7 AG-YA500G(VQT2H48)_EGFISJ.book Sistema Modello telecamera 8 ページ Formato del segnale di ingresso RET all’AG-BS300E HD SDI AG-HPX500E SD 2009年10月6日 火曜日 午後6時56分 AG-CA300G Segnale connettore VF OUT Non è possibile trasmettere HD SDI. Segnale Immagine visualizzata connettore sull’AJ-HVF21G/ VF telecamera AG-VF11G/AJ-CVF100G Non utilizzabile poiché non è possibile trasmettere video HD. SD SDI SD COMPONENT SD COMPONENT (può essere utilizzato AG-VF11G) SD (il mirino incluso con COMPOSITE COMPONENT l’AG-HPX500E puo essere utilizzato) HD SDI AJ-HPX3000G* AJ-HPX2100E* SD SDI Non è possibile Non utilizzabile poiché HD trasmettere non è possibile COMPONENT HD SDI. trasmettere video HD. SD COMPONENT SD SD (può essere utilizzato COMPOSITE COMPONENT COMPONENT AG-VF11G) AJ-HPX3700G Non utilizzabile poiché il sistema non è impostabile sulla modalità AJ-HPX2700G SD. AJ-HDX900E <Nota> Il funzionamento di AJ-VF15BP/E e AJ-VF20WBP/E è uguale a quello di AG-VF11G. Si osservi che la AJ-VF15BP/E e la AJ-VF20WBP/E non supportano la commutazione automatica tra le frequenze di campo di 59.94 (60) Hz/50 Hz. Selezionare un mirino per adattarlo alla frequenza di campo utilizzata. I-8 ITALIANO * E possibile commutare i segnali del connettore VF della telecamera utilizzando il menu dell’unita della telecamera. AG-YA500G(VQT2H48)_EGFISJ.book 9 ページ 2009年10月6日 火曜日 午後6時56分 Specifiche tecniche [Generale] Ingresso DC + 5,6 V, 0,06 A DC - 5,6 V, 0,06 A sono le informazioni sulla sicurezza. Dimensioni (L a H a P): 113 mm a 60 mm a 41 mm (escluse parti sporgenti) Peso: Aprox. 410 g Temperatura d’esercizio: Da 0 °C a 40 °C Temperatura di immagazzinaggio: Da -20 °C a 60 °C Umidità in esercizio: Da 10 % a 85 % (senza condensa) [Sezione I/O] LENS: Circolare a 12 pin CAM LENS: Circolare a 12 pin CAM VF: Circolare a 20 pin VF: Circolare a 20 pin CA VF: D-Sub a 15 pin [Accessori] Staffa di montaggio a 1 Viti di montaggio (8 mm) a 4 Viti di montaggio (12 mm) a 2 Pesi e dimensioni sono indicativi. Specifiche soggette a modifiche senza preavviso. I-9 AG-YA500G(VQT2H48)_EGFISJ.book 10 ページ 2009年10月6日 火曜日 午後6時56分 Informazioni per gli utenti sullo smaltimento di apparecchiature elettriche ed elettroniche obsolete (per i nuclei familiari privati) Questo simbolo sui prodotti e/o sulla documentazione di accompagnamento significa che i prodotti elettrici ed elettronici usati non devono essere mescolati con i rifiuti domestici generici. Per un corretto trattamento, recupero e riciclaggio, portare questi prodotti ai punti di raccolta designati, dove verranno accettati gratuitamente. In alternativa, in alcune nazioni potrebbe essere possibile restituire i prodotti al rivenditore locale, al momento dell’acquisto di un nuovo prodotto equivalente. Uno smaltimento corretto di questo prodotto contribuirà a far risparmiare preziose risorse ed evitare potenziali effetti negativi sulla salute umana e sull’ambiente, che potrebbero derivare, altrimenti, da uno smaltimento inappropriato. Per ulteriori dettagli, contattare la propria autorità locale o il punto di raccolta designato più vicino. In caso di smaltimento errato di questo materiale di scarto, potrebbero venire applicate delle penali, in base alle leggi nazionali. Per gli utenti aziendali nell’Unione Europea Qualora si desideri smaltire apparecchiature elettriche ed elettroniche, contattare il rivenditore o il fornitore per ulteriori informazioni. ITALIANO Informazioni sullo smaltimento in nazioni al di fuori dell’Unione Europea Questo simbolo è valido solo nell’Unione Europea. Qualora si desideri smaltire questo prodotto, contattare le autorità locali o il rivenditore e chiedere informazioni sul metodo corretto di smaltimento. I-10 AG-YA500G(VQT2H48)_EGFISJ.book 1 ページ 2009年10月6日 火曜日 午後6時56分 ESPANÕL Lea esto primero ADVERTENCIA: z Para reducir el riesgo de producir un incendio o recibir una sacudida eléctrica, no exponga este equipo a la lluvia ni a la humedad. z Para reducir el riesgo de incendio o sacudida eléctrica, mantenga este equipo alejado de todos los líquidos. Utilícelo y guárdelo solamente en lugares donde no corra el riesgo de que le caigan gotas o le salpiquen líquidos, y no coloque ningún recipiente de líquidos encima del equipo. ADVERTENCIA: Mantenga siempre los accesorios (tornillos) fuera del alcance de los bebés y niños pequeños. ADVERTENCIA: No quite la cubierta desatornillándola. No quite la tapa para evitar el riesgo de sacudidas eléctricas. Las piezas del interior no requieren mantenimiento por parte del usuario. Solicite las reparaciones al personal de servicio calificado. AVISO: Para reducir el riesgo de incendios, sacudidas eléctricas e interferencias molestas, ulilice solamente los accesorios recomendados. AVISO: El enchufe del cable de la alimentación deberá poder conectarse y desconectarse fácilmente. La toma de CA (toma de la red) deberá estar cerca del equipo y a ella podrá accederse fácilmente. Para desconectar completamente el equipo de la red, desconecte el cable de alimentación de la toma de red. indica información de seguridad. S-1 AG-YA500G(VQT2H48)_EGFISJ.book 2 ページ 2009年10月6日 火曜日 午後6時56分 Lea esto primero (continuación) AVISO SOBRE CEM PARA EL COMPRADOR/USUARIO DEL APARATO 1. Normas aplicables y ambiente de funcionamiento (Para Europa) El aparato está conforme con: z normas EN55103-1 y EN55103-2 1996.11. y z ambientes electromagnéticos E1, E2, E3 y E4. 2. Condiciones previas para conseguir la conformidad con las normas mencionadas <1> Equipo periférico por conectar al aparato y cables de conexión especiales z Se recomienda que el comprador/usuario utilice solo equipos recomendados por nosotros como equipos periféricos que se pueden conectar al aparato. z Se recomienda que el comprador/usuario utilice solo los cables de conexión descritos más abajo. <2> Para los cables de conexión, utilizar cables apantallados que se ajusten al destino del aparato. z Cables de conexión de señales de vídeo Utilizar cables coaxiales apantallados dobles, diseñados para aplicaciones de alta frecuencia del tipo de 75 ohm, para SDI (Interfaz digital en serie). Cables coaxiales, diseñados para aplicaciones de alta frecuencia del tipo de 75 ohm, están recomendados para señales de vídeo analógicas. z Cables de conexión de señales de audio Si el aparato es compatible con las señales de audio digitales en serie AES/EBU, utilizar cables diseñados para AES/EBU. Utilizar cables apantallados, que proporcionan un rendimiento de calidad para aplicaciones de transmisión en alta frecuencia, para señales de audio analógicas. z Otros cables de conexión (IEEE1394, USB) Utilizar cables apantallados, que proporcionan un rendimiento de calidad para aplicaciones de transmisión en alta frecuencia, como cables de conexión. z Para conectar el terminal de señales DVI, utilice un cable con un núcleo de ferrita. z Si el aparato está equipado con núcleo(s) de ferrita, tiene que conectarse al cable(s) siguiendo las instrucciones contenidas en este manual. El nivel de rendimiento del aparato es equivalente a o mejor respecto al nivel de rendimiento requerido por estas normas. Sin embargo, el aparato puede quedar perjudicado por las interferencias si se está utilizando en un ambiente CEM, como una zona donde haya fuertes campos electromagnéticos (generados por la presencia de torres de transmisión de señales, teléfonos móviles, etc.). Para minimizar los efectos negativos de la interferencia en el aparato en casos como éste, se recomienda llevar a cabo las siguientes operaciones en el aparato afectado y en su ambiente de funcionamiento. 1. Colocar el aparato a cierta distancia de la fuente de la interferencia. 2. Cambiar de dirección el aparato. 3. Cambiar el método de conexión utilizado para el aparato. 4. Conectar el aparato a otra toma de corriente que no comparta su energía con otros dispositivos. S-2 ESPANÕL 3. Nivel de rendimiento AG-YA500G(VQT2H48)_EGFISJ.book 3 ページ 2009年10月6日 火曜日 午後6時56分 Gracias por haber adquirido la interfaz de VF AG-YA500G (en adelante “esta unidad”). Índice Lea esto primero ..............................................................................S-1 Accesorios suministrados ..............................................................S-3 Características .................................................................................S-3 System Diagram ...............................................................................S-4 Partes y sus funciones ....................................................................S-5 Montaje en la videocámara grabadora ...........................................S-6 Funcionamiento básico ...................................................................S-7 Especificaciones ..............................................................................S-9 Accesorios suministrados Soporte de montaje a 1 Tornillos de montaje (8 mm) a 4 Tornillos de montaje (12 mm) a 2 Características z Esta unidad conmuta la salida de señal de vídeo del conector VF de la videocámara grabadora que está grabando con la salida de retorno de vídeo (RET video) del adaptador de videocámara (AG-CA300G, opcional), y la envía al visor. z La conmutación de la señal se puede realizar mediante el interruptor RET del objetivo o el interruptor RET del adaptador de videocámara. z Es posible activar el tally del visor si hay una salida de señal de tally desde la videocámara grabadora o el adaptador de videocámara. S-3 AG-YA500G(VQT2H48)_EGFISJ.book 4 ページ 2009年10月6日 火曜日 午後6時56分 System Diagram Visor AJ-VF15BP/E AJ-VF20WBP/E AG-VF11G AJ-HVF21G AJ-CVF100G AG-EC4G AG-BS300P/E Objetivo AG-CA300G AG-YA500G CAM VF CA VF LENS CAM LENS * Videocámaras grabadoras compatibles AG-HPX500/502 AJ-HPX3700G AJ-HPX2700G AJ-HPX3000G AJ-HPX2000/2100 AJ-HDX900P/E <Notas> z En esta unidad debe seleccionarse el tipo de visor (HD/LCD SD) conectado a través del menú de la estación base (AG-BS300P/E, opcional). Consulte la hoja de instrucciones de la AG-BS300P/E. z Conecte todos los conectores de esta unidad a la videocámara grabadora, el objetivo, el adaptador de videocámara y el visor. z Extraiga esta unidad de la videocámara grabadora cuando guarde la videocámara grabadora en la bolsa de transporte dura. z Solo son compatibles con esta unidad los objetivos que tengan un interfaz de conector circular de 12 clavijas. S-4 ESPANÕL Videocámara grabadora * AG-YA500G(VQT2H48)_EGFISJ.book 5 ページ 2009年10月6日 火曜日 午後6時56分 Partes y sus funciones VF CAM VF CA VF 4 LENS 1 CAM LENS 2 1. Conector LENS (12 clavijas) Conector de entrada de la señal del objetivo. Conéctelo con el conector del objetivo. 2. Cable CAM LENS Conector de salida de la señal del objetivo a la videocámara grabadora. Conéctelo con el conector del objetivo de la videocámara grabadora. 3. Cable CAM VF Conector de entrada de la señal de la videocámara grabadora. Conéctelo con el conector VF de la videocámara grabadora. 4. Cable CA VF Conector que recibe el vídeo de retorno (RET video) y la señal de tally del adaptador de videocámara. Conéctelo con el conector VF OUT del adaptador de videocámara. 5. Conector VF Conector de salida de la señal de vídeo y de la señal de tally conmutadas por esta unidad. Conéctelo con el visor. 6. Tornillo de ajuste Se utiliza para ajustar esta unidad hacia adelante y hacia atrás de forma que se adapte al visor utilizado. 7. Soporte de ajuste Instale el soporte de montaje incluido. Despues de consultar “Montaje en la videocámara grabadora” (página 6), instalelo en el soporte de montaje y la videocamara grabadora. S-5 3 7 6 5 AG-YA500G(VQT2H48)_EGFISJ.book 6 ページ 2009年10月6日 火曜日 午後6時56分 Montaje en la videocámara grabadora 2 Confirme que tiene los accesorios suministrados. 3 Instale el soporte de montaje en el soporte de ajuste utilizando los dos tornillos de montaje incluidos (8 mm) de modo que esta unidad quede en posicion horizontal al montarla en la videocamara grabadora para su uso. Tenga en cuenta que la posicion del soporte de montaje varia tal como se muestra a continuacion dependiendo del modelo de videocamara grabadora que se este utilizando. Instale el soporte de montaje en la videocamara grabadora utilizando los dos tornillos de montaje (8 mm) incluidos. Cuando utilice el portamicrófono (AJ-MH800G, opcional) junto con esta unidad, utilice los tornillos de montaje incluidos (12 mm). Tornillos de montaje AJ-HPX2700G/AJ-HPX3700G AJ-HPX2000/2100/AJ-HPX3000G AG-HPX500/502 AJ-HDX900P/E 4 Para conectar la videocámara grabadora y el adaptador de videocámara a esta unidad consulte “Partes y sus funciones” (página 5). ESPANÕL 1 S-6 AG-YA500G(VQT2H48)_EGFISJ.book 7 ページ 2009年10月6日 火曜日 午後6時56分 Funcionamiento básico z La conmutación de las señales de vídeo se realiza pulsando el interruptor RET del objetivo o el interruptor RET del adaptador de videocámara. El vídeo de retorno sale de esta unidad mientras se está pulsando el interruptor RET. Además, si hay una señal de tally procedente de la videocámara grabadora o de la estación base, también se extrae de esta unidad, y el LED de tally del visor se puede activar. Sin embargo, el LED de tally del adaptador de videocámara se enciende sólo mediante la señal de tally de la estación base. z Cuando el sistema combina la estación base y el adaptador de videocámara, es posible seleccionar la señal de vídeo HD o SD como vídeo de retorno. Si el sistema es HD, se puede seleccionar vídeo de retorno HD o SD. Si el sistema es SD, el vídeo de retorno sólo será señal de vídeo SD. El sistema de cámara (HD/SD), el vídeo de retorno (HD/SD) y el visor se pueden usar en las siguientes combinaciones: Conmutación de la señal RET cuando se utiliza esta unidad (Visor conectado: AJ-HVF21G / AJ-VF11G / Visor incluido con la AG-HPX500/502 / AJ-CVF100G) Sistema Modelo de cámara Formato de señal de entrada RET a la AG-BS300P/E HD SDI AG-HPX500/ 502 Señal del Imagen visualizada en el conector VF de AJ-HVF21G/AG-VF11G/ la videocámara AJ-CVF100G grabadora COMPONENTE HD No se puede utilizar ya que se mezclan HD y SD No se puede COMPONENTE COMPONENTE SD transmitir SD SD (se puede utilizar SDI. AG-VF11G) (Se puede utilizar el COMPONENTE visor incluido con la COMPUESTO SD AG-HPX500/502) SD SDI HD SDI HD AG-CA300G Señal del conector VF OUT AJ-HPX3000G* AJ-HPX2000/ SD SDI 2100* COMPONENTE HD COMPONENTE COMPONENTE (se puede utilizar AJHD HD HVF21G/AJ-CVF100G) No se puede transmitir SD COMPONENTE SD COMPONENTE SDI. (se puede utilizar SD AG-VF11G) COMPONENTE COMPUESTO SD HD SDI AJ-HPX3700G AJ-HPX2700G SD SDI AJ-HDX900P/E COMPONENTE HD COMPONENTE HD (se puede utilizar AJ-HVF21G/AJ-CVF100G) No se puede COMPONENTE transmitir SD HD No se puede utilizar ya SDI. que se mezclan HD y SD COMPONENTE COMPUESTO SD * Es posible cambiar entre las senales del conector VF de la videocamara grabadora utilizando el menu de la videocamara grabadora. S-7 AG-YA500G(VQT2H48)_EGFISJ.book Sistema Modelo de cámara 8 ページ Formato de señal de entrada RET a la AG-BS300P/E HD SDI AG-HPX500/ 502 SD 2009年10月6日 火曜日 午後6時56分 AG-CA300G Señal del conector VF OUT No se puede transmitir HD SDI. Señal del Imagen visualizada en el conector VF de AJ-HVF21G/AG-VF11G/ la videocámara AJ-CVF100G grabadora No se puede utilizar ya que no se puede transmitir vídeo HD. SD SDI COMPONENTE COMPONENTE SD (se puede utilizar SD AG-VF11G) COMPONENTE (Se puede utilizar el COMPUESTO SD visor incluido con la AG-HPX500/502) HD SDI AJ-HPX3000G* AJ-HPX2000/ SD SDI 2100* No se puede utilizar ya No se puede COMPONENTE que no se puede transmitir HD HD transmitir vídeo HD. SDI. COMPONENTE SD COMPONENTE COMPONENTE (se puede utilizar SD COMPUESTO SD AG-VF11G) AJ-HPX3700G No se puede utilizar ya que el sistema no se puede ajustar en el AJ-HPX2700G modo SD. AJ-HDX900P/E * Es posible cambiar entre las senales del conector VF de la videocamara grabadora utilizando el menu de la videocamara grabadora. ESPANÕL <Nota> AJ-VF15BP/E y AJ-VF20WBP/E funcionan del mismo modo que el AG-VF11G. Tenga en cuenta que el AJ-VF15BP/E y el AJ-VF20WBP/E no permiten el cambio automatico entre frecuencias de campo de 59.94 (60) Hz/50 Hz. Seleccione un visor que se ajuste a la frecuencia de campo que se este utilizando. S-8 AG-YA500G(VQT2H48)_EGFISJ.book 9 ページ Especificaciones [Generales] Entrada CC + 5,6 V, 0,06 A CC - 5,6 V, 0,06 A indica información de seguridad. Dimensiones (An. a Al. a Pr.): 113 mm a 60 mm a 41 mm (4,4 pulgadas a 2,4 pulgadas a 1,6 pulgadas) (excluidas las partes que sobresalen) Peso: Aprox. 410 g (Aprox. 0,9 lb) Temperatura de funcionamiento: de 0 °C a 40 °C (de 32 °F a 104 °F) Temperatura de almacenamiento: de -20 °C a 60 °C (de -4 F a 140 F) Humedad de funcionamiento: de 10 % a 85 % (sin condensación) [Sección E/S] LENS: Circular de 12 clavijas CAM LENS: Circular de 12 clavijas CAM VF: Circular de 20 clavijas VF: Circular de 20 clavijas CA VF: D-Sub de 15 clavijas [Accesorios] Soporte de montaje a 1 Tornillos de montaje (8 mm) a 4 Tornillos de montaje (12 mm) a 2 El peso y las dimensiones que se muestran son aproximados. Las especificaciones pueden sufrir cambios sin previo aviso. S-9 2009年10月6日 火曜日 午後6時56分 AG-YA500G(VQT2H48)_EGFISJ.book 10 ページ 2009年10月6日 火曜日 午後6時56分 Información sobre la eliminación para los usuarios de equipos eléctricos y electrónicos usados (particulares) La aparición de este símbolo en un producto y/o en la documentación adjunta indica que los productos eléctricos y electrónicos usados no deben mezclarse con la basura doméstica general. Para que estos productos se sometan a un proceso adecuado de tratamiento, recuperación y reciclaje, llévelos a los puntos de recogida designados, donde los admitirán sin coste alguno. En algunos países existe también la posibilidad de devolver los productos a su minorista local al comprar un producto nuevo equivalente. Si desecha el producto correctamente, estará contribuyendo a preservar valiosos recursos y a evitar cualquier posible efecto negativo en la salud de las personas y en el medio ambiente que pudiera producirse debido al tratamiento inadecuado de desechos. Póngase en contacto con su autoridad local para que le informen detalladamente sobre el punto de recogida designado más cercano. De acuerdo con la legislación nacional, podrían aplicarse multas por la eliminación incorrecta de estos desechos. Para empresas de la Unión Europea Si desea desechar equipos eléctricos y electrónicos, póngase en contacto con su distribuidor o proveedor para que le informe detalladamente. ESPANÕL Información sobre la eliminación en otros países no pertenecientes a la Unión Europea Este símbolo sólo es válido en la Unión Europea. Si desea desechar este producto, póngase en contacto con las autoridades locales o con su distribuidor para que le informen sobre el método correcto de eliminación. S-10 AG-YA500G(VQT2H48)_EGFISJ.book 1 ページ 2009年10月6日 火曜日 午後6時56分 日本語 このたびは VF インターフェースボックス AG-YA500G(以下、本機)をお買い上げいただ き、まことにありがとうございました。 目 次 付属品 ............................................................................................. J-1 安全上のご注意 ............................................................................... J-2 特 長 ............................................................................................. J-4 システム図 ...................................................................................... J-4 各部の名称と機能............................................................................ J-5 カメラに取り付けるには ................................................................. J-6 基本動作.......................................................................................... J-7 保証とアフターサービス ................................................................. J-9 定 格 ............................................................................................. J-10 付属品 取り付け金具× 1 J-1 固定ビス(8 mm) 固定ビス(12 mm) ×4 ×2 AG-YA500G(VQT2H48)_EGFISJ.book 2 ページ 2009年10月6日 火曜日 午後6時56分 安全上のご注意 必ずお守りください 人への危害、財産の損害を防止するため、必ずお守りいただくことを説明しています。 _ 誤った使い方をしたときに生じる危害や損害の程度を区分して、説明しています。 警告 「死亡や重傷を負うおそれがある内容」です。 注意 「傷害を負うことや、財産の損害が発生するおそれがある内 容」です。 _ お守りいただく内容を次の図記号で説明しています。 してはいけない内容です。 実行しなければならない内容です。 警告 異常、故障時には直ちに使用を中止する _異常があったときは、接続プラグを外す [内部に金属や水などの液体、 異物が入ったとき、落下などで外装ケース が破損したとき、 煙や異臭、 異音などが出たとき] (そのまま使うと、 火災の原因になります。 ) ⇒ 販売店に相談してください。 (次ページに続く) 日 本 語 J-2 AG-YA500G(VQT2H48)_EGFISJ.book 3 ページ 2009年10月6日 火曜日 午後6時56分 警告(続き) _本機がぬれたり、 水などの液体や異物が入らないようにする (火災の原因になります。 ) ⇒ 雨天・降雪・海岸・水辺での使用は、 特にご注意ください。 ⇒ 機器の上や近くに、 水などの液体が入った花びんなどの容器を置かないでください。 _コードのプラグは、根元まで確実に差し込む (差し込みが不完全ですと、 発熱による火災の原因になります。 ) ⇒ 傷んだプラグは使用しないでください。 _コードが破損するようなことはしない [傷つける、加工する、高温部や熱機器具に近づける、無理に曲げる、 ねじ る、 引っ張る、 重いものを載せる、束ねるなど] (傷んだまま使用すると、 火災・ショートの原因になります。 ) ⇒ コードの修理は、 お買い上げの販売店にご相談ください。 _固定ビスは、乳幼児の手の届く所に置かない (誤って飲み込むと、 身体に悪影響を及ぼします。 ) ⇒ 万一、 飲み込んだと思われるときは、 すぐに医師にご相談ください。 _分解や改造をしない (火災の原因になります。 また、 使用機器を損傷することがあります。 ) 分解禁止 注意 _直射日光の当たる場所や異常に温度が高くなる場所に置かない (特に真夏の車内、 車のトランクの中は、 想像以上に高温 (約60℃以上) になります。 本機 を絶対に放置しないでください。 外装ケースや内部部品が劣化するほか、 火災の原因に なります。 ) _油煙や湯気の当たるところ、湿気やほこりの多いところに置かない (電気が油や水分、 ほこりを伝わり、 火災の原因になることがあります。) _本機をカメラレコーダーに取り付けた状態で本機を使って持ち上げない (カメラレコーダーに取り付けた状態で持ち上げたりすると、 カメラレコーダーの重量 も本機に加わるため、 本機や取り付け部が破損し、 けがの原因になります。) _お手入れの際は安全のため、接続プラグを抜く (火災の原因になります。 ) J-3 AG-YA500G(VQT2H48)_EGFISJ.book 4 ページ 2009年10月6日 火曜日 午後6時56分 特 長 z 本機はカメラレコーダーの VF 端子から出力されるカメラレコーダーで撮影中の映像信号と カメラアダプター(AG-CA300G・別売品)から出力される送り返し映像(RET 映像)を 切り替えてビューファインダーに供給するものです。 z 信号の切り替えはレンズの RET スイッチ、あるいはカメラアダプターの RET スイッチで行 うことができます。 z カメラレコーダー、およびカメラアダプターから出力されるタリー信号のどちらか一方が あれば、ビューファインダーのタリーを点灯させることができます。 システム図 ビューファインダー AJ-VF15BP/E AJ-VF20WBP/E AG-VF11G AJ-HVF21G AJ-CVF100G AG-EC4G AG-BS300 レンズ AG-CA300G カメラレコーダー * AG-YA500G CAM VF CA VF LENS CAM LENS * 対応するカメラレコーダー AG-HPX555 AJ-HPX3700G AJ-HPX2700G AJ-HPX3000G AJ-HPX2100 AJ-HDX900 AJ-HDX400A < ノート > z 本機を使用時、接続するビューファインダーの種類(HD/LCD SD)をベースステーショ ン(AG-BS300・別売品)側のメニューで設定する必要があります。AG-BS300 の取扱説 明書を参照してください。 z 本機についている全てのコネクターをカメラレコーダー、レンズ、カメラアダプター、お よびビューファインダーに接続してください。 z カメラレコーダーをハードキャリングケースに収納するときは、本機をカメラレコーダー から外して収納してください。 z 本機が対応しているレンズは、丸型 12 ピンコネクターのインターフェイスを有するレンズ のみです。 J-4 日 本 語 AG-YA500G(VQT2H48)_EGFISJ.book 5 ページ 2009年10月6日 火曜日 午後6時56分 各部の名称と機能 VF CAM VF CA VF 4 LENS 1 CAM LENS 2 1. LENS 端子(12 ピン) レンズからの信号を入力する端子です。 レンズについているコネクターを接続し ます。 2. CAM LENS ケーブル レンズからの信号をカメラレコーダーへ 出力する端子です。カメラレコーダー本 体のレンズコネクターに接続します。 3. CAM VF ケーブル カメラレコーダーからの信号を入力する 端子です。カメラレコーダー本体の VF コ ネクターに接続します。 4. CA VF ケーブル カメラアダプターからの送り返し映像 (RET 映像)およびタリー信号を入力す る端子です。カメラアダプターの VF OUT 端子に接続します。 5. VF 端子 本機で切り替えた映像信号およびタリー 信号を出力する端子です。ビューファイ ンダーを接続します。 6. 調節ねじ ご使用になるビューファインダーに合わ せて、本機を前後方向に調節するときに 使用します。 7. 調節金具 付属の取り付け金具を取り付けます。 「カメラに取り付けるには」 (6 ページ) をご確認の上、取り付け金具およびカメ ラレコーダーに取り付けてください。 J-5 3 7 6 5 AG-YA500G(VQT2H48)_EGFISJ.book 6 ページ 2009年10月6日 火曜日 午後6時56分 カメラに取り付けるには 1 2 本機の付属品をご確認ください。 ご使用になるカメラレコーダーに取り 付けたとき、本機が水平の位置に来る ように付属の固定ビス(8 mm )2 本を 使って取り付け金具を調整金具に固定 してください。 ご使用になるカメラレコーダーにより、 取り付け金具の位置は以下のようにな ります。 3 付属の固定ビス(8 mm)2 本を使って、 取り付け金具をカメラレコーダーに固 定します。 マイクホルダー(AJ-MH800G・別売品) と本機を同時に使用する場合は、付属の 固定ビス(12 mm)をご使用ください。 固定ビス AJ-HPX2700G/AJ-HPX3700G AJ-HPX2100/AJ-HPX3000G AG-HPX555 AJ-HDX900/AJ-HDX400A 4 「各部の名称と機能」(5 ページ)をご 確認の上、カメラレコーダー、カメラ アダプターと本機を接続してください。 日 本 語 J-6 AG-YA500G(VQT2H48)_EGFISJ.book 7 ページ 2009年10月6日 火曜日 午後6時56分 基本動作 z 映像信号の切り替えはレンズの RET スイッチ、あるいはカメラアダプターの RET スイッチ を押すことにより行なわれます。RET スイッチを押している間は、送り返し映像が本機か ら出力されます。 また、カメラレコーダーおよびベースステーションから出力されるタリー信号のどちらか 一方があれば、本機からも出力され、ビューファインダーのタリー LED を点灯させること ができます。ただしカメラアダプターのタリー LED はベースステーションから出力される タリー信号でのみ点灯します。 z ベースステーションとカメラアダプターを組み合わせたシステムでは、送り返し映像とし て HD もしくは SD の映像信号を選択することができます。 システムが HD の場合は送り返し映像は HD/SD のどちらも選択可能です。 システムが SD の場合は送り返し映像は SD 映像信号のみとなります。 、送り返し映像( HD/SD)およびビューファインダーは、下表に カメラシステム(HD/SD) 示すような組み合わせで使用することができます。 本機使用時の RET 信号切り替え (接続ビューファインダー :AJ-HVF21G / AG-VF11G / AG-HPX555 付属のビューファインダー / AJ-CVF100G ) システム カメラ品番 AG-BS300 への AG-CA300G の RET 入力信号 VF OUT 端子信号 形態 HD AJ-HVF21G/ AG-VF11G/ AJ-CVF100G に 表示される画像 HD COMPONENT HD/SD が混在のため 使用できません。 SD COMPONENT SD SDI は伝送 SD SD SDI できません。 COMPONENT(AG-VF11G を使用可) (AG-HPX555 付属の SD ビューファインダーを COMPOSITE COMPONENT 使用可) HD COMPONENT HD HD HD SDI (AJ-HVF21G/ COMPONENT COMPONENT AJ-CVF100G を使用可) HD SDI AG-HPX555 カメラ レコーダーの VF 端子信号 AJ-HPX3000G* AJ-HPX2100* SD SDI SD SDI は伝送 SD COMPONENT できません。 SD COMPONENT(AG-VF11G を使用可) SD COMPOSITE COMPONENT HD SDI AJ-HPX3700G AJ-HPX2700G AJ-HDX900 SD SDI AJ-HDX400A HD COMPONENT HD COMPONENT (AJ-HVF21G/ AJ-CVF100G を使用可) HD SD SDI は伝送 COMPONENT できません。 HD/SD が混在のため 使用できません。 SD COMPOSITE COMPONENT * カメラレコーダーの VF 端子信号をカメラレコーダー本体メニューで切り替えることがで きます。 J-7 AG-YA500G(VQT2H48)_EGFISJ.book システム カメラ品番 8 ページ AG-BS300 への AG-CA300G の RET 入力信号 CA VF 端子信号 形態 カメラ レコーダーの VF 端子信号 AJ-HVF21G/ AG-VF11G/ AJ-CVF100G に 表示される画像 HD 映像を伝送できな いため使用できませ ん。 SD SD COMPONENT AG-HPX555 SD SDI COMPONENT(AG-VF11G を使用可) SD (AG-HPX555 付属の COMPOSITE COMPONENT ビューファインダーを 使用可) HD 映像を伝送できな HD SDI は伝送 HD HD SDI いため使用できませ COMPONENT できません。 AJ-HPX3000G* ん。 AJ-HPX2100* SD SDI SD COMPONENT SD SD COMPOSITE COMPONENT COMPONENT(AG-VF11G を使用可) HD SDI SD 2009年10月6日 火曜日 午後6時56分 HD SDI は伝送 できません。 AJ-HPX3700G AJ-HPX2700G システムを SD モードに設定できないので使用できません。 AJ-HDX900 AJ-HDX400A * カメラレコーダーの VF 端子信号をカメラレコーダー本体メニューで切り替えることがで きます。 < ノート > AJ-VF15BP/E、AJ-VF20WBP/E は AG-VF11G と同じ動作になります。ただし、AJ-VF15BP/E、 AJ-VF20WBP/E はフィールド周波数:59.94(60)Hz/50 Hz の自動切換えには対応しておりませ ん。ご使用のフィールド周波数に合ったビューファインダーをお選びください。 日 本 語 J-8 AG-YA500G(VQT2H48)_EGFISJ.book 9 ページ 2009年10月6日 火曜日 午後6時56分 保証とアフターサービス 故障・修理・お取扱い などのご相談は、まず、 お買い上げの販売店 へ、お申し付けください。 お買い上げの販売店がご不明の場合は、当社(裏表紙)までご連絡ください。 ※ 内容により、お近くの窓口をご紹介させていただく場合がございますので、ご了承ください。 z 保証書(別添付) お買い上げ日・販売店名などの記入を必 ずお確かめの上、お買い上げの販売店か らお受け取りください。 内容をよくお読みいただいた上、大切に 保存してください。 万一、保証期間内に故障が生じた場合に は、保証書記載内容に基づき、「無料修 理」させていただきます。 保証期間:お買い上げ日から本体 1 年間 z 保守・点検 保守・点検は機器の機能を常に良好な状 態に維持し、お客様が安心してご使用し ていただくためのものです。 部品の磨耗、劣化、ごみ、ホコリの付着 などにより突発的な故障、トラブルを未 然に防ぐとともに、安定した機能、性能 の維持のために、定期的な保守・点検を 推奨いたします。 保守・点検(有料)についての詳しい内 容は、お買い上げの販売店にご相談くだ さい。 z 補修用性能部品の保有期間 8 年 当社では、VF インターフェースボックス の補修用性能部品を、製造打ち切り後、8 年保有しています。 ※ 補修用性能部品とは、その製品の機能 を維持するために必要な部品です。 修理を依頼されるとき この取扱説明書を再度ご確認の上、お買い上 げの販売店までご連絡ください。 ◆ 保証期間中の修理は. .. 保証書の記載内容に従って、修理させて いただきます。詳しくは、保証書をご覧 ください。 ◆ 保証期間経過後の修理は.. . 修理により、機能、性能の回復が可能な 場合は、ご希望により有料で修理させて いただきます。 J-9 ご連絡いただきたい内容 品 名 VF インターフェースボックス 品 番 AG-YA500G 製造番号 お買い上げ日 故障の状況 AG-YA500G(VQT2H48)_EGFISJ.book 10 ページ 2009年10月6日 火曜日 午後6時56分 定 格 [ 総合 ] [ 入出力部 ] 入力 DC + 5.6 V、0.06 A DC - 5.6 V、0.06 A は安全項目です。 外形寸法 ( 幅×高さ×奥行き ) 113 mm × 60 mm × 41 mm ( 突起物を除く ) 質量 約 410 g 動作周囲温度 0 ℃∼ 40 ℃ 保存温度 − 20 ℃∼ 60 ℃ 動作周囲湿度 10 % ∼ 85 % ( 結露のないこと ) LENS 丸型 12 ピン CAM LENS 丸型 12 ピン CAM VF 丸型 20 ピン VF 丸型 20 ピン CA VF D-Sub15 ピン [ 付属品 ] 取り付け金具× 1 固定ビス(8 mm)× 4 固定ビス(12 mm)× 2 仕様および外観は、改良のため予告なく変更 することがありますが、ご了承ください。 ヨーロッパ連合以外の国の廃棄処分に関する情報 このシンボルマークは EU 域内でのみ有効です。 製品を廃棄する場合には、最寄りの市町村窓口、または販売店で、 正しい廃棄方法をお問い合わせください。 日 本 語 J-10 AG-YA500G(VQT2H48)_EGFISJ.book 5 ページ 2009年10月6日 火曜日 午後6時56分 Web Site: http://panasonic.net Panasonic Broadcast & Television Systems Company Unit Company of Panasonic Corporation of North America Executive Office: One Panasonic Way 4E-7, Secaucus, NJ 07094 Tel: 201-348-7000 Eastern Zone: One Panasonic Way 4E-7, Secaucus, NJ 07094 Tel: 201-348-7196 Southeast Region: Tel: 201-392-6151 Western Zone: 3330 Cahuenga Blvd W., Los Angeles, CA 90068 Tel: 323-436-3608 Government Marketing Department: One Panasonic Way 2E-10, Secaucus, NJ 07094 Tel: 201-348-7587 Broadcast PARTS INFORMATION & ORDERING: 9:00 a.m. – 5:00 p.m. (EST) Tel: 800-334-4881/24 Hr. Fax: 800-334-4880 Emergency after hour parts orders Tel: 800-334-4881 e-mail: [email protected] TECHNICAL SUPPORT: Emergency 24 Hour Service Tel: 800-222-0741 e-mail: [email protected] Panasonic Canada Inc. 5770 Ambler Drive, Mississauga, Ontario L4W 2T3 Tel: 905-624-5010 Panasonic de México S.A. De C.V. Casa Matriz: Moras No.313 Col. Tlacoquemecatl Del Valle Del.Benito Juárez México, D.F., C.P.03200 Tel: 55-5488-1000 Fax: 55-5575-6783 Panasonic Latin America, S.A. P.O.Box 0816-03164 Panama, Republic of Panama Tel: +507-229-2955 Fax: 507-229-5352 Panasonic do Brasil Ltda. Rua Cubatão, 320-6o andar-Paraíso CEP 04013-001- São Paulo -SP Tel: 11-3889-4000 Fax: 11-3889-4004 Professional & Broadcast IT Systems Business Unit Europe Panasonic AVC Systems Europe a Division of Panasonic Marketing Europe GmbH Hagenauer Str. 43, 65203 Wiesbaden-Biebrich Deutschland Tel: +49-611-235-481 Panasonic Systems Asia Pacific (Broadcast Regional Operation Center) 2 Jalan Kilang Barat, Panasonic Building, Singapore 159346 Tel: +65-6270-0110 파나소닉 코리아 주식회사 (PKL) 서울특별시 서초구 서초동 1553-5 오퓨런스 17 층 서비스 문의 : 02-533-8452 http://panasonic.kr チȿɁɎɨ̗Ꮱȸɳʀɟ 〒 571-8503 大阪府門真市松葉町 2 番 15 号 i (06) 6901ー 1161 © 2009 G