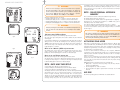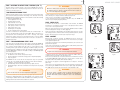
1
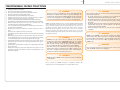
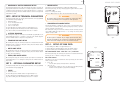
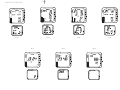
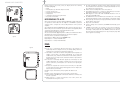
cod. 44200105 - Rev. A - 07/03 - printed by MECA - 3500- 07/03 - ArtBooK 0098/03 LIBRETTO D’ISTRUZIONI - USER’S GUIDE - BEDIENUNGSANLEITUNG - MANUEL D’UTILISATION - MANUAL DE INSTRUCCIONES - MANUAL DE INSTRUÇÕES HTM SPORT S.p.A. - Salita Bonsen, 4 - 16035 RAPALLO - ITALY - Ph. +39 01852011 - Fax +39 0185669984 www.mares.com EN 17 CONTENTS AIRLAB DIVE COMPUTER WARNINGS RESPONSIBLE DIVING PRACTICES QUICK GUIDE TECHNICAL/FUNCTIONAL CHARACTERISTICS TECHNICAL SPECIFICATIONS FUNCTIONAL CHARACTERISTICS OPERATING MODES UTILITY FUNCTIONS MONITORING OF THE BATTERY POWER LEVEL AUTOMATIC SWITCH-OFF DISPLAY BACKLIGHT PREDIVE - DIVE SETUP OF TECHNICAL PARAMETERS SET1 - SETUP OF "AIR", "NITROX" OPERATING MODE AND ASSOCIATED PARAMETERS SET2 - SETUP OF TECHNICAL PARAMETERS SET 3 - OPTIONAL PARAMETER SETUP SET 4 - SETUP OF TANK DATA SET 5 - DATE AND TIME SETUP SET 6 - CLEAR RESIDUAL NITROGEN MEMORY ACTIVATING DIVE MODE AIR DIVE "NITROX" DIVE SURFACE MODE POST DIVE SURFACE TIME CALENDAR AND CLOCK SCROLLING OF NO DECOMPRESSION LIMITS DIVE SIMULATOR LOGBOOK INTERFACING TO A PC FAQ MAINTENANCE REPLACING THE BATTERIES INSTRUCTIONS FOR CONNECTING AIRLAB TO THE HP HOSE INSTRUCTIONS FOR CONNECTING THE COMPASS WARRANTY 18 18 19 20 21 21 21 21 21 21 22 22 22 22 22 23 23 23 24 24 24 24 27 27 27 27 29 29 29 30 30 31 31 31 31 32 AIRLAB DIVE COMPUTER AIRLAB DIVE COMPUTER EN 18 AIRLAB DIVE COMPUTER Congratulations! The dive computer which you have purchased is the result of the latest MARES technology, and has been designed to ensure maximum safety, efficiency, reliability and long life. This computer is further enhanced by certain innovative features, which place it at the top of the MARES product range. • Exclusive patented system of visual alarms which use high-efficiency LEDs to indicate when the programmed low-air limit is reached. • New RGBM Mares-Wienke decompression algorithm with deep stop option. • Operating modes: "Air", "Nitrox". • Optical port for uploading data to a PC. • Increased Logbook capacity (approximately 25 hours of profiles, with points at 20 sec intervals). • Timer-controlled or permanent backlighting. In this manual you will discover all the other functions that make AIRLAB one of the most complete computers available on the market today. You will find all the instructions for learning how to use the AIRLAB computer and its functions. MARES thanks you for your choice and urges you to always practice safe and responsible diving. WARNINGS, CAUTIONS AND SAFETY RULES Important: Any critical information or warnings that might affect the performance or result in the injury of the technician, COMPUTER AIRLAB owner, or other persons are highlighted with the following symbols: CAUTION Indicates a potentially hazardous situation which, if not avoided, may result in minor or moderate injury. It may also be used to alert against unsafe practices. WARNING Indicates a potentially hazardous situation which, if not avoided, could result in death or serious injury. DANGER Indicates an imminently hazardous situation which, if not avoided, will result in death or serious injury. WARNING Before diving, make sure you have read and understood the entire instruction manual. WARNING The dive computer cannot prevent possible decompression problems. The dive computer cannot take into account the physical conditions of the individual diver, which may vary from one day to the next. For your safety, have a general medical check-up before undertaking a dive. WARNING To use your SCUBA equipment safely, along with a dive computer you also need a depth gauge, a pressure gauge, a watch or timer, and the decompression tables. WARNING Before diving, make sure you have correctly set the units of measurement. An incorrect setting may give rise to confusion during the dive, and hence to underwater behavior errors. WARNING Do not dive if the readings on the instrument appear irregular or unclear. WARNING Check the battery power level before starting your dive. Do not dive if the <battery> icon indicates that the battery is low. Replace the batteries. The position of the <battery> icon in the display is shown in the quick guide in the paragraph following point 23. WARNING Do not dive in mountain lakes without having first checked that the appropriate altitude program is selected. WARNING AIRLAB may be used with oxygen-rich mixtures (Nitrox) ONLY by suitably trained and certified divers. Attempting to dive without adequate Nitrox training might result in serious injury. WARNING The use of oxygen-rich mixtures exposes the diver to different hazards from those associated with compressed air. The diver must be aware of these risks and understand how to avoid them. WARNING Before starting a "Nitrox" dive, check that the dive computer is set to "Nitrox" mode, then check the composition of the breathing mix you will be using and enter its oxygen percentage in the appropriate SET function. Entering an incorrect oxygen percentage will lead to errors in the readouts for: - no decompression time remaining; - decompression stop times; - alarm for exceeding the maximum permitted O2 partial pressure. WARNING DO NOT UNDER ANY CIRCUMSTANCES USE NITROX MIXES WITH OXYGEN PERCENTAGES GREATER THAN 50%. WARNING AIRLAB has been designed for use with oxygen-air mixtures (Maximum permitted oxygen percentage: 50%). If you wish to use the dive computer with normal compressed air, before using it again with oxygen-rich mixtures, thoroughly clean it to remove all traces of contaminants (hydrocarbons or other impurities) which may spark combustion. It is also necessary to replace the high pressure hose with a new one, or with one that has only been used with Nitrox mixes. WARNING The high pressure seals on the AIRLAB must be lubricated exclusively with oxygen compatible grease; use of other types of lubricants in the presence of oxygen rich mixtures may spark an explosion. WARNING In the case of Nitrox mixes, it is recommended to replace the HP hose every two years. WARNING Correctly setting the tank volume is essential for obtaining a precise indication of the breathing rate. The safety of a dive can only be assured by adequate preparation. MARES recommends taking a specialist training course before diving with a dive computer. MARES recommends scrupulous observance of the simple safe diving rules set out in the paragraph on "responsible diving practices". AIRLAB DIVE COMPUTER EN 19 RESPONSIBLE DIVING PRACTICES • • • • • • • • • • • • • • • • • • Always plan your dives in advance. Never exceed the limits of your skill and experience. Go to your deepest planned depth at the beginning of the dive. Check your computer frequently during the dive. Comply with the ascent rate indicated by the computer. Always do a safety stop at 10 - 16 feet (3 - 5 meters) for at least 3 minutes. After the safety stop, ascend very slowly to the surface. Avoid yo-yo dives (repeatedly ascending and descending underwater). Avoid strenuous activity during the dive and for half an hour after surfacing. When diving in cold water or in the case of a strenuous dive, start ascending well before reaching the NO DEC limits. If it is a decompression dive, prolong the decompression stop nearest to the surface by several minutes. Repetitive dives should be separated by a surface interval of at least 2 hours. Your deepest dive should be the first one of the day. Avoid diving until the computer memory has cleared from the preceding day's dive. When doing repetitive dives for several consecutive days, take at least one day off from diving every week. In the case of decompression-stop diving, it is recommended to take one day off from diving every three days. Avoid planned decompression dives and do not dive deeper than 130 feet (40 meters) unless you have been specifically trained in this type of technical diving. Avoid repetitive "square profile" dives (dives to a single depth) deeper than 60 feet (18 meters). Always wait as long as possible before flying after a dive (at least 12 and preferably 24 hours), in accordance with the recommendations of the Divers' Alert Network. WARNING Recreational divers should NOT dive deeper than 40m (130 ft). Although this computer will continue to provide information for compressed-air dives deeper than 40m (130 ft.), the risk of nitrogen narcosis and decompression sickness (DCS) is greatly increased; therefore this information should be treated as only approximate. MARES recommends that divers never exceed the maximum permitted depth for their qualification. Dives deeper than 130 feet (40 meters) or outside the safety curve (decompression dives) significantly increase the risk of decompression sickness. Always ascend several minutes before going into DEC mode, and allow yourself even more time in the case of cold water conditions, repetitive dives deeper than 60 feet (18 m), or for any dive involving unusually high exertion. Failure to do this will increase your risk of decompression sickness. WARNING NEVER dive deeper than 130 feet (40 m) or do planned decompression dives with the COMPUTER unless you are a trained and certified technical diver (IANTD, TDI, ANDI, PSA, etc.) familiar with the skills and risks of deep air diving, and licensed at least to the level of Deep Air diving for depths beyond 130 feet (40 m). Even with this level of certification and experience, this type of technical dive entails a much higher risk of DCS, regardless of the dive table or computer used. You must be aware of and willing to accept these risks before attempting such a dive. WARNING NEVER dive alone. AIRLAB cannot replace the assistance provided by a diving buddy. Do not compress your AIRLAB computer in a hyperbaric chamber. The instrument can be seriously damaged if it is not submerged in water. WARNING The user must be aware of the risks related to using the instrument under specific conditions: - Be careful when diving in conditions of poor visibility; the readings provided by the instrument may not be visible. - Be careful when diving in cold water; you may use more air than during standard dives. Check the pressure gauge readings frequently. - Be careful during dives that require more physical exertion than standard dives; you may use a greater amount of air. Check the pressure gauge readings frequently. - Check the position of the hose to avoid the risk of becoming entangled. WARNING NEVER use your AIRLAB or any other dive computer for repetitive "square profile" dives (dives to the same or nearly the same depth) deeper than 60 feet (18 m). This is an unsafe diving practice which will greatly increase your risk of DCS, regardless of what your AIRLAB reads. WARNING Do not fly within 24 hours of your last dive, and in any case wait until the AIRLAB <airplane> icon disappears. AIRLAB DIVE COMPUTER EN 20 QUICK GUIDE 1 <MODE> button. 2 <-> button. DISPLAY "A" 3 Current depth Date (clock function) Total Dives (logbook function, history) 4 Dive time Month (clock function) 5 no-dec time Deco stop Time (clock function) surface time No-fly time Desaturation time Total number of hours dived (logbook function, history) 6 Greatest depth logged % O2 mixture 7 Temperature ( for no dec dives) Total time to surface (for decompression dives) N° of dives (in logbook function) 8 % ascent rate 9 error indications: omitted stop and uncontrolled ascent 10 Altitude level 11 No-fly indicator 12 Unit of depth measurement 13 Unit of temperature measurement 14 Salt / fresh water 15 "Nitrox" dive DISPLAY "B" 16 Tank pressure Year (in clock function) 17 Air time 18 Air consumption CNS O2 % limit 19 Tank volume 20 Pressure unit 21 Volume unit 22 Air consumption: "lung" icon 23 Low battery indicator AIRLAB DIVE COMPUTER EN 21 TECHNICAL/FUNCTIONAL CHARACTERISTICS TECHNICAL SPECIFICATIONS TEMPERATURE MEASUREMENT: PRESSURE GAUGE FUNCTION • Measurement range: -10 / +50 °C (14/122°F). • Measurement resolution: 1°C. • Measurement accuracy: ±2°C (±2°F). The pressure gauges integrated into the AIRLAB dive computer have been tested and CE certified by Registered Test Center n°0426 - ITALCERT, V.le Sarca, 336 -20126 Milan - Italy. The pressure gauges integrated into the AIRLAB dive computer is a Category III device as defined under European Directive 89/686/CEE, and complies with the specifications set out in the harmonised European Standard EN 250/2000. The EC certification process and verification of pressure gauge performance in the AIRLAB dive computer according to EN 250:2000 standard are intended for a maximum depth of 50 meters below the surface and for use with breathable air in conformity with the EN 12021 standard (oxygen content of 21%). The AIRLAB dive computer can be used in cold water (water at temperatures below 10°C). MARKING The instrument markings are located on the back of the case, and consist of the following: • maximum rated pressure: 300 bar / 4,350 psi • reference standard: EN 250/2000 • reference marking: CE 0426. The conformity marking indicates compliance with the essential health and safety requirements as per annex II D. and 89/686/CEE. The number after EC identifies Registered Test Centre n° 0426 - ITALCERT V.le Sarca, 336 - 20126 Milano - Italy, assigned to inspect the production system with oversight as per Art. 11 B.D. e. 89/686/EEC. CHARACTERISTICS Maximum pressure indication: 360 bar (5150 psi). Accuracy: The guaranteed accuracy of the pressure measurement is: at 50 bar ± 5 bar at 100 bar ± 10 bar at 200 bar ± 10 bar at 300 bar ± 15 bar Connecting port airflow: <100 liters/min. at a pressure of 100 bar. Measurement resolution: 1 bar (10 psi). DEPTH MEASUREMENT: • Maximum displayed depth: 150 m (15,087.60 cm). • Measurement resolution: 10 cm in the 0-100 m range / 1 m in the 100150 m range. • Temperature compensation of the measurement. • Measurement accuracy: from 0 to 80 m, ±1% of full scale. • Calibration in fresh water. • Difference in sea water: 2.5%. ALGORITHM: RGBM Mares-Wienke , the result of a collaboration between Dr. Bruce R. Wienke and the MARES research and development center. • 10 tissue compartments. • Reduction of permissible gradient (M factors) in case of repetitive dives, deeper-than-previous dives or multi-day diving. • Deep stop. • 10 m/min ascent rate. • Display backlight: timer-controlled and permanent. • Power supply: 2 alkaline 1.5 V batteries (type AAA) easily replaceable by the user. • Life: • Approximately 12 months with 50 dives and occasional use of the backlight. • Approximately 10 dives with the backlight always on. • Operating temperature: from -10 to +50°C (14/122°F). • Storage temperature: from -20 to +70° C (-4/+158° F). FUNCTIONAL CHARACTERISTICS • Operating modes: • "Air". • "Nitrox". • Stop Mode: lockout in case of omitted stop and/or uncontrolled ascent (unless disabled by the user). • Depth display: meters / feet. • Temperature display: °C/°F. • Indication of pressure: bar/psi. • Indication of tank volume: liters/cubic-feet. • Fresh/sea water selection: manual. • Altitude programs: • P0 (0-700 m) (0-2296 ft) • P1 (700-1500 m) (2300-4900 ft). (2296-4921 ft) • P2 (1500-2400 m).(4921-7874 ft) • P3 (2400-3700 m / 7900- 12100 ft). (7874-12139 ft) • Decompression stops: up to 24 meters (79 feet). • Visual alarms: • yellow LEDs - 80-120 bar (1160-1740 psi) low-air alarm • red LEDs - 50-70 bar (725-1015 psi) low-air alarm. • Audible alarms: • Low battery. • Deco stop depth violation. • Excessive ascent rate. • No decompression limits reached. • Maximum permitted depth for the programmed value of max PPO2. • Deep stop indication. • Simulator mode. • Scrolling of no decompression limits: from 12 to 48 meters (39 to 157 feet). • Calendar and clock: Year, month, date, hour, minutes (leap year management). • PC Interface: Optical, with RS232 serial adapter. • History. • Dives stored in logbook: 50 with profile for a maximum of approximately 25 hours. • Profile point interval: 20 Sec. OPERATING MODES The nine operating modes of the AIRLAB dive computer are listed below: 1. OFF mode. 2. DIVE mode. 3. SURF mode. 4. SET mode. 5. CLOCK mode. 6. PLAN mode. 7. SIMUL mode. 8. LOGBOOK mode. 9. PC mode. UTILITY FUNCTIONS MONITORING OF THE BATTERY POWER LEVEL AIRLAB periodically monitors the battery power level. If the battery power is found to be low (level 1), an audible alarm is sounded, the battery icon appears, and the display backlight function is disabled. If battery power level 1 is reached during a dive, the battery icon appears but the audible alarm is disabled. If the battery icon is visible, do not dive, and replace the batteries. When the battery reaches its lowest power level (level2), the "off bAt" message appears, Fig. 1, and the AIRLAB is disabled. Even if the dive computer is not used, the batteries should be replaced at least every 12 months. AIRLAB DIVE COMPUTER EN 22 AUTOMATIC SWITCH-OFF If the AIRLAB is ON but no buttons are pressed for a certain amount of time, it will automatically switch itself OFF. The delay before automatic switch-off varies depending on the current operating mode. DIVE - PreDive DIVE - Dive SIMUL - Dive, PostDive and Surface LOGBOOK - automatic scrolling of the profile Under all other conditions 10 min NEVER 15 min 10 min 3 min The switch-off delay timer is cleared whenever a button is pressed, and in PC mode it is cleared at each transmission. After a dive, if the no-fly time is not zero, the AIRLAB switches to OFF mode but the display remains active, showing some information. When the no-fly time goes to zero the display switches off. WARNING If the dive computer is left connected to a pressurized hose, it will remain in PreDive mode. This may considerably reduce battery life. fig. 1 DISPLAY BACKLIGHT The illumination of the backlight is enabled in DIVE Mode and can be activated in two ways: PREDIVE • 15 sec timer-controlled: press the <-> button for approximately 2 sec. DIVE • 15 sec timer-controlled: press and release the <-> button. • Always on: press the <-> button for approximately 2 sec; the backlight can then be switched off by pressing the <-> button again. fig. 3 fig. 2 SETUP OF TECHNICAL PARAMETERS From SET6, pressing the <Mode> button saves any changes made to the settings and goes on to CLOCK mode. The parameters within a given SET function group are modified using the <-> button. SET1 - SETUP OF "AIR", "NITROX" OPERATING MODE AND ASSOCIATED PARAMETERS The display initially shows the following parameters, (fig. 2): • "Nitrox" icon. • "Air". To enter SET1 press the < Mode > button for approximately 2 sec. Alternatively, to advance to SET2, press and immediately release the <Mode> button . • OPERATING MODE SETUP: "AIR" - "NITROX" The display shows the currently active operating mode. Press the <-> button to change the setting. If 'Nitrox' mode is selected, pressing the <Mode> button will advance to the setup of %O2 and then of max PPO2. Otherwise, if "Air" or "Bt" mode is selected, pressing the <Mode> button advances to SET2. WARNING If you have completed a NITROX dive and are planning a repetitive dive using compressed air, set your dive computer for NITROX mode with a % O2 of 21%. In this way, the monitoring of the % CNSO2 will remain active. • "NITROX" BREATHING MIX SETUP The percentage of O2 in the breathing mix can be entered in the range between 21% - 50%, in increments of 1%. Press the <-> button to increase the percentage. Press the <Mode> button to save the percentage value and advance to the next parameter. WARNING Do not use breathing mixes with % of O2 higher than 50%. SET mode can be accessed in the following ways : by pressing the <Mode> button from DIVE or SURF mode, or by pressing the <-> button from CLOCK mode. To access SET mode, press the <Mode> button for 2 seconds. SET mode is subdivided into six groups, SET1...SET6. It is possible to advance to the next group, or go back to the preceding one, in the following way: • To enter a given SET function group, press the <Mode> button for approximately 2 sec. • Alternatively, press and immediately release the <Mode> button to skip to the next SET function. • Press and immediately release the <-> button to go back to the preceding SET function. WARNING Correctly setting the percentage of oxygen in the breathing mix is indispensable for ensuring correct readouts of: - no decompression time remaining; - decompression stop times; - alarm on exceeding the maximum permitted PPO2. AIRLAB DIVE COMPUTER EN 23 • MAXIMUM O2 PARTIAL PRESSURE SETUP • BEEPER SETUP The maximum partial pressure of O2, which triggers an alarm if exceeded, can be programmed between a minimum of 1.2 bar (17.4 psi) and a maximum of 1.6 bar (23.2 psi) in increments of 0.1 bar (1.45 psi). Press the <-> button to increase the percentage. Press the <Mode> button to save the changes made and advance to SET2. This function is used for inhibiting or enabling the audible alarms. On entering this setup, the 'beep' message appears together with the current setting (ON or OFF). Press <-> to change the setting. Press the <Mode> button to skip to the uncontrolled ascent setup. SET2 - SETUP OF TECHNICAL PARAMETERS The display initially shows the various parameters which can be programmed in the SET4 function group (fig. 3): • Altitude program. • "°C" or "°F" temperature units. • "m" or "ft" depth units. • "salt" or "fresh" water. To enter SET2 press the < Mode > button for approximately 2 sec. To skip to SET3 press and immediately release the <Mode> button. To go back to SET1 press and immediately release the <-> button. • ALTITUDE PROGRAM On entering this setup, the currently selected altitude program (P0, P1, P2, P3) is displayed; press the <-> button to select the next altitude program. Press the <Mode> button to skip to the next parameter. • TEMPERATURE UNIT SETUP On entering this setup, the currently selected unit of measurement will start blinking; use the <-> button to change the setting. Press the <Mode> button to skip to the next parameter. • DEPTH UNIT SETUP On entering this setup, the currently selected unit of measurement will start blinking; use the <-> button to change the setting. Press the <Mode> button to skip to the next parameter. • FRESH/SEA WATER SETUP On entering this setup, the currently selected option (fresh or seawater) will start blinking. Press <-> to change the setting. Press the <Mode> button to skip to SET3. SET 3 - OPTIONAL PARAMETER SETUP The display initially shows the various parameters which can be programmed in the SET4 function group (fig. 4): • "BEEP". • Ascent rate icons. To enter SET3, press the <Mode> button for approximately 2 sec. To skip to SET4, press and immediately release the <Mode> button. To go back to SET2, press and immediately release the <-> button. WARNING The audible alarms should only be disabled by expert divers who take full responsibility for the consequences of this operation. • UNCONTROLLED ASCENT SETUP This function disables or enables the "stop" in case of uncontrolled ascent. It can be useful for instructors when practicing emergency ascents, to prevent the dive computer from locking out. On entering this setup, the ascent rate indicator and the currently selected option (ON or OFF) will appear. Press <-> to change the setting. Press <Mode> to skip to SET4. WARNING The above option is intended only for highly experienced divers, who take full responsibility for the consequences of disabling the function which locks out the computer in case of an uncontrolled ascent. fig. 4 SET 4 - SETUP OF TANK DATA To enter SET4, press <Mode> for approximately 2 sec. To skip to SET5, press and immediately release the <Mode> button. To go back to SET3, press and immediately release the <-> button. SET MEASUREMENT UNITS - CUBIC FEET - PSI / LITERS BAR On entering this setup, the currently selected unit of measurement will start blinking; use the <-> button to change the setting. SET TANK CAPACITY Depending on the unit of measurement chosen previously, the tank volume will be set up as follows: • liters - bar - enter the tank capacity in liters (from 0 to 39.9 liters) • cubic feet- psi - enter the tank capacity in cubic feet (from 0 to 399 Cuft) and the nominal reference pressure in psi (from 0 to 4999 psi). fig. 5 AIRLAB DIVE COMPUTER EN 24 WARNING In this case it is necessary to enter the theoretical value of pressure (in psi) corresponding to the rated tank capacity in cu. ft. Do not use the actual pressure measured by the instrument. Example: 80 cu.ft. tank at 3000 psi. Even if the tank is filled to a pressure different from 3000 psi, enter 3000 psi on the AIRLAB. The above settings take place as follows: • Blinking units digit; use the <-> button to enter the desired value. • Blinking tens digit; use the <-> button to enter the desired value. • Blinking hundreds digit; use the <-> button to enter the desired value. • Blinking thousands digit (psi); use the <-> button to enter the desired value. WARNING Correctly entering the tank volume is of fundamental importance in order to obtain an exact indication of air consumption and residual air time. 100 BAR ALARM (1450 PSI) SETUP On entering this setup, the yellow warning light will start to blink. This is an on/off type setting and can be used to disable the yellow 100 bar warning light. If the warning is disabled, the corresponding visual indication will not appear during the dive. If the 100 bar warning has been disabled, pressing the <MODE> button will enter the setup of the 50 bar low-air limit, otherwise it will enter the setup of the 100 bar low-air limit. The on/off setting can be toggled using the <-> button. fig. 6 SETUP fig. 8 OF THE 100 BAR (1450 PSI) LOW-AIR LIMIT The default value for this limit is 100 bar (1450 psi). This function can be used to change the limit, using the <-> button, in the range from 80 bar (1160 psi) to 120 bar (1740 psi), in increments of 10 bar (145 psi). SETUP fig. 7 OF THE THE 50 BAR LOW-AIR LIMIT On entering this setup, the red warning light will start to blink . The default value for this limit is 50 bar (725 psi). This function can be used to change the limit, using the <-> button, in the range from 50 bar (725 psi) to 70 bar (1015 psi) in increments of 10 bar (145 psi). SET5 - DATE AND TIME SETUP To enter SET5, press <Mode> for approximately 2 sec. To skip to SET6 press and immediately release the <Mode> button. To go back to SET4, press and immediately release the <-> button. The display shows the current date and time, with the date digits blinking. The blinking value can be incremented by pressing <-> (hold down the button for rapid increment); when the desired value is reached, press <Mode> to save the new setting and go on to the next value (month). After setting the minutes, AIRLAB checks the compatibility of the date and month settings, taking leap years into account. If the date and month are incompatible with each other, pressing the <Mode> button returns to the date setting instead of advancing to SET6, prompting the user to correct the date. In this way it is not possible to enter inexistent dates such as April 31 or February 29 2001. SET6 - CLEAR RESIDUAL NITROGEN MEMORY This set function is used for clearing the residual nitrogen memory. The display initially shows the "desat" icon. To enter SET6, press the <Mode> button for approximately 2 sec (fig. 5). Alternatively, to exit SET mode and advance to CLOCK mode, press and immediately release the <Mode> button. To go back to SET5 press and immediately release the <-> button. To clear the residual nitrogen memory, press and hold down the <-> button for at least 6 seconds. The clearing of the nitrogen memory is confirmed as shown in fig. 6. WARNING This option is intended only for highly experienced divers. Users who clear the residual nitrogen memory cannot then use the instrument for repetitive dives. After this operation, do not dive with AIRLAB if you have already dived within the previous 24 hours. ACTIVATING DIVE MODE DIVE mode is activated by means of the buttons. When the <Mode> button is pressed in OFF mode, the AIRLAB performs the autozero procedure (depth calibration) and the low battery check. Then it illuminates the display and backlight for approximately 2 seconds and, if everything is working correctly, the instrument goes into PreDive mode. If a dive is started without switching on the computer, AIRLAB will nevertheless activate automatically, thanks to its continual monitoring of ambient pressure and tank air pressure, within 30 seconds of exceeding the depth of 1.5 meters. In this case, the computer does not perform the autozero depth calibration, but uses the most recent data (last ambient pressure reading, which takes place every 30 sec), after which it measures the tank air pressure and goes into [DIVE] mode. AIRLAB monitors the tank air pressure in the following way: • [OFF] mode - every 30 sec. Detects opening of the air valve, switches on and goes into [DIVE] mode • dive mode (pre dive) - at 20 sec intervals • dive mode (when the depth is greater than 1.5 meters) - at one minute intervals. AIR DIVE The various operating phases of DIVE mode are described below: AIRLAB DIVE COMPUTER EN 25 DIVE - WAITING TO START DIVE, PREDIVE (FIG. 7) Until the diver goes below a depth of 1.5 meters. If AIRLAB fails to detect a depth of at least 1.5 m or a tank pressure greater than 10 bar in the next 15 minutes, it will switch itself off. "NO-DECOMPRESSION" DIVE When the depth reading exceeds 1.5 m (4.9 ft), the dive begins and the dive timer starts measuring its duration. Recording of the dive data in memory (LogBook) begins if this phases persists for more than 20 seconds. The following information is displayed (fig. 8): • current depth (in "m" or "ft"); • maximum depth reached; • temperature (in °C or in °F); • Dive duration expressed in minutes; • tank capacity in liters or cubic feet; • tank pressure in bar or psi; • breathing rate in liters/min; • air time remaining at the current depth. If the dive is within the no-decompression limits, this is indicated by a -no dec- (no decompression) message. The display (Fig. 8) then shows the nodecompression time remaining with the "-min- " message at the depth indicated in "-depth-"; when the no-decompression time is 1 min, an audible alarm is sounded which indicates that the diver is about to exceed the nodecompression limits. DIVE - "DECOMPRESSION STOP" DIVE If the diver does not ascend when the above alarm is sounded, the AIRLAB will start calculating a "decompression stop" dive, indicated by the appearance of the "dec" message and an audible alarm. The value of no-decompression time remaining will be replaced with the depth [n] and duration [min] of the first decompression stop; in addition, the value [asc time] will indicate the total time to surface (Fig. 9); these values are increased according to the RGBM algorithm as the dive progresses. The ascent time is given by the sum of: • The durations of the various decompression stops. • The time required to ascend at an average speed of 10 m/min (33ft/min). • Deep stop option. The AIRLAB will also check that the decompression stops are performed correctly; two icons, graphically indicate what action the diver should take: • 2 triangles: correct decompression stop depth; • upward triangle: diver below decompression stop depth, ascend; • downward triangle: diver has ascended above decompression stop depth, descend!! WARNING Never ascend above the correct decompression stop depth. If the diver overshoots the decompression stop depth by more than 30 cm (11.8 in), the "downward triangle" icon starts blinking; if the overshoot exceeds 1 m (3.28ft), an audible alarm is sounded in addition to the blinking icon. These warnings remain active until normal conditions are restored. WARNING When the omitted deco stop alarms are triggered, desaturation of the simulated tissues is halted; it resumes when the diver returns to the correct decompression stop depth. If the decompression stop overshoot exceeds 1 meter (3.28 ft) and lasts more than 3 minutes, the computer switches to Omitted Stop mode. In this case, the corresponding icon appears (fig. 10). If, after surfacing, the diver attempts a repetitive dive, the AIRLAB will function only as a depth gauge (Stop Mode). DIVE - DEEP STOP To minimize the likelihood of critical bubble seed formation, the AIRLAB prompts for a one-minute deep stop in case of decompression dives or dives close to the no-decompression limit. When the diver approaches the deep stop depth, AIRLAB sounds an audible alarm and displays the message "St 1min", (fig. 11). The deep stop depth is determined by an algorithm which takes into account the average pressure to which the diver was exposed during the dive, and the depth to which he must ascend for any decompression stops. fig. 9 DIVE - ASCENT On detecting a reduction in depth, the AIRLAB activates an ascent rate monitoring algorithm. It computes the value of the ascent rate as a percentage of the optimal 10 m/min rate. If this value exceeds 60% of the maximum permitted rate, the ascent rate bar graph indicator appears. If the "Slow" message appears, an audible alarm is sounded which persists until the diver's speed of ascent drops below 120%. DANGER fig. 11 A rapid ascent increases the risk of decompression sickness. If the diver's ascent rate is sufficiently fast to trigger the audible alarm, the computer begins monitoring an uncontrolled ascent. An ascent is considered to be "uncontrolled" when the maximum ascent rate is exceeded (SLOW with audible alarm) for a stretch equal to at least 2/3 of the depth at which the audible alarm started sounding. This criterion only applies to alarms triggered below a depth of 12 meters (39.4 feet). In the event of an uncontrolled ascent, if the user attempts a repetitive dive after surfacing, the AIRLAB will function only as a depth gauge (Stop Mode). The "STOP after uncontrolled ascent" function can be disabled in SET. WARNING The above option is intended only for highly experienced divers, who take full responsibility for the consequences of disabling the function which locks out the computer in case of an uncontrolled ascent. fig. 10 AIRLAB DIVE COMPUTER EN 26 DIVE - SAFETY STOP If the maximum depth of a dive exceeds 10 meters (32.8 feet) a "Safety Stop" is activated for the ascent; the AIRLAB will then suggest a 3 minute safety stop at a depth between -2.5 and -5 meters (-8.2 and -16.4 feet). replacing the no-dec time of 99 min with the message "St 3 min…2min…1min" (Fig. 12). If the diver moves outside the above mentioned depth range, the no-dec time reappears on the display, and the safety stop timer is stopped. When the diver re-enters the safety stop depth range, the safety stop timer resumes from where it left off. If the diver returns below 10 meters (32.8 feet), the safety stop timer ignores the aborted stop and will subsequently start counting down from 3 minutes again. In the case of decompression-stop dives, the computer will extend the duration of the stop at 3 meters (9.8feet) by an additional 3 minutes, displaying the safety stop information as described above. BREATHING RATE GAUGE fig. 13 fig. 12 fig. 14 The high pressure port is monitored at one minute intervals in order to compute the diver's breathing rate (liters/min). However, for greater clarity, the value displayed is normalized relative to ambient pressure. For example, if a diver breathing normally at the surface has an air consumption of 15 liters/min, when breathing at the same rate at a depth of of 10 metres his consumption would become 30 liters/min, and at 30 meters it would be 60 liters/min. This kind of reading, though correct, would not be at all clear. Normalization removes the effect of variations in depth, so that the data displayed gives a direct indication of the diver's actual breathing rate. With reference to the above example, the instrument would display a breathing rate of 15 liters/min at every depth. This data is displayed in both digital and analog modes (lung icon, Fig. 13). LOW-AIR ALARMS fig. 15 fig. 16 fig. 17 If the tank pressure reading drops below 100 bar or the programmed value for this limit, the yellow warning lights will start to blink. If the tank pressure reading drops below 50 bar or the programmed value for this limit, the red warning lights will start to blink. DIVE - SURFACING When the measured depth is less than 1 meter (3.28 feet), the dive is suspended and the dive timer is stopped. If the diver does not return below 1.5 meters (1.5m) within the next 3 minutes, the AIRLAB considers dive to be completed and records its data in the LogBook; otherwise the dive continues and the AIRLAB resumes the dive timer count. The display shows (Fig. 14): • the duration of the dive; • the maximum depth; • average breathing rate during the dive. After 3 minutes, the AIRLAB switches from DIVE mode to OFF mode, and shows the following data (Fig. 15): • The airplane icon until the no-fly time goes to zero. • Desaturation time and icon until the desaturation time goes to zero. • Any icons for underwater behavior errors (omitted stop, uncontrolled ascent). AIRLAB DIVE COMPUTER EN 27 WARNING Do not fly while the no-fly icon is illuminated. DIVE - STOP MODE In the event of an omitted stop and/or uncontrolled ascent, the AIRLAB will lock out and function only as a depth gauge for any subsequent dives. This data will be displayed as illustrated in fig. 16 and fig. 17. If the user attempts to dive while the computer is in Stop Mode, the profile will nevertheless be recorded in the logbook. Stop Mode lasts for 24 hours. The AIRLAB can be released from this condition by clearing the residual nitrogen memory. WARNING This option is intended only for highly experienced divers. Users who clear the residual nitrogen memory cannot then use the instrument for repetitive dives. After this operation, do not dive with AIRLAB if you have already dived within the previous 24 hours. "NITROX" DIVE Due to the lower percentage of nitrogen in the breathing mix, diving with oxygen-rich mixtures carries a lower risk of decompression sickness than diving with compressed air. However, the higher oxygen content of the mix exposes the diver to oxygen toxicity hazards which do not generally occur in recreational diving with compressed air. The AIRLAB monitors the dive time and depth and, on the basis of the oxygen percentage entered in the SET function, provides indications which allow the diver to remain within the safety limits for oxygen exposure. To do a Nitrox dive, it is necessary to choose the NITROX option in SET1. WARNING Before the dive, check that the Nitrox dive parameters have been correctly set up: the percentage of oxygen in the mix and the partial pressure of oxygen partial pressure which determines the maximum permitted depth for the dive. WARNING Do not use breathing mixes with % of O2 higher than 50%. WARNING Correctly setting the percentage of oxygen in the breathing mix is indispensable for ensuring correct readouts of: - no decompression time remaining; - decompression stop times; - alarm for exceeding the maximum permitted PPO2. The AIRLAB handles "Nitrox" dives in a similar manner to compressed air dives, with the same phases and procedures for activating DIVE mode. The only differences between compressed-air and Nitrox dives concerns the monitoring of critical "Nitrox" dive parameters, and the display of these parameters in addition to the normal air dive parameters (described in the preceding chapter). The following section describes the critical "Nitrox" dive parameters monitored by the AIRLAB, and the differences in the data display layouts. WARNING Before reading the "Nitrox Dive" chapter, the user is advised to carefully read the "Air Dive" chapter. CHECKING THE CRITICAL NITROX DIVE PARAMETERS OXYGEN PARTIAL PRESSURE When the diver reaches a depth at which the PPO2 exceeds the maximum permitted value entered in the corresponding SET, (from 1.2 to 1.6 ATM), an alarm condition is triggered indicated by: • Blinking depth indication. • Audible alarm. The alarm persists until the diver ascends sufficiently for the oxygen partial pressure to return within the acceptable limits. EFFECTS ON THE CENTRAL NERVOUS SYSTEM Oxygen toxicity exposure is monitored by means of a CNS (Central System Calculation), based on currently accepted recommendations for exposure limits. This toxicity is expressed as a percentage value, %CNS O2, ranging from 0% to 120%. The percentage value of CNS O2 is shown on the display, and an alarm is triggered when it exceeds 75%, signaled by blinking of the value. Figs. fig. 18-21 show the data that is displayed during the various phases of the dive. SURFACE MODE POST DIVE SURFACE TIME SURF mode can be accessed in the following ways : by pressing the <Mode> button from DIVE mode or by pressing the <-> button from SET mode. AIRLAB keeps SURF mode visible for as long as the no-fly icon is active. To enter SURF mode, press the <Mode> button for 2 seconds. • The duration of the surface interval in hours and minutes is displayed. In case of a "Nitrox" dive, the value of %CNS O2 (fig 22) is displayed. Pressing the <-> button displays the desat time. Pressing the <-> button again switches displaying to the no-fly time. Pressing the <-> button again reverts to showing the surface time. Pressing the <Mode> button exits SURF mode and goes on to SET mode. DESATURATION TIMES AND NO FLY TIMES Non repetitive "no dec" dive "dec dive" or repetitive dives DESATURATION TIME 0 - 12 hours "NO-FLY" TIME 12 hours > 12 hours 0 - 24 hours = Desaturation time 24 hours > 24 hours = Desaturation time CALENDAR AND CLOCK CLOCK mode can be accessed in the following ways: by pressing the <Mode> button from SET mode or by pressing the <-> button from PLAN mode. The display (Fig. 23) shows: • Year (4 digits). • Date. • Month. • Date and time (in 24 h format). SCROLLING OF NO DECOMPRESSION LIMITS PLAN mode can be accessed in the following ways : by pressing the <Mode> button from CLOCK mode or by pressing the <-> button from SIMUL mode. This function allows the user to scroll through the no decompression limits, automatically taking into account the current residual saturation of his body tissues from the preceding dive. If a "Nitrox" dive is selected, the computer also takes into account the percentage of O2 and the max PPO2 settings. To enter PLAN mode, press the <Mode> button for 2 seconds. Scrolling is started by pressing the <Mode> button, the computer displays (Fig. 24): • Depth. • No decompression time remaining expressed in minutes. AIRLAB DIVE COMPUTER EN 28 fig. 18 fig. 19 fig. 22 fig. 20 fig. 23 fig. 21 fig. 24 AIRLAB DIVE COMPUTER EN 29 Repeatedly press and release the <-> button to increase the depth by three meters (9.8 feet) each time, up to a maximum of 48 m (157.4 ft). For each depth, the display shows the corresponding no decompression time remaining expressed in minutes. Instead, if the two buttons are pressed simultaneously, the computer exits PLAN mode. If "Nitrox" mode is active, the display shows the programmed % of O2. The maximum permitted depth will vary depending on the values entered for % O2 and maximum PPO2. If the computer is in "stop mode", the PLAN function is disabled. DIVE SIMULATOR SIMUL mode can be accessed in the following ways : by pressing the <Mode> button from PLAN mode or by pressing the <-> button from LOG mode. The AIRLAB can simulate dives taking into account the current residual saturation of the diver's tissues. In the case of "Nitrox" dives, the simulation also takes into account the settings for %O2 in the breathing mix and for maximum PPO2. If the computer is in "stop mode", the SIMUL function is disabled. To enter SIMUL mode, press the <Mode> button for 2 seconds. This simulation mode phases are: SIMUL - WAITING TO START DIVE Press the <-> button to start simulating the dive. SIMUL - DIVE The simulation time runs 5 times faster than real time. In other words, after 12 seconds of real time, one minute will have passed in the simulated dive. The AIRLAB displays the data in the same way as for a real dive. Button functions: Press and release the <-> button to increase the depth by 1 meter (3.28 feet) each time. Repeatedly press and release this button to simulate a descent rate of 12 m/minute (39.3 ft/minute). Keep it pressed to simulate a descent rate of 24 m/min (78.7 ft/min). By pressing the <Mode> button it is possible to simulate an ascent rate of 10 m/min. Press <Mode> and <-> simultaneously to exit SIMUL mode. SIMUL - SURFACING When the depth is less than one meter (3.28 feet), the AIRLAB considers the diver to be at the surface. The computer will show the maximum depth reached and the duration of the dive. Pressing the <-> button resumes the simulated dive. Press <Mode> and <-> simultaneously to exit SIMUL mode. SIMUL - SURFACE On surfacing from the simulated dive, the AIRLAB switches to surface mode and displays the surface time. This value increases quickly because the simulation time runs even faster than during dive mode (one real-time second = one minute in the simulated surface time). Press <Mode> to switch to a display of the "desat time". LOG BOOK LOGBOOK mode enables the user to view the data recorded for the last 50 dives, organized like the pages of a "logbook", with the number "1" assigned to the most recent dive, "2" to the preceding dive, and so forth up to dive number "50". For the 50 most recent dives, and with a maximum limit of approximately 25 hours, it is possible to view the individual profile points of each recorded dive. When the LogBook memory is full and the user dives again, the oldest dive record is deleted to free up memory for the new data. LOGBOOK mode can be accessed in the following ways : by pressing the <Mode> button from SIMUL mode or by pressing the <-> button from PC mode. The display shows the history data (fig. 25), i.e.: • total number of dives done • total dive hours logged • maximum depth • coldest logged temperature. Pressing the <Mode> button for approximately 2 minutes, activates scrolling of the dives. The display shows the following details for the most recent dive (fig. 26): • Sequential number of the dive • Start dive date and time. Pressing the <Mode> button scrolls through the dives in memory. Pressing the <-> button displays page 2, which contains the summary details of the currently selected dive. These are (fig. 27): • type of dive Air or Nitrox • dive: Fresh or Salt (fresh water or sea water) • In case of a Nitrox dive: - percentage of O2 - CNS Max setting • maximum logged depth during the dive • total duration of the dive • underwater behavior errors • fastest ascent rate • decompression stop violation • "No deco" icon for no decompression dive • "Deco" icon for decompression-stop dive • minimum water temperature • average breathing rate • tank capacity • tank pressure at the end of the dive To exit logbook mode, press the <Mode> and <-> buttons simultaneously. Pressing the <Mode> button for 2 seconds enters profile viewing mode. There are three ways for scrolling through the profile points: • Press and release the <Mode> button to scroll through the profile points one at a time. • Press <Mode> for 2 seconds and then release it to activate automatic scrolling of the profile points. • Press and hold down the <Mode> button to activate automatic scrolling three time faster than above. During automatic scrolling of the profile points, press <Mode> to revert to scrolling the points one at a time. fig. 25 fig. 27 fig. 26 AIRLAB DIVE COMPUTER EN 30 During viewing of the profile points, the display shows the following information (Fig. 28): • depth • Interval (20 Sec) to which the depth is referred • Speed of ascent, if any • Decompression stop violation • tank pressure • consumption referred to the past minute • deco/no dec information. INTERFACING TO A PC Using a special interface unit and a dedicated Windows software application, it is possible to transfer data from the LogBook of an AIRLAB to a personal computer, and to configure the various SET parameters from a personal computer. The communication between AIRLAB and the PC is optical. It takes place via an RS232 serial port of the PC and the special Iris interface unit (optional) which converts the optical signals into electrical signals and vice versa. The data transfer procedure is as follows: The user selects PC mode (Fig. 29). In this condition, the transmission will be managed by the interface program running on the personal computer. PC mode can be accessed in the following ways : By pressing the <Mode> button from LOGBOOK mode. By pressing the <-> button from OFF mode. By pressing the <-> button from DIVE mode. fig. 28 FAQ fig. 29 Q: If the level 1 low-battery indication appears (i.e. the battery icon illuminates) when the computer is in use, for example during a dive: how many dives can I still do before replacing the batteries? A: The number of dives that can be done using residual power depends on a number of factors (use of the display backlighting, use of visual and audible alarms, etc.), and therefore the duration of the battery cannot be defined a priori. For safety reasons, the batteries must be replaced before taking another dive. Q: If the level 1 low-battery indication appears (i.e. low battery icon and audible alarm) when the computer is switched on after it has not been used for some time, how many dives can I still do before replacing the batteries? A: Because the computer has not been used for some time, it is impossible to know when the battery charge first dropped below level. Replace the batteries before your next dive. Q: When I replace the batteries, will my LogBook dive data be lost? A: No. Q: When I replace the batteries, will I lose the data of my last dive? A: No, provided you do NOT replace the batteries within the 3 minutes after the end of your dive. Q: What happens if I replace the batteries after a dive, before the desaturation time has gone to zero? A: The tissue desaturation calculation will be aborted, and when you put in the new batteries the tissues will be completely desaturated. Do not use the computer for at least 24 hours. Q: How do I use the backlight when I am on the surface? A: From DIVE mode, press the <-> button for approximately 2 seconds. The backlight will illuminate in timer-controlled mode. Q: What happens if I start a dive with the AIRLAB switched off or in some mode other than DIVE mode? A: The AIRLAB will switch to DIVE mode and indicate the correct depth, automatically within 30 seconds, or immediately on pressing the buttons. Q: After replacing the batteries, the display illuminates and some numbers appear: what do they mean? A: They are the serial number. Q: I want to change some set functions, but AIRLAB automatically goes into dive mode. A: If AIRLAB is connected to an open tank, or if the tank is closed but the air has not been released from the high pressure hose, its automatic monitoring of tank pressure will cause AIRLAB to switch into dive mode. Close the tank valve and discharge the air by pressing the purge button on the regulator second stage. AIRLAB DIVE COMPUTER EN 31 MAINTENANCE AIRLAB is a particularly rugged instrument, designed to withstand the ordinary wear and tear of diving without any problems. However it is advisable to treat it with the care that is usual for precision instruments, avoiding violent knocks, prolonged exposure to sunlight or contact with sharp objects. For ordinary maintenance, just rinse with fresh water at the end of each dive. If necessary, wash with a neutral pH soap. Do not use detergents, alcohol, gasoline or sprays. The buttons do not require any special maintenance: do not lubricate them with oils or sprays. In the event of a malfunction, do not use the instrument for diving and have it checked by an authorized MARES service center. In any case, every 2 years or after completing 100 dives, the instrument must be serviced at an authorised MARES service centre. STORAGE INSTRUCTIONS WARNING BEFORE CLOSING THE COVER, CHECK THAT THE O-RING IS IN GOOD CONDITION AND CORRECTLY POSITIONED INSIDE THE COVER. MAKE SURE IT IS PERFECTLY CLEAN AND LUBRICATE WITH A THIN FILM OF SILICONE GREASE. CAUTION Do not replace the battery within the 3 minutes immediately following a dive. Replacing the battery too soon after the dive will result in loss of the data for that dive. In any case, remember that replacing the battery causes the residual nitrogen, desaturation time and no-fly time data to be lost. It is therefore advisable to make a note of this information before replacing the battery. Do not replace the battery between repetitive dives. Storage temperature: from -20 to +70° C (-4/+158° F). When replacing the hose be careful not to damage it with excessive folds (Ø no less than 62.5 mm). INSTRUCTIONS FOR CONNECTING AIRLAB TO THE HP HOSE TRANSPORTING INSTRUCTIONS AIRLAB is made up of two distinct parts: the computer and the high pressure hose, which are connected to each other by means of a quick-release coupling designed and tested for an operating pressure of 300 bar. The hose must be connected to the regulator's first stage before the latter is mounted on the tank: if this operation is carried out when the regulator is already assembled on the tank, make sure that the tank valve is fully closed and that the entire system is depressurized by pressing the purge button on the regulator second stage. No special operations are required for transport. It can be transported with the rest of the equipment, being careful to avoid blows. REPLACING THE BATTERIES Replacing the batteries is a very simple operation which can be performed directly by the user. Unscrew the water-tight cover by rotating it through a ¼ turn in the anticlockwise direction and replace the batteries, being careful to insert them with the correct polarity. The correct polarity is indicated on the back of the instrument. The battery compartment is watertight and non-communicating with the core of the instrument. If water leaks inside the battery compartment, just dry it carefully to remove all moisture before re-installing the batteries. Do not throw the old batteries away at sea! WARNING TO CLOSE THE COVER AGAIN, FIRST PUSH IT ALL THE WAY IN, THEN ROTATE THE COVER BY A ¼ TURN IN THE CLOCKWISE DIRECTION. CAUTION: BEFORE ROTATING THE COVER TO LOCK IT IN THE CLOSED POSITION, MAKE SURE IT HAS BEEN PUSHED ALL THE WAY IN, COMPLETELY UP AGAINST THE COMPUTER BODY. AFTER CLOSING THE BATTERY COMPARTMENT, DOUBLE-CHECK THAT THE COVER HAS BEEN CLOSED CORRECTLY, AND IS PERFECTLY INSERTED IN ITS SEAT. WARNING Attempting to carry out operations in the presence of high pressure may result in serious injury. Connect the threaded 7/16" UNF terminal to a high-pressure outlet on the regulator's first stage (check the regulator instruction manual to find out which are the high pressure outlets) and tighten with a hexagon wrench (14 mm). WARNING The AIRLAB can only be connected and subsequently disconnected from the high pressure hose after depressurizing the group. Therefore, if the computer is assembled on the first stage of a regulator that is already connected to a tank, depressurize the group as described previously. To connect the computer to the hose, fully insert the computer's male connector into the female coupling on the hose, turn it in a clockwise direction to its end of travel and check that the mark on the back of the AIRLAB matches up with the reference mark on the grip of the female quick coupling, see fig. 30 (do not use tools to lock down the male connector to the AIRLAB). WARNING Before pressurising the instrument, check that the quick coupling has been correctly engaged. WARNING Do not under any circumstances replace the hose fitted on the pressure gauge with one of a different type; consult your dealer or MARES for information about the type of hose to be used. INSTRUCTIONS FOR CONNECTING THE COMPASS (OPTIONAL COMPONENT, SOLD SEPARATELY) In order to install the compass, refer to fig 31 and proceed as follows: 1. Back off the 4 screws securing the two shells of the AIRLAB 2. Remove the bottom shell 3. Remove the top shell 4. Remove the top cover 5. Fit the compass module 6. Replace the bottom and top shells and lock the 4 screws back down. WARNING Avoid any actions that could damage the protective gel. Do not press on the surface, introduce sharp objects, or cause detachment from the walls. Any damage to the gel can cause the instrument to malfunction. AIRLAB DIVE COMPUTER EN 32 WARRANTY LIMITED WARRANTY- MARES warrants to the original purchaser that the MARES product is free from defects in materials and workmanship, under normal use and service, for a period of two years from the date of purchase. Any and all implied warranties, including, without limitation, the implied warranties of merchantability and fitness for a particular purpose, shall be limited to one year from the date of purchase. MARES disclaims any and all other warranties, express or implied. Buyer's sole remedy under the above limited warranty, or under any implied warranty, is limited to the repair or replacement at MARES' sole option, of the MARES product or parts thereof. Buyer should return the MARES product exclusively to the place of purchase for warranty service. This limited warranty, or any implied warranties, will apply only to MARES products that exhibit normal use and service and will not cover any damage resulting from any misuse, modification, disassembly or alteration. Proof of purchase must accompany all MARES products returned for consideration under this warranty. VALIDATION OF THE WARRANTY: To validate the warranty, mail the certificate complete with vendor's stamp in a sealed envelope to HTM SPORT S.p.A. (for Italy) or to the MARES distributor in the country of purchase (see the list on last page or visit our web site) within 10 days of the date of purchase. Validating the warranty ensures that you are kept up to date on AirLab and other MARES products. LIMITATION OF LIABILITY: In no event shall MARES be liable for incidental or consequential damages, including, without limitation, loss to property other than the MARES product, loss of the use of MARES product or other property, or other economic loss. Some states do not allow limitations on how long an implied warranty lasts, so the above limitations may not apply to you. Some states do not allow the exclusion or limitation of incidental or consequential damages so the above limitation or exclusion may not apply to you.-repeated. The limited warranty gives you specific legal rights and you may also have other rights which vary from state to state. THE WARRANTY DOES NOT COVER: fig. 30 - Damage caused by water infiltration resulting from improper use (e.g. seal not clean, battery compartment closed incorrectly, etc.) rupture or scratching of the case, glass or strap as a result of impact or knocks. rupture or scratching of the glass. damage resulting from excessive exposure to high temperatures. HOW TO FIND THE PRODUCT CODE: fig. 31 To view the product code, remove the batteries and then put them back in; after a few seconds the serial number of the instrument will appear (fig. 32). This code, in the example in figure 32 is "009735", must be noted on the warranty certificate at the end of this manual. The serial number is also marked on the box. fig. 32 CERTIFICATO DI GARANZIA - WARRANTY REGISTRATION CARD - GARANTIEKARTE CARTE D'ENREGISTREMENT DE LA GARANTIE - CERTIFICADO DE GARANTIA - CERTIFICADO DE GARANTIA Serial Number AIRLAB Model ACQUIRENTE - CUSTOMER - KÄUFER - CLIENT - COMPRADOR - COMPRADOR Nome acquirente - Customer's name - Name des Käufers - Nom du client - Nombre del comprador - Nome do comprador Indirizzo - Address - Adresse - Adresse - Direccion - Endereco Città - City - Stadt - Ville - Ciudad - Cidade Cap - Zip code - Plz - Code postal - Codigo postal -Código Postal Stato - State - Staat - Pays - Estado - Estado Tel. e-mail CERTIFICATO DI GARANZIA - WARRANTY REGISTRATION CARD - GARANTIEKARTE CARTE D'ENREGISTREMENT DE LA GARANTIE - CERTIFICADO DE GARANTIA - CERTIFICADO DE GARANTIA Punto Vendita - Store - Geschäft - Cachet du revendeur - Tienda - Loja ITA Spedire in busta chiusa alla HTM SPORT S.p.A. completa del timbro del negoziante, entro 10 giorni della data di acquisto. EN To validate the warranty, mail this certificate complete with vendor's stamp in a closed envelope to HTM SPORT S.p.A. for Italy or to the Mares distributor in the country of purchase (see the list at last page or visit our web site) within 10 days of the date of purchase. Validating the warranty ensures you are kept up to date on Airlab and on other Mares products. Already under validation of warranty. G Um die Garantie in Kraft zu setzen, schicken Sie bitte die ausgefüllte und vom Verkäufer abgestempelte Garantiekarte innerhalb 10 Tagen nach dem Kauf in einem geschlossenen Umschlag an HTM SPORT S.p.A. (für Italien) oder an die Mares Vertretung des Landes, in dem das Produkt gekauft wurde (Anschriften siehe letzte Seite oder unsere Website). FR Pour valider la garantie, poster le certificat dûment rempli et portant le cachet du revendeur sous pli fermé à HTM SPORT S.p.A. (pour l'Italie) ou à l'importateur Mares du pays d'achat (voir liste en dernière page ou sur notre site web) dans les 10 jours qui suivent la date d'achat. La validation de la garantie vous permet d'être informé sur la Airlab et les autres produits Mares. SP Para la validación de la garantía enviar este cupón en sobre cerrado a HTM SPORT S.p.A. con el sello del comerciante, dentro de 10 días a contar de la fecha de adquisición. PO Para validar a garantia, encaminhar este cupom num envelope fechado para HTM SPORT S.p.A. juntamente com o carimbo da loja, no prazo de 10 dias a contar da data de aquisição. COPIA PER IL RIVENDITORE - DEALER COPY - COPIEFÜR DAS GESCHÄFT COPIE REVENDEUR - COPIA PARA EL REVENDEDOR - CÓPIA DO REVENDEDOR Serial Number AIRLAB Model ACQUIRENTE - CUSTOMER - KÄUFER - CLIENT - COMPRADOR - COMPRADOR Nome acquirente - Customer's name - Name des Käufers - Nom du client - Nombre del comprador - Nome do comprador Indirizzo - Address - Adresse - Adresse - Direccion - Endereco Città - City - Stadt - Ville - Ciudad - Cidade Cap - Zip code - Plz - Code postal - Codigo postal -Código Postal Stato - State - Staat - Pays - Estado - Estado Tel. e-mail Punto Vendita - Store - Geschäft - Cachet du revendeur - Tienda - Loja CERTIFICATO DI GARANZIA - WARRANTY REGISTRATION CARD - GARANTIEKARTE CARTE D'ENREGISTREMENT DE LA GARANTIE - CERTIFICADO DE GARANTIA - CERTIFICADO DE GARANTIA MODALITÀ DI SPEDIZIONE CLAIMS PROCEDURE INANSPRUCHNAHME DER GARANTIE Per usufruire della Garanzia il prodotto deve essere inviato alla HTM SPORT S.p.A. esclusivamente tramite il Rivenditore e deve essere accompagnato dallo scontrino fiscale o prova d'acquisto, da cui risulta la data d'acquisto. Il prodotto deve essere accompagnato anche da questo certificato di garanzia, in mancanza del quale verranno addebitate sie le spese di manodopera che riparazione. La spedizione deve essere effettuata in Porto Assegnato avendo cura di utilizzare un imballo sufficientemente protettivo. La spedizione viene effettuata dalla HTM SPORT S.p.A. al rivenditore in Porto Franco e senza addebito alcuno se il malfunzionamento è riconosciuto quale difetto di fabbricazione. In caso contrario, HTM SPORT S.p.A. rispedisce in contrassegno al rivenditore il prodotto riparato, addebitando: - spese di trasporto sostenute all'origine - la manodopera - valore dei componenti sostituiti For any claims under this :warranty, the product must be returned to HTM SPORT S.p.A. (for Italy) or to the Mares distributor in the country of purchase, exclusively through the Dealer and accompanied by a sales slip or proof of purchase showing the date of purchase. The returned product must also be accompanied by the warranty certificate. In its absence, the customer will be charged for both repairs and labor. The product must be sent postage prepaid, using adequate protective packing. HTM SPORT S.p.A. will consign the repaired product to the Dealer, postage paid at no charge, if the problem was ascertained to be a defect in materials or workmanship. However, if HTM SPORT S.p.A. deems that the damage was caused by any of the conditions listed under "Limitation of Liability," they will consign the repaired product to the Dealer with payment on delivery, and will charge for: - all transport costs - labor - cost of the components replaced Wenn Sie diese Garantie in Anspruch nehmen müssen, lassen Sie das Produkt vom Verkäufer an HTM SPORT S.p.A. (für Italien) oder an die Mares Vertretung des Landes, in dem das Produkt gekauft wurde, einschicken. Dem Produkt muss der Kassenzettel bzw. ein datierter Kaufbeleg beiliegen. Liegt dem zurückgesandten Produkt keine Garantiekarte bei, trägt der Kunde die Kosten für Ersatzteile und Arbeitszeit. Das Produkt muss unter Vorauszahlung der Frachtkosten und in einer ausreichend schützenden Verpackung versandt werden. Wenn sich der Defekt tatsächlich als Material- oder Herstellungsfehler erweist, sendet HTM Sports S.p.A. das reparierte Produkt porto- und kostenfrei an den Händler zurück. Wenn hingegen von HTM Sports S.p.A. festgestellt wird, dass der Defekt auf die unter "Die Garantie unterliegt den folgenden Beschränkungen:" genannten Bedingungen zurückzuführen ist, wird das reparierte Produkt per Nachnahme an den Händler zurückgesandt, und es wird folgendes in Rechnung gestellt: - sämtliche Transportkosten - Arbeitszeit - Ersatzteile La HTM SPORT S.p.A. declina ogni responsabilità per danni e smarrimenti che dovessero verificarsi durante il trasporto. HTM SPORT S.p.A. declines all responsibility for damage or loss occurring during transport. HTM Sports S.p.A. haftet nicht für Beschädigungen oder Verlust während des Transports. RÉCLAMATION MODALIDAD DE ENVÍO MODALIDADE DE ENTREGA Pour toute réclamation au titre de cette garantie, le produit doit être renvoyé à HTM SPORT S.p.A. (pour l'Italie) ou à l'importateur Mares du pays d'achat exclusivement par l'intermédiaire du revendeur et doit être accompagné d'une copie de la facture portant la date d'achat. Le produit renvoyé doit aussi être accompagné du certificat de garantie. S'il est manquant, les pièces et la main-d'oeuvre seront facturées au client. Le produit doit être envoyé correctement affranchi dans un emballage offrant une protection adéquate. HTM SPORT S.p.A. retournera le produit réparé au revendeur sans frais s'il a été constaté que le problème était dû à un défaut de matériaux ou de main-d'oeuvre. Par contre, si HTM SPORT S.p.A. estime que le dommage a pour origine l'une des conditions citées au paragraphe "Limitation de responsabilité," le produit sera retourné au revendeur contre remboursement avec facturation: - de tous les frais de transport - de la main-d'oeuvre - des composants remplacés Para utilizar la garantía el producto debe ser enviado a HTM SPORT S.p.A. exclusivamente por el revendedor y debe ir acompañado por el resguardo fiscal o prueba de adquisición, donde resulta la fecha de adquisición. El producto debe ir acompañado además por el presente certificado de garantía, a falta del cual se adeudarán los gastos de mano de obra y de reparación. El envío debe efectuarse en Porte Asignado utilizando un embalaje suficientemente protector. El envío es efectuado por HTM SPORT S.p.A. al detallista en Porte Franco y sin ningún cargo si el funcionamiento defectuoso es reconocido como defecto de fabricación. En caso contrario, HTM SPORT S.p.A. devuelve contrareembolso al revendedor el producto reparado, adeudando: - todos los gastos de transporte sostenidos - mano de obra - valor de los componentes reemplazados Para usufruir da Garantia, o produto deve ser enviado para a HTM SPORT S.p.A. exclusivamente pelo Revendedor e deve ser acompanhado pela nota fiscal ou prova de compra onde conste a data de aquisição. O certificado de garantia deve igualmente ser anexado ao produto, sem o qual serão debitadas as despesas relativas à mão de obra bem como o custo da reparação. A entrega deve ser feita através de meio de transporte designado, utilizando uma embalagem devidamente protetora. A entrega é feita pela HTM SPORT S.p.A. para o revendedor em um Porto Franco e sem qualquer encargo caso seja comprovado que o mau funcionamento for derivado de defeito de fabricação. Caso contrário, a HTM SPORT S.p.A. encaminhará ao revendedor o produto já reparado, debitando: - todas as despesas relativas ao transporte - mão de obra - custo das peças substituídas HTM SPORT S.p.A. rechaza cualquier responsabilidad por daños y extravíos que se hayan verificado durante el transporte. A HTM SPORT S.p.A. declina qualquer responsabilidade decorrente de perdas e danos que possam ocorrer durante o transporte. HTM SPORT S.p.A. décline toute responsabilité concernant tout dommage ou perte durant le transport CERTIFICATO DI GARANZIA - WARRANTY REGISTRATION CARD - GARANTIEKARTE CARTE D'ENREGISTREMENT DE LA GARANTIE - CERTIFICADO DE GARANTIA - CERTIFICADO DE GARANTIA COPIE CUSTOMER COPY - COPIA PER L'ACQUIRENTE - KÄUFER-KOPIE CLIENT - COPIA PARA EL COMPRADOR - CÓPIA PARA O COMPRADOR Serial Number AIRLAB Model PUNTO VENDITA - STORE - GESCHÄFT - MAGASIN - TIENDA - LOJA Nome acquirente - Customer's name - Name des Käufers - Nom du client - Nombre del comprador - Nome do comprador Indirizzo - Address - Adresse - Adresse - Direccion - Endereco Città - City - Stadt - Ville - Ciudad - Cidade Cap - Zip code - Plz - Code postal - Codigo postal -Código Postal Stato - State - Staat - Pays - Estado - Estado Tel. e-mail CERTIFICATO DI GARANZIA - WARRANTY REGISTRATION CARD - GARANTIEKARTE CARTE D'ENREGISTREMENT DE LA GARANTIE - CERTIFICADO DE GARANTIA - CERTIFICADO DE GARANTIA Punto Vendita - Store - Geschäft - Cachet du revendeur - Tienda - Loja AGENTS, DISTRIBUTOR AND IMPORTERS OF MARES PRODUCTS COUNTRY EUROPE Austria Belgium Canary Islands Croatia•Slovenia Cyprus Czech & Slovak Republics France Germany Greece Holland Hungar Malta Poland Russia Serbia•Bosnia•Montenegro Spain•Andorra•Portugal Sweden•Norway•Denmark•Finland Switzerland Turkey United Kingdom MIDDLE EAST Israel Lebanon Maldives Qatar United Arab Emirates AFRICA Egypt South Africa FAR EAST Hong Kong Indonesia Japan Malaysia Micronesia Philippines Singapore South Korea Taiwan Thailand AMERICA U.S.A.•Caribe•Canada•Mexico Cuba Dutch Caribe Brazil Venezuela OCEANIA Australia New Zealand For updates of the distributor list: www.mares.com COMPANY CITY PHONE N° FAX N° HTM Deutschland GmbH Dive Technics Bvba Sport Sub S.A. Bignami S.r.l. Mavros Ltd. Olson s.r.o. HTM Sport S.p.A. HTM Deutschland GmbH Ionas Bros.O.E. Topsport Diving Equipment B.V. yWintersport Subacqua Supplies & Services Ltd. Oceania Sp. zo.o Czar Trade House Calypso Diving Center HTM Iberica S.L. Cbm Produkter AB TFS/Tuned for Sports Nil Deniz a.s. Blandford Sub Aqua Feldkirchen (Germany) Broechem Las Palmas Trieste (Italy) Nicosia Praha Rapallo (Italy) Feldkirchen Athens Oosterhout Budapest Gzira/Msida Warsawa Moscow Beograd Barcelona Nacka (Sweden) Rickenbach Istanbul Watford 89/9099950 3/4750421 928/248591 040/300698 22/680898 2/20805300 0185/2011 89/9099950 210/2844484 162/471000 0185/2011 21/344739 22/7601041 095/1013362 063/309007 93/4092080 8/4482890 071/9290000 212/2780700 1923/801572 89/90999555 3/4750433 928/248664 040/308092 22/676939 2/66713056 0185/201470 89/90999555 210/2845623 162/470955 0185/201467 21/344739 22/7832802 095/1468445 11/3222232 93/4092081 8/7168063 071/9290090 212/2812877 1923/801573 Dougit Sasson Yeheskel Lebanon Divers JIN Pte. Ltd. Pearl Diver W.L.L. Mohammed Bin Masaood & Sons Tel Aviv Beirut Malé Doha Abu Dhabi 3/6045034 1/200442 324657 4449553 2/6423336 3/5441744 1/329441 324671 4358968 2/6423533 Divex Inc. Divetek Pty. Ltd. Sharm El Sheikh Cresta 69/603103 11/7911095 69/603103 11/7911289 Scuba Supplies Ltd. PT. Jayausaha Binabersama Mares Japan Co. Ltd. TCE Sports SDN. BHD. Guam Tropical Dive Station Scuba World Subsea Sport Dae Woong Suits. Co. East Diving Corporation Siam Diving Enterprises A.P. co. Ltd. Kawi Chung, N.T. Jakarta Kanagawa Penang Agana Makati City M.M. Singapore Seoul Taipei Bangkok 24181129 21/72895020 44/8616371 4/2638700 671/4772774 2/8907805 6/4405288 2/5880970 2/27535959 2/3692974 24811789 21/7238025 44/8616380 4/2614470 671/4772775 2/8908982 6/4405300 2/5870392 2/27699938 2/3692976 Mares America Corporation Comei S.r.l. Topsport Diving Caribbean Ocean Pro Scrosoppi Mar C.A. Norwalk (CT) Habana Curaçao Sao Paulo Caracas 203/8550631 7/8664142 9/4650723 11/56132833 212/9920292 203/8669573 7/8664145 9/4650723 11/55470452 212/9910796 Cape Byron Imports & Wholesale Pty. Ltd. Dive H.Q. Distribution Ltd. Byron Bay Auckland 266/857185 9/5258090 266/857245 9/5257898 cod. 44200105 - Rev. A - 07/03 - printed by MECA - 3500- 07/03 - ArtBooK 0098/03 LIBRETTO D’ISTRUZIONI - USER’S GUIDE - BEDIENUNGSANLEITUNG - MANUEL D’UTILISATION - MANUAL DE INSTRUCCIONES - MANUAL DE INSTRUÇÕES HTM SPORT S.p.A. - Salita Bonsen, 4 - 16035 RAPALLO - ITALY - Ph. +39 01852011 - Fax +39 0185669984 www.mares.com