1
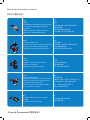
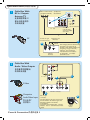
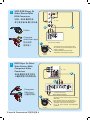
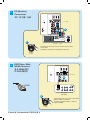
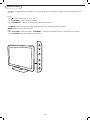
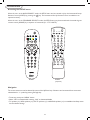
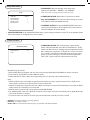
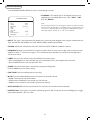
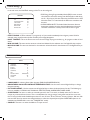
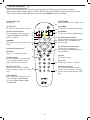
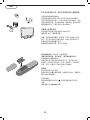
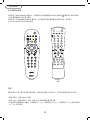
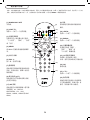
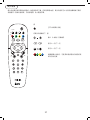
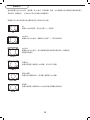
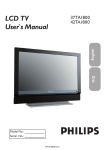
32HFL5530
42HFL5580
中文
English
User Manual
Quick Start Guide Inside !
用户手册
内附快速使用指南!
Model No.:
Serial No.:
3139 285 20081
How to make the optimal connection?
如何进行最佳连接?
Best
HDMI
High-Definition Multimedia Interface provides
an uncompressed, all-digital audio/video
connection.
HDMI provides the ultimated connection
(Please use a certified HDMI cable.)
HDMI 提供的是终极的连接
(请使用通过认证的 HDMI 电缆)
Better
Component Video input
Provides superior picture quality by separating
the green, blue and red luminance signals.
Typically used with red/white audio cables.
很好
分量视频输入
通过将绿色、蓝色和红色亮度信号分离,
提供卓越的画面质量。
通常配合红色/白色音频线使用。
Good
S-Video
Supplies a better picture than RF and
Composite connections.
Used with red/white audio cables.
好
S 视频
提供比 RF 和复合连接
更好的画面质量。
配合红色/白色音频线使用。
Basic
Composite Audio/Video
Separate video (yellow) and audio (red/white)
cables that provide a basic connection from
the cable box and other devices.
Note: The color of audio inputs may differ,
e.g. red/ white or red/ black.
基本
RF
Provides a basic connection for antenna
or cable.
Provides both audio and video.
RF
Cover & Connection/外盖和连接 1
最好
HDMI
高清晰多媒体接口提供无压缩的全数字
音频/视频连接。
复合音频/视频
分离视频(黄色)和音频(红色/白色)线,
通过有线盒和其它设备提供基本连接。
注意:音频输入的颜色可能不同,
如红色/白色或红色/黑色。
为天线或有线提供基本连接。
提供音频和视频。
AUX AUDIO
OUT 1
AUX AUDIO
OUT 2
AUX AUDIO
OUT 1
AUX AUDIO
OUT 2
DIGITAL VOLUME 8
CONTROL
DATA 2
(RJ45)
DATA 1 (RJ12)
SMARTPLUG
RS 232
AUX AUDIO
OUT 1
DIGITAL VOLUME 8
CONTROL
DATA 2
(RJ45)
DATA 1 (RJ12)
SMARTPLUG
Position of the connectors is
dependent on the model of
the TV
插口的位置取决于电视机的
型号
AUX AUDIO
OUT 2
RS 232
DIGITAL VOLUME 8
CONTROL
DATA 2
(RJ45)
DATA 1 (RJ12)
SMARTPLUG
RS 232
HDMI 1
HDMI 2
AUDIO IN
SPDIF OUT
HDMI 3
VGA
SERV. C
R
L
Y
Y
75X
75X
TV ANTENNA
TV ANTENNA
VIDEO
Pr
VIDEO
L
L
L
R
R
R
CVI
AV OUT
AV IN
HDMI 1
HDMI 2
AUDIO IN
SPDIF OUT
HDMI 3
VGA
SERV. C
R
L
Y
75X
TV ANTENNA
VIDEO
Pr
L
L
L
R
R
R
CVI
AC IN
HDMI 1 / HDMI 2 / HDMI 3
VGA - PC Analog input, Audio L/R input
SPDIF
AV IN - Video input, Audio L/R input
AV OUT - Video output, Audio L/R output
CVI - Component (YPbPr), Audio L/R input
75 Ω /RF
8 ohm 1 watt speaker out
Digital Volume Control
Aux Audio 1 - Audio output
Aux Audio 2 - Audio output
DATA 1 (RJ12-SmartPlug) / DATA 2 (RJ45)
RS232
Side AV - S-video, Audio L/R, Video input
Earphone
HDMI
Cover & Connection/外盖和连接 2
VIDEO
AV OUT
AV IN
AC IN
HDMI 1 / HDMI 2 / HDMI 3
VGA - PC 模拟输入,左/右音频输入
SPDIF
AV IN – 视频输入、左/右音频输入
AV OUT – 视频输出、左/右音频输出
CVI – 分量 (YPbPr)、左/右音频输入
75 Ω /RF
8 欧姆1 瓦扬声器输出
数字音量控制
Aux Audio 1 – 音频输出
Aux Audio 2 – 音频输出
DATA 1 (RJ12-SmartPlug) / DATA 2 (RJ45)
RS232
侧面 AV – S-video 输入、左右音频输入、视频输入
耳机
HDMI
Quick Start Guide/快速使用指南
1
Cable Box With
RF In / Outputs
Antenna TV
连接到射频输入/
输出天线电视的
有线电视盒
HDMI 2
Outdoor or Indoor Antenna 室外或室内天线
AUDIO IN
(Combination VHF/UHF) (复合 VHF/UHF)
R
VGA
SERV. C
L
Y
VIDEO
Pr
75X
TV ANTENNA
L
L
R
R
R
CVI
TV
VIDEO
L
AV OUT
or 或
AV IN
Antenna with
75W cable
使用 75W 电缆的天线
Twin-lead wire
to 300-75W adapter
连接 300-75W 适配器
的平行双线缆
电视
or
或
RF
The Cable TV signal
from Cable Company
来自有线电视公司的
有线电视信号
A
75 coaxial cable
同轴电缆
75
OUTPUT
CH
3
CABLE
IN
4
TO
TV
*After setting up, please run the Auto Install
TV function to set up the TV for the
broadcast or cable channels available in your
area. (please go to page 13 for detail)
*设置完成后,请运行自动搜寻功能,
以便设置电视机可在您所在地区接收到
的广播或有线频道。(有关详细信息,
请参阅第 32 页的内容)
Cable Box
有线电视盒
2
B
Cable Box With
Audio / Video Outputs
具有音频/视频输出
的有线电视盒
TV
C
B
电视
S-Video
OUTPUT
CH
3
CABLE
IN
Composite
Audio/Video Input
复合音频/
视频输入
TO
TV
A
4
L
AUDIO
OUT
R
VIDEO
OUT
S VIDEO
Cable Box 有线电视盒
D
Cable TV Signal
有线电视信号
*Use the AV button on the remote control to tune
to the AV channel for the cable box signal. Once
tuned, change channels at the cable box,
not the television.
*使用遥控器上的 AV 按钮调至 AV 频道,以接收有线
电视盒信号。调好台后,请更改有线电视盒而非电视机
中的频道。
Cover & Connection/外盖和连接 3
AV Button
AV 按钮
3
VCR, DVD Player, Or
Other Devices With
RCA Connectors
VCR、DVD 播放机或
其它具有 RCA 插口的设备
TV
电视
A
B
S-Video
Composite
Audio/Video Input
复合音频/
视频输入
AV Player with A/V connectors
具有 A/V 插口的 AV 播放机
C
*Use AV button on the remote control to select
AV or Side AV if you use the different jacks for the
hookup to watch VCR.
*如果使用连接装置的不同插孔来观看 VCR,
请使用遥控器上的 AV 按钮选择 AV 或 Side AV。
AV Button
AV 按钮
HDMI 2
4
DVD Player Or Other
Video Devices With
Component Video
Connectors
AUDIO IN
VGA
SERV. C
R
L
Y
VIDEO
Pr
75X
TV ANTENNA
DVD 播放机或其它具有
分量视频插口的视频设备
VIDEO
L
L
L
R
R
R
CVI
AV OUT
TV
电视
B
AV IN
A
Component
Video Input
分量视频输入
Accessory device equipped with
component video outputs
配备有分量视频输出的配套设备
C
*Use AV button on the remote control to select CVI to
watch DVD.
Note: The Y, Pb, Pr jacks do not provide audio, so
audio cables must be connected to provide sound.
*使用遥控器上的 AV 按钮选择 CVI 以观看 DVD。
注意:Y、Pb、Pr 插孔不提供音频,因此必须连接音频线
AV Button
AV 按钮
Cover & Connection/外盖和连接 4
才能播放声音。
5
PC (Monitor)
Connections
PC(显示器)连接
HDMI 1
HDMI 2
AUDIO IN
SPDIF OUT
HDMI 3
VGA
SERV. C
R
TV
L
电视
Y
VIDEO
Pr
75X
TV ANTENNA
L
L
R
R
CVI
C
AV OUT
VIDEO
B
L
A
R
AV IN
Computer
电脑
*Use AV button on the remote control to select PC to use your LCD TV
as a PC monitor.
*使用遥控器上的 AV 按钮选择 PC 以便将液晶电视用作 PC 显示器。
AV Button
AV 按钮
6
DVD Player With
HDMI Connector
具有 HDMI 插口
的 DVD 播放机
HDMI 1
HDMI 2
AUDIO IN
SPDIF OUT
HDMI 3
VGA
SERV. C
R
L
75X
TV ANTENNA
HDMI
TV
电视
A
Y
VIDEO
Pr
VIDEO
L
L
L
R
R
R
CVI
AV OUT
AV IN
DVD player
DVD 播放机
B
*Use AV button on the remote control to select HDMI 1,
HDMI 2 or HDMI 3 to watch DVD.
*使用遥控器上的 AV 按钮选择 HDMI 1、HDMI 2 或
HDMI 3 以观看 DVD。
AV Button
AV 按钮
Cover & Connection/外盖和连接 5
Important safety instructions
Read and understand all instructions before you use your
TV. If damage is caused by failure to follow instructions,
the warranty does not apply.
Safety
•
Ensure that no part of the TV hangs over the edge of
the surface.
• Never place the TV on tall furniture (such as a bookcase) without anchoring both the furniture and TV to
the wall or a suitable support.
• Educate children about the dangers of climbing on
furniture to reach the TV.
Risk of overheating! Never install the TV in a confined
space. Always leave a space of at least 4 inches around the
TV for ventilation. Ensure curtains or other objects never
cover the ventilation slots on the TV.
Risk of injury, fire or power cord damage! Never place
the TV or any objects on the power cord.
Disconnect the mains cord before connecting devices.
Where the mains plug or an appliance coupler is used as
the disconnect device, the disconnect device shall remain
readily operable.
Disconnect the TV from the power outlet and antenna
before lightning storms. During lightning storms, never
touch any part of the TV, power cord or antenna cable.
Risk of hearing damage! Avoid using earphones or headphones at high volumes or for prolonged periods of time.
If the TV is transported in temperatures below 5°C, unpack the TV and wait until the TV temperature matches
room temperature before connecting the TV to the
power outlet.
•
Risk of electric shock or fire!
• Never expose the TV to rain or water. Never
place liquid containers, such as vases, near the
TV. If liquids are spilt on or into the TV, disconnect the TV from the power outlet immediately.
Contact Philips Consumer Care to have the TV
checked before use.
• Never place the TV, remote control or batteries
near naked flames or other heat sources, including direct sunlight.
To prevent the spread of fire, keep candles or
other flames away from the TV, remote control
and batteries at all times.
•
•
•
•
•
•
•
Never insert objects into the ventilation slots or
other openings on the TV.
• When the TV is swiveled ensure that no strain is
exerted on the power cord. Strain on the power
cord can loosen connections and cause arcing.
• Risk of short circuit or fire!
• Never expose the remote control or batteries to
rain, water or excessive heat.
• Avoid force coming onto power plugs. Loose
power plugs can cause arcing or fire.
• Risk of injury or damage to the TV!
• Two people are required to lift and carry a TV
that weighs more than 55 lbs.
• When stand mounting the TV, use only the supplied stand. Secure the stand to the TV tightly.
Place the TV on a flat, level surface that can
support the combined weight of the TV and the
stand.
• When wall mounting the TV, use only a wall
mount that can support the weight of the TV.
Secure the wall mount to a wall that can support the combined weight of the TV and wall
mount. Koninklijke Philips Electronics N.V. bears
no responsibility for improper wall mounting that
results in accident, injury or damage.
• Risk of injury to children!Follow these precautions to
prevent the TV from toppling over and causing injury
to children:
• Never place the TV on a surface covered by a
cloth or other material that can be pulled away.
•
Screen care
•
•
•
•
•
Avoid stationary images as much as possible. Stationary
images are images that remain on-screen for extended
periods of time. Examples include: on-screen menus, black
bars and time displays. If you must use stationary images,
reduce screen contrast and brightness to avoid screen
damage.
Unplug the TV before cleaning.
Clean the TV and frame with a soft, damp cloth. Never
use substances such as alcohol, chemicals or household
cleaners on the TV.
Risk of damage to the TV screen! Never touch, push, rub
or strike the screen with any object.
To avoid deformations and color fading, wipe off water
drops as soon as possible.
Recycling
Your product is designed and manufactured with high quality
materials and components, which can be recycled and reused.
When you see the crossed-out wheel bin symbol attached to
6
a product, it means the product is covered by the European Directive 2002/96/EC:
Never dispose of your product with other household
waste. Please inform yourself about the local rules on the
separate collection of electrical and electronic products.
The correct disposal of your old product helps prevent
potentially negative consequences on the environment
and human health.
7
Contents
Important safety instructions . . . . . . . . . . . . . . . . 6
Contents . . . . . . . . . . . . . . . . . . . . . . . . . . . . . . . . . . 8
Preparation . . . . . . . . . . . . . . . . . . . . . . . . . . . . . . . . 9
Wall mounting . . . . . . . . . . . . . . . . . . . . . . . . . . . . . 9
Use of the remote control . . . . . . . . . . . . . . . . . . . . 9
Buttons on the TV . . . . . . . . . . . . . . . . . . . . . . . . . . 10
To use the menus . . . . . . . . . . . . . . . . . . . . . . . . . . . 11
Accessing the SETUP menu
11
Navigation
11
Setup menu items . . . . . . . . . . . . . . . . . . . . . . . . . . . 12
Communication . . . . . . . . . . . . . . . . . . . . . . . . . . . . 12
Channel Installation . . . . . . . . . . . . . . . . . . . . . . . . . 13
Configuration . . . . . . . . . . . . . . . . . . . . . . . . . . . . . . 14
Switch On/ OSD . . . . . . . . . . . . . . . . . . . . . . . . . . . . 14
Picture and Sound settings . . . . . . . . . . . . . . . . . . . 15
Security settings . . . . . . . . . . . . . . . . . . . . . . . . . . . . 15
Control settings . . . . . . . . . . . . . . . . . . . . . . . . . . . . 16
Guest menu items . . . . . . . . . . . . . . . . . . . . . . . . . . 16
Remote control keys . . . . . . . . . . . . . . . . . . . . . . . . 17
Teletext . . . . . . . . . . . . . . . . . . . . . . . . . . . . . . . . . . . 18
Picture Formats . . . . . . . . . . . . . . . . . . . . . . . . . . . . 19
Wireless Smart Loader . . . . . . . . . . . . . . . . . . . . . . 20
Low battery check . . . . . . . . . . . . . . . . . . . . . . . . . . 21
Trouble shooting tips . . . . . . . . . . . . . . . . . . . . . . . . 22
Glossary. . . . . . . . . . . . . . . . . . . . . . . . . . . . . . . . . . . 23
Specification . . . . . . . . . . . . . . . . . . . . . . . . . . . . . . . 24
8
Preparation
Do not insert the power plug in a wall socket before all connections are made.
Place the TV on a solid surface.
For ventilation, leave at least 4” to 6” free all around the TV.
Do not place the TV on a carpet. To prevent any unsafe
situations, no naked flame sources, such as lighted candles,
should be placed in the vicinity. Avoid heat, direct sunlight and
exposure to rain or water. The equipment shall not be exposed to dripping or splashing.
Mounting the TV on the wall
This TV set complies with the VESA standard for wall mounting.
Refer to specification page 24 for detail.
Caution: Installing the TV requires special skills that should
only be performed by qualified personnel. You should not
attempt to do the work yourself. Philips bears no
responsibility for improper mounting or mounting that
results in accident or injury.
Make sure that the wall mount is being fixed securely enough
so that it meets safety standards.
ANTENNA
To connect accessory devices, see Cover and Connection.
Refer to the bottom of the set (Model label) for the
correct operation voltage.
Insert the power cord into the wall socket.
Consult your local dealer if your main power supply voltage is
different than that indicated for the TV. Never place the TV
on top of the (AC) cord. Placing the TV on top of the AC cord
could cause a fire or electric shock.
CABLE
CABLE OR ANTENNA
Remote control:
Insert the two supplied AA batteries.
The batteries supplied do not contain the heavy metals mercury and cadmium. Please determine and comply with local
regulations when disposing of depleted batteries.
75
Turn the TV on:
Press the power switch on the side of the TV. An
indicator on the front of the TV lights up.
Press the POWER button on the remote control.
ANTENNA
CE
CABLE
HDMI 1
IN
OUTPUT
/OUT
(TO TV)
HDMI 2
CABLE OR ANTENNA
75
2
3
9
Cable box
Buttons on the TV
Should your remote be lost or broken you can still change some of the basic settings with the control buttons on
your TV.
Press:
•the button to switch the TV on or off.
•the + VOLUME - button to adjust volume;
•the + CHANNEL - buttons to select the TV channels or sources.
The MENU button can be used to display the Settings menu without the remote control.
MENU button can also Exit the menu.
Use:
•the + VOLUME - buttons and the + CHANNEL - buttons to select menu items in the directions as shown;
•the + VOLUME button to confirm your selection.
VOLUME
MENU
CHANNEL
POWER
10
To use the menus
Accessing the SETUP menu
When the set is in the HIGH SECURITY mode, the SETUP menu can be accessed only by the Institutional Set-up
Remote Control (RC2573) by pressing the
key. The Institutional Set-Up Remote Control is available as an
optional accessory.
When the set is in the STANDARD SECURITY mode, the SETUP menu may be accessed with the standard guest
remote control (RC2887) by a sequence of commands (3 1 9 7 5 3 MUTE).
POWER
RECALL
TEXT
SMART
SLEEP
CC
ALARM
GUEST
DCM
ON
PAY TV
INFO
RADIO
SETUP
OFF
1
2
3
4
5
6
7
8
9
GUIDE
CH
0
RESET
OK
M
A/CH
TV
VOL
CH
A
TEXT
B
C
E
F
CLOCK
AV
D
G
AV
RC2573
(Optional)
RC2887
Navigation
The current menu item can be selected by means of the Up/Down keys. Submenus can be accessed from menu items
indicated with a “>” symbol by pressing the Right key.
• To exit any menu press “MENU” button
• Select “YES” to activate/enable a setting, “NO” to deactivate/disable.
• TV up/down (+/-), INFO up/down (+/-), PAY-TV up/down (+/-) and RADIO up/down (+/-) are available when Setup menu
has the relevant settings.
11
Setup menu items
• LANGUAGE: Select the language of the Setup menu.
Options are “ENGLISH”, “MELAYU” and “CHINESE”
Note: The Chinese Language is for the Guest Menu only.
SETUP
LANGUAGE
COMMUNICATION
NO. OF CHANNELS
CHANNEL INSTALL SETUP
CONFIGURATION
ENGLISH
>
>
>
>
LANGUAGE
COMMUNICATION
NO. OF CHANNELS
CHANNEL INSTALL
CONFIGURATION
ENGLISH
>
>
>
>
• COMMUNICATION: Please refer to the section for detail.
• NO. OF CHANNELS: This sub menu allows setting the number
of TV, PAY-TV, INFO and RADIO channels.
• CHANNEL INSTALL: In the CHANNEL INSTALL sub-menu,
various channel settings can be set. Please refer to the section on
Channel Installation for further details.
• CONFIGURATION: In the CONFIGURATION menu, various settings and features of the TV can be adjusted. Please
refer to the section on Configuration for further details.
COMMUNICATION
Communication
COMMUNICATION
STORE
OFF
>
• COMMUNICATION: The Communication options SP-SPI,
SP-I2C, HM-Link, Multi RC, Smart RC and Serial Express. SP-SPI,
SP-I2C and HM-Link are for enabling interactive applications. MultiRC is a feature to program the TV and RC for a one to one matching in a multi TV environment. Multi-RC allows up to four unique
groups of TV-RC matching. For normal stand-alone applications
select “OFF” option under the Communication sub menu.
COMMUNICATION
COMMUNICATION
STORE
OFF
>
CHANNEL INSTALL
CHANNEL
TV 1
TUNER
INPUT
SYSTEM
AUTO
MultiFREQUENCY
RC Set-up procedure:
184.2500 >
CHANNEL INSTALL
LABELthe RC Menu key
( together
)>
1. Press
with one of the coloured keys (Red/Green/Yellow/Blue) for at least
STORE
>
2. Access
the
TV
Set-Up
Menu
and
select Multi RC option
0
FINE
TUNE
CHANNEL
TV 1
3. Under
Multi
RC
sub-menu,
select
the corresponding colour to match the colour selected in Step 1
MUTE
NONE
INPUT
TUNER
AUTO
INSTALL
TV
>
SYSTEM
AUTO
PROTECTION
NO
FREQUENCY
184.2500
>
4 seconds.
Notes:
LABEL
(
)>
1. SP-SPI
STOREand SP-I2C refers to the >Philips communication protocols that are used in conjunction with the Data 1 (RJ12) or/and
FINE 2
TUNE
Data
(RJ45) connectivity to an0 external STB or Smart Card Xpress Box.
MUTE
NONE
2.HM-Link
is mainly used in conjunction
with Data 1 (RJ12) connectivity to an external STB. Serial Express is used with the RS232 AUTO INSTALL TV
>
(D89)
connector
for
connectivity
to
an
external STB.
PROTECTION
NO
CONFIGURATION
3.Multi RC feature requires specific remote control models RC2887/RC2886. 4.The Multi RC default colour code is BLUE (for TV and RC). The RC colour code will be automatically reset to default BLUE colour
SWITCH ON/OSD
>
when thePICTURE/SOUND
RC batteries are changed.
>
5.To checkSECURITY
the colour code status> of TV and RC, just press the OK button on the RC for at least 4 seconds.
•
•
CONFIGURATION >
CONTROL
FEATURES
>
STORE: To
saveFEATURES
your settings by
AUDIO
> pressing right
SWITCH ON/OSD
>
RS232 ID: To setup the TV ID.
PICTURE/SOUND
>
DCM TYPE:
To communicate with
Smartport.
SECURITY
>
CONTROL
>
FEATURES
>
AUDIO FEATURES
>
key.
(It’s available in SP-SPI and SP-I2C)
12
Channel Installation
In the CHANNEL INSTALLATION sub-menu, channel settings can be set.
CHANNEL INSTALL
CHANNEL
INPUT
SYSTEM
FREQUENCY
LABEL
STORE
FINE TUNE
MUTE
AUTO INSTALL TV
PROTECTION
TV 1
TUNER
AUTO
184.2500 >
(
)>
>
0
NONE
>
NO
• CHANNEL: The channel type can be selected with the cursor
Left/Right key. The available options are: “TV”, “INFO”, “PAY
TV” and “RADIO”.
Note:
Use the numeric keys to enter the program number. For program number
below 10, enter the first digit as “0” followed by the program number. Eg
“01” for TV 1. Alternatively, enter the program number followed by Up/
Down key. Program number “0” or “00” are not allowed.
• INPUT: The “Input” menu item selects the desired input source that will be assigned to the program. Possible values are
Tuner, AV, SIDE AV, SIDE SVIDEO, CVI, VGA, HDMI1, HDMI2, HDMI3 and Side HDMI.
CONFIGURATION
• SYSTEM: AUTO, PAL 4.43 BG, PAL 4.43 I, PAL 4.43 DK and NTSC 3.58M are available for selection.
•
SWITCH ON/OSD
>
PICTURE/SOUND
>
FREQUENCY:
SECURITY Digits can be >entered for
displayed as
dashes “-”. Enter the
CONTROL
> first digit
FEATURES
>
start the auto search.
AUDIO FEATURES
>
a frequency in MHz. When you enter the first digit, other incomplete number
as “0” for frequencies below 100 MHz. You can also press the Right key to
• LABEL: This menu item will be used to add a label/name for each program.
o Press the Left/Right key to select the label digit; press the Up/Down key to insert alphanumeric characters.
o Press the MENU button to exit the Label menu item.
• STORE: The channel information is stored after pressing the Left/Right key.
Press the MENU key to exit without storing.
• FINE TUNE: Press the Left/Right key for fine-tuning.
• MUTE: This item enables/disables picture and sound for the particular channel.
o NONE: normal picture and sound enabled
o VIDEO: picture is blanked for this channel (e.g. radio channel)
o AUDIO: sound is muted for this channel (e.g. information channel)
• AUTO INSTALL TV: This sub menu allows the TV channels to be scanned and set automatically.
• PROTECTION: This function is to protect a selected program for PAY TV purpose. Press the Left/Right key to toggle
the protection between “YES” and “NO”.
13
STORE
FINE TUNE
MUTE
AUTO INSTALL TV
PROTECTION
>
0
NONE
>
NO
Configuration
In the Configuration menu, various settings and features of the TV can be adjusted.
CONFIGURATION
SWITCH ON/OSD
PICTURE/SOUND
SECURITY
CONTROL
FEATURES
AUDIO FEATURES
>
>
>
>
>
>
IN PC mode, there is one more item.
• SWITCH ON/OSD: In this sub-menu the SWITCH ON
characteristics and ON SCREEN DISPLAY settings of the TV can
be set.
• PICTURE/SOUND: In this sub-menu, the PICTURE and
SOUND settings of the TV can be set.
• SECURITY: In this sub-menu, the SECURITY settings of the TV
can be configured.
• CONTROL: In this sub-menu, the CONTROL settings of the TV
can be configured.
• FEATURES: In this sub-menu Energy Savings settings of this TV
can be set.
• AUDIO FEATURES: In this sub-menu, the different audio features can be set.
• VIDEO ADJUSTMENT:
o HORIZONTAL: Adjusts the horizontal placement of the picture
o VERTICAL: Adjusts the vertial placement of the picture
o PHASE: Eliminates the horizontal interfering lines.
o CLOCK: Eliminates the vertical interfering lines.
o AUTO ADJUST: The PC mode will automatically adjust the best image position.
o RESET: Resets to the default mode.
Switch On/OSD
In this sub menu the behavior of the TV after switching on and the behavior of the ON SCREEN DISPLAY can be selected.
SWITCH ON/OSD
WELCOME MESSAGE
SWITCH ON CHANNEL
SWITCH ON VOLUME
SWITCH ON PIC FMT
POWER ON
VOLUME INDICATOR
CHANNEL DISPLAY
>
AV
30
WIDESCREEN
LAST STATUS
YES
ALL
• WELCOME MESSAGE: Press Cursor Left/Right to display
Welcome message entry menu:
o WELCOME MESSAGE
o DISPLAY YES/NO
o LINE 1
o LINE 2
o CLEAR
With the Up/Down key you can set the message characters.
Press Up key to insert alphabets, and Down key to insert digits.
• SWITCH ON CHANNEL: This item sets the television’s channel at switch on.
• SWITCH ON VOLUME: This item sets the television’s volume at switch on. Use the Right/Left key to adjust.
• SWITCH ON
PIC FMT: This item sets the television’s Picture Format at switch on. Use the Right/Left key to select
PICTURE/SOUND
the desired format.
• POWER BRIGHTNESS
ON: The POWER ON
50 menu function defines the behavior of the television whenever AC Power is applied.
COLOUR
50
The available
options are “FORCED
ON”, “LAST STATUS”, “STANDBY” and “ON”.
CONTRAST
50
o FORCEDSHARPNESS
ON: TV will be automatically
switched to ON mode whenever the mains power is turned ON or resumed
50
50
TINT interruption. Note
after a power
that the remote control STANDBY key will no longer function when TV is set in this
ACTIVE CONTROL
YES
mode. TV
can only be switched
TREBLE
50 OFF by means of the main switch or a set-up remote control or by ESP function
50 controls the maximum continuous viewing time allowed).
(Energy BASS
Saving Programmability
50
BALANCE
o LAST STATUS:
TV will be automatically
switched to the last status (either STANDBY or ON) whenever the mains
AVL
ON
power is turned ON or resumed after a power interruption.
14
SECURITY
SWITCH
ON/OSD
o STANDBY: TV
will be
automatically switched to STANDBY mode (even if the last status was ON) whenever the mains
power is turned ON or resumed after a power interruption.
WELCOME MESSAGE
>
o ON:
Similar function as “FORCED
ON” but the remote control STANDBY key function is enabled when TV is set to SWITCH ON CHANNEL
AV
this
mode.
SWITCH
ON VOLUME
30
• VOLUME
To display volume indicator when adjusting volume, select “YES”.
SWITCH ONINDICATOR:
PIC FMT
WIDESCREEN
POWER
ON to hide the
LAST
STATUS indicator.
Select
“NO”
volume
VOLUME INDICATOR
YES
• CHANNEL DISPLAY: CHANNEL
DISPLAY values can be: NUMBER, LABEL, ALL, and NONE.
CHANNEL DISPLAY
ALL
SWITCH ON/OSD
Picture and Sound settings
WELCOME MESSAGE
>
In this
sub ON
menu,
the Picture and
SWITCH
CHANNEL
AV Sound settings of the TV can be selected.
SWITCH ON VOLUME
30
SWITCH ON PIC FMT
WIDESCREEN
POWER ON PICTURE/SOUND
LAST STATUS
VOLUME INDICATOR
YES
CHANNEL
DISPLAY
ALL
BRIGHTNESS
50
COLOUR
50
CONTRAST
50
SHARPNESS
50
TINT
50
ACTIVE CONTROL
YES
TREBLE
50
BASS
50
BALANCE
PICTURE/SOUND 50
AVL
ON
•
•
•
•
•
•
•
BRIGHTNESS: Changes picture brightness.
COLOUR: Changes the intensity of the colour.
CONTRAST: Changes the difference between the light and dark
tones.
SHARPNESS: Adjusts to improve detail.
TINT: Adjusts the colour balance in an image.
ACTIVE CONTROL: Allows adjustment for picture noise reduction.
Notes:
COLOUR and SHARPNESS are not available in the PC mode
BRIGHTNESS
50
50
COLOUR
CONTRAST
50
• TREBLE/BASS:
Adjusts
the
level
of treble and bass effects on the TV’s sound output.
50
SHARPNESS
• BALANCE:
TINTAdjusts the balance
50 of the right and left speakers to best suit your listening position.
SECURITY
ACTIVE CONTROL
YES
• AVL (Automatic
Volume Leveller):
Limits the increase in sound level especially during programme
50
TREBLE
slots.
BASS
50
SECURITY
STANDARD
50
BALANCE
KEYBOARD
NO ON
AVL LOCK
Security
settings
REMOTE CONTROL LOCK
NO
VIDEO OUT MUTE
NO
In thisENABLE
sub menu,
the Security
GUEST MENU
YES settings of the TV can be configured.
ENABLE TELETEXT
YES
SECURITY
SECURITY
KEYBOARD LOCK
REMOTE CONTROL LOCK
CONTROL
VIDEO OUT MUTE
ENABLE GUEST MENU
ENABLE
ESPTELETEXT
•
•
•
•
•
STANDARD
NO
NO
NO
YES
YES OFF
AUDIO/VIDEO MUTE
STEP TUNING
DIGIT TIMEOUT
MIN VOLUME
MAX VOLUME
NO
NO
3.0
0
99
STEP TUNING
DIGIT TIMEOUT
MIN VOLUME
MAX VOLUME
NO
3.0
0
99
change or advertising
• SECURITY: The “SECURITY” function allows the user to select one
of two states - “HIGH” or “STANDARD”.
The default is “STANDARD”.
o When the set is in the SECURITY HIGH mode, the SETUP menu
can only be accessed by a Institutional Set-up Remote Control.
o When the set is in the SECURITY STANDARD mode, the SETUP
menu can be accessed with a guest remote control by a sequence
of commands (3 1 9 7 5 3 MUTE).
KEYBOARD LOCK: Disables the television’s local keyboard for volume and program control.
REMOTE CONTROL
LOCK: Locks all buttons on the guest remote control.
CONTROL
VIDEO OUT MUTE: Disables video out signal from all sources.
ENABLE GUEST MENU: Enables the Guest Menu.
ESP
OFF
ENABLE TELETEXT
(only if applicable)
: Enables Teletext.
AUDIO/VIDEO MUTE
NO
15
REMOTE CONTROL LOCK
VIDEO OUT MUTE
ENABLE GUEST MENU
ENABLE TELETEXT
NO
NO
YES
YES
Control settings
In this sub menu, the CONTROL settings of the TV can be configured.
CONTROL
ESP
AUDIO/VIDEO MUTE
STEP TUNING
DIGIT TIMEOUT
MIN VOLUME
MAX VOLUME
OFF
NO
NO
3.0
0
99
• ESP: Energy Saving Programmability Mode (ESP) function controls
the maximum continuous viewing time allowed and its valid values
are 00 - 99 (in hours). 00 value means that the ESP function is OFF.
Note that if the TV is switched off, the ESP timer countdown will
be reset.
• AUDIO/VIDEO MUTE: The Audio/Video Mute menu function
determines whether the video should be blanked and the audio
should be muted if the currently tuned channel has no signal.
• STEP TUNING: If YES is selected, TV programs (1 to 9) are tuned immediately when a digit is pressed. If NO is
selected, tuning is performed only after the dash (second digit) disappears.
• DIGIT TIMEOUT: This is the time-out to enter the second digit of program number, e.g. for program number 10 and
above.
• MIN VOLUME: This item sets the minimum volume level allowed for the television set. Use Right/Left key to adjust.
• MAX VOLUME: This item sets the limit for the maximum volume allowed for the television set. Use Right/Left key to
adjust.
Guest menu items
MENU
LANGUAGE
BRIGHTNESS
COLOUR
CONTRAST
SHARPNESS
TINT
PICTURE FORMAT
SLEEPTIMER
SOURCE
ENGLISH
50
50
50
50
50
WIDESCREEN
Off
TV
• LANGUAGE:For selecting Guest Menu language (ENGLISH/CHINESE/MELAYU).
• BRIGHTNESS/COLOUR/CONTRAST/SHARPNESS/TINT: Use the remote control Right/Left key to change
the picture setting.
• PICTURE FORMAT : Use the remote control Right/Left key to select the desired picture format. The following options are available: 4:3, ZOOM 14:9, ZOOM 16:9, SUBTITLE ZOOM, WIDESCREEN, SUPER WIDE.
• SLEEPTIMER: This item is to select an automatic period for the TV to switch to Standby when the TV does not
receive any commands from the user. This is a useful feature for energy saving if hotel guests have left the room with
the TV still in the ON mode. Available periods are 15 mins, 30 mins, 45 mins, 60 mins, 90 mins, 120 mins, 180 mins, 240
mins and OFF. Use the remote control Right/Left key to select the required period (Note: SLEEPTIMER option is not
available when POWER ON is set to the “FORCED ON” mode).
• SOURCE: This item is to select the different TV input sources.
16
Remote control keys
Note: Pressing most buttons once will activate the assigned function. Pressing a second time will de-activate it.
When a button enables multiple options, a small list will be shown. Press repeatedly to select the next item in the list.
The list will be removed automatically after six seconds or press MENU to remove immediately.
(9) STANDBY
Press to switch the TV to standby mode.
(1) Alarm On / Off
No function.
(9)
(2) +Pay TVTo move up or down a Pay TV channel.
(3) Smart Sound button
Press repeatedly to select among the
4 settings: PERSONAL, THEATRE,
MUSIC, or VOICE.
ALARM
(1)
(10)
ON
PAY TV
INFO
(2)
Press repeatedly to select either RICH,
NATURE, SOFT, or PERSONAL of
(14) picture setting.
OK
(13) I-II button / Sound mode
To select 1st or 2nd language.
(15) Note: Language availability depends on
the transmission.
(6)
TV
(7)
(8) Teletext (p.18)
Press to turn on or off the Teletext
function (available in certain TV models (8)
only).
To move up or down a RADIO channel.
(13)
(6) VOL +/Press + or - to adjust the volume.
(7) Mute button
Press to eliminate or restore the LCD
TV sound. Mute will appear on the
screen when the sound is muted.
(11) (11) RADIO
(12) (12) Smart Picture button
(3)
(4)MENU
Press menu to activate on screen menu (4)
on/off.
(5)
(5) Cursor direction key
RADIO
OFF
(10) +INFOTo move up or down an INFO channel.
(14) OK
To activate a setting.
(15) + TV -
(16) To move up or down a TV channel.
TEXT
AV
(17) AV button
Press to select the video input source:
Tuner, AV, SIDE AV, SIDE SVIDEO,
CVI, VGA, HDMI1, HDMI2, HDMI3
and SIDE HDMI.
17
(16) Number button
Press the number buttons for direct
access to the TV channels. For 2 digit
(17)
channel, enter the 2nd digit after the 1st
digit.
Teletext
Teletext is an information system broadcast available in certain channels. In some countries, it also offers access to
subtitles for viewers with hearing problems or who are not familiar with the transmission language (cable networks,
satellite channels, etc.).
Press
To switch Teletext ON/OFF.
i
ALARM
ON
PAY TV
INFO
RADIO
OK
In Teletext mode, press
OK
ii
OK
OK
i
i a OK
To enter
(3-digit) page number
OFF
For previous / next page
OK
For previous / next page
Depending on indication of sreen, coloured buttons are used to access the items or corresponding
pages.
TV
TEXT
AV
18
Picture Formats
The pictures you receive may be transmitted in 16:9 format (wide screen) or 4:3 format (conventional screen). 16:9
pictures sometimes have a black band at the top and bottom of the screen (letterbox format). This function allows
you to optimize the picture display on screen.
Using the different formats, the Picture Format can be set via the Guest Menu or Set-Up Menu.
4:3
The picture is reproduced in 4:3 format and a black band is displayed on either
side of the picture.
4:3
ZOOM 14:9
The picture is enlarged to 14:9 format, a thin black band remains on both sides
of the picture.
ZOOM 14:9
ZOOM 16:9
The picture is enlarged to 16:9 format. This mode is recommended when displaying pictures that have black bands at the top and bottom (letterbox format).
ZOOM 16:9
SUBTITLE ZOOM
This mode is used to display 4:3 pictures using the full surface of the screen
leaving the subtitles visible.
SUBTITLE ZOOM
SUPER WIDE
This mode is used to display 4:3 pictures using the full surface of the screen by
enlarging the sides of the picture
SUPER WIDE
WIDESCREEN
This mode restores the correct proportions of pictures transmitted in 16:9 using the full screen display.
WIDESCREEN
19
Wireless Smart Loader
The Philips Wireless Smart-Loader 22AV1120/00 and 22AV1135/00 are installation tools especially designed for easy
and fast installation of Philips Institutional TV’s.
Preparation
Make sure that the 3 R6/AA sized batteries are placed correctly in the battery compartment of the Wireless
Smart-Loader. Turn the power switch on at the left side of the product. A green LED at the top casing should light
up when pressing any button indicating operational batteries. When the LED light is red, it indicates that the
batteries need to be replaced.
The installation procedure consists of three steps:
1. Choosing the master TV
2. Programming the Wireless Smart-Loader
3. Installing a TV with the Wireless Smart-Loader
Step 3 can be repeated on as many TV sets as required.
1. Choosing a Master TV
The master TV is the TV whose installation set-up has to be copied into other TV’s of the same type.
2. Programming the Wireless Smart-Loader
This step has to be done only once or the program of the Wireless Smart-Loader would be overwritten.
Point the Wireless Smart-Loader to the TV’s infra red receiver (distance around 5 to 30cm).
Press the “MENU” Key on the Wireless Smart-Loader.
TV shows the following menu:
SMARTLOADER TO TV >
TV TO SMARTLOADER >
o Highlight “TV TO SMARTLOADER”
o Press the right cursor key on the Wireless Smart-Loader for wireless method or on the TV
Remote Control for wired method.
> A number display shows from 1~100 the percentage of memory storage progress from the TV to the
Wireless Smart-Loader (100 = fully loaded).
TV TO SMARTLOADER |||-------- ##
> When the data transfer is completed, ## is “100”, the following menu appears for 3 seconds:
SMARTLOADER READY >
> Now the Wireless Smart-Loader is programmed and can be used to install other TV sets.
3. Installing a TV with the Wireless Smart-Loader
Use a Wireless Smart-Loader programmed with the settings from a master TV of the same type.
Turn on the TV and point the Wireless Smart-Loader to the TV’s infra red receiver (max. distance around 30cm).
---- Press the “MENU” Key on the Wireless Smart-Loader.
o Highlight “SMARTLOADER TO TV”
o Press the right arrow key on the Wireless Smart-Loader for wireless method.
20
> A number display shows from 1~100 the percentage of memory storage progress from the
Wireless Smart-Loader to the TV (100 = fully loaded).
SMARTLOADER TO TV |||-------- ##
> When data transfer is completed, ## is “100”, the following menu appears for 3 seconds:
TV READY >
> After that, the following menu comes up
GOODBYE >
> The TV goes to standby now and your TV is installed and ready for start-up and use.
Problems and Solutions:
Problem
Solution
The message “WRONG VERSION” is
displayed on the screen.
The program stored into the Wireless Smart-Loader has a
software code incompatible with the actual TV.
Reprogram the Wireless Smart-Loader from a master TV
whose software code is compatible with the actual TV.
TV doesn’t respond to the Wireless SmartLoader.
-check if the LED on the Wireless Smart-Loader is green when
pressing any button and check if the batteries are in a good
condition. Replace batteries if necessary.
- try to bring the Wireless Smart-Loader more closer to the
TV infra red receiver and try again.
Tips:
1. Do not forget to write the software code and the type of relevant master TV on the sticker used on the back
of the Wireless Smart-Loader.
2. The Wireless Smart-Loader can retain without batteries, the stored information for ten years if required.
Note:
Before putting the Wireless Smart-Loader into store for a long time, make sure that the batteries are all taken
out to prevent the batteries corroding the contacts.
Low battery check
Press the OK key for approximately 5 seconds. The following text then appears:
SERVICE
1
REMOTE BATTERY
OK
If the word “LOW” appears instead of “OK”, the remote control batteries are low and must be replaced.
21
Trouble Shooting Tips
Symptoms
Items to Check and Actions to follow
“Ghost” or double
images
• This may be caused by obstruction to the antenna due to high rise buildings or hills.
Using a highly directional antenna may improve the picture.
No power
• Check that the TV’s AC power cord is plugged into the mains socket.
• Unplug the television, wait for 60 seconds. Then re-insert plug into the mains socket
and turn on the television again.
No picture
• Check antenna connections at the bottom of the TV to see if they are properly connected to
the TV.
• Possible broadcast station trouble. Try another channel.
• Adjust the contrast and brightness settings. Try another auto picture setting.
• Check if you selected the correct AV source.
No picture and
power switched on
• Your TV has a protective mode in case there is too much heat build-up. Check the
clearance around the vents of the device to be certain there are no blocking walls or
cabinets which would limit the air flow.
No photo, music or • Check if the source complies with a supported code.
video play or in poor
quality only
No sound
• Increase the VOLUME.
• Check that the TV is not muted, press the MUTE button on the remote control.
• When no signal is detected, the TV automatically switches off the sound. This is proper
operation and does not indicate a malfunction.
Good sound but
poor color or no
picture
• Adjust the contrast, color, tint and brightness setting. Try another auto picture setting.
Snowish picture and • Check the antenna connection.
noise
Television not
responding to
remote control
• Check whether the batteries are working. Replace if necessary.
• Clean the remote control sensor lens on the monitor.
• Operating range between TV and the remote control should not be more than approximately
twenty feet.
• You can still use the buttons on the side of your TV.
• Check if the remote control is in the correct mode.
Control of accessory • The infrared signals of the screen may influence the reception sensibility of other peripherals
devices
Solution:
Replace the batteries of the remote control of other devices. E.g. keep away a wireless headphone from within a radius of approximately four feet.
PC modes do not
work
• Check whether connections are correct.
• Check whether the source is correctly selected. Press AV button to select the correct source.
• Check whether you have configured the computer on a compatible display resolution.
Standby
Your TV consumes energy less than 3w in the standby mode.
After improper
shutdown
If your TV has been shutdown in an improper way (e.g. power drop, power cord plug out), starting up the TV again will take a longer time than usual.
Miscellaneous
See Specifications on this user manual.
22
Glossary
Aspect Ratio
The ratio between the width and height of the TV picture on the screen. In a normal TV set the
aspect ratio is 4 to 3 (4:3). The new aspect ratio in HDTV is 16:9 which resembles the aspect ratio
in a movie theatre (Widescreen). New TV systems support both 4:3 and 16:9 aspect ratio and can
automatically switch between them.
Audio Video (A/V)
A term often used when discussing a channel on a TV receiver or on video equipment, which has
been especially designed to accept VCR audio-video signals. This channel automatically activates
special circuitry within the TV set to prevent picture distortion and skewing. It is also used for
audio-video processors, which handle both types of signals.
CVBS
Composite Video Baseband Signal. In broadcast television this refers to the video signal, including
the colour information and syncs.
Component Video
Input (Y Pb Pr)
Component Video Input is a type of connection that uses a cinch-type connector to allow set
top boxes or analog DVD players to connect a signal to the TV. By offering the cinch-type input
(YPbPr) the primary colors, red, green and blue are connected from a set top box directly into
the TV allowing for the signal to display on the screen.
HDTV
The generally agreed upon definition of HDTV is approximately twice the vertical and
horizontal picture resolution of today’s TV, which essentially makes the picture twice as sharp.
HDTV also has a screen ratio of 16:9 as compared with most of today’s TV screens, which have a
screen ratio of 4:3. HDTV offers reduced motion artifacts (i.e. ghosting, dot crawl).
Progressive Scan
In Progressive Scanning all the horizontal scan lines are scanned on to the screen at one time. The
HDTV Standards accept both Interlaced Scan and Progressive Scan broadcast and display methods.
Resolution
Resolution: A measurement of the finest (smallest) detail that is visible in a video image. TV Resolutions may be expressed as number of pixels in an image; or more commonly,
As Total Number of (horizontally scanned) Lines used to create the image.
Standard Digital TV Resolutions:
SDTV: 576i - The picture is 720x576 pixels, 576p - The picture is 720x576 pixels.
HDTV: 720p - The picture is 1280x720 pixels, 1080i - The picture is 1920x1080 pixels,
SPDIF
SPDIF (Sony and Philips Digital Interconnect Format) is highly recommended for high quality digital
sound output.
Note: SPDIF only supports at HDMI source.
23
Specification - TV
On Screen Display language
Connectivity
Back
Side
Weight and dimensions
Weight (incl. packaging)
Weight (excl. packaging, with stand)
Carton dimensions (W x H x D)
Product dimensions - with stand (W x H x D)
Power consumption
Standby power consumption
Main power
Wall mount
M6 screws are needed for wall mounting of 32”
and M8 for 42” (not included).
32HFL5530/93
32HFL5530/97
English, Chinese, Melayu
42HFL5580/93
42HFL5580/97
AC IN
HDMI 1/ HDMI 2/ HDMI 3
CVI – Component Video (YPbPr), Audio L/R input
AV – Video input, Audio L/R input
AV output – Video output, Audio L/R output
VGA – PC-Analog input, Audio L/R input
SPDIF output
75 ohm / RF
8 ohm 1 watt bathroom speaker out
Digital Volume Control for bathroom speaker
Aux Audio 1 – Audio output
Aux Audio 2 – Audio output
DATA 1 (RJ12) Smartplug
DATA 2 (RJ45)
RS232
Side HDMI
Side AV – Video input, Audio L/R input
Side S-Video – S-video input, Audio L/R input
Earphone
21 kg
18 kg
931 mm x 632 mm x 248 mm
819 mm x 579 mm x 220 mm
140W
< 2W
220-240V,
100-240V,
50-60Hz
50-60Hz
vesa 200 x 300mm
24
31.5 kg
25.5 kg
1164 mm x 810 mm x 326 mm
1046 mm x 716 mm x 262 mm
200W
220-240V,
50-60Hz
100-240V,
50-60Hz
vesa 400 x 400mm
重要安全说明
•
•
在使用电视机之前,请阅读并理解所有说明。因未
遵守说明而造成的损坏不在保修范围内。
安全
•
小心触电或发生火灾!
• 切勿让电视机与雨或水接触。切勿将液体容器
(例如花瓶)放置在电视机旁边。如果将液体
洒到了电视机表面或内部,请立即断开电视机
的电源。 请与 Philips 客户服务中心联系,
对电视机进行检查后再行使用。
• 切勿将电视机、遥控器或电池放在明火或其它
热源(包括直射的阳光)附近。
为避免火焰蔓延,请始终使蜡烛或其它明火远
离电视机、遥控器和电池。
•
•
•
•
•
•
•
•
•
•
•
切勿向电视机上的通风槽或其它开口中插入
任何物体。
• 旋转电视机时,请确保电源线不会绷紧。
电源线绷紧会使电源连接变松,进而产生
火花。
小心短路或起火!
• 切勿将遥控器或电池暴露在雨中、水中或过
热的环境中。
• 请避免电源插头产生拉力。 松动的电源插头
可能产生火花或者导致起火。
小心人身伤害或电视机损坏!
• 需由两个人搬运重量超过 55 磅的电视机。
• 将电视机安装在机座上时,请仅使用提供的机
座。将机座牢固地固定到电视机上。将电视机
放在水平、平坦且可承受电视机和机座总重量
的表面上。
• 采用壁挂方式安装电视机时,请仅使用可承受
电视机重量的壁挂安装托架。将壁挂安装托架
固定到可承受电视机和壁挂安装托架总重量的
墙壁上。Koninklijke Philips Electronics N.V. 对
由于安装不当而造成的事故、人身伤害或损失
不负任何责任。
小心伤害儿童!请遵循以下注意事项,以避免因
电视机掉落而导致儿童受伤:
• 切勿将电视机放在由可拉动的布或其它材料覆
盖的表面上。
确保电视机的任何部分均位于表面边缘以内。
将电视机放在较高的家具(如书柜)上时,
一定要将家具和电视机都固定到墙壁或适当的
支撑物上。
• 告知儿童爬上家具触摸电视机可能带来的危险。
小心过热!切勿将电视机安装在封闭空间内。始终在
电视机周围留出至少 4 英寸的空间以便通风。确保窗
帘或其它物体不会遮挡电视机上的通风槽。
小心人身伤害、起火或电源线损坏!切勿将电视机或
任何物体放在电源线上。
连接设备前请断开电源线。
当使用电源插头或产品连接器作为断开设备时,
断开设备应随时保持可操作状态。
雷雨天气来临之前,请断开电视机与电源插座及天线
的连接。在雷雨天气里,切勿触摸电视机、电源线或
天线的任何部分。
小心听力损害!避免在高音量下或长时间使用耳机或
听筒。
如果在低于 5°C 的温度下运送电视机,请先拆开电视
机的包装,待电视机适应了室温后再将电视机连接到
电源插座上。
屏幕养护
•
•
•
•
•
25
尽量避免静止图像。静止图像是在屏幕上保持很长时
间的图像。例如 屏幕菜单、黑条和时间显示等。
如果必须使用静止图像,请降低屏幕的对比度和亮
度,以防止损坏屏幕。
在清洁前拔下电视的插头。
用柔软的湿布擦拭电视机和框架。切勿使用酒精、
化学品或家用清洁剂等物质清洁电视机。
小心损坏电视机屏幕!切勿使用任何物体接触、
推按、摩擦或敲击屏幕。
为了避免变形和褪色,请尽快擦掉水滴。
回收
本产品采用可回收利用的高性能材料和组件设计和制
造而成。
如果产品上贴有带叉的轮式垃圾桶符号,则表示此产
品符合欧洲指令 2002/96/EC:
对本产品进行处理时切不可将其丢弃到其它生活垃圾
中。请自行了解有关分别收集电气和电子产品的当地
规定。正确处理用过的旧产品有助于避免可能给环境
和人类健康造成的潜在负面影响。
26
目录
重要安全说明 . . . . . . . . . . . . . . . . . . . . . . . . . . . . . . . . .
目录 . . . . . . . . . . . . . . . . . . . . . . . . . . . . . . . . . . . . . .
准备 . . . . . . . . . . . . . . . . . . . . . . . . . . . . . . . . . . . . . .
壁挂方式安装 . . . . . . . . . . . . . . . . . . . . . . . . . . . . .
遥控器的使用 . . . . . . . . . . . . . . . . . . . . . . . . . . . .
电视机上的按钮 . . . . . . . . . . . . . . . . . . . . . . . . . . . . .
使用菜单 . . . . . . . . . . . . . . . . . . . . . . . . . . . . . . . . . .
访问 SETUP 菜单
导航
设置菜单项 . . . . . . . . . . . . . . . . . . . . . . . . . . . . . . . . .
通信 . . . . . . . . . . . . . . . . . . . . . . . . . . . . . . . . . . . . . .
频道安装 . . . . . . . . . . . . . . . . . . . . . . . . . . . . . . . . . .
配置 . . . . . . . . . . . . . . . . . . . . . . . . . . . . . . . . . . . . . . .
开机/OSD . . . . . . . . . . . . . . . . . . . . . . . . . . . .
图像和声音设置 . . . . . . . . . . . . . . . . . . . . . . . . . . . .
安全设置 . . . . . . . . . . . . . . . . . . . . . . . . . . . . . . . . . . .
控制设置 . . . . . . . . . . . . . . . . . . . . . . . . . . . . . . . . . . .
来宾菜单项 . . . . . . . . . . . . . . . . . . . . . . . . . . . . . . . . .
遥控器上的键 . . . . . . . . . . . . . . . . . . . . . . . . . . . . . . .
图文电视 . . . . . . . . . . . . . . . . . . . . . . . . . . . . . . . . . .
图像格式 . . . . . . . . . . . . . . . . . . . . . . . . . . . . . . . . . . .
无线灵智转载器 . . . . . . . . . . . . . . . . . . . . . . . . . . . . . .
电池电量低检查 . . . . . . . . . . . . . . . . . . . . . . . . . . . . . .
故障排除提示 . . . . . . . . . . . . . . . . . . . . . . . . . . . . . .
术语表 . . . . . . . . . . . . . . . . . . . . . . . . . . . . . . . . . . .
规格 – 电视机 . . . . . . . . . . . . . . . . . . . . . . . . . . . . . . .
27
25
27
28
28
28
29
30
30
30
31
31
32
33
33
34
34
35
35
36
37
38
39
40
41
42
43
准备
在完成所有连接之前,请勿将电源插头插入墙壁插座。
将电视机放在稳固的表面上。
在电视机周围至少留出 4 英寸到 6 英寸的空间以便通风。
切勿将电视机放在地毯上。为防止出现不安全的情况,请勿
在附近放置明火源,如点燃的蜡烛。避免高温、阳光直射和
遭受雨淋或进水。不得向设备上滴水或溅水。
在墙壁上安装电视机
本电视机符合壁挂式安装设备的 VESA 标准。
请参阅第 43 页了解规格详情。
注意:安装电视机需要专门的技能,只能让合格的人员来
执行。您不应尝试自行安装电视机。Philips 对因安装不当
而造成的意外或损害概不负责。
确保壁挂安装固定牢靠,符合安全标准。
ANTENNA
要连接配套设备,请参阅“外盖和连接”。
请参阅电视机底部(型号标签)了解正确的操作电压。
将电源线插入墙壁插座中。
如果电源电压与电视机标明的电压不同,请咨询当地的
经销商。切勿将电视机放在(交流)电源线上。将电视机
放在(交流)电源线上可能会导致火灾或触电。
CABLE
CABLE OR ANTENNA
遥控器:
装入提供的两节 AA 电池。
提供的电池不含重金属汞和镉。处理废弃电池时,请确定并
遵守当地的规章制度。
75
打开电视机:
按电视机侧面的电源开关 。电视机前面的指示灯将会
亮起。
按遥控器上的 POWER 按钮。
ANTENNA
CE
CABLE
HDMI 1
IN
OUTPUT
/OUT
(TO TV)
3
Cable box
HDMI 2
CABLE OR ANTENNA
75
2
28
电视机上的按钮
即使遥控器丢失或损坏,您仍然可以使用电视机上的控制按钮更改某些基本设置。
按:
• 按钮可以打开或关闭电视。
• + VOLUME - 按钮可以调节音量;
• + CHANNEL - 按钮可以选择电视频道或信号源。
在没有遥控器的情况下,可以使用 MENU 按钮来显示设置菜单。
MENU 按钮也可以用于退出菜单。
使用:
• + VOLUME - 按钮和 + CHANNEL - 按钮可以按所示方向选择菜单项;
• + VOLUME 按钮可以确认选择。
VOLUME
MENU
CHANNEL
POWER
29
使用菜单
访问 SETUP 菜单
电视机处于 HIGH SECURITY 模式时,只能使用公共设置遥控器 (RC2573) 通过按
键来访问 SETUP 菜单。
公共设置遥控器以可选件形式提供。
电视机处于 STANDARD SECURITY 模式时,可以使用标准来宾遥控器 (RC2887) 通过一系列命令
(3 1 9 7 5 3 MUTE) 来访问 SETUP 菜单。
POWER
RECALL
TEXT
SMART
SLEEP
CC
ALARM
GUEST
DCM
ON
PAY TV
INFO
RADIO
SETUP
OFF
1
2
3
4
5
6
7
8
9
GUIDE
CH
0
RESET
OK
M
A/CH
TV
VOL
CH
A
TEXT
B
C
E
F
CLOCK
AV
D
G
AV
RC2573
(可选)
RC2887
导航
通过使用向上/向下键可以选择当前菜单项。通过按向右键可以访问用 “>” 符号指示的菜单项中的子菜单。
•要
退出菜单,请按 “MENU” 按钮
•选
择 “YES” 可激活/启用某一设置,选择 “NO” 则取消激活/禁用该设置。
•当
设置菜单中确有相关设置时,电视频道上/下 (+/-)、信息频道上/下 (+/-)、付费频道上/下 (+/-) 和音乐频道
上/下 (+/-) 即可使用。
30
设置菜单项
•L
ANGUAGE:选择设置菜单的语言。
选项有 “ENGLISH”、“MELAYU” 和 “CHINESE”
注意:中文仅用于来宾菜单。
SETUP
LANGUAGE
COMMUNICATION
NO. OF CHANNELS
CHANNEL INSTALL SETUP
CONFIGURATION
ENGLISH
>
>
>
>
LANGUAGE
COMMUNICATION
NO. OF CHANNELS
CHANNEL INSTALL
CONFIGURATION
ENGLISH
>
>
>
>
• COMMUNICATION:有关详细信息,请参阅本部分。
• NO. OF CHANNELS:使用此子菜单可以设置电视频道、
付费频道、信息频道和音乐频道的编号。
• CHANNEL INSTALL:在 CHANNEL INSTALL 子菜单中,
可以设置多种频道设置。有关更多详细信息,请参阅有关频道
安装的部分。
• CONFIGURATION:在 CONFIGURATION 菜单中,可调整电视机的各种设置和功能。有关更多详细信息,
请参阅有关配置的部分。
COMMUNICATION
通信
COMMUNICATION
STORE
OFF
>
COMMUNICATION
COMMUNICATION
STORE
OFF
>
• COMMUNICATION:通信选项有 SP-SPI、SP-I2C、
HM-Link、Multi RC 、Smart RC 和 Serial Express。SP-SPI、SP-I2C
和 HM-Link 用于启用交互式应用程序。Multi-RC 功能可对电视
机和遥控器进行编程,以便在多台电视机环境下实现一对一的
匹配。Multi-RC 最多允许建立四组独立的电视机-遥控器匹配。
对于普通的独立应用程序,请在 Communication 子菜单下
选择 “OFF” 选项。
CHANNEL INSTALL
CHANNEL
TV 1
TUNER
INPUT
SYSTEM
AUTO
MultiFREQUENCY
RC 设置过程:
184.2500 >
CHANNEL INSTALL
LABEL
(
)>
1. 同时按住遥控器上的
Menu
键和一个彩色键(红/绿/黄/蓝)至少
4 秒钟。
STORE
>
2. 进入电视设置菜单并选择
Multi
0
FINE
TUNE
CHANNEL
TVRC
1 选项
MUTE
NONE
INPUT
TUNER
3. 在AUTO
Multi
RC 子菜单中,选择相应颜色以匹配在步骤
1 中选择的颜色
INSTALL TV
>
SYSTEM
AUTO
PROTECTION
NO
FREQUENCY
184.2500 >
LABEL
(
)>
注意:
STORE
>
1. SP-SPI
和 SP-I2C 指的是 Philips 通信协议,这些协议与外部机顶盒或智能卡
Xpress 接口盒的 Data 1 (RJ12)
FINE TUNE
0
MUTE
NONE
和AUTO
/或 Data
2 (RJ45) 连接配合使用。
INSTALL TV
>
PROTECTION
NO 1 (RJ12) 连接配合使用。Serial Express 主要与外部机顶盒的 RS232 (DB9) 连接配
2. HM-Link
主要与外部机顶盒的
Data
CONFIGURATION
合使用。
3. Multi RCSWITCH
功能需要使用特定遥控器型号
RC2887/RC2886。
ON/OSD
>
PICTURE/SOUND
>
4. Multi RC 默认颜色编码是 BLUE(对于电视和遥控器)。更换遥控器电池后,遥控器颜色编码将自动重置为
SECURITY
>
默认 BLUE
颜色。
CONFIGURATION
CONTROL
>
•
•
•
FEATURES
>
AUDIO FEATURES
>
SWITCH ON/OSD
>
STORE:通过按向右键保存设置。
PICTURE/SOUND
>
RS232 ID:设置电视机
ID。
SECURITY
>
CONTROL
>
DCM TYPE:与灵智端口通信。(在
FEATURES
>
AUDIO FEATURES
>
SP-SPI 和 SP-I2C 中可用)
31
频道安装
在 CHANNEL INSTALLATION 子菜单中,可以设置频道设置。
CHANNEL INSTALL
CHANNEL
INPUT
SYSTEM
FREQUENCY
LABEL
STORE
FINE TUNE
MUTE
AUTO INSTALL TV
PROTECTION
TV 1
TUNER
AUTO
184.2500 >
(
)>
>
0
NONE
>
NO
• CHANNEL:可使用光标向左/向右键选择频道类型。可用
的选项有:“TV”、“INFO”、“PAY TV” 和 “RADIO”。
注意:
输入节目号时可使用数字键。对于 10 以下的节目号,
输入的第一位数为 “0”,后面跟随节目号。例如 “01”
表示 TV 1;或者在输入节目号后按向上/向下键。不允许
输入节目号 “0” 或 “00”。
• INPUT:“Input” 菜单项用于选择分配给节目的所需输入源。可能的值有:电视频道、AV、SIDE AV、
CONFIGURATION
SIDE SVIDEO、CVI、VGA、HDMI1、HDMI2、HDMI3
和 Side HDMI。
• SYSTEM:AUTO、PAL
4.43 BG、PAL
4.43 I、PAL 4.43 DK 和 NTSC 3.58M 可用于选择。
SWITCH ON/OSD
>
•
PICTURE/SOUND
>
SECURITY
>
CONTROL
>
FREQUENCY:可以输入以
MHz
为单位的频率数字。输入第一个数字时,其它未输完的数字会显示为
FEATURES
>
短划线 “-”。对于 100 MHz 以下的频率,输入的第一位数为
“0”。您也可以按向右键开始自动搜索。
AUDIO FEATURES
>
• LABEL:此菜单项用于为每个节目添加标签/名称。
o 按向左/向右键可选择标签数字,按向上/向下键可插入字母数字字符。
o 按 MENU 按钮可退出 Label 菜单项。
• STORE:按向左/向右键后存储频道信息。
按 MENU 键可退出而不存储。
• FINE TUNE:按向左/向右键进行微调。
• MUTE:此项可启用/禁用特定频道的图像和声音。
o NONE:启用正常图像和声音
o VIDEO:消隐此频道的图像(如音乐频道)
o AUDIO:此频道静音(如信息频道)
• AUTO INSTALL TV:此子菜单允许自动扫描和设置电视频道。
• PROTECTION:此功能保护付费频道中的所选节目。 按向左/向右键可在 “YES” 和 “NO” 之间切换保护
选项。
32
LABEL
STORE
FINE TUNE
MUTE
AUTO INSTALL TV
PROTECTION
(
)>
>
0
NONE
>
NO
配置
在 Configuration 菜单中,可调整电视机的各种设置和功能。
CONFIGURATION
SWITCH ON/OSD
PICTURE/SOUND
SECURITY
CONTROL
FEATURES
AUDIO FEATURES
>
>
>
>
>
>
• SWITCH ON/OSD:在此子菜单中可以设置电视机
的 SWITCH ON 特性和 ON SCREEN DISPLAY 设置。
• PICTURE/SOUND:在此子菜单中可以设置电视机的
PICTURE 和 SOUND 设置。
• SECURITY:在此子菜单中可以配置电视机的 SECURITY
设置。
• CONTROL:在此子菜单中可以配置电视机的 CONTROL
设置。
• FEATURES:使用 ENERGY SAVINGS 子菜单可以设置电视机
的省电功能。
• AUDIO FEATURES:在此子菜单中可以设置不同的音频
功能。
在 PC 模式中,另外还有一项。
•V
IDEO ADJUSTMENT:
o HORIZONTAL:调整图像的水平位移
o VERTICAL:调整图像的垂直位移
o PHASE:消除水平干扰线。
o CLOCK:消除垂直干扰线。
o AUTO ADJUST:PC 模式会自动调整图像的最佳位置。
o RESET:重置为默认模式。
开机/OSD
在此子菜单中,可以选择电视机开机后的特性和屏幕显示特性。
SWITCH ON/OSD
WELCOME MESSAGE
SWITCH ON CHANNEL
SWITCH ON VOLUME
SWITCH ON PIC FMT
POWER ON
VOLUME INDICATOR
CHANNEL DISPLAY
>
AV
30
WIDESCREEN
LAST STATUS
YES
ALL
• WELCOME MESSAGE:按光标向左/向右键可显示欢迎消息输
入菜单:
o WELCOME MESSAGE
o DISPLAY YES/NO
o LINE 1
o LINE 2
o CLEAR
使用向上/向下键可以设置消息字符。
按向上键可插入字母,按向下键可插入数字。
• SWITCH ON CHANNEL:此项设置电视机开机后显示的频道。
• SWITCH ON
VOLUME:此项设置电视机开机后的音量。使用向左/向右键可进行调整。
PICTURE/SOUND
• SWITCH ON PIC FMT:此项设置电视机开机后的图像格式。使用向左/向右键可选择所需的格式。
• POWER BRIGHTNESS
ON:POWER ON50菜单功能可定义电视机使用交流电源时的特性。可用选项有 “FORCED ON”、
COLOUR
50
“LAST STATUS”、“STANDBY”
和 “ON”。
CONTRAST
50
o FORCED
ON:在开启电源或断电后电力恢复时,电视机将自动切换到
ON 模式。请注意,在将电视机设置
SHARPNESS
50
TINT
50
为此模式时,遥控器上的
STANDBY
键不再起作用。只能通过使用电源开关或设置遥控器,或者通过 ESP 功能
ACTIVE CONTROL
YES
(节能编程,可控制允许的最大连续观看时间)来关闭电视机。
TREBLE
50
BASS
50
o LAST STATUS:在开启电源或断电后电力恢复时,电视机将自动切换到上一个状态(STANDBY
或 ON)。
BALANCE
AVL
SECURITY
50
ON
33
SWITCH ON/OSD
o STANDBY:在开启电源或断电后电力恢复时,电视机将自动切换到
STANDBY 模式(即使上一个状态
为 ON)。
WELCOME MESSAGE
>
o ON:
功能与 “FORCED ON”AV相似,但在将电视机设置为此模式时,会启用遥控器上的 STANDBY 键功能。
SWITCH ON CHANNEL
• VOLUME
INDICATOR:要在调节音量时显示音量指示器,请选择
“YES”。
SWITCH ON VOLUME
30
SWITCH
ON PIC
FMT
WIDESCREEN
选择
“NO”
可隐藏音量指示器。
POWER ON
LAST STATUS
• CHANNEL
DISPLAY:CHANNEL
DISPLAY 的值可以是:NUMBER、LABEL、ALL 和 NONE。
VOLUME INDICATOR
YES
CHANNEL DISPLAY
ALL
SWITCH ON/OSD
图像和声音设置
WELCOME MESSAGE
>
在此子菜单中可以选择电视机的图像和声音设置。
SWITCH ON CHANNEL
AV
SWITCH ON VOLUME
30
SWITCH ON PIC FMT
WIDESCREEN
POWER ON PICTURE/SOUND
LAST STATUS
VOLUME INDICATOR
YES
CHANNEL
DISPLAY
BRIGHTNESS
50 ALL
COLOUR
50
CONTRAST
50
SHARPNESS
50
TINT
50
ACTIVE CONTROL
YES
TREBLE
50
BASS
50
PICTURE/SOUND 50
BALANCE
AVL
ON
•
•
•
• BRIGHTNESS:改变图像亮度。
• COLOUR:更改色彩强度。
• CONTRAST:更改浅色调和深色调之间的差异。
• SHARPNESS:调整以提高细节部分的质量。
• TINT:调节图像的色彩平衡。
• ACTIVE CONTROL:允许调整图像降噪。
注意:
COLOUR 和 SHARPNESS 在 PC 模式中不可用
BRIGHTNESS
50
COLOUR
50
CONTRAST
50
TREBLE/BASS:调整电视机声音输出的高音和低音效果。
SHARPNESS
50
BALANCE:调节左右扬声器的平衡,以便最适合您的收听位置。
TINT
50
SECURITY
ACTIVE CONTROL
YES
AVL(自动音量均衡器):限制音量的增加,特别是在换节目或插播广告时。
TREBLE
50
BASS
50
SECURITY
STANDARD
BALANCE
50
KEYBOARD LOCK
NO
AVL
ON
REMOTE CONTROL LOCK
NO
VIDEO OUT MUTE
NO
在此子菜单中可以配置电视机的安全设置。
ENABLE GUEST MENU
YES
ENABLE TELETEXT
YES
安全设置
SECURITY
SECURITY
KEYBOARD LOCK
REMOTE CONTROL LOCK
CONTROL
VIDEO OUT MUTE
ENABLE GUEST MENU
ENABLE
ESP TELETEXT
AUDIO/VIDEO MUTE
STEP TUNING
DIGIT TIMEOUT
MIN VOLUME
MAX VOLUME
STANDARD
NO
NO
NO
YES
YES OFF
NO
NO
3.0
0
99
• SECURITY:“SECURITY”功能允许用户选择两种
状态之一:“HIGH” 或 “STANDARD”。默认值
为 “STANDARD”。
o 电视机处于 SECURITY HIGH 模式时,只能使用公共
设置遥控器来访问 SETUP 菜单。
o 电视机处于 SECURITY STANDARD 模式时,可以使用
来宾遥控器通过一系列命令 (3 1 9 7 5 3 MUTE) 来访问
SETUP 菜单。
CONTROL
• KEYBOARD LOCK:禁用电视机的自有按键对音量和节目的控制。
• REMOTE CONTROL LOCK:锁定来宾遥控器上的所有按钮。
OFF
• VIDEO ESP
OUT MUTE:禁用所有信号源的视频输出信号。
AUDIO/VIDEO MUTE
NO
• ENABLE GUEST MENU:启用来宾菜单。
STEP TUNING
NO
• ENABLEDIGIT
TELETEXT(仅在适用时):启用图文电视。
TIMEOUT
3.0
MIN VOLUME
MAX VOLUME
0
99
34
REMOTE CONTROL LOCK
VIDEO OUT MUTE
ENABLE GUEST MENU
ENABLE TELETEXT
NO
NO
YES
YES
控制设置
在此子菜单中可以配置电视机的 CONTROL 设置。
CONTROL
ESP
AUDIO/VIDEO MUTE
STEP TUNING
DIGIT TIMEOUT
MIN VOLUME
MAX VOLUME
OFF
NO
NO
3.0
0
99
• ESP:节能编程模式 (ESP) 功能控制允许的最大连续观看时间,
其有效值为 00 – 99(单位为小时)。00 值表示 ESP 功能处
于“关”状态。请注意,如果关闭电视机,则将重置 ESP 定时
器倒计时。
• AUDIO/VIDEO MUTE:当前调谐的频道没有信号时,
Audio/Video Mute 菜单功能会确定是否应消隐视频并使
音频静音。
• STEP TUNING:如果选择 YES,则在按一个数字后会立即对电视节目(1 到 9)进行调谐。如果选择 NO,
则仅在短划线(第二位数)消失后才执行调谐。
• DIGIT TIMEOUT:这是输入节目号的第二位数时的超时时间,例如对于 10 及以上的节目号。
• MIN VOLUME:此项可设置允许电视机使用的最小音量。使用向左/向右键可进行调整。
• MAX VOLUME:此项可设置允许电视机使用的最大音量极限。使用向左/向右键可进行调整。
来宾菜单项
MENU 菜单
LANGUAGE
BRIGHTNESS
COLOUR
CONTRAST
SHARPNESS
TINT
PICTURE FORMAT
SLEEPTIMER
SOURCE
语言
亮度
色彩
对比度
清晰度
色度
图像格式
睡眠定时
信号源
中文
50
50
50
50
50
宽屏幕
关
电视频道
• 语言:用于选择来宾菜单语言(英语/中文/马来语)。
• 亮度/色彩/对比度/清晰度/色度:使用遥控器左/右键更改画面设置。
• 图像格式:使用遥控器上的向左/向右键可以选择所需的图像格式。可以使用以下选项:4:3、14:9 放大、
16:9 放大、字幕放大、宽屏幕、超放大屏幕。
• 睡眠定时:此项用于选择在电视机未收到用户指令的情况下自动切换到待机状态的时间段。 如果旅店客人没有
关闭电视就离开房间,这一功能可以有效地节能。 可用时间段有 15 分钟、30 分钟、45 分钟、60 分钟、90 分
钟、120 分钟、180 分钟、240 分钟和“关”。使用遥控器上的向左/向右键可以选择所需的时间段
(注意:当 POWER ON 设置为 “FORCED ON” 模式时,“睡眠定时”选项不可用)。
• 信号源:此项用于选择不同的电视信号源。
35
遥控器上的键
注意:大多数按钮在按一次时将激活指定的功能。再按一次将取消激活该功能。如果一个按钮可启用多个选项,则会显示一个小的
列表。反复按可选择列表中的下一项。 该列表将在六秒后自动移除,也可以按 MENU 立即移除该列表。
(1) ALARM ON / OFF
无功能。
(2) +PAY TV选择上一个或下一个付费频道。
(3) 灵智声音按钮
反复按可在 4 种设置中进行选择:
“个人设定”、“剧场”、“音乐”
或“对白”。
(9)
ALARM
(1)
(10)
ON
PAY TV
INFO
RADIO
OFF
(2)
(11)
(12)
(3)
(13)
(4)
(5) 光标方向键
(6)
(15)
TV
(7) 静音按钮
按此按钮可消除或恢复液晶电视的
声音。声音关闭后,屏幕上会显示
静音图标。
(16)
(8)
(11) RADIO
选择上一个或下一个音乐频道。
(12) 灵智图像按钮
反复按可选择“鲜艳”、
“自然”、“柔和”或
“个人设定”图像设置。
(13) I-II 按钮/声音模式
选择第一语言或第二语言。
注意:语言可用性取决于传输内容。
(7)
(6) VOL +/按 + 或 – 可调节音量。
(10) +INFO选择上一个或下一个信息频道。
(14)
OK
(5)
(4) MENU
按 MENU 可激活/取消激活屏幕菜
单。
(9) 待机
按此按钮可使电视机切换到待机
模式。
(14) OK
激活设置。
TEXT
AV
(8) 图文电视 (p.37)
按此按钮可以开启或关闭图文电视
(仅用于某些型)。
(17)
(15) + TV 选择上一个或下一个电视频道。
(16) 数字按钮
按数字按钮可直接进入电视频道。
对于两位数频道,先输入第 1 位
数字,然后输入第 2 位数字。
(17) AV 按钮
按此按钮可以选择视频输入信号源:
电视频道、AV、SIDE AV、
SIDE SVIDEO、CVI、VGA、
HDMI1、HDMI2、HDMI3 和 SIDE
HDMI。
36
图文电视
图文电视是在特定频道中提供的一种信息系统广播。在某些国家/地区,图文电视还可以让有听觉障碍或不熟悉
传输语言(有线电视网络、卫星频道等)的人看到字幕。
按
打开/关闭图文电视。
ALARM
ON
PAY TV
INFO
RADIO
在图文电视模式下,按
OFF
i
OK
ii
i
OK
OK
OK
OK
输入(3 位数)页面编号
显示上一页/下一页
OK
显示上一页/下一页
根据屏幕上的指示,可使用彩色按钮访问相应的项
或对应的页面。
TV
TEXT
AV
37
图像格式
接收的图像可以按 16:9 格式(宽屏幕)或 4:3 格式(传统屏幕)传输。16:9 图像有时会在屏幕的顶部和底部显示
黑色条带(信箱格式)。此功能允许您优化屏幕上的图像显示。
图像格式可以通过来宾菜单或设置菜单使用不同格式进行设置。
4:3
图像以 4:3 格式重现,两边分别显示一个黑条带。
4:3
14:9 放大
图像放大到 14:9 格式,图像两边分别留下一个较窄的黑条带。
14:9 放大
16:9 放大
图像放大到 16:9 格式。显示的图像顶部和底部带有黑条带时(信箱格式),
推荐使用此模式。
16:9 放大
字幕放大
此模式使用整个屏幕显示 4:3 图像,并且显示子标题。
字幕放大
超放大屏幕
此模式放大图像的四边,使用整个屏幕显示 4:3 图像
超放大屏幕
宽屏幕
此模式使用整个屏幕恢复以 16:9 格式传输的图像的正确比例。
宽屏幕
38
无线灵智转载器
Philips 无线灵智转载器 22AV1120/00 和 22AV1135/00 是专门为简便快速安装 Philips 公共电视机而设计的安装工具。
准备
确保将 3 节 R6/AA 型号的电池正确放置在无线灵智转载器的电池盒内。打开产品左侧的电源开关。按任意
按钮时,顶壳上的绿色指示灯亮起,指示电池可操作。红色指示灯亮起时,指示需要更换电池。
安装过程包含三步:
1. 选择主电视机
2. 对无线灵智转载器进行编程
3. 用无线灵智转载器安装电视机
可以根据需要在任意多台电视机上重复步骤 3。
1. 选择主电视机
主电视机是必须将其安装设置复制到同一类型其它电视机的电视机。
2. 对无线灵智转载器进行编程
此步骤只能执行一次,否则,无线灵智转载器的程序将被覆盖。
将无线灵智转载器对准电视机的红外接收器(距离约 5 到 30 厘米)。
按无线灵智转载器上的 “MENU” 键。
电视机将显示以下菜单:
SMARTLOADER TO TV >
TV TO SMARTLOADER >
o 高亮显示 “TV TO SMARTLOADER”
o 按无线灵智转载器上的向右光标键以使用无线方法,或者按电视机
遥控器上的相应键以使用有线方法。
> 数字显示从电视机到无线灵智转载器的内存存储进度百分比,
其范围为 1~100(100 = 完全加载)。
TV TO SMARTLOADER |||-------- ##
> 数据传输完成后,## 为 “100”,并显示以下菜单 3 秒:
SMARTLOADER READY >
> 现在无线灵智转载器编程完成,可用于安装其它电视机。
3. 用无线灵智转载器安装电视机
使用已利用同一类型主电视机的设置进行编程的无线灵智转载器。
打开电视机,并将无线灵智转载器对准电视机的红外接收器(最大距离约 30 厘米)。
---- 按无线灵智转载器上的 “MENU” 键。
o 高亮显示 “SMARTLOADER TO TV”
o 按无线灵智转载器上的向右箭头键以使用无线方法。
39
> 数字显示从无线灵智转载器到电视机的内存存储进度百分比,其范围为 1~100(100 = 完全加载)。
SMARTLOADER TO TV |||-------- ##
> 数据传输完成后,## 为 “100”,并显示以下菜单 3 秒:
TV READY >
> 随后,显示以下菜单
GOODBYE >
> 现在,电视进入待机状态且电视机安装完成,随时可以开机使用。
问题和解决方案:
问题
解决方案
屏幕上显示 “WRONG VERSION” 消息。
存储在无线灵智转载器中的程序软件代码与实际使用的电视机
不兼容。
利用软件代码与实际所使用电视机兼容的主电视机来对无线灵
智转载器重新编程。
电视机对无线灵智转载器无响应。
– 检查按任意按钮时无线灵智转载器上的指示灯是否为绿色,
并检查电池是否处于良好状态。必要时更换电池。
– 尝试将无线灵智转载器距离电视机红外接收器更近些并
重试。
提示:
1. 不要忘记将软件代码和相关主电视机类型写到无线灵智转载器背面的标签上。
2. 在没有电池的情况下,无线灵智转载器可以将存储的信息保存 10 年(如果需要)。
注意:
长期存放无线灵智转载器之前,务必取出所有电池以防止电池腐蚀触点。
电池电量低检查
按 OK 键约 5 秒。 随后会显示以下文本:
SERVICE
1 REMOTE BATTERY OK
如果显示 “LOW” 而不是 “OK”,则表明遥控器电池电量低,必须更换电池。
40
故障排除提示
症状
要检查的项目和采取的措施
“重影”或双图像
• 这可能是由于高建筑物或高山挡住天线造成的。
使用强定向天线可以改善图像质量。
不通电
• 检查电视机的交流电源线是否插入电源插座。
• 拔下电视机插头,等待 60 秒。然后将插头重新插入电源插座并重新打开电视机。
无图像
• 检查电视机底部的天线连接,查看其是否已正确连接到电视机。
• 可能是广播电台故障。尝试另一个频道。
• 调节对比度和亮度设置。尝试使用其它自动图像设置。
• 检查是否选择了正确的 AV 信号源。
无图像且电源已打开
• 在产生过多热量的情况下,电视机会进行保护模式。检查设备四周的通风间隙,确保没有
阻挡墙或柜限制空气流动。
不播放照片、音乐
或视频,或播放质
量很差
无声音
• 检查信号源是否符合受支持的规范。
声音效果好但色彩
很差或无图像
• 调节对比度、色彩、色度和亮度设置。 尝试使用其它自动图像设置。
图像有雪花和杂信号
• 检查天线连接。
电视机对遥控器无
响应
• 检查电池是否正常工作。必要时更换电池。
• 清洁显示器上的遥控器传感器镜头。
• 电视机和遥控器之间的操作距离不应超过二十英尺。
• 您仍可以使用电视机侧面的按钮。
• 检查遥控器是否处于正确的模式。
配套设备的控制
• 屏幕的红外信号可能影响其它外设的接收敏感度。
解决方案:
更换其它设备的遥控器电池。例如,使耳机保持在半径约四英尺以外。
PC 模式不工作
• 检查连接是否正确。
• 检查是否正确选择了信号源。按 AV 按钮选择正确的信号源。
• 检查计算机是否配置了兼容的显示分辨率。
待机
电视机在待机模式下耗电不超过 3 瓦。
不正确关机后
如果以不正确方式关闭电视机(如断电、拔出电源线),则重新开启电视机需要的时间会
比平时长。
其它
请参阅本用户手册中的规格信息。
• 提高音量。
• 检查电视是否静音,按遥控器上的 MUTE 按钮。
• 检测不到信号时,电视机会自动关闭声音。这是正常操作,不是故障。
41
术语表
宽高比
电视机图像在屏幕上的宽度和高度的比例。一般情况下电视机的宽高比为 4 比 3 (4:3)。
高清晰度电视机应用了新的宽高比 16:9,这类似于影院(宽屏幕)的宽高比。新的电视制式
支持 4:3 和 16:9 两种宽高比,并可以在两者之间自动切换。
音频视频 (A/V)
这是描述电视接收器或视频设备(专用于接收 VCR 音频视频信号)上的一个频道时常用的
一个术语。该频道会自动启动电视机中的专用电路,以防画面失真滞后。此术语还用于可处
理音频和视频两种信号的音频视频处理器。
CVBS
复合视频基带信号。 在广播电视中,此术语是指视频信号,包括色彩信息和同步。
分量视频输入
(Y Pb Pr)
分量视频输入是一种使用 cinch 型连接器的连接类型,允许机顶盒或模拟 DVD 播放机将信号
连接至电视机。通过提供 cinch 型输入 (YPbPr),三基色(红、绿、蓝)可以直接从机顶盒连
接到电视机,使信号显示在屏幕上。
HDTV
一般认为,高清晰度电视机的清晰度大约是目前电视机垂直和水平图像分辨率的两倍,实际
上就是图像清晰了两倍。高清晰度电视机的屏幕比例也是 16:9,而如今大多数的电视机屏幕
比例则为 4:3。 高清晰度电视机减少了运动伪影(即重影、点蠕动)。
逐行扫描
在逐行扫描中,可以同时对屏幕上所有水平扫描线进行扫描。 高清晰度电视机标准允许使用
隔行扫描和逐行扫描广播与显示方法。
分辨率
分辨率: 对视频图像中可见的最微小细部的数量。电视机分辨率可以用图像中的像素数来
表示;更为常见的表示法是,用生成图像的总行数(水平扫描)来表示。
标准数字电视机分辨率:
标准数字电视机:576i - 图像为 720x576 像素,576p – 图像为 720x576 像素。
高清晰度电视机:720p – 图像为 1280x720 像素,1080i – 图像为 1920x1080 像素。
SPDIF
对于高品质数字声音输出,极力推荐使用 SPDIF(Sony 和 Philips 数码互连格式)。
注意:仅在使用 HDMI 信号源时支持 SPDIF。
42
规格 – 电视机
屏幕显示语言
连通性
背面
侧面
重量和尺寸
重量(包括包装)
重量(不包括包装,带座架)
纸箱尺寸 (W x H x D)
产品尺寸 – 带座架 (W x H x D)
功耗
待机功耗
电源
壁挂安装
壁挂安装 32 英寸电视机需要 M6 螺丝,
安装 42 英寸电视机需要 M8 螺丝(不包含)。
32HFL5530/93
32HFL5530/97
英语、中文、马来语
42HFL5580/93
42HFL5580/97
AC IN
HDMI 1/ HDMI 2/ HDMI 3
CVI 1 – 分量视频 (YPbPr),左/右音频输入
AV – 视频输入,左/右音频输入
AV 输出 – 视频输出,左/右音频输出
VGA – PC 模拟输入,左/右音频输入
SPDIF 输出
75 欧姆/RF
8 欧姆1 瓦浴室扬声器输出
浴室扬声器的数字音量控制
Aux Audio 1 – 音频输出
Aux Audio 2 – 音频输出
DATA 1 (RJ12) Smartplug
DATA 2 (RJ45)
RS232
侧面 HDMI
侧面 AV – 视频输入,左/右音频输入
侧面 S-Video – S-video 输入,左/右音频输入
耳机
21 千克
18 千克
931 毫米 x 632 毫米 x 248 毫米
819 毫米 x 579 毫米 x 220 毫米
140 瓦
<2瓦
220-240 伏,
100-240 伏,
50-60 赫兹
50-60 赫兹
vesa 200 x 300 毫米
43
31.5 千克
25.5 千克
1164 毫米 x 810 毫米 x 326 毫米
1046 毫米 x 716 毫米 x 262 毫米
200 瓦
220-240 伏,
50-60 赫兹
100-240 伏,
50-60 赫兹
vesa 400 x 400 毫米