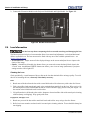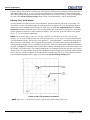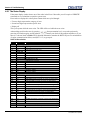
1
RPMWU-RPMSP-LED01 SETUP GUIDE 020-100445-01 RPMWU-RPMSP-LED01 SETUP GUIDE 020-100445-01 NOTICE This equipment has been tested and found to comply with the limits for a Class A digital device, pursuant to Part 15 of the FCC Rules. These limits are designed to provide reasonable protection against harmful interference when the equipment is operated in a commercial environment. This equipment generates, uses, and can radiate radio frequency energy and, if not installed and used in accordance with the instruction manual, may cause harmful interference to radio communications. Operation of this equipment in a residential area is likely to cause harmful interference in which case the user will be required to correct the interference at his own expense. This Class A digital apparatus complies with Canadian ICES-003. Cet appareil numérique de la classe A est conforme à la norme NMB-003 du Canada. 決 匶匶垚 櫋怺殯 ͙Ͳ 匏 ͚ 求嵢 洊沖砒洇穯姷嵣汊 穢 匶匶決欪城 砖廪沖 嬖垚 斲殯沖垚 決洖汊 渂汞穞柢匶 愚岂彶 ͝ 儆洛 歾汞 滆櫳櫖昢 斲殯穞垚 冉 汊͑徯洇求嵢͑穯城埪 ͟ The equipment is designed and manufactured with high-quality materials and components that can be recycled andreused. This symbol means that electrical and electronic equipment, at their end-of-life, should be disposed of separately from regular waste. Please dispose of this equipment appropriately and according to local regulations. In the European Union, there are separate collection systems for used electrical and electronic products. Please help us to conserve the environment we live in! Copyright © 2009 Christie Digital Systems USA, Inc. All rights reserved. All brand names and product names are trademarks, registered trademarks or trade names of their respective holders. Canadian manufacturing facility is ISO 9001 and 14001 certified. Performance specifications are typical, but may vary depending on conditions beyond Christie's control such as maintenance of the product in proper working conditions. Performance specifications are based on information available at the time of printing. Every effort has been made to ensure accuracy, however in some cases changes in the products or availability could occur which may not be reflected in this document. Christie reserves the right to make changes without notice or obligation. WARRANTY For complete information about Christie’s limited warranty, please contact your Christie Dealer. In addition to the other limitations that may be specified in Christie’s limited warranty, the warranty does not cover: (a) Damage occurring during shipment, in either direction. (b) Projector lamps (See Christie’s separate lamp program policy). (c) Damage caused by use of a projector lamp beyond the recommended lamp life, or use of a lamp supplied by a supplier other than Christie. (d) Problems caused by combination of the equipment with non-Christie equipment, such as distribution systems, cameras, video tape recorders, etc., or use of the equipment with any non-Christie interface device. (e) Damage caused by misuse, improper power source, accident, fire, flood, lightening, earthquake or other natural disaster. (f) Damage caused by improper installation/alignment, or by equipment modification, if by other than Christie service personnel. (g) For LCD projectors, the warranty period specified applies only where the LCD projector is in “normal use.” “Normal use” means the LCD projector is not used more than 8 hours a day, 5 days a week. For any LCD projector where “normal use” is exceeded, warranty coverage under this warranty terminates after 6000 hours of operation. (h) Failure due to normal wear and tear. PREVENTATIVE MAINTENANCE Preventative maintenance is an important part of the continued and proper operation of your projector. Please see the Maintenance section for specific maintenance items as they relate to your projector and/or model. Failure to perform maintenance as required, and in accordance with the maintenance schedule specified by Christie, will void the warranty. Table of Contents 1: Introduction 1.1 Using this Manual........................................................................................................................1-1 1.1.1 Labels and Marking .............................................................................................................1-1 1.1.2 Safety Warnings and Guidelines..........................................................................................1-1 1.2 Purchase Record and Service Contacts .......................................................................................1-2 1.2.1 Key Features ........................................................................................................................1-2 1.2.2 List of Components..............................................................................................................1-3 2: Installation and Setup 2.1 Ventilation ...................................................................................................................................2-1 2.2 Lifting, Transporting and Mounting ............................................................................................2-1 2.3 Unpacking the Projector ..............................................................................................................2-1 2.4 Lens Information .........................................................................................................................2-2 Cleaning the Lens .................................................................................................................2-2 2.5 Calculating Throw Distance, Position and Mount Projector .......................................................2-3 Vertical and Horizontal Position ..........................................................................................2-3 Mounting the Projector .........................................................................................................2-3 Special Mounting ..................................................................................................................2-3 2.6 Connecting Sources .....................................................................................................................2-4 LEDS ....................................................................................................................................2-4 Dual Link DVI Input Card ....................................................................................................2-4 2.7 Power Connection........................................................................................................................2-5 2.7.1 Connecting the projector to AC ...........................................................................................2-5 2.7.2 Turning the Projector ON ....................................................................................................2-5 2.7.3 Disconnecting the projector from AC..................................................................................2-5 2.8 Setting up the Image ....................................................................................................................2-6 2.8.1 Adjusting the Projection Lens..............................................................................................2-6 2.8.2 Adjust Software to Optimize Image ....................................................................................2-6 3: Basic Operation 3.1 Safety Warnings and Guidelines .................................................................................................3-1 3.2 Using the Remote Keypad ...........................................................................................................3-1 3.2.1 Wired Remote ......................................................................................................................3-2 3.2.2 Remote Keypad Commands ................................................................................................3-2 Power ON/OFF .....................................................................................................................3-2 Test .......................................................................................................................................3-2 Auto .....................................................................................................................................3-2 Channel .................................................................................................................................3-3 Slot 1, 2, 3, 4 .........................................................................................................................3-3 Input ......................................................................................................................................3-3 PIP ........................................................................................................................................3-3 Swap .....................................................................................................................................3-3 Contrast .................................................................................................................................3-3 Bright ....................................................................................................................................3-3 Gamma ..................................................................................................................................3-3 Entero RPMWU/RPMSP-LED01 Setup Guide 020-100445-01 Rev. 1 (12-2009) i Table of Contents Number Keys ........................................................................................................................3-3 10+ ........................................................................................................................................3-4 Help .......................................................................................................................................3-4 Menu .....................................................................................................................................3-4 OSD (On-screen display) .....................................................................................................3-4 Shutter ..................................................................................................................................3-4 Function Key .........................................................................................................................3-4 Projector ................................................................................................................................3-5 Enter ......................................................................................................................................3-5 Exit ........................................................................................................................................3-5 Arrow Keys ...........................................................................................................................3-5 Laser ......................................................................................................................................3-5 3.2.3 On-line Help.........................................................................................................................3-6 3.3 Adjusting Geometry & Color.......................................................................................................3-6 3.3.1 Test Pattern .........................................................................................................................3-6 3.3.2 Geometry Correction............................................................................................................3-6 Adjusting an Image for Keystone Correction .......................................................................3-7 3.3.3 Brightness Uniformity..........................................................................................................3-8 What is Brightness Uniformity? ...........................................................................................3-8 Adjusting Brightness uniformity ..........................................................................................3-8 Cancelling Brightness Uniformity ........................................................................................3-9 3.3.4 Edge Blending......................................................................................................................3-9 What is a Blend? ...................................................................................................................3-10 How Are Blends Used? .........................................................................................................3-10 Edge Blending Controls ........................................................................................................3-10 Other Functions .....................................................................................................................3-11 Edge Blending Procedure .....................................................................................................3-11 3.3.5 Color Adjustments By X,Y .................................................................................................3-11 Defining “User” Color Gamuts .............................................................................................3-12 3.3.6 Color Saturation ..................................................................................................................3-13 3.3.7 Black Level Blending...........................................................................................................3-13 Black Level Blending Procedure ..........................................................................................3-13 3.3.8 Default Color Adjustments ..................................................................................................3-14 3.4 Diagnostics & Calibration - Submenu .........................................................................................3-15 3.5 Using Multiple Projectors ............................................................................................................3-16 Preliminary Calibration .........................................................................................................3-17 Color Adjustment Procedure .................................................................................................3-17 4: Troubleshooting 4.1 Troubleshooting Guidelines.........................................................................................................4-1 4.2 System Warnings / Errors ............................................................................................................4-1 System Warnings ..................................................................................................................4-1 System Errors ........................................................................................................................4-1 4.2.1 The Status Display ...............................................................................................................4-2 4.2.2 LED Error Status.................................................................................................................4-3 4.3 Power ...........................................................................................................................................4-3 ii Entero RPMWU/RPMSP-LED01 Setup Guide 020-100445-01 Rev. 1 (12-2009) Table of Contents 4.3.1 Projector Does Not Power ON.............................................................................................4-3 4.4 Light Module ...............................................................................................................................4-4 4.4.1 Light Module Suddenly Goes OFF......................................................................................4-4 4.5 Displays .......................................................................................................................................4-4 4.5.1 The Projector is ON, but There is No Display.....................................................................4-4 4.5.2 The Display is Jittery or Unstable........................................................................................4-4 4.5.3 The Display is Faint.............................................................................................................4-4 4.5.4 The Upper Portion of the Display is Waving, Tearing or Jittering......................................4-4 4.5.5 Portions of the Display are Cut OFF or Warped to the Opposite edge ...............................4-4 4.5.6 Display Appears Compressed (Vertically Stretched) ..........................................................4-5 4.5.7 Data is Cropped from Edges ................................................................................................4-5 4.5.8 Display Quality Appears to Drift from Good to Bad, Bad to Good ....................................4-5 4.5.9 Display has Suddenly Froze ................................................................................................4-5 4.5.10 Colors in the Display are Inaccurate..................................................................................4-5 4.5.11 Display is Not Rectangular ................................................................................................4-5 4.5.12 Display is “Noisy” .............................................................................................................4-5 5: Specifications 5.1 Regulatory ...................................................................................................................................5-1 5.1.1 Safety ...................................................................................................................................5-1 5.1.2 Environmental Regulations..................................................................................................5-1 5.1.3 Emissions .............................................................................................................................5-1 5.1.4 Electromagnetic Compatibility ............................................................................................5-2 5.1.5 Immunity..............................................................................................................................5-2 5.2 Display.........................................................................................................................................5-2 5.3 Lenses ..........................................................................................................................................5-3 5.4 Power Requirements ...................................................................................................................5-3 5.5 Illumination Module ..............................................................................................................................5-3 5.6 Physical Specifications ................................................................................................................5-4 Maximum Product Dimensions (L x W x H) .......................................................................5-4 Product Weight .....................................................................................................................5-4 5.6.1 Projector Dimensions and Mounting Information ...............................................................5-4 5.7 Environment ................................................................................................................................5-6 Operating Environment ........................................................................................................5-6 Non-Operating Environment ................................................................................................5-6 5.8 Standard and Optional Components ............................................................................................5-6 5.8.1 Standard Components ..........................................................................................................5-6 5.8.2 Optional Accessories ...........................................................................................................5-6 User Kit (P/N: 125-108100-xx) ............................................................................................5-6 Input Cards Other Input Cards ..............................................................................................5-6 Service Manual .....................................................................................................................5-6 Motoblend Mounting Kit ......................................................................................................5-7 Lenses ...................................................................................................................................5-7 5.9 Inputs ..........................................................................................................................................5-7 Entero RPMWU/RPMSP-LED01 Setup Guide 020-100445-01 Rev. 1 (12-2009) iii 1 Introduction 1.1 Using this Manual This manual is intended for trained users authorized to operate professional high-brightness projection systems. Only CHRISTIE accredited personnel trained specifically by CHRISTIE on light module replacement and safety may handle the light module. Disclaimer: Every effort is made to make sure the information in this document is accurate and reliable. However, due to constant research, the information in this document can change without notice. Christie Digital Systems USA, Inc. assumes no responsibility for omissions or inaccuracies. Updates to this document are published regularly, as required. Please contact Christie Digital Systems USA, Inc. for availability. 1.1.1 Labels and Marking Observe and follow all warnings and instructions marked on the projector. Danger symbols indicate a hazardous situation which, if not avoided, will result in death or serious injury. Warning symbols indicate a hazardous situation which, if not avoided, could result in death or serious injury. Caution symbols indicate a hazardous situation which, if not avoided, could result in minor or moderate injury. NOTICE! Information provided with this heading alerts users to key points of interest not related to personal injury. 1.1.2 Safety Warnings and Guidelines Be aware of the caution label on the projector warning of possible eye hazard if the projected visible and invisible LED radiation light is viewed directly through certain optical instruments at close range. Figure 1-1 indicates where the label is located. The projector is a class 2M source of visible and invisible LED radiation. Directly viewing the LED output with certain optical instruments (for example, eye loupes, magnifiers and microscopes) within a distance of 100 mm may pose an eye hazard. Figure 1-1 LED Caution Label Location Entero RPMWU/RPMSP-LED01 Setup Guide 020-100445-01 Rev. 1 (12-2009) 1-1 Section 1: Introduction 1.2 Purchase Record and Service Contacts Whether the projector is under warranty or the warranty has expired, Christie’s highly trained and extensive factory and dealer service network is always available to quickly diagnose and correct projector malfunctions. Complete service manuals and updates are available for all projectors. If a problem is encountered with any part of the projector, contact your dealer. Usually servicing is performed on site. If you have purchased the projector, fill out the information below and keep with your records. Table 1.1 Purchase Record Dealer: Dealer or Christie Sales/Service Contact Phone Number: Projector Serial Number*: Purchase Date: Installation Date: * The serial number can be found on the license label located on the back of the projector. Table 1.2 Ethernet Settings Default Gateway DNS Server Projector IP Address Subnet Mask 1.2.1 Key Features • WUXGA, 1920 x 1200 resolution Or: • SXGA+, 1400 x 1050 resolution • 0.69:1 Fixed Lens • 10-bit image processing module • Display of RGB, NTSC, PAL, and SECAM video inputs and HDTV formats • Picture-in-Picture display • Edge Blending ability via software for seamless displays • Dual frequency IR sensor for use with standard IR remote and optional long-range dual frequency remote • Memory for up to 99 custom “channels” (source setups) • Intuitive on-screen menu system • Built-in GPIO port to enable active control of external devices • LED display for projector status monitoring • Multiple control options including RS-232 and RS-422 • On-board ChristieNET software • Universal AC input 100-240 VAC, 50/60Hz 1-2 Entero RPMWU/RPMSP-LED01 Setup Guide 020-100445-01 Rev. 1 (12-2009) Section 1: Introduction 1.2.2 List of Components Make sure these components were received with the projector: • Projector Head Module (PHM), with attached Illumination Module (LM) • Electronics Module (EM) • Warranty Card • Web Registration Form • Line Cord (rated, North American) NOTE: A User’s Kit is supplied with each projection system. Additional User Kits can be purchased separately (P/N: 125-108100-xx). Entero RPMWU/RPMSP-LED01 Setup Guide 020-100445-01 Rev. 1 (12-2009) 1-3 2 Installation and Setup 2.1 Ventilation NOTICE! Caution do not obstruct the air exchange to the projector. The projector vents provide ventilation, both for intake and exhaust. DO NOT block or cover these openings. DO NOT install the projector near a radiator or heat register, or within an enclosure. Make sure there is a minimum clearance of 25cm (10”) on the left, right, top and rear sides of the projector. 2.2 Lifting, Transporting and Mounting Mount the projector to a sturdy, flat surface that fits the entire projector. Use all four mounting points to secure the projector to the surface. Maintain a minimum clearance of 25cm (10”) around the projector, called a “stay out zone”, for air circulation and clearance for cable connections to the input panel. Insufficient stay out zone clearance can cause the projector to overheat during operation and/or place undue stress on source connections The projector should be lifted by two people. Use a stable cart to transport the projector. Refer to the drawings given for your specific projector model for the mounting hole location and other technical information and restrictions which may be useful during installation. Also, refer to the CC50-2301/CC67-3001 Installation Manual (P/N: 020-100248-xx) for installation instructions. 2.3 Figure 2-1 Mounting Holes Unpacking the Projector The projector is shipped assembled with the projection lens shipped separately. The lens must be installed prior to setting up the projector. 1. Remove the projector from the box and packing material. NOTE: Save packing material for at least one projector in case a projector needs to be shipped for service. Entero RPMWU/RPMSP-LED01 Setup Guide 020-100445-01 Rev. 1 (12-2009) 2-1 Section 2: Installation and Setup 2. Connect the Electronics Module to the Projector Head Module and Light Module. See Figure 2-2 . Figure 2-2 Module Interconnections 2.4 Lens Information Use the lens cap when transporting the lens to avoid scratching and damaging the lens. The Entero projector includes a lens mount that allows lens control and adjustment: vertical and horizontal offsets, zoom and focus. The lens mount can be fitted with any one of the available optional lenses – see Section 5 Specifications. • Zoom and Focus – Adjust zoom to fit the displayed image on the screen and adjust focus to improve the clarity of the image. • Shutter – Standard on all models, the shutter allows you to turn the screen absolutely black when in the “Closed” state. An additional WHITE shutter state allows you to view an image (and menus) if projector settings turn the visible light OFF. Cleaning the Lens Check periodically. A small amount of dust or dirt on the lens has minimal effect on image quality. To avoid the risk of scratching the lens, clean only if absolutely necessary. Dust: 1. Brush most of the dust from the lens with a camel-hair brush or blow dust away with a dust-free blower. 2. Fold a microfibre cloth smooth and gently wipe remaining dust particles from the lens. Wipe evenly with the smooth portion of the cloth that has no folds or creases. DO NOT apply pressure with your fingers - use the tension in the folded cloth itself to collect dust. 3. If significant dust is still bound to the surface, dampen a clean microfibre cloth with coated optics cleaning solution (damp, not dripping). Wipe gently until clean. Fingerprints, smudges, or oil: 1. Brush away most of the dust with a camel-hair brush and/or blow away using a dust-free blower. 2. Roll a lens tissue around a swab and soak it in coated optics cleaning solution. Tissue should be damp, but not dripping. 2-2 Entero RPMWU/RPMSP-LED01 Setup Guide 020-100445-01 Rev. 1 (12-2009) Section 2: Installation and Setup 3. Gently wipe the surface using a figure-8 motion. Repeat this motion until the blemish is removed. 2.5 Calculating Throw Distance, Position and Mount Projector Throw distance is the distance measured from your projector to the screen. This calculation determines if there is enough room to install your projector with a desired screen size and if the image will be of the right size for your screen. To estimate the throw distance, take the horizontal width of the screen and multiply it by the lens throw ratio. The result determines approximately the distance the projector should be positioned from the screen to project a focused image large enough to fill the screen. For example, using the standard 0.69:1 lens, throw ratio would be roughly 0.69 x screen width. IMPORTANT! Use the lens and screen size to calculate the precise throw distance. Due to lens manufacturing tolerances for lens focal length, actual throw distance can vary ±2% between lenses with the same nominal throw ratio. Table 2.1 Entero Lens and Screen Diagonal CHRISTIE Lens Screen Diagonal Inches 0.69:1 Meters Min Max Min Max 50 100 1.3 2.5 NOTE: Throw distance is measured from the front of the lens to the screen position. Throw ratio is defined as: throw distance Throw Ratio = ----------------------------------- 2% screen width Vertical and Horizontal Position The correct vertical and horizontal position of the projector in relation to the screen depends on the lens type and the screen size. Ideally, the projector should be positioned perpendicular to the screen. This way, the image will appear rectangular instead of keystoned (trapezoidal). Mounting the Projector There are several methods for mounting the projector. In typical front and rear screen installations the projector can be mounted to a secure and level surface. For details installation instructions, refer to the CC50-2301/ CC67-3001 Installation Manual (P/N: 020-100248-xx). Special Mounting The projector can also be rotated (front-to-back) up to 360° and fixed in a rotated position without affecting performance. Entero RPMWU/RPMSP-LED01 Setup Guide 020-100445-01 Rev. 1 (12-2009) 2-3 Section 2: Installation and Setup 2.6 CONNECTING SOURCES All source connections are made to the input panel of the Electronics Module. Each input is labeled for easy identification. Using the correct cable(s), connect your source. An interconnection label is available for reference on the light module. Sources are connected to the Input Panel located at the top of the EM. The Input Panel has slots for one image processor board and up to four Dual Link DVI input cards. The input cards are hot swappable; they can be plugged in and out while the projector is running. The image processor should only be replaced when the projector is off or when it is in standby mode. These cards slide into any of the available option slots. One or more of the option slots may be used. Up to 2 active inputs can be displayed at any time, either from one card or from 2 cards. These 2 inputs can be routed to outputs or to the main or PIP video image. NOTE: Use only high quality shielded cables for all connections. LEDS LEDs are located on the faceplate of each input card and indicate the following: • Power ON - Green • Signal Valid - Green • Signal Invalid - OFF Dual Link DVI Input Card This card accepts a single DVI signal without High-Bandwidth Digital Content Protection (HDCP) video signal over a DVI-I connector and analog video signals over the DVI-I or 15-pin VGA connector. The module can simultaneously support a digital signal on the DVI input and an analog signal on the VGA port, however it does not support 2 analog signals at the same time. There are 4 LEDs on the module faceplate. PWR indicates power is applied and the card is initialized, and the other three on the right-side of the corresponding connectors indicate that a valid signal has been detected. Figure 2-3 Connecting Analog or Digital Video Devices 2-4 Entero RPMWU/RPMSP-LED01 Setup Guide 020-100445-01 Rev. 1 (12-2009) Section 2: Installation and Setup 2.7 POWER CONNECTION The projector is a class 2M source of visible and invisible LED radiation. Directly viewing the LED output with certain optical instruments (for example, eye loupes, magnifiers and microscopes) within a distance of 100 mm may pose an eye hazard. DO NOT operate if the AC supply and cord are not within the specified voltage and power range. The North American rated line cord is supplied with this projector. For all other regions, use only a regionally approved line cord, power plug and socket. DO NOT use a damaged line cord. 2.7.1 Connecting the projector to AC The input voltage to the projector must be capable of 100-240 VAC. Use only a correctly rated line cord. NOTE: DO NOT use a line cord or AC supply not in the specified voltage and power range. See Section 5 Specifications for projector power requirements. 1. Connect an approved line cord to the projector’s AC receptacle, located on the Light Module. NOTE: Use only the line cord supplied with the projector or a power cord of correct ratings that comply with regional standards. 2. Connect the 3-pronged end of the line cord to a grounded AC outlet. NOTE: The outlet must be near the equipment and easily accessible. 2.7.2 Turning the Projector ON 1. Flip the power switch on the LM (Light Module) ON. The projector takes about 2 minutes to initialize. The status light beside the LED window turns yellow. 2. Using the remote keypad press the Power button, and then the UP arrow. 3. Press one of the input keys on the remote to select and display the image for the source connected in 2.6 Connecting Sources. For more information on the keys available on the remote and their function, refer to 3.2 Using the Remote Keypad, on page 3-1. 2.7.3 Disconnecting the projector from AC DO NOT turn the main power switch to the OFF position or disconnect the projector until the cooling fans have stopped. Stop the projector. After the internal cooling fans stop, move the main power switch on the light module to the OFF position. This gives the light module enough time to cool. Disconnect the line cord from the wall outlet. Refer to Section 5 Specifications for complete details on all power requirements for the projector. Entero RPMWU/RPMSP-LED01 Setup Guide 020-100445-01 Rev. 1 (12-2009) 2-5 Section 2: Installation and Setup 2.8 SETTING UP THE IMAGE 2.8.1 Adjusting the Projection Lens NOTICE! Lock lens adjustments to prevent unnecessary tampering. 1. Loosen the adjustments locks on the lens barrel. 2. Display a test pattern appropriate for analyzing image focus and geometry, such as the “framing” test pattern showing the cross-hair centered across the image. Press the Test key on the remote keypad. 3. Do a coarse preliminary focus and (if available) zoom adjustment with the primary lens. DO NOT worry about consistency across the image at this point, just center focus. It is good practice to have zoom adjustment collar and focus adjustment collar in the center of its range. 4. When the image is focused, lock adjustments in place by tightening the adjustment lock until just tight. Figure 2-4 Lens Lock Screws 2.8.2 Adjust Software to Optimize Image NOTES: 1) See 3 Basic Operation for details on accessing and adjusting individual settings. 2) Unless otherwise indicated, instructions apply to all projector models in stand-alone or multi-projector configurations. 1. Display an external signal. 2. Select Image Orientation in the Configuration>Output Settings menu and change the orientation of the displayed image to suit the installation. 3. Assign projector ID number(s). 4. Modify options in the Main menu. For example, select Language to change the menu language to one of the five available languages. 5. Enable Broadcast Key in the Communications menu – this lets you to switch between communicating with one or all projectors when connected serially. 6. Select Auto Setup to give the projector a chance to setup the best possible settings for the chosen incoming signal. 7. Make sure that Processing Mode, in Image Settings, is correct for the selected source. 2-6 Entero RPMWU/RPMSP-LED01 Setup Guide 020-100445-01 Rev. 1 (12-2009) Section 2: Installation and Setup 8. Change Resize Presets if you want the image displayed at another resolution other than native. 9. Adjust Pixel Phase and Pixel Tracking from the Size and Position menu to eliminate noise from the displayed image. 10. Adjust H-Position and V-Position from the Size and Position menu to re-center the image on screen. 11. Adjust Size in Size and Position until the image is at the necessary width then adjust Vertical Stretch. Adjusting one option may have an affect on the other, repeat adjustment if necessary. Adjust H-Position and V-Position again if required to center the image. 12. Do the Color Temperature setup. 13. Adjust Blacklevels and Input Levels. 14. Adjust color primaries, brightness uniformity and edge blending using the detailed procedure, User Manual, section 3.11.1 Multiple Projector Communication, on page 3-42. Entero RPMWU/RPMSP-LED01 Setup Guide 020-100445-01 Rev. 1 (12-2009) 2-7 3 Basic Operation 3.1 Safety Warnings and Guidelines Installers, service trained operators and all users must maintain a safe operating environment at all times. Read this section in its entirety and understand all warnings and precautions before operating the projector. The projector is a class 2M source of visible and invisible LED radiation. Directly Viewing the LED output with certain optical instruments (e.g. eye loupes, magnifiers and microscopes) within a distance of 100mm may pose an eye hazard. The projector is a class 2M source of visible and invisible LED radiation. Directly viewing the LED output with certain optical instruments (for example, eye loupes, magnifiers and microscopes) within a distance of 100 mm may pose an eye hazard. Power should always be disconnected from the illumination module before servicing, to avoid the possibility of inadvertent exposure to visible and invisible LED radiation. Directly viewing the illumination module optical output through certain optical instruments (for example, eye loupes, magnifiers and microscopes) within a distance of 100mm may pose an eye hazard. Disconnect the AC cord before disconnecting the light module from the Projector Head Module (PHM). NOTICE! This projector must be operated in an environment that meets the operating range specification, as listed in Section 5.7 Environment. 3.2 Using the Remote Keypad Laser radiation is emitted from the laser diode in the remote. DO NOT look directly into the beam of the laser. The projector remote keypad can be used as a wired (25 foot cable included) or wireless control. Under optimal conditions, the wireless keypad can communicate with a projector over a 100 foot distance. In wireless mode, the keypad communicates with the projector with a battery-powered infrared (IR) transmitter. Use the remote keypad the same way you would use a remote keypad supplied with a TV or VCR. When pressing a function key, direct the keypad toward the projector’s front IR sensor. The IR sensor on the projector will detect the signal and relay the commands for internal processing. A laser pointer is built into the remote keypad. Keep these guidelines in mind: • Press keys one-at-a-time; there are no simultaneous key combinations required. NOTE: To use Power, Shutter, and OSD functions, press the power button and then press the Up arrow to switch ON or the Down arrow to switch OFF: You can also press-and-hold the power button for 2 seconds, or press it twice quickly. • Arrow keys are held down for continuous adjustment/movement in the related key direction. NOTE: In serial networks, pause briefly between adjustments to make sure that more distant projectors can “keep up” with Entero RPMWU/RPMSP-LED01 Setup Guide 020-100445-01 Rev. 1 (12-2009) 3-1 Section 3: Operation the commands. If you press a key while the projector is still responding to the previous action, such as during power-up, the second key press may not take effect. 3.2.1 Wired Remote You can convert the remote keypad into a wired remote keypad using the cable provided with the projector. Connect one end into the remote and the other to the XLR connector on the input panel labeled as wired keypad. The wired remote is recommended when the lighting conditions are unsuitable for proper IR transmission. NOTE: Batteries are not required for the wired remote projector controls to operate; however, if the laser pointer is required batteries must be installed in the remote. 3.2.2 Remote Keypad Commands The projector is a class 2M source of visible and invisible LED radiation. Directly viewing the LED output with certain optical instruments (for example, eye loupes, magnifiers and microscopes) within a distance of 100 mm may pose an eye hazard. Power ON/OFF Press and hold Power for two seconds or press twice quickly to action the projector ON or OFF. Or, press and release Power followed immediately by Up arrow key (ON) or Down arrow key (OFF) to guarantee the correct action (useful if you are unsure of the present state). Test Steps forward through all internal test patterns. After stepping past the last test pattern, you will return to current input. Press Test and then cycle by using the Left or Right arrow keys, to cycle in either direction through the test patterns. Press Exit to return to the current input. Auto Initiates an automated process in which the projector optimizes critical display parameters such as size, position, pixel tracking, etc., for the current source. These parameters are listed in Table 3.1. An auto setup can save time in perfecting a display and you can modify the adjustments as desired. Table 3.1 Auto Setup OPTIMIZES Pixel Tracking Pixel Phase Size and Blanking Vertical Stretch Position Input Levels SETS TO DEFAULT Contrast Brightness Auto Input Level (off) Detail (if video source) Filter Luma Delay NOTE: You must have an unlocked channel present to use Auto Setup. The best auto setup will be obtained under the following conditions: • Input levels: It is best to have an image with saturated (very bright) colors. • Phase: High contrast edges are needed. To determine active window size: • Video images should have whites and blacks in the image. • Wide range video images should have content (including white) that extends to all edges of the image. 3-2 Entero RPMWU/RPMSP-LED01 Setup Guide 020-100445-01 Rev. 1 (12-2009) Section 3: Operation Channel Select a specific source setup (channel) defined and stored in projector memory. Once you enter a two-digit channel number (or, if there is a list displayed, highlight it and press Enter), the display will automatically change and update according to the numerous setup parameters defined for that channel. NOTES: 1) A new channel is automatically created if you adjust an image from a new source. 2) Channel key behavior during a presentation depends on whether or not the Display Channel List option is enabled in the Menu Preferences menu. You can choose to use a scrollable list of channels when you press Channel, or you may prefer to enter the desired channel number “blind”, i.e., without on-screen feedback. See Menu Preferences later in this section. Slot 1, 2, 3, 4 Press to display the next active input on the card in the slot. Input Displays all inputs in all slots, both active and inactive. Scroll through the list to select an input for the main image. Press Input again to show the list and select the picture-in-picture (PIP) image. PIP Turns PIP ON or OFF. Swap Swaps the main and PIP images. Contrast Changes the level of peak white in your images. Use Left/Right arrow key until you reach the desired level of contrast—for best results, start low and increase so that whites remain bright but are not distorted or tinted and that light areas do not become fully white (i.e., “crushed”). Conversely, low contrast causes dim images. Bright Increases or decreases the black level in the image. Use Left/Right arrow key until you reach the desired level of brightness. For best results, start high and decrease so that dark areas do not become fully black (i.e., “crushed”). Conversely, overly high brightness changes black to dark gray, causing washed-out images. Gamma Determines how gray shades are displayed between minimum input (black) and maximum input (white) for a given amount of signal. The proper setting helps maintain optimized blacks and whites while ensuring a smooth transition for the “in-between” values utilized in grays. Unlike brightness and contrast controls, the overall tone of an image can be lightened or darkened without changing the two extremes and your images will be more vibrant yet with good detail in dark areas when using the Gamma control.The nominal setting for Gamma Correction of 0 is correct for most signals and conditions. If excess ambient light washes out the image and it becomes difficult or impossible to see details in dark areas, increase the gamma correction setting to compensate. Number Keys Press 1 to 9 to enter a value in a text box or to select a menu item. Entero RPMWU/RPMSP-LED01 Setup Guide 020-100445-01 Rev. 1 (12-2009) 3-3 Section 3: Operation 10+ Press 0 before pressing another number to enter a number greater than 9, e.g. press 0 then 2 to enter the number 12 as a menu selection. NOTE: When entering numbers in a text field, this button acts as 0. Help Press Help to display context-sensitive help. Press Help again to toggle the help window OFF. Menu Press Menu to enter or exit the projector’s menu system. OSD (On-screen display) Press OSD then the Down arrow to hide the projector’s menu system during use. To see the menus again, do one of the following: • Press and hold OSD for two seconds. • Press and release OSD followed immediately by Up arrow. • Press OSD, OSD Invisible menus are fully functional, enabling “hidden” access to numbered features and image adjustments by entering the corresponding sequence of key presses on the keypad. NOTE: With OSD “on”, you can still hide error messages and slide bars by disabling these options in the Menu Preferences menu. Shutter Press and hold Shutter to move between simulated shutter states in the order; open-closed-white-open. Or, press and release Shutter followed immediately by Up arrow key (closed) or Down arrow key (open) to guarantee the correct state (useful if you are unsure of the present state). Alternatively, press Shutter, Shutter to toggle from the present ON/OFF state. A closed shutter blanks the display (turns it to black). Close the shutter to block the displayed image while maintaining access to projector functions. An additional "white" shutter state allows you to view an image (and menus) if projector settings turn the visible light OFF. Opening the shutter restores the image. NOTES: 1) The LED status display shows SH when the shutter is in either black or white modes. 2) The shutter is open upon power-up. Function Key IF WITHIN A NUMERIC FIELD IN A MENU: Use Func to enter a negative number. IF WITHIN A TEXT FIELD: Press Func followed by the Up arrow key or Down arrow key to convert between capital and lower case letters. Press Func followed by the Left arrow key or Right arrow key to insert or delete a character. Press Func followed by Enter to delete all characters. IF WITHIN A PRESENTATION: Press Func followed by two numeric numbers to enable a specific color or colors in the display (see right). For example, will display only red, and will display green data. Eliminating one or more colors can help with certain diagnostics and setups, such as when accurately overlaying one image on top of another from stacked projectors. NOTE: Color enabling can also be implemented from numerous locations within the menu system. FIGURE 3-1 - FUNCTION KEY 3-4 Entero RPMWU/RPMSP-LED01 Setup Guide 020-100445-01 Rev. 1 (12-2009) Section 3: Operation Press Func followed by Help to disable Keystone, Edge Blending and Brightness Uniformity settings. This will disable the features without changing the settings associated with them. Projector Press Proj to access a specific projector within a group of projectors or to confirm if the local projector is listening. The number in the “Enter Number” window indicates which projector is currently listening to commands and will match the projector address defined in the Configuration-Communications menu. The Proj check box (read-only) shows whether or not the projector physically connected to a keypad is listening to commands from that keypad. A checkmark means that connected projector is listening; if there is no checkmark, you are communicating with a different projector.To control a specific projector with the keypad, press Proj and then enter the three-digit number assigned to the projector you want to use. If you switch to a projector other than the one you are currently using, the checkmark will disappear. To broadcast to multiple projectors, press Proj and then Proj again without entering a projector number. Keypad commands will then affect all projectors present. NOTE: There is no method of controlling a group of projectors within the same wired configuration using the wired keypad exclusively, since there is only one wired protocol available. NOTE: The projector’s address can be set in the Configuration Menu> Communications Submenu. Enter Press Enter to select a highlighted item, to toggle a check box, or to accept a parameter adjustment and return to the previous menu or image. Exit Press Exit to return to the previous level, such as the previous menu. NOTE: Exit does not save changes within text editing boxes (including number editing of a slide bar value) or within pull-down lists. It acts as a “cancel” in these cases. Arrow Keys Use the Left/Right arrow key to change a slide bar value or to select a different option within a pull-down list without having to first scroll through options or navigate within a menu, pull-down list or text box. Laser Press Laser to activate the laser pointer on the remote. Point the remote at the screen to highlight an area of your presentation. NOTE: Leave batteries in the wired remote keypad for the Laser key to work. Entero RPMWU/RPMSP-LED01 Setup Guide 020-100445-01 Rev. 1 (12-2009) 3-5 Section 3: Operation 3.2.3 On-line Help Press Help to display summary information about the current menu or highlighted option. Press Help again to exit. FIGURE 3-2 ON-LINE HELP 3.3 Adjusting Geometry & Color In the Configuration menu, select the Geometry and Color submenu when you need to modify overall color performance and/or image geometry for all sources. 3.3.1 Test Pattern Choose the desired internal test pattern, or select OFF to turn off a test pattern. Alternatively, use the TEST key for cycling through test patterns. 3.3.2 Geometry Correction Keystone is typically caused by tilting the projector in relation to the screen, so that the lens surface and screen are no longer parallel to each other. Use the projector menu options to make basic keystone adjustments appropriate for flat screens. For complex geometry correction, for example for spherical screen, refer to the TWIST User Manual included in the user kit. Settings to adjust keystone are in the Geometry Correction submenu. Brightness Uniformity, Edge Blending and Black Level Blending should be disabled before performing Keystone adjustments. Vertical keystone is used to correct a keystoned image shape in which the top and bottom borders of the image are unequal in length, and both sides of the image are inclined toward the top or bottom edge, see Figure 3-3. FIGURE 3-3 - VERTICAL KEYSTONE 3-6 Entero RPMWU/RPMSP-LED01 Setup Guide 020-100445-01 Rev. 1 (12-2009) Section 3: Operation Horizontal keystone is used to correct a keystoned image shape in which the left and right borders of the image are unequal in length, and the top and bottom are slanted to one of the sides, see Figure 3-4. FIGURE 3-4 - HORIZONTAL KEYSTONE Adjusting an Image for Keystone Correction 1. Enable keystone adjustments by selecting Keystone from the Geometry Correction drop down list. NOTE: This will enable the controls for performing 1D or 2D keystone adjustments. 2. Select a Test Pattern. NOTE: It is recommended to use the Grid test pattern. 3. Perform coarse keystone adjustment by using the Horizontal or Vertical Adjust setting. Use the left and right arrow keys to make the adjustment. NOTE: The corner cursors are a guide as to how the image will be adjusted. The outside edge of a cursor will be the outside edge of the image. It may not be possible to exactly match the screen dimensions with the Horizontal and Vertical Keystone controls, but these settings can be refined when the 2D keystone settings are adjusted. 4. When adjustment of the corners is complete, select OK. NOTE: A message will be displayed indicating that the projector is “Processing request”. The settings are applied to the displayed image, and will take approximately 10 seconds. If Vertical Keystone adjustments have been made, starting to do any Horizontal Keystone adjustments will erase the Vertical settings, and vice versa. 5. After the Horizontal or Vertical adjustments have been made, selecting 2D Keystone adjustments will retain these settings. Fine adjustment can now be made by moving any single corner separately. 6. Use the arrow keys to move to the required corner. NOTE: The current corner will be displayed in red. 7. Press Enter to select the corner. NOTE: The current corner will be displayed in green. 8. Use the arrow keys to move the selected corner to match the screen. 9. Press Enter again, to save that position for the corner. 10. Repeat Steps 6 to 9 to adjust all 4 corners until they match the screen. 11. Select OK to apply the new corner positions to the image. NOTE: A message will be displayed for approximately 10 seconds indicating that the projector is “Processing request”. Under certain combinations of extreme keystone co-ordinates and specific signal frequency, a keystoned image may result that is outside the bandwidth limitations of the projector. When attempting to apply the keystone settings, a message will pop up on the OSD, indicating that the bandwidth has been exceeded and the keystone cannot be applied. The cursor co-ordinates for keystone adjustment will remain at the failed keystone position. This will allow the user to make minor changes and attempt to reapply the corner settings. Either the coordinates must be adjusted, or the free run frequency must be changed to fall within the allowed bandwidth. Entero RPMWU/RPMSP-LED01 Setup Guide 020-100445-01 Rev. 1 (12-2009) 3-7 Section 3: Operation The Func+Help key combination will immediately disable the Keystone, Brightness Uniformity, Edge Blending and Black Level Blending features. This is helpful when, in some extreme keystone configurations, some image corruption may appear and/or the menus may not be readable. Although Func+Help disables these features, it will not overwrite their settings. If keystone is simply enabled again, the same image corruption may occur. After pressing Func+Help, it is recommend to immediately “Reset Keystone Settings”, which will set all keystone co-ordinates to zero. 3.3.3 Brightness Uniformity Brightness Uniformity provides further refinement of displays already matched for their primary colors and overall light output. Use the Brightness Uniformity menu options for basic adjustments so that no area appears brighter than another. In the Brightness Uniformity menu, enable the Brightness Uniformity Enable check box to access a multitude of adjustments for light output control in specific areas throughout the image. Your settings apply as long as the Brightness Uniformity Enable check box is enabled. While making adjustments, enable the Coarse Adjustment check box to apply Brightness Uniformity settings with a large granularity. Coarse Adjustment helps identify brightness changes and accelerates projector response time while adjusting settings. To disable the Brightness Uniformity function, delete the Brightness Uniformity Enable checkmark. To correct brightness uniformity for a complex screen setup, see the TWIST User Manual included in the user kit. What is Brightness Uniformity? When used to refine screens already matched for their primary colors (see 3.5 Using Multiple Projectors) and overall light output, proper adjustment of Brightness Uniformity can create an exceptionally smooth screen in which: • No area of the screen appears brighter than another • Light output from one screen closely matches adjacent screens Although the Brightness Uniformity control can be used for a stand-alone projector, it is particularly useful for setting up and maintaining tiled images that form a cohesive display wall in which the color “cast” and light output appear uniform throughout each image as well as throughout the entire wall. The procedure provided here assumes a multiple-screen application. IMPORTANT! Before You Begin Read through the entire procedure before attempting to adjust Brightness Uniformity controls. Adjusting Brightness uniformity 1. Adjust the primary colors as described in 3.5 Using Multiple Projectors, before attempting to work with Brightness Uniformity. This ensures that primary colors, color temperature, and maximized light output are all well matched from one screen to another. These matches are needed before you can achieve good brightness uniformity results. IMPORTANT! Double-check that all WHITES and LIGHT OUTPUT are well-matched. 2. Enable the Brightness Uniformity check box. This will enable access to the uniformity controls and will apply the settings to your image. 3-8 Entero RPMWU/RPMSP-LED01 Setup Guide 020-100445-01 Rev. 1 (12-2009) Section 3: Operation 3. Select the 13-Point test pattern for Full White for display. The 13Point test pattern provides nine screen “zones” with 13 targets, see 13-Point Test Pattern. 4. Determine by eye or meter which areas need to be adjusted. FOR BEST RESULTS Rather than examining the CENTER of each zone when assessing Brightness Uniformity adjustments focus on extreme EDGES as indicated in the illustration at right. 5. In either Color Adjustments menu, select the color settings that the projectors were matched on: • Custom color gamut, for example User 1, if you have created a custom color gamut for a well-matched wall (recommended). • Max Drives, if you prefer maximum brightness rather than a particular color temperature. FIGURE 3-5 13-POINT TEST PATTERN 6. Enable Coarse Adjustment to quickly apply display changes without redrawing the whole image. 7. Use sliders to achieve relative uniformity in the necessary zone. 8. Disable Coarse Adjustment to accurately display changes as you make them. 9. Use sliders for fine adjustment as necessary in the required zones. 10. Adjust overall gain to ensure that overall light output remains well matched from one screen center to the next. Cancelling Brightness Uniformity If you do not want to use or apply Brightness Uniformity settings, delete the checkmark from the Uniformity Enable check box at the top of the Brightness Uniformity menu. 3.3.4 Edge Blending The Edge Blending submenu provides a range of basic controls for smoothing together the overlapping bright edges of multiple adjacent projected images to create a single larger “seamless” image. These controls, which primarily affect white levels, are typically used in conjunction with mechanical lens blinders (optional), which are installed on the front of the projector and which primarily affect black levels. Brightness uniformity adjustment, if desired, should be performed first. The Edge Blend or Grid test pattern is useful for the mechanical setup of the projectors. If necessary, adjust Black Level Blending first with the Black test pattern, then use the White test pattern to blend the white levels on the blend edges. The final step is to check the blended image with an external source.There is a centerline (both horizontal and vertical) in the Edge Blending test pattern. The intersection of these lines is the true center of the projector’s display area. The Show Blending Overlap control enables or disables edge blending overlap. When enabled, this will make the size of the Edge Blending regions obvious. This control should only be used during setup. For information about advanced blending of complex configurations, for example with spherical screens, see the Twist User Manual included in the user kit. Entero RPMWU/RPMSP-LED01 Setup Guide 020-100445-01 Rev. 1 (12-2009) 3-9 Section 3: Operation What is a Blend? In simple terms, a blend appears as a gradient strip along an edge of a projected image. It is darkest along the extreme edge of the image, and lightens nearer to the rest of the image (Figure 3-6). How Are Blends Used? In multiple-projector walls, complementary blends between neighboring images can compensate for the extra “brightness” or intensity where these edges overlap. By controlling blend width and other properties, you can achieve uniformity across the group of images. Visible overlaps disappear (Figure 3-7). For best results, use the same projector model and type throughout your display wall. In addition, avoid high-gain screens whenever possible—the optical performance of such screens demands minimal image offset, thus projectors must be located very close to one another. FIGURE 3-6 EDGE BLENDING Edge blending software controls are located in the two-page Edge Blending submenu—access via Configuration menu, then go to the Geometry and Color menu and select Edge Blending. The Advanced Edge Blending option opens the second page of the Edge Blending submenu. Edge Blending Controls FIGURE 3-7 EDGE BLENDING CONCEPT Use Edge Blending controls to set the precise width, shape and midpoint you need to blend overlapping edges together smoothly. NOTE: For information about advanced blending of complex configurations, for example with spherical screens, see the Twist User Manual included in the user kit. • Blend Width determines how much area is used for blending along an overlapping edge. Slide bar values represent the number of pixels used for the blend. For example: • A setting of 8 creates a blended edge 8 pixels wide. • A setting of “0” signifies no blending. For best results in most applications, use a blend width of 12-25% (for example with a screen size of 1920 × 1200, 230-480 pixels). NOTE: Ranges: 0-960 horizontal, 0-60 vertical. • Blend Shape determines the rate of roll-off across the blend width, i.e. how quickly the white levels across the blend change from light and dark. Increasing the Blend Shape setting accelerates the rate of change at both extremes so that less of the region appears mid-gray. Decreasing the Blend Shape setting slows the rate of change so that more of the region appears mid-gray. For most applications, this subtle control is best left close to 50. • Blend Midpoint determines the white level at the blend midpoint (the point equidistant between the beginning and end of the blend). Increasing the Blend Midpoint setting creates a blend that appears brighter than the rest of the image. Decreasing the Blend Midpoint setting creates a blend that is darker than the rest of the image. A setting of 50 means the midpoint is approximately 50% black—for best results in most applications, keep fairly close to this default. • Show Blending Overlap turns your defined blend width area to solid gray so that, if needed, simply overlapping the gray bars can seamlessly align two adjacent images. Toggle the Show Blending Overlap off to reactivate the blend effect. 3-10 Entero RPMWU/RPMSP-LED01 Setup Guide 020-100445-01 Rev. 1 (12-2009) Section 3: Operation Other Functions For convenience, the Edge Blending submenu also includes related options for enabling a test pattern. Such functions duplicate those provided elsewhere in the menu system. Edge Blending Procedure NOTES: 1) Before attempting to work with edge blending software functions, align the projectors/images by correctly overlapping the displays from your intended external source. 2) Match colors and the brightness uniformity. IMPORTANT! For a shared edge, all blend procedures and settings should be identical on both projectors. 1. Start with two projectors. Display full white field test pattern from both. 2. In the Edge Blending submenu, enable Edge Blending by entering a checkmark in the top check box. 3. SET STARTING POINTS FOR ADJUSTMENT a. Set all blend widths to 0. b. Go to More and set everything in the Edge Blending menu to 50. 4. SET BLEND WIDTH On one projector, increase the Blend Width for an overlapping edge (for example, if the projector’s image is on left, its right edge overlaps the adjacent image—adjust Right Blend Width). Use the same setting on the second projector for this shared edge. 5. Re-adjust width (both projectors) until the overly bright band at the midpoint of the overlapping blends disappears or just changes to very light gray. For the shared edge, use the same Blend Width setting on each projector. NOTE: If the best blend appears to be between two settings, choose the wider setting for both projectors. 6. Check the blend and adjust as required: • To lighten the overall blend, increase the Blend Midpoint in both projectors. • To darken the overall blend, decrease the Blend Midpoint in both projectors. • To fine-tune the amount of mid-gray intensity (as opposed to black/white) in the blend, adjust Blend Shape in both projectors. 7. Repeat with remaining projectors / overlaps. 8. Check completed display wall with the desired external signal. 9. If necessary, adjust the mechanical alignment to maintain perfect pixel-on-pixel alignment over time. In applications where you are projecting only white or light images, the Blend Width may be slightly higher— set according to how much overlap you have between images. NOTE: Recommended overlap is 12.5%–25%. 3.3.5 Color Adjustments By X,Y Enter known x/y coordinates from the chromaticity graph. NOTES: 1) For defining or changing a User 1, 2, 3, or 4 color performance or “gamut”. Sometimes known as Comprehensive Color Adjustment™. 2) Factory-defined primary color levels, which ensure a specific color performance from projector-toprojector, can be calibrated in the Service menu only. The factory settings can be recovered with selection of “Reset to Factory Defaults?” in the Color Primary Settings submenu accessed via the Service menu (password-protected). Entero RPMWU/RPMSP-LED01 Setup Guide 020-100445-01 Rev. 1 (12-2009) FIGURE 3-8 COLOR ADJUSTMENT 3-11 Section 3: Operation From the factory, the projector can utilize any of the three pre-defined color performance settings identified at right (default=Max Drives), or colors can be driven on the basis of color temperature. For most applications, one of these gamuts will produce accurate and realistic colors from a variety of sources. They can be applied at any time in the Advanced Image Settings menu (“Select Color Adjustment”), and are not adjustable. Defining “User” Color Gamuts You may find the pre-defined “Select Color Adjustment” options do not suit your needs. For example, you may require a unique color gamut (range) for a single projector or application, or you may need to precisely match colors across multiple adjacent displays. In such cases, use the Color Adjustments by X,Y or Color Saturation submenu to define the precise hue of each primary color component (red, green, blue, and white) used to generate the millions of colors produced in displays. You can create up to four custom color gamuts (User 1, 2, 3, or 4) with these adjustments. NOTE: The two menus differ in their user interface, and the Color Saturation menu also controls color intensity. Use the controls that best suit your needs and application. A color meter can help with adjustments. Use this submenu to create, alter or copy a color gamut (i.e., “color adjustment”). Controls in this menu define the precise hue of each primary color component (red, green, blue, and white) used to generate the millions of colors produced in displays. The x/y coordinates for each color define its location on the standard CIE chromaticity graph, see Figure 3-9. Changing either or both of these numbers will change the hue of the color, and relocate the “triangle” for possible colors. For example, changing the x/y coordinates for red may move the color closer to orange or closer to violet, which will in turn affect all displayed colors having a red component. Adjust the slide bars or enter new specific coordinates as desired to define or change up to four “User” color gamuts needed for your environment and applications. Apply at any time in the Advanced Image Settings menu. FIGURE 3-9 CIE 1931 CHROMATICITY DIAGRAM NOTE: Keep new x,y coordinates within the original color gamut triangle shown here. 3-12 Entero RPMWU/RPMSP-LED01 Setup Guide 020-100445-01 Rev. 1 (12-2009) Section 3: Operation 3.3.6 Color Saturation Adjust color slide bars and judge image color by eye or meter. A user-defined color “adjustment” can be applied by selecting it in the Advanced Image Settings menu (select ‘Color Adjustment’). Use this submenu if you do not have specific color coordinates in mind and will judge color performance by eye or meter. Like the Color Adjustment by X,Y submenu, each color control defines new x/y coordinates for that color and changes its hue. Adjust the hue of each primary color (red, green, blue, and white) by using more or less of it in relation to the other colors. NOTE: A Color Saturation adjustment defines the corresponding x/y coordinates shown in the Color Adjustment by X,Y submenu. These x/y coordinates will remain stable for this User gamut until they are changed again via either menu. Values displayed in the Color Saturation menu, will fluctuate as you use the projector, and will be different when you return to this menu in the future. These floating changes do not affect the x/y coordinates or gamut. 3.3.7 Black Level Blending Brightens the center regions to match adjacent blend regions when edge blending multiple projectors. The Black Level Blending submenu provides controls that allow you to adjust the black level hues of multiple adjacent projected images to create one large seamless display. NOTES: 1) Adjust edge blending before adjusting black levels. 2) Blinders are recommended for fixed installations. 3) Do not use black level blending if Twist was used for the geometry. Black Level Blending Procedure NOTES: 1) Adjust edge blending before adjusting black levels. 2) The zones in Black Level Blending menu correspond to the Edge Blend zones. If a given Edge Blend zone width is set to 0 (i.e. no blend on that side) then the corresponding BLB zone is disabled. It only becomes accessible when that Edge Blend zone is active. 1. Start with two projectors. Select the black test pattern for both projectors from the Geometry and Color submenu. 2. In the Black Level Blending submenu, enable black blending by putting a checkmark in the check box for each projector. 3. Set the blend width. 4. Working with one projector at a time, use the center brightness slide bar to adjust the center brightness (brightness of the non-blended region) so that the center intensity matches that of the brightest blended region (the center of all images when blending a 2 x 2 display is the target area). 5. You can choose which of the next four options, Top, Bottom, Left, Right, to use depending on which edge of the projector you are working with has been edge blended. The blend width can be adjusted to line up properly but by default it corresponds to the edge blending setting determined for that edge. 6. The brightness and black hues of the blended region can be adjusted in more detail in case fine-tuning is needed (may be necessary only for blending a 2 x 2 projector display because of blending differences for the sides and center). NOTES: 1) The menu options vary depending on the edge blending parameters. 2) You may need to re-adjust the black level brightnesses following the overlap adjustments on each blended edge. 3) When adjusting six or more projectors, you need to ensure that the hue and brightness of each target area is matched at closely as possible. Entero RPMWU/RPMSP-LED01 Setup Guide 020-100445-01 Rev. 1 (12-2009) 3-13 Section 3: Operation 3.3.8 Default Color Adjustments Select the default values for the color adjustment. The value selected is the default to be used by the system during auto setup or initial detection of a new source. See Color Adjustments By X,Y, on page 3-11. Light Module-Advanced Color Adjustment These adjustments can turn on multiple RGB LEDs simultaneously, which uses more power and increases the possibility of overheating. The Advanced Color Adjustment menu lets you adjust the native projector color space by adjusting the LED power levels. Use LED color adjustment to define a gamut that is slightly larger than the target color gamut. Then finish with the traditional video based comprehensive color adjustment (CCA). LED color adjustment significantly increases the brightness of unsaturated colors compared to CCA on its own. Important! Only CHRISTIE accredited service technicians should attempt this procedure. For general use, adjust color and brightness using Color Adjustment X,Y and Color Saturation. Color Mode–This menu allows selection of Native, EBU or User Color Presets. These are presets which control the settings of the LM LED powers for each color. Figure 3-10 Advanced Color Adjustment LM Red Part Of Red–Changes the power of the red LED for the red color. LM Green Part Of Red–Changes the power of the green LED for the red color. WARNING! These adjustments can turn on multiple RGB LEDs simultaneously which uses more power and increases the possibility of overheating. LM Blue Part Of Red–Changes the power of the blue LED for the red color. LM Red Part Of Green–Changes the power of the red LED for the green color. M Green Part Of Green–Changes the power of the green LED for the green color. LM Blue Part Of Green–Changes the power of the blue LED for the green color. LM Red Part Of Blue–Changes the power of the red LED for the blue color. LM Green Part Of Blue–Changes the power of the green LED for the blue color. LM Blue Part Of Blue–Changes the power of the blue LED for the blue color Copy Setting From–This control allows you to copy the Color Mode Settings from an existing preset to the current preset. RGB Brightness–This setting controls the overall brightness of the LEDs. 3-14 Entero RPMWU/RPMSP-LED01 Setup Guide 020-100445-01 Rev. 1 (12-2009) Section 3: Operation Adjusting Advanced Color The procedure switches ON multiple RGB LEDs simultaneously which uses more power and increases the possibility of overheating. Use Advanced Color Adjustment to defined a color gamut that is slightly larger than the target color gamut and then finish with the video based traditional comprehensive color adjustment (CCA). LED color adjustment uses the light module to change the native projector color space. LED color adjustment significantly increases the brightness of unsaturated colors compared to CCA on its own. Important! Only CHRISTIE accredited service technicians should attempt this procedure. For general use, adjust color and brightness using Color Adjustment X,Y and Color Saturation. 1. To choose the color mode for your video source, choose Menu, 4 Configuration, 8 Geometry and Color, Advanced Color, 1 Color Mode. The stored values for the selected mode display on the Advanced Color menu. 2. Edit the RGB values so that resulting color gamut is slightly larger than the selected mode. NOTE: Native color mode has preset values. To edit Native values: select a custom user color mode; choose 15 Copy Settings From; and select Native. The preset values are copied to the custom user color to be edited. 3. Fine tune the color adjustment with traditional CCA, see Color Saturation, on page 3-13. 3.4 Diagnostics & Calibration - Submenu Test Pattern Choose the desired internal test pattern to display, or select OFF to turn off a test pattern. Alternatively, use the Test key for cycling through test patterns. Grey Level Set the level of grey for displaying in the full gray field test pattern. Freeze Image Enter a check mark to freeze (stop) an image on a single frame. Use this diagnostic tool to examine in detail a still version of an incoming image that cannot be “frozen” at the source. For example, in moving images it is sometimes difficult to observe artifacts such as external de-interlacing/resizing and signal noise. Remove the checkmark to return to normal. Color Enabled Select which color(s) you want to see. Use this while working with color temperature, input levels or other special setup parameters. Colors can be enabled/disabled by entering the corresponding function code listed on the back of the standard remote keypad. Input Peak Detector This is a fast method for defining individual input levels, and improving the accuracy of input levels set by the Auto Input Level function. Enabling the Peak Detector activates a special operating mode for detecting only pixels that are considered black or white—all other levels are displayed as a mid-level gray. When used with a 16-step grayscale pattern in which the two black and white bands are known to be at opposite edges of the image, you can watch these isolated areas while adjusting individual black levels and input drives until both bands are just visible. Images from this source will then display correct blacks and whites without crushing or washing out. NOTE: If using Peak Detector with PIP, both images must have the same color space. Entero RPMWU/RPMSP-LED01 Setup Guide 020-100445-01 Rev. 1 (12-2009) 3-15 Section 3: Operation Input Level Detector The Input Level Detector check box enables specific thresholds for blacks and whites. Input levels that fall below a specified level value (see below) are displayed as black, and all others are displayed as white. To use: 1. Enable Input Level Detector and display a continuous grayscale. 2. Set Level Detector Threshold to near black (such as 200). 3. Adjust Offsets to minimize area of black stripe. 4. Set Level Detector Threshold to near white (such as 800). 5. Adjust Gains to minimize area of white stripe. Level Detector Threshold Input Level Value defines the value to be used by the Input Level Detector in recognizing blacks and whites. See Input Level Detector, above. Aspect Ratio Overlay Check this box to display an overlay pattern over the image. The overlay shows the boxes corresponding to the size and shape of different aspect ratios. Test Pattern Color Swap This function swaps the green and red color when drawing the Grid test pattern, and may be helpful when adjusting convergence on the projector. Advanced Diagnostics Allows for the setting of advanced controls which may cause image disruption, including the possible loss of the OSD menus. These disruptions are only temporary; pressing EXIT to exit the menu will restore the settings and allow normal operation. • OUTPUT PEAK DETECTOR This is an aid for setting up the input levels. It causes the data to be processed so that very bright and very dark signals display as fully on or off, and everything in-between is set to mid level gray. The input levels should be adjusted so that bright and dark objects in the image are just visible. • OUTPUT LEVEL DETECTOR This is an aid for setting up the input levels. It causes the data to be processed so that all levels below a specified value are set to black and all above (and including) it are set to white. • INPUT LEVEL VALUE Specifies the value to be used by the level detector. • LIGHT MODULE TEST PATTERN One of three light module test patterns may be displayed: black, white or grey scale. 3.5 Using Multiple Projectors IMPORTANT! When working with more than two projectors, work left to right, top to bottom. 3-16 Entero RPMWU/RPMSP-LED01 Setup Guide 020-100445-01 Rev. 1 (12-2009) Section 3: Operation When an installation requires multiple projectors, use the RS232 serial ports to daisy chain the units together and control the group with a single keypad or a computer/controller connected to the first projector. In such a network, you can choose to broadcast commands to the entire group, or use the Proj key as desired to limit responses to an individual projector. Alternatively, you may want to add projectors to a hub on an Ethernet network. Matching Colors in Multiple Screens In a multiple-projector wall, you will likely want to precisely match color and intensity from image-to-image so that the full wall is as uniform as possible. The following table lists the recommended steps for setting up and matching projectors in an array. Table 3.2 Recommended order for image setup Flat, straight-forward alignment (Use the options available in Menu>Configuration>Geometry and Color) Complex geometry (Use Twist software for geometry correction and blending, see the Twist User Manual) Geometry Correction, Twist Software - Warping Edge Blending Twist Software - Blending Black Blending NOTE: Do not use black blending if Twist software is used for geometry correction. Brightness Uniformity Twist Software - Brightness Uniformity Color Adjustment Color Adjustment Preliminary Calibration All primary colors in the projector are precisely set to pre-established values to ensure that overall color performance is optimized and is as accurate as possible. Lighting and other environmental factors may slightly change how these colors appear on your screen. While the change is negligible in most cases, you may prefer to recover the originally intended color performance before trying to match colors from several projectors. To achieve consistency use a color meter to measure the native primary colors—red, green, blue, and white—as they appear at the screen. Record these as Color Primary Settings in the Service menu (password-protected) for each projector. On the basis of these new values, which are stored in memory, each projector will then automatically calculate any necessary corrections to reproduce the original factory colors under the current environmental conditions. This essentially calibrates a projector to its surroundings, compensating for factors such as screen type; and/or ambient lighting and will improve color accuracy and consistency in a group of projectors. It ensures a good starting point for further customizing and matching; however, is not critical for all installations. To access the Service menu (password-protected) return to the factory-set color primaries. Select the “Reset to Factory Defaults?” option in the Color Primaries submenu. Then repeat the calibration process described above and continue with matching of colors. Color Adjustment Procedure Once the Color Primary Settings are calibrated for the site (see above), use the Color Adjustments by X,Y or Color Saturation menu to further refine each projector’s fundamental colors so that the hue and intensity of each color appears the same from one display to another. Once matched, you will have created a single new shared range of colors or “color gamut” that all of your projectors can produce. This palette—named User 1, 2, 3 or 4—can be applied or disabled for a source at any time throughout a bank of adjacent displays, simplifying both the setup and maintenance of a “seamless” wall. 1. Set up and optimize all projector settings. You can ignore color temperature, since you will be redefining color performance in this procedure, but do optimize each projector in every other aspect. Closely align all screen edges (see Table 3.2). 2. Assign projector numbers to make communications easier. Entero RPMWU/RPMSP-LED01 Setup Guide 020-100445-01 Rev. 1 (12-2009) 3-17 Section 3: Operation 3. Use the same light engine mode for all projectors and do the following: a. Display a full white test pattern. b. Set Light Mode to “Native”. c. If required, adjust RGB brightness until adjacent white fields appear the same brightness. 4. Display the Color Adjustments by X,Y menus for all projectors. Each menu shows the x/y coordinates defining the “Max Drives” color gamut for this projector. NOTES: 1. Use the “Copy From” function to copy them into a “User” gamut in one projector. 5. Manually record the X,Y values from the least saturated projector. Figure 3-11 Record a Set of “Max Drives” X/Y Values 6. For each projector, select a “User” color adjustment (1-4) to enable Color Adjustments by X,Y changes and enter your recorded X,Y values. Figure 3-12 Copy X/Y Values into all Projectors 7. Use the Color Saturation menu to fine tune the colors for adjacent projectors, see Using the Color Saturation Menu for Color Matching, on page 3-19. 3-18 Entero RPMWU/RPMSP-LED01 Setup Guide 020-100445-01 Rev. 1 (12-2009) Section 3: Operation These coordinate adjustments move the three color points closer together (see below) to establish a “shared” gamut attainable by all projectors in your group. Adjust only as necessary to ensure that the resulting color palette is as large as possible. When done, you may need to adjust RGB brightness slightly. NOTE: You can fine tune color matches using either the Color Saturation menu ( Using the Color Saturation Menu for Color Matching, on page 3-19) or the Color Adjustment X,Y menu ( Using the Color Saturation Menu for Color Matching, on page 3-19). All screens should now be color-matched. Apply this new “User” gamut to a source at any time by selecting it in the “Select Color Adjustment” list accessed in the Advanced Image Settings menu. Using the Color Saturation Menu for Color Matching In the three Color Adjustment submenus (Red, Green, Blue, and White—see right), set all main values to 1000 and the secondary values to 0, if applicable. Then judge by eye and adjust the slide bars as needed. NOTE: Adjustments here define new x/y coordinates in the Color Adjustments by X,Y menu. For best results, use this menu after doing the color adjustment procedure. Figure 3-13 - Color Matching Using Color Saturation Menu Entero RPMWU/RPMSP-LED01 Setup Guide 020-100445-01 Rev. 1 (12-2009) 3-19 4 Troubleshooting If the projector is not operating properly, record the symptoms and use this section as a guide. If a solution to the problem cannot be found, contact your dealer for assistance. NOTE: A Christie accredited service technician is required when opening an enclosure to diagnose any “probable cause”. 4.1 Troubleshooting Guidelines Read, understand and observe all warnings and precautions when diagnosing and servicing the projector. • • • • Ensure the projector is plugged in. Ensure cables are connected and not damaged. Check for a normal power up sequence. Check the LEDs on the input panel of the projector for any error codes. Correct these if possible. See 4.2 System Warnings / Errors • Check source reliability. Switch sources if possible. • Use ‘RS-232’ serial communications to communicate with the projector during diagnosis. 4.2 System Warnings / Errors When the projector finds a system malfunction, a System Warning or a System Error message will appear. These messages shown in the status display window with a numerical error code. A system malfunction can be cleared with from presentation level, but may show the necessity of a CHRISTIE accredited service technician. For better results reset the projector—power the projector down and up with the (power) key. Wait a minimum of 90 seconds and allow for proper cooling. NOTE: Display Error Messages must be set to “Screen” or “All” for System messages to appear on-screen. SYSTEM WARNINGS Shows that a system malfunction exists. A system warning message replaces the input signal message and disappears when the input signal status changes. The projector will remain operational but the message does show a possibly serious problem that must be reported to the manufacturer. Reset the projector. SYSTEM ERRORS Shows that a serious malfunction exists and must be reported to the manufacturer as soon as possible. The projector will no longer operate. Reset the projector. Entero RPMWU/RPMSP-LED01 Setup Guide 020-100445-01 Rev. 1 (12-2009) 4-1 Section 6: Troubleshooting 4.2.1 The Status Display If the status display window shows one of the codes in the Error Codes table you will require a CHRISTIE accredited service technician to repair the system error. Error codes are displayed in a three phase format which are cycled through: • First two digits represent the category of error • Second two digits represent the specific item • Display off This cycle repeats while the error exists. The LED will be red while the error exists Acknowledge and clear the error by pressing from presentation level, or reset the projector by powering it off and on again, cooling when necessary. Contact your dealer if the problem continues or if you there is a code not listed in Table 4.1. For detailed information, monitor the RS232 IN port. For an indication of engine communication failure, send (SST? 1 15) to get report. Table 4.1 Error Codes LE LE LE LI LI LI FP FP FP FP FE FE SP SP SP SP SP SP SP SP SP SP SP SP SP SP SE 4-2 CODE DESCRIPTION Light Engine (LE) 01 Light engine link error 02 Light engine initialization error 03 Light engine run time error Link (LI) 01 Error on EM network 02 Error on PHM network 03 Error on ArrayLOC link Projector Head Module Fan (FP) 01 PHM FD Fan 1 stalled 02 PHM FD Fan 2 stalled 03 PHM LMC Fan 1 stalled 04 PHM LMC Fan 1 stalled Electronic Module Fan (FE) 01 EM Fan 1 stalled 02 EM Fan 2 stalled Projector Head Module Sensors (SP) 01 PHM FD sensor 1 overtemp (not connected) 02 PHM FD Air inlet overtemp or sensor not functioning 03 PHM QDPC board overtemp or sensor not functioning 04 PHM FD DMD overtemp or sensor not functioning 05 PHM QDPC board overtemp or sensor not functioning 06 LM Air inlet overtemp or sensor not functioning 07 LM C Air exhaust overtemp or sensor not functioning 08 LM Power supply overtemp or sensor not functioning 09 LM LED Driver overtemp or sensor not functioning 10 LM ambient overtemp or sensor not functioning 11 LM Red thermistor overtemp or sensor not functioning 12 LM Green thermistor overtemp or sensor not functioning 13 LM Blue thermistor overtemp or sensor not functioning 14 LM IR THERMISTOR OVERTEMP or sensor not functioning Electronics Module Sensors (SE) 01 PHM FD sensor 1 overtemp or sensor not functioning Entero RPMWU/RPMSP-LED01 Setup Guide 020-100445-01 Rev. 1 (12-2009) Section 6: Troubleshooting 4.2.2 LED Error Status Adjacent to the 2-digit status display is a single LED that will illuminate one of three colors to show the current status of the system. A solid red LED shows a system error and the corresponding error code will display in the status display. Refer to the table below for a description of LED variations. Press to acknowledge and clear the error. Table 4.2 Error LED Status LED STATUS 2-CHARACTER DISPLAY Rotating With rotating status display • Initializing Hardware • Waiting to establish connection with PHM • Standby (connected to PHM) • BO (Booting) when power first applied • B1 (Boot phase 1) starting main script • B2 (Boot phase 2) starting projector code • B3 (Boot phase 3) about to initialize connections • SH (Shutter Mode) active EM • When powering on (booting) the projector the LED will go through phases that require that are shown on the status display. • Powered ON, • Normal operations • EM on Solid yellow Solid green DESCRIPTION System error – see corresponding error code on status display Solid Red PR (Programming TI) yellow Keypad command sent - Command received Flashing green • Key press error • Wrong protocol sent Flashing red 4.3 Power 4.3.1 Projector Does Not Power ON 1. Ensure the projector is plugged in. 2. Ensure cables are connected and not damaged. Entero RPMWU/RPMSP-LED01 Setup Guide 020-100445-01 Rev. 1 (12-2009) 4-3 4.4 Light Module 4.4.1 Light Module Suddenly Goes OFF 1. Check shutter setting - if status display shows SH then the shutter may be active. Toggle through shutter modes. In gray shutter mode it should be possible to display menus. 2. Verify RGB Brightness is set sufficiently higher than zero to ensure a visible image.The DMDs may be overheated. Check for an alarm condition. 4.5 Displays 4.5.1 The Projector is ON, but There is No Display 1. Make sure the lens cover is removed from the lens. 2. Make sure the correct display button is selected in the channel setups. 3. Make sure AC power is connected. 4. Is an active source connected properly? Check the cable connections and make sure the alternative source is selected. 5. Make sure that the DVI cable from the PHM to the EM is connected. 6. Are the test patterns accessible? If so, check source connections again. 4.5.2 The Display is Jittery or Unstable 1. If the non-cinema display is jittery or blinking erratically, make sure the source is properly connected and of adequate quality for detection. With a poor quality or improperly connected source, the projector repeatedly tries to display an image, however briefly. 2. The horizontal or vertical scan frequency of the input signal may be out of range for the projector. 3. The sync signal may be inadequate. Correct the source problem. 4.5.3 The Display is Faint 1. The source may be double terminated. Make Sure the source is terminated only once. 2. The source (if non-video) may need sync tip clamping. 3. Check RGB Brightness setting and Brightness Uniformity control. 4. If the Twist software was used, test by disabling the blend. 4.5.4 The Upper Portion of the Display is Waving, Tearing or Jittering 1. This can occur with video or VCR sources. Check your source. 2. Check that the RGB Brightness setting is not unexpectedly low. 4.5.5 Portions of the Display are Cut OFF or Warped to the Opposite edge Resizing may need adjustment. Adjust until entire image is visible and centered. Section 6: Troubleshooting 4.5.6 Display Appears Compressed (Vertically Stretched) 1. The frequency of the pixel sampling clock is incorrect for the current source. 2. Sizing and positioning options may be adjusted poorly for the incoming source signal. 3. Check the geometry correction for warp or keystone correction. 4.5.7 Data is Cropped from Edges 1. To display the missing material, reduce image size to fill the display area available in the projector, then stretch vertically to fill the screen from top to bottom. Add the anamorphic lens to regain image width. 2. Check blend settings and masking. 4.5.8 Display Quality Appears to Drift from Good to Bad, Bad to Good 1. The source input signal may be of low quality. 2. The H or V frequency of the input may have changed at the source end. 4.5.9 Display has Suddenly Froze If the screen blacks out inexplicably, it is possible excessive voltage noise on the AC or ground input has interrupted the projector's ability to lock on to a signal. Power the projector down and up again. 4.5.10 Colors in the Display are Inaccurate The color, tint, color space and/or color temperature settings may require adjustment at your input source, or on the web user interface Channel>Page2 menu. Make Sure the correct PCF, TCGD and/or Color Space file for the source is used. 4.5.11 Display is Not Rectangular 1. Check leveling of the projector. Make sure the lens surface and screen are parallel to one another. 2. Is the vertical offset correct? Make the necessary adjustments to the vertical offset on the lens mount. 3. Check geometry corrections settings, for example keystone adjustment. 4.5.12 Display is “Noisy” 1. Display adjustment at the input source may be required. Adjust pixel tracking, phase and filter. Noise is very common on YPbPr signals from a DVD player. 2. Make Sure the video input is terminated (75 ohms). If it is the last connection in a loop-through chain, the video input must be terminated at the last source input only. 3. The input signal and/or signal cables carrying the input signal may be of poor quality. 4. If the distance between the input source device and the projector is greater than 25 feet, signal amplification/conditioning may be required. 5. If the source is a VCR or off-air broadcast, detail may be set too high. Entero RPMWU/RPMSP-LED01 Setup Guide 020-100445-01 Rev. 1 (12-2009) 4-5 5 Specifications 5.1 Regulatory 5.1.1 Safety Be aware of the caution label on the projector warning of possible eye hazard if the projected visible and invisible LED radiation light is viewed directly through certain optical instruments at close range. Figure 1-1 LED Caution Label Location, on page 1-1 indicates where the label is located. The projector is a class 2M source of visible and invisible LED radiation. Directly viewing the LED output with certain optical instruments (for example, eye loupes, magnifiers and microscopes) within a distance of 100 mm may pose an eye hazard. • CSA C22.2 No. 60950-1-03 First Edition • UL 60950-1 1st Edition • IEC 60950-1:2001 European Norm, Safety of Information Technology Equipment 5.1.2 Environmental Regulations • EU Directive (2002/95/EC) on the restriction of the uses of certain hazardous substances (RoHS) in electrical and electronic equipment and the applicable official amendment(s). • EU Directive (2002/96/EC) on waste and electrical and electronic equipment (WEEE) and the applicable official amendment(s). • Japanese industrial standard (JIS C 0950:2005) on marking for the presence of specific chemical substances for electrical and electronic equipment. • China Ministry of Information Industry Order No.39 (02/2006) on the control of pollution caused by electronic information products, hazardous substances concentration limits (SJ/T11363-2006), and the applicable product marking requirement (SJ/T11364-2006). 5.1.3 Emissions • • • • FCC Code of Federal Regulations, Title 47, Part 15, Conducted and Radiated Emissions, Class A EN55022 (CISPR 22) for Information Technology Equipment, Conducted and Radiated, Class A EN61000-3-2 Induced Harmonic Distortion EN61000-3-3 Induced Voltage Fluctuations (Flicker) Entero RPMWU/RPMSP-LED01 Setup Guide 020-100445-01 Rev. 1 (12-2009) 5-1 Section 7 Specifications 5.1.4 Electromagnetic Compatibility • • • • FCC CFR47, Part 15, Subpart B, Class A – Unintentional Radiators CISPR 22: 2005 (Modified) / EN55022:2006, Class A – Information Technology Equipment CISPR 24: 1997 (Modified) +A1:2001+A2:2002 / EN55024: 1998 +A1:2001 +A2:2003 EMC Requirements - Information Technology Equipment 5.1.5 Immunity • EN55024, specific to Information Technology Equipment (all parts), under which are: • EN61000-4-2 ESD, • EN61000-4-3 Radiated Immunity, • EN61000-4-4 Fast Transient/Burst Immunity • EN61000-4-5 Surge Immunity, • EN61000-4-6 Immunity to Conducted Disturbances, • EN61000-4-8 Magnetic Field Immunity, • EN61000-4-11 Voltage Dips, Short Interruptions and Voltage Variations Immunity 5.2 Display RESOLUTION SP: SXGA + RESOLUTION 1400 X 1050 WU: WUXGA + RESOLUTION 1920 X 1200 BRIGHTNESS SP 600 LUMENS @ 90% EBU ± 10% WU 600 LUMENS @ 80% EBU ± 10% CONTRAST RATIO FULL-ON/FULL-OFF 1400:1 ± 10% NATIVE (ANSI) 450:1 ± 10% BRIGHTNESS UNIFORMITY 0 LENS OFFSET CENTER-TO-CORNER 87% MIN WITH SOFTWARE ADJUSTMENT 100% COLORS AND GRAY SCALE RESOLUTION 8 BITS DISPLAYABLE COLORS 16.8 MILLION COLOR WHEEL NONE 5-2 NONE Entero RPMWU/RPMSP-LED01 Setup Guide 020-100445-01 Rev. 1 (12-2009) Section 7 Specifications COLOR TEMPERATURE 5.3 NATIVE WHITE COLOR (K) 6500 ± 500 IMAGE WHITE COLOR (K) 3200 TO 9300 RANGE OF ADJUSTMENT 3200K – 9600K COLOR TEMP. VARIATION (K) 250 max. Lenses FIXED 0.69:1 SXGA + LENS (0.637:1 EFFECTIVE WUXGA) THROW RATIO 5.4 SP 0.69 ± 2% WU 0.637 NOMINAL PROJECTION RANGE (DIAGONAL) 1016MM X 2540MM (40” X 100”) LATERAL COLOR ERROR 0.5 PIXELS MAX. GEOMETRY DISTORTION 0.1% MAX. Power Requirements ENTERO GENERAL VOLTAGE RANGE 90 – 240VAC NOMINAL LINE FREQUENCY 50 – 60HZ NOMINAL MAXIMUM INRUSH CURRENT 30 A MAX. POWER CONSUMPTION 400W NOMINAL Typical Current Consumption 4A @ 100V (normal brightness, one input) Maximum Current Consumption 5.9A @ 100V (maximum brightness, multiple inputs, and external accessories) 5.5 Illumination Module TYPE 3XPT120 LED MODULES OPERATING POSITION ANY LIGHT ENGINE LIFE 50,000 HOURS Entero RPMWU/RPMSP-LED01 Setup Guide 020-100445-01 Rev. 1 (12-2009) 5-3 Section 7 Specifications 5.6 Physical Specifications Maximum Product Dimensions (L x W x H) PROJECTOR HEAD MODULE ASSEMBLY (WITH LM)* 219MM X 467MM X 286MM (8.6” X 18.4” X 11.3”) ELECTRONIC MODULE 426MM X 426MM X 169MM (16.8” X 16.8” X 6.7”) * The Projector Head Module assembly is sized to fit within the following cubes; Bamboo 50”, Bamboo 67”, CX50-100U, CX60-100U, CX67-100U, CX50-100U and the C50. The Projector Head Module is compatible with both the motorized and manual 6-axis adjuster. Product Weight PROJECTOR HEAD MODULE ASSEMBLY AND LIGHT MODULE 15.9 KG (35 LB) ELECTRONIC MODULE 4.4 KG (9.7 LB) 5.6.1 Projector Dimensions and Mounting Information Figure 5-1 Entero Top View Dimensions 5-4 Entero RPMWU/RPMSP-LED01 Setup Guide 020-100445-01 Rev. 1 (12-2009) Section 7 Specifications Figure 5-2 Entero Back View Dimensions Figure 5-3 Entero Bottom View Dimensions Entero RPMWU/RPMSP-LED01 Setup Guide 020-100445-01 Rev. 1 (12-2009) 5-5 Section 7 Specifications 5.7 Environment Operating Environment TEMPERATURE 0C TO +40C (40F TO 95F) HUMIDITY 15% - 90% ALTITUDE 0 - 3048 M (10000FT) VIBRATION 0.05GRMS 10-500HZ, 15 MINUTES ALL AXES Non-Operating Environment 5.8 TEMPERATURE -25C TO +70C (-13°F TO 158°F) WITH RELATIVE HUMIDITY VARYING BETWEEN 0% TO 95% HUMIDITY 0% - 95% (NON-CONDENSING) ALTITUDE 0 TO 9144 M (30,000FT) VIBRATION 0.74GRMS 10-500HZ, 15 MINUTES ALL AXES Standard and Optional Components Due to continuing research, specifications are subject to change without notice. Specifications apply to all models unless otherwise noted. 5.8.1 Standard Components • Line Cord (North American and European rated) • Digital input card • User Manual 5.8.2 Optional Accessories User Kit (P/N: 125-108100-xx) • User Manual (electronic and hard copy) • Installation Manual (electronic and hard copy) • All necessary tools for normal servicing Input Cards Other Input Cards • Digital (DVI) Input Card, VGA Input Card (P/N: 108-312101-xx) Service Manual • Service Manual (P/N:020-100368-xx) 5-6 Entero RPMWU/RPMSP-LED01 Setup Guide 020-100445-01 Rev. 1 (12-2009) Section 7 Specifications Motoblend Mounting Kit • Custom Motoblend Mounting Kit Lenses • Fixed 0.64:1 (HD/WUXGA) - P/N: 125-103105-xx • Zoom 1.2-1.6:1 (HD/WUXGA) - P/N: 125-101103-xx 5.9 Inputs ANALOG RGB OR YPRPB (INTERLACED OR PROGRESSIVE SCAN FORMAT) PIXEL CLOCK RATE 13 – 270 MHZ MAX COLOR SPACE RGB OR YPBPR INPUT LEVELS: R, G, B, - WITH SYNC: 1.0VP-P ±2DB R, G, B, - WITHOUT SYNC: 0.7VP-P ±2DB PB, PR 0.7P-P ±2DB DC OFFSET ±2V NOMINAL IMPEDANCE 75 OHMS NOTE: Pixel rates above 150MHz require DIPC SYNC (INTERLACED OR PROGRESSIVE SCAN FORMAT) HORIZONTAL FREQUENCY RANGE 15 – 150HZ VERTICAL FREQUENCY RANGE 1,3 23 – 150HZ SYNC TYPE SEPARATE H AND V COMPOSITE (BI-LEVEL, TRI-LEVEL, XOR) SYNC-ON-GREEN/LUMA (BI-LEVEL, TRI-LEVEL) SERRATIONS AND/OR EQUALIZATION PULSES MARCOVISION COMPATIBLE POLARITY 2 POSITIVE OR NEGATIVE INPUT LEVELS 2 0.5VPP – 4.0VPP DC OPERATING RANGE 2 ±3V NOMINAL IMPEDANCE 2 75 OHMS HORIZONTAL SYNC DUTY CYCLE 3% MIN, 20% MAX Entero RPMWU/RPMSP-LED01 Setup Guide 020-100445-01 Rev. 1 (12-2009) 5-7 Section 7 Specifications NOTES: 1) Value specifies frame rate of non-interlaced sources and field rate for interlaced sources. Frame/field rates higher than the maximum refresh rate of the panels will be displayed at a lower rate.2) Does not apply to sync-on-green/luma.3) As the horizontal frequency increases and/or as the vertical scaling ratio of input lines to output lines increases many sources will run into the internal 180Mpix/s processing which limits the number of pixels that can be processed. DVI-I – ANALOG INPUT CHARACTERISTICS SAME AS ANALOG RGB, EXCEPT AS NOTED BELOW. FORMATS RGB OR YPBPR – VIDEO SIGNAL CANNOT BE ROUTED TO THE DECODER SYNC TYPES SEPARATE H AND V (DIRECT OR SWAPPED) BI-LEVEL – TTL LEVELS ONLY COMPOSITE (XOR, OR) SYNC-ON-GREEN SERRATIONS AND/OR EQUALIZATION PULSES MACROVISION (STANDARD & PROGRESSIVE) ANALOG SYNC LOGIC LOW 0V – 0.8V ANALOG SYNC LOGIC HIGH 2.4V – 5V ANALOG SYNC INPUT IMPEDANCE 1KW DVI-I – DIGITAL INPUT CHARACTERISTICS MEETS DVI SPEC DVI CABLE LENGTH 5M SINGLE LINK DVI PIXEL RATE 25-165 MPIX/SEC NOTE: Pixel rates above 150 MHz require DIPC DUAL LINK DVI PIXEL RATE 165- 330 MPIX/SEC NOTE: Pixel rates above 150 MHz require DIPC EDID SUPPORTED HDCP (HIGH SPEED DIGITAL CONTENT PRO- SUPPORTED TECTION) RS-232/RS-422 SERIAL INPUT CONNECTOR TYPE 2 MALE DB9 (RS-232 OUT, GPIO) 2 FEMALE DB9 (RS-232 IN, RS-422 IN) NETWORK CONTROL ETHERNET MEETS DVI SPEC MAXIMUM BAUD RATE 1 RJ45 CONNECTOR REMOTE CONTROL TYPE 5-8 LOW FREQUENCY IR WITH WIRED ABILITY Entero RPMWU/RPMSP-LED01 Setup Guide 020-100445-01 Rev. 1 (12-2009) Section 7 Specifications RANGE 30 METERS LASER POINTER INCLUDED BATTERY TYPE (2 REQUIRED) AA, 1.5V ALKALINE WIRED CONTROL CONNECTOR TYPE XLR INPUT LEVELS HIGH: 2.2V MIN. LOW: 0.9V MAX. POWER: 500MA @ 5V Entero RPMWU/RPMSP-LED01 Setup Guide 020-100445-01 Rev. 1 (12-2009) 5-9 Corporate offices Worldwide offices USA – Cypress ph: 714-236-8610 United Kingdom ph: +44 118 977 8000 Hungary/Eastern Europe ph: +36 (0) 1 47 48 100 Beijing ph: +86 10 6561 0240 Canada – Kitchener ph: 519-744-8005 Germany ph: +49 2161 664540 Singapore ph: +65 6877 8737 Korea ph: +82 2 702 1601 France ph: +33 (0) 1 41 21 44 04 Shanghai ph: +86 21 6278 7708 Japan ph: +81 3 3599 7481 For the most current technical documentation, please visit www.christiedigital.com