1
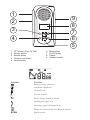
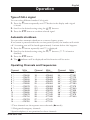
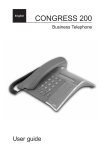
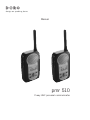
design on speaking terms
Manual
pmr 510
2-way UHF personal communicator
1
2
9
8
7
6
5
3
4
1
2
3
4
5
PTT button (Push To Talk)
Monitor button
Search button
Channel lock button
Scroll buttons
Indicator
6
7
8
9
Menu button
On/Off button
Display
Headset socket
Function
Battery charge indicator.
Automatic shutdown.
Channel lock.
Volume control.
PS
Power saving/Stand-by mode.
Sending messages/talk.
Incoming signals/Channel busy.
Shows the selected channel/Repeater mode.
SCAN
Signal search.
English
Setting Up
Unpacking
The package should include the following items:
- 2 handsets with belt clips
- 8 alkaline batteries
- This manual
- Guarantee Card
Please Note!
An optional Accessory Pack is available (pmr a-pack) that contains:
- 2 Ni-MH rechargeable battery packs,
- A twin handset charger and mains adapter,
- 2 headsets,
- 2 carry cases.
Approved usage
This product can be freely used in Australia and New Zealand without a license.
The handsets are made from durable plastic for indoor and outdoor use,
however, they are not resistant to rain, fluid ingress, abuse or any careless
treatment.
Batteries
Each unit requires four AAA 1.5V alkaline batteries to function (included). The
battery symbol in the display indicates when it is time to change the batteries.
The battery symbol has two segments, which disappear as the battery charge
decreases. When the batteries are almost fully discharged the battery symbol
flashes and a warning tone is emitted, the batteries should be changed as soon
as possible. Good quality alkaline batteries will allow approximately 4 hours talk
time or 100 hours of stand-by time.
1. Remove the belt clip if fitted (see below).
2. Remove the battery cover by pressing on the indentation markings, and
pushing out (away from aerial).
3. Insert the batteries ensuring correct polarity is observed.
4. Replace the battery cover.
www.doro.com
3
English
Setting Up
Belt clips
A belt clip is included, which can be fitted on the back of the handset once the
batteries have been installed. The belt clip allows the handset to be attached to
a belt, waistband or similar.
To remove, lift the small tab at the top of the clip and simultaneously push
upwards.
Range
The communication range is dependent on many factors, with the maximum
range being achieved when there are no obstacles in the transmission path (line
of sight). Under optimum conditions the maximum range can be up to 5km.
There will be a reduction in the range when the units are used in built up areas,
undulating terrains and vehicles.
Headset
The handset can be used with the headset supplied in the optional Accessory
Pack (pmr a-pack) which can be purchased from your local DORO retailer.
When the headset is connected, the microphone and speaker on the handset are
automatically disconnected, all other functions remain unchanged.
Please note!
Use only DORO original headsets with these PMR units.
Adjust the Call signal and headset volume immediately upon connecting a headset, as these
settings may initially be too loud.
Turning the handset On/Off
To turn the handset On or Off press and hold the ! button (1-2 seconds) until
a tune is heard.
4
www.doro.com
English
Operation
Channel Selection
This product can operate on the available 40 channels for UHF CB use in
Australia and New Zealand, refer to the channel/frequency allocation table on
page 7.
If the selected channel is being used by other persons an alternate channel can
be selected, the channel number will be displayed in the stand-by mode.
1. Press the w button until CHAN flashes in the display.
2. Scroll to the desired channel using the v /V buttons.
3. Press the PTT (Push to Talk) button to save the settings.
Please note!
Speech telephony is not permitted on channels 22 and 23 and if selected an error tone will be
heard when the PTT button is pressed. No communication will occur on these channels.
Repeater Operation
In addition to the standard operating channels 1 to 40 there are an additional 8
settings that can be selected. When selected, by following the procedure above,
the display will show the channel number, 1 to 8 plus du indicating the handset
is in the repeater mode.
This mode allows the handset to operate via a local repeater thereby increasing
the communication range. It does this by linking channels 1 - 8 to channels
31 - 38 respectively.
When the handset is set to channel 1du it will transmit on channel 31 and
receive on channel 1.
For more information on the CB repeater network contact the local ACA office
in your capitol city, or the local MED office in New Zealand.
Channel lock
The controls can be locked can be locked to prevent accidental operation of the
buttons. Only the PTT and v /V buttons function with the handset locked.
1. Press and hold the N button until the display shows the lock symbol and
a beep tone is heard.
2. Unlock by pressing and holding the N button, a beep will be heard and the
lock symbol will disappear from the display.
www.doro.com
5
English
Operation
Communication between the handsets
1. Ensure that you use the same channel, e.g. 1.
2. Hold the handset approximately 10 cm in front of you at face height.
3. Press and hold the PTT button, wait a second and then speak clearly towards
the handset. Release the button when you have finished speaking.
4. The handset is now ready to receive.
5. If nobody answers, try sending a CALL signal by pressing and holding the
PTT and v buttons simultaneously.
6. The handset will automatically revert to stand-by mode (PS flashes in
display) when you release the PTT button.
Please note!
If the handsets are unable to communicate this may be due to different channels being selected,
low batteries or if handsets are out of range.
Volume control
The receive volume can be adjusted by using the v /V buttons. The display will
show the selected setting VOL.
Monitor function
The handset will usually receive all calls on the selected channel.
If the signal is weak (ie the handsets at maximum range), the monitor may be
used to listen for any transmission within range on the selected channel.
1. Press and hold the MON button until you hear a beep.
2. To disable the monitor function press and hold the MON button again.
Signal search
You can scan all channels to locate a PMR unit that has a signal.
If a signal is located, the display will show the channel number and the signal
will be heard. Press the PTT button to remain on the located channel.
1. Press and hold the button until the unit starts searching.
2. Press and hold the button again to stop searching.
When searching battery power consumption will be four times higher than in stand-by mode
6
www.doro.com
English
Operation
Type of CALL signal
You can select different handset Call signals.
1. Press the w button repeatedly until CA flashes in the display and a signal
is heard.
2. Scroll to the desired setting using the v /V buttons.
3. Press the PTT button to confirm selected signal.
Automatic shutdown
You can select automatic shutdown to conserve battery power.
If no button is pressed within the set time period (hours) the handset will switch
off. A warning tone will be heard approximately 1 minute before this happens.
1. Press the w button repeatedly until Hr is displayed.
2. Scroll to the desired setting using the v /V buttons. ( 0 Hr=function
disabled).
3. Press the PTT button.
4. The
indicator will be displayed and the function will be active.
Operating Channels and Frequencies
Channel
MHz
1 *................ 476.425
2 *................ 476.450
3 *................ 476.475
4 *................ 476.500
5 ** .............. 476.525
6 *................ 476.550
7 *................ 476.575
8 *................ 476.600
9 .................. 476.625
10 ................ 476.650
11 ................ 476.675
12 ................ 476.700
13 ................ 476.725
14 ................ 476.750
Channel
MHz
15.................476.775
16.................476.800
17.................476.825
18.................476.850
19.................476.875
20.................476.900
21.................476.925
22 ! ..............476.950
23 !...............476.975
24.................477.000
25.................477.025
26.................477.050
27.................477.075
28.................477.100
Channel
MHz
29 .................477.125
30 .................477.150
31 *...............477.175
32 *...............477.200
33 *...............477.225
34 * ..............477.250
35 ** .............477.275
36 * ..............477.300
37 *...............477.325
38 *...............477.350
39 .................477.375
40 .................477.400
* These channels are the repeater access channels (du mode).
** Designated emergency channels.
! Speech telephony is not permitted on these channels.
www.doro.com
7
English
Other
Troubleshooting
The handset will not turn on
- Check the batteries are installed correctly.
- Ensure the batteries are in good condition and/or are fully charged.
Cannot change channel or volume setting
- Ensure the Channel Lock function is not active.
Reduced operating range
- Batteries may be failing, replace or recharge batteries if the indicator shows
low.
- Operating in built up areas or undulating terrain? Line of sight/flat open
environment provides for maximum range.
No or Weak reception
- Are both handsets set to the same channel?
- Reduce the distance between the handsets.
- Increase the receive volume.
- Activate the monitor function.
Sound is distorted
- Speak clearly towards the handset from a distance of 10cm.
- Adjust the receive volume to a comfortable level.
- Check the battery charge level.
8
www.doro.com
English
Other
Australia and New Zealand
If you believe this product is malfunctioning, please refer to the relevant section
and/or consult the troubleshooting guide in this manual to ensure that you have
followed the instructions carefully. As an alternative you can visit our web site
for FAQ’s or send an e-mail for a prompt reply.
Guarantee
This product is guaranteed for a period of 12 months from the date of purchase.
Should you experience difficulties with the product, please contact us for
assistance. If the product is then found to be faulty you will be asked to return it
directly to us with a copy of the purchase receipt.
This guarantee shall not apply to a fault caused by an accident or a similar
incident or damage, liquid ingress, negligence, abnormal usage or any other
circumstances on the purchaser’s part. This guarantee does not affect your
statutory rights.
AUSTRALIA
DORO Australia Pty Ltd
PO Box 6760
Baulkham Hills BC NSW 2153
Australia
NEW ZEALAND
Atlas Gentech (NZ) Limited
Private Bag 14927
Panmure
Auckland
New Zealand
Consumer Support
Ph:
(02) 8853 8444
Fax: (02) 8853-8489
Email: [email protected]
Web site: www.doro.com.au
Consumer Support
Ph: 0900-500-25 (Toll Call)
Fax: (09) 574-2722
Email: [email protected]
www.doro.com
9
Australia
Version 1.1