1
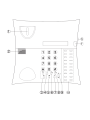
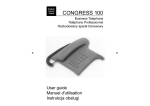
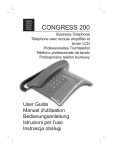
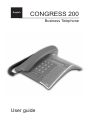
English
CONGRESS 200
Business Telephone
User guide
1
Hook switch
8
Group listening button and LED
2
Speaker
9
Speaker/Headset button and LED
3
Handset/Headset Volume Control
10 One-Touch Memories
4
Recall Button
11 Ringer/Message Waiting Indicator
5
Redial/Pause Button
6
Store/Mute button and LED
12 Speaker Volume Control (on the
underside)
7
Hold button and LED
English
Installation
Batteries
In order for the Caller ID, memory and other functions to operate, the
telephone requires three good quality AAA 1,5 V alkaline batteries to be
installed. If batteries are either not installed or running low, the Mo bAtt
symbol will be visible in the display, you will need to change the batteries as
soon as possible.
The battery compartment is located on the underside of the telephone.
1. Ensure the telephone line cord is not connected to the telephone network
wall socket.
2. Remove the battery cover by pressing a small screwdriver (up to Ø 2,5mm)
or similar into the hole to the right of the cover.
3. Install the batteries ensuring correct battery polarity is observed.
4. Refit the battery cover.
Connection
Once the batteries have been installed:
1. Connect the curly cord to the handset and to the socket marked q on the
underside of the telephone.
2. Connect the telephone line cord to the socket marked T on the underside
of the telephone and then to a telephone network wall socket.
3. A click will be heard when the modular plug is correctly in place.
4. Position the cables in the grooves underneath the telephone.
5. Lift the handset and listen for the dial tone. Your telephone is now
operational.
Setting the Time
1.
2.
3.
4.
Lift the handset (ignore the dialling tone) and press z and *.
Press # (to select 12/24 hour display please refer to page 11).
Enter time (Hours-Minutes-Seconds) using the telephone keypad (0-9).
Replace the handset. The time (clock) will be displayed after 5-10 seconds.
Hearing Aid Compatible
This telephone is hearing aid compatible. Select the T mode on your hearing
aid to enable this feature.
4
www.doro.com
Installation
English
Connection of a headset
A headset can be connected to the socket underneath the telephone marked = .
Simply press the headset button = to access an incoming call or dial tone, press
again to terminate the call.
While a headset is connected the speaker function will NOT operate.
IMPORTANT!
The DORO Congress 200 is designed to operate with DORO original headsets. Other
manufacturer headsets may be used, although the function and sound quality cannot be
guaranteed.
Any damage occurring due to incompatible or non Doro headsets being installed, will not be
covered under the telephones guarantee.
Making a call with the headset
1. Press = . Dial tone will be heard in the headset and the LED next to the
headset button will illuminate.
2. Dial the telephone number required.
3. Press the headset button again to terminate the call.
Connection of additional equipment
On the side of the telephone there is a socket marked 8, this will allow
additional telephone equipment i.e. cordless, modems etc to be connected
allowing access to the telephone line.
IMPORTANT!
When additional equipment is connected to the socket marked 8, only one device at a time
will operate.
Labels/protective cover
Information such as a company logo can be placed under the protective cover.
This is especially useful where the back of the telephone is facing a customer/
visitor on a reception desk.
The back cover is fastened by 2 pieces of plastic and secured by two screws,
these have to be removed first.
To memory index cover can be removed by carefully prising the right hand side
of the cover using a small flat blade screwdriver.
www.doro.com
5
English
Operation
Redial Button
If the number dialled is engaged or if you wish to redial the last number dialled
(up to a maximum of 32 digits), lift the handset (or press the
/= ) and press
the redial button r.
Timer
Approximately 5 seconds after dialling a timer will be shown on the display. The
timer helps you keep track of how long the call lasts.
Mute Button
The handset/headset microphone can be disabled during a call by pressing z .
Press z once more to reactivate the microphone.
On Hook Dialling
1. Press
. The speaker will be activated and the LED indicator will
illuminate.
2. Dial the required telephone number. Adjust the volume, if needed, using the
volume control on the underside of the telephone.
3. Once the call is answered, pick up the handset.
IMPORTANT!
This is not a hands free speaker telephone i.e. there is a microphone in the handset only. When a
headset is fitted the on hook dialling function will not operate.
Hold Button
Press h to place a call on hold. The LED next to the button will illuminate.
The call can be resumed by pressing h again or from another telephone
connected to the same line.
1. While on a call.
2. Press h to place the telephone call on hold. If the handset is in use it may
now be replaced onto the hook switch.
3. To resume the telephone call, lift any handset connected to the same line.
6
www.doro.com
Operation
English
Group Listening
During a call, it is possible to activate the Group Listening function by
pressing .
With this function activated a call can be heard on the loudspeaker as well as
from the handset, it is therefore possible for someone in the same room to hear
both parties and follow the conversation.
1. Dial a telephone number as usual.
2. When the call is connected, press . Group listening is now activated and
the conversation can be heard via the speaker. The indicator by the button
will be illuminated.
3. Adjust the volume, if needed, using the volume control on the side
.
4. To terminate the Group Listening function, press once again.
IMPORTANT!
It is recommended that the Group Listening function is terminated before replacing the handset.
Direct connection
The telephone allows you to dial a number using the telephone keypad (0-9),
the One-Touch memories or by pressing r, without picking up the handset or
pressing
/= .
The call is connected to the speaker or headset (if connected) and then the
number is dialled. Please refer to page 9 for information on selecting this feature
Volume Control
The handset/headset earpiece volume may be adjusted in 5 stepped increments
during a call. Press $ to increase the volume, or £ to decrease the volume.
To adjust the speaker volume (hands free dialling and group listening), use
on the side of the phone.
Recall
Press the recall button R followed by the extension number to transfer calls
when connected to a PBX.
Access to additional network services can be gained by using the recall
button keys. Please refer to page 9 for information on this feature or contact
your network operator for more information.
www.doro.com
7
English
Settings
Memory
This telephone has 20 One-Touch memories numbered M1-M20.
Once a number has been stored in a memory location, you need only to press
one button to make the call.
Storing One-touch Memories
1. Lift the handset and press z (ignore anything you hear in the earpiece).
2. Select a location M1-M20 by pressing the corresponding button.
3. Enter the telephone number to be stored (up to 22 digits) using the number
keys (0-9). Press r if you want a pause in the telephone number.
4. Press z again and replace the handset. The number is now stored.
In case of a number change, store the new number in the location of the old one following
the above procedure
Dialling using One-Touch Memories
1. Lift the handset (or press
/= ) and wait for a dialling tone.
2. Dial the desired number by pressing the corresponding memory location,
M1-M20.
Ringer
1. Lift the handset (ignore anything you hear in the earpiece) and press z
and # .
2. Select the desired melody and ringer volume by pressing the number keys
0 - 9 as shown below.
3. Press z and replace the handset. The ring signal is now set.
Key/setting
Melody type
Ringer level
1.......................................... Melody A........................ Low
2.......................................... Melody A........................ Normal
3.......................................... Melody A........................ High
4.......................................... Melody B........................ Low
5.......................................... Melody B........................ Normal
6 (factory setting)................ Melody B........................ High
7.......................................... Melody C ....................... Low
8.......................................... Melody C ....................... Normal
9.......................................... Melody C ....................... High
0.......................................... Off * ............................... -
* If 0 is selected, the ringer will be turned off until the next time the handset is lifted. The
ringer will then revert to the previous setting.
8
www.doro.com
Settings
English
Technical information
On the underside of the telephone you will find several switches located within
the battery compartment.
These switches determine certain technical parameters when connecting the
telephone to e. g. a PBX.
Remove the cover by pressing a small screwdriver (up to Ø 2,5mm) or similar
into the hole to the right of the cover.
IMPORTANT!
These switches should only be adjusted by qualified personnel.
1. System Settings
Allow system settings to be changed (ON) or not. See next page for more
information about the system settings.
2. Direct connection
Allow direct connection to be activated (ON) or not.
3. Recall (R) Button Technology (United Kingdom only)
Select Recall (R) type, either Time break recall ( H ) or Earth recall ( ) with
the switch H/ .
IMPORTANT!
If you are unsure of the PBX/network requirements initially select the time break H position.
4. Tone/Pulse Dialling
Select dialling type, either Tone (♫) or Pulse (...) using the ♫/... switch.
IMPORTANT!
If you are unsure of the PBX/network requirements initially select the time break H position.
Message waiting
You can select between three types of Message Waiting systems: Neon(80100V)/LED+ (12VLR)/LED- (48VLR).
Message Waiting Indicator
Many PBX systems use a function called Message Waiting. The telephone can
show if a call was received in you absence by flashing the Message Waiting
Indicator in standby mode. This function operates differently depending on the
PBX in question. Please contact the system controller for more information.
www.doro.com
9
English
Other
System Settings
You can select several parameters when connecting the telephone to a PBX.
Recall (R) Time Duration (TBR only)
This allows you to select TBR recall access timing. The time selected will
depend on the PBX, network and country of installation. For example, UK and
Australia use 100, New Zealand uses 600.
If you are unsure as to the correct setting for your installation initially select
1 = 100ms
1. The system setting switch must be in the position ON, see page 9.
2.
3.
4.
5.
Lift the handset (ignore any network announcements) and press
Press 0 .
Select the required setting ( 1 =100, 2 =300, 3 =600 ms).
Press z and replace the handset.
z
and *.
Pause Time Duration
This allows you to select the Pause timing. The time selected will depend on
the PBX and network through which your memory number is being dialled.
If you are unsure as to the correct setting for your installation initially, select
1 = 2.0.
1. The system setting switch must be in the position ON, see page 9.
2.
3.
4.
5.
10
Lift the handset (ignore any network announcements) and press z and *.
Press 2 .
Select preferred setting ( 1 =2.0 and 2 =3.6 s).
Press z and replace the handset.
www.doro.com
Other
English
Direct Dialling Waiting Time
When direct dialling the period of time the telephone waits before dialling can
be adjusted between 2.0-3.1 seconds.
1. The system setting switch must be in the position ON, see page 9.
2.
3.
4.
5.
Lift the handset (ignore any network announcements) and press z and *.
Press 3 .
Select preferred waiting time ( 1 =2.0 and 2 =3.1 s).
Press z and replace the handset.
Display Clock (12 or 24 hour format)
1. The system setting switch must be in the position ON, see page 9.
2.
3.
4.
5.
Lift the handset (ignore any network announcements) and press z and *.
Press 4 .
Select preferred hour display ( 1 =12 hrs and 2 =24 hrs).
Press z and replace the handset.
www.doro.com
11
English
Other
Troubleshooting
Check that the telephone cord is undamaged and properly plugged in.
Disconnect any additional equipment that may be connected. If the problem is
resolved, the fault is with the other equipment.
Test the equipment on a known working line. If the product works then the
fault is with the line.
UK
If you cannot resolve the fault using the faultfinder section, technical support is
available on the Premium Rate Number: 0906 302 0114.
Calls cost 50 pence per minute (prices correct at the time of going to
press), and is operational between 9AM - 5PM Monday-Friday excluding Bank
Holidays. Alternatively,
E-mail on: [email protected]
You can contact us in writing: Consumer Support Group, Doro UK Ltd.,
22 Walkers Road, North Moons Moat, Redditch, Worcestershire, B98 9HE,
(regarding any Spares or Technical query), or
Telephoning (Spares only): 01527 584377
Web site: www.doro-uk.com
Guarantee
This product is guaranteed for a period of 24 months from the date of purchase.
Proof of purchase is required for any service or support required during the
guarantee period.
This guarantee shall not apply to a fault caused by an accident or any similar
incident or damage, liquid ingress, negligence, abnormal usage or any other
circumstances on the purchaser’s part. Furthermore, this guarantee shall not
apply to a fault caused by a thunderstorm or any other voltage fluctuations.
This guarantee does not in any way affect your statutory rights. (As a matter of
precaution, we recommend disconnecting the telephone during a thunderstorm.)
12
www.doro.com
English
Other
Australia and New Zealand
If you believe this product is malfunctioning, please refer to the relevant section
and/or consult the troubleshooting guide in this manual to ensure that you have
followed the instructions carefully. As an alternative you can visit our web site
for FAQ’s or send an e-mail for a prompt reply.
Guarantee
This product is guaranteed for a period of 24 months from the date of purchase.
Should you experience difficulties with the product, please contact us for
assistance. If the product is then found to be faulty you will be asked to return it
directly to us with a copy of the purchase receipt.
This guarantee shall not apply to a fault caused by an accident or a similar
incident or damage, liquid ingress negligence, abnormal usage or any other
circumstances on the purchaser’s part. Furthermore, this guarantee shall not
apply to a fault caused by a thunderstorm or lightning, excessive or any other
voltage fluctuations or faults on the telephone line. (As a matter of precaution,
we recommend disconnecting the telephone during a thunderstorm).
This guarantee does not affect your statutory rights.
AUSTRALIA
DORO Australia Pty Ltd
PO Box 6760
Baulkham Hills BC NSW 2153
Australia
NEW ZEALAND
Atlas Gentech (NZ) Limited
Private Bag 14927
Panmure
Auckland
New Zealand
Consumer Support
Ph: (02) 8853 8444
Fax: (02) 8853-8489
Email: [email protected]
Web site: www.doro.com.au
Consumer Support
Ph: 0900 50-025 (Toll Call)
Fax: (09) 574-2722
Email: [email protected]
www.doro.com
13
Other
REN (RN for New Zealand)
The REN (Ringer Equivalence Number) or (RN) is of significance only if you
wish to connect more than 1 telephone to your telephone line. A standard
telephone line has a maximum REN capacity of 3 (RN of 5). It is possible
to connect 3 devices with a REN of 1 (RN of 1) with no degradation to the
product’s performance. Exceeding this limit may cause the volume of the ringer
in any phone to decrease or not ring at all.
Notes for operation in New Zealand
The grant of a Telepermit for any item of terminal equipment indicates only
that Telecom has accepted that the item complies with the minimum conditions
for connection to its network. It indicates no endorsement of the product by
Telecom, nor does it provide any sort of warranty. Above all, it provides no
assurance that any item will work correctly in all respects with another item of
Telepermitted equipment of a different make or model, nor does it imply that
any product is compatible with all of Telecom’s network services.
This equipment shall not be set to make automatic calls to the Telecom “111”
Emergency Service. This equipment may not provide for the effective hand-over
of a call to another device connected to the same line.
14
www.doro.com
www.doro.com