1
FINALIZING THE INSTALLATION (CONT.) - For Qualified Installers Only!
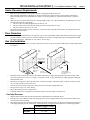
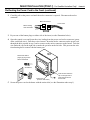
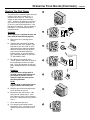
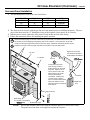
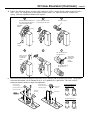
Replace the door (follow the step # 1 in reverse order).
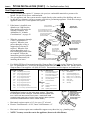
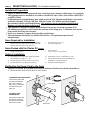
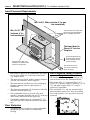
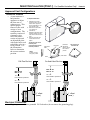
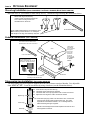
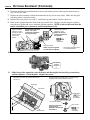
To adjust the pilot flame, remove the cover screw (and
The pilot flame should impinge the top 3/8Ó (10 mm)
Turn on gas to the
gasket) and turn the needle valve. Clockwise lowers
of the thermopile. If it does not, you may need to
the flame while counter-clockwise raises it.
heater. Leak test all
turn the pilot up.
gas joints prior to
Thermopile
starting the
appliance. Start the
Pilot Hood
pilot. Start the main
burner. Leak test all
Needle Valve
gas joints again.
Micro (1/16Ó)
Standard
Check the pilot flame
Screwdriver
to make sure it looks
Cover Screw Gasket
like the illustration to
Cover Screw
the right. Adjust the
The cover screw and
gasket must be
pilot flame if
replaced to prevent gas
Standard
from leaking
necessary.
Thermocouple
3/8Ó (10 mm)
Screwdriver
Let the heater burn
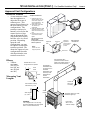
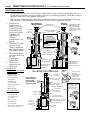
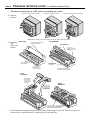
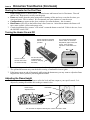
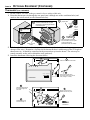
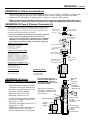
Locate the air shutter adjustment
lever behind the gas control valve.
for fifteen minutes.
Move it up or down until the flame
Adjust the air shutter, looks correct. Pushing up gives the
Gas Control Valve
flame more air (making it bluer).
if necessary, to
Pulling it down cuts air down,
achieve the correct
making it more orange.
looking flame (see
NOTE: If the air control is all the
the illustration to the
way up, yet the flames remain
sooty, shut off gas to the fireplace
right).
and contact a qualified gas service
technician.
The air shutter
NOTE: The logs must be installed correctly to
monitor the flame while adjusting the air shutter.
adjusts the amount of
air that mixes with
the gas before it exits
the burner holes. It
is used to fine-tune
the flame for
differences in
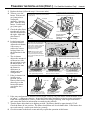
Correct
Not Enough Air
Too Much Air
altitude and vent
If the flames are too tall or sooty on
If the flames are all blue and
Flames should be blue at the
configuration.
the ends, push up on the lever.
short, pull down the lever.
base, yellow-orange on the top.
If the air shutter is in
its fully open
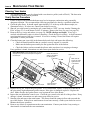
Burner Ports
position, yet the
(consists of slots
and holes)
Burner Pan
flames remain sooty,
shut off gas to the
heater and contact
your dealer for a
remedy.
N
O
3
4
PAGE 21
PI L OT
AA
VENT
PILOT ADJ
OFF
6
FF
O
5
PI
LO
T
I
ON
LO
H
PILOT ADJ
¥
!
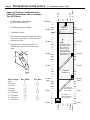
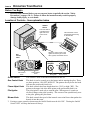
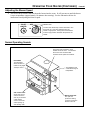
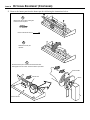
The flames should burn right off
the top of the burner ports (if they
are too blue, adjust the air control).
!
7
8
If the flames are lifting, yet the
vent configuration is correct,
contact your dealer.
If the flames are ghosting, yet the
vent configuration is correct,
contact your dealer.
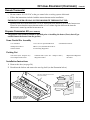
If the vent configuration is installed incorrectly the vent may cause the flames inside the heater to lift
or "ghost" Ð a dangerous situation. Inspect the flames after installation to insure proper performance.
If the vent configuration is correct, yet the flames are lifting or ghosting, shut off gas to the heater
and contact the dealer for information on remedying the problem.
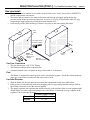
Turn the flame adjust knob to its highest position - the flames should be approximately 12"tall.
Check the flame on low position. The flames should burn off of each burner hole. If the heater does
not work correctly, contact your dealer for a remedy.
Give this manual to the home owner and fully explain the operation of this heater.