1
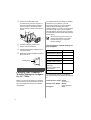
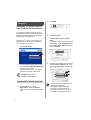
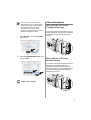
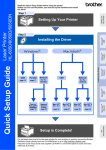
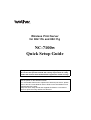
Wireless Print Server
for 802.11b and 802.11g
NC-7100w
Quick Setup Guide
This product is approved for use in the country of purchase only.
Do not use this product outside the country of purchase as it may
violate the wireless telecommunication regulations of that country.
Please read this Quick Setup Guide before you install the NC-7100w and
use the printer on the wireless network.
For more details about how to optimize the wireless print server, please
refer to the NC-7100w Network User’s Guide on the CD-ROM we have
supplied with NC-7100w.
Keep this Quick Setup Guide and supplied CD-ROM in a convenient
place for quick and easy reference at all times.
English
3
Carton Components
3
1
Documentation
View NC-7100w Network User’s Guide
and the Quick Seup Guide in PDF
format.
Setting up the Print Server
2
1
2
3
Step 1
NC-7100w wireless print server
Installing the Print Server
Quick Setup Guide
CD-ROM (including setup software and
NC-7100w Network User’s Guide)
What is supplied on the
CD-ROM
1
Turn off the printer power switch, and
then unplug the printer if connected.
Disconnect the interface cable from the
printer.
2
Slide and remove the side cover of the
printer.
3
Open the interface access cover.
4
Loosen the two screws, and then
remove the network cover plate.
1
2
3
1
Brother Solutions Center
The Brother Solutions Center
(http://solutions.brother.com) is a
one-stop resource for all your printer
needs. Download the latest drivers and
utilities for your printers, read the FAQs
and troubleshooting tips, or learn about
printer solutions.
2
Setup
You can view the Wireless Setup
Wizard which guides you through the
print server configuration. You can also
install the printer driver and BRAdmin
Professional utility.
1
5
Put the NC-7100w print server
connector firmly into the connector of
the main controller board by aligning
the two screws to the groove of the
printer, and then secure it with the two
screws.
To configure the NC-7100w from a wireless
computer on your network, you must
temporarily change your current wireless
settings. Before changing the current
wireless settings of your PC, we recommend
you make a note of your current wireless
network settings using the chart on the right.
You will need to return to these settings at the
end of Step 3.
We recommend you to contact your
network administrator if you need
assistance with your computers
wireless settings.
6
7
8
Close the interface access cover.
9
Make sure that the POWER LED of the
print server is on.
Put the side cover back on.
Plug the printer back in and then turn on
the power switch.
Current wireless network settings of
your computer
Item
Current Setting
Communication Mode:
(Infrastructure / Ad-hoc)
Network Name (SSID)
Channel: (1-14)
POWER LED
Step 2
Encryption:
(NONE / WEP / Other)
Encryption Key Size
and Type:
(64 bit, 128 bit / ASCII,
HEX / Other)
Encryption Key:
Changing your Computer’s
Wireless Settings to configure
the NC-7100w
Before you can use the printer in a wireless
network, the NC-7100w wireless print server
must be configured to match your network
configuration.
2
To communicate with the un-configured
NC-7100w change your wireless PC settings
to:
Communication mode: Ad-hoc
(channel 11)
Network name (SSID): SETUP
(case sensitive)
Encryption:
None
English
For Windows® 98/Me/2000,
Windows NT®4.0 Users
3
Select and right click Wireless
Network Connection. Click View
Available Wireless Networks.
4
You can see the Brother wireless print
server in the Available wireless
networks box. Select SETUP and
check the Allow me to connect...
check box. Click the Connect button.
5
Check the wireless network connection
status. It may take a few minutes for the
IP address to be shown on screen.
Please refer to your wireless card
manufacturer instructions for changing the
wireless settings. And then go to Step 3
Configuring the Print Server.
Continue to Step 3
If you are using Windows® XP or Mac OS®
X 10.1 to 10.3 and you are using its built in
Wireless Ethernet capabilities, use the
following steps for each Operating
System.
For Windows® XP Users
1
Click Start and then Control Panel.
2
Click the Network Connections icon.
3
If the Brother wireless print server
you want to choose is not listed,
follow these steps:
3
1 Move your printer with the wireless
print server installed closer to your
PC, or reorient the print server and try
again.
2 Reset the print server back to its
default factory setting and try again.
See Other Information in this Quick
Setup Guide for information how to
reset to factory default setting.
3 Refer to Chapter 10 of the NC-7100w
Network User’s Guide on the
CD-ROM we have supplied with
NC-7100w.
If the Brother wireless print server
you want to choose is not listed,
follow these steps:
1 Move your printer with the wireless
print server installed closer to your
PC, or reorient the print server and try
again.
2 Reset the print server back to its
default factory setting and try again.
See Other Information in this Quick
Setup Guide for information how to
reset to factory default setting.
3 Refer to Chapter 10 of the NC-7100w
Network User’s Guide on the
CD-ROM we have supplied with
NC-7100w.
Continue to Step 3
For Mac OS® X 10.1 to 10.3 Users
1
Your wireless network is connected
successfully.
Click the AirPort status icon and select
Open Internet Connect....
Step 3
Configuring the Print Server
2
4
Click the Network tab to see the
available wireless devices.
You can see the Brother wireless print
server in the Network option.
Select SETUP.
1
Insert the CD-ROM into your CD-ROM
drive.
(For Windows® users) The opening
screen will appear automatically.
(For Mac OS® X 10.1 to 10.3 users)
Double-click the NC7100w icon on your
Macintosh®, and then double-click the
Start Here icon.
English
2
Click Setup.
3
Click Wireless Setup Wizard.
4
Review the Welcome information and
when you are sure you have completed
the necessary tasks, click Next.
5
The search will display a list of found
Brother Wireless Devices. Select the
device you wish to configure and click
Next.
6
If your network supports DHCP, choose
Obtain an IP address automatically
and the NC-7100w will automatically
obtain IP address information from your
network.
If you want to manually enter the IP
address settings of the NC-7100w,
choose Set static IP address and
enter the necessary IP address settings
for your network.
After making your selection, click Next
and the Wizard will search for available
wireless networks.
The NC-7100w supports the
Automatic Private IP Addressing
(APIPA) protocol. If a DHCP server
is unavailable, the NC-7100w will
automatically assign an IP address
from the range 169.254.1.0 to
169.254.254.255.
5
We recommend that you contact
your network administrator if you are
unsure about the correct IP address
settings.
7
A list of the found Wireless Networks
will be displayed. Select the Access
Point/Base Station or Ad-hoc network
you wish to associate the NC-7100w
with and click Next.
If the Access Point/Base Station or
Ad-hoc network does not appear on
the list, you can manually add it by
clicking Add. Follow the on screen
instructions for entering the SSID
and Channel number.
8
If your network is not configured for
Authentication and Encryption, the
screen shown will appear. To continue
installation, click OK.
Go to Step 10.
9
When configuring your Brother
Wireless device, you must ensure that it
is configured to match the
Authentication and Encryption settings
of our existing wireless network. If your
network is configured for Authentication
and Encryption, choose the
Authentication Method and
Encryption Mode from the pull downs
in each setting box. Then enter the
Network Key and click Next.
Authentication Methods:
Authentication is used to identify each
wireless device that is attempting to
access the network.
Open System
Wireless devices are allowed access to
the network without authentication.
Shared Key (Infrastructure mode only)
A secret pre-determined key is shared
by all devices that will access the
wireless network.
Encryption Methods:
Encryption is used to secure the data
itself. The NC-7100w supports WEP
encryption.
None
No encryption method is used.
WEP
By using WEP (Wired Equivalent
Privacy), the data is transmitted and
received with a secured key.
6
English
11
When the Setup Complete screen
appears, click Next.
12
Using the information you recorded in
Step 2, return the wireless settings of
your computer back to their original
settings. Click Exit.
Network Key:
There are some rules for each security
method:
Open System / Shared Key with WEP
Enter the WEP key that will be used to
access your network. This key is a
64-bit or 128-bit value that must be
entered in an ASCII or HEXADECIMAL
format.
■ 64 (40) bit ASCII
Uses 5 text characters.
e.g. “Hello” (this is case sensitive)
■ 64 (40) bit Hexadecimal
Uses 10 digits of Hexadecimal data.
e.g. “71f2234aba”
■ 128 (104) bit ASCII
Uses 13 text characters.
e.g. “Wirelesscomms” (this is case
sensitive)
■ 128 (104) bit Hexadecimal
Uses 26 digits of Hexadecimal data.
e.g. “71f2234ab56cd709e5412aa3ba”
10
Click Next to submit the settings to the
NC-7100w.
You can also configure the
NC-7100w from the control panel of
the printer, or using the BRAdmin
utilities or a web browser. See
Appendix B of the NC-7100w
Network User’s Guide for more
details.
7
Step 4
4
Click Add.
5
Select IP Printing.
Installing the Printer Driver
and Network Print Software
You need to install the printer driver and
network print software, and configure it for the
wireless network connection of the printer.
Please follow the steps below.
For Mac OS X 10.2.4 or greater
users:
If you want to connect your printer using
Rendezvous, select Rendezvous and
then the HL-6050D_DN series. Setup
is now complete.
(For Mac OS® X 10.1 to 10.3 users) If you
already have the printer driver installed in
your computer, go to Step 3.
1
Click Printer Driver.
2
(For Windows® users) Refer to P19 to
P23 ot the Printer Quick Setup Guide
for the rest of the steps.
(For Mac OS® X 10.1 to 10.3 users)
Follow the on-screen instructions.
6
Enter the TCP/IP address of the printer
into the Printer’s Address box. If you
are not using the default Queue, enter
BRN_xxxxxx_P1_AT.
For Windows® users:
Setup is now complete.
For Mac OS® X 10.1 to 10.3 Users
3
8
From the Go menu, select
Applications. Open the Utilities
folder, and then open the Print Center
icon.
You can find the TCP/IP address by
printing out the Network
Configuration Page. See Other
Information in this Quick Setup
Guide for information how to print
the Network Configuration Page.
English
xxxxxx is the last six digits of the
MAC address. You can find the MAC
address by printing out the Network
Configuration Page. See Other
Information in this Quick Setup
Guide for information how to print the
Network Configuration Page.
7
Select Brother from the Printer Model
pull-down list.
8
Select HL-6050D/DN BR-Script3, and
then click Add.
Other Information
How to Print a Network
Configuration Page
To print the Network Configuration Page, use
a fine ball point pen to hold down the Network
Test Button of the printer for less than 5
seconds.
How to Reset to Factory
Default Setting
If you wish to reset the print server back to its
default factory settings (resetting all
information such as the password and IP
address information), use a fine ball point pen
to hold down the Network Test Button for
more than 5 seconds.
Setup is now complete.
9
Important Information: Regulations
Federal Communications Commission (FCC) Declaration
of Conformity
Responsible Party:Brother International Corporation
100 Somerset Corporate Boulvard
Bridgewater, NJ 08807-0911, USA
Telephone: (908) 704-1700
declares, that the products
Product Name:
Model Number:
Brother Network Card (BR-net)
NC-7100w / NC-7100
(NC-7100 is a wireless LAN card which is installed in NC-7100w)
complies with Part 15 of the FCC Rules. Operation is subject to the following two conditions: (1)
This device may not cause harmful interference, and (2) this device must accept any
interference received, including interference that may cause undersired operation.
This equipment has been tested and found to comply with the limits for a Class B digital device,
pursuant to Part 15 of the FCC Rules. These limits are designed to provide reasonable
protection against harmful interference in a residential installation. This equipment generates,
uses, and can radiate radio frequency energy and, if not installed and used in accordance with
the instructions, may cause harmful interference to radio communications. However, there is no
guarantee that interference will not occur in a particular installation. If this equipment does
cause harmful interference to radio or television reception, which can be determined by turning
the equipment off and on, the user is encouraged to try to correct the interference by one or
more of the following measures:
■
■
■
■
Reorient or relocate the receiving antenna.
Increase the separation between the equipment and receiver.
Connect the equipment into an outlet on a circuit different from that to which the receiver is
connected.
Consult the dealer or an experienced radio/TV technician for help.
Important
Changes or modifications not expressly approved by Brother Industries, Ltd. could void the
user's authority to operate the equipment.
10
English
Intel Copyright and License Information
This product includes object code from Intel's UPnP SDK.
The following is the copyright and licensing information for Intel UPnP SDK.
Copyright
Intel Corporation 2004
All rights reserved.
Redistribution and use in source and binary forms, with or without modification, are permitted
provided that the following conditions are met:
■
■
■
Redistributions of source code must retain the above copyright notice this list of conditions
and the following disclaimer.
Redistributions in binary form must reproduce the above copyright notice, this list of
conditions and the following disclaimer in the documentation and/or other materials
provided with the distribution.
Neither name of Intel Corporation nor the names of its contributors may be used to endorse
or promote products derived from this software without specific prior written permission.
THIS SOFTWARE IS PROVIDED BY THE COPYRIGHT HOLDERS AND CONTRIBUTORS "AS IS" AND
ANY EXPRESS OR IMPLIED WARRANTIES, INCLUDING, BUT NOT LIMITED TO, THE IMPLIED
WARRANTIES OF MERCHANTABILITY AND FITNESS FOR A PARTICULAR PURPOSE ARE
DISCLAIMED. IN NO EVENT SHALL INTEL OR CONTRIBUTORS BE LIABLE FOR ANY DIRECT,
INDIRECT, INCIDENTAL, SPECIAL, EXEMPLARY, OR CONSEQUENTIAL DAMAGES (INCLUDING,
BUT NOT LIMITED TO, PROCUREMENT OF SUBSTITUTE GOODS OR SERVICES; LOSS OF USE,
DATA, OR PROFITS; OR BUSINESS INTERRUPTION) HOWEVER CAUSED AND ON ANY THEORY OF
LIABILITY, WHETHER IN CONTRACT, STRICT LIABILITY, OR TORT (INCLUDING NEGLIGENCE OR
OTHERWISE) ARISING IN ANY WAY OUT OF THE USE OF THIS SOFTWARE, EVEN IF ADVISED OF
THE POSSIBILITY OF SUCH DAMAGE.
Trademarks
Brother is a registered trademark of Brother Industries, Ltd.
Windows and Windows NT are registered trademarks of Microsoft Corporation in the US and
other countries.
Ethernet is trademark of Xerox Corporation.
Apple, Macintosh, iMac, LaserWriter and AppleTalk are registered trademarks and Rendezvous
is a trademark of Apple Computer, Inc.
IBM, LAN Server, and AIX are trademarks of International Business Machines Corporation.
This product includes object code from Atheros SDK for AR5001.
All other brand and product names mentioned in this user's guide are registered trademarks or
trademarks of respective companies.
11
©2004 Brother Industries, Ltd. ©1998-2004 TROY Group, Inc. ©1983-2004 PACIFIC
SOFTWORKS INC. ©2004 Atheros Communications, Inc. ALL RIGHTS RESERVED.
Printed in Japan
LM3842001