1
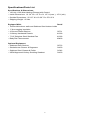
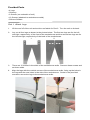
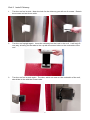
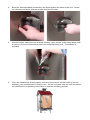
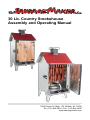
R
30 Lb. Country Smokehouse
Assembly and Operating Manual
1500 Clinton St. Bldg. 123, Buffalo, NY 14206
Tel: (716) 824-5814 • Fax: (716) 824-6465
www.sausagemaker.com
30 Lb. Country Smokehouse Operating Manual
Table of Contents
Page
Introduction
1
Smoking Meat
1
Important Safeguards
2
Operating Instructions 2
Troubleshooting
3
Cleaning
5
Warranty
5
Limitation of Liability
5
Specifications/Parts List
6
Assembly Instructions
7
Introduction
Congratulations! You have purchased a smokehouse designed, engineered and
constructed by a company with 30 years experience in creating products for making
homemade sausage. The materials used will give you years of trouble-free service,
provided that you carefully follow the use and maintenance instructions in this manual.
Please remember that this smokehouse must always be monitored when in use. Like any
piece of cooking equipment, it generates heat that, if not controlled, may lead to fires and
possible injuries.
Smoking Meat
Smoking meat can accomplish two things simultaneously: it can prepare meat for long term
storage and impart unique flavor profiles depending on the ingredients and methods used.
There are so many different recipes and methods that they cannot be adequately covered
in this manual. We recommend that you purchase a complete book on sausage making
to get the most out of this smokehouse. The most thorough text of this subject is Great
Sausage Recipes and Meat Curing by Rytek Kutas. This book is available on our website
as well as through many bookstores and some local libraries.
1
Important Safeguards
1.
2.
3.
4.
5.
6.
7.
8.
9.
10.
11.
12.
13.
14.
Read ALL of these instructions thoroughly before using.
Save these instructions for future reference.
Never leave your smokehouse unattended.
Never use your smokehouse indoors.
Close supervision is necessary when this smokehouse is used near children. NOTE:
This machine is not intended for use by children.
Smokehouses are major appliances and should only be used by a person that is
familiar with smoking procedures.
This smokehouse operates at 110 volt, 9 amps and should be serviced only by a
qualified electrician. Failure to do so may result in electrical shock, bodily injury or
property damage.
As with any electrical appliance, basic safety precautions should always be followed.
Your smokehouse is really a cooking utensil and needs your complete attention. It is
no different from using an oven, barbecue grill or frying pan at home. We all know
what can happen if they are left unattended for any length of time. Follow basic safety
precautions and enjoy your smokehouse.
To protect against electrical shock, do not immerse cord, plugs or heating element in
water or other liquid. Avoid using this smokehouse in the rain.
Unplug this smokehouse when not in use.
Unplug this smokehouse before cleaning or servicing.
Do not operate any appliance with a damaged cord or plug, after the appliance mal
functions, or has been damaged in any manner.
Extreme caution must be used when moving any appliance. Do not move this smoke
house while operating.
If there are any questions about this appliance, contact the manufacturer.
Operating Instructions
Our smokehouses are about as simple to operate as your kitchen stove. The proper and
efficient operation of this smokehouse rests with you. This appliance is equipped with one
control or thermostat and a thermometer located on the upper left hand outside panel. The
thermostat control has a range from 50° F to 200° F. The ideal temperature when smoking
sausage is 165° F. This can be monitored by checking the thermometer.
THE SMOKEHOUSE TEMPERATURE SHOULD NEVER EXCEED 170° F AT ANY TIME
WHEN SMOKING MEATS.
The 30 Lb. capacity smokehouse is designed to hold 30 lbs. of meat (sausage, bacon,
hams, hindquarters). If overloaded, the time from start to finish will greatly increase.
ONLY OPERATE THIS APPLIANCE AFTER YOU HAVE READ AND UNDERSTAND
THESE INSTRUCTIONS. IF YOU HAVE ANY DOUBTS, CONTACT THE
MANUFACTURER.
2
Operating Instructions, cont’d
1.
2.
3.
4.
5.
6.
7.
8.
9.
Fully open the damper located on the top of the smokehouse by turning the lever on
the damper stack. Preheat the smokehouse to 130° F by turning the smokehouse
control, located below the door, to between Low and Medium. Monitor the inside
temperature on the dial thermometer inserted through the hole in the door. Adjust the
temperature by turning the smokehouse control in 1/8 turn increments until the desired
temperature is reached.
While you are waiting for the smokehouse to preheat, dampen the sawdust. Do not
soak it or get it too wet or it will create extra moisture that will condense on the inside
of the smokehouse. On the other hand, if it is too dry, it may create an open flame
which may scorch the meat and/or damage the smokehouse. There are three ways
to check if your sawdust has reached the proper dampness: 1. There should be no
visible water collecting in the bottom of the sawdust pan, 2. All of the sawdust should
now be a darker color, 3. When you pick up a little more than a pinch of sawdust and
squeeze it in your fingers, water should not drip out. The amount of sawdust used
greatly depends upon individual taste. Using one full pan is a good place to start, but
you can use more if you desire a stronger taste. Set it aside for Step 4.
After approximately 15 minutes, place the product you will be smoking in the
smokehouse, close the door and let the product dry for 30-45 minutes at 130° F.
Open the smokehouse door and carefully place the sawdust pan with sawdust in it.
(TIP: Pack the dampened sawdust in the pan and create a hole in the middle of
sawdust. This will help to keep the sawdust smoldering and create a heavy smudge.)
Close the door, leave the damper open and turn the smokehouse control to High.
When you see smoke coming from the smokestack (this could take up to 10 minutes),
lower the temperature to 140-145° F and hold at this temperature by turning the
smokehouse control in 1/8 turn increments until the desired temperature is reached.
Close the smokestack to 1/4 open (repeat Step 4 if smoke stops).
Raise the temperature every 1 1/2 hours until the smokehouse temperature reaches
160-165° F. Hold at this temperature until the internal temperature of the product you
are smoking reaches 152° F.
When 152° F is reached, turn off the smokehouse and carefully remove sausage.
Shower with cold water until the internal temperature reaches 120° F.
Refrigerate sausage overnight. Product is now ready to eat or freeze.
Troubleshooting
What happens during the smoking process?
During the smoking process, smoke emits acids which cling to the meat and to the outside
layer of skin. This acid helps preserve the meat by preventing the growth of surface mold
and bacteria compounds.
How long does it take to smoke a sausage?
A 19 mm casing takes approximately 7 hours, a 32-35 mm casing takes approximately 8
hours, a 3 1/2” synthetic casing may take up to 12 hours, and a ham can take a couple of
days.
3
Troubleshooting, cont’d
How do I know when the meat is smoked?
You can identify that your meat is fully smoked by the distinctive color that develops as a
result of the carbon compounds combining with the meat pigments. Also, the cures that are
used will give smoked meat a red color.
How do I use the sawdust or wood chips?
The sawdust or wood chips should be dampened, yet not soaked. Dampened sawdust will
burn for a longer period of time and will impart gentle flavors into the meat. To dampen,
place sawdust in a bucket or bowl and squirt with a water bottle. You should mix the sawdust as you add the water to make sure all of the sawdust is moistened.
Can I cold smoke with my Sausage Maker smokehouse?
It all depends on what you mean by “cold smoke”. Cold smoking refers to a smoking
process in which the heat source is in one area while the smoke is forced into another area
where the meat product is. In other words, the meat will have a smoked flavor, but will
not be exposed to heat. If you are referring to making sausage and keeping the temperature within the 170 degree area, then yes, this is what our smokehouses are designed
for. Smoking sausage is a slow process. The temperature of the smokehouse should be
between 165 degrees and 170 degrees. When the temperature rises higher, between 190
degrees and 200 degrees, the fat breaks down, and over 200 degrees you will melt the fat.
Can I use liquid smoke and still use my smoker?
Yes, you can. Just add liquid smoke to your spices and mix with the meat. Then proceed
to use the smokehouse at the low temperatures as instructed.
Can I put more sausage in my smokehouse than suggested?
No. If overloaded, the time from start to finish will be greatly increased. Also, if the meat is
touching there will be discoloration where the smoke was not able to penetrate the meat.
Can I do BBQ Ribs in my smokehouse?
No. The Sausage Maker Smokers are made for the sole purpose of smoking meat and are
meant for temperatures no higher than 190 degrees. If the temperature goes higher the fat
melts, which can cause the heating element to burn out or may cause a fire in the smokehouse itself.
Why was there liquid on the bottom of my smokehouse after smoking?
Your temperature was too high and it melted the fat in the meat.
My sausage does not look good, it is shriveled. What do you think was the
problem?
There could be several reasons for these results. The temperature may have risen too high
and either melted or repositioned the fat. Also, the sausage may not have been showered
with cold water immediately after it was finished smoking. Finally, the sausage casings
may not have been stuffed to their full capacity.
Most of my sausage has a nice mahogany color, but there are areas of white spots. Why?
If the sausage was touching during smoking, the smoke was not able to penetrate that
area, leaving a white spot after smoking. There is no problem with your sausage.
4
Cleaning and Maintenance
Your smokehouse has been designed to give you years of trouble-free service, provided
that it is properly maintained. After each use, unplug the smokehouse and allow it to cool.
Do not try to clean it while it is still hot. Wipe it down with a good cleaner or detergent. If
possible, avoid scouring the surface as this will mar the finish and promote sticking in subsequent uses. The Sausage Maker, Inc. carries a smokehouse cleaner that does a great
job. If you have excessive amounts of dripping or if there is liquid in the bottom of your
smokehouse, it should be cleaned up immediately.
Warranty
The Sausage Maker, Inc., through its Distributors, warrants each new product sold by it to
the initial user to be free of defects in material and workmanship for a period of one year
from the date of sale of the equipment. With respect to the sale of spare parts, such
warranty period shall be three (3) months from the date of sale.
The Sausage Maker, Inc. will provide a new or repaired part, at its election, in place of any
part which is found upon inspection to be defective in material and workmanship during the
period described above. Purchaser must present proof of purchase and purchase date at
the time of exercising this warranty.
This warranty does not apply to failures occuring as a result of abuse, misuse, negligent
repairs, corrosion, erosion and normal wear and tear, alterations or modifications made to
the product without express written consent of The Sausage Maker, Inc. or failure to follow
the recommended operating practices and maintenance procedures as provided in the
products operating and maintenance publications.
The warranty provided herein does not apply to equipment sold hereunder but
manufactured by others as they are warranted by their respective manufacturers directly to
the user. This warranty is in lieu of all other warranties (except of title) expressed or implied
and there are no warranties of merchantability or of fitness for a particular purpose.
Limitation of Liability
The remedies of the user set forth under the provisions outlined above are exclusive and
the total liability of The Sausage Maker, Inc. or its distributors with respect to this sale of
the equipment and service furnished hereunder, in connection with the performance or
breach thereof, or from the sale, delivery, installation, repair or technical direction covered
by or furnished under this sale, whether based on contract, warranty, negligence, indemnity,
strict liability or otherwise shall not exceed the purchase price of the unit of equipment upon
which such liability is based.
The Sausage Maker, Inc. and its Distributors shall in no event be liable to the user, any
successors in interest or any beneficiary or assignee relating to this sale for any consequential, incidental, indirect, special or punitive damages arising out of this sale for any
breach thereof, or any defects in, or failure of, or malfunction of the equipment under
this sale whether based upon loss of use, lost profits or revenue, interest, lost goodwill,
work stoppage, impairment of other goods, loss by reason of shutdown or non-operation,
increased expenses of operation, cost of purchase or replacement power claims of user or
customers of the user for service interruption whether or not such loss or damage is based
on contract, warranty, negligence, indemnity, strict liability or otherwise.
5
Specifications/Parts List
Specifications & Dimensions: • 120 Volt, 1000 Watt Heating Element with Control
• Inside Dimensions: 16 1/4” W x 15” D x 31 1/2” H (max.), 14” H (min)
• Outside Dimensions: 22 1/2” W x 19 3/4” D x 55 1/4” H
• Shipping Weight: 62 Lbs.
Equipped With: Part #
• Textured Aluminum walls and Stainless Steel bottom inside
• 1” Non-sagging insulation
• 4 Chrome Plated Shelves 32731
• 3 Hickory Hardwood Dowels 41200
• 7 3/4” Stainless Steel Sawdust Pan 41600
• Baby Dial Thermometer 49400
Optional Equipment:
• Stainless Steel Shelves • Smokehouse Cleaner & Degreaser • Stainless Steel Cleaner & Polish • USDA Approved Hickory Smoking Sawdust 6
32733
31450
31542
31450
Provided Parts
• 4 Legs
• Chimney
• 2 Screws (on underside of roof)
• 12 Screws (attached to smokehouse walls)
• Silicone Sealant
Part 1: Attach Legs
1.
Lift the roof off of the unit and set the roof aside for Part 2. Turn the unit on its back.
2.
Lay out all four legs as shown in the picture below. The first two legs are for the left
and right, respectively, of the front of the smokehouse and the second two legs are for
the left and right, respectively of the back of the smokehouse.
1
2
3.
There are 12 screws in the sides of the smokehouse walls. Remove these screws and
set them aside.
4.
Align the legs with the outside corners of the smokehouse walls, lining up the holes in
the legs with the new holes in the side of the smokehouse. Screw in the provided
screws to secure the legs to the smokehouse walls.
7
Part 2: Install Chimney
1.
Turn the roof on its side. Near the hole for the chimney you will see 2 screws. Detach
the screws and set them aside.
2.
Turn the roof upright again. Insert the chimney into the hole in the roof. It will only fit
one way, allowing for the tabs to line up with the screw holes on the underside of the
roof.
3.
Turn the roof on its side again. The tabs, which are now on the underside of the roof,
should be in line with the screw holes.
8
4.
Bend the tabs backwards so that they are flush against the sides of the roof. Screw
the chimney into place with the screws that you set aside.
5.
Seal the edges where the roof and the chimney meet, shown in the image below with
a red line, to prevent heat and smoke from escaping during use. The sealant is
provided.
6.
Once the sealant has dried properly (reference instructions on the bottle of silicone
sealant), your smokehouse is ready to use. Set the roof back onto the unit and follow
the smokehouse’s operating instructions to start the smoking process.
9
10
The Sausage Maker, Inc.
1500 Clinton St. Bldg. 123, Buffalo, NY 14206
Tel: (716) 824-5814 • Fax: (716) 824-6465
www.sausagemaker.com