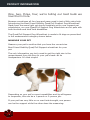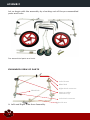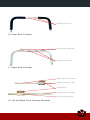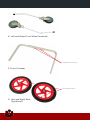
1
USER’S MANUAL
Quad/Full Support Dog Wheelchair
(Large)
TABLE OF CONTENTS
INTRODUCTION ........................................................................
1
PRODUCT INFORMATION ...........................................................
2
2
Measure Your Pet ...........................................................
ASSEMBLY ...............................................................................
6
Expanded View of Parts ..................................................
6
Assembling the Wheelchair .............................................
9
FITTING YOUR DOG TO THE WHEELCHAIR ...................................
30
ADDITIONAL MEASUREMENTS ....................................................
45
CARE AND MAINTENANCE ..........................................................
48
CONTACT US ............................................................................
49
INTRODUCTION
Best Friend Mobility® Rehabilitation Aids
Dear Pet Owner and Valued Customer:
The following guidelines, along with the attached assembly and fitting
instructions, will help you get the best use of your dog wheelchair.
Please read and follow the Assembly instructions carefully before making
any attempt to place your pet in the wheelchair. Should you encounter any
problems with assembly and fitting, please call Best Friend Mobility
directly through our hotline (843) 492-5283.
If you think you need a different size, we can process the exchange for
you easily. Just contact us at [email protected] or
call our hotline.
This is a learning process and can take time. We realize that both you and
your pet are most likely unfamiliar with the use of a dog wheelchair so do
not hesitate to contact us for help. Please be advised that most dogs do
not intuitively know how to use a wheelchair, and they will require training
and practice. Some dogs may be afraid at first, so it is important to give
positive reinforcement when placing them in the chair, especially for the
first time.
Use treats. Treats held in front of your pet will encourage it to take steps
and move forward; this will teach them to ambulate while in the chair. It
may take several training sessions before a dog is able to actually use the
chair. It is okay and normal if your dog does not take to the chair right
away.
It is very important, especially with skittish animals, that they come into
physical contact with the wheelchair in some way every day. This should
always be coupled with positive reinforcement like praise, pets, and treats.
This will help to create a positive association with the wheelchair and help
the animal to eventually to love the wheelchair and be able to learn to use
it. This process may take from days to months, so please don’t lose hope,
persistence will pay off. Contact us for any help or questions.
Thank you for purchasing a Best Friend Mobility dog wheelchair. Again, we
love receiving feedback, stories, photos, and videos of how your pets are
doing in their wheelchairs.
Sincerely,
Tim Cantrell
TIM CANTRELL
Vice President
Best Friend Mobility
Phone: (843) 492-5283
1
PRODUCT INFORMATION
One, two, three, four, we’re telling our best buds we
love them more.
Because sometimes all four legs and paws need is just a little extra help.
Introducing the Best Friend Mobility Quad/Full Support Dog Wheelchair.
Made from the same light yet sturdy materials as our rear support pet
wheelchairs, our new Quad/Full Support Dog Wheelchair are for pets with
both forelimb and hind limb disabilities.
The Quad/Full Support Dog Wheelchair is made to fit dogs as prescribed
in the measurement category shown below.
MEASURE YOUR PET
Measure your pet to confirm that you have the correct size
Best Friend Mobility Quad/Full Support wheelchair for your
pet.
The only information you truly need to get the right size is the
measurement from the floor to your pet’s back—at its
hindquarters. It’s that simple!
Depending on your pet’s current capabilities and its willingness
to cooperate, this can be a 1-person or 2-person job.
If your pet has very little or no rear-limb strength, one person
can be the support while the other does the measuring.
2
Specifications:
•
•
•
•
•
•
•
•
Lightweight, non-rust aluminum
Stainless steel hardware
Fully and easily adjustable height, length, and width
Deluxe neoprene front and rear harness for comfortable support
All terrain polyurethane wheels with sealed bearings
Easy clip-on front harness system
Comfortable paw slings
Durable and easy-to-clean rear harness
The Quad/Full Support Dog Wheelchair is best for:
•
•
•
•
•
•
•
•
Advanced stages of degenerative myelopathy (DM)
Cervical spondymyelopathy (CSM) or wobbler syndrome
Multiple injury rehabilitation
Unilateral or bilateral forelimb weakness
Strokes and other neurological disorders
Pets with amputations
Instability in the forelimbs or on all four legs
Pets with deformity in the forelimbs or on all four legs
3
ASSEMBLY
Let us begin with the assembly by checking out all the pre-assembled
parts and tools.
Pre-assembled parts and tools
EXPANDED VIEW OF PARTS
Left side arm
Wheel bolt
Right wheel connector
Wheel bolt
Upper crossbar
connectors (2)
Left wheel connector
A. Left and Right Side Arm Assembly
4
Right side arm
Adjustment screws
B. Lower Rear Crossbar
Rear Harness Supports
Adjustment Screws
C. Upper Rear Crossbar
Right side arm connector
Right front harness bar
Thumbscrew
Left side arm connector
Left front harness bar
D. Left and Right Front Harness Assembly
5
E. Left and Right Front Wheel Assembly
Adjustment screws
F. Front Crossbar
Air intake valves
G. Left and Right Rear
Big Wheels
6
H. Front Harness
I. Basic Rear Harness – gives better support for your dog’s body while
harnessed to the wheel chair.
J. Sports Rear Harness – gives better mobility for your pet while
harnessed to the wheelchair.
7
K. Rear Leg Straps
L-1.
L-2.
L-3.
L-4.
8
Big Hex Wrench (black)
Small Hex Wrench (silver)
Big and Small Wrench
Spare Bolts
ASSEMBLING THE WHEELCHAIR
1. Connecting the lower rear crossbar (B) to the left and right side
arm assembly (A)
1.1. Insert big hex wrench (L-1) in bolt on the right wheel
connector (B) of right side arm assembly (A).
1.2. On the opposite side of right wheel connector (B), insert nut in
small wrench (L-3). Unscrew and remove nut and bolt entirely.
9
1.3. Insert one end of the lower rear crossbar (B) in the hole of
right wheel connector (A). Make sure that the wheel bolt is
facing in the opposite direction of the lower rear crossbar (B).
1.4. Make sure that the hole on lower rear crossbar (B) is aligned
to the hole on right wheel connector (A).
10
1.5. Re-insert bolt in hole until it comes out the other side.
1.6. Re-insert nut and turn using big hex wrench (L-1) and small
wrench (L-3) until secure but do not tighten.
1.7. Repeat 1.1. to 1.6 to install the other end of the lower rear
crossbar (B) in the hole of left wheel connector.
11
2. Connecting the upper rear crossbar (C) to the left and right side arm
assembly (A)
2.1. On the upper crossbar connector of the right side arm
assembly (A), insert nut in small wrench (L-3).
2.2. On the opposite side of upper crossbar connector (A), insert
big hex wrench (L-1) in bolt. Unscrew and remove entirely.
12
2.3. Insert one end of the upper rear crossbar (C) in the hole of the
upper crossbar connectors (A). Make sure that the upper rear
crossbar (C) is parallel with the lower rear crossbar.
2.4. Make sure that the hole on upper rear crossbar (C) is aligned
to the hole on upper crossbar connectors (A).
13
2.5. Re-insert bolt in hole until it comes out the other side.
2.6. Re-insert nut and turn using big hex wrench (L-1) and small
wrench (L-3) until secure but do not tighten.
14
2.7. Hold the other end of the upper rear crossbar and pull
towards the direction of the hole on the upper crossbar
connector on the left side arm assembly (A).
2.8. Insert the end into the hole as soon as it is aligned.
2.9. Re-insert bolt in hole until it comes out the other side. It may
take some jiggling pulling and pushing of the bars to align the
holes to allow the bolt to pass thru.
15
2.10. Re-insert nut and turn using big hex wrench (L-1) and small
wrench (L-3) until secure. You may now tighten all the nuts and
bolts of both upper (C) and lower rear crossbars (B).
This is what it should look like so far
Figure 1
16
3. To install the left and right front harness assembly
3.1. Insert the left front harness bar (D) in the hole of the left side
arm assembly (A).
3.2. Make sure the thumbscrew on the left side arm connector (D)
is facing outwards.
17
3.3. Adjust to desired length. Make sure the hole on the left front
harness bar (D) is aligned with a hole on the left side arm
assembly (A).
3.4. Insert metal lock in aligned hole until it comes out the other end.
3.5. Repeat 3.1. to 3.4. to insert the right front harness bar (D) in
the hole of the right side arm assembly (A). Make sure the left
and right front harness bars (D) are of equal distance when
adjusting their length.
18
4. To attach front small wheels
4.1. Remove rubber end cap from front wheel assembly (E).
4.2. Loosen thumbscrew on left side arm connector (D).
19
4.3. Insert front wheel assembly (E). Make sure the side with
hollowed circles is facing the same side as the thumbscrew.
4.4. Adjust to desired height and align a hollowed circle to the
thumbscrew. Tighten the thumbscrew.
4.5. Return rubber end cap.
4.6. Repeat 4.1. to 4.5. to install the right front wheel assembly (E)
to the right side arm connector (D).
20
After installing front wheel assembly, it should look like this.
Figure 2
5. To install front crossbar (F)
5.1. Remove the black rubber cover from the front crossbar (F).
21
5.2. Loosen and remove screws with big hex wrench (L-1) and
Phillips screwdriver (not included).
5.3. Move the metal bars to desired width.
22
5.4. Return screws and tighten with big hex wrench (L-1) and
Phillips screwdriver (not included). Return the black rubber
cover on the front crossbar (F).
5.5. Unscrew the bolts on the left and right front wheel assembly
(E) using the big hex wrench (L-1).
23
5.6. Position the front crossbar (F) so that the ends with holes are
aligned to the holes on the sides of the left and right front
wheel assembly (E).
5.7. Insert a bolt thru the hole of the front crossbar (F) on each
side and screw to the front wheel assembly (E) then tighten
with the big hex wrench (L-1).
24
The front assembly should look like this
Figure 3
6. To install the big wheels (G)
6.1. Unscrew the wheel bolts from the right wheel connector (A)
with big wrench (L-3.). Remove bolt and the two metal
washers.
25
6.1.1. Insert a metal washer thru the bolt then insert the bolt thru the
wheel hole.
6.2. Insert the other metal washer thru the bolt on the other side of
the wheel.
6.3. Screw the bolt back to the right wheel connector (A) and
tighten with big wrench (L-3).
26
6.4. Repeat 6.1 to 6.4 to install the other wheel on the left
wheel connector.
6.5. Inflate the wheel to the recommended 35 psi, if necessary,
with any standard air pump.
7. To adjust the height of the rear big wheels (G)
7.1. Loosen the small hex screws on the on the left and right wheel
connector block with the small hex wrench (L-2).
27
7.2. Adjust the heights of the wheel connectors and upper crossbar
connectors according to desired position. Align on both sides.
7.3. Tighten the small hex screws on the on the left and right wheel
connector block with the small hex wrench (L-2).
8. To make final adjustments
8.1. Loosen connector block screws with the small hex wrench
(L-2) on the upper crossbar connectors.
28
8.2. Adjust the heights of the according to desired position.
Align on both sides.
8.3. When aligned, tighten with the small hex wrench (L-2).
You are done with the assembly!
29
FITTING YOUR DOG TO THE WHEELCHAIR
1. To put on the front harness (H) on your pet
1.1. Unlock the front leg strap (red strap) by pressing on the side
release buckle.
Your pet’s head thru
1.2. Guide your pet’s head thru the two black straps until middle
black strap reaches your pet’s upper chest below the neck and
the upper black strap is across your pets back shoulder area.
Make sure the front leg strap (red strap) is at the bottom.
Front legs here
1.3. Place the front leg strap (red strap) behind the front leg,
across the bottom chest, behind the other front leg until it
reaches the partner of the side release buckle on the other side.
30
1.4. Lock the side release buckle.
1.5. Adjust straps for comfort and firmness. Lift rounded end of
adjuster buckle to loosen. Pull on strap ends to tighten.
2. If you will be using the basic rear harness (I)
Pet facing this way
Hind legs go thru here
2.1. Guide each hind leg of your pet into each hole of the basic rear
harness.
31
2.2. Place the two straps above your pet going across the back
until it reaches the corresponding side release clasps on the
other side.
2.3. Adjust the straps for comfort and firmness.
32
2.4. Lock the side release buckles.
Move forward from
behind pet
Lift front part
Your pet should be facing
this way
2.5. Bring up the wheelchair from behind your pet. Lift the front
part to allow your pet to pass thru.
2.6. Move the wheel chair forward until your pet fits in the middle
of the wheelchair. Lower the front part.
33
2.7. Make sure each plastic clamp on the basic rear harness (I) is
level with and near a side arm bolt.
Plastic Ring
Plastic Clamp
Side Arm Bolt
2.8. Put your finger in plastic ring. Position strap to go above and
around the side arm assembly.
34
2.9. Fasten the plastic clamp to the side arm bolt.
2.10. Lock plastic clamp by pushing it upward.
35
2.11. Repeat steps 2.9. to 2.11. to attach remaining 3 plastic clamps.
2.12. Lengthen or shorten the straps attached to the plastic clamps
to adjust the rear harness to a comfortable weight-bearing
position for your pet.
36
3. If you will be using the Sports Rear Harness (J)
3.1. Install the sports rear harness to the main assembly before
placing your pet in to the harness.
3.2. Place the sports rear harness so that each plastic clamp is
level with and near a side arm bolt.
Plastic Ring
Plastic Clamp
Side Arm Bolt
3.3. Put your finger in plastic ring. Position strap to go above and
around the side arm assembly.
37
3.4. Fasten the plastic clamp to the side arm bolt.
3.5. Lock plastic clamp by pushing plastic clamp upward.
38
3.6. Repeat steps 3.3 to 3.5 to attach remaining 3 plastic clamps.
3.7. Lengthen or shorten the straps attached to the plastic clamps
to adjust the rear harness to a comfortable weight-bearing
position for your pet.
3.8. Bring up the wheelchair behind your pet. Lift the front part to
allow your pet to pass thru.
3.9. Move the wheelchair forward until your pet fits in the middle of
the wheelchair.
Pet facing this way
Hind legs go thru here
3.10. Lift each hind leg of your pet and insert in the corresponding
hole of the attached rear sports harness.
39
3.11. Place the back straps on the back of your pet. Strap the lower
left strap to the upper right and the lower right to the upper
left strap so that both straps cross your pet’s lower back.
4. To fasten the front harness (H)
4.1. Unfasten harness straps on both sides of front harness.
40
4.2. Wrap one strap around left front harness assembly.
4.3. Adjust then tighten straps.
4.4. Repeat to fasten other strap around right front harness
assembly.
5. To use the rear leg straps (K).
5.1. Use the rear leg straps to protect your pet’s paws and keep
them from dragging.
5.2. Attach rear leg straps on the rear harness support on the
upper rear crossbar.
41
5.3. Loosen the straps by pressing on the cord lock.
5.4. Insert each leg to corresponding rear leg strap.
5.5. Adjust to a comfortable tightness.
42
5.6. Make sure that legs can rest at a relaxed angle.
CONGRATULATIONS!
Your pet is now ready to take the first steps towards mobility.
Figure 4 – with Basic Rear Harness attached
Figure 5 – with Basic Rear Harness attached
43
Figure 6 – with Sports Rear Harness attached
Figure 7 – with Sports Rear Harness attached
44
ADDITIONAL MEASUREMENTS FOR A PROPER FIT
Once you have assembled your pet’s new Best Friend Mobility wheelchair,
you can use the measuring guide below to give it a customized fit.
We always strive to keep things simple. The following are the key measurements you need to take to ensure a comfortable ride for your pet.
Please remember to use a rigid tape measure. If your pet has difficulty
standing or staying upright, get someone to help either support your pet
or do the measuring.
A. Rear leg height, from floor all the way to the backbone (top of the
pelvis)
B. Body length
C. Hip width—straight across
D. Floor to groin height
45
Notes on measurements
1. The rear leg height measurements (A and D) are to ensure that the
wheelchair is set so that your dog’s body is properly supported. When set
at the correct height, your pet can use what movement and strength it has
in its legs—allowing your pet some traction (instead of pawing air). If your
pet has no hind leg strength, use the leg straps to prevent paw dragging.
2. The hip width measurement (C) will help you get the right setting for
the crossbars. The right width setting will prevent painful chafing that can
occur in improperly set wheelchairs, where your pet’s body may end up
repeatedly rubbing against the metal frame.
Tips
• The front side arms should be approximately 2 inches below the top of
your pet’s shoulders.
• The rear side arms should be approximately 2 inches below the top of
your pet’s hip.
• The two side arms of the wheelchair’s frame should be parallel to your
pet’s back
• Your pet’s sides should be approximately 1 inch away from the side
arms.
• Your pet’s sides should not rub against the side arms while your pet is
walking.
• The front harness should rest snugly but comfortably under your pet’s
forelegs.
• The front strap should sit slightly above the center of the chest.
• The front strap must not press against the throat.
• The front strap must not rest below the center of the chest.
Because Best Friend Mobility wheelchairs are adjustable in all three
dimensions, it is important to get your pet fitted properly. Setting the
height, length, and width will be your task. You might get it right on the
first try or a bit of fine-tuning might be required. Please keep in mind that
although some pets are able to ambulate in the chair on their first time, it
is much more likely to take several sessions before your pet is able to use
46
the wheelchair with assistance, and even longer without. Please be patient
and remember that this is a learning process.
DO NOT LEAVE YOUR PET ALONE IN THE CART!
Using the Quad/Full Support Wheelchair
It is usually best to attach a leash to the front bar to help with the training, and to help give the dog cues and assistance in moving the chair.
Please note that if the dog has not ambulated in some time, they will not
be able to push a full support chair on their own, they will require some
exercise first. You must assist them with pushing the chair for several sessions before they can build the strength to walk and run in the quad chair
unassisted.
Please feel free to call us for assistance or visit our YouTube Channel
https://www.youtube.com/channel/UCvcCwjFFW0kPZl6asNfBKmA and
our website’s FAQ page http://bestfriendmobility.net/faq-i18.html?osCsid=268q8eqrmb1f2e20pslpdrn9n2 for more information.
47
CARE AND MAINTENANCE
Keep the Best Friend Mobility wheelchair clean. Your pet will surely appreciate it and ride with pride. Wipe down aluminum surfaces with warm,
soapy water using a soft cloth such as a microfiber or cotton rag. Rinse
and dry.
Check the bolts and screws frequently; retighten if loose. Adjust or tighten
loose straps as well.
Remember to hose or wipe down tires to keep them from tracking dirt.
Check tire pressure every so often and inflate when needed. To reduce
bounce and increase traction, lessen tire pressure (to just under 35 PSI)
to give the wheelchair a more comfortable ride.
Wash the sling, harness, and straps in cool, soapy water and hang them to
dry. Opting for a perfume-free detergent will help your pet avoid skin irritation. You may want to try odor neutralizers (homemade or storebought)
to counter any smell that may remain in the harness.
48
CONTACT US
If you find that you have further questions regarding the use of the
Best Friend Mobility wheelchair, please contact us at:
Best Friend Mobility
279 Hwy 57 S STE4
Little River, SC 29566
Phone: (843) 492-5283
Email: [email protected]
49
Best Friend Mobility
279 Hwy 57 S STE4
Little River, SC 29566
(843) 492-5283
[email protected]