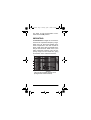
1
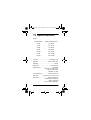
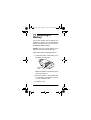
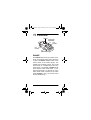
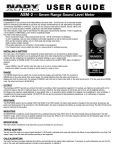
33-2050.fm Page 1 Monday, April 17, 2000 2:04 PM
Please read before using this equipment.
Owner’s Manual
Sound Level Meter
33-2050.fm Page 2 Monday, April 17, 2000 2:04 PM
ˆ Contents
Introduction ......................................... 3
Specifications ...................................... 5
Installing a Battery .............................. 7
Controls ................................................ 9
Range ............................................ 9
Output .......................................... 10
Response ..................................... 10
Weighting ..................................... 11
Microphone .................................. 12
Tripod Adapter ............................. 12
Cal (Calibration) ........................... 13
Measurements ............................. 13
Checking Noise Levels ................. 16
Checking Room Acoustics ........... 17
© 2000 Tandy Corporation. All Rights Reserved.
RadioShack and RadioShack.com are trademarks used
by Tandy Corporation.
2
33-2050.fm Page 3 Monday, April 17, 2000 2:04 PM
ˆ Introduction
Your RadioShack Sound Level Meter is
an extremely versatile device for measuring sound intensity in just about any
acoustic environment — loud or soft; highpitched, low-pitched, or broad-band; intermittent or continuous. You can use it to
measure noise levels in factories, schools,
offices, and airports, or to check acoustics
of studios, auditoriums, and home theater
installations.
Your meter features a large, easy-to-read
indicator for taking quick measurements.
The meter uses a 9V battery (not supplied) which allows you to use it anywhere.
The meter’s other features include:
Seven Sound-level Ranges — allow
measurements form 50–126 dB (referenced to 0.0002 µbar).
A And C Weightings — lets you check
compliance with safety regulations and
make an acoustic analysis.
Slow And Fast Response Settings — let
you check peak and average noise levels.
Introduction
3
33-2050.fm Page 4 Monday, April 17, 2000 2:04 PM
Built-in Battery Condition Indicator —
lets you check the battery condition.
Phono-type Output Jack — for connection to home theater or test equipment.
Threaded Insert — lets you attach the
meter to a camera tripod for increased accuracy.
4
Introduction
33-2050.fm Page 5 Monday, April 17, 2000 2:04 PM
ˆ Specifications
Range:
Switch Setting
Range of Measurement
60 dB
50–66 dB
70 dB
60–76 dB
80 dB
70–86 dB
90 dB
80–96 dB
100 dB
90–106 dB
110 dB
100–116 dB
120 dB
110–126 dB
Accuracy ............................... ± 2 dB @ 114 dB
Standard ........................... 0 dB = 0.0002 µbar
Weighting ........................................... A and C
Response ................................... Fast and Slow
Signal Output ................................. 1.0V (peak)
minimum into open circuit,
with full-scale meter,
deflection at 1 kHz
Load Impedance .................10k Ohm minimum
Distortion ............ Less than 2% at 1 kHz, 0.5V
Microphone ........................ Electret condenser
omnidirectional becoming
slightly directional
with increase in frequency
Specifications
5
33-2050.fm Page 6 Monday, April 17, 2000 2:04 PM
Battery ................................................. One 9V
Battery Check ................ Tests “good” from 7.0
to 10.5V
Expected Battery Life ......... 110 working hours
(alkaline battery)
Size (HWD) .............. 5 /16 × 2 7/16 × 13/4 Inches
(160 × 62 × 44 mm)
Weight ................................................... 6.6 oz
(185 g)
Specifications are typical; individual units might
vary. Specifications are subject to change and
improvement without notice.
6
Specifications
33-2050.fm Page 7 Monday, April 17, 2000 2:04 PM
ˆ Installing a
Battery
Your meter requires one 9V battery (not
supplied) for power. For the best performance and longest life, we recommend a
RadioShack alkaline battery.
Caution: Use only a fresh battery of the
required size and recommended type.
Follow these steps to install the battery.
1. Press both sides of the battery compartment cover and lift it.
Press both
sides
Note: The battery compartment cover
cannot be removed.
2. Place the battery in the compartment
as indicated by the polarity symbols
(+ and –) marked inside.
3. Close the cover.
Installing a Battery
7
33-2050.fm Page 8 Monday, April 17, 2000 2:04 PM
To test the battery, set RANGE to BATT. If
the meter shows a reading in the red
BATT TEST region, the battery is still
good. Replace the batteries when the
reading is in any other region or the meter
stops operating.
Warning: Dispose of old batteries
promptly and properly. Do not burn or
bury them.
Caution: If you do not plan to use the
meter for a week or more, remove the batteries. Batteries can leak chemicals that
can destroy electronic parts.
Note: Leave RANGE in the OFF position
when the meter is not in use to conserve
battery power.
8
Installing a Battery
33-2050.fm Page 9 Monday, April 17, 2000 2:04 PM
ˆ Controls
RANGE
SLOW FAST
RESPONSE
Level
Indicator
CAL
OUTPUT
AC
WEIGHTING
RANGE
The RANGE selector lets you select one of
seven sound level ranges, each spanning
16 dB. The RANGE numbers refer to the
center points of the seven ranges. The
needle level indicator shows the actual
sound level as a displacement from the
center point. For example, if RANGE is set
to 80 and the meter scale reads –3, the
actual sound level is 77 dB (80–3). If the
meter scale reads 0 (same as the value
where RANGE is set), the actual sound
level is 80 dB (80+0).
Controls
9
33-2050.fm Page 10 Monday, April 17, 2000 2:04 PM
OUTPUT
The phono-type OUTPUT jack lets you
connect the meter to recording or other
measurement equipment. For example,
you might use an audio patch cord to connect the meter to the AUX or high-level input of a recorder.
Note: The meter response will not be flat,
due to the A- and C-weighting networks.
Set RANGE so the maximum needle deflection is never greater than +4, to prevent the built-in amplifier from clipping.
Use A-weighting for voice recordings, or
C-weighting for full-range musical material. The OUTPUT jack can also be connected to high-impedance headphones, or an
oscilloscope, a frequency analyzer, or other test equipment.
RESPONSE
The RESPONSE selector has two settings:
FAST and SLOW. In the FAST position, the
meter reacts quickly to changes in the
sound level, showing you the peak sound
levels present in the environment. In the
SLOW position, the meter is damped and
indicates an average-value sound level.
10
Controls
33-2050.fm Page 11 Monday, April 17, 2000 2:04 PM
The effect of brief sound peaks is minimized in the SLOW position.
WEIGHTING
Set WEIGHTING to weight the sound measurement for a particular frequency range.
When set to A, the meter primarily measures frequencies in the 500–10,000 Hz
range, which is the area of greatest sensitivity to the human ear. When set to C, the
meter measures uniformly over the frequency range from 32–10,000 Hz, giving
an indication of the overall sound level.
Typical A- and C-weighted response curves
(A-weighted with random-incidence)
Controls
11
33-2050.fm Page 12 Monday, April 17, 2000 2:04 PM
MICROPHONE
The meter’s built-in microphone works
best when you point it directly at a sound
source.
TRIPOD ADAPTER
You can mount the meter on a camera tripod (standard 1/4–20 thread) to eliminate
hand noise and minimize the effects of
sound reflected from your body. This
makes it easy to use the meter with auxiliary recording or test equipment.
12
Controls
33-2050.fm Page 13 Monday, April 17, 2000 2:04 PM
CAL (CALIBRATION)
Your meter has been accurately calibrated and normally will not require further adjustment. If adjustment is necessary, take
the sound meter to an audio professional
who can calibrate the meter by connecting
special equipment, such as a sound generator, to the CAL jack.
MEASUREMENTS
Important:
• Do not hold the meter directly
between you and the sound source,
as this might produce an error of several decibels in the frequency range
above 100 Hz. Position the meter so
an imaginary line between you and
the meter is perpendicular to a line
between the meter and the sound
source.
• Handle the meter carefully. The
microphone and meter movement are
fragile and might be damaged if the
instrument is dropped. Do not operate the meter at a range setting that
causes pegging of the needle. This
could damage the movement.
Controls
13
33-2050.fm Page 14 Monday, April 17, 2000 2:04 PM
Follow these steps to select the desired
response, weighting, and range.
1. Set RESPONSE to FAST if the sound
source you want to measure consists
of short bursts or if you want to measure only peak values. Or, set
RESPONSE to SLOW if you want to
measure average sound levels.
2. Set WEIGHTING to A if you want to
measure noise level or C if you want
to measure sound levels of musical
material.
3. Set RANGE to the highest setting (120
dB) then adjust it downward until
there is significant deflection of the
needle. For the greatest accuracy,
always use the lower of any two possible settings.
For example, if RANGE is set to 80 dB
and the meter reads –5, reset
RANGE to 70 dB so the meter reads
+3, for an actual sound level of 73
dB.
Important: For meaningful readings,
any particular sound to be measured
must be at least 10 dB louder than
the background noise level.
14
Controls
33-2050.fm Page 15 Monday, April 17, 2000 2:04 PM
While taking measurements, minimize the
effect of your body’s presence. When the
sound is coming mainly from one direction, the level reading might be significantly affected by reflections from your body.
For the most accurate readings and the
best polar response, point the meter’s microphone toward the sound source when
possible.
Controls
15
33-2050.fm Page 16 Monday, April 17, 2000 2:04 PM
CHECKING NOISE LEVELS
This chart, gathered from Federal, State,
and local agencies, shows standards for
acceptable noise levels.
Sound Level (dB)
(A-weighting,
SLOW response)
Maximum
Duration per Day
(hours)
90
8
92
6
95
4
97
3
100
2
102
1 1/2
105
1
110
1/2
1/2
115
or less
Permissible noise exposures. Extracted
from U.S. Department of Labor Noise Regulations.
Noise is inevitable in almost any environment. Depending on the level and duration, noise can be a minor irritant, a
definite disturbance, or even a threat to
your hearing.
16
Controls
33-2050.fm Page 17 Monday, April 17, 2000 2:04 PM
To use your meter to check noise levels,
set WEIGHTING to A and RESPONSE to
SLOW. Take measurements at several
points in the test area, with the meter positioned properly.
Average dB levels of some common
activities.
CHECKING ROOM
ACOUSTICS
The size, shape, and furnishings of a
room can have a tremendous effect on a
home theater system’s performance. A
“hard” room with bare surfaces tends to
exaggerate treble response, sometimes
giving the music a strident quality. A “soft”
room with curtains, overstuffed furniture,
carpet, and so on, might reduce high-frequency response. This may result a dominant bass sound.
Controls
17
33-2050.fm Page 18 Monday, April 17, 2000 2:04 PM
Depending on the speaker placement,
standing waves might also develop in the
room, giving your system a “peaky”, eccentric response.
To determine a room’s acoustics, analyze
the acoustics with your meter and a suitable test recording. The test recording
should produce pure tones, one at a time,
at intervals spanning the audio spectrum.
Make a graph or table showing the sound
levels generated by the individual tones.
This gives you a clear idea of the frequency response of your “total system”—home
theater equipment and room included.
To smooth out the response, adjust the
tone controls and vary the speaker placement. To approximate the ideal, “flat response”, you could add a frequency
equalizer to your home theater system.
Your local RadioShack store carries frequency equalizers that let you boost or cut
response in different ranges, as indicated
by your frequency response analysis.
Properly equalized, your system can
sound like one costing considerably more!
18
Controls
33-2050.fm Page 19 Monday, April 17, 2000 2:04 PM
Note: When checking the frequency response, if WEIGHTING is set to C, the
meter’s frequency response is flat from 32
–10,000 Hz (± 3 dB). Above 10 kHz, the
frequency response of the meter drops off
rapidly. Be sure to consider this when you
use a test recording that includes tones at
the extreme high end of the audio spectrum.
Controls
19
33-2050.fm Page 20 Monday, April 17, 2000 2:04 PM
Limited Ninety-Day Warranty
This product is warranted by RadioShack against manufacturing
defects in material and workmanship under normal use for ninety
(90) days from the date of purchase from RadioShack companyowned stores and authorized RadioShack franchisees and dealers.
EXCEPT AS PROVIDED HEREIN, RadioShack MAKES NO EXPRESS WARRANTIES AND ANY IMPLIED WARRANTIES, INCLUDING THOSE OF MERCHANTABILITY AND FITNESS FOR A
PARTICULAR PURPOSE, ARE LIMITED IN DURATION TO THE
DURATION OF THE WRITTEN LIMITED WARRANTIES CONTAINED HEREIN. EXCEPT AS PROVIDED HEREIN, RadioShack
SHALL HAVE NO LIABILITY OR RESPONSIBILITY TO CUSTOMER OR ANY OTHER PERSON OR ENTITY WITH RESPECT
TO ANY LIABILITY, LOSS OR DAMAGE CAUSED DIRECTLY OR
INDIRECTLY BY USE OR PERFORMANCE OF THE PRODUCT
OR ARISING OUT OF ANY BREACH OF THIS WARRANTY, INCLUDING, BUT NOT LIMITED TO, ANY DAMAGES RESULTING
FROM INCONVENIENCE, LOSS OF TIME, DATA, PROPERTY,
REVENUE, OR PROFIT OR ANY INDIRECT, SPECIAL, INCIDENTAL, OR CONSEQUENTIAL DAMAGES, EVEN IF RadioShack
HAS BEEN ADVISED OF THE POSSIBILITY OF SUCH DAMAGES.
Some states do not allow limitations on how long an implied warranty lasts or the exclusion or limitation of incidental or consequential damages, so the above limitations or exclusions may not apply
to you.
In the event of a product defect during the warranty period, take the
product and the RadioShack sales receipt as proof of purchase
date to any RadioShack store. RadioShack will, at its option, unless
otherwise provided by law: (a) correct the defect by product repair
without charge for parts and labor; (b) replace the product with one
of the same or similar design; or (c) refund the purchase price. All
replaced parts and products, and products on which a refund is
made, become the property of RadioShack. New or reconditioned
parts and products may be used in the performance of warranty
service. Repaired or replaced parts and products are warranted for
the remainder of the original warranty period. You will be charged
for repair or replacement of the product made after the expiration of
the warranty period.
This warranty does not cover: (a) damage or failure caused by or
attributable to acts of God, abuse, accident, misuse, improper or
abnormal usage, failure to follow instructions, improper installation
or maintenance, alteration, lightning or other incidence of excess
voltage or current; (b) any repairs other than those provided by a
RadioShack Authorized Service Facility; (c) consumables such as
fuses or batteries; (d) cosmetic damage; (e) transportation, shipping or insurance costs; or (f) costs of product removal, installation,
set-up service adjustment or reinstallation.
This warranty gives you specific legal rights, and you may also
have other rights which vary from state to state.
RadioShack Customer Relations, 200 Taylor Street, 6th Floor, Fort Worth,
TX 76102
We Service What We Sell
04A00
33-2050
12/99
8110147501
Printed in China