1
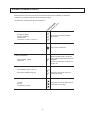
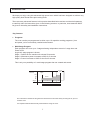
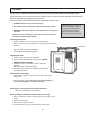
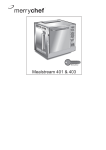
Merrychef ® ® MENUKEY2 Microcook HD USER GUIDE IMPORTANT INFORMATION READ BEFORE USE CONTENTS Safety instructions.............................................. 3 Electrical supply ................................................. 3 Precautions ........................................................ 4 Installation instructions....................................... 5 Suitable cooking utensils ................................... 6 Introduction ........................................................ 7 Main features ..................................................... 8 Control panel...................................................... 9 Operating instructions: Manual mode ................................................... 10 Programing number pads ................................ 12 Running a Program .......................................... 13 Daily cleaning................................................... 14 Problem solving ............................................... 15 Technical specification ..................................... 15 Service Contact Details.................................... 16 Users are cautioned that maintenance and repairs should be performed by a Merrychef authorized service agent using genuine Merrychef replacement parts. Merrychef will have no obligation with respect to any product that has been improperly installed, adjusted, operated or not maintained in accordance with national and local codes or installation instructions provided with the product, or any product that has its serial number defaced, obliterated or removed, or which has been modified or repaired using unauthorized parts or by unauthorized service agents. For a list of authorized service agents, please refer to the inside back page of this booklet. The information contained herein ( including design and parts specifications ) may be superseded and is subject to change without notice. 2 IMPORTANT SAFETY INSTRUCTIONS 1. 2. 3. 4. 5. 6. 7. 8. 9. 10. 11. 12. 13. 14. DO NOT operate empty, without food or liquid inside the oven, as this will result in overheating and may cause damage. NEVER remove the exterior casework of the oven. NEVER remove any fixed internal parts of the oven. NEVER tamper with the control panel, door, seals, or any other part oven. DO NOT obstruct air vents/filters or steam outlet. NEVER hang tea towels or cloths on any part of the oven. If the door seals are damaged, the oven must be repaired by an approved Engineer. All service and repair work must be carried out by an approved Engineer. If the power cable is damaged in any way it MUST be replaced by an approved Engineer. When handling hot liquids, foods, and containers, care should be taken to avoid scalds and burns. When heating liquids the contents should be stirred prior to heating to avoid eruptive boiling. Feeding bottles and baby food jars should be opened when heating, the contents stirred or shaken and the temperature checked prior to consumption to avoid burns. Never use the oven to heat alcohol, e.g. brandy, rum etc. Also, food containing alcohol, such as Christmas pudding, can more easily catch fire if overheated. Never attempt to deep fry in the oven. ELECTRICAL SUPPLY WARNING This appliance must be earthed. Failure to do so may result in electric shock and death. The oven must be installed by a qualified and approved electrician. In order to enable isolation of this appliance, the mains plug must be positioned where it is easily accessible All UK models are supplied fitted with a 13Amp moulded plug approved to BS1363. We strongly recommend that this plug is never removed. However, certain establishments may require a different plug to be fitted. In this case, the following wiring instructions should be observed. The installation wiring (hard wired or socket fitting) must be in accordance with current IEE regulations and safety standards. The electrical supply lead is located at the rear of the oven. If you are in any doubt about your electrical supply, seek the advice of a qualified and approved electrician. It is essential that the mains supply is properly installed and earthed. It should be fed from a circuit which is suitable for very high power electrical appliances and it is important that this circuit is not overloaded. Establishments with standard ( Type ‘B’ ) circuit breakers are sensitive to ‘surges’ which occur on switching on freezers, refrigerators and other catering equipment, including microwave ovens. Because of this, we strongly recommend that a separate Type ‘C’ circuit breaker ( designed specifically for this type of equipment ) is fitted to each oven installation. SAVE THESE INSTRUCTIONS 3 PRECAUTIONS TO BE OBSERVED 1. 2. Read this manual before using your oven. As with all electrical appliances, it wise to have the electrical connections inspected periodi- 3. cally. The oven interior, door seals should be cleaned frequently, following the instructions described in the CLEANING section. 4. There is no need to switch off your oven after each function but remember to switch off at the end of the day or period of operation. 5. 6. Microwave energy should not be used to dry linen or warm plates. As with any cooking appliance, care should be taken to avoid combustion of the items within the oven. If smoke is observed: Switch off Isolate from the electrical supply Keep door the closed to stifle any flames 7. 8. 9. 10. 11. 12. 13. Ensure food is placed centrally in cavity for best results. When using the microwave only function, cover the food to prevent splashing the walls of the cavity. Food in combustible plastic or paper containers should only be used in microwave only function and checked frequently to avoid the possibility of ignition. Items should be unwrapped when using convection and combination functions. Eggs and whole hard-boiled eggs should not be heated using the microwave or combination function as they may explode. Food with a skin, e.g. potatoes, apples, sausages etc. should be pierced before heating. Food should not be heated in a completely sealed container as the build-up of steam may cause it to explode. 14. Excess fat should be removed during ‘roasting’ and before lifting heavy containers from the oven. 15. In the event of glass breaking or shattering within the oven, ensure that food is totally free of glass particles. If in doubt, dispose of any food that was in the oven at the time of the breakage. 16. DO NOT attempt to operate this oven with: object caught in door, door that does not close properly or damaged door, hinge, latch, sealing surface or without food in the oven. 4 INSTALLATION Remove packing material and protective film from the oven. Check for obvious signs of transit damage. If necessary, inform the supplier IMMEDIATELY. LOCATION AND POSITIONING Choose a site away from major heat sources. DO NOT position so that hot air is drawn in from fryers, grills, griddles, etc. A heat barrier to the height of the oven must be installed if sited next to a hob, stove or range. Note the minimum recommended clearance required for air flow Note: The air intake is located under each side of the oven and to the rear, even with the clearance specified below it is important that airflow is as cool as possible and not pre-heated by other appliances such as fryers, grills and griddles as this will deteriorate the life and performance of the oven. Gastronorm HD2025 Note the minimum recommended clearance required for air flow Microcook HD1025 & HDV1025 Model Place the oven on a flat surface that is LEVEL, STRONG and STABLE. Allow a minimum clearance of 50mm to the rear, top and each side to allow air to circulate freely. The air intake is located under each side and to the rear of the oven, even with the clearance specified above it is important that airflow is as cool as possible and not pre heated by other appliances such as fryers, grills or griddles. Allow a minimum of 50mm clearance above the oven for hot air to escape. Allow sufficient clearance for the door to open fully upwards. Do not affix labels/stickers to oven other than those applied by the manufacturer 5 WARNING: Check that the AIR FILTERS are in place prior to operation ( see Main Features ) SUITABLE COOKING UTENSILS Manufacturer’s instructions should be checked to determine the suitability of individual containers or utensils using each of the cooking functions. The following chart provides general guidelines: ly e av ow r ic m on Heat resistant containers Toughened glass Vitreous ceramics Earthenware (porcelain, crockery, china etc.) Do not use items with metallic decoration. Metallic Trays Do not use metal items. Plastic containers Dual-ovenable plastic containers (up to certain temperatures) are now available. Check manufacturer’s instructions before use Rigid, boilable, plastic containers Disposables Combustibles (paper, card, etc) Cling film should not come into contact with food. Microwave-suitable cling film Other utensils Tie tags Cutlery Temperature probes No kitchen utensil should be left in food while it is cooking 6 INTRODUCTION We hope you enjoy using this advanced high speed oven which has been designed to achieve very high quality food results with rapid cooking times. There are many advanced features in this product described below and we would ask all operators to carefully read the instructions given in the following sections. In particular, close attention MUST be given to the safety and installation instructions. Key features: Programs The oven can be pre-programmed to allow up to 10 repetitive cooking programs ( time and power ) to be conveniently recalled and activated. Multi-Stage Program Each program can have up to 3 stages allowing independent control of stage time and Power Level. A typical 3 stage program is shown: Stage 1: Defrost for the maximum 9 minutes 59 seconds Stage 2: Microwave power increases to 50% for 5 minutes Stage 3: Power increases to 100% for the final 5 minutes. This is only one possibility of a multi-stage program that can created and stored. The instructions outlined in this guide are intended to ensure the safety and long life of your microwave oven. It is important that all staff are fully trained before using the oven. 7 MAIN FEATURES 6 5 1 2 7 3 8 4 9 1 AIR OUTLETS 2 3 4 5 6 ON/OFF SWITCH These vents on the side and rear panels enable air which has been used to cool internal components to escape. It will not allow microwave energy to escape into the environment. They must be kept free from obstruction. OVEN CAVITY The cavity is constructed mainly from stainless steel. It must be kept clean see CLEANING). AIR INLET FILTER (AT REAR) Situated on the rear panel. These are part of the ventilation system and must be kept free of obstruction and cleaned on a daily basis. DOOR HANDLE On the lower edge of the door CONTROL PANEL See page 9. 8 When switched ON, the control panel will illuminate. The fan and ventilation system will also operate. 7 RATING PLATE Found on the rear panel, this states the serial number, model type, electrical specifications, Merrychef, address and telephone number. 8 DOOR This is a precision-made energy barrier with three microwave safety interlocks. It must be kept clean (see CLEANING section ). 9 DOOR SEALS These ensure a tight seal around the door. They should be kept clean and checked regularly for signs of damage. At the first sign of wear they should be replaced by an approved Service Engineer. CONTROL PANEL MULTI-STAGE INDICATOR/ PROGRAM DISPLAY POWER PADS PROGRAM PAD TIME/ERROR DISPLAY CANCEL PAD TIME/PROGRAM SELECT PADS TIME/ERROR DISPLAY PROGRAM DISPLAY MULTI-STAGE INDICATOR PROGRAM DISPLAY/MULTI-STAGE INDICATOR The program display indicates the program number selected. ‘P’ indicates programming stage in a multi-stage program. POWER PAD ( Microcook HD only ) The Power Pads select 100%, 50% Microwave power or Defrost option. A light will indicate when in use. (These pads are blanked out on Microcook HDV models.) TIME DISPLAY & ERROR DISPLAY Shows the time set in minutes and seconds and counts down in 1 second steps during a cooking cycle. Also displays error messages. ( See PROBLEM SOLVING ) 9 CANCEL/ CALLBACK ‘C’ PAD Cancels all timed cooking cycles, pre-programmed operations and stops the microwave energy. This pad will also cancel any incorrect operations. It will not erase programs. It can also be used to view the details of stored programs. ( see CALL BACK ) TIME/PROGRAM SELECT PADS These pads are used for setting the cooking time in 1 second steps to a maximum of 30 minutes. They are also used for programmes from 1-9. PROGRAM PAD Activates multi-stage cooking and allows programming of preset pads. OPERATING INSTRUCTIONS: MANUAL MODE (Microcook HD Models) The oven can be operated in manual or programmed mode. It is important to understand manual mode prior to attempting program operation. WARNING: DO NOT APPLY MICROWAVE ENERGY WHEN OVEN IS EMPTY DO NOT USE THE OVEN WITHOUT CLEAN AIR FILTERS IN POSITION To familiarise yourself with the controls place a bowl containing approximately 1.5 litres of water in the oven prior to operation. 1 Place the food in the oven and close the door. 2 Set required cooking time by pressing the numeric TIME SELECT PADS. MAXIMUM TIME The time set cannot exceed 9 minutes 59 seconds Total cooking for multiple items cannot exceed 30 minutes. ( If 30 minutes is exceeded error code E:3 will be displayed) Example: 2 Minutes 35 seconds Only valid times of Minutes and Seconds will be accepted. e.g. 1minute 1 second not 61 secs TO STOP THE COOK CYCLE The cycle may be stopped and cancelled at any time by pressing the CANCEL PAD 3 To cook the food press one of the POWER PADS either 100%, 50% or Defrost. The LED within the selected pad will light. PAUSE The cycle may interrupted by opening the oven door. On opening the door the timer will be held at this point and the light on the relevant POWER PAD (microwave or convection) will flash to indicate an interrupted cycle. 4 The timer will now count down. When the remaining time reaches zero the door will open automatically. Remove the food from the cavity. TO CONTINUE the cycle close the door, an audible warning sounds as a reminder to press any power pad to restart the timer. Note: The automatic ‘ Pop-up ‘ door is not fitted to Microcook HD1025ML & HDV1025ML models. At the end of the cycle an audible signal will be given and the door on these models must be lifted open manually. 5 Test the food with a temperature probe to To ensure the required core temperature has been reached. Replace food and cook for a little longer if necessary. ‘STAND BY’ FACILITY To conserve energy and extend the life of components, the oven will go into ‘standby status if not in use for approximately 5 minutes. The interior light will go out, the fans will stop and the displays will dim. Simply touch any pad to restart the oven 10 PAUSE FACILITY A cooking cycle may be interrupted by opening the door. This facility is useful when stirring, repositioning or if temperature readings are required during a heating cycle On opening the door the timer will be held at this point and the light on the relevant power pad will flash to indicate an interrupted cycle. TO CONTINUE To continue the cycle or program close the door press any POWER PAD to restart the timer. MULTIPLE ITEM COOKING Two and three food items take longer to cook than a single item. The required cooking time, however, is not simply two or three-fold. A multiplication factor is used which takes into account the number of items to be cooked and the level of microwave energy to be applied. Once the program has been saved for a single item of food, the MULTIPLE ITEM COOKING facility enables this program to be used for two and three items of the same food. The items are simply placed in the oven. The number of items is entered (i.e. 2 or 3 ) the program pad is touched and the program entered. the length of time required for cooking is calculated automatically and the cooking cycle begins. This facility is intended as a guide to multiple item cooking. It is still advisable to check that the required core temperature has been reached. If necessary, return food and cook for a little longer. 11 PROGRAMMING NUMBER PADS ( 0-9 ) Pre-programming allows repetitive cooking procedures to be stored for ease of use. Each program can comprise up to three stages, allowing at each independent control of Stage time and Microwave power level. However, programs must be used with caution since if the food to cook varies in weight or density then good results and more importantly adequately cooked food may not be achieved. Therefore, it is vital that all food prepared for service should be checked to ensure that core temperatures have been achieved. (Note: Model 1025 has only a single stage program) 1 Press and hold PROGRAM PAD until a flashing ‘P’ appears in the PROGRAM DISPLAY An amount of experimentation will be required to determine the correct program for a particular product. 2 Enter required cooking time by pressing the TIME SET PADS (The display colons flash to indicate a time is required). Only valid times of Minutes and Seconds will be accepted. e.g. 1 minute 1 second not 61 secs 3 Select the power setting press one of the POWER PADS 100%, 75%, 50% or Defrost. The LED within the selected pad will light. CALL BACK To save as a single stage program Press the required number pad example: stage 1 saved as Program 8 To review program details use CALLBACK. Press and hold CANCEL until a flashing ‘C’ appears in the program display To save a multi-stage program Follow steps 1– 3 for each stage of cooking and on completing press the PROGRAM PAD to enter a second and third stage of cooking to the program. Press the required number pad to save the program. Press the number pad for the program you wish to check and the details will be displayed. We recommend you keep a note of program instructions for future reference example: stage 1, stage 2, stage 3 saved as Program 8 The program details are displayed momentarily as the program is saved. 12 RUNNING A PROGRAM Using number pad keys to run a programme Programs 0 to 9 can be recalled using the number pad keys. The following procedure should be used to activate these programs. 1 Place the food in the centre of the oven and lower the door 2 Press the PROGRAM PAD the ‘P’ will appear in the PROGRAM DISPLAY. (Microcook HD models only) TO STOP THE COOK CYCLE The cycle may be stopped and cancelled at any time by pressing the CANCEL PAD. 3 Press the number pad key you wish to activate (0-9) The program number and total cooking time appear on the display and the first stage indicator will light (not on 1025 models). PAUSE The cycle may interrupted by opening the oven door. On opening the door the timer will be held at this point and the light on the relevant POWER PAD (microwave or convection) will flash to indicate an interrupted cycle. example: Program 8 The program will now operate with the total remaining time counting down on the display. When the time reaches “0:00” the oven door will ‘pop-up’. TO CONTINUE the cycle close the door, an audible warning sounds as a reminder to press any power pad to restart the timer. HD 1025 (Open door manually on 1025) 4 Taking normal precautions to avoid burning yourself, open the door and remove the food. To ensure the required core temperature has been reached , test the food with a temperature probe before serving. If necessary, replace the food in the oven and cook for a little longer to achieve the required core temperature. MULTIPLE ITEM COOKING ( Not available on HD1025 models ) This facility automatically calculates the cooking time required for two or three food items when using a programmed cook cycle. 1 Enter the number of items to be cooked, i.e. 2 or 3. 2 Touch the program pad, a ‘P’ will appear in the program display 3 Press the desired program selection pad. The required cooking time is calculated and the cycle begins. 4 When the cooking cycle has finished, test the food with a temperature probe before serving. If necessary, repace the food in the oven and cook for a little longer to achieve the required core temperature. 13 To review a program use CALLBACK CLEANING For the oven to operate at peak efficiency, the cavity, door and air filters must be kept clean. A daily cleaning routine will ensure that you comply with the required hygiene standards and will help to maintain and prolong the efficiency of your oven. Follow the SAFETY INSTRUCTIONS at the beginning of this manual. ALWAYS switch off at the electrical supply. As required, wipe out spillages with disposable paper wipes NEVER use steel wool, knives or harsh abrasives on any part of the oven Faults arising from neglect or misuse including use without clean filters in place are not covered by the guarantee. Service visits as a result of such faults will be chargeable. As with all electrical appliances, it is wise to have the electrical connections inspected periodically. Cleaning the Air filter 1. Ease the air filter cover from the top of the rear panel. 2. Wash in clean, warm soapy water, rinse and pat dry. Put back into position. DO NOT USE THE OVEN WITHOUT A CLEAN AIR FILTER IN POSITION Cleaning the door 1. Lift the door up and out of the channels. 2. Wipe the door and seals with a damp cloth. NEVER IMMERSE DOOR IN WATER. 3. Examine the door and seals for signs of wear and damage. Refer to SAFETY INSTRUCTIONS 4. Using both hands slot the door back into its channels and slide fimly down. Cleaning the oven cavity 1. Wipe down the sides and the floor of the cavity with a clean damp cloth. 2. Gently wipe the ceiling. Take care not to press upwards as this could damage the concealed stirrer fans. Cleaning the control panel and exterior surfaces Wipe down regularly with a damp cloth. Hints and Tips for stubborn stains in the oven cavity 1. Place a container of water (1.5 litres) into the centre of the oven cavity. 2. Set timer to 9 minutes. 3. Set microwave power to 100%. 4. At end of steam cycle wipe out cavity with a clean cloth. 14 Door seals PROBLEM SOLVING Error code display The oven will identify some of the most common problems by flashing an error message code in the time display window. Fault Error code display Recommended action Door not fully shut. Possible electrical fault Oven has overheated Close door fully. Call Merrychef Service Dept. Clean air filter and vents Leave oven switched on but not cooking for 4-5 minutes. No time has been set. Invalid time has been set. e.g. 61secs The required cooking time for multiple items exceeds 30minutes Set a time Set time in correct format 1:01 Display shows 0:00 but the cavity light and cooling fans do not operate Oven has gone into ‘stand-by’ mode, press any pad to restart. Control panel lights do not operate with oven connected to electrical supply. 1. Check oven is connected to electrical supply 2. Check fuse is correct value and in good order. 3. Call Merrychef Service Dept. Remove one item and try again Please remember - No servicing or repairs should be carried out other than by an approved Service Engineer Technical Specifications Height ( mm ) Microcook HD1025 & HDV1025 Width ( mm ) 489 500 Depth ( mm ) 425 Microcook HD1425 & HDV1425 Microcook HD1725 & HDV1725 489 500 500 Microcook HD1925 & HD1925 Microcook HD2025 Manufacturers recommended clearances 489 50 650 500 50* 50 each side Microwave Wt. Power output ( kgs) ( watts ) 40 1025 42.5 1425 42.5 1725 42.5 1925 42.5 2025 *For 2 ovens side by side clearance is 100mm Power Supply: See rating plate at rear of oven This equipment complies with the following EEC directives: EMC 89/336 EEC LVD 73/23 EEC Merrychef reserves the right to alter specifications without prior notice. 15 Pt No. 32Z3046GB Issue 5 MERRYCHEF SERVICE DEPARTMENT To register for service visits, please complete and return the SERVICE REGISTRATION CARD enclosed with this guide. Unless this card is received, the terms of the guarantee will commence from the date of despatch from the manufacturer and NOT from the date of purchase. If, after referring to the PROBLEM SOLVING section, you need a service engineer, telephone: FREE CALL 1800 998 125 www.iceandoven.com Please make a note of the following before you call and for future reference: Model number Serial number Proof of purchase Oven address Post code Telephone number: Name to contact: Hours of access: Your nearest Merrychef approved engineer will be notified immediately and will endeavor to respond within 24 hours. However, there are certain circumstances when such rapid service may not be possible, e.g. public holidays, weekends, remote areas etc. Each engineer is able to carry out repairs and replacements ‘on site’. The oven need not be removed to a workshop unless access is limited to the engineer, e.g. offshore establishments. On such occasions it is the customer’s responsibility to return the oven to an authorised service centre for repair. During the Guarantee period, service calls are chargeable when: The oven has been incorrectly installed. The oven has been damaged, whether by accident, neglect, abuse etc. Incorrect cooking techniques have been used. A leakage check is requested outside normal service routine. SERVICE CONTRACTS Service contracts may be extended at the time of purchase. Contact the Merrychef Service Department for more details. 16