1
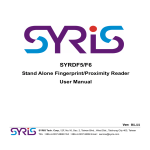
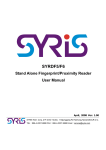
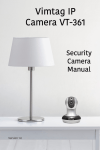
Cloud Camera user manual IP Camera - CM-IPMP
(HD Cloud camera)
User's manual
Model:CM-IPMP
Note: after the setup , in Order to protect your privacy please modify the factory
password, and keep the user name and password safe.
Manual version:
Version
Date
description
V1.0
September 16, 2012
CM-IPMP revised version of A1
1 Cloud Camera user manual Content
Product Overview .............................................................................................................................4 Packing List. .............................................................................................................................4 System Requirements................................................................................................................4 Introduction...............................................................................................................................4 Features .....................................................................................................................................5 Hardware Overview...................................................................................................................6 Installation.........................................................................................................................................7 Hardware Installation................................................................................................................7 Camera Installation Wizard.......................................................................................................8 Wireless Installation Considerations ........................................................................................11 Home page .......................................................................................................................................13 1.Camera Status Bar: ...............................................................................................................13
2. Image Settings and PTZ Control Bar. .................................................................................14
Recording ................................................................................................................................15
Playback..........................................................................................................................................15 Log ..................................................................................................................................................16 Management....................................................................................................................................17 1. Product information:...........................................................................................................17
2 . User .....................................................................................................................................18 Equipment nickname.......................................................................................................18 Password: ........................................................................................................................18 3. Media stream: .....................................................................................................................19 Stream .............................................................................................................................19 Image: .............................................................................................................................19 Frame Rate .......................................................................................................................19 4. Network ...............................................................................................................................20 1. Ethernet: ......................................................................................................................20 2. Wireless Network:.......................................................................................................21 5. Servers ................................................................................................................................22 IP address ........................................................................................................................22 6. Media transfer:....................................................................................................................23 Transfer Protocol:............................................................................................................23 7. PTZ......................................................................................................................................23 Speed...............................................................................................................................24 8. OSD:....................................................................................................................................24 Display Name..................................................................................................................25 Display date.....................................................................................................................25 Date format .....................................................................................................................25 Display Week...................................................................................................................25 9.Audio:................................................................................................................................26 Speaker............................................................................................................................26 Microphone .....................................................................................................................26 10.SD card:............................................................................................................................27 2 Cloud Camera user manual Status............................................................................................................................... 27 Capacity: .........................................................................................................................27 Usage: .............................................................................................................................27 11. Alarm: ...............................................................................................................................28
External Input:.................................................................................................................28
IO linkage:.......................................................................................................................28 12.Date/Time ..........................................................................................................................29
Date:................................................................................................................................29 Time: ...............................................................................................................................29 Time Synchronization ....................................................................................................29
Time Server Address:......................................................................................................29
13.System Maintenance: .........................................................................................................30
Online Upgrade...............................................................................................................30
Restore the default settings: ............................................................................................30 Restart the device:...........................................................................................................30 Troubleshooting ..............................................................................................................................31 Wireless Infrastructure ....................................................................................................................34 Wireless Security ............................................................................................................................36 Specifications..................................................................................................................................37 3 Cloud Camera user manual Product Overview
Packing List.
9
9
9
9
9
9
9
1 x network camera
1 x Ethernet cable
1 x 5V power adapter
1 x Disc
1 x Quick Installation Guide
1 x Bracket (base) and mounting set
1 x Wireless antenna
Note: The use of non-regulated power supply, will result in damage, and will void
the product warranty.
Please contact your dealer in case any of the described item above is missing.
System Requirements
•
Microsoft Windows ® 7, Vista ®, XP ®, Mac OS or Linux
•
CPU clocked at 1.3G or higher, at least 128MB of RAM
•
Internet Explorer 7 or later, Firefox 3.5 or later, Safari 4 and Chrome 8.0 or Later.
Introduction
Congratulations on your purchase of the Cloud CAMERA.The Cloud CAMERA has
multiple functions, is suitable for small offices and home.Unlike
traditional IP CAMERAS, Cloud CAMERA has a complete system with built-in CPU
and web server, which can transmit high-quality images, improving the security
and monitoring. Cloud CAMERA can be accessed from any computer or laptop via a local network or
from the Internet using a web browser where can be viewed and controlled.
4 Cloud Camera user manual Its installation is simple.
intuitive user-friendly WEB interface settings, can be combined with 802.11b/n /g
wireless network. The Cloud CA MERA also has a remote monitoring and
motion detection function, making it a complete, cost-effective home security
solution.
Features
9 Supports H.264/MPEG4/MJPEG stream, suitable for Local, Internet access as
well as cross-platform;
9
CMOS sensor, supports 1280 * 720,640 * 360 , 320 * 180,160 * 90 real-time
video encoding;
9
Supports Smartphone to watch the video screen, support Windows
Phone, Android system Smartphones / IPHONEs / IPADs devices
(720P HD image is available for 25fps streaming);
9
P2P Technology-free configuration plug-and-play (no need to do port mapping ,
DNS, IP address settings)
9 WPS easy wireless connectivity and privacy features.
9 Intelligent transmission technology
9
Supports two-way voice intercom, the use of carrier-grade signal processing (echo
cancellation, noise suppression, voice equaliser, comfort sound, noise
suppression).
9
Support the SNS social networks, open id (QQ, facebook landing)
9
Supports remote firmware upgrade (automatically prompt to the latest version).
9
Access to multi-users, multi-device managements.
9
Two-dimensional code, each machine has a unique ID number and password.
9
Same Encryption protection used by financial industry, (using
RSA/DH/DES/MD5/SHA/CRC/BASE64 encryption algorithm).
9
Support cloud storage technology.
9
Alarm linkage/ Push, transfer video and pictures by E-mail, FTP; SMS alarm
notification methods.
9
Support motion detection, and can be an external alarm detector, to achieve
the comprehensive protection;
5 Cloud Camera user manual 9
Support more than one type of browser for video playback and monitoring, such as IE /
Firefox / Safari / Google Chrome, etc.;
9
Supports Flash Player, Quicktime, Realplayer, VLC, The Mplayer video player
direct access to the camera.
9
9
On PTZ , 320 ° Pan rotation and 120 ° Tilt rotation;
Infrared LED for night vision range of 10 meters, All day monitoring;
support IR CUT, Day / Night;
9
Built-in WIFI module, and the flexibility to set up wireless monitoring
environment;
9
Maximum 32G SD card storage,for Snapshots and Videos;
9
Supports POE power supply (compliant with the IEEE the standard 802.3
standard). (Optional)
Overview of the Hardware view
PhotRVHQVRU
Lens
IR LED
0icrophone
Status Light
Status Light
STATE1 POWER LED
6 STATE2 Cloud Camera user manual Reset 6peaker FN %XWWRQ
WIFI
Antenna
DC5V
Power
SD card
Ethernet
External
interface
input/output
interface Audio input/output
MDFNV
Note: press the reset buttom once to restart; Press and hold press the reset button for
5 seconds, to reset to factory default.
Installation
Hardware Installation
Connect the network cable and power
Wired: Plug the Ethernet cord into the
Ethernet port into the IPCAM
and the other end into the router
Wireless: The package comes with an antenna. Connect it onto the back of the unit.
Also connect the power using the original power adapter.
7 Cloud Camera user manual POWER LED should be red.
Connect an external alarm interface and an
external audio
External audio input / output interface:
Audio
IN: MIC and Audio OUT: External Speaker or Headphone
A
Camera Installation Wizard
The first step to configure the network connection:
1.WIRED LAN IPCAM connect to the power
supply and Network Cable. The Power indicator will lid in
STATE2
steady red light.
indicator light
STATE2 indicator will also turn red,but
Wait 20 seconds, and the led will turn green and flash every 3 seconds
8 Cloud Camera user manual 2. Wi-Fi: WIFI: You Can use either the (WPS) connection
or manually login to the router and look for the IPCAM IP.
Power the unit ON and wait until the Unit stops its self test movement
and the green light is flashing on STATE2 indicator.
1..Press the FN button for 3 seconds, the button is located
in the back of the unit right above the audio jack.
FN button
2..Press the WPS Button from the router within 60seconds.
Please look at the user’s manual of the Router if you can’t
locate the button.
3..In some routers you might have to login and proceed
from the router’s WIFI connection wizard.
4..If there is no WPS option in your router, please login and look for wireless
IP address on the network.
Look for one that is new to the Network and type that IP using the Internet Browser
•.Note: The Router’s DHCP server function must be enabled.
The second step: This Following step is to create an Account for your own central management
service.
1..Go to http://www.mipcm.com and create an account typing your new username and password.
2..Please keep these two information safe.
Mobile client software to download
language option Input ID number or registered account Enter Password
9 The registered account user Cloud Camera user manual ce.
Central Management Interface
User's interface
Play Button C: Install Plug-in:
10 Cloud Camera user manual Click on the install plugin Note: If the Unit is not connected to internet, you can still watch it on your local lan just typing the
IP address of you IPCAM . the camera's ip can be found in your router.
Wireless Installation Considerations
IPCAM wireless cameras allows you to install anywhere in the wireless coverage area
However, the wireless signal needs to pass through the walls, ceilings and other objects.Signal strenght
may vary depending on your room or office's type of building materials and environmental RF (radio
frequency) noise. Please follow these basic guidelines to maximize wireless range:
1. The Wall, ceiling between the routers and other network devices (such as
network cameras) minimize the number - and each wall or ceiling will weaken the signal between
3 -90 feet
2. Note that if you have walls between the camera and the router it can lower the range and the
transmition quality.Specially if the transmission line and the wall makes an angle lower or over 90°.
11 Cloud Camera user manual
3. Building materials makes difference. The metal door or aluminum
frame will weaken the wireless signal. Place the access points, wireless
routers and other network equipment to transmit signal through drywalls or open
doorways. Materials and objects, such as glass, steel, metal,
water (fish tanks), mirrors, file cabinets, brick and concrete walls will weaken
these signals.
4. This product should be placed in at least 3-6 feet or 1-2 meters away from any RF
generating electronic devices and appliances.
5. If you are using 2.4GHz cordless phones or other radio equipments
(such as microwaves), your wireless connection may deteriorate
drop completely. Put the 2.4GHz phone base away from the wireless device
as possible. Even if the phone is not being used, the dock will still transmit signals.
12 Cloud Camera user manual Home page
Once Logged in, at the Home page, press on Play button to see a live video.
Double‐click the video to watch window, can full screen display:
One .Camera status bar:
1. Here, you can see the online status of each camera.
• Green means camera is online and ready.
• Yellow means the camera online, but the camera password has
been changed. You need to enter a new password in order to access
the camera.
• Red indicates the camera is offline and not accessible remotely.
1. If the camera is offline, try these following approaches:
• Check to make sure the camera's network connection is normal.
• Try restarting your network router.
• Check the camera cable connections to ensure that they are securely
connected.
• Check and confirm if the camera's STATE2 green light flashes
(every 3 seconds).If you still cannot access, please reboot the unit.
13 Cloud Camera user manual 2.
: Searches the IPCAM within the local LAN, and add the remote IPCAM
and manage the cameras which had been added.
3.
: show and hide the status bar
Two. Image settings and PTZ control bar.
1.
: Exit the video interface.
2.Brightness: adjust the brightness level of the video screen.
3.Contrast: adjust the video screen contrast level.
4.Saturation: adjust the video screen color saturation level.
5.
: PTZ control IPCAM up / down / left / right
6.
: Control the Audio Volume
7.
: Display and hide the Status bar.
Three. Interface buttons:
1.
Video play / pause button: Click button on the video image playback / pause.
Click on the inverted triangle button, select playback image resolution (1280 *
720,640 * 360,320 * 180,160 * 90).
2.
Record button (the recorded files will be stored on SD Card ): Click on the
audio / video recording button
on the inverted triangle button
, the icon will indicate rec on
to enter the
mode
Recording Options:
Option1 - 24/7 recording mode
Option 2 - Schedule Recording
Alarm Recording Options:
I/O Alarm : Triggered by an External alarm device
Motion Alarm: Triggered by a Video motion detection
14 Cloud Camera user manual Audio Recording:
When Enabled, it will record audio when alarm is triggered.
3. Snapshot button - Click on this icon to take snapshots from the live video.
Click on arrow down button to change the display Resolution.
(1280x720, 340x360,320x180, 160x90).
4. Intercom - a two way communication between the camera and the remote user.
Playback
Playback video from SDCARD.
Camera list Video file query and directory list Progress bar and queries to the video file number fast reverse Prev play/pause next Fast Forward 1. Select one camera from the camera List.
2. Select the start day by clicking on [begin time] and select the time by using the sliding bars for hours
and minutes and click on [query] button.
15 Cloud Camera user manual
3. After Searching, the progress bar will be displayed in color
4. Use these video controls to watch the video or look for any specific footage or event.
Log: It shows the user's log history in chronological order.
Camera list 1. Select the Camera from the list.
2. Select the Start Time.
3. Select the End Time.
4. Select a State.
5. Query
Cloud Camera user manual Management:
This section is for camera setup.
1. Product Information:
Model:
Firmware Version:
Plug-in Version:
Device Serial Number:
Modify registered users password 17 Quit, returns to the landing interface Cloud Camera user manual 2. Equipment
Modify camera's password.
Device nickname: Modify the Camera Name.
Password: Modify the Password you must enter the current password.
New Password:Modify the Password ( Please make sure you keep it safe)
Confirm Password: Confirm your New Password.
Click Apply to save the changes.
18 Cloud Camera user manual 3. Media stream:
Audio / Video Stream Bit rate Settings.
Stream: The video stream options are: high (HD) / normal (normal) / half (half) / (min)
four, and their corresponding resolution of 1280x720, 640x360, 320x180,
Image:
Resolution: Select the display resolution corresponding to the video stream resolution.
Frame Rate: Select the frame rate speed.30fps is consider realtime view, anything lower than this will
affect the playback content.
Bit Rate: select the video transmission speed rate. the higher the value the slower the transmission will
get.
I Frame Interval:Send Each Keyframe Interval.
Audio:
Encoding Type: Audio Encoding G.711, G.726, AMR, AAC, four encodings.
Sampling Rate: Refers to the frequency of the Audio Samples.
Click Apply to save Changes.
19 Cloud Camera user manual 4. Network
NIC: Ethernet (wired) and wireless networks.
4.1.Ethernet:
More Effective when connected to a wired network.
Startup Status: Displays the current Ethernet Mode.
Mac Address: Displays the current Ethernet Mac
address.
Automatically obtain an IP address: The unit will
automatically obtain its own IP address, Gateway and
Subnet mask information.
Use the Following Address: Manually gives a specific
IP address to the unit.
Auto Obtain DNS Server Address: It will automatically
Obtain its own DNS Address.
Use the follwing DNS Address: Input Manually a DNS
Address.
20 Cloud Camera user manual
4.2. Wireless Network:
NIC choose a wireless network.
Startup Status: Displays the current wireless network, enable /
disable.
Wireless mode: hot / terminal
A. Hot spot: as the default it searchs equipment, network
cameras, wireless hot spot, wireless devices through wireless
search, Point-to-point connection to the camera.
DHCP: Dynamic Host Configuration Protocol for wireless hotspots, starting address
to the end the address and gateway.
B. Terminal: As search equipment.
Connection Status: Displays the status of the wireless
network.
Select Network: Wireless will automatically search for the
cameras surrounding the wireless network terminal in the
drop-down list, select the wireless network terminal.
Password: Enter the password for the wireless network
equipment.
Click the connect button to connect the selected wireless
Click Apply to save your changes.
Mac address: displays the current wireless network Mac
address.
Automatically obtain an IP address (cameras default):
select camera
Machine automatically get connected to the router and it is
automatically assigned to
IP address / gateway / subnet mask information.
Use the following IP address: Check the user manual
allocation
One IP address / gateway / subnet mask to the camera.
Dns server address automatically exercised: After checked, camera will
Automatically get the DNS Information from the router where is connected to.
Following dns server addresses: After checked, user
Manually assign DNS to the camera.
Click Apply to save your changes.
21 Cloud Camera user manual Reset 6peaker FN %XWWRQ
WIFI
Antenna
DC5V
Power
SD card
Ethernet
External
interface
input/output
interface Audio input/output
MDFNV
Note: press the reset buttom once to restart; Press and hold press the reset button for
5 seconds, to reset to factory default.
Installation
Hardware Installation
Connect the network cable and power
Wired: Plug the Ethernet cord into the
Ethernet port into the IPCAM
and the other end into the router
Wireless: The package comes with an antenna. Connect it onto the back of the unit.
Also connect the power using the original power adapter.
7 Cloud Camera user manual 6. Media transfer:
Transfer Protocol: drop-down list have RTMP, RTSP, RTDP, MUTP, four transport
protocol, select AUTO (the default protocol RTDP).
RTMP: port 7010, do not install the plug when viewing images with this agreement.
RTSP: port is 7020, this agreement play equipment suitable for streaming media
player (such as QuickTime and VLC Universal Player) video.
RTDP / MUTP: ports 7030/7040, private P2P video streaming protocol.
Click Apply to save your changes.
7. PTZ
PTZ rotation parameter settings.
23 Cloud Camera user manual Speed: PTZ speed parameter settings, the greater the value, the PTZ faster.
Click Apply to save your changes
8. OSD:
Image screen display menu settings.
24 Cloud Camera user manual
Display Name: After checked , will display the name of the camera in the top left
corner of the screen.
Name: The user can modify the screen displays the name of the camera.
Display date : After checked , will display the date of the camera.
Date format: User can select year / month / day or month / day / year both date
formats.
Show time: After checked , will display the time of the camera.
Time format: user can select 24-hour or 12-hour system.
Display week: Check the upper left corner of the screen displays the day of the week.
Click Apply to save your changes
25 Cloud Camera user manual 9.Audio:
Speaker: Set the camera the size of the sound from the speakers, use the mouse to
drag the slide bar, the greater the value, the greater the sound from the speaker
Microphone: Set the sensitivity of the camera microphone, use the mouse to drag the
slide bar to set, the greater the value, the more sensitive microphone will be.
Click Apply to save changes.
26 Cloud Camera user manual
1.SD card:
Display the status of the camera SD card.
Status: Displays the current SD card plugged into the camera and whether it has been
read to the camera.
Capacity: Show the total size of the plug into the camera's SD card.
Usage: displays the current plug into the SD card in the camera has been used in the
situation.
Click Apply to save your changes.
27 Cloud Camera user manual 11. Alarm:
External input arming: trigger signal input, an external alarm sensor probe (such as
smoke alarms probe).Checked m ode depending on the type of external alarm probe
equipment to select normally closed or normally open.
IO linkage: the alarm trigger signal output, external alarm equipment (such as
speaker equipment). Checked, the machine triggered the alarm linkage output alarm
signal to trigger external alarm, normally closed or normally open mode depending on
the type of external alarm devices.
Click Apply to save your changes.
28 Cloud Camera user manual 12.Date/Time
Date: the date of the camera can be manually modified.
Time: time of the camera can be manually modified.
Automatically synchronized with the time server: after checked , the camera time
is automatically synchronized with the server time.
Time server address: the address of the time server.
Click Apply to save your changes.
29 Cloud Camera user manual 13 .System maintenance:
Online upgrade: If you have the latest software will prompt <update> click update,
the camera will upgrade the software online.
Note: Software upgrade on the camera there is a certain risk, software upgrade and
cannot cut off the network, or they can put the machine up dead.
Restore the default settings: click the restore button, the camera will be restored to
the factory default settings, the user will cancel the camera settings made.
Restart the device: click on the reset button to restart the camera.
Click Apply to save your changes.
30 Cloud Camera user manual Troubleshooting
This chapter provides solutions to problems that may arise in the IP CAMERA
install and running.
If you encounter problems, please read the following description. (The following
example is based on Windows ® Vista ™ and XP Description If you are using a
different operating system, your computer screen and following a similar example.)
1. What is remote access? How do I enable it?
Through remote access, you can use a web browser from any PC connected to the
Internet to access the camera. So even if you are not at home, you can watch the
camera images, and manage the camera settings.
To enable remote access, you can simply follow the Quick Installation Wizard.
If you are not connected on the camera, make sure the following items:
....The green LED camera on SETATE2 green light flashes (every three seconds
shiny 5 times).
....Network connection is working properly
... Router's LAN & WAN connection is working properly.
... The router has enabled UPnP.
... The router can get a public network IP.
... The router has been upgraded to the latest firmware version.
... You have tried to restart the router by unplugging the power and then plug it in
again the way
After the completion of the inspection of the above, you can re-landing.
2. Why photo camera's network connection unreliable?
The network cable may be a problem. Make sure the cable is working, PING
network known address of the device. If the cable connection is correct and your
network connection is working, you should receive a similar (bytes = 32 time = 2 ms)
reply.
Another possibility is that the network camera network devices such as hubs or
switches, there is a problem. Make sure that the power for all devices are connected
and working properly.
3. Why Network Camera work locally, but the remote does not work?
This may be caused by the firewall prot ection, and your system administrator to
check network firewall. The firewall may need to make some configuration changes,
in order from your local LAN, external access to the network cam era. For m ore
31 Cloud Camera user manual detailed information, please refer to the relevant sections of the cameras installed in
the router backend.
Ensure that the network camera does not conflict with any Web server running on
your network.
The default router setting might be the problem. Make sure that the router settings
configured to allow external access from your local LAN network cameras.
4. Why the image on some of the vertical white line?
There may be a CMOS sensor due to exposure to light (such as direct exposure to
sunlight or a halogen light) and overload result. The CMOS sensor is located in the
rear of the lens, its role is the measurement light signal and converts it to a digital
format so that the computer will digital format in the form of an image presented to
the user. CMOS sensor is a long time in the bright light , the network camera cannot
be immediately transferred to a dark area, so as not to damage the CMOS sensor. .
5. The camera blurred image, how to solve?
If the network camera work where light is dim, the video image may become blurred.
Another possibility is that the camera lens and CMOS sensor not good focus, the
camera aligned 5 meters away from the object, turn the lens slowly by hand
repeatedly adjusted until the image is most clear.
6. The image quality is poor, how to improve the image quality?
Determine your computer's display properties set at least six colors.16 or 256 colors
makes the image appear jitter artifacts, it seems the quality will be poor.
Network Camera image display is not configured correctly. Configuration through
the Web Management Web video interface, you can adjust the parameters to
improve the image quality, these parameters include: brightness, contrast, and color
saturation.
7. Why no images on the Web browser?
The ActiveX might not enabled. If you are through Internet Explorer to see the
image, make sure to enable ActiveX in the Internet Options menu. You may also
need to modify the browser's security settings to allow installation of ActiveX plug.
If you are using Internet Explorer version is less than 7.0, you need to upgrade to a
Web browser, in order to watch the video sent by the network camera.
8. Troubleshooting, LED status indication:
Indicator
POWER (red light)
Indicator f lashing
frequency
Long bright
normal Power supply
STATE1 (red light)
32 Status
Cloud Camera user manuals STATE1 (green light)
STATE2 (red light)
STATE2 (green light)
flash 2 times every 3
seconds
SD card connected
flash 2 times every 3
seconds
Did not get to the IP address
flash 2 times every 3
seconds
Connected on the router, but
not connected to external
networks
flash 5 times every 3
seconds
Wired is connected to external
networks, and can be accessed
remotely
flash 6 times every 3
seconds
Wireless connection on the
outside network, remote access
33 Cloud Camera user manual Wireless Infrastructure
IP CAMERA wireless products are based on industry standards for your home,
business or public access wireless network to provide a simple and compatible
high-speed wireless connection. The IP CAMERA strictly follow the IEEE standard,
wireless products allows you anytime, anywhere secure access to the data you need.
You will be able to enjoy the freedom of the wireless network.
Wireless LAN (W LAN) is a unit of the computer network by a wireless signal
instead of wires to transmit and receive data. WLAN is more and more used in home
and office environments, as well as public places such as airports, coffee shops and
universities. WLAN technology in innovative wa ys to help the character work , and
communicate more effectively. No cabling and other fixed infrastructure, as well as
better mobility provides more convenience for many users.
In many environments, the mobile network equipment needs to be connected to a
conventional Ethernet LAN, in order to use servers, printers or an Internet
connection via a wired LAN. The wireless router is used to provide such a
connection device.
What is wireless?
Wireless or WiFi technology is not using a cable to connect your computer to a
network. WiFi uses radio frequency to connect wirelessly, so you can be free to
connect computers anywhere in your home or office network.
Why buy CM-IPMP wireless equipment?
CM-IPMP is the world's leading real smartphone remote monitoring network camera
products, can get the smoothly and clearly video. And access the real P2P
technology. CM-IPMP products at reasonable prices, and excellent performance.
How does the wireless network work?
Similar with wireless phone when the wireless network work , through radio
signals to transmit data from point A to point B. However, a wireless
network have some restrictions on how you access the network . You must
be the coverage of the wireless network, in order to connect to your
computer. The wireless network is divided into two different types of
wireless local area network (WLAN) and wireless personal area network
(WPAN).
Wireless local area network (WLAN)
34 Cloud Camera user manual In wireless local area network, the access point (AP) as a computer to access
the network device. The access point has a small antenna, whether through
radio signals to transmit data. Indoor access point shown in the drawing, the
signal can reach a distance of 300 feet. In outdoor access point signal
distance up to 30 miles .Can be used such as a factory floor, industrial areas,
college and high school campuses, airports, golf courses, as well as many
outdoor occasions.
Which kind person are suitable for wireless network?
Increasingly popular wireless network technology in recent years, almost
everyone is using it, it can provide wireless solutions for the home, office
and business, D-Link.
Home
• provide for everyone at home broadband access.
• browse the web, view email, instant messaging, etc.
• No cable connection in the room around
• Simple and easy to operate
SOHO (Small Office and Home Office)
• When you at home are as in the office .everything will be in your hands
• Remote access of your office from home.
• Multiple computers to share an Internet connection and a printer
• Does not require a dedicated office space
Where to use the wireless network ?
Not just confined to the home and office, wireless technology is being extended
to every corner. People like the freedom of mobility, wireless networks are
becoming increasingly popular, more and more public places began offering
wireless access to attract people. The wireless connection in public places is
usually called "hot spots".
Use a wireless card in your laptop, you c an be in distant places such as: airports,
hotels, cafes, libraries, restaurants and conference center with wireless network.
The wireless network is easy to install, if you first installed, you will need to
work hard to understand where to start. This is why we want to provide some of
the installation steps and tips to help you complete the installation process for
the wireless network.
Prompt
35 Cloud Camera user manual When you install a wireless network, please note the following:
Post your router or access point on the center place of the network.
Verify that your router / access point on the center position of the network, in
order to get the best results. Try to place the router / access point to the highest
point in the room, so that the signal can be distributed to your room. If your
home is a two-story building, you need to install the repeater signal expanding
coverage.
Eliminate interference
Household appliances, such as cordless phones, microwaves, and televisions as
far as possible from the router / access point. This will greatly reduce the
electrical interference caused by the work at the same frequency.
Safety
Prevent your next door neighbors or intruders connect to your wireless
network. Open the router's WPA or WEP security features to protect your wireless
network. Please refer to the product manual to set the properties detailed
information.
Wireless Security
This section describes the different levels of security you can use to protect your data
from intrusion. .
IPC1 provides the following security types:
•
WPA-PSK (pre-shared password)
•
WEP (Wired Equivalent Privacy)
What is WEP?
WEP is Wired Equivalent Privacy. It is based on the IEEE 802.11 standard, using
the RC4 encryption algorithm. WEP for data encryption via your wireless network
to provide security, so that it can protect the security of transmission from one
wireless device to another
To access the WEP network, you must know the key. The key is the string you create.
Using WEP, you must specify the level of encryption. The type of encryption
36 Cloud Camera user manual determines the key length.128-bit encryption key is longer than 64.Key input HEX
(16 hex -0-9, AF) or ASCII (American Standard Information Interchange Code alphanumeric characters) format string definition. ASCII format allows you to enter
the easy-to-remember string. ASCII string used on the network transmitted converted
into HEX. Righteousness four keys can be given. You can easily change the key.
What is WPA?
WPA, or Wi-Fi Protected Access, is a Wi-Fi standard, designed to improve the
security features of WEP (Wired Equivalent Privacy).
Has two major improvements than WEP:
Improve data encryption through the Temporal Key Integrity Protocol
(TKIP).TKIP scrambles the keys using a hashing algorithm and, by adding
integrity-checking feature, ensures that the keys have not been tampered
with.WPA2 is based on 802.11i, using the Advanced Encryption Standard
(AES) instead of TKIP.
User authentication through the Extensible Authentication Protocol (EAP) ,
usually missing in WEP.WEP-based computer hardware MAC address to
restrict access to the wireless network is relatively easy be listened and stealed.
EAP builts on a more secure public key encryption system to ensure that only
through authorized network users can access the network.
WPA-PSK/WPA2-PSK uses a passphrase or key to authenticate your wireless
connection. The key is an alphanumeric password, 8-63 characters long. The
password can include symbols (!?* & _) And spaces. This key must be entered on
your wireless router or access point the same key.
Complete the quick installation the IP CAMERA guide installation, you can use the
IP address has been assigned the camera. A local IP address for your PC and one or
more shared network through a router, so assigned to the IP address of the network
camera. At this time, your local network can see the camera, configure the router to
allow the camera from a remote viewing can be viewed on the network.
Specifications
Specification
Image sensor Sensor
Display
Resolution
CM-IPMP
1/4 "color CMOS sensor
1280 * 720 pixels (1,000,000 pixels)
37 Cloud Camera user manual Audio
frequency
Videos
Network
Alarm
Hardware
interface
other
Environment
there is a camera
Minimum
illumination
Perspective
Input / Output
Audio
Compression
Video
compression
mode
Lighting
frequency
Image frame rate
Image resolution
White balance,
backlight
compensation
Night Vision
Ethernet
Support
Agreement
Wireless
standards
Support IP
addresses
Alarm detection
Alarm
notification
External alarm
Memory card
Power
Audio input /
output interface
Button
Wireless
interface
External alarm I
/O
PTZ rotation
angle
LED indication
Operating
f: 3.6mm, F: 2.4
0.5Lux
65 degrees
Built-in MIC and SPEKER, two-way voice intercom
G.711/G.726/AAC/ADPCM
MJPEG/MPEG4/H.264
50Hz, 60Hz
1-30fps
1280 * 720,640 * 360, 384 * 216,256 * 144
Automatic Query
12 IR LED, IR distance: 10 meters
A 10/100Mbps RJ-45 interface
TCP / IP, UDP / IP, HTTP, SMTP, FTP, DHCP, DDNS,
UPNP , RTSP And RTMP, MUTP
WIFI (IEEE802.11b/g/n)
Static IP address and dynamic IP address
Motion Detection
Support E-mail, FTP, SMS alarm alarm notification
methods (requires server support)
External alarm input / output
Micro SD card. (Supports up to 32GB)
DC 5V/2.0A and POE power supply (optional), power
consumption <8 watts
An audio output jack and an audio input socket
A reset button, a function button
1 WIFI external antenna interface
External alarm I / O port
Horizontal: 320 ° & Vertical: 120 °
Power / network signal / function indicator
0 ° ~ 55 ° C (32 ° F ~ 131 ° F)
38 Cloud Camera user manual Temperature
Operating
humidity
Storage
temperature
Dimensions
Specification (L*W*H)
Weight
Central
processor
RAM
Computer
Graphics Card
Requirements Operating
system
Browser
Identification certification
10% ~ 80% RH (non-condensing)
-10 ° C ~ 60 ° (14 ° F ~ 140 ° F)
112 (L) *114 (W) *157mm (H)
400g (Containing rack)
2.0GHz or above (recommended 3.0GHz)
256MB or more (Recommended 1.0GB)
64MB or more
Microsoft Windows 2000/XP, Vista, Windows7, Mac OS,
Linux
IE6 or later / Firefox / Google browser or other
standards-compatible browser
CE, FCC,ROHS
39