1
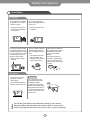
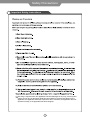
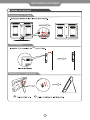
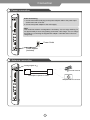
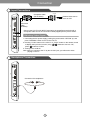
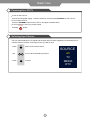
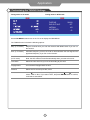
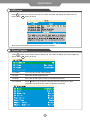
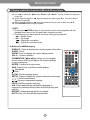
CONTENTS
Safety Precautions
- Power Supply
- Installation
- Use and Maintenance
- Important Safety Instructions
1
2
3
4-5
User Guidance Information
- Accessories
- Names of each part
- Remote Control
6
6-7
8
Connection
- Power connection
- Antenna connection
- Input connections
- Headphone connection
9
9
10
10
Basic Use
- Powering the LCD TV
- Selecting input source
11
11
Application
- Operating the menu
- Customizing the PICTURE Settings
- Customizing the FUNCTION Settings
- Customizing the TUNING Settings
- EPG menu
- Closed Caption
12
13
14
15
16
16
Media Operation
- Playing media files from the USB and SD card slots
- System Settings for Media
17-18
19-20
Maintenance and Service
- Troubleshooting
21
Safety Precautions
Power Supply
Warnings
Do not touch the power
plug with wet hands.
. Doing so may result in
electric shock.
Do not bend the power
cord excessively or place
heavy objects on it.
. Doing so may result in
fire or electric shock.
Do not plug several
devices into the same
outlet.
Do not use a damaged
power cord or plug or a
loose outlet.
. Doing so may result in
fire or electric shock.
. Doing so may cause
the outlet to overheat
and start a fire.
Insert the power plug
fully into the outlet.
. A loose or improperly
inserted power plug
may result in fire.
Be sure to ground the unit.
. Failing to do so may lead to electric shock when a short circuit or overload occurs.
If necessary, install a ground fault circuit breaker. Never ground to a telephone line,
lighting rod, or metal gas pipe.(Doing so may result in fire, electric shock, or other
hazards.)
Cautions
When disconnecting the
power cord from an AC
outlet, always grasp it by
the plug.
. Pulling on the cord
can damage the
internal wire and may
result in fire.
Always unplug the unit
before cleaning.
The purpose of these precautions is to
ensure user safety and prevent property
damage.
Be sure to read and observe all safety
precautions.
. Not doing so may
result in fire or electric
shock.
1
Safety Precautions
Installation
Warnings
Do not place the unit where it
is exposed to rain, excessive
moisture or grease.
Do not use or store flamm
able or combustible materials
near the unit.
. Doing so may result in fire
electric shock, malfunction,
or deformation.
. Doing so may result in fire
or explosion.
Do not place a burning candle,
burning anti-mosquito incense,
or lighted cigarette on top of the
unit. Do not place the unit near
any heat source sunch as a
fireplace or space heater.
. Doing so poses a serious
risk of fire.
Do not run power cords near
heat-producing appliances
such as radiators, stoves, or
irons.
Install the antenna away from
high-voltage power lines and
communication cables and
make sure it is installed
securely.
. The excessive heat could
melt the insulation and
expose live wires, resulting
in fire or electric shock.
. If the antenna touches a
power line, contact with the
antenna could result in fire,
electric shock, serious injury,
or death.
Cautions
Do not cover the unit with
a tablecloth, curtain, or
other material.
. If the temperature inside the
unit rises, it may result in fire.
Warning
Form a drip loop where the
coaxial antenna cable enters
your building to prevent
rainwater from traveling along
the cable and coming in contact
with the antenna input terminal.
. If rainwater finds its way inside
the unit, it may result in fire or
electric shock.
The following precautions are divided into “Warning” and “Caution”.
Warning: lgnoring this precaution may result in death or serious injury.
Caution: lgnoring this precaution may result in injury or property damage.
2
Safety Precautions
Use and Maintenance
Warnings
Disconnect the power
cord from the wall outlet
during an electric storm.
Do not insert any metal objects,
such as a screwdriver, paper
clip, or A/V terminals..
. Not doing so may result
in fire or electric shock.
. Doing so poses a serious
risk of fire or electric shock.
Never disassemble or modify
the unit in any way. Do not
attempt to service the unit
yourself.
. Doing so may result in fire
or electric shock. If the unit
requires repair, contact the
service center.
Cautions
When not using the unit for
long periods of time, disconnect the power cord from
the wall outlet.
When moving the unit, be
sure to turn off unit and
unplug the power cord from
the wall outlet.
. Dust could accumlate over time
on the unit and cause it to
generate heat and ignite, or
deteriorate insulation, which in
turn may result in an electrical fire.
. Moving the unit with the
power cord connected to the
outlet may cause damage to
the cord, resulting in fire or
electric shock.
If you notice any unusual
odors or smoke around the
unit, immediately disconnect
the unit from the outlet and
contact the service center.
. Failure to do so may result
in fire or electric shock.
Warning
When removing the batteries
from the remote control, make
sure children do not swallow
them. Keep the batteries out
of the reach of infants and
children.
. If a child has swallow a
battery, seek medical attention immediately.
Wipe off any moisture,
dirt, or dust on the power
plug pins with a clean dry
cloth.
Always turn off the unit and
unplug the power cord when
cleaning the unit. Use a soft dry
cloth to clean the unit.
. Failure to do so may
result in fire or electric
shock.
. Never clean with industrial
strength polish, wax, benzene
paint thinner, air freshener,
lubricant, detergent, or other
such chemincals. Also, do not
clean with a damp cloth.
3
As a disconnect device
from the MAINS, the
MAINS plug of the
attached adapter shall
remain readily operable.
Safety Precautions
Important Safety Instructions
Servicing is required when the apparatus has been damaged in any way, such as power
supply cord or plug is damaged, liquid has been spilled or objects have fallen into the
apparatus, the apparatus has been exposed to rain or moisture, the apparatus does not
operate normally, or the apparatus has been dropped.
4
Safety Precautions
Important Safety Instructions
Servicing is required when the apparatus has been damaged in any way.
Your TV could require servicing if any of the following occur:
• Supply cord or plug is damaged
• Objects have fallen into the apparatus
• Apparatus has been exposed to rain or moisture
• Apparatus has been dropped
• Apparatus does not operate normally
Apparatus with Class I construction shall be connected to a Main socket outlet with a
protective earthing connection.
This unit complies with America Safety directives.
This unit complies with FCC directives.
5
User Guidance Information
Accessories
The following accessories are included in the package
STANDBY INPUT
TV/AV
MUTE DISPLAY
LANG
AB/EPG
CC
SUBTITLE
EPG
-/--
ANGLE
ZOOM
10+
EXIT
SLEEP
VOL-
VOL+
TITLE
LCD
MENU
CH+
MENU LCD MENU
CH-
CH+
FAV
TEXT
DVD SETUP
DVB
SUB
MENU
SLOW
ZOOM
SLOW
STEP
SETUP
REPEAT
GOTO
INTRO
PROG
User’s Guide
A-B
Remote Control
Power adapter
TV antenna
AV connection cable
Headphones
Car adapter
Names of each part
Front view
5
Profile view
4
3
2
7
1
8
9
10
11
12
13
14
15
6
7 ANT.IN —Connect to antenna.
8
9
1 STANDBY —Switch the power on/standby.
10
2 TV/AV —Input source select.
3 VOL+/- —Volume up/down.
11
4 CH+/- —Channel Program up/down.
5 MENU —Press to display the OSD menu.
13
6 LED indicator and remote control window.
14
12
LED Blue – Power ON, LED Red – Standby
15
6
SD/MS/MMC card reader
USB jack
AV IN —Video & Audio input.
AV OUT —Video & Audio output.
EAR PHONE— Headphone out.
ON/OFF —Power switch:
up--power on, down--power off.
Power led indicator:
Light red—Battery is not full.
DC IN —Connect to DC power supply.
User Guidance Information
Names of each part
Disassembly of TV Base
Wall-Hanging
slots
Standing the TV with Bracket
7
User Guidance Information
Remote Control
Function of remote control buttons
The remote control uses infra-Red(IR). Point it towards the front of the LCD TV. The remote control
may not work correctly if it is operated out of range or out of angle.
STANDBY TV/AV
MUTE DISPLAY
LANG
STANDBY : Press to turn the TV on/standby.
TV/AV: Press to display the input source menu.
MUTE: Press to mute the TV, press again or press VOL+/button to unmute.
DISPLAY: Press to display the current program information.
CC
EPG
-/--
ZOOM
10+
SLEEP
VOLVO
L-
VOL+
LCD MENU
CH-
PROG
CH+
A-B
SUB
SLOW
SETUP
REPEAT
GOTO
Step1
Step2
Step3
Insert a batteries.
Ensure that the polarities(+ and -)
of the batteries are aligned correctly.
NUMBER buttons and -/-- button:
Choose channel directly.
Press -/-- buttons to select “-”, and press a number button to
select the channel;
Press -/-- buttons to select “- -”, and press two number buttons
to select the channel;
Press -/-- buttons to select “- - -”, and press three number
buttons to select the channel;
:Return to the previous channel viewed.
LANG: Press to display the language select menu.
CC: Closed caption(see page 16).
EPG: To show the Electronic Program Guide during no-menu
state only(see page 16).
ZOOM: Press to change the screen display mode.
VOL+/-: Volume up/down.
SLEEP : Timer.
LCD-MENU: Press to display OSD menu.
THUMBSTICK
: Allows you to navigate the
on-screen menus and adjust the system settings to your
preference.
ENTER : Confirm for source menu.
CH+/-: Channel/program up/down.
Buttons for Media operation
SUB: Press to turn on/off the subtitle display.
: Play/pause.
: Stop
SLOW: Slow the playing speed.
SETUP: Press to display the SETUP menu.
: Fast reverse/forword.
: Previous chapter/next chapter.
PROG: Edit the program and play.
A-B: Select and play the preferable paragraph of program
by pressing this key twice at the beginning and end of it.
REPEAT: Repeat playing the title or chapter.
GOTO: Play your favorite title/chapter/track.
How to use the remote control
- Check the polarity(+,-) of the batteries in the remote control.
- Check that the batteries have power.
- Check that the LCD TV is powered and that it is properly plugged in.
- Check if any three-wavelength lamp, special fluorescent or neon sign is turned on near the LCD TV.
- The remote control should be operated within 30 feet (7m) and 30° to the left and the right of the
IR receiver at the front of the LCD TV.
- Used batteries should be disposed properly.
8
Connection
Power connection
Power Connecting
1. Connect the small round plug on the power adapter cable to the power input
socket at the rear of the set.
2. Connect the power adapter to the main supply.
Note:
This model has a built-in rechargeable Li-ion battery. You can enjoy watching TV
for approximately 2 hours using battery power after a full charge. You can charge
the battery by connecting the supplied AC adapter. It will take about 3 hours to
charge fully.
Power Outlet
Power adapter
(Included)
Antenna connection
Analog+Digital 75
External Antenna
Coaxial(Round)Antenna Cable
Wall jack with F-Connector
9
Connection
Input Connections
Composite Cable
(Not included)
AV OUT
External video source
such as VCR
AV
Connection
Cable
(Included)
* Connect the LCD TV’s AV IN/OUT terminal to the output/input terminals with a
Composite Cable and an AV Connection Cable(supplied) as the picture shows.
Watching Video Signal
1. Connecting the DC power supply, pushing the power switch “OFF/ON” up, and
press “STANDBY” button to turn on the LCD TV.
2. Pressing “TV/AV” button on the LCD TV or “TV/AV” button on the remote control
to display the input source menu, using
buttons to move to “AV”,
press ENTER button to confirm.
3. Turning on the VCR etc.
Note: After you connect to the TV by the AV OUT jack, you will see the video
playing on the TV.
Headphone Connection
Connection for headphones
10
Basic Use
Powering the LCD TV
To turn on the LCD TV.
Connect the DC power supply. Push the switch up, and then press STANDBY on the LCD TV.
To turn off the LCD TV.
Press the STANDBY button on the LCD TV, and push the switch down.
To turn on/off the LCD TV by remote control
STANDBY
Pressing
button.
Selecting Input Source
* You can select between the TV signal and the input signal of other equipments connected to the TV.
* Use this function to switch to the input source you wish to view.
TV/AV
Press
button on the remote control.
SOURCE
Use
Press
to move to the desired input source.
ENTER
to select.
11
AV
TV
MEDIA
DTV
Application
Operating the menu
1. Press STANDBY button to turn the LCD TV on.
2. Press LCD-MENU button on the remote control; the on-screen menu will appear on the screen.
3. Use
and
buttons to select your main menu option.
4. If you do not have a remote, use the following buttons to select an option from the sub-menu:
LCD-Menu = menu or exit
CH+/- = Scroll up and down
Vol. + = Select
1. TV / DTV menu
Allows you to make adjustments to your
picture settings.
(Select TV/DTV source for example)
2. TV / DTV menu
Allows you to setup a variety of setup options.
(Select TV/DTV source for example)
3. TV menu
Allows you to search channels and setup a variety
of channel options.
(Select TV source for example)
3. DTV menu
Allows you to search channels and setup a variety
of channel options.
(Select DTV source for example)
TIMEZONE
SAMOA
DAYLIGHT SAVE
OFF
ANTENNA
AIR
AUTOSEARCH
4. Use the
and
buttons to select an option of the sub-menu, and press the
button.
While in adjustment mode, use the
and
buttons to change the value of the item.
5. Press the LCD-MENU button to exit the menu.
Note:
Only when you input the suitable signal, the relevant items can be activated.
12
Application
Customizing the PICTURE Settings
Press LCD-MENU button on the TV set to display the OSD MENU.
The OSD menu includes the following options:
Brightness
Controls the overall brightness of the picture
Contrast
Controls the difference between the brightest and darkest regions of the picture.
Saturation
Controls the saturation of the picture.
Sharpness
Increase this setting to see crisp edges in the picture; decrease it for soft edges.
Hue
Controls the hue(only used in NTSC mode).
13
Application
Customizing the FUNCTION Settings
Press LCD-MENU button twice on the TV set to display the OSD MENU.
The FUNCTION menu includes the following options:
Language
Select the OSD menu language.
Blue Screen
Turn on/off the blue screen display when there’s no signal.
Wide Screen
Control the OSD menu display mode on the screen: 16:9, 4:3.
Reset
Press
button to reset all the set above.
14
Application
Customizing the TUNING Settings
Tuning menu in TV mode
Tuning menu in DTV mode
TIMEZONE
SAMOA
DAYLIGHT SAVE
OFF
ANTENNA
AIR
AUTOSEARCH
Press LCD-MENU button thrice on the TV set to display the OSD MENU.
The TUNING menu includes the following options:
Skip (in TV mode)
Skip the channel when you scan the channels with CH+/- button if you turn on
the function.
AFC (in TV mode)
Automatic frequency control, the LCD TV will autosearch the best signal on the
appointed frequency if you turn on the function.
Fine Tune
(in TV mode)
Fine tune the frequency of the channel.
Note: the AFC will be turned off automatically when you start to fine tune.
Time Zone
Select the Time Zone for your TV set according to you area.
Daylight Save
Turn on/off the Daylight Save function.
Antenna
Select the TV source input: AIR, CATV.
Autosearch
Press
button, the screen will display a cue, and use
and
button to
select “YES” or “NO”, if you select “YES”, and press ENTER button to confirm,
it will start to autosearch.
15
Application
EPG menu
Press EPG button on the remote control in DTV mode, the screen will display the Guide menu as
below. Press EPG button to cancel.
Note: The content shown in the picture above is just an example.
Closed Caption
Press CC button on the remote control in DTV mode, the screen will display the Closed Caption as
below. Press CC button to cancel.
CC Display
Turn on/off the Closed Caption display.
CC Type
Select the Closed Caption service.
CC Mode
Select the Closed Caption mode from Broadcast/Customer.
CC Customer
Press
button to go to the CC customer menu to custom the CC style.
(Available only when the CC mode is selected to Customer)
16
Media Operation
Playing media files from the USB and SD card slots
- The following files formats are supported by this TV: JPG, MP3, WMA, MP4 (DivX3.11-5.11,
Xvid), MPEG1 (DAT, MPG, MPEG), MPEG2 (mpeg, mpg).
- File formats including the following are not supported by this TV: BMP, PNG, AAC, DivX 6,
DivX HD, Vob, ts.
- The following cards are supported by this TV: SD, MMC, Memory Stick (MS).
- Only full-size card formats are supported. If you wish to use compact formats such as miniSD,
microSD, Memory Stick Duo etc., please be sure to use an adapter to convert to the full-size
format.
1) Insert your USB device or card.
SD/MMC/MS card reader
USB jack
2) Press the TV/AV button to display the input source menu, Select “MEDIA” by
and press ENTER button to enter the device screen as below:
SOURCE
AV
TV
MEDIA
DTV
3) Play the Music, Video or view the Photos
2
1
3
17
4 5
/
button,
Media Operation
Playing media files from the USB and SD card slots
Ź8VHŻŹWRVHOHFW(3) - Music, (4) - Photo or (5) - Movie7KHOLVWRIIROGHUVLVGLVSOD\HG
in area (1).
Ź6HOHFWDUHD(1) XVLQJWKHŻŹNH\VDQGVHOHFWWKHIROGHUXVLQJŸź7KHOLVWRIILOHVLV
GLVSOD\HGLQDUHD(2).
Ź6HOHFWDUHD(2)XVLQJWKHŻŹNH\VDQGVHOHFWWKHILOH\RXZLVKWRSOD\XVLQJŸź
Ź3UHVVENTEREXWWRQWREHJLQSOD\EDFN
NOTE:
3UHVVLQJWKHSTOPEXWWRQRQWKHUHPRWHFRQWUROGXULQJSOD\EDFNZLOOKDOW
SOD\EDFNDQGUHWXUQWRWKHILOHDQGIROGHUQDYLJDWLRQVFUHHQ
7KHIROORZLQJNH\VKDYHVSHFLILFIXQFWLRQVGXULQJSKRWRSOD\EDFN
ŻŹ5RWDWHLPDJH
Ÿź)OLSLPDJH
'LVSOD\WKHQH[WSKRWR
'LVSOD\WKHSUHYLRXVSKRWR
4) Buttons for MEDIA playing
DISPLAY 3UHVVWRGLVSOD\WKHFXUUHQWSURJUDPLQIRUPDWLRQ
SLEEP 7LPHU
ZOOM3UHVVWRFKDQJHWKHVFUHHQGLVSOD\PRGH
VOL+/- 9ROXPHXSGRZQ
THUMBSTICK
$OORZV\RXWRQDYLJDWH
WKHRQVFUHHQPHQXVDQGDGMXVWWKHV\VWHPVHWWLQJV
WR\RXUSUHIHUHQFH
ENTER &RQILUPIRUVRXUFHPHQX
SUB3UHVVWRWXUQRQRIIWKHVXEWLWOHGLVSOD\
3OD\SDXVH
6WRS
SLOW6ORZWKHSOD\LQJVSHHG
SETUP3UHVVWRGLVSOD\WKHV\VWHPPHQXVHHQH[WSDJH
)DVWUHYHUVHIRUZRUG
3UHYLRXVFKDSWHUQH[WFKDSWHU
PROG(GLWWKHSURJUDPDQGSOD\
A-B6HOHFWDQGSOD\WKHSUHIHUDEOHSDUDJUDSKRI
SURJUDPE\SUHVVLQJWKLVNH\WZLFHDWWKHEHJLQQLQJDQG
HQGRILW
REPEAT 5HSHDWSOD\LQJWKHWLWOHRUFKDSWHU
GOTO3OD\\RXUIDYRULWHWLWOHFKDSWHUWUDFN
18
67$1'%< 79$9
M8T( 'I63LA<
LAN*
CC
(3*
ZOOM
10+
6/((3
VOLVO
L-
VOL+
/&'0(18
CH-
352*
CH+
$%
68%
6/2:
6(783
5(3($7
*272
Media Operation
System Settings for Media
System operation will define the setting of the set; these definitions will be stored until you change them
again.
General Steps of Setup Menu
1. Press SETUP on the remote control. The main menu will be shown as below.
/
buttons to select the Icon of the desired section, e.g. “TV System" and press button
2. Press the
to open that section.
button to open that section.
3. Press / to select the desired feature and again press
4. Press / to select the desired feature and then press "ENTER " to select the new setting.
to select EXIT SETUP and then press " ENTER "
5 To exit the menu, press "SETUP" or
When launching the setup routine, the pressing of the following buttons will turn off the setup menu,
while the choices that have been changed will be saved.
Menu specification
1. SYSTEM SETUP
The system setup options are illustrated below:
SOURCE
Select the source of the information you want to play: AUTO, CARD, USB
TV SYSTEM
According to the Color system of your TV, select proper TV TYPE.
TV TYPE
Format 4:3 PS, 4:3 LB, 16:9
19
Media Operation
System Settings for Media
2. LANGUAGE SETUP
The language setup options are illustrated below:
- OSD LANGUAGE: The OSD will display in the language you choose.
3. AUDIO SETUP
-TONE: Use the
/
button to move the scroll and adjust the tone.
20
Maintenance and service
Trouble shooting
- Do not use other functions that are not mentioned in this user’s manual.
- In case a problem occurs with your LCD TV, please take the following steps first.
- If the problem still occurs, turn the power off and contact your dealer or an authorized service center.
Problem
Action
The screen does not appear.
Is the power plug pulled out? Insert the power plug.
Press the power button.
The screen appears too
slowly after the power is turned on.
This problem occurs for a brief time in the progression of image
elimination processing in order to hide temporary screen noise that
occurs when the power is turned on. If the screen does not appear
after one minute, contact your dealer or an authorized service center.
Screen is too bright or too dark.
Perform brightness adjustment or contrast adjustment.
Screen is too large or too small.
Adjust the screen size.
Stripes appear on the screen
and it shakes.
This problem can occur if wireless telephones, hair dryers, or electric
drills are used near the TV.
Screen appears, Voice is not heard
1. Press the "MUTE"button.
2. Increase the sound level by pressing volume adjustment button.
3. Check if sound terminal of external input is connected properly.
4. Check if audio cables are connected properly.
5. Select and check the other input.
If the sound still does not work and you have checked every channel
to ensure that the problem is not channel specific, contact your dealer
or an authorized service center.
Remote control does not work
1. Check if main power is On.
2. Check that the batteries of the remote controller were loaded
properly.
3. Check to see if any obstacle exists between the LCD TV and the
remote control.
4. If the batteries have no power, replace them with two new
batteries.
This LCD TV is for household use and registered as harmless on electromagnetic waves. You can use
it in every location as well as residential areas.
21
VIORETM LIMITED WARRANTY
Model: PLC10V49
This VIORE brand Product, as supplied and distributed by VIORE and delivered new in the original carton to the original purchaser is
warranted by VIORE against manufacturing defects in materials and workmanship for a limited warranty period of one (1) year on parts and
labor. However, there will be only a 90 day parts and labor limited warranty for commercial use.
Proof of purchase within one year from date of purchase in the form of a Bill of Sale, Receipt or Receipted Invoice is evidence the Product is
within the limited warranty period. The Bill of Sale, Receipt or Receipted Invoice must be presented as a pre-condition to obtaining the limited
warranty service.
This limited warranty begins on the original date of purchase, and is valid only on Products purchased through VIORE authorized dealers and
used in the United States by the original purchaser. To receive warranty service, the purchaser must contact VIORE for problem determination
and service procedures. Warranty service may only be performed by a duly authorized VIORE service center. The original dated bill of sale,
receipt or receipted invoice must be presented upon request as proof of purchase to VIORE or VIORE's authorized service center.
VIORE will repair or if repairs cannot be made, VIORE will replace this Product at no charge if the Product is defective as specified in this
limited warranty during the limited warranty period. VIORE may use new, or remanufactured parts or products to repair or replace the Product
at its sole discretion. All replaced parts and Products become the property of VIORE and must be returned to VIORE. Replacement parts and
Products assume the remaining original limited warranty, or ninety (90) days, whichever is longer.
Product freight needs to be prepaid by original purchaser and shipped in either its original packaging or packaging affording an equal degree
of protection. VIORE shall not be responsible for or obligated to replace damaged goods. If you reside in California and you cannot transport
the television due to the size, weight, and method of attachment, VIORE will provide transportation for the television to the repair facility. If
you reside in a state other than California, you are responsible for the costs of transporting the television to a repair facility.
If the product is received damaged by VIORE, it is the responsibility of the consumer to file a claim against the carrier. VIORE will only store
the damaged product for 30 days and reserves the right, in its sole discretion, to dispose of the damaged product or ship it back to the
consumer at consumer’s expense after 30 days.
This limited warranty covers manufacturing defects in materials and workmanship encountered in normal, and except to the extent otherwise
expressly provided for in this statement, noncommercial use of this product, and shall not apply to the following, including, but not limited to: to
consumable parts, such as batteries, unless damage has occurred due to a defect in materials and workmanship; store display products;
product sold as a “marked down” special; product sold in “as is” or, "open box" condition; products missing accessories; products received with
no fault found; products damaged at time of delivery to VIORE; damage which occurs in shipment; delivery and installation; applications and
uses for which this product was not intended; altered product or serial numbers; cosmetic damage or exterior finish; accidents, abuse, neglect,
fire, water, lightning or other acts of nature; use of products, equipment, systems, utilities, services, parts, supplies, accessories, applications,
installations, repairs, external wiring or connectors not supplied or authorized by VIORE which damage this product or result in service
problems; incorrect electrical line voltage, fluctuations and surges; customer adjustments and failure to follow operating instructions, cleaning,
maintenance and environmental instructions that are covered and prescribed in the instruction book; reception problems and distortion related
to noise, echo, interference or other signal transmission and delivery problems; burned-in images. VIORE does not warrant uninterrupted or
error-free operation of the product.
THERE ARE NO EXPRESS WARRANTIES OTHER THAN THOSE LISTED AND DESCRIBED ABOVE, AND NO WARRANTIES
WHETHER EXPRESS OR IMPLIED, INCLUDING, BUT NOT LIMITED TO, ANY IMPLIED WARRANTIES OF MERCHANTABILITY OR
FITNESS FOR A PARTICULAR PURPOSE, SHALL APPLY AFTER THE EXPRESS WARRANTY PERIODS STATED ABOVE, AND NO
OTHER EXPRESS WARRANTY OR GUARANTY GIVEN BY ANY PERSON, FIRM OR CORPORATION WITH RESPECT TO THIS
PRODUCT SHALL BE BINDING ON VIORE. REPAIR OR REPLACEMENT AS PROVIDED UNDER THIS LIMITED WARRANTY IS THE
EXCLUSIVE REMEDY OF THE CONSUMER. VIORE SHALL NOT BE LIABLE FOR ANY INCIDENTAL, OR CONSEQUENTIAL
DAMAGES FOR BREACH OF ANY EXPRESS OR IMPLIED WARRANTY ON THIS PRODUCT; EXCEPT TO THE EXTENT PROHIBITED
BY APPLICABLE LAW, ANY IMPLIED WARRANTY OF MERCHANTIBILITY OR FITNESS FOR A PARTICULAR PURPOSE ON THIS
PRODUCT IS LIMITED IN DURATION TO THE DURATION OF THIS LIMITED WARRANTY. THIS LIMITED WARRANTY SHALL NOT
EXTEND TO ANYONE OTHER THAN THE ORIGINAL PURCHASER OF THIS PRODUCT, IS NONTRANSFERABLE AND STATES YOUR
EXCLUSIVE REMEDY.
Some states do not allow limitations on how long an implied warranty lasts, or the exclusion or limitation of incidental or consequential
damages, so the above limitations or exclusions may not apply to you. This warranty gives you specific legal rights, and you may also have
other rights which vary from state to state. Any provision contained herein which is found contrary to state or local laws shall be deemed null
and void and the remaining provisions shall continue in full force and effect.
To obtain warranty service, please contact VIORE at:
Phone: 1-877-777-1428
www.viore.com
Ver. 090904
Printed in China
VIORE, Inc. 7801 Hayvenhurst Avenue, Van Nuys, California 91406
Printed in China