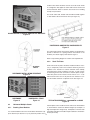
1
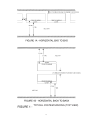
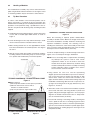
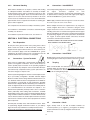
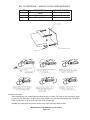
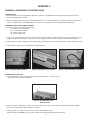
®
®
Installation and Operating
Instructions
For
ABSOLYTE® GX Batteries
SECTION 92.80 2010-12
TABLE OF CONTENTS
SECTION 1:
GENERAL ...................................................................................................................................6
SECTION 2:
SAFETY MESSAGES .................................................................................................................6
2.0
Sulfuric Acid Electrolyte Burns ....................................................................................................6
2.1
Explosive Gases..........................................................................................................................6
2.2
Electrical Shock and Burns .........................................................................................................6
2.2.1
Static Discharge Precautions for Batteries..................................................................................6
2.3
Safety Alert ..................................................................................................................................6
2.4
Important Message......................................................................................................................6
SECTION 3:
DELIVERY INFORMATION .........................................................................................................6
3.0
Receipt of Shipment ....................................................................................................................6
3.1
Concealed Damage.....................................................................................................................7
SECTION 4:
STORAGE INFORMATION .........................................................................................................7
4.0
Storage Prior to Installation .........................................................................................................7
4.1
Storage Location .........................................................................................................................7
4.2
Storage Interval ...........................................................................................................................7
SECTION 5:
INSTALLATION CONSIDERATIONS ...........................................................................................7
5.0
General ........................................................................................................................................7
5.1
Space Considerations .................................................................................................................7
5.2
Battery Location & Ambient Temperature Requirements ............................................................7
5.3
Temperature Variations................................................................................................................9
5.4
Ventilation ....................................................................................................................................9
5.5
Floor Loading...............................................................................................................................9
5.6
Floor Anchoring ...........................................................................................................................9
5.7
Connecting Cables: Battery System to Operating Equipment ....................................................9
5.7.1
Paralleling ....................................................................................................................................9
5.8
Stacking Limitations.....................................................................................................................9
5.9
Terminal Plates ............................................................................................................................9
5.10
Grounding ....................................................................................................................................9
SECTION 6:
UNPACKING..............................................................................................................................10
6.0
General ......................................................................................................................................10
6.1
Accessories ...............................................................................................................................10
6.2
Recommended Installation Equipment and Supplies................................................................10
6.3
Unpacking..................................................................................................................................10
6.4
Handling of Modules..................................................................................................................10
SECTION 7:
7.0
SECTION 8:
SYSTEM ARRANGEMENTS ....................................................................................................11
Module Arrangements ...............................................................................................................11
SYSTEM ASSEMBLY ................................................................................................................11
8.0
Module Assembly Identification .................................................................................................11
8.1
Bottom Supports (I-beams) .......................................................................................................11
8.2
Handling of Modules..................................................................................................................12
8.3
Tip Over Procedure ...................................................................................................................12
8.4
Horizontal-Multiple Stacks .........................................................................................................13
8.4.1
Stacking Base Modules .............................................................................................................13
8.4.2
Stack Tie Plates.........................................................................................................................13
8.4.3
Horizontal Stacking....................................................................................................................14
SECTION 9:
ELECTRICAL CONNECTIONS.................................................................................................14
9.0
Post Preparation ........................................................................................................................14
9.1
Connections - System Terminals ...............................................................................................14
9.2
Connections - InterMODULE.....................................................................................................14
9.3
Connections - InterSTACK.........................................................................................................14
9.4
Torquing .....................................................................................................................................14
9.5
Connections - Check .................................................................................................................14
9.6
Connection Resistance..............................................................................................................15
SECTION 10:
IDENTIFICATION LABELS........................................................................................................15
10.0
Surfaces.....................................................................................................................................15
10.1
Cell Numerals ............................................................................................................................15
10.2
System Polarity Labels ..............................................................................................................15
10.3
Warning Label ...........................................................................................................................15
10.4
Battery Nameplate.....................................................................................................................15
SECTION 11:
PROTECTIVE MODULE COVERS ...........................................................................................15
11.0
General ......................................................................................................................................15
11.1
Module Clear Cover Installation ................................................................................................15
SECTION 12:
BATTERY CHARGING ..............................................................................................................15
12.0
Initial Charge .............................................................................................................................15
12.1
Constant Voltage Method ..........................................................................................................15
SECTION 13:
BATTERY OPERATION.............................................................................................................17
13.0
Cycle Method of Operation........................................................................................................17
13.1
Floating Charge Method ............................................................................................................17
13.2
Float Charge - Float Voltages....................................................................................................17
13.3
Recharge ...................................................................................................................................19
13.4
Determining State-of-Charge ....................................................................................................19
13.5
Effects of Float Voltage..............................................................................................................19
13.6
Float Current and Thermal Management ..................................................................................19
13.7
AC Ripple ..................................................................................................................................19
13.8
Ohmic Measurements ...............................................................................................................19
SECTION 14:
EQUALIZING CHARGE.............................................................................................................20
14.0
General ......................................................................................................................................20
14.1
Equalizing Frequency ................................................................................................................20
14.2
Equalizing Charge Method ........................................................................................................20
SECTION 15:
RECORDKEEPING ...................................................................................................................21
15.0
Pilot Cell ....................................................................................................................................21
15.1
Voltmeter Calibration .................................................................................................................21
15.2
Records .....................................................................................................................................21
SECTION 16:
16.0
SECTION 17:
17.0
SECTION 18:
18.0
SECTION 19
19.0
SECTION 20
20.0
TAP CONNECTIONS ................................................................................................................21
Tap Connections........................................................................................................................21
TEMPORARY NON-USE ..........................................................................................................21
Temporary Non-Use ..................................................................................................................21
UNIT CLEANING.......................................................................................................................21
Unit Cleaning .............................................................................................................................21
CONNECTIONS MAINTENANCE.............................................................................................21
Connections...............................................................................................................................21
CAPACITY TESTING.................................................................................................................22
Capacity Testing ........................................................................................................................22
LIST OF ILLUSTRATIONS
FIGURE
DESCRIPTION
8
Fig. 1
Typical System Spacing
10
Fig. 2
Packaged Modules
10
Fig. 3
Unpacking Modules
10
Fig. 4
Handling - Lifting Strap Placement
11
Fig. 5
Handling - Module
11
Fig. 6
Typical System Arrangements
11
Fig. 7
I-Beam Hardware Installation
11
Fig. 8
I-Beam Support Installed
12
Fig. 9
Tip-Over Procedure - Shackle-Strap Usage
12
Fig. 10
Tip-Over Procedure - Photo
12
Fig. 11
Module After Tip-Over
12
Fig. 12
Horizontal Stacking - Shackle-Strap Usage
13
Fig. 13
Handling and Stacking Horizontal Modules
13
Fig. 14
Hardware Installation Sequence
13
Fig. 15
Installing Hardware
13
Fig. 16
Completed Horizontal Stack
13
Fig. 17
Positioning Horizontal Base Modules
13
Fig. 18
Tie Plate Assemblies
14
Fig. 19
Stack Connections
16
Fig. 20
Terminal Plate Kit Materials & Assembly
18
Fig. 21
Module Clear Cover Materials & Assembly
24
Fig. 22
Sample Record Form
PAGE
PAGE
LIST OF TABLES
TABLE
DESCRIPTION
7
A
Temperature Effects on Life
9
B
Absolyte GX Stacking Limitations
17
C
Equalize Charge Voltages
19
D
Float Voltage Effects on Life
20
E
Equalize Charge Voltages
PAGE
APPENDICES
APPENDIX
DESCRIPTION
25
A
Temperature Corrected Float Voltages
26
B
Maximum Storage Interval Between Freshening Charges
Versus Average Storage Temperature
27
C
Bonding and Grounding of Battery Rack
SECTION 1: GENERAL
1.0
Ensure that personnel understand the risk of working with batteries, and are prepared and equipped to take the necessary
safety precautions. These installation and operating instructions
should be understood and followed. Assure that you have the
necessary equipment for the work, including insulated tools, rubber gloves, rubber aprons, safety goggles and face protection
General Information
CAUTION!
2.2.1
Before proceeding with the unpacking, handling, installation and operation of this sealed lead-acid storage
battery, the following information should be reviewed
thoroughly. The safety procedures should be strictly
adhered to when working with Absolyte GX batteries.
DANGER!
ELECTRICAL SHOCK AND BURNS
SECTION 2: SAFETY MESSAGES
2.0
Static Discharge Precautions for Batteries
CAUTION!
Sulfuric Acid Electrolyte Burns
HIGH VOLTAGE…
RISK OF SHOCK.
DO NOT TOUCH
UNINSULATED
TERMINALS OR
CONNECTORS.
If the foregoing precautions are not fully understood, clarification should be obtained from your nearest GNB representative. Local conditions may introduce situations not covered by
GNB Safety Precautions. If so, contact the nearest GNB representative for guidance with your particular safety problem;
also refer to applicable federal, state and local regulations as
well as industry standards.
DANGER!
SULFURIC ACID ELECTROLYTE
BURNS
"Warning: Risk of fire, explosion or burns. Do not disassemble,
heat above 50°C or incinerate." Batteries contain dilute (1.295
nominal specific gravity) sulfuric acid electrolyte which can
cause burns and other serious injury. In the event of contact
with electrolyte, flush immediately and thoroughly with
water. Secure medical attention immediately.
When maintaining a connected battery string, care must be
taken to prevent build-up of static charge. This
danger is particularly significant when the worker is
electrically isolated, i.e. working on a rubber mat or an epoxy
painted floor or wearing rubber shoes.
When working with batteries, wear rubber apron and rubber
gloves. Wear safety goggles or other eye protection. These will
help prevent injury if contact is made with the electrolyte.
Prior to making contact with the cell, discharge static electricity
by touching a grounded surface.
2.1
Explosive Gases
Wearing a ground strap while working on a connected battery
string is not recommended.
DANGER!
EXPLOSIVE GASES
2.3
The safety alert symbol on the left appears
througout this manual. Where the symbol
appears, obey the safety message to avoid
personal injury.
Hydrogen gas formation is an inherent feature of all lead acid
batteries. Absolyte GX VRLA batteries, however, significantly
reduce hydrogen formation. Tests have shown that 99% or more
of generated gases are recombined within the cell under normal
operating conditions. Under abnormal operating conditions (e.g.
charger malfunction), the safety valve may open and release
these gases through the vent. The gases can explode and
cause blindness and other serious injury.
2.4
Important Message
The symbol on the left indicates an important message. If not followed, damage to
and/or impaired performance of the battery
may result.
Keep sparks, flames, and smoking materials away from the battery area and the explosive gases.
SECTION 3: DELIVERY INFORMATION
All installation tools should be adequately insulated to minimize
the possibility of shorting across connections.
3.0
Never lay tools or other metallic objects on modules as shorting,
explosions and personal injury may result.
2.2
Safety Alert
Electrical Shock and Burns
Receipt of Shipment
Immediately upon delivery, examine packaging for possible
damage caused in transit. Damaged packing material or
staining from leaking electrolyte could indicate rough handling. Make a descriptive notation on the delivery receipt
before signing. If cell or unit damage is found, request an
inspection by the carrier and file a damage claim.
Multi-cell systems attain high voltages, therefore, extreme caution must be exercised during installation of a battery system to
prevent serious electrical burns or shock.
Interrupt the AC and DC circuits before working on batteries or
charging equipment.
6
3.1
Concealed Damage
be provided to permit initial installation as well as for service or
surveillance. After installation, any additional equipment
installed after the battery should not compromise access to the
battery system.
Within 10 days of receipt, examine all cells for concealed damage.
If damage is noted, immediately request an inspection by the carrier and file a concealed damage claim. Pay particular attention to
packing material exhibiting damage or electrolyte staining. Delay
in notifying carrier may result in loss of right to reimbursement for
damages.
A minimum aisle space of 36 inches from modules / 33 inches
from clear covers should be available adjacent to the battery
system. See Figure 1 for typical space allocations required.
Following the spacing requirements will aid in maintenance of
the battery and help maintain air flow to battery surfaces to
enhance heat dissipation.
SECTION 4: STORAGE INFORMATION
4.0
Storage Prior to Installation
NOTE: When planning system space requirements, allow at
least 6 inches past system total length wherever a terminal plate
assembly is to be located (Figure 1A). Allow 4.5” minimum
between back to back stacks (Figure 1B).
Do not remove shipping materials if a storage period is planned,
unless charging is required per Section 4.2.
4.1
Storage Location
See Figure 1 for typical space allocations required. For total
length, width and height dimensions of connected systems, consult layout/wiring diagram for the particular system.
If the battery is not to be installed at the time of receipt, it is recommended that it be stored indoors in a cool (25°C, 77°F),
clean, dry location.
4.2
Storage Interval
Any modifications, alterations or additions to an
Absolyte GX system, without the expressed written
consent of GNB’s Engineering, may void any warranties
and/or seismic qualifications. Contact your GNB representative for additional information.
The storage interval from the date of battery shipment to the
date of installation and initial charge should not exceed six (6)
months. If extended storage is necessary, the battery should be
charged at regular intervals until installation can be completed
and float charging can be initiated. When in extended storage,
it is advised to mark the battery pallets with the date of shipment
and the date of every charge. If the battery is stored at 77°F
(25°C) or below, the battery should be given its initial charge
(refer to Section 10) within 6 months of the date of shipment and
receive a freshening charge (perform per Section 10 Initial
Charge) at 6 month intervals thereafter. Storage at elevated
temperatures will result in accelerated rates of self discharge.
For every 18°F (10°C) temperature increase above 77°F (25°C),
the time interval for the initial charge and subsequent freshening
charges should be halved. Thus, if a battery is stored at 95°F
(35°C), the maximum storage interval between charges would
be 3 months (reference Appendix B). Storage beyond these
periods without proper charge can result in excessive sulphation
of plates and positive grid corrosion which is detrimental to battery performance and life. Failure to charge accordingly may
void the batteryʼs warranty.
5.2
It is recommended that the battery unit be installed in a clean,
cool, dry location. Floors should be level.
A location having an ambient temperature of 24°C (75°F) to
25°C (77°F) will result in optimum battery life and
performance. Temperatures below 25°C (77°F) reduce battery
charge efficiency and discharge performance. Temperatures
above 25°C (77°F) will result in a reduction in battery life (see
Table A on Page 9).
TABLE A
TEMPERATURE EFFECTS ON LIFE
Maximum Annual
Average Battery
Temperature
NOTE: Storage in temperatures above 25°C (77°F)
will result in loss of operating life.
25°C
30°C
35°C
40°C
45°C
50°C
Initial and freshening charge data should be saved and included
with the battery historical records (see Section 15).
SECTION 5: INSTALLATION CONSIDERATIONS
5.0
(77°F)
(86°F)
(95°F)
(104°F)
(113°F)
(122°F)
Maximum
Battery
Temperature
Percent
Reduction
In Battery Life
50°C
50°C
50°C
50°C
50°C
50°C
0%
30%
50%
66%
75%
83%
(122°F)
(122°F)
(122°F)
(122°F)
(122°F)
(122°F)
For example: If a battery has a design life of 20 years at 77°F
(25°C),
but
the
actual
annual
average
battery
temperature is 95°F (35°C), the projected life of the
battery is calculated to be only 10 years.
General
Prior to starting installation of the Absolyte GX Battery System, a
review of this section is strongly recommended.
5.1
Battery Location & Ambient
Temperature Requirements
The battery temperature shall not be allowed to exceed 50°C
(122°F).
Minimum
battery
temperature
is
-40°C
(-40°F). Temperature records shall be maintained by the user in
accordance with the maintenance schedule published in this
manual.
Space Considerations
It is important to know certain restrictions for the area where the
battery is to be located. First, a designated aisle space should
7
TYPICAL SYSTEM SPACING (TOP VIEW)
8
5.3
Temperature Variations
DO NOT SELECT CABLE SIZE BASED ON CURRENT CARRYING CAPACITY ONLY. Cable size selection should provide
no greater voltage drop between the battery system and operating equipment than necessary. Excess voltage drop will reduce
the desired support time of the battery system.
Sources of heat or cooling directed on portions of the battery can
cause temperature variations within the strings resulting in cell
voltage differences and eventual compromise of battery performance.
5.7.1
Heat sources such as heaters, sunlight or associated equipment
can cause such temperature variations. Similarly, air conditioning
or outside air vents may cause cell string temperature variations.
Every effort should be made to keep temperature variations within 3°C (5°F).
5.4
Where it is necessary to connect battery strings in parallel in
order to obtain sufficient load backup time, it is important to minimize the differences in voltage drop between the battery strings
in parallel in order to promote equal load sharing upon discharge. Therefore, equal resistance of cable connections for
each parallel string is important. When paralleling multiple
strings to a load or common bus, please follow these guidelines:
Ventilation
The Absolyte battery is a Valve Regulated Lead Acid (VRLA)
low maintenance design. Tests have confirmed that under recommended operating conditions in stationary applications, 99%
or more of gases generated are recombined within the cell. In
most cases, no special ventilation and or battery room is
required. Consult your local building and fire codes for requirements that may apply to your specific location.
• Each parallel string must have the same number of cells (same
string voltage).
• The cables connecting the positive and negative terminals of
each string to the load (or bus) should be of the same size (i.e.
same capacity/cross-sectional area).
• The cables connecting the positive and negative terminals of
each string to the load (or bus) should be of the same length.
Choose the shortest cable length that will connect the battery
string that is furthest from the load, and cut all cables used to
connect each string to the load to this same length.
Hydrogen and oxygen gases can be vented to the atmosphere
under certain conditions. Therefore, the battery should never be
installed in an air-tight enclosure. Sufficient precautions must be
taken to prevent excessive overcharge.
5.5
Floor Loading
5.8
The floor of the area where the battery system is to be installed
should have the capability of supporting the weight of the battery
as well as any auxiliary equipment. The total battery weight will
depend on the cell size, number of cells, as well as module configuration involved. Consult layout/wiring diagram for the battery
system weight Prior to installation, a determination should be
made that the floor integrity is adequate to accommodate the
battery system.
5.6
Stacking Limitations
There are recommended limits on stacked (horizontal only) battery configurations, see Table B and consult your layout/wiring
diagram.
TABLE B
Absolyte GX Stacking Limitations for the 2-Cell Tray
GX System
GX2000
GX3000
GX4000
GX5000
GX6000
Floor Anchoring
Where seismic conditions are anticipated, floor anchoring should
be provided. Such anchoring is the responsibility of the user.
Non-Seismic
6 High
6 High
6 High
6 High
6 High
Seismic
6 High
6 High
6 High
6 High
6 High
3-Cell GX2000 trays provide UBC Zone 4 compliance when
stacked 4 modules high and UBC Zone 1 compliance at 8 modules high.
Where non-seismic conditions are anticipated, anchoring is recommended for maximum stability.
5.9
Four 9/16” (14.3 mm) holes are provided in the I-Beam for
anchoring. To maintain seismic certification, use four anchor
bolts per horizontal support. Anchor design is the responsibility
of the purchaser/installer.
5.7
Paralleling
Terminal Plates
Each system is supplied with a terminal plate assembly for the
positive and negative terminations. These should always be used
to provide proper connection to the operating equipment and cell
terminals. Any attempt to connect load cables directly to cell terminal may compromise battery system performance as well as
the integrity of cell post seals.
Connecting Cables:
Battery System to Operating Equipment
5.10
The Absolyte cell is a UL recognized component.
Battery performance is based on the output at the battery terminals. Therefore, the shortest electrical connections between the
battery system and the operating equipment results in maximum
total system performance.
Grounding
It is recommended that the modules or racks be grounded in
accordance with NEC and/or local codes. See Appendix C for
recommended procedure.
9
SECTION 6: UNPACKING
6.0
• Chalk line
• Line Cord
• Torpedo level (Plastic)
• Plywood straight edge 1/2” x 4” x 48”
• Torque wrenches (100 in-lbs, 35 ft-lbs)
• Ratchet wrench with 10, 13, 17, 19 mm and
1/2 in. sockets
• Box wrenches 10, 13, 17, 19 mm sizes
• Vinyl electrical tape
• Paper wipers
• 3M Scotch Brite® scour-pads™*
• Hammer drill (Floor anchoring)
* Registered trademark of 3M
PACKAGED MODULES
Figure 2
6.3
General
Carefully remove bolts and protective shipping hood. See Figure
3. Remove the bolts holding modules to shipping pallet. Also
remove hardware bolting upper channels of modules together.
Do not remove modules at this time. Base supports for horizontally stacked modules are more easily attached before removing
modules from pallet (see Section 8 System Assembly).
Do not remove shipping materials if a storage period is
planned, unless charging is required per Section 4.2.
The battery modules are generally packed in groups. Lag bolts
retain the modules to the shipping pallet together with a protective hood bolted in place. Modules are also bolted together
at the top adjacent channels. See Figure 2.
6.1
Unpacking
Note: Placement of modules on shipping pallet has
no relationship to final installation and should be
disregarded.
Accessories
NOTE: Check accessory package against packing list to assure
completeness. Do not proceed with installation until all
accessory parts are available.
Accessories are packed separately and will include the following:
• Layout/wiring diagram
• Installation and operating instructions
• Lifting straps and lifting shackles
• Bottom Supports - I beams
• Hardware bag for I beam installation
• Hardware bag for module to module connections
• Standard clear covers
• Top clear covers
• Clear cover mounting brackets and assembly hardware
• Terminal plates
• Terminal plate mounting bracket
• Terminal plate hardware kit
• Terminal Plate Cover and assembly hardware
• Module tie plates and hardware (where required)
• Lead-Tin Plated copper connectors
• Hardware bag for connectors
• NO-OX-ID® “A” * grease
• Battery warning label
• Battery nameplate
• Cell numerals with polarity indicators
• Shims (leveling)
• Seismic Shims (where required)
• Alignment (drift) pins
6.4
UNPACKING MODULES
Figure 3
Handling of Modules
The design of the modular tray permits handling by a fork lift,
portable crane or by a hoist sling . Whichever method is used,
make sure equipment can safely handle the module weight. See
Section 6.2 for module weights. Always use the two lifting straps
and four lifting shackles for lifting and placement of modules.
See Figure 4.
*Registered Trademark of Sanchem Inc.
6.2
Recommended Installation Equipment
and Supplies
• Fork lift, portable boom crane or A-Frame hoist
— GX2000 Module Weight: 315 kg (695 lb)
— GX3000 Module Weight: 447 kg (985 lb)
— GX2000 3-Cell Module Weight: 478 kg (1050 lb)
— Bottom Support (I-beams) Height: 10 mm (4 in)
HANDLING - LIFTING STRAP PLACEMENT
Figure 4
10
shipment for completeness before continuing further. The
Absolyte GX has a standard module configuration of two cells
per module. Where application voltage requires, a module may
have only one cell in a two-cell tray. For example, a 46 volt system will consist of eleven full modules and one single-cell module. Assemblies can be rotated 180° for proper polarity location.
NOTE (for Figure 4):
1) Straps must be criss-crossed.
2) Observe lifting shackle orientation and
proper channel hole use.
3) See Figure 13 for handling modules in
horizontal orientation.
4) Never lift more than one module with straps and hooks.
8.1
Bottom Supports (I-beams)
Locate bottom I-beam supports and M10 serrated flange bolts
and nuts. I-beam supports and seismic shims should be
attached to the appropriate module assembly shown on the layout/wiring diagram prior to removal from shipping pallet. Consult
layout/wiring diagram for proper location of positive/negative terminals relative to I-beam.
NOTE: Failure to use seismic shims (on systems where seismic
shims are indicated) will result in the assembly not meeting seismic certification criteria.
HANDLING MODULE
Figure 5
Secure I-beam support to a module channel as shown in
Figures 7 & 8, with access slots outward. Torque hardware to 47
Newton-meters (35 Ft-Lbs) using insulated tools. The side of the
I-beam will be approximately 3.2mm (.125”) away from the end
of the channels.
SECTION 7: SYSTEM ARRANGEMENTS
7.0
Module Arrangements
Absolyte GX batteries may only be arranged horizontally. Figure
6 shows some typical arrangements.
Absolyte GX
3 Stacks
4 High
End to End
Absolyte GX
2 Stacks
6 High
Back to Back
I-BEAM
HARDWARE INSTALLATION
Figure 7
TYPICAL SYSTEM ARRANGEMENTS
Figure 6
Modules are shipped without connectors installed. The wiring diagram enclosed with shipment will show proper battery hook-up.
Module stack height limitation depends on cell size and the seismic requirements of the application.
SECTION 8: SYSTEM ASSEMBLY
8.0
Module Assembly Identification
I-BEAM SUPPORT INSTALLED
Figure 8
Consult layout/wiring diagram for total number and type
of module assemblies in system. Compare required module
assemblies called for on layout/wiring diagram with modules in
Similarly, install the remaining I-beam on the other side of the
module.
11
8.2
Handling of Modules
The module/I-beam assembly may now be removed from the
pallet using methods outlined in Section 6.5. See Figures 4 and
5. Remaining modules may be removed in a similar manner.
8.3
Tip Over Procedure
In order to stack modules in the horizontal position, refer to
Figures 9 through 11 to perform the tip-over procedure. The
module/I-Beam assembly tip-over should be performed first. This
procedure can be performed using a portable boom crane or
fork lift in conjunction with the lifting straps and lifting shackles
supplied.
HORIZONTAL STACKING SHACKLE-STRAP USAGE
Figure 12
A. Install lifting strap using lifting shackles in channel base holes
at each end of module upper front channel as shown in
Figure 9.
Where floor anchoring is required, position module/I-Beam
assembly in desired location. Mark floor through I-beam holes
and remove module/base assembly. Install floor anchoring and
reposition module/base assembly over anchoring. Prior to
installing nuts and washers, check that assembly is level in both
axes. Level using shims provided. When level, fasten assembly
and torque nuts to 47 Newton-meters (35 Ft-Lbs).
B. Center the lifting hook onto strap and lift until strap is under
tension and raises bottom of module from floor surface.
C. While exerting manual force on the upper front of module,
lower hoist until module is in horizontal position. See Figures
10 and 11.
In order to complete stacking of a horizontal single stack refer to
Figures 12 to 15 and steps A through C listed below.
D. After tip over procedure when module is horizontal, install the
four lifting shackles and two lifting straps as shown in Figure
12 to position and handle battery in horizontal position.
NOTE: The use of leveling shims is required when assembling
any Absolyte GX system in order to meet seismic
requirements. Failure to use the shims to level each
module and to fill spaces between tray channels during
module assembly will result in the assembly not meeting
seismic certification criteria. In extreme cases, stack to
stack connectors cannot be installed.
A. Using Section 6.5 and 8.1.3 and the layout/wiring
diagram, position the next module on top of first so that channels of each mate with one another. Use drift pins to align
channel holes. Make sure channel ends and sides of the
upper and lower modules are flush. Remove lifting straps and
install M10 serrated flange bolts and nuts in open holes, finger tight. Use leveling shims to fill gaps between trays. See
Figures 13, 14 and 15.
TIP-OVER PROCEDURE - SHACKLE-STRAP USAGE
Figure 9
NOTE (for Figure 9):
1) One strap with shackles used for tip-over procedure.
2) Observe channel hole used as well as
direction of shackle insertion.
3) Tip over procedure for single modules only.
TIP-OVER PROCEDURE
Figure 10
MODULE AFTER TIP-OVER
Figure 11
B. At this time, check to see that the first two modules are plumb
front to back and side to side using wooden or plastic level
together with plywood straight edge. This is to insure proper
alignment for module interconnection later on. Torque hardware to 47 Newton-meters (35 Ft-Lbs).
C. Proceed with stacking of remaining modules, checking that
stack is plumb in both axes as stacking progresses before
torquing hardware. Be certain to check the layout/wiring diagram for correct horizontal orientation to provide proper polarity interconnection as stacking progresses. See Figure 16 for
completed assembly.
12
chalk line floor mark should be used to assure all stacks will be
in a straight line. This applies for stacks end-to-end or end-to-end
and back-to-back. Refer to Sections 6.5 and 8.1.3 for handling
and tip over procedures.
For stacks end-to-end, module ends should be butted together
so that module side channel ends meet (see Figure 17).
HANDLING AND STACKING HORIZONTAL MODULES
Figure 13
POSITIONING HORIZONTAL BASE MODULES
Figure 17
For stacks back-to-back, the two base modules are positioned to
provide a minimum 4.5” spacing between the bottoms of the
modules (not I-beam edges). Refer back to Figure 1.
Refer to layout/wiring diagram for seismic shim requirements.
8.3.2
At this time stack tie plates should be installed. It will be necessary to temporarily remove the hardware fastening the base
modules to the I-beams. To achieve maximum stack stability,
especially where seismic conditions may exist, as well as proper interfacing of inter-stack connections, metal tie plates are provided. The plates used on stacks end to end are 3” x 1” x 1/8”
with two 9/16” holes. Use one tie plate at each interface to connect the module channels of adjacent stacks. See Figure 18.
HARDWARE INSTALLATION SEQUENCE
Figure 14
8.3
8.3.1
INSTALLING
HARDWARE
Figure 15
Stack Tie Plates
TOP MODULE
COMPLETED
HORIZONTAL STACK
Figure 16
BASE MODULE
TIE PLATE ASSEMBLIES - HORIZONTAL STACKS
Figure 18
Horizontal-Multiple Stacks
Stacking Base Modules
Position plates on the module channels and secure with hardware
as shown. Where stacks have different heights (for example a 3
high stack adjacent to 4 high stack), install plates on shorter stack
top module and adjacent module. Torque hardware to 47 Newtonmeters (35 Ft-Lbs).
It is recommended that all of the first modules with bottom supports attached (see Section 8.1.1) be placed in position first. A
13
8.3.3
Horizontal Stacking
9.2
When all base modules are set in place, continue with stacking
of subsequent modules. Procedures for assembly of multiple
horizontal stacks are the same as outlined in section 8.1.3. Also
consult layout/wiring diagram. Each stack should be built up in
sequence to the same level until the top modules in all stacks
are the last to be installed. The use of a line chord attached to
upper module corners of opposite end modules as stacking progresses aids in alignment.
Consult layout/wiring diagram for correct quantity of lead-tin plated
copper
connectors
required
for
each
connection. Follow procedure in Section 9.0 and brighten leadtin plated surfaces coming in contact with copper posts. Apply a
thin film of NO-OX-ID “A” grease to these areas.
NOTE: Apply a minimum amount of grease to cover the surface.
As a rule: "If you can see it, it's too much".
This completes the mechanical assembly of the battery system.
Where multiple connectors are required across any single connection, brighten both sides of connectors along the entire
length. Grease these areas as well. It is recommended when
installing connectors on horizontal arrangements that the upper
bolts be installed first to reduce risk of accidental shorting.Refer
to layout/wiring diagram for connector placement and materials
list. Figure 19 shows typical module connections, intrastack
connections and interstack connections.
For installation of intermodular connections and terminal plate
assembly, see Section 9.
For installation of protective module cover, see Section 11.
SECTION 9: ELECTRICAL CONNECTIONS
9.0
Post Preparation
WASHERS SHOULD BE INSTALLED WITH THE CURVED
EDGE TOWARD THE CONNECTORS.
All cell posts were greased at the factory. Using either a brass
bristle suede shoe brush or 3M Scotch Brite scouring pad,
brighten the flat copper terminal surfaces to ensure lowest resistance connections. Apply a thin film of NO-OX-ID “A” grease
(supplied) to all terminal surfaces, bolts, and washers. This will
preclude oxidation after connections are completed.
9.1
Connections - Inter-MODULE
9.3
Connections - System Terminals
Connections - Inter-STACK
BOLT
WASHER CONNECTOR
POST
Multiple stacks end to end are interconnected as shown in layout/wiring diagram. Follow the procedures in Sections 9.1 & 9.3.
9.4
Each system is supplied with a terminal plate assembly for the
positive and negative terminations. These should always be
used to provide proper connection to the operating equipment
and cell terminals. Any attempt to connect load cables directly to
cell terminal may compromise battery system performance as
well as the integrity of cell post seals.
Torquing
When all inter-module and inter-stack connections have been
installed, tighten all connections to 11.3 Newton-meters (100 inLbs) Use insulated tools. Recheck connections after the initial
charge due to heating during charge.
Refer to layout/wiring diagram for location of terminal plate assembly in your battery configuration. Assemble Terminal Support
Bracket to module channel using hardware indicated, items 3, 4,
5, 6. Hardware will be located in a bag labeled K17-417240P for
top termination or K17417256 for side termination. Assemble
Terminal Plate to Support Bracket and battery posts. Hardware to
attach to Support bracket is also located in the terminal plate kit.
It is recommended that all connections be torqued to 11.3
Newton-meters (100 in-lbs). Retorque value is also 11.3 Newtonmeters (100 in-lbs). After making cable connections, assemble
Terminal Plate Covers, Items 7 & 8, to the Terminal Support Bracket
using hardware indicated. Hardware to assemble Terminal Plate
Covers will be located in the terminal plate kit. Refer to Sections
9.0 and 9.2 for electrical contact surface preparation of terminal
plate components.
9.5
Terminal plate assembly varies with termination location. Refer
to layout/wiring diagram termination location on your battery.
Figure 20 shows top termination assembly with instructions.
Do not make connections to operating system at this time.
STACK CONNECTIONS
Figure 19
Connection - Check
Again, visually check to see that all module terminals are
conected positive (+) to negative (-) throughout the battery.
Positive terminals have red cap. Negative terminals have
black cap.
14
10.3
Also measure the total open circuit voltage from terminal plate to
terminal plate. This should be approximately equal to 2.14 volts
times the number of cells in the system, e.g., a 24 cell system
would read: 24 x 2.14v = 51.4 volts. An incorrect voltage reading
may mean connectors were installed incorrectly.
Apply pressure sensitive warning label provided on a prominently visible module side or end.
10.4
9.6 Connection Resistance
SECTION 11: PROTECTIVE MODULE COVERS
11.0 General
Each module is provided with a transparent protective cover to help
prevent accidental contact with live electrical connections, and to
provide easy visual access to the system.
Resistance measurements or microhm measurements should
be taken at the time of installation and annually thereafter. Initial
measurements at installation become the benchmark values
and should be recorded for future monitoring of electrical
integrity.
When all system assembly has been completed, as well as initial testing, including initial charge and cell float voltage readings, all covers should be installed. Covers should remain in
place at all times during normal operation of the battery system.
It is important that the benchmark value for all similar connections be no greater than 10% over the average. If any connection
resistance exceeds the average by more than 10%, the connection should be remade so that an acceptable benchmark value
is established.
11.1
The cover is then installed by grasping it so that the GNB logo is
upright. Locate slots at bottom of cover to the bottom standoff
legs and slide in place. Locate holes at top of cover and install to
top standoff legs. Refer to Figure 21.
SECTION 12: BATTERY CHARGING
All benchmark values should be recorded. Annually, all connection resistances should be re-measured. Any connection which
has a resistance value 20% above its benchmark value should
be corrected.
12.0
SECTION 10: IDENTIFICATION LABELS
Initial Charge
Batteries lose some charge during shipment as well as during
the period prior to installation. A battery should be installed and
given its initial charge as soon after receipt as possible. Battery
positive (+) terminal should be connected to charger positive (+)
terminal and battery negative (-) terminal to charger negative
(-) terminal. Failure to perform the initial charge within the
time limits stated in section 4.2 will affect the performance
and life of the battery and may void the warranty.
Surfaces
Make sure surfaces are free of dirt and grease by wiping with
clean, dry wipers (isopropyl alcohol may be used) to ensure
proper label adhesion.
Cell Numerals
12.1
A set of pressure sensitive cell numerals and system
polarity labels are supplied and should be applied at this time. Cell
numerals should be applied to the cell being identified. Designate
the positive terminal cell as #1 with succeeding cells in series in
ascending order.
10.2
Module Clear Cover Installation
Refer to Figure 21 for Module Clear Cover installation. Install
standoff legs and standoff keys first, as shown.
Benchmark values for connection resistances should also be
established for terminal plates, where used, as well as cable
connections. Benchmark values should preferably be established upon installation.
10.1
Battery Nameplate
For future reference and warranty protection, apply
pressure sensitive nameplate on a prominently visible module.
Fill in date of installation and the specified capacity and rate.
Electrical integrity of connections can be objectively established
by measuring the resistance of each connection. These resistances are typically in the microhm range. Meters are available
which determine connection resistance in microhms. Be sure
that the probes are touching only the posts to ensure that the
contact resistance of connector to post is included in the
reading.
10.0
Warning Label
Constant Voltage Method
Constant voltage is the only charging method allowed. Most
modern chargers are of the constant voltage type. Determine the
maximum voltage that may be applied to the system equipment.
This voltage, divided by the number of cells connected in series,
will establish the maximum volts per cell (VPC) that is available.
Table C lists recommended voltages and charge times for the
initial charge. Select the highest voltage the system allows to
perform the initial charge in the shortest time period.
System Polarity Labels
The system polarity labels should be applied next to the positive
and negative system terminals.
Temperature Correction of Charger Voltage
V corrected = V25°C - ((T actual -25°C) x (.0055 V/°C))
15
BILL OF MATERIALS — TOP TERMINAL PLATE ASSEMBLY
ITEM
DESCRIPTION
1
PLATE, TOP TERMINAL
2
BRACKET, TERMINAL SUPPORT
3
LOCK WASHER, M10
4
FLAT WASHER, M10
5
NUT, M10 X .8D
6
BOLT, M10 X 40
7
COVER, FRONT
8
COVER, BACK
9
NUT, M6 X .8D
10
BOLT, M6 X 25
11
WASHER, M6
QTY PER SYSTEM
2
2
8
16
8
8
2
2
4
VARIES
VARIES
Terminal Plate Kit Materials & Assembly
Figure 20
16
cells require approximately 105-110% of the ampere-hours
removed to be returned to a full state of charge.
or
V corrected = V77°F - ((T actual - 77°F) x .003V/°F))
The upper voltage settings recommended, given that the maxium charge current is 5% of the nominal C100 Amp-hour rating
and the ambient temperature is 25°C (77°F), are as follows:
Please refer to Appendix A for standard values.
STEP 1
2.28 ± 0.02 VPC @ 0-2% DOD
2.33 ± 0.02 VPC @ 3-5% DOD
2.38 ± 0.02 VPC @ >5% DOD
1. Set constant voltage charger to maximum setting without
exceeding 2.35 VPC.
Example: For a target charge of 2.35 VPC on a 24-cell system,
you would set the charger voltage to 56.4 volts.
Due to the variety of applications and charging equipment (particularly in photovoltaic systems) it is recommended that you
contact an GNB representative when determining proper
recharge profiles.
Depending on the battery’s state of charge, the charger may go
into current limit at the beginning and decline slowly once the
target charge voltage is reached.
13.1
2. Record time and current at regular intervals – every hour as a
minimum.
In this type of operation, the battery is connected in
parallel with a constant voltage charger and the critical load circuits. The charger should be capable of maintaining the required
constant voltage at battery terminals and also supply a normal
connected load where applicable. This sustains the battery in a
fully charged condition and also makes it available to assume
the emergency power requirements in the event of an AC power
interruption or charger failure.
3. Continue charging the battery until there is no further drop in
charge current over 3 consecutive hours. This could take days if
the battery has been in storage for a long time.
4. When the current has stabilized, proceed to step 2.
STEP 2
13.2
1. Continue the charge for the time listed in Table C depending
on the charger voltage setting. The time is IN ADDITION to the
time spent charging in Step 1.
Float Charge - Float Voltages
Following are the float voltage ranges recommended for the
Absolyte Battery System. Select any “volts per cell” (VPC) value
within the range listed that will result in the series string having an
average volts per cell equal to that value.
Example: charge for 12 hours if the charger voltage is set to 2.35
VPC.
TABLE C
EQUALIZE CHARGE (77°F)
CELL VOLTS
TIME (HOURS)
2.30
24
2.33
18
2.35
12
RECOMMENDED FLOAT RANGE (@77°F)
2.23 to 2.25 VPC
NOTE: Recommended float voltages are for 77°F. For other temperatures a compensation factor of .003 V/°F (.0055 V/°C) per
cell is recommended. The minimum voltage is 2.20 VPC, temperature correction does not apply below this voltage. The maximum voltage is 2.35 VPC, temperature correction does not
apply above this voltage.
2. Record cell voltages hourly during the last 3 hours of the
charge time. If, after the charge time has completed, but the lowest cell voltage has continued to rise, you may extend the
charge, monitoring cell voltages hourly, until the lowest cell voltage ceases to rise.
3. Proceed to Step 3.
Floating Charge Method
TEMPERATURE CORRECTION
V corrected = V25°C - (( T actual-25°C) x (.0055V/°C)) or
V corrected = V77°F - ((T actual-77°F) x (.003V/°F))
STEP 3
1. The initial charge is complete. Charger voltage can now be
reduced to float voltage setting per Section 13.2. For a target
float charge of 2.25 VPC on a 24-cell system, you would set the
charger voltage to 54 volts.
See Appendix A for standard values.
SECTION 13: BATTERY OPERATION
Modern constant voltage output charging equipment is recommended for the floating charger method of operation of GNB
Absolyte batteries. This type of charger, properly adjusted to the
recommended float voltages and following recommended surveillance procedures, will assist in obtaining consistent serviceability and optimum life.
In cycle operation, the degree of discharge will vary for different
applications. Therefore, the frequency of recharging and the
amount of charge necessary will vary. Generally, Absolyte GX
After the battery has been given its initial charge (refer to
Section 12), the charger should be adjusted to provide the recommended float voltages at the battery terminals.
13.0
Cycle Method of Operation
17
BILL OF MATERIALS — MODULE CLEAR COVER MATERIALS
ITEM
1
2
3
DESCRIPTION
Cover
Standoff Leg
Standoff Key
QTY PER SYSTEM
1
4
4
Assembly Instructions:
Install standoff legs and standoff keys to module channel as shown. The cover is then installed by grasping it so that the GNB logo is upright. Locate slots at bottom of cover to bottom standoff legs and slide in
place. Locate holes at top of cover and install to top standoff legs.
Standoff legs need not be removed to access cells, simply remove protective cover.
Module Clear Cover Materials and Assembly
Figure 21
18
obtain the optimum service life from the battery, it is important to
make sure the battery’s float voltage is within the recommended
range.
Do not use float voltages higher or lower than those recommended. Reduced capacity or battery life will result.
13.6 Float Current and Thermal Management
Check and record battery terminal voltage on a regular
basis. Monthly checks are recommended. See Section 15.0,
Records. If battery float voltage is above or below the correct
value, adjust charger to provide proper voltage as measured at
the battery terminals.
13.3
Increased float current can portend a condition known as thermal
runaway, where the battery produces more heat than it can dissipate. VRLA batteries are more prone to thermal runaway
because the recombination reaction that occurs at the negative
plate, and reduces water loss, also produces heat. High room
temperature, improper applications, improper voltage settings,
and incorrect installation practices can increase the chances of
thermal runaway.
Recharge
All batteries should be recharged as soon as possible following
a discharge with constant voltage chargers. To recharge in the
shortest period of time, raise the charger output voltage to the
highest value which the connected system will permit. Do not
exceed the voltages and times listed in Table E in Section 14.2.
13.4
As with good record-keeping practices, monitoring float current
can prevent a minor excursion from becoming a major issue.
Determining State-of-Charge
13.7 AC Ripple
If the normal connected load is constant (no emergency load
connected), the following method can be used to determine the
approximate state-of-charge of the battery. The state-of-charge
can be identified to some degree by the amount of charging current going to the battery. When initially placed on charge or
recharge following a discharge, the charging current, read at the
charger ammeter, will be a combination of the load current plus
the current necessary to charge the battery. The current to the
battery will start to decrease and will finally stabilize when the
battery becomes fully charged. If the current level remains constant for three consecutive hours, then this reflects a state-ofcharge of approximately 95 to 98%. For most requirements, the
battery is ready for use.
AC ripple is noise or leftover AC waveform riding on the DC
charge current to the battery that the rectifier did not remove. It
is usually more pronounced in UPS than telecom systems.
Proper maintenance of the UPS capacitors will reduce the
amount of ripple going into the battery.
Establishment of absolute limits for AC ripple has always been
problematic because the degree of damage it causes depends
on the wave shape, peak-to-peak magnitude and frequency.
Accurate characterization of AC ripple requires an oscilloscope
and even then, only represents a picture of the ripple at that
moment in time.
If the normal connected load is variable (i.e. telecommunications),
the following method may be used to check the state-of-charge of
the battery. Measure the voltage across a pilot cell (See Section
15 for definition of pilot cell). If the voltage is stable for 24 consecutive hours, the battery reflects a state of charge of approximately 95%.
13.5
Whatever its exact characteristics, AC ripple is always harmful to
batteries. Depending on its particular properties, ripple can
result in overcharge, undercharge and micro-cycling that can
prematurely age the battery. The most common and damaging
result of AC ripple is battery heating which can lead to thermal
runaway. AC ripple will decrease battery life and should be
reduced as much as possible.
Effects of Float Voltage
13.8 Ohmic Measurements
Float voltage has a direct effect on the service life of your battery
and can be the cause of thermal instability.
Impedance, resistance and conductance testing is collectively known
in the industry as ohmic measurements. Each measurement is
derived using a manufacturer-specific and proprietary algorithm and /
or frequency. This means that one type of measurement cannot be
converted or related easily to another.
A float voltage above the recommended values reduces service
life. Table D shows the effects of float voltage (temperature corrected) on battery life.
TABLE D
FLOAT VOLTAGE EFFECTS ON LIFE
Temperature corrected 25°C (77°F)
Percent
Float voltage per cell
Reduction
Minimum
Maximum
in Battery Life
2.23
2.25
0%
2.28
2.30
50%
2.33
2.35
75%
“Reference” ohmic values are of dubious value because so many
factors can affect the way the readings are made and displayed
by the devices. Connector configuration and AC ripple as well as
differences between readings of temperature and probe placement will prevent the ohmic devices from generating consistent
and meaningful data. The meters work better with monoblocs
and small capacity VRLA products and less well with large
(>800-Ah) VRLA and flooded battery designs. Users should be
particularly skeptical of data taken on series-parallel VRLA battery configurations as the feedback signal to the device may follow unforeseen paths that can overwhelm it.
Voltage records must be maintained by the user in accordance
with the maintenance schedule published in this manual. To
19
the system equipment. This voltage, divided by the number of
cells connected in series, will establish the maxi-mum volts per
cell that may be used to perform the equalizing charge in the
shortest period of time (not to exceed 2.35 VPC applicable at
77°F, 25°C). Refer to Table E for voltages and recommended time
periods.
It is best for users to establish their own baseline values for their
battery as specifically configured. Do not rely on reference values.
If users wish to enhance normal maintenance and record-keeping with ohmic measurements, GNB recommends the trending
of this data over time. Use a first set of readings taken 6 months
after initial charge and installation as the baseline data.
Because cell positioning within the string (connector configuration to a particular cell) can affect the reading, always compare
each cell at baseline to itself in the new data. Standalone ohmic
data is not sufficient to justify warranty cell replacement.
NOTE: Charge volts listed in Table E are for 77°F. For other temperatures a compensation factor of .003 V/°F (.0055 V/°C) per cell is recommended. The minimum voltage is 2.20 VPC. The maximum voltage is 2.35 VPC. Temperature correction does not apply outside of
this range.
Responsible ohmic device manufacturers acknowledge that there
is no direct relationship between percent ohmic change from
baseline and battery capacity. A change from baseline of 25% or
less is in the normal noise or variability range. Changes between
25% and 50% may call for additional scrutiny of the system. An
IEEE compliant discharge test is usually warranted on systems
exhibiting more than a 50% change from baseline. Consult an
GNB representative for specific questions about ohmic data.
V corrected = V25°C - ((T actual-25°C) x (.0055 V/°C)) or V corrected = V77°F - ((T actual-77°F) x (.003 V/°F))
See Appendix A for standard values.
STEP 1
SECTION 14: EQUALIZING CHARGE
A. Set constant voltage charger to maximum setting without exceeding 2.35 VPC.
Under normal operating conditions an equalizing charge
is not required. An equalizing charge is a special charge
given a battery when non-uniformity in voltage has developed between cells. It is given to restore all cells to a fully
charged condition. Use a charging voltage higher than the
normal float voltage and for a specified number of hours,
as determined by the voltage used.
B. Record time and current at regular intervals – every hour as a minimum.
14.0
General
Example: For a target charge of 2.35 VPC on a 24-cell system, you
would set the charger voltage to 56.4 volts.
C. Continue charging the battery until there is no further drop in
charge current over 3 consecutive hours.
D. When the current has stabilized, proceed to step 2.
STEP 2
Non-uniformity of cells may result from low float voltage due
to improper adjustment of the charger or a panel voltmeter
which reads an incorrect (higher) output voltage. Also, variations in cell temperatures greater than 5°F (2.78°C) in the
series string at a given time, due to environmental conditions or module arrangement, can cause low cells.
14.1
A. Continue the charge for the time listed in Table E depending on the
charger voltage setting. The time is IN ADDITION to the time spent
charging in Step 1.
Example, charge for 12 hours if the charger voltage is set to
2.35 VPC.
TABLE E
EQUALIZE CHARGE (77°F)
CELL VOLTS
TIME (HOURS)
2.30
24
2.33
18
2.35
12
Equalizing Frequency
An equalizing charge should be given when any of the following
conditions exist:
A. The float voltage of any cell is less than 2.18 VPC.
B. A recharge of the battery is required in a minimum time period following an emergency discharge.
B. Record cell voltages hourly during the last 3 hours of the charge
time. If, after the charge time has completed, but the lowest cell voltage has continued to rise, you may extend the charge, monitoring
cell voltages hourly, until the lowest cell voltage ceases to rise.
C. Individual cell(s) float is more than +/- 0.05 volts from average.
D. Accurate periodic records (See Section 15) of individual cell
voltages show an increase in spread since the previous semiannual readings.
C. Proceed to Step 3.
An annual equalize charge is recommended to help ensure uniform cell performance.
14.2
Equalizing Charge Method
STEP 3
The Equalize charge is now complete. Charger voltage can now be
reduced to float voltage setting per Section 13.2. For a target float
charge of 2.25 VPC on a 24-cell system, you would set the charger
voltage to 54 volts.
Constant voltage charging is the method for giving an equalizing
charge. Determine the maximum voltage that may be applied to
20
SECTION 15: RECORDKEEPING
SECTION 17: TEMPORARY NON-USE
A pilot cell is selected in the series string to reflect the general
condition of cells in the battery. The cell selected should be the
lowest cell voltage in the series string following the initial charge.
See Section 12.0 - Initial Charge. Reading and recording pilot
cell voltage monthly serves as an indicator of battery condition
between scheduled overall individual cell readings.
An installed battery that is expected to stand idle longer than the
maximum storage interval (see Section 4.2), should be treated
as stated below. The maximum storage interval is 6 months if
stored at 25°C, 77°F.
15.0
15.1
Pilot Cell
17.0
Give the battery an equalizing charge as per Section 14. Following
the equalizing charge, open connections at the battery terminals to
remove charger and load from the battery.
Voltmeter Calibration
Panel and portable voltmeters used to indicate battery float voltages
should be accurate at the operating voltage value. The same holds
true for portable meters used to read individual cell voltages. These
meters should be checked against a standard every six months and
calibrated when necessary.
15.2
Repeat the above after every 6 months (25°C, 77°F) or at the
required storage interval. See Section 4.2 for adjustments to
storage intervals when the storage temperature exceeds 25°C,
77°F.
Records
To return the battery to normal service, re-connect the battery to
the charger and the load, give an equalizing charge and return
the battery to float operation.
SECTION 18: UNIT CLEANING
The following information must be recorded at installation, and
annually for every year of operation after installation. These
records must be maintained throughout the life of the battery and
made available for review by GNB representatives for capacity or
life related warranty claims. Failure to collect and store these
maintenance data will void the warranty. Please review the warranty statement specific to the application for any additional
requirements.
• Individual cell voltages
• Overall string voltage
• Ambient temperature immediately surrounding battery
• Battery temperature at several places throughout the string.
Recommend 1 reading per battery stack. More data points are
recommended for larger batteries and to check for temperature gradients. Readings on the tray, cell cover or negative terminal are good places to measure battery temperature. Take
readings away from HVAC sources.
• Float current measured at stack to stack connections (optional)
• Ohmic measurements (optional). Baseline ohmic readings of
individual cells should be taken 6 months from the date of initial charge.
• Retorque connectors as part of annual maintenance.
18.0
Unit Cleaning
Periodically clean cell covers with a dry 2” paintbrush to remove
accumulated dust. If any cell parts appear to be damp with electrolyte or show signs of corrosion, contact your local GNB representative.
CAUTION!
Do not clean plastic parts with solvents, detergents, oils,
mineral spirit or spray type cleaners as these may cause
crazing or cracking of the plastic materials.
SECTION 19: CONNECTIONS MAINTENANCE
19.0
Connections
Battery terminals and intercell connections should be corrosion
free and tight for trouble-free operation. Periodically these connections should be inspected.
ONCE PER YEAR READINGS ARE THE ABSOLUTE MINIMUM REQUIRED TO PROTECT WARRANTY. More frequent
readings are recommended, especially for critical sites. Good
record-keeping will prevent minor issues from escalating into
more serious problems over time. See Figure 22 for a sample
record-keeping form.
CAUTION: DO NOT WORK ON CONNECTIONS
WITH BATTERY CONNECTED TO CHARGER OR
LOAD.
If corrosion is present, disconnect the connector from the terminal.
SECTION 16: TAP CONNECTIONS
16.0
Temporary Non-Use
Gently clean the affected area using a suede brush or Scotch
Brite scouring pad. Apply a thin coating of NO-OX-ID “A” grease
to the cleaned contact surfaces, reinstall connectors and
retorque connections to 11.3 Newton-meters (100 inch pounds).
Tap Connections
Tap connections are not to be used on a battery. This can cause
overcharging of the unused cells and undercharging of those
cells supplying the load, thus reducing battery life.
21
All terminal and intercell connections
should be retorqued at least once every year to
11.3 Newton-meters (100 inch pounds).
NOTE: Design and/or specifications subject to change without
notice. If questions arise, contact your local sales representative for clarification.
SECTION 20: CAPACITY TESTING
20.0
Capacity Testing
When a capacity discharge test is desired, it is recommended
that it be performed in accordance with IEEE-1188*, latest revision.
An equalizing charge, as described in Section 14.2, must be performed within 7 days prior to the capacity test. The batteries
must be returned to float charging immediately after the equalize charge completes.
After the capacity discharge has completed, the batteries can be
recharged in the shortest amount of time by following the equalize charge procedure described in Section 14.2.
*IEEE-1188: Recommended Practice for Maintenance, Testing,
and Replacement of Valve-Regulated Lead-Acid (VRLA)
Batteries for Stationary Applications.
22
23
Volts
TYPE:
Conn. Ohmic
Resist. C / R / I Temp
ADDITIONAL COMMENTS:
1
2
3
4
5
6
7
8
9
10
11
12
13
14
15
16
17
18
19
20
21
22
23
24
25
26
27
28
29
30
No.
Cell
SYSTEM VOLTAGE:
No. of CELLS:
ADDRESS:
COMPANY:
DATE:
Figure 22.1
31
32
33
34
35
36
37
38
39
40
41
42
43
44
45
46
47
48
49
50
51
52
53
54
55
56
57
58
59
60
No.
Cell
Volts
TEMPERATURE:
61
62
63
64
65
66
67
68
69
70
71
72
73
74
75
76
77
78
79
80
81
82
83
84
85
86
87
88
89
90
No.
Cell
Volts
91
92
93
94
95
96
97
98
99
100
101
102
103
104
105
106
107
108
109
110
111
112
113
114
115
116
117
118
119
120
No.
Cell
Volts
CHARGER CURRENT:
PAGE 1 OF
Conn. Ohmic
Resist. C / R / I Temp
INSTALL DATE:
CHARGER VOLTAGE:
Conn. Ohmic
Resist. C / R / I Temp
MANUF. DATE:
BATTERY LOCATION / NUMBER:
SERIAL NUMBER:
ABSOLYTE BATTERY MAINTENANCE REPORT
TECHNOLOGIES
Conn. Ohmic
Resist. C / R / I Temp
INDUSTRIAL ENERGY
Figure 22.2
24
Volts
TYPE:
Conn. Ohmic
Resist. C / R / I Temp
ADDITIONAL COMMENTS:
121
122
123
124
125
126
127
128
129
130
131
132
133
134
135
136
137
138
139
140
141
142
143
144
145
146
147
148
149
150
No.
Cell
SYSTEM VOLTAGE:
No. of CELLS:
ADDRESS:
COMPANY:
DATE:
151
152
153
154
155
156
157
158
159
160
161
162
163
164
165
166
167
168
169
170
171
172
173
174
175
176
177
178
179
180
No.
Cell
Volts
TEMPERATURE:
181
182
183
184
185
186
187
188
189
190
191
192
193
194
195
196
197
198
199
200
201
202
203
204
205
206
207
208
209
210
No.
Cell
Volts
211
212
213
214
215
216
217
218
219
220
221
222
223
224
225
226
227
228
229
230
231
232
233
234
235
236
237
238
239
240
No.
Cell
Volts
CHARGER CURRENT:
PAGE 1 OF
Conn. Ohmic
Resist. C / R / I Temp
INSTALL DATE:
CHARGER VOLTAGE:
Conn. Ohmic
Resist. C / R / I Temp
MANUF. DATE:
BATTERY LOCATION / NUMBER:
SERIAL NUMBER:
ABSOLYTE BATTERY MAINTENANCE REPORT
TECHNOLOGIES
Conn. Ohmic
Resist. C / R / I Temp
INDUSTRIAL ENERGY
APPENDIX A
Temperature Corrected Float Voltages
3
4
5
6
7
8
9
10
11
12
13
14
15
16
17
18
19
20
21
22
23
24
25
26
27
28
29
30
31
32
33
34
35
36
37
38
39
2.23
2.35
2.35
2.34
2.34
2.33
2.33
2.32
2.32
2.31
2.31
2.30
2.30
2.29
2.28
2.28
2.27
2.27
2.26
2.26
2.25
2.25
2.24
2.23
2.23
2.22
2.22
2.21
2.21
2.20
2.20
Float Voltage at 25°C
2.24
2.25
2.26
2.35
2.35
2.35
2.34
2.34
2.33
2.33
2.32
2.32
2.31
2.31
2.30
2.29
2.29
2.28
2.28
2.27
2.27
2.26
2.26
2.25
2.24
2.24
2.23
2.23
2.22
2.22
2.21
2.21
2.20
2.20
2.35
2.35
2.34
2.34
2.33
2.33
2.32
2.32
2.31
2.30
2.30
2.29
2.29
2.28
2.28
2.27
2.27
2.26
2.25
2.25
2.24
2.24
2.23
2.23
2.22
2.22
2.21
2.21
2.20
2.20
2.35
2.35
2.34
2.34
2.33
2.33
2.32
2.31
2.31
2.30
2.30
2.29
2.29
2.28
2.28
2.27
2.26
2.26
2.25
2.25
2.24
2.24
2.23
2.23
2.22
2.22
2.21
2.20
2.20
2.27
2.35
2.35
2.34
2.34
2.33
2.32
2.32
2.31
2.31
2.30
2.30
2.29
2.29
2.28
2.27
2.27
2.26
2.26
2.25
2.25
2.24
2.24
2.23
2.23
2.22
2.21
2.21
2.20
2.20
Battery Temperature (°F)
Battery Temperature (°C)
Expressed in Volts per Cell
25
55
56
57
58
59
60
61
62
63
64
65
66
67
68
69
70
71
72
73
74
75
76
77
78
79
80
81
82
83
84
85
86
87
88
89
90
91
92
93
94
95
2.23
2.30
2.29
2.29
2.29
2.28
2.28
2.28
2.28
2.27
2.27
2.27
2.26
2.26
2.26
2.25
2.25
2.25
2.25
2.24
2.24
2.24
2.23
2.23
2.23
2.22
2.22
2.22
2.22
2.21
2.21
2.21
2.20
2.20
Float Voltage at 77°F
2.24
2.25
2.26
2.31
2.32
2.33
2.30
2.31
2.32
2.30
2.31
2.32
2.30
2.31
2.32
2.29
2.30
2.31
2.29
2.30
2.31
2.29
2.30
2.31
2.29
2.30
2.31
2.28
2.29
2.30
2.28
2.29
2.30
2.28
2.29
2.30
2.27
2.28
2.29
2.27
2.28
2.29
2.27
2.28
2.29
2.26
2.27
2.28
2.26
2.27
2.28
2.26
2.27
2.28
2.26
2.27
2.28
2.25
2.26
2.27
2.25
2.26
2.27
2.25
2.26
2.27
2.24
2.25
2.26
2.24
2.25
2.26
2.24
2.25
2.26
2.23
2.24
2.25
2.23
2.24
2.25
2.23
2.24
2.25
2.23
2.24
2.25
2.22
2.23
2.24
2.22
2.23
2.24
2.22
2.23
2.24
2.21
2.22
2.23
2.21
2.22
2.23
2.21
2.22
2.23
2.20
2.21
2.22
2.20
2.21
2.22
2.21
2.22
2.21
2.22
2.20
2.21
2.20
2.21
2.21
2.27
2.34
2.33
2.33
2.33
2.32
2.32
2.32
2.32
2.31
2.31
2.31
2.30
2.30
2.30
2.29
2.29
2.29
2.29
2.28
2.28
2.28
2.27
2.27
2.27
2.26
2.26
2.26
2.26
2.25
2.25
2.25
2.24
2.24
2.24
2.23
2.23
2.23
2.23
2.22
2.22
2.22
APPENDIX B
MAXIMUM STORAGE INTERVAL BETWEEN FRESHENING CHARGES
VERSUS AVERAGE STORAGE TEMPERATURE
Maximum Storage Interval
Months
Days
25
6
0
77
6
0
26
5
18
78
5
23
27
5
7
79
5
17
28
4
26
80
5
10
29
4
16
81
5
4
30
4
7
82
4
29
31
3
29
83
4
23
32
3
21
84
4
18
33
3
13
85
4
12
34
3
7
86
4
7
35
3
0
87
4
3
36
2
24
88
3
28
37
2
18
89
3
23
38
2
13
90
3
19
39
2
8
91
3
15
40
2
4
92
3
11
41
1
29
93
3
7
42
1
25
94
3
4
43
1
22
95
3
0
44
1
18
96
2
27
45
1
15
97
2
23
98
2
20
99
2
17
100
2
14
101
2
11
102
2
9
103
2
6
104
2
4
105
2
1
106
1
29
107
1
27
108
1
25
109
1
23
110
1
21
111
1
19
112
1
17
113
1
15
Average Ambient Storage Temperature (°F)
Average Ambient Storage Temperature (°C)
Maximum Storage Interval
Months
Days
26
APPENDIX C
BONDING & GROUNDING OF BATTERY RACK
INTRODUCTION
1. To insure personnel safety, and equipment protection, operation, and reliability, the battery rack should be connected to the
Common Bonding Network (CBN).
2. Electrical continuity between modules is provided through the use of serrated hardware. Testing has shown that standard systems are compliant with the GR-1089-CORE, Issue 4, Section 9 requirements of the Bonding and Grounding tests.
GROUNDING KIT INSTALLATION (OPTIONAL)
1. Each kit consists of the following components:
(2) #6 AWG, 12 in. 90°C cables
(4) “C” shaped beam clamps
(4) 1/4-20 x 0.75 in. bolts
(4) 1/4-20 x 1.00 in. bolts
2. Using (1) 1/4-20 x 1.00 in. bolt per beam clamp, connect (1) beam clamp to the I-beam flange and (1) beam clamp to the back
flange of the module (see Figure 1). Be sure to securely tighten the bolts such that the paint is penetrated (see Figure 2).
3. Attach each end of cable assembly to a beam clamp using (1) 1/4-20 x 0.75 in. bolt per end (see Figure 3). Tighten hardware securely.
4. Repeat Steps 2 and 3 for the second horizontal support (I-beam).
Figure 1: Beam Clamp Installation
Figure 2: Adequate Paint Penetration
Figure 3: Cable Assembly Installation
CONNECTING TO THE CBN
1. The recommended location for attaching the frame ground is the back “C” channel on the
upper module of the stack (see Figure 4).
Figure 4: Recommended Frame
Ground Location
2. Once the location is determined, it will be necessary to drill (2) holes for the frame ground conductor/lug (installer supplied).
Note, hole size and spacing will be dependent on the lug.
3. Using a grinder, etc., remove the paint from around the holes drilled in Step 2.
Apply a thin film of NO-OXID grease to the bare metal and attach the frame ground conductor/lug.
27
28
GNB Industrial Power –
The Industry Leader.
®
GNB Industrial Power, a division of Exide technologies, is a
global leader in network power applications including
communication/data networks, UPS systems for computers
and control systems, electrical power generation and
distribution systems, as well as a wide range of other
industrial standby power applications. With a strong
manufacturing base in both North America and Europe and a
truly global reach (operations in more than 80 countries) in
sales and service, GNB Industrial Power is best positioned to
satisfy your back up power needs locally as well as all over
the world.
Based on over 100 years of technological innovation the
Network Power group leads the industry with the most
recognized global brands such as ABSOLYTE®, GNB®
FLOODED CLASSIC®, MARATHON®, ONYX™, RELAY GEL®,
SONNENSCHEIN®, and SPRINTER®. They have come to
symbolize quality, reliability, performance and excellence in
all the markets served.
GNB Industrial Power takes pride in its commitment to a
better environment. Its Total Battery Management program,
an integrated approach to manufacturing, distributing and
recycling of lead acid batteries, has been developed to
ensure a safe and responsible life cycle for all of its products.
GNB Industrial Power
USA – Tel: 888.898.4462
Canada – Tel: 800.268.2698
www.exide.com
SECTION 92.80 2010-12
A Division of Exide Technologies