1
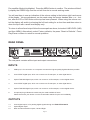
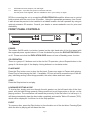
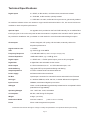
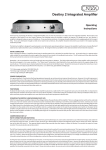
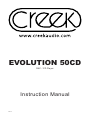
EVOLUTION 50CD
DAC / CD Player
Instruction Manual
Rev 1.2
Congratulations on purchasing a Creek EVOLUTION 50CD. Please read this manual thoroughly as it will explain in detail the features and operation of your EVOLUTION 50CD and
help to ensure a trouble free installation. Unpack the player carefully, as it is recommended
that you save the carton and packing material for future use, should you need to move home
or return it for service etc.
SAFETY INFORMATION
The EVOLUTION 50CD is designed to operate on either 220-240 Volts - 50 Hz AC, or 110120 Volts - 60 Hz AC. The voltage selector switch is located on the bottom of the case; to
select a different voltage range, use a small flat-blade screwdriver to push the switch from
one position to the other. A mains fuse is fitted to a sliding tray inside the IEC socket. There
is a spare one also fitted inside and they are designed to work in both voltage ranges. If the
mains fuse fails and the spare fails also when fitted, it usually indicates a serious internal
fault and the product should be returned to the dealer or a specialised service company for
inspection and or repair. Do not attempt to effect repairs yourself.
The product has been tested and found to comply with the limits for a Class B digital device,
pursuant to Part 15 of the FCC Rules. These limits are designed to provide reasonable protection against harmful interference in residential installations.
TO ACHIEVE MAXIMUM PERFORMANCE FROM YOUR EVOLUTION 50CD:
Install the equipment in a location which is relatively free of moisture and dust, and is well
ventilated. The equipment may not be able to perform at its best in an extremely cold or hot
environment. Do not attempt to use below 5 C / 41 F or above 35 C / 95 F.
Always handle compact discs with clean hands. Avoid using scratched discs. Do not attempt to clean the CD
player or discs with chemical solvents, as this may cause irreparable damage. Use a clean, dry cloth, or specially designed cleaning materials for discs. If the CD player malfunctions, do not open the unit and attempt
to repair it yourself. This is a highly technical product and requires specialist service – please return it to your
dealer.
Use two batteries (2 x AA) of the same type in the remote control handset. Do not use odd
or different type cells as it may affect the performance.
Keep this manual in a safe place for future reference.
Page: 1
GETTING STARTED
The EVOLUTION 50CD is not just a CD Player; it is primarily a Digital to Analogue Converter and Pre-amplifier, fitted with a Slot Drive CD transport as one of its digital sources. The
DAC has 2x SPDIF and 2x TOSLINK digital inputs capable of reading digital signals up to
24 bit 192 kHz high-resolution. The USB input is capable of playing 24 bit 96 kHz files from
either a PC or MAC computer, without additional software drivers needing to be installed.
Connect your EVOLUTION 50CD to a suitable audio amplifier. Creek Audio recommends
the EVOLUTION 50A or EVOLUTION 100A integrated amplifier as a perfect cosmetic and
performance match, but virtually any stereo amplifier with a line-level input and volume control should be OK. If you enable the EVOLUTION 50A’s volume control, it is possible to just
use it with a Power Amplifier.
Connect the mains supply using the 3-core mains cord supplied. Push the 3 pin IEC plug
into the socket on the rear panel of the EVOLUTION 50CD and plug the other end into a
suitable wall socket. Do not overload the socket with too many connectors. Ask your dealer
for advice if in doubt.
Use a pair of good-quality stereo interconnects to join the analogue output of the DAC/CD
Player to the input of your amplifier. There are both un-balanced and balanced outputs available. Although it is possible to use both outputs simultaneously we do not recommend it,
as it can reduce the performance. NEVER use Balanced-to-Unbalanced cables such as an
XLR to RCA cable, as these will give poor performance and could damage the EVOLUTION
50CD.
Note: Balanced outputs can be connected directly to the EVOLUTION 50A amplifier and if the distance between them is greater than 5 metres, this may provide a better quality of sound. Balanced audio, using XLRs is
a professional standard and designed to eliminate unwanted noise or hum over long cable lengths. For shorter
cable runs it may not improve the sound of your system, because of the additional circuitry required, so please
experiment to see what works best. Just as with un-balanced interconnects, cable quality can affect the sound
quality. Ask your dealer for advice if you are not sure.
Output level:
The factory setting fixes the output level at ‘Line Level (0dB max)’, by default. If you wish to
change this to become variable, Pre-Amplifier Mode must be enabled through the start-up
Menu. To enable ‘Preamplfier Mode’ start with the EVOLUTION 50CD switched off. Press
the MENU button and hold it down simultaneously while pressing the power button on, to
reveal a hidden Menu.
The Setup Menu will display the following: ‘Analogue Output’ and ‘Factory Defaults’.
To enable the EVOLUTION 50CD to have a volume controlled output - Select Analogue
Output by pressing the Play/Pause button. Press either the Track Back/Forward button until
Page: 2
Pre-amplifier Mode is highlighted. Press the MENU button to confirm. The window will briefly display the CREEK logo and the unit will then be in normal working mode.
You will see there is now an indication of the volume setting in the bottom right hand corner
of the display. Volume adjustment can be made using the remote handset blue + or – button, after the CD or DAC button at the top has been pressed. When using the volume control the display will switch to showing the full level setting for a short time and then return to
show the input with a small level display only.
To return to a fixed level output follow the same path as above, but select LINE LEVEL (0dB)
and then MENU. Alternatively, select Factory defaults, the press ‘Reset to Defaults’. Press
Play/Pause or Menu to return to normal operation.
REAR PANEL
The rear panel contains all the input and output connections.
INPUTS
1.
USB input, is for connection to a computer to extract the highest quality digital audio data possible.
2.
Co-ax SPDIF digital input, which can connect to a CD transport, or other digital device.
3.
Optical TOSLINK digital input, which can connect to a CD transport, or other digital device.
4.
Co-ax SPDIF digital input, which can connect to a CD transport, or other digital device.
5.
Optical TOSLINK digital input, which can connect to a CD transport, or other digital device.
6.
An optional plug-in Bluetooth module may be made available in future.
Please check with your dealer or on the Creek Audio website for price and availability.
OUTPUTS
1 x
Co-ax digital output, is for passing digital signals through the EVOLUTION 50CD.
1x
Optical digital output
2 x
RCA un-balanced audio outputs, Left and Right.
Page: 3
2x
XLR balanced audio outputs, Left and Right.
1x
Mains input - 3 pin IEC with ground connection and fuse.
Use the power cord supplied, which is suitable for use in your country or region.
RC Bus connecting the out to a matching EVOLUTION 50A amplifier allows one to control
both products with the use of one IR sensor. Using the appropriate accessory from Creek,
it also allows the product to be installed in a hidden location and still operated by using an
optional extension IR receiver. Consult your dealer or www.creekaudio.com for price and
availability.
FRONT PANEL CONTROLS
DISP
POWER
The mains On/Off switch is a button located on the right hand side of the front panel with
the engraved power symbol above it. Press this button to power the EVOLUTION 50CD on
or off. Please note that the EVOLUTION 50CD does not have a Standby power function.
CD OPERATON
There is a group of 5 buttons next to the slot for CD operation, plus a Repeat button in the
group of 4 buttons right of the display. Listing buttons in a clockwise order:
PLAY/PAUSE
Press the Play button once to play the first track. Press once again to Pause while playing.
Press Play to start playing the disc. If available, CD text will scroll across the top of the display, indicating among other things possible, the artist, album and track name.
STOP
Press the Stop button to end play.
LOADING/EJECTING A DISC
To load a disc, simply post one through the slot aperture on the left hand side of the front
panel, with the label facing upwards, being careful not to put finger prints or dirt etc. on the
playing surface. The mechanism will sense the proximity of the disc after it is half way in. It
will then automatically draw the disc inside completely and read its Table of Contents (TOC),
which will be displayed. It will then be in the Stop position.
EJECT
To remove a disc, press the Eject button to force the disc out of the slot drive. Pressing Eject
while the disc is playing will not harm the disc.
Page: 4
SKIP FORWARD/SCAN FORWARD Press once to Skip-forward through the tracks.
Press and hold to Scan-forward through the currently track.
SKIP BACKWARDS/SCAN BACKWARDS
Press once to Skip-back to the start of the track and again to Skip-back to the previous track,
or tracks. Press and hold to Scan - backwards through the track currently playing.
REPEAT
Press this button to toggle the Repeat function between single tracks, a whole CD, or off.
Holding this button down longer will enable the Random play function on/off.
Display features:
With a disc loaded, the display will indicate the total number of tracks and total playing time
when in STOP mode. During playback, the track number and track time will also be displayed. Symbols are also shown for Repeat and Random functions. If the disc contains CD
text data, this will also be shown across the top of the display and will scroll when the disc is
playing showing Artist, Album name and Track name.
INFO
Toggles CD Text on and off, when available.
TIME
Toggles the display between Track Elapsed, Track Remaining, Disc Elapsed and Disc Remaining, modes.
DAC AND CD OPERATION
SRC. This button is short for Source. Press it to toggle through the various inputs available,
from CD only, Input 1 = USB, Input 2 = Co-Ax, Input 3 = Optical, Input 4 = Co-Ax,
Input 5 = Optical. Optional BT input will follow.
MENU
Pressing the MENU button will reveal a selection of options that affect the way the product
operates. These should be set to taste and the option tree looks like this:
Display settings
Always on Display is always on
Auto off
Display goes off after a short time.
Selecting any function will cause the display to light again for a few seconds.
Display Brightness Low - Med - Full
Using the front panel CD buttons will enable these functions. Play = Enter, Stop = Exit,
Previous and Next moves the cursor up and down.
Page: 5
REMOTE CONTROL OPERATION
Press CD button first:
SELECT A SPECIFIC TRACK
Press the track numbers at the top, 0 - 9. The number
will appear in the display and the track will begin to play
after a short delay.
RANDOM
Will select random track playback.
INFO
Toggles the display between elapsed and remaining
time. A long press will enable or disable CD text.
REPEAT
Causes the current track or the whole disc to be repeated. Press the REPEAT button once and the current
track will be repeated. Press REPEAT a second time
and the entire disc will be repeated. Press the REPEAT
button a third time and the player will revert to normal
play.
DIM
Adjusts the display brightness.
FILTER
Offers 5 optional digital filter shapes. see further FILTER description below.
VOLUME
Blue buttons +/- will adjust the volume level, provided
the product has been configured to Preamplfier Mode.
see explanation on earlier page. Select either CD or
DAC buttons at the top first.
FUNCTIONS NOT YET IN USE:
PROGRAM
Is not yet enabled. Look for future software updates
from Creek to see if this little used feature has been
written.
Page: 6
PHASE
Cannot be enabled for the EVOLUTION 50 CD.
DAC OPERATION
Press DAC button first. The DAC will operate like a digital pre-amp, allowing you to select a
different input for various digital sources. Some digital devices output their signal optically,
so use a good quality TOSLINK cable to pass the signal to the DAC. Some products use
only co-axial connections. Use a dedicated ‘digital interconnect’ for the best results. Ask
your dealer for advice.
The EVOLUTION 50CD can supports digital input signals from 16 to 24 Bit word lengths and
sample rates from 32 kHz to 192 kHz. The incoming signal will be checked and the sample
rate will automatically be displayed.
All digital signals will be output via the co-ax or optical connectors, to allow another device
to receive the same signal.
USB input, allows the DAC to behave like a sound card. Your computer will recognise the
USB DAC and should have no problem linking to it automatically. Once the link is established audio data can be transferred and converted at the highest quality. The remote control will allow limited control of the incoming signal, such as play, pause, stop etc. However,
if a media player such as iTunes is used, it is much more convenient to control files using
the (remote) App to view and control your library via a tablet computer, smart phone or other
remote device. The USB input is totally galvanically isolated to prevent any computer generated electrical noise from interfering with its performance.
DIGITAL FILTERS
Toggling the FILTER button on the remote handset selects five available digital filter options.
These are used by the DAC to reconstruct the analogue waveform from the digital signal
provided by the source. The five filters offer differing compromises between performance
and suppression of ultrasonic noise. The best option will be system dependant so try experimenting to see which option you prefer. The differences are very subtle so it may take some
time to find your favourite! None of the filters significantly affect the frequency response in
the critical 20Hz – 20kHz audible range so don’t be worried about having the “wrong” selection; there is no right or wrong option.
Page: 7
Technical Specifications:
Digital inputs
2 x SPDIF, 24 Bit 192 kHz, via RCA sockets, transformer isolated
2 x TOSLINK, 24 Bit 192 kHz, optically isolated
1 x USB class 1.0 Audio, 24 Bit 96 kHz asynchronous, galvanically isolated.
No additional software drivers are needed to support 96 kHz with either MAC or PC, but several choices are
available to obtain bit perfect performance.
Optional input
An upgrade slot is provided on the DAC PCB internally, for an addition Blue-
tooth input, plus a hole on the rear panel to attach an antenna. A separate user manual for the BT option will
be provided for installation. Ask your dealer or Creek Audio for more information about fitting this option.
CD transport
Custom designed, ICE quality, CD slot-loader, externally clocked for bit perfect performance.
Signal to Noise ratio
> 115 dBA
THD
typ. 0.001% @ 1kHz 0dBFS
Frequency Response
+/-0.1dB 20Hz-20kHz (at 48kHz and higher sampling rates)
Channel Separation
>95dB 20Hz-20kHz, typ. 110dB @ 1kHz
Digital output
1 x SPDIF and 1 x Toslink optical output, pass-on all input signals
Digital filter
5 digital filters are selectable via the remote
Audio output
2 x RCA un-balanced, 2.0V. 2 x XLR balanced output, 4.0V
Audio buffering
High grade FET Op-amp audio buffering and filtering.
Output impedance
47 Ohms unbalanced and 94 Ohms balanced
Power supply
25 Watt toroidal mains transformer
RC Bus
Input/output connection for external IR remote and serial link to EVO 50A
DAC type
2 x Wolfson WM8742, 24 Bit 192 kHz, in double differential configuration
Input receiver
WM8805, multichannel digital input receiver
USB type
Class 1 Audio (24Bit 96kHz) galvanically isolated and on a separate PCB for potential future upgradability
Operating Voltages 100 - 120V/ 200 - 240V, Switchable
Consumption 6W idle, 10W During CD Playback
Weight 5.5Kgs (12.12 lbs)
Dimensions W/H/D
430 x 60 x 280mm
Finish
Silver or black engraved front panels
(16.9 x 2.36 x 11 inches)
Creek Audio Ltd reserves the right to change or modify the specification of its products without prior warning.
Page: 8
WARRANTY
If within two years of purchase date your Creek product proves to be defective for any reason other than accident, misuse, neglect, unauthorized modification, or fair wear and tear,
Creek Audio Ltd. will, at its discretion, replace the faulty parts without charge for labour or
return carriage within the United Kingdom. For warranty outside the UK, please consult your
dealer or the importer. Worldwide distributors details are shown on the Creek website.
This warranty is valid only in the United Kingdom and given in addition to statutory rights.
Service enquiries outside the United Kingdom should be addressed first to the supplying
dealer and/or the Creek distributor/importer.
Warranties granted in countries other than the UK are entirely at the discretion of the distributor/importer.
Page: 9
Creek Audio Ltd
12 Avebury Court, Mark Road, Hemel Hempstead, Hertfordshire, HP2 7TA England
www.creekaudio.com - [email protected] - +44(0)1442 260146