1
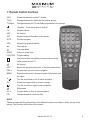
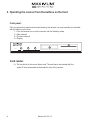
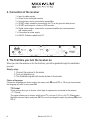
USER MANUAL ENGLISH C 901 CX POWER Cable receiver Maximum C 901 CX Maximum C 901 CX 1. 2. 3. 4. 5. 6. 7. 8. 9. 10. 11. 12. 13. 14. 15. 16. 17. 18. TABLE OF CONTENTS Remote control functions...............................................................................page Operating the receiver from the buttons on the front.....................................page Installation.....................................................................................................page Connection of the receiver.............................................................................page The first time you turn the receiver on...........................................................page Channel lists..................................................................................................page The personal channel lists.............................................................................page Moving and editing of channel lists................................................................page Daily use........................................................................................................page EPG - Electronic Program Guide...................................................................page Timer..............................................................................................................page Access control...............................................................................................page The type-in box..............................................................................................page Searching for new channels..........................................................................page Advanced channel search.............................................................................page Installation.....................................................................................................page Teletext..........................................................................................................page Radio channels..............................................................................................page Maximum C 901 CX 3 4 5 6 6 8 8 9 10 11 11 12 12 13 14 14 15 15 1. Remote Control functions INFO Shows the status bar on the TV screen. TV/AV Changes between the video and the receiver picture. TV/Radio Changes between the TV and Radio programmes in the receiver. “Standby” - Turns the receiver on and off. 0-9 Number buttons. UHF No function. SAT Shows the signal information on the screen. PR Previous program. EPG Shows the program information. 5 5 6 6 One page up. AUDIO One page down. Choice of sound track. POSITION Program editing. _ L R One press shows the subtitles, the second press of this button shows the text TV. No function. EXIT Back to the previous menu point, or cancel a menu choice. PR+ Program up or up in the menu navigation. MENU - Enters the main menu, the second press of the button exits the menu. Turn the sound down or left in menu navigation. OK Shows the program lists or accept a change. + Turn the sound up or right in menu navigation. Mute sound. PR- Program down or down in menu navigation. FAV Change between the favourite lists. NOTE! Please be aware that the coloured keys have different functions according to, where you are in the menus. Their function will be show on the screen. Maximum C 901 CX 2.Operating the receiver from the buttons on the front Front panel: If for any reason the remote control stops working, the receiver can very basically be controlled with the buttons on the front. 1 = Turn the receiver on or put the receiver into the Stand-by mode 2 = Next channel 3 = Previous channel 4 = Display 5 C 901 CX POWER 1 2 3 4 Card reader: 5 = The top slot is for the conax Smart card. The card has to be inserted with the yellow IC chip downwards and towards the rear of the receiver. Maximum C 901 CX 3. Installation Read these instructions carefully before connecting the receiver. Your new Digital Receiver has been designed to be user-friendly and easy to use. The receiver can receive digital channels via cable. Furthermore, the receiver has the ability to decode Conax encoded channels with the help of a smart card. A digital sound output on the rear of the receiver gives the possibility of real cinema sound, if you have a surround amplifier. One of the goals in the development of this receiver, has been to make an easy to use menu structure, enabling user-satisfaction. Under the development, we have paid particular attention to the software in the receiver, especially the stability, so that there is less need for updates of the software. Even though particular attention has been paid to the software, there is no guarantee that an update will not be necessary, e.g. if there is any change to the way in which the programs are sent. It is important to ensure that you have the most recent software in your receiver; this will give you the best possible performance from the receiver. The software can be downloaded from the homepage www.kjaerulff1.com. Safety! To protect you and your receiver from hazards and danger, protect the receiver from: • Fluids, of all forms. • Cold, heat and extreme temperature changes. • Dust • Lack of ventilation, especially if the ventilation holes become covered. • Crushing. If you take the receiver from a cold environment to a warm one, please be careful with the condensation build up in the receiver. To stop any hazard here, please allow the receiver to stand without power connected for at least one hour. Lightning can damage the receiver. Therefore remember to remove the signal cable from the receiver, if there is a risk of lightning. Do not allow foreign objects (metal objects, paper clips, fluids, candle wax, and other items) to enter the receiver cabinet, through the ventilation holes and the card reader. This can short circuit the receiver and cause a fire hazard. If anything does enter the cabinet, remove the cable from the mains immediately and contact your dealer. Please pay particular attention to the mains cable, so that it cannot be damaged in any way. The cable must not be subjected to sharp edges, knots, or heavy furniture. Damage to the mains cable can cause a fire hazard or electrical shock. The mains power cable must not be pulled on. To remove the power, please hold the plug and do not pull on the cable. Pulling on the cable can damage it. Lightning, damage from fluids, connection of any equipment not specified in this manual, use of excessive force, installation of any software not officially released (patch or copy software) is not covered under the terms of the guarantee. Maximum C 901 CX 4. Connection of the receiver 1 = Input for cable signals. 2 = Output to the next digital receiver. 3 = Sound output, can be connected to an amplifier. 4 = SCART output, should be connected to the TV as this gives the best picture. 5 = SCART inout/output to a Video or DVD recorder. 6 = Digital optical output, connected to a surround amplifier you can experience real cinema sound. 7 = Connection for power supply 8 = RS-232, Software update from PC. 8 1 2 CABLE IN CABLE OUT 5 3 7 4 6 5. The first time you turn the receiver on When you turn the receiver on for the first time, you will be guided through the installation process. Step by step: 1. Connect the receiver to the mains. 2. Turn you television on. 3. The installations guide will now be shown on the screen. Choice of language: Choose the language you wish to use for the menus, with ��� PR-and PR+. When you have chosen the language you wish to use, press OK. TV Format These options allow you to choose, which type of equipment is connected to the receiver. 1. TV Format. This option allows you to choose, which type of TV you have. A 4:3 or a Via TV (Widescreen). Highlight the menu option and press OK. You can now change the option by pressing ��� PR-and PR+. Maximum C 901 CX 2. TV Scart This option will define which type of Picture information you wish to use. CVBS or RGB. CVBS has limited picture information and works on all types of television. Where as RGB has more picture information. We recommend the use of RGB if possible, some types of TV cannot work with RGB, so make sure you choose the correct setting. When you have made the appropriate adjustments to the settings, press GREEN to search for channels. Search: The receiver will now start to search for channels. Depending on the number of channels, this can take up to 10 minutes. Maximum C 901 CX Clock To ensure that the EPG and Timer functions in the receiver work correctly, the receiver has to be set-up with the right time zone. This will normally be set-up correctly by the receiver, and there would be no need to change the settings. 1. Time zone: Choose which time zone you are in. 2. Update channel. Choose the channel that the receiver should update the clock from. When you now press GREEN the receiver will be ready for use. 6. Channel lists All depending on which area the reciever is in, it will find and allocate channels differently according to the operators’ lists. (This will only work where the operator has implemented this function). The minimum will be a complete main list with every channel in it. 7. The personal channel lists A digital receiver can receive a large number of channels. To make this more user friendly, you can organise the channels to suit your needs. Apart from the lists the receiver generates you can also define four lists. To do this, press MENU and you will come into the menu. Highlight Channels and press OK. To make a channel list, highlight Edit by pressing ��� PR-and PR+ and confirm the choice by pressing OK. Press FAV until you have the list with every channel in it. By using the number buttons 1 – 4 you can add a channel to one of the four favourite lists. First highlight a channel you would like in the list with ��� PR-and PR+. After this, press 1 if you want the channel in the first favourite list, 2 if it should be in the second favourite list, and the same with 3 and 4. The same channel can appear in every list if necessary. The order you choose them will also be the order they are displayed when you are finished. So if you choose Channel 1 to be in the list first, channel three, then channel two, the list will be in the order Channel 1- Channel 3- Channel 2. If you want to delete a channel from a favourite list, you press one of the number buttons 1-4, depending on which list (1-4) you want to delete a channel from. Maximum C 901 CX 8. Moving and editing of channel lists It can be an idea to move channels so that they are easy to find. To move and edit channels around, press MENU to enter the menu. Highlight channels and press OK. Then highlight Edit by using ��� PR-and PR+, then press OK. In the main list you have the following possibilities: Erasing channels: Highlight the channel you wish to erase, then press GREEN. A message will be shown on the screen. If the channel should be erased press GREEN. If this was a mistake, press RED. If you remove a channel from the main list you also remove it from every other list. Change the name of the program list: If you press YELLOW you can change the name of the program list. • StartUp List This is the channel list the receiver should start on if the receiver has been turned off. Press OK to choose the channel list you would like the receiver to start on. With ��� PR-and PR+you can highlight the list, then press OK to confirm your choice. • FAV1 is the name of Favourite list 1. • FAV2 is the name of Favourite list 2 . • FAV3 is the name of Favourite list 3. • FAV4 is the name of Favourite list 4. To change the name of the favourite list, please read chapter “The type in box”. Press GREEN to save the settings, and RED to come back to the previous menu. To change an operator list or a favourite list, the list has to be chosen first. Do this by pressing FAV. Every time you press, the next list will be used. You can see which list is active in the bottom left hand corner. To change the order in which the list is presented, highlight the channel that is to be moved with ��� PR-and PR+. Press RED and the channel will change colour to grey. Highlight the channel, where you would like to move the chosen channel to and press RED again. The channel will now be placed where you highlighted. Edit channel name and channel data: To change a channel name and channel data, highlight the channel you wish to change, and press OK. Name = The channel name. NB! This name will come back if you search for new channels. Frequency = The frequency the channel sends on, this should not be changed. Adult lock = Cross this box if you would like the channel to be locked by a code. Service ID, VID/PCR/AUD = These are only used on special channels. This requires the user to type these in. Quality = The quality of the signal that the receiver receives. This should be as high as possible. If you change any of these, press GREEN to save the changes. To cancel the changes press RED. Maximum C 901 CX 9. Daily use Once you have made a favourite list, you are ready to use the receiver for the first time. Channel navigation: Press ��� PR- to choose the next channel and PR+to choose the previous channel. Press OK to show a list of the channels which are available in the current channel list. By using PR-and PR+ you can move the highlighting up or down the list. When you have highlighted the channel you would like to see, press OK. You can choose a different channel list by pressing FAV. The green bar at the bottom of the picture, shows the name of the present channel list. The channel list. The channel list with every channel, is called TV. Info bar: Every time you change a channel, the info bar will be shown on the screen. The info bar contains information on the channel that you have changed to, e.g. the actual program on the channel, the next program on the channel, how long the program has left. The info bar can always be shown on the screen by pressing INFO. If you press INFO twice there will be more information show about the program you are watching. More information on the next program can be found by pressing +. Choose a different soundtrack: Some channels are transmitted with a number of different soundtracks. Press RED to change the soundtrack. Subtitles: A number of channels have different subtitles available. Press YELLOW and you will see a list of the subtitles available. If you do not want any subtitles, highlight No subtitles, there will be no more subtitles while you are on the same channel. The receiver will always choose the subtitles that match your choice of language. 10 Maximum C 901 CX 10. EPG - Electronic Program Guide A big advantage of digital receivers is that a number of operators send, what is called an EPG (Electronic Program Guide). The EPG gives the user a display of which programs will be on what channels. To see this information press EPG. The TV screen will look as shown in the picture to the right. Showing information on the Present and the Next program for the next five channels in the channel list. Using PR+and ��� PR-highlight the channel you wish to see more information on and press OK. If you cannot see the program you wish to have information on, press5 5and6 6to choose the next or previous page. The receiver will now collect more information on the channel, such as the programs for the next 7 days. This can take up to 30 seconds. The exact number of days shown, depends on the program distributor and can vary from channel to channel. In some cases, the picture will disappear whilst trying to find the EPG data. More information about the program can be found by pressing OK. If you would like to record a program on a video recorder, you can send the information to the timer by pressing GREEN. Remember to set the Timer on the video recorder to start at the same time. If you would rather change to the program, press YELLOW. To come out of the EPG function, press EXIT until the picture comes back. 11. Timer The receiver can start at a planned time. Used together with a Video recorder or a DVD recorder, the timer will enable you to record programs. Press MENU to enter the Menu. Press ��� PR-until Timer is highlighted, then press OK. The TV screen will now show a list of the timers that have been programmed. If you would like to program a new timer, press YELLOW. The following information has to be put into the timer: List = The list you know the channel with the program you would like to record is in. Channel = The channel you would like to record on. Text = A name to help you remember which timer is which. Start = When the program starts. Press GREEN to save the timer, or RED to cancel the timer. Remember to also program the Video Recorder or DVD recorder. Maximum C 901 CX 11 12. Access control The access control menu shows all relevant information on the smart card. A further function in the access control menu is the Adult Lock. This can lock channels that all users should not have access to. To do this press MENU. Use PR+and ��� PR-to highlight Access Control and press OK. The first menu will only be shown if there is a Canal Digital card in the smartcard slot. Highlight Adult Lock with ��� PR-and press OK. By pressing OK again and ��� PR-you can activate the Adult lock. After this, you must type in a four digit code. Type in the same code again in the next box. Press GREEN to save the settings or RED to cancel the settings. To activate the Adult Lock, the receiver has to be turned off and on again. The Menu will now be locked, and can only be opened with the four digit code. If you have forgotten the code, contact your dealer who can help to open the receiver again. NB! Every channel that is locked can only be opened with the four digit code. 13. The type-in box There are a number of places in the menus, where you will be asked to type in information. A type-in box can do this. The type-in box will automatically appear if you can type in anything. Use PR+and ��� PR-to move the cursor up and down,- and +will move the cursor left or right. When the cursor is on the right letter, press OK. With GREEN and RED you can move the cursor backwards and forwards in the text you have written. This can be helpful if there is an error in the text. YELLOW changes between capital and small letters. BLUE deletes the last letter. When you have written your text, place the cursor on OK and press OK. 12 Maximum C 901 CX 14. Searching for new channels There will always be new channels available, so once in a while we recommend that you search for new channels. The receiver will automatically search for new channels and add them to the lists. For some other operators you will have to initiate a search. Press MENU to enter the Menu. Highlight Channels and press OK. Highlight “Channel Search” and press OK again. You will have the following possibilities: GREEN = Automatic, the receiver will search through the frequencies it knows and find new channels. YELLOW = Manual you have to provide a frequency that you would like to search on. We recommend you always to search automatically, as this is the easiest and will find the most usual channels. Maximum C 901 CX 13 15. Advanced channel search There are some channels that cannot be found automatically in the receiver and therefore need a manual search. Press MENU to enter the menu. Highlight Channels and press OK. Highlight Channel Search and press OK. Press YELLOW to start a manual search. The following has to be typed in: Start frequency, Stop frequency, Frequency steps, Symbol Rate and QAM. Press GREEN to start the search. In the most cases, the receiver will find the new channel. If the receiver does not find the channel, you may have to input the frequency manually. This manual search is not included in the manual. 16. Installation The menu structure has all of the basic settings for the receiver under one section: installation. This manual will only highlight the most important, as there are many functions that are automatically set-up. Press MENU to enter the menu. Highlight Installation and press OK. Language: You can choose which language you would like the Menu, sound and subtitles to be in. Clock: The receiver will automatically install all settings. Changes should only be made, if you are situated in a country that has a different language to the one you use in the menu. TV Format: This is how the picture is presented on your TV. You should only choose CVBS if you have problems with RGB. Reset Receiver: This will reset the receiver to the factory settings. This takes the receiver back to the first time you turned the receiver on. NB! If you use this function, all channels and setting will be reset. Information: This shows information on the receiver, e.g. which version of software is installed. This information is necessary for customer support if you have a problem. 14 Maximum C 901 CX 17. Teletext Your receiver is equipped with a minimum of 2000 pages of teletext. Press YELLOW twice to enter the teletext. In the top status bar you can see which channel you are on. P:xxx shows which page you are on, S: 1/x shows how many pages are under this page, and the last thing is the time. With PR+and ��� PR-you can choose the next or previous page. With– and +you can choose the next or previous subpage. If you require another page, press the number keys (0-9) to choose a new page. Press INFO to see hidden text. 5 5 Buttons and increase the text size. Press or twice to see the normal text size. 5 6 6 5 6 6 The coloured buttons can direct the teletext to some pre-programmed pages. Press EXIT to exit the teletext. 18. Radio channels Your receiver will during the channel search have found a number of radio channels. To hear these radio channels, press TV/RADIO. You can now make a favourite list in the radio list or just hear the music you like. The receiver works the same on radio channels, as it does on TV channels. Maximum C 901 CX 15 © Kjaerulff1 A/S 2005 16 Maximum C 901 CX