1
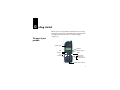
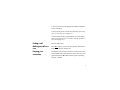
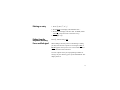
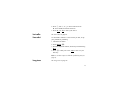
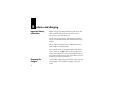
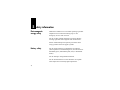
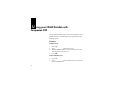
C3060 Portable Telephone
User Guide
COMPANION
Contents
Getting started . . . . . . . . . . . . . . . . . . . . . . . . . . . . . . . . . . . . . . . . . . .5
Using your telephone directory . . . . . . . . . . . . . . . . . . . . . . . . . . . . .11
Using your services directory . . . . . . . . . . . . . . . . . . . . . . . . . . . . . . .15
Using your headset . . . . . . . . . . . . . . . . . . . . . . . . . . . . . . . . . . . . . . .19
Customizing your portable . . . . . . . . . . . . . . . . . . . . . . . . . . . . . . . . .21
Extra features . . . . . . . . . . . . . . . . . . . . . . . . . . . . . . . . . . . . . . . . . . . .25
Batteries and charging . . . . . . . . . . . . . . . . . . . . . . . . . . . . . . . . . . . .32
Accessories for your portable . . . . . . . . . . . . . . . . . . . . . . . . . . . . . .37
Safety information . . . . . . . . . . . . . . . . . . . . . . . . . . . . . . . . . . . . . . . .38
Technical specifications for USA . . . . . . . . . . . . . . . . . . . . . . . . . . . .41
Caring for your portable . . . . . . . . . . . . . . . . . . . . . . . . . . . . . . . . . . .43
Using your C3060 Portable with
Meridian Companion . . . . . . . . . . . . . . . . . . . . . . . . . . . . . . . . . . . . . .45
Using your C3060 Portable with
Companion 200 . . . . . . . . . . . . . . . . . . . . . . . . . . . . . . . . . . . . . . . . . . .51
Using your C3060 Portable with
Norstar Companion . . . . . . . . . . . . . . . . . . . . . . . . . . . . . . . . . . . . . . .55
3
4
Getting started
Before you use your portable for the first time, see Safety
information on page 38. You should charge its battery pack
overnight (See All about batteries and recharging
on page 32).
The parts of your
portable
Volume switch
Softkeys
Mute
Directory
Line
Services
Navigation keys
Menu
Power On/Off
Release calls
Terminate activity
Headset /data connector
5
Turn the portable on
Press and hold the k button for at least two seconds.
Turn the portable off
Press the k button for at least two seconds.
Portable screen icons
J,I,H,G Battery strength indicators (strong to very weak)
Radio signal strength indicator (strong to very weak)
p, Q, P
Vibrator indicator
V
Note: The three buttons directly below your portable’s display are
called softkeys. Their labels appear on the display with an underline
above the button to which they are assigned. A softkey label is shown
like this in this user guide:
Setting your
portable to ring
6
REDIAL.
You can set your portable to one of three ring options by
pressing the m button when the portable is idle. Select
one of the softkeys for FULL, CHIRP, or NONE then press the
OK softkey, or press the m button.
FULL provides a normal ring volume and cadence. CHIRP
provides one short ring at low volume. NONE provides no
audible ring.
Answering a call
Press the i button. When the portable is ringing, you
can press the m button to stop the ringing/vibration and
continue to answer the call.
Adjusting the ringing
volume
When the phone is ringing, you can adjust the ringing
volume with the volume switch. When the phone is not
ringing, use the Menu to access the volume adjustment
levels.
Adjusting the
speaker volume
While on a call, pressing b or B can adjust the volume in
twelve steps. The steps 0 to 8 raise the volume, with step 0
the lowest volume. The steps 9 to 11 are for noisy
environments. The display shows the volume step for two
seconds as follows:
• after adjusting the volume
• before making or receiving a call at volume levels 9 to 11
7
.
to increase volum
e,press here
to reduce volum
e,press here
Making a call
Dial the telephone number directly or:
• dial from your directory (See Using your telephone
directory on page 11)
• predial (See Customizing your portable on page 21)
• press a customized softkey (See Customizing softkeys on
page 30)
Accessing features
during a call
You can access features or Computer Telephony
Integration (CTI) applications while on a call, by three
methods:
8
1. Press m, then select the appropriate softkey and dial the
access code digits.
2. Select an entry from your Services directory. (See Using
your services directory on page 15.)
3. Dial a feature from a programmable On-a-call softkey.
(See To assign a number to a softkey when the portable is
on a call on page 30.)
Ending a call
Press the k button.
Making two calls in a
row
Press NEXT after your first call. The portable maintains its
radio connection for another call.
Keeping your
connection
To maintain your call, stay in the radio coverage area. If you
have problems with your connection, retrace your steps. The
signal strength icon Q indicates if the signal is becoming
stronger or weaker.
9
Muting a call
To prevent your caller from hearing you, press m on the left
side of the portable. The display shows Microphone muted
and then i in j flashes. To end muting, press m again.
Redialing last
number
Your portable is set up so that you can redial the last
number you dialed by pressing REDIAL when it appears.
Dialing the last caller
You can view the names of the last two callers when LAST
appears on the display. Press LAST and , or . to view
the names. Press > to view the number. Press DIAL to call
the number or ERASE to delete the number. To add the
name to the directory, press SAVE .
10
Using your telephone directory
Your portable has an alphanumeric directory that allows
you to store up to 100 entries for telephone numbers.
Storing telephone
directory entries
1. Press l, ADD.
2. Enter the telephone number, then press SAVE.
3. Enter the first letter of the name by pressing the button
that has the letter you want. For example to enter A,
press 2; to enter B, press 22. Use 1 to
choose special characters such as , - ’ _ . ( )
4. Enter the rest of the letters as shown in step 3. Use >
to move the cursor forward if the next letter you want is
on the same button, or select SPACE to insert a space.
5. When the name is complete, press SAVE.
Hint: If you want an entry to appear at the start of your directory,m ake
its first character a space using > or other special characters on the
1 key.
11
Find an entry in the
telephone directory
Once you have stored entries into the telephone directory,
you can move through them quickly by pressing the first
letter of the entry you want. For example to look for
listings under D, press l, then 3; for listings under E,
press l, then 33. If there is more than one entry
under a letter, press . to keep looking.
Note: Use 1 to choose special characters such as ,- ’ _ . ( )
Editing telephone
directory entries
1. Press l, then . or , (or the first letter of the entry
you want) until you reach the entry you want to change.
Directory entries are in alphabetical order.
2. To edit the entry’s name press EDIT, then edit the name.
3. Press SAVE.
4. To edit the entry’s number press >, then press EDIT,
then edit the number.
5. Press SAVE, k or press l.
12
Deleting an entry
1. Press l, then , or ..
2. Press ERASE. The display will ask Erase item?
3. Press OK. The display will show Item erased. (Select
CANCEL if you do not want to erase the entry.)
4. Press k or l.
Dialing from the
telephone directory
Press l, find the entry, DIAL.
Pause and link signal
When adding a directory item or customizing a softkey,
you may need to insert a pause or a link signal. LINK or
PAUSE appears when you are on a call to enable features
such as Transfer and Conference.
To insert a pause when you are predialing a number or
storing it in your directory, press m and select Pause. The
display shows P.
13
To insert a link signal, press m and select Link signal.
The display shows L. (See Using your C3060 Portable with
Meridian Companion or with Companion 200 or with
Norstar Companion in this guide for using this feature.)
14
Using your services directory
Your portable has a services directory that allows you to
store up to 15 entries for feature codes and Computer
Telephony Integration (CTI) applications.
Note: Although the services directory can store telephone num bers,
use the services directory for feature codes and CTI applications.
If your system has a CTI server, double clicking the j
button displays a pre-programmed menu of CTI
applications.
Note: The pre-program m ed m enu of CTI applications is only available
on certain CTI system s.
Storing services
directory entries
15
1. Press j, ADD.
2. Enter the feature code or application code, then press
SAVE. (See Using your C3060 Portable with Meridian
Companion or with Companion 200 or with Norstar
Companion in this guide for using this feature.) (See the
your system administrator for feature codes to access
CTI applications.)
3. Enter the first letter of the name by pressing the button
that has the letter you want. For example to enter A,
press 2; to enter B, press 22.
4. Enter the rest of the letters as shown in step 3. Use >
to move the cursor forward if the next letter you want is
on the same button, or select SPACE to insert a space.
5. When the name is complete, press SAVE.
Hint: If you want an entry to appear at the start of your directory,m ake
the directory entries first character a space using > or other special
characters on the 1 key.
Find an entry in the
services directory
Once you have stored entries into the services directory,
you can move through them quickly by pressing the first
letter of the entry you want. For example to look at listings
under D, press j, then 3; for listings under E, press
j, then 33. If there is more than one entry under a
letter, press . to keep looking.
Note: Use 1 to choose special characters such as ,- ’ _ . ( )
16
Pause, link signal
and feature request
When adding a directory item, you may need to insert a
pause, link or a feature request signal. You can use the
feature request signal to enable CTI applications.
Pause
To insert a pause when you are predialing a number or
storing a pause in your directory, press m and select
Pause. The display shows P.
Link signal
To insert a link signal, press m and select Link signal or
press Link if it is available. The display shows L. (See
Using your C3060 Portable with Meridian Companion or
with Companion 200 or with Norstar Companion in this
guide for using this feature.)
Feature request signal
To insert a feature request signal, press m and select
Feature request or press Feat if it is available. The
display shows F. (See Using your C3060 Portable with
Meridian Companion or with Companion 200 or with
Norstar Companion in this guide for using this feature.)
17
Editing services
directory entries
1. Press j, then find an entry. Directory entries are in
alphabetical order.
2. To edit the entry’s name press EDIT, then edit the name.
3. Press SAVE.
4. To edit the entry’s number press >, then press EDIT.
5. Press SAVE, k.
Deleting an entry
1. Press j, then find an entry.
2. Press ERASE. The display will ask Erase item?
3. Press OK. The display will show Item erased. (Select
CANCEL if you do not want to erase the entry.)
4. Press k or j.
Dialing from the
services directory
18
Press j, find an entry, SELCT.
Using your headset
Use one of the optional headsets to free both hands for
other tasks.
Hint: Use the portable with a holster to protect the portable from falls.
A holster also allows you free m ovem ent while you are on a call.
Connecting and
disconnecting the
headset
You can disconnect the headset during a call and the call
remains on the portable.
19
Using your portable
with the headset
To answer a call, press i. To end a call, press k .
Note: If you wear a hearing aid, use the C3002 headset to prevent
unwanted tones in your hearing aid.
Note: In noisy environm ents you can use the C3002 headset to
provide better voice transm ission and reception.
20
Customizing your portable
Hint: Whenever you are searching through a list,you can press the
first letter of the feature,directory,or system entry you want. If there is
m ore than one entry under a letter,press . to keep looking.
To customize your portable, use the Menu, which contains
a number of features in alphabetical order.
Find a menu item
To search through the available options on the Menu press
m, , or ..
Note: The portable displays options in several different ways.
Whenever the display shows a heading followed by a colon,as in
Vibrator: On,you can select the underlined softkey,OFF in this
case,to switch to the other option.
Whenever the display shows a heading followed by >,as in
Language>,press > to enter a m enu of options which you can
then m ove through by pressing , or ..
21
Key click
1. Select Key click:.
2. Choose ON to hear a short beep when you press a button.
Keypad light
Your portable’s keypad and display light for low-light
conditions. The keypad and display lights independent of
key pad light settings when the portable rings.
1. Select Keypad light:.
2. Choose ON to light the keypad when pressing a key.
You can extend battery life by leaving the keypad light OFF
when lighting is not required.
Key-protect
Key protect prevents accidently pressing the keys.
1. Select Key-protect:.
2. Choose ON or OFF .
When Key-protect is turned on, press START to activate
softkeys or buttons on the portable.
Language
22
1. Select Language>.
2. Press >, then , or . to move between the In
English and En français selections.
3. Press SELCT or SÉL, to select your choice.
Last caller
See Last caller on page 26.
Line select
To check that a number is correct before you dial, set up
your portable for predialing.
1. Choose Line selct:.
2. Select MANUAL, k.
3. Enter the telephone number, which may be edited using
BKSP.
4. Press i to dial your call or SAVE to store it in your
directory.
Note: You can insert a pause or a link into a predial sequence (See
page 13).
Long tones
See Long tones on page 26.
23
Message service
See Message Service on page 27
Program softkeys
See Program softkeys on page 30
Ringer
1. Select Ringer:.
2. Press FULL for a normal ring volume and cadence.
3. Press CHIRP for one short ring at low volume.
4. Press NONE for no audible ring.
Ring types
1. Select Ring types>.
2. Press >, , or . to hear samples.
3. Press SELCT to choose a new ring type, k.
Ringer volume
1. Select Ringer volume>.
2. Press > , , or ., to hear samples or press a number
from 1 to 5.
3. Press SELCT to choose a new ring volume, k.
Vibrator
24
Select Vibrator:. The display shows V, and the portable
vibrates briefly.
Extra features
Find a menu item
To search through the available options on the Menu press
m, , or ..
Note: The portable displays options in several different ways.
Whenever the display shows a heading followed by a colon,as in
Vibrator: On,you can select the underlined softkey,OFF in this
case,to switch to the other option.
Whenever the display shows a heading followed by >,as in
Language>,press > to enter a m enu of options which you can
then m ove through by pressing , or ..
If your system supports features such as Call Forward or
Call Transfer, you can customize your Services directory
to include them or you can assign them to a softkey (See
Using your services directory on page 15, Customizing
softkeys on page 30) and (See Using your C3060 Portable
with Meridian Companion or with Companion 200 or with
Norstar Companion in this guide for using this feature.)
25
You can put CTI feature codes, or system feature codes, or
telephone numbers into your Services directory.
Last caller
If your system supports calling line ID, the last caller list
shows the last two incoming calls.
1. Select Last caller:.
2. Press LAST to choose the last caller.
3. Press SAVE to save the last caller in the telephone
directory.
4. Press ERASE to erase the last caller from the last caller
list.
5. Press END to return to the idle display.
Long tones
1. Select Long tones:.
2. Choose ON, k for long tones to respond to electronic
banking services and telephone answering machines.
This way you can send a tone that lasts until you take
your finger off the button (up to 3 seconds).
26
Note: Not all system s support this feature. (See your system
adm inistrator for features your system supports.)
Message waiting
Some systems allow your portable to display Message
waiting if you have a voice mail message.
Even if your system does not support Message Waiting
indication, you can set up your portable with Message
Service to dial directly into your voice mailbox.
Message Service
First, store a message service code. See To store your
message service code on page 28.
1. Press MAIL to access the voice mail system.
2. Press PLAY to listen to the message and NEXT to move on
to the next message.
3. Press PREV to listen to the previous message.
4. Press CALL to dial the number. Press DEL to delete the
message.
5. Press END to exit your message service.
27
Note: If you press CALL ,and you want to use your active softkeys,
press EXIT .
Depending on your voice mail system, you may be required to
change the dial codes. Dial codes are the numbers used to access
voice mail system features. For example, the default dial code 76
deletes a message. If your voice mail system is Meridian Mail,
you do not have to change the dial codes. If you change your
message service code, you will have to change the dial codes as
required.
To store your message service code
1. Select Msg service #, CODE.
2. Enter ___________ (your voice mail service access
number) and insert one or more pauses as required (See
Pause and link signal page 13).
3. Enter __________ (your voice mailbox number and
password) and press SAVE.
Note: Your voice m ail system m ay require you to press # after you
enter your m ailbox num ber or password.
28
4. The display shows Dialcodes?
Note:
Dialcodes? is only displayed after you first store the
m essage service code. If you erase your m essage service code,you
will have to go through dial codes again and change as required.
Hint: For m ost Meridian Voice Mail system s,select DEFAULT. For
Norstar Com panion system s that support integrated voice m ail,select
NO. On som e Norstar Com panion system s,m essage service m ay work
differently. (See your system adm inistrator for assistance.)
5. Press EDIT to change the default dial codes. Press
DEFAULT when you do not want to change the dial codes.
Press NO when you are not using dial codes.
6. Go through the dial codes and change the values for
your voice mail system, if required.
29
Program softkeys
For direct, one-touch access to frequently used features or
frequently called numbers, customize your softkeys.
You can program the softkeys for use when the portable is
idle or is on a call.
Softkeys not programmed keep their default values when
the portable is idle or is on a call.
The default idle softkeys are REDIAL, MAIL and LAST. The
default on a call softkeys are NEXT, LINK and SAVE.
To assign a number to a softkey for use when the
portable is idle or on a call
1. Select Program softkeys.
2. Press the SELCT softkey.
3. Press the IDLE softkey to use the softkey when the
portable is idle or press the On CALL softkey to use the
softkey when the portable is on a call.
4. Press the SK - 1, SK - 2, or SK - 3 to select a softkey.
30
5. Enter a number at prompt Enter number, and SAVE. You
can press m to access Pause, Link signal or Feature
request. (See Pause, link signal and feature request on
page 17.)
6. Enter a key label at prompt Enter key lable and SAVE.
Label your softkey with up to four characters by
pressing the button that has the letter you want. For
example to enter A, press 2; to enter B, press
22.
To return a customized softkey to the default setting
1. Select Program softkeys.
2. Press the SELCT softkey.
3. Press the On CALL or IDLE softkey.
4. Press the SK - 1, SK - 2, or SK - 3 to select the softkey
you want to return to the default value.
5. Select new softkey to redefine another number and lable
to the softkey. Or select REDIAL / MAIL / LAST / NEXT / LINK
/ SAVE to return the softkey to the default setting.
31
Batteries and charging
Important battery
information
Before using your rechargeable battery pack for the first
time, it must be charged for at least 8 hours. This is
necessary to ensure full battery life.
Do not leave your portable or battery pack on a battery
charger for extended periods when the batteries are fully
charged.
Do not expose the battery packs to temperatures above
40°C/104°F for extended periods.
Your portable needs a rechargeable battery pack. Battery
level is shown by the J symbol on the top right of the
display. If the batteries are very low, the display flashes G
and you hear warning beeps. Your programming will not
be lost if you replace your batteries.
Preparing the
chargers
32
Connect the ac adaptor plug of the power cable to the rear
of the chargers, then attach the ac adaptor to a power
source.
Group Charger
The Companion Group Charger accepts up to six battery
packs for charging. Each slot has a LED indicator.
Batteries are charged independent of position. For
example, the first battery inserted is the first battery
charged.
Installing battery packs
Insert the battery pack under the tab in the charger slot.
33
Individual Charger
The Companion Individual Charger can charge a handset
or a spare battery pack. To charge a separate battery pack
in the desktop charger, you must place the battery pack
under the tab in the desktop charger.
You can store a spare battery pack in the rear slot of the
battery charger. The rear slot is not a charging slot.
34
Note: All Com panion battery chargers will charge all Com panion
battery packs. Except the Com panion C3050 Standard battery
charger (A0628269/NTHH06BA) which will not charge the hi-cap
(A0628217/NTHH04CA) batteries.
Hint: In high usage environm ents it is a good idea to have a spare
battery pack. Alternating the spare battery pack between charges will
prolong battery life.
Companion battery charger LED indications
This table applies to the group and individual battery chargers.
LED
Red
Indication
Fast flashing
Description
Battery defective. Replace the battery
Red
Flashing
Battery charging
Yellow
Flashing
Testing or preparing battery for charging
Green
Steady
Battery fully charged
Off
None
Battery not inserted under the tab correctly
35
AAA batteries
You can also use an optional AAA battery holder with your
portable. Insert the batteries into the battery holder.
Note: The com m ercially available AAA batteries cannot be charged
in any Com panion battery charger.
36
Accessories for your portable
The following accessories work with your C3060 portable:
• C3001 Ear Bud Headset
a sm all and lightweight ear-bud type headset
• C3002 Over-the-head Headset
a full over-the-head band for extra stability and hold with a single
earpiece.
• C3050 Clip-on Holster
a custom -designed holster with an adjustable belt clip.
• C3060 Leather Glove
a leather glove that holds the portable with a plastic panel covering
the keypad and display.
• C3050 Rugged Protector
a rubber protective case with a built-in rigid black plastic belt clip.
The accessories listed here are available from your Nortel
Networks distributor.
37
Safety information
Electromagnetic
energy safety
Hazardous conditions can occur while operating a portable
telephone near construction blasting caps or near
emergency service radio receivers.
Do not use this portable telephone in locations bearing
warning signs that caution against radio transmission.
Follow standard hospital acceptance procedures when
using a portable near life-support systems.
Battery safety
Do not replace batteries in a hazardous environment
(where sparks are considered dangerous, or where there are
flammable gases, flammable liquids, dust, or flammable
fumes).
Do not attempt to charge alkaline batteries.
Do not discard batteries in a fire. Batteries can explode
when subjected to extremely high temperatures.
38
Do not place the portable where the battery charging
contacts, on the bottom of the portable, will short out. For
example, placing the portable in a pocket with loose coins.
Charge the battery pack provided with the portable only in
accordance with the instructions specified in this manual.
Antenna safety
The C3060 portable telephone emits low levels of radio
energy. Although any risk associated with this energy is
minimal, you can further minimize your exposure by not
touching the antenna to your face while the portable
telephone is turned on.
Charger safety
The C3060 charger power supply is an electrical device
containing hazardous voltages. Do not open the power
supply or the charger.
Care when using
earpiece
Do not place the earpiece next to your ear if a foreign
object has become attached to the earpeice.
Note for hearing aid
users
Use of the portable telephone can produce an audible tone
within a hearing aid. The C3002 headset can be used with
hearing aids and will prevent the occurrence of the audible
tone.
39
40
Technical specifications for USA
Voltage
3.6 V rechargeable batteries
4.5 V (total voltage rating), three AAA alkaline batteries
Frequency band
1.920 to 1.930 GHz
Total channel
capacity
99
Operating
temperature
14°F to 104°F
RF output power
32 mW ERP maximum
41
Regulatory
compliance
PCI CAI: FCC Etiquette
This device complies with Part 15 of the FCC rules.
Operation is subject to the following two conditions:
1). This device may not cause harmful interference, and
2). This device must accept any interference received,
including interference that may cause undesired operation.
Any changes or modifications applied to the portable
telephone not expressly approved by Nortel could void the
user’s authority to operate the equipment.
Privacy
42
This portable telephone uses digital encoding to protect the
speech transmission.
Caring for your portable
Temperature
extremes
Avoid subjecting the portable telephone to extremes in
temperature.
Care and
maintenance
Clean the portable telephone by wiping it with a damp
cloth. Do not use solvents or polishes. If your portable
telephone does not work, check all charging contacts on
the portable and the charger for dirt, grease, or other
material. If necessary, clean them with a soft dry cloth.
If your portable drops into a liquid, let the portable dry for
two days before using.
Do not spray cleaning or disinfectant solutions on the
portable. Spray the solution on a cloth and wipe the
portable with the cloth.
43
Do not spray
44
Using your C3060 Portable with
Meridian Companion
This procedure describes steps to access several features of your
portable telephone. Available features vary depending on your
telephone system.
Features
Call Forward
1. Press i .
2.
3.
4.
Enter ___________ (flexible feature code).
Dial the number to which you want to forward your calls.
Press k .
Cancel Call Forward
1. Press i .
2.
3.
45
Enter ____________ (flexible feature code).
Press k .
Call Park
1.
2.
3.
4.
While on a call, press LINK.
Enter ____________ (flexible feature code).
Enter ____________ (the number where you want to park
the call).
Press k to end the current call.
Retrieve a parked call
1.
2.
3.
Press i .
Enter ____________ (flexible feature code).
Enter the number to which the call was parked.
Conference
1.
2.
3.
While on a call with the first party, press LINK.
Dial the second number.
When your call is answered, press LINK.
Transfer
1.
2.
3.
46
While on a call, press LINK.
Dial the second number.
When the second number rings, press k .
Call Waiting
While you are on a call, your portable beeps to indicate you have
another call.
1. Press LINK to answer the second call.
2. Press LINK again to return to your previous call.
Ring Again
1.
2.
3.
4.
When you encounter a busy number, press LINK.
Enter ____________ (flexible feature code).
Press k . Your portable rings you back when a busy party
is free.
Press i . Your portable automatically places the call.
Cancel Ring Again
1. Press i .
2.
3.
Enter ____________ (flexible feature code).
Press k .
Speed Call
1.
2.
Enter ____________ (flexible feature code).
Enter ____________ (Speed Call code).
System Speed Call
1.
Enter ____________ (flexible feature code).
47
2.
Enter ____________ (System Speed Call code).
Add a link
1. Press m, , or ..
2. Select Link signal. The portable will display an L.
Message Waiting
Your portable displays Message waiting if you have a voice
mail message. If you have already stored a message waiting
code, you can access your messages by selecting CALL . (See
page 27 for more information.)
Switch from your portable to your desk telephone
If Wireless Privacy is enabled
•
Use Call Transfer.
•
Use Conference.
If Wireless Privacy is disabled
•
Use your portable as an extension telephone.
Troubleshooting checklist
1.
2.
48
Battery charged? Properly placed?
Call Forward canceled?
3.
Still having trouble? Call your system administrator.
Other frequently used Feature Codes:
Contact for your system:
Nam e:
Tel #:
49
Troubleshooting checklist
50
Using your C3060 Portable with
Companion 200
This procedure describes steps to access several features of your
portable telephone. Available features vary depending on your
telephone system.
Features
Call Forward
1.
2.
3.
4.
Press i .
Enter ___________ (Call Forward code).
Dial the number to which you want to forward your calls.
You may need to wait for a tone.
Press k .
Cancel Call Forward
1.
2.
51
Press i .
Enter ___________ (Cancel Call Forward code). You may
need to wait for a tone.
3.
Press k .
Call Park
1.
2.
3.
While on a call, press LINK.
Enter ________ (Call Park code).
Press k .
Retrieve a parked call
1.
2.
3.
Press i .
Enter ___________ (Call Park Retrieval code).
Enter the number to which the call was parked.
Conference
1.
2.
3.
While on a call with the first party,
press LINK.
Dial the second number.
When your call is answered, press LINK.
Transfer
1.
2.
3.
52
While on a call, press LINK.
Dial the second number.
When your call is answered, press k .
Switch from your portable telephone to your desk
telephone:
Troubleshooting checklist
1.
2.
3.
Battery charged? Properly placed?
Call Forward canceled?
Still having trouble? Call your system administrator.
Other frequently used Feature Codes:
53
Contact for your system:
Nam e:
Tel #:
54
Using your C3060 Portable with
Norstar Companion
This procedure describes steps to access several features of your
portable.
Note: Underlined text indicates a softkey to use below the display of the
C3060 portable.
Making an internal call
1.
Dial the number (you may have to press i to select a
line).
Making an external call
1.
2.
55
Dial external access code: ________ or enter a line pool code
(provided by your installer): ________. (You may have to
press i to select a line.)
Dial the number.
Features
Transferring using a number
1. While on a call, press LINK.
2.
3.
Dial a second internal number.
When call is answered, press k .
Transferring using the directory
1. While on a call, press LINK.
2. Press l.
3. Use , or . or enter a letter to search through the list of
4.
5.
entries.
Press DIAL when you have made a selection.
When call is answered, press k .
Using Conference
1.
2.
3.
While on a call with the first party, press LINK.
Dial a second internal number.
When it is answered, press LINK again.
Switching between two calls
While on a call you will hear a beep to indicate an incoming call (call
56
waiting tone).
1. Answer a second incoming call by pressing LINK. The first
caller is put on hold.
2. When you are ready to switch to the other caller, press
LINK.
Page
1.
Press FEAT 60 or *60 . The display shows
Page choice:.
2.
3.
To page specific speakers, press SPKR.
or
To page telephone extensions, press SETS .
or
To page speakers and extensions, press BOTH.
The display shows Enter zone:. Enter the page zone (1 to 6) on
the keypad or press ALL.
Note: For systems earlier than MICS-XC 2.0, Page can only be used if an
ATA is configured.
To page telephone extensions on systems earlier than MICS-XC 2.0:
1. Press i and enter the line pool code associated with the
ATA.
57
2.
3.
Press LINK and enter FEAT 71 or *71.
Enter the page feature code to use followed by a page zone
number (0 to 6).
Language selection
You can change the language for system messages. (See the Quick
Reference Table for features that use system messages.)
1. To select English for system messages, press FEAT
501 or *501.
2. To select French for system messages, press FEAT
502 or *502.
3. To select Spanish for system messages, press FEAT
503 or *503.
To change the portable telephone language:
1. Press m and select Language>.
2. Press >, then , or . to move between the In
English and the En français selections.
3. Press SELCT or SÉL to select your choice.
Quick Reference Table
You may have to press i to select a line to activate some of the
following features.
58
Enter the feature code you want to use.
Feature
Activation Code
Call Forward
FEAT 4 or *4
Cancel Call Forward
FEAT #4 or *#4
During a call press LINK + FEAT 74
Call Park*
Call Park (retrieve)*
Call Pickup - directed†
Call Pickup - group†
System Speed Dial
or *74
The portable then displays the call park location
Press LINK and enter the call park location.
This is only required when you are on a call.
FEAT 76 or *76 + extension number
FEAT 75 or *75
FEAT 0 or *0 + two digit Speed
Dial code
Trunk Answer from any FEAT 800 or
station
*800
Voice Mail retrieval
FEAT 981 or
*981
59
Feature
Activation Code
Query Voice Mail DN
*985
Leave VM Message
*980
Intercept Voice Mail
*987
FEAT 985 or
FEAT 980 or
FEAT 987 or
* These features require MICS-XC 2.0 or later telephone system software.
† These features require MICS-XC 3.0 or later telephone system software.
The use of the FEAT softkey requires MICS-XC 4.1 or later telephone
system software.
Portable telephone hints
• The softkeys on your C3060 portable operate differently
than on your Norstar desk telephone. Some C3060
portable softkeys work with the local features described
in this guide.
60
• Norstar Voice Mail operates by means of your C3060
portable’s softkeys during voice mail sessions in MICSXC 2.0 systems or later.
Troubleshooting checklist
• Batteries charged?
• Batteries properly placed?
• Still problems? Call your system administrator.
Contact for your system:
Nam e:
Tel #:
61
Troubleshooting checklist
62
E
Printed on recycled paper
Copyright © 1999 Nortel Networks
All rights reserved.
Meridian,Norstar and Com panion are tradem arks of Nortel Networks Corporation.
P0906702
Issue 1.00
Printed in Canada
For m ore inform ation,visit the Com panion hom epage at
http://www.nortel.com /com panion