1
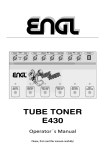
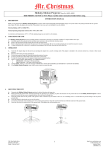
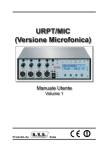
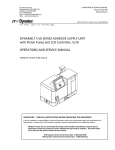
Clean
Lead
Bass
Middle
Treble
Reverb
Lead
Presence
Lead
Volume
Master
Input
Bright
Lead
Boost
Clean
Lead
Screamer
100
Stand By Power
TUBE - AMPLIFIER
Screamer 100
Operator´s Manual
Please, first read this manual carefully!
Screamer - a really great fully-tube guitar amplifier: The right choice for Rock and Blues!
Sensible features and a very clear arrangement of the controls allow an easy handling of this amp. An
exeptional noble optical design and the unique, creamy warm tube-sound combined with an excellent
sounding spring reverb gives this amplifier an noninterchangeable character. Channel selection, Lead
Boost, two different Master volumes (V.L.S.) and the Reverb can be switched via conventional double
footswitches or with the help of the
MIDI Switcher (Z-11, optional) via MIDI. Futheron quality
components, excellent workmanship and strict quality control measures ensure this amp retains its
value. You will find guidelines on care and maintenance of tube amps on the last page of the manual.
Please read and heed these before operating your amp. The boxes shaded in gray located between the
diverse descriptions of the amp´s functions contain interesting tips covering the preceding function.
All crucial information pretaining to the operation of this amp is preceded by "NOTE" or "CAUTION."
Please read and heed these as well. The
-team wishes you a "harmonic future" together with this
amplifier!
Front Panel
Clean
Lead
Bass
Middle
Treble
Reverb
Lead
Presence
Lead
Volume
Screamer
Master
50
Input
Bright
1
2
3
Lead
Boost
4
5
Clean
Lead
6
7
8
9
10
11 12
Stand By Power
13
14
15
16
1 Input: Unbalanced 1/4" input jack.
2 Clean: Input sensitivity control (Gain) for the Clean channel, adjust the volume by means of this
control and the Master (13).
Gain settings depend on what type of pickups are installed in your guitar. The recommended setting
for humbuckers or active pickups lies between the 10 and 1 o’clock positions and 12 to 3 o’clock for
single coils for a pure clean response.
3 Bright: Alters the EQ by boosting the upper treble range; effectiveness decreases at higher Gain (2, 4)
settings; affects both channels.
For a crisp glassy tone, set the Bright switch to the On position. This setting boosts
the treble response of muddy pickups.
4 Lead: Gain for the Lead channel, controls the amount of preamp overdrive in the Lead mode.
To get Crunch-sounds, set this control between the 9 and 12 o´clock´s position (depending on the
type of pick-up) and leave the Lead Boost pusbutton in the Off-position.
CAUTION: Extremely high gain and volume levels in the Lead mode can produce
strong feedback. Avoid feedback squeals, they lead to hearing loss and damaged speakers!
5 Lead Boost: Boosts the degree of the distortion in the Lead channel. This feature can also be switched
via a footswitch connected to jack (20), the pushbutton is deactivated once a footswitch is connected to
the footswitch jack.
6 Bass: Bottom end voicing control.
7 Middle: Mid-range voicing control.
8 Treble: Upper range voicing control.
To get an idea of this amp's capabilities, we suggest you set the tone control pots Bass (6),
Middle (7), Treble (8) and Lead Presence (10) to the 12 o'clock position.
9 Reverb: Reverb control, adjusts the portion of the reverb signal and increases reverb intensity
if you rotate it clockwise; the reverb can be switched on/off via a footswitch connected to jack (19).
10 Lead Presence: This control defines the Treble response in the poweramp stage for the Lead
channel.
11 Lead Volume: Volume control for the Lead channel (in front of the FX loop, affects the Send level).
12 Clean / Lead: Channel selector pushbutton for Clean and Lead modes, red LED indicate Lead mode;
This function can also be activated via a footswitch connected to jack (20). Once a footpedal
is connected, the channel selector pushbutton is deactivated.
13 Master: Master volume control for power amp output. The feature to switch between two Master
volume levels (V.L.S.) can be accessed by means of a footswitch connected to jack (19).
14 Power LED: This LED indicates the operation of the amp.
15 Stand By: Poweramp standby switch.
16 Power: AC power on/off.
Rear Panel
VOLTAGE
FUSED
!
100-120 V
5A
CAUTION !
220-240 V
2,5 A
DO NOT OPEN !
RISK OF ELECTRIC SHOCK !
DO NOT EXPOSE THIS EQUIPMENT
TO RAIN OR MOISTURE !
Footswitch
Poweramp Output
F.X. Loop
Balanced Line Output
MADE IN
GERMANY
WIRED FOR:
All-tube Guitar
Combo Amplifier
230 VOLT
SERIAL NUMBER:
REPLACE FUSE
ONLY WITH SAME
TYPE AND RATING !
17 18
Screamer 100
V.L.S. Clean / Lead
Reverb Lead Boost
Send
Return
Balance
Dry Effect
095660
19 20
21 22 23
4 ohms parallel
1 x 4 ohms
2 x 8 ohms
8 ohms parallel
1 x 8 ohms
2 x 16 ohms
internal
speaker
16 ohms
24 24 25 25 26
TYPE 340
Amp-Design by
Horst Langer
Level Overload
Line Out
Frequency
Compensated
27
29
28
17 AC Socket: Connect AC cord here.
CAUTION: Ensure you use an intact AC cord with an insulated plug only!
Before you power the amp up, ensure the voltage value printed beside the
AC socket corresponds to the available current.
18 AC Fuse Box: Contains mains fuse (rear chamber) and spare fuse (front chamber).
NOTE: Ensure replacement fuses bear identical ratings (refer to the table)!
19 Footswitch V.L.S., Reverb: 1/4" stereo jack for double footswitches, executes the following
functions:
1.Switching between the two Master volume levels Hi and Lo (mono terminal)
2.Reverb on/off (stereo terminal).
20 Footswitch Clean / Lead, Lead Boost: 1/4" stereo jack for double footswitches, executes the
following functions:
1.Channel switching between Clean and Lead (mono terminal)
2.Lead Boost (stereo terminal).
All functions that can be accessed via footswitch can also be switched via the ENGL MIDI
Switcher Z-11. Simply connect the two 1/4" stereo jacks (19) and (20) to the stereo inputs
of the Switcher via two cables equipped with 1/4" stereo plugs. You can control switching
functions via the buttons on the Switcher. The respective settings of the functions (e, g. Lead
channel, Lead boosted, Reverb active, Hi Master volume) are saved to the desired MIDI program
locations. The ENGL MIDI Footswitch Z-12 is ideal for activating MIDI programs. When used in
conjunction with the ENGL MIDI Switcher Z-11, this durable footswitch does not require a separate
AC power pack. The requisite power is routed via the MIDI cable.
21 F.X. Loop Send: Signal output for the Effects loop. Connect this output to a signal processor’s
input/return jack via a shielded cable with 1/4" plugs.
22 F.X. Loop Return: Signal input for the Effects loop. Connect this input to a signal processor’s
output/send jack via a shielded cable with 1/4" plugs.
23 Balance: FX mix control for the Effects loop: Rotate the knob to the Dry position for the pure amp
signal, i.e. no effect on the signal. Turn clockwise to blend in an effect connected to the loop
to the dry signal (parallel/passive). At the Effect position, only the wet signal, i.e. the signal
sent from the FX device is fed to the power amp (serial/passive).
NOTE: If no effects processor is connected to this loop, leave this control in position Dry!
24 Poweramp Output, 4 Ohms parallel: 4 ohms speaker output jacks, internal connected parallel.
For diverse cabinet options see the last chapter on this page!
25 Poweramp Output 8 Ohms parallel: 8 ohms speaker output jacks, internal connected parallel;
the internal 8 ohms speaker is connected to one of this two jacks at the combo E340. For diverse
cabinet options see the last chapter on this page! The impedance of a additional cabinet for the combo
should bear 8 ohms.
26 Poweramp Output 16 Ohms: 16 ohms speaker output jack. For diverse cabinet options see the
last chapter on this page!
NOTE: Never operate the amplifier without a sufficient load, otherwise you may damage or destroy the
power amp! Ensure your cabinet’s specifications match the respective output’s specs.
Choose only one of the following cabinet options:
A: One 4 ohms cabinet connected to a 4 ohms jack; (Combo E340: without the internal speaker to
reach the maximum power !);
B: Two 8 ohms cabinets connected to the 4 ohms jacks; Combo: An external 8 ohms cabinet and the
internal 8 ohms speaker connected to the 4 ohms jacks. When you unplug the cable for the
external cabinet, ensure you plug the internal speaker back into the 8 ohms jack!
C: One 8 ohms cabinet connected to a 8 ohms jack (Combo: The internal speaker is connected to a
8 ohms jack);
D: Two 16 ohms cabinets connected to the 8 ohms jacks (Combo: without the internal speaker !);
E: One 16 ohms cabinet connected to the 16 ohms jack (Combo: without the internal speaker !).
27 Level: Signal level control for the frequency-corrected line output; it is used to match
the amp’s signal level at the Line output to the mixing console or recorder’s input.
28 Overload: This LED denotes the Line output is overloading; in this case,
reduce the signal’s level via the Level control.
29 Line Out Frequency Compesated: The frequency-corrected, balanced Line output jack
(XLR; Pin 2 and 3 signal, Pin 1 = N.C. ). This signal can be routed directly to a mixing console or
a recording unit. The line out is located post poweramp in the signal chain, so ensure the poweramp
is activated and a load is connected to one of the output jacks.
The Line Out’s output level is influenced by the following factors: By the input level (Gain), the Volume
control setting for the Lead channel, to some degree by voicing control settings, and by the Master
volume level. First dial in the desired sound combination at the front panel. Then adjust levels at FX
devices or signal processors (if connected). Now use the Level control to adjust the Line level. The Line
output is not overloaded until the Overload LED illuminates brightly and continuously. You can push the
level up to this point to match a mixing console or recorder’s input level requirement. Use the respective
device’s input sensitivity or gain control to fine-tune level adjustments.
Technical Data:
Rated power:
Tubes:
approx. 100 watts at 4, 8 or 16 ohms.
V1 (input-tube): ECC 83 / 12AX7, FQ selected;
V2, V3: ECC 83 / 12AX7, selected;
V4: ECC 83 / 12AX7, standard;
V5 - V8: 5881(6L6GC) matched set.
Fuses:
external: 2,5 AM (medium) at 230 Volts;
5 AM (medium) in the 100 and 120 Volts models.
internal: 3,15 AT (slow) at 230 Volts;
6,3AT (slow) in the 100 and 120 Volts models.
CAUTION:
Replace fuses only against same type and rating!
Cooling:
two fans each 12 Volts DC - 1,2 watts;
Please Note:
To protect your amp from damage due to overheating, please ensure the cooling
fans remains in operation at all times, especially during lengthy gigs or other
occasions when your amp´s operating temperature is high.
For recording in the studio or other applications that demand absolutely silent
operation, you may disconnect the power supply to the fan pulling the central
power supply plug. Ensure the fan is not off for longer than two to three hours.
Dimensions:
Combo E340: approx. 57,5 x 48 x 27 cm; Head E345: approx. 57,5 x 27 x 27 cm
(lxhxd)
Weight:
Combo E340: approx. 24 kg; Head E345: approx. 18 kg;
Tube array:
cooling fan
connector
V5
V 6 output transformer
V4
power
transformer
V3
V7
V2
V1
Chassis Type E340
cable to the reverb spring,
and E345
red plug: Input
black plug: Output
V8
Clean
Lead
Bass
Middle
Treble
Reverb
Lead
Presence
Lead
Volume
Master
Input
Bright
Lead
Boost
Clean
Lead
Screamer
100
Stand By Power
TUBE - AMPLIFIER
Amp:
V.L.S.
Reverb
Amp:
Clean/Lead
Lead Boost
external
power
pack
MIDI Footcontroller Z-12
MIDI OUT
5
6
7
8
0
MIDI Footcontroller Z-12
1
2
3
9
POWER SUPPLY MIDI
7-14 Volts AC
OUTPUT
9-20 Volts DC
SERIAL
NUMBER
300 mA
MADE IN GERMANY
MIDI FOOTCONTROLLER
TYPE Z-12
1xx
1
3
2
4
5
MIDI SWITCHER
WRITE
MIDI
CHANNEL
SWITCH
LOOP 1
SWITCH
LOOP 2
SWITCH
LOOP 3
SWITCH
LOOP 4
SWITCH
LOOP 5
SWITCH
LOOP 6
ENGL Switcher Z-11
1: Power Supply
2: Loop 3 & 4
3: Loop 1 & 2
4: MIDI IN
5: MIDI THRU
UP
e.g.
Effects
Processor:
MIDI IN
BANK
4
TO SELECT
MIDI CHANNEL 1-16
PRESS UP AND DOWN
PUSHBUTTON
AT THE SAME TIME
UNTIL THE RIGHT DOT
OF THE DISPLAY STARTS
BLINKING AND USE
UP OR DOWN TO SELECT
THE DEMANDED
CHANNEL THEN.
DOWN
this graphic depicts a typical setup: The Screamer 100 Head combined with
the excellent sounding ENGL 412 cabinet; the Channel switching, Lead Boost,
Reverb and the Master Volume Level Switching (V.L.S.) is controlled via the
ENGL MIDI Footcontroller Z-12 and the ENGL MIDI Switcher Z-11.
Handling and Care
Protect the amp from mechanical knocks (tubes!).
Let the amp cool down before you transport it (approx. 10 minutes).
Tubes need about 20 seconds to warm up after you switch the power on,
and furtheron a few minutes before they reach their full power capability.
Avoid storing the amp in damp or dusty rooms, they are hard on jacks,
switches and potentiometers.
Make sure air can circulate at the rear side and the top of the amp
to allow for adequate cooling (increases component life).
Never operate the amp without an adequate load.
Replace tubes with select
replacement tubes (special selection criteria) to
avoid microfonic properties, undesireable noise and unbalanced performance.
Attention! Please read the following!
This guitar amplifier can produce high volume levels.
Exposure to high volume levels may cause hearing damage!
Leave tube replacement and power amp biasing to qualified professional.
Be sure the unit is switched off and unpluged!
Caution! Tubes can get very hot and cause skin burns.
Always use high quality cables.
Never operate the amp through an ungrounded outlet!
Never bridge a defective fuse and be sure replacement fuses feature
identical ratings!
Pull the AC mains plug before replacing fuses!
Never open the chassis or attempt repairs to your own. Consult qualified
service personnel!
Never expose the amplifier to extreme humidity or dampness!
Please read the instructions carefully before operating the unit!
Only operate the amplifier in a manner it is designed for and therefore
note this operational instructions!
ENGL Gerätebau GmbH, Germany;
Internet: www.engl-amps.com
Text, design, grafics and layout by Horst Langer
We r e s e r v e t h e r i g h t t o m a k e
unannounced technical upgrades!