1
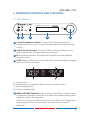
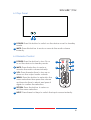
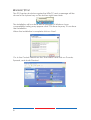
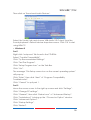
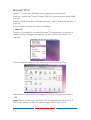
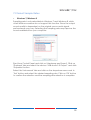
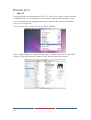
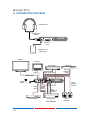
™
HDACC
High Def Audio Control Center
Operation Manual
™
Contact:
Bob Rapoport, [email protected], 727-580-4393
St. Petersburg, FL USA
™
SAFETY PRECAUTIONS
Please read all instructions before attempting to unpack, install or
operate this equipment and before connecting the power supply.
Please keep the following in mind as you unpack and install this
equipment:
•
Always follow basic safety precautions to reduce the risk of fire,
electrical shock and injury to persons.
•
To prevent fire or shock hazard, do not expose the unit to rain,
moisture or install this product near water.
•
Never spill liquid of any kind on or into this product.
•
Never push an object of any kind into this product through any
openings or empty slots in the unit, as you may damage parts
inside the unit.
•
Do not attach the power supply cabling to building surfaces.
•
Use only the supplied power supply unit (PSU). Do not use the PSU
if it is damaged.
•
Do not allow anything to rest on the power cabling or allow any
weight to be placed upon it or any person walk on it.
•
To protect the unit from overheating, do not block any vents or
openings in the unit housing that provide ventilation and allow for
sufficient space for air to circulate around the unit.
TRADEMARK ACKNOWLEDGMENTS
HDMI, the HDMI Logo, and High-Definition Multimedia Interface are
trademarks or registered trademarks of HDMI Licensing LLC in the
United States and other Countries.
™
CONTENTS
1. Introduction�������������������������������������������� 1
2. Applications������������������������������������������� 1
3. Package Contents�������������������������������� 1
4. System Requirements���������������������������� 2
5. Features�������������������������������������������������� 2
6. Operation Controls and Functions������� 4
6.1 Front Panel����������������������������������������4
6.2 Rear Panel�����������������������������������������5
6.3 Top Panel������������������������������������������6
6.4 Remote Control��������������������������������6
6.5 OLED Menu���������������������������������������7
7. Software Installation������������������������������ 8
7.1 Install Driver���������������������������������������8
7.2 Select Sample Rates����������������������12
7.3 Uninstall Driver���������������������������������14
8. Connection Diagram�������������������������� 15
9. Specifications�������������������������������������� 16
10. HDACC AUDIO PERFORMANCE�������� 17
™
1. INTRODUCTION
The High Def Audio Control Center is designed to allow multiple audio
sources to be controlled, switched and output to a variety of audio
equipment. With its 6 audio inputs (including an HDMI input) and
6 audio outputs (including a 6.3mm headphone output) you can
integrate and convert any digital or analog audio source to any type
of amplifier or active speakers.
This device has an built-in sampling rate converter which can
upscale audio signals between 44.1 kHz to 192 kHz (24-bit). With HDMI
connectivity, it allows the user to embed or de-embed audio within
the HDMI signal path.
For professionals, the Ti TPA6120A2 headphone amplifier, XLR (Lownoise Professional Balanced output) and 6.3mm headphone jack (3.5
mini-jack adaptor supplied) offer unparalleled audio quality. With a
highly accurate PLL and low jitter reduction clock system, and with an
OLED display and IR remote for controlling the device the HD Audio
Center is an incredibly useful tool for getting the most out of your
audio devices.
2. APPLICATIONS
• Multiple input/output Audio Center
• Audio format and sampling rate conversion
• Professional audio system integration with XLR balanced outputs
• Mac/PC USB audio output support
• Analog to digital or digital to analog audio conversion
• HDMI audio embedding or de-embedding
3. PACKAGE CONTENTS
• 1×HDACC
• 1×Remote Control (with battery)
• 1×6.3mm to 3.5mm Headphone Adaptor
• 1×Software CD
• 1×5 V/3 A DC Power Adaptor
• Operation Manual
1
™
4. SYSTEM REQUIREMENTS
Input source equipment such as PC (USB) or DVD player with relevant
connection cables and output to amplifier, active speakers or
headphones
5. FEATURES
Main
• HDMI v1.3 Deep Color, HDCP Compliant, and Uncompressed LPCM
2.0 (24/96K) Audio
• Supports HDMI 3D formats: Framing Packing, Side-by-Side ( half ),
Top-and-Bottom
• 6 Input, 6 Output HD Audio Control Center
• 4 Digital Inputs, 2 Analog Inputs
• 3 Digital Outputs, 2 Analog Outputs and Headphone Output
• Full system control from IR remote or main control dial via OLED
display.
Digital
• HDMI, USB, Optical and Coaxial digital audio inputs support LPCM
stereo
• HDMI input supports LPCM stereo in all modes but can pass surround
sound signal whilst in bypass mode
• All digital inputs support 192kHz sampling rate at up to 24-bit
resolution
• HDMI, Optical and Coaxial digital outputs
• All digital inputs can be SRC (Sample Rate Conversion) to 44.1, 48,
88.2, 96, 176.4 and 192 kHz via DSP Engine (Digital Signal Processing)
• Highly accurate PLL and low jitter reduction clock system
• HDMI Audio output (video is always bypassed to HDMI output) can
either output the incoming HDMI (HDMI Bypass Mode) or embed
the selected audio signal (HDMI Input Mode)
Analog
• Built-in Ti TPA6120A2 high quality headphone amplifier output
• Professional XLR balanced stereo output
• RCA analog stereo output
• RCA analog stereo input
2
™
• Mini-jack (3.5mm) stereo input
• Total Harmonic Distortion (THD): Less than 100dB (-20dBFS)
• Analog inputs provide digital output sampling rates up to 192 kHz
Misc
• IR Remote with direct source, power and mute buttons
• HDMI audio embedding or de-embedding
• Volume control of analog and headphone outputs or just
headphone output via remote or main control dial
• Direct power and mute button on unit
• High viewing angle OLED display
• Headphone output fades in after system is muted
• 6.3mm headphone output (3.5mm mini-jack adaptor supplied)
3
™
6. OPERATION CONTROLS AND FUNCTIONS
6.1 Front Panel
High Def Audio Control Center
MENU
VOLUME
1 2
3
4
5
1 6.3mm Headphone Output: Connect to 6.3mm professional
headphone set for user to enjoy the individual professional audio
sound.
2 3.5mm Line-level Input: Connect 3.5mm mini-jack cable to any
audio equipment for stereo input audio signal.
3 IR: IR receiver window. Accepts the IR signal from the supplied
remote control.
4 OLED: Displays the input/output selection, volume setting, sampling
rate and audio channels.
A
B
C
D
A. Input source
B.Headphone or analog line level volume or system mute
C.Input sampling rate
D.Output sampling rate
5 MENU/VOLUME Controller: Turn to adjust the volume. Press inwards
to enter into the menu and turn it to select the desire setting, press
again to confirm the selection.
Note: The Volume and Mute functions only affect the headphone
and analog line-out volume levels, all other outputs are not
affected.
4
™
6.2 Rear Panel
4
DC 5V
COAX.
HDMI OUT
L
USB
OPT.
OUT
HDMI IN
1
2
3
R
IN
5
OUT
IN
6
XLR OUT R
XLR OUT L
7
1 DC 5V: Plug the 5V DC power supply into the unit and connect the
adaptor to an AC outlet.
2 HDMI IN/OUT: Connect to an HDMI source such as a satellite box
or DVD Audio player and output to an HDMI HDTV/AV Receiver for
display output.
3 USB: Connect to a PC/MAC source for USB audio signal input.
4 COAX OUT/IN: Connect the COAX IN to a coaxial digital audio
input source such as set-top box or CD player and the COAX OUT
to an amplifier or active speakers with a coaxial cable.
5 OPT. OUT/IN: Connect the OPT. IN to an optical digital audio input
source such as a DVD/CD player or PS3 and the OPT. OUT to an
amplifier or active speakers with an optical cable.
6 L/R IN/OUT: Connect the L/R IN to an analog stereo input source
such as a CD player or media player and the L/R OUT to amplifier
or active speakers with RCA jack cables.
7 XLR L/R OUT: Connect to an amplifier with balanced XLR inputs or
directly to professional balanced equipment with XLR cables.
Note:
HDMI Input Mode: In this mode, whatever audio input is selected
will be routed to the HDMI output as well as all other outputs.
HDMI Bypass Mode: In this mode HDMI video and audio will always
be routed to the HDMI output no matter what input is selected,
whilst all other outputs will output the audio from the selected
input. This function allows the user to have two distinct audio
pathways through the unit.
5
™
6.3 Top Panel
POWER
MUTE
1 2
1 POWER: Press this button to switch on the device or set to standby
mode.
2 MUTE: Press this button to mute or unmute the audio volume
instantly.
6.4 Remote Control
1 POWER: Press the button to turn On or
1
2 MUTE: Press the button to mute or
3
to set the device to standby mode.
unmute the audio volume instantly.
2
4
5
3 VOL: Press these buttons to turn up or
down on the output audio volume.
4 MENU: Press the button to enter into the
menu selections then press the volume
up/down buttons to select and press it
again to confirm the selection.
6
5 RETURN: Press the button to return or
exit the menu selection.
6 INPUT: Press these hot keys to switch the input sources instantly.
6
™
6.5 OLED Menu
1ST LAYER
FULL NAME
2ND LAYER
Source In
Source Selection
HDMI In
USB In
Optical In
Coaxial In
Line In (L/R In)
Front In
Return
SRC Set
Sampling Rate Conversion Setup
Bypass
192 kHz
176.4 kHz
96 kHz
88.2 kHz
48 kHz
44.1 kHz
Return
HDMI TX Set
HDMI Output Setup
Bypass
Input
Return
Display Set
Display Time Out Setup
TimeOut 5s
TimeOut 10s
TimeOut 15s
Return
HP Impedance
Headphone Impedance
16 Ω
32 Ω
64 Ω
200 Ω
300 Ω
600 Ω
Return
Line Out Set
Headphone/Line Out Setup
Fix Level
Volume Level
Return
Reset to Default
OK
Return
Return
7
™
7. SOFTWARE INSTALLATION
7.1 Install Driver
•
Windows 7/Windows XP
Insert the CD-ROM included in the package into your computer's CDROM drive. The setup wizard should automatically start. Connect the
HDACC to the computer.
Click on 'Next' to start the setup.
Confirm the location of the 'Destination Folder' (the default location
will be shown) and click on 'Install' to continue the setup.
While the installation may proceed uninterrupted, a message may
appear (example shown below). Click 'Continue Anyway' to continue
the installation.
During the setup the unit must be connected to your PC/laptop
source device. When the message appears to asking for the unit to
be disconnected and reconnected, follow the onscreen prompts and
when finished click on 'OK'.
8
™
The PC/Laptop should recognize the HDACC and a message will be
shown in the system tray on the bottom right-hand side.
The installation will continue and a message of Windows Logo
compatibility testing may appear click 'Continue Anyway' to continue
the installation.
When the installation is complete click on 'Next'.
Go to the Control Panel from the 'Start Menu' and click on 'Sounds,
Speech, and Audio Devices'.
9
™
Then click on 'Sound and Audio Devices'.
Select the 'Audio' tab and choose 'USB Audio 2.0 Output' from the
Sound playback’s Default device dropdown menu. Click 'OK' to start
using HDACC.
• Windows 8
Part 1
Right click “setup.exe” file found in the CD-ROM.
Select “Trouble Compatibility”.
Click “Try Recommended Settings”.
Click “Test The Program”.
Click “Setup Program Icon” on the Task Bar.
Click “Yes”.
The message “This Setup cannot run on the current operating system”
will pop-up.
Click “Enter”, then click “Next” of “Program Compatibility
Troubleshooter”.
Click “Cancel” to quit part 1.
Part 2
Move the mouse cursor to the right up corner and click “Settings”.
Click “Change PC settings”.
Click “General”, then click “Restart now” of “Advanced Startup”.
Click “Troubleshoot” to bring up the “Choose An Option” window.
Click “Advanced Options”.
Click “Startup Settings”.
Click “Restart”.
10
™
Press “7” to choose “Disable driver signature enforcement”.
Execute “setup.exe” found in the CD-ROM to install driver when Win8
OS runs.
Select “Install this driver software anyway” when “Windows Security” is
pop-up.
Restart Win8 OS after the driver is installed.
• Mac OS
There is no installation required for Mac OS computers, however, a
simple setting change is required in order to allow the HDACC to
function.
Click on 'System Preferences' and then click 'Sound' button.
When the sound preferences appear, click on 'Output' and select
'USB'.
Note: Please make sure the USB Audio is upgraded to version 2.0. If
USB Audio driver is under 2.0 version some noise may occur.
11
™
7.2 Select Sample Rates
•
Windows 7/Windows 8
Sampling rate is only selectable in Windows 7 and Windows 8, while
other Windows versions do not support this function. Since the output
sound quality is dependent on the original source audio signal,
performance may vary. Selecting the sampling rate may improve the
sound available from your computer.
Start from Control Panel and click on 'Hardware and Sound'. Click on
'Playback' tab and select the device “USB Audio 2.0 Output” and click
'Properties' button.
Select the 'Advanced' tab and click on the dropdown menu next to
'Test' button and select the desired sampling rate. Click on 'OK' button
to confirm the selection and the sampling rate selection is complete.
12
™
•
Mac OS
Sampling Rate is selectable in Mac OS. Since the output sound quality
is dependent on the original source audio signal, performance may
vary. Selecting the sampling rate may improve the sound available
from your computer.
On the menu bar, click 'Go' and select 'Utilities'.
Click 'Applications' in the left pane, then double click the 'Audio MIDI
Setup' in the right pane to launch the 'Audio Devices' screen.
13
™
Click 'Built-in Output' in the left pane. Use the 'Format' dropdown menu
to select the desired sampling rate, then click 'Configure Speakers'
button to apply.
7.3 Uninstall Driver
1. Open the Control Panel from the 'START Menu' and 'then select
'Add or Remove Programs'.
2. Select 'USB Audio Driver' and click 'Remove'.
3. Click 'Yes' to confirm the removal and click 'Yes' again to restart
the computer in order to remove the software completely.
14
™
8. CONNECTION DIAGRAM
Headphones
Headphone
Output
FRONT
High Def Audio Control Center
MENU
VOLUME
Line-level
Input
Smartphone or
MP3 Player
Display
Mac PC
Set-top Box
USB
Input
Digital Audio Input
CD Player
Stereo
Analog
Input
HDMI Output
DC 5V
Power
Supply
L
USB
OPT.
HDMI IN
HDMI
Input
Blu-ray player
15
COAX.
HDMI OUT
OUT
R
IN
IN
OUT
Digital
Audio
Output
XLR OUT R
XLR OUT L
REAR
Stereo
Analog
Output
XLR
Balanced
Output
AV Receiver
or
Stereo Amplifier
Active
Speakers
™
9. SPECIFICATIONS
Input Ports
1×HDMI,
1×USB (Type B),
1×Coaxial,
1×Optical,
1×L/R (Analog Stereo 2RCA),
1×3.5mm Phone Jack (L/R)
Output Ports
1×HDMI,
1×Coaxial,
1×Optical,
1×L/R (Analog Stereo 2RCA),
1×XLR (Balanced Analog Stereo),
1×6.3mm Phone Jack (Headphone)
Digital Audio I/O Support
LPCM 2CH
Stereo Audio I/O Level
2 Vrms ±0.2
XLR Blanced I/O Level
4 Vrms ±0.2
Headphone Impedance
16 Ω ~ 600 Ω
Analog Line-Out Gain
0db to -80db
Headphone Output Gain
-0.5db to -91.5db
ESD Protection
Human body model:
±8 kV (air-gap discharge)
±6 kV(contact discharge)
Power Supply
5 V/3 A DC (US/EU standards, CE/FCC/
UL certified)
Dimensions
138 mm (W)×223 mm (D)×50 mm (H)
Weight
680 g
Chassis Material
Aluminum
Silkscreen Color
Black
Power Consumption
15 W
16
™
10. HDACC AUDIO PERFORMANCE
Fs = 44.1 to 96 kHz, 20 to 20 kHz BW, 1 kHz test tone, 0 dBFS = +24 dBu
(unless noted):
SNR – A-Weighted, (0 dBFS = +20 to +29 dBu): 109 dB
SNR – Unweighted, (0 dBFS = +20 to +29 dBu): 107 dB
THD+N, 1 kHz at 0 dBFS:
-85 dB, 0.005095%
THD+N, 1 kHz at –1 dBFS:
-87 dB, 0.004849%
THD+N, 1 kHz at –3 dBFS:
-89 dB, 0.004521%
THD+N, 20 to 20 kHz test tone at –3 dBFS:
-89 dB, 0.004521%
Frequency Response at Fs=48 kHz:
± 0.1dB(20 to 20kHz)
0.2 dB at 20 Hz
-0.2 dB at 20 kHz
Frequency Response at Fs=96 kHz:
± 0.1dB(20 to 20kHz)
0.25 dB at 20 Hz
-0.2 dB at 20 kHz
Crosstalk
-113 dB at 20 kHz
-118 dB at 1 kHz
-119 dB at 20 Hz
Interchannel Differential Phase (Stereo Pair):
± 0.1 degrees at 1
kHz - any sample rate
Interchannel Differential Phase (Between
DAC1 Units Fs<110):
± 0.1 degrees at 1
kHz - Fs < 110 kHz
Interchannel Differential Phase (Between
DAC1 Units Fs>110):
± 0.1 degrees at 1
kHz - Fs > 110 kHz
Delay (Digital Input to Analog Output):
3.909 ms at 44.1 kHz
3.592 ms at 48 kHz
1.956 ms at 88.2 kHz
1.798 ms at 96 kHz
0.980 ms at 176.4 kHz
0.900 ms at 192 kHz
Mute on Receive Error:
17
Yes
™
Mute on Lock Error:
Yes
Mute on Idle Channel:
No
18
™
www.essenceelectrostatic.com