1
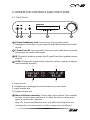
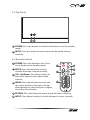
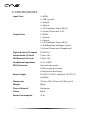
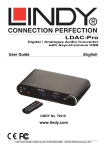
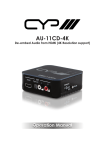
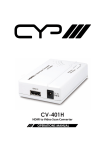
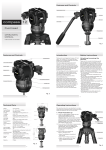
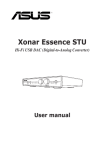
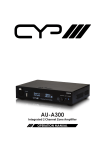
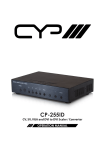
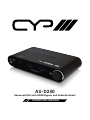
AU-D250
Advanced DAC with HDMI Bypass and Audio Breakout
OPERATIONS MANUAL
DISCLAIMERS
The information in this manual has been carefully checked and is
believed to be accurate. CYP (UK) Ltd assumes no responsibility for any
infringements of patents or other rights of third parties which may result
from its use.
CYP (UK) Ltd assumes no responsibility for any inaccuracies that may be
contained in this document. CYP (UK) Ltd also makes no commitment to
update or to keep current the information contained in this document.
CYP (UK) Ltd reserves the right to make improvements to this document
and/or product at any time and without notice.
COPYRIGHT NOTICE
No part of this document may be reproduced, transmitted, transcribed,
stored in a retrieval system, or any of its part translated into any language
or computer file, in any form or by any means—electronic, mechanical,
magnetic, optical, chemical, manual, or otherwise—without express
written permission and consent from CYP (UK) Ltd.
© Copyright 2011 by CYP (UK) Ltd.
All Rights Reserved.
Version 1.1 August 2011
TRADEMARK ACKNOWLEDGMENTS
All products or service names mentioned in this document may be
trademarks of the companies with which they are associated.
SAFETY PRECAUTIONS
Please read all instructions before attempting to unpack, install or operate
this equipment and before connecting the power supply.
Please keep the following in mind as you unpack and install this
equipment:
• Always follow basic safety precautions to reduce the risk of fire,
electrical shock and injury to persons.
• To prevent fire or shock hazard, do not expose the unit to rain,
moisture or install this product near water.
• Never spill liquid of any kind on or into this product.
• Never push an object of any kind into this product through any
openings or empty slots in the unit, as you may damage parts inside
the unit.
• Do not attach the power supply cabling to building surfaces.
• Use only the supplied power supply unit (PSU). Do not use the PSU if
it is damaged.
• Do not allow anything to rest on the power cabling or allow any
weight to be placed upon it or any person walk on it.
• To protect the unit from overheating, do not block any vents or
openings in the unit housing that provide ventilation and allow for
sufficient space for air to circulate around the unit.
REVISION HISTORY
VERSION NO. DATE
SUMMARY OF CHANGE
v1.01
First release
18/03/13
CONTENTS
1. Introduction�������������������������������������������6
2. Applications�������������������������������������������6
3. Package Contents����������������������������������6
4. System Requirements���������������������������6
5. Features��������������������������������������������������7
6. Operation Controls and Functions�������9
6.1 Front Panel��������������������������������������������������� 9
6.2 Rear Panel���������������������������������������������������10
6.3 Top Panel����������������������������������������������������11
6.4 Remote Control����������������������������������������11
6.5 OLED Menu������������������������������������������������12
7. Connection Diagram�������������������������� 13
8. Specifications�������������������������������������� 14
9. Acronyms��������������������������������������������� 15
1. INTRODUCTION
The AU-D250 is designed to integrate and convert both analogue and
digital audio signals into any AV system. This device has an in-built
sample rate converter which can upscale audio signals between 44.1kHz
to 192kHz (24 bit). With HDMI connectivity, allowing the user to embed
or de-embed audio within the HDMI signal path, the AU-D250 not only
provides a truly enhanced listening experience, but also the flexibility to
manage all audio signals in your AV system.
For professionals the Ti TPA6120A2 headphone amplifier, XLR (Low noise
Professional Balanced output) and 6.3mm headphone jack (3.5 mini-jack
adaptor supplied) offer unparalleled audio quality. With a highly accurate
PLL and low jitter reduction clock system and an OLED display and IR
remote for controlling the device, the AU-D250 is an incredibly useful tool
for getting the most out of your audio devices.
2. APPLICATIONS
Advanced DAC with Multiple input/output
Audio format and sampling rate conversion
Professional audio system integration with XLR balanced outputs
MAC/PC audio output to professional speakers/headphones
Analogue to digital or digital to analogue audio conversion
HDMI audio embedding or de-embedding
3. PACKAGE CONTENTS
Advanced DAC with HDMI Bypass and Audio Breakout
1×Remote Control (with battery)
6.5mm to 3.5mm phone jack adaptor
5 V/3.6 A DC Power adaptor
Operation Manual
4. SYSTEM REQUIREMENTS
Input source equipment such as PC (USB) or DVD player with relevant
connection cables and output to amplifier, active speakers or headphones
6
5. FEATURES
Main
6 Input, 6 Output Advanced DAC
4 Digital Inputs, 2 Analogue Inputs
3 Digital Outputs, 2 Analogue Outputs and Headphone Output
Full system control from IR remote or main control dial via OLED
display.
Digital
HDMI, USB, Optical and Coaxial digital audio inputs support LPCM
stereo
HDMI input supports LPCM stereo in all modes but can pass surround
sound signal whilst in bypass mode
All digital inputs support 192kHz sampling rate at up to 24-bit
resolution
HDMI, Optical and Coaxial digital outputs
All digital inputs can be SRC (Sample Rate Conversion) to 44.1, 48, 88.2,
96, 176.4 and 192 kHz via DSP Engine (Digital Signal Processing)
Highly accurate PLL and low jitter reduction clock system
HDMI Audio output (video is always bypassed to HDMI output) can
either output the incoming HDMI (HDMI Bypass Mode) or embed the
selected audio signal (HDMI Input Mode)
Analogue
Built-in Ti TPA6120A2 high quality headphone amplifier output
Professional XLR balanced stereo output
RCA analogue stereo output
RCA analogue stereo input
Mini-jack (3.5mm) stereo input
Total Harmonic Distortion (THD): Less than 100dB (-20dBFS)
Analogue inputs provide digital output sampling rates up to 192 kHz
7
Misc
IR Remote with direct source, power and mute buttons
HDMI audio embedding or de-embedding
Volume control of analogue and headphone outputs or just
headphone output via remote or main control dial
Direct power and mute button on unit
High viewing angle OLED display
Headphone output fades in after system is muted
6.3mm headphone output (3.5mm mini-jack adaptor supplied)
8
6. OPERATION CONTROLS AND FUNCTIONS
6.1 Front Panel
MENU
1 2
3
4
5
1 6.5mm Headphone Jack: Connect to a 6.5mm professional
headphone set for the user to enjoy the individual professional audio
sound.
2 3.5mm Front IN: Connect with 3.5mm mini-jack cable from any audio
equipment for stereo audio input.
3 IR: IR receiver window, accepts the IR signal from the supplied remote
control.
4 OLED: Displays the input/output selection, volume setting, sampling
rate and audio channels..
A
B
C
D
A. Input Source
B. Headphone or analogue line level volume or system mute
C. Input sample-rate
D. Output sample-rate
5 Menu & Volume controller: Turn to adjust the volume. Press inwards
to enter into the menu and turn it to select the desire setting, press
again to confirm the selection.
Note: The Volume and Mute functions only affect the headphone and
analogue line-out volume levels, all other outputs are not affected.
9
6.2 Rear Panel
4
DC 5V
COAX.
HDMI OUT
L
USB
OPT.
OUT
HDMI IN
1
2
3
R
IN
5
OUT
IN
6
XLR OUT R
XLR OUT L
7
1 DC 5V: Plug the 5V DC power supply into the unit and connect the
adaptor to an AC outlet.
2 HDMI IN/OUT: Connect to a HDMI source such as a satellite box or
DVD Audio player and output to a HDMI HDTV/monitor for display
output.
3 USB: Connect to a PC/MAC source for USB audio signal input.
4 COAX OUT/IN: Connect the COAX IN to an coaxial digital audio input
source such as set-top box or CD Player and the COAX OUT to an
amplifier or active speakers with a coaxial cable.
5 OPT. OUT/IN: Connect the OPT. IN to an optical digital audio input
source such as a DVD/Blu-ray player or PS3 and the OPT. OUT to an
amplifier or active speakers with an optical cable.
6 L/R IN/OUT: Connect the L/R IN to an analogue stereo input source
such as a CD Player or media player and the L/R OUT to amplifier or
active speakers with RCA jack cable.
7 R/L XLR OUT(Balanced): XLR L/R OUT: Connect to an amplifier with
balanced XLR inputs or directly to professional balanced equipment
with XLR cables
Note:
HDMI Input mode: In this mode, whatever audio input is selected will be
routed to the HDMI output as well as all other outputs.
HDMI Bypass mode: In this mode HDMI video and audio will always be
routed to the HDMI output no matter what input is selected, whilst all
other outputs will output the audio from the selected input. This function
allows the user to have two distinct audio pathways throught the unit.
10
6.3 Top Panel
1 2
1 POWER: Press this button to switch on the device or set to standby
mode.
2 MUTE: Press this button to mute or unmute the audio volume
instantly.
6.4 Remote Control
1 POWER: Press this button to turn On or
to set the device in standby mode.
1
2 MUTE: press this button to mute or
unmute the audio volume instantly.
3
3 VOL. Up/Down: Press these buttons to
turn up or down on the output audio
volume.
4 MENU: Press these button to enter into
the menu selections then press the up/
down buttons to select and press it again
to confirm the selection.
2
4
5
6
5 RETURN: Press this button to return or exit the menu selection.
6 INPUT: Press these hot keys to switch the input sources instantly.
11
6.5 OLED Menu
1ST LAYER
FULL NAME
2ND LAYER
Source In
Source Selection
HDMI In
USB In
Optical In
Coaxial In
Line In (L/R In)
Front In
Return
SRC Set
Sampling Rate Conversion Setup
Bypass
192 kHz
176.4 kHz
96 kHz
88.2 kHz
48 kHz
44.1 kHz
Return
HDMI TX Set
HDMI Output Setup
Bypass
Input
Return
Display Set
Display Time Out Setup
TimeOut 5s
TimeOut 10s
TimeOut 15s
Return
HP Impedance
Headphone Impedance
16 Ω
32 Ω
64 Ω
200 Ω
300 Ω
600 Ω
Return
Line Out Set
Headphone/Line Out Setup
Fix Level
Volume Level
Return
Reset to Default
OK
Return
Return
12
7. CONNECTION DIAGRAM
Headphones
Headphone
Output
FRONT
MENU
Line-level
Input
Smartphone or
MP3 Player
Display
Mac PC
Set-top Box
USB
Input
Digital Audio Input
CD Player
Stereo
Analogue
Input
HDMI Output
DC 5V
Power
Supply
COAX.
HDMI OUT
L
USB
OPT.
HDMI IN
HDMI
Input
DVD/CD Player
OUT
R
IN
IN
OUT
Digital
Audio
Output
XLR OUT R
XLR OUT L
REAR
Stereo
Analogue
Output
XLR
Balanced
Output
AV Receiver
or
Stereo Amplifier
Active
Speakers
13
8. SPECIFICATIONS
Input Ports
1×HDMI,
1×USB (Type B),
1×Coaxial,
1×Optical,
1×L/R (Analogue Stereo 2RCA),
1×3.5mm Phone Jack (L/R)
Output Ports
1×HDMI,
1×Coaxial,
1×Optical,
1×L/R (Analogue Stereo 2RCA),
1×XLR (Balanced Analogue Stereo),
1×6.3mm Phone Jack (Headphone)
Digital Audio I/O Support
LPCM 2CH
Stereo Audio I/O Level
2 Vrms ±0.2
XLR Blanced I/O Level
4 Vrms ±0.2
Headphone Impedance
16 Ω ~ 600 Ω
ESD Protection
Human body model:
±8 kV (air-gap discharge)
±6 kV(contact discharge)
Power Supply
5 V/3 A DC (US/EU standards, CE/FCC/UL
certified)
Dimensions
138 mm (W)×223 mm (D)×50 mm (H)
Weight
680 g
Chassis Material
Aluminum
Colour
Black
Power Consumption
15 W
9. ACRONYMS
ACRONYM
COMPLETE TERM
COAX
Coaxial
HD
High Definition
HDMI
High-Definition Multimedia Interface
OLED
Organic Light-Emitting Diode
OPT
Optical
PLL
Phase Locked Loop
SRC
Sample Rate Conversion
THD
Total Harmonic Distortion
CYP (UK) Ltd., Unit 7, Shepperton Business Park, Govett Avenue, Shepperton,
Middlesex, TW17 8BA
Tel: +44 (0) 20 3137 9180 | Fax: +44 (0) 20 3137 6279
Email: [email protected]
www.cypeurope.com
v1.01