1
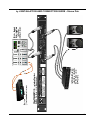
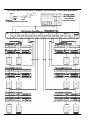
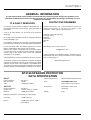
DRAWMER
SP2120
Speaker Protector
CONTENTS
Warranty . . . . . . . . . . . . . . . . . . . . . . . . . . . . . . . . . . . . . . . . . . . . . . . . . . . . . . . . . . . 2
Safety Consideration . . . . . . . . . . . . . . . . . . . . . . . . . . . . . . . . . . . . . . . . . . . . . . . . 2
Chapter 1 - Introduction
Introduction . . . . . . . . . . . . . . . . . . . . . . . . . . . . . . . . . . . . . . . . . . . . . . . . . . . . . . . 3
Installation . . . . . . . . . . . . . . . . . . . . . . . . . . . . . . . . . . . . . . . . . . . . . . . . . . . . . . . . 4
Tamper-proof Bracket . . . . . . . . . . . . . . . . . . . . . . . . . . . . . . . . . . . . . . . . . . . . . . 4
Audio Connections . . . . . . . . . . . . . . . . . . . . . . . . . . . . . . . . . . . . . . . . . . . . . . . . . 4
Installation and Connection Guide - Stereo Pair . . . . . . . . . . . . . . . . . . . . . . . . . 5
Installation and Connection Guide - Multiple Speakers . . . . . . . . . . . . . . . . . . . 6
Chapter 2 - Control Description
Front Panel Controls . . . . . . . . . . . . . . . . . . . . . . . . . . . . . . . . . . . . . . . . . . . . . . . . 7
The Setup Procedure . . . . . . . . . . . . . . . . . . . . . . . . . . . . . . . . . . . . . . . . . . . . . . . 7
Chapter 3 - General Information
If a fault develops . . . . . . . . . . . . . . . . . . . . . . . . . . . . . . . . . . . . . . . . . . . . . . . . . . . 8
Contacting Drawmer . . . . . . . . . . . . . . . . . . . . . . . . . . . . . . . . . . . . . . . . . . . . . . . . 8
Specification . . . . . . . . . . . . . . . . . . . . . . . . . . . . . . . . . . . . . . . . . . . . . . . . . . . . . . 9
Block Diagram . . . . . . . . . . . . . . . . . . . . . . . . . . . . . . . . . . . . . . . . . . . . . . . . . . . . 9
COPYRIGHT
This manual is copyrighted 8 2012 by Drawmer Electronics Ltd. With all rights reserved. Under copyright
laws, no part of this publication may be reproduced, transmitted, stored in a retrieval system or translated
into any language in any form by any means, mechanical, optical, electronic, recording, or otherwise, without the written permission of Drawmer Electronics Ltd.
ONE YEAR LIMITED WARRANTY
Drawmer Electronics Ltd., warrants the Drawmer SP2120
Speaker Protector to conform substantially to the specifications
of this manual for a period of one year from the original date of
purchase when used in accordance with the specifications
detailed in this manual. In the case of a valid warranty claim,
your sole and exclusive remedy and Drawmer’s entire liability
under any theory of liability will be to, at Drawmer’s discretion,
repair or replace the product without charge, or, if not possible,
to refund the purchase price to you. This warranty is not
transferable. It applies only to the original purchaser of the
product.
DRAWMER
SP2120
SPEAKER PROTECTOR
SAFETY CONSIDERATIONS
CAUTION - MAINS FUSE
For warranty service please call your local Drawmer dealer.
Alternatively call Drawmer Electronics Ltd. at +44 (0)1709
527574. Then ship the defective product, with transportation
and insurance charges pre-paid, to Drawmer Electronics Ltd.,
Coleman Street, Parkgate, Rotherham, S62 6EL UK. Write the
RA number in large letters in a prominent position on the
shipping box. Enclose your name, address, telephone number,
copy of the original sales invoice and a detailed description of
the problem. Drawmer will not accept responsibility for loss or
damage during transit.
TO REDUCE THE RISK OF FIRE
REPLACE THE MAINS FUSE ONLY WITH
A FUSE THAT CONFORMS TO IEC127-2.
250 VOLT WORKING, TIME DELAY TYPE
AND BODY SIZE OF 20mm x 5mm.
THE MAINS INPUT FUSE MUST BE
RATED AT 230V=T50mA and 115V=T100mA.
This warranty is void if the product has been damaged by
misuse, modification or unauthorised repair.
CAUTION - MAINS CABLE
THIS WARRANTY IS IN LIEU OF ALL WARRANTIES,
WHETHER ORAL OR WRITTEN, EXPRESSED, IMPLIED OR
STATUTORY. DRAWMER MAKES NO OTHER WARRANTY
EITHER EXPRESS OR IMPLIED, INCLUDING, WITHOUT
LIMITATION, ANY IMPLIED WARRANTIES OF
MERCHANTABILITY, FITNESS FOR A PARTICULAR PURPOSE,
OR NON-INFRINGEMENT. PURCHASER’S SOLE AND
EXCLUSIVE REMEDY UNDER THIS WARRANTY SHALL BE
REPAIR OR REPLACEMENT AS SPECIFIED HEREIN.
IN NO EVENT WILL DRAWMER ELECTRONICS LTD. BE
LIABLE FOR ANY DIRECT, INDIRECT, SPECIAL, INCIDENTAL
OR CONSEQUENTIAL DAMAGES RESULTING FROM ANY
DEFECT IN THE PRODUCT, INCLUDING LOST PROFITS,
DAMAGE TO PROPERTY, AND, TO THE EXTENT PERMITTED
BY LAW, DAMAGE FOR PERSONAL INJURY, EVEN IF
DRAWMER HAS BEEN ADVISED OF THE POSSIBILITY OF
SUCH DAMAGES.
DO NOT ATTEMPT TO CHANGE
OR TAMPER WITH THE
SUPPLIED MAINS CABLE.
CAUTION - SERVICING
DO NOT PERFORM ANY SERVICING.
REFER ALL SERVICING TO QUALIFIED
SERVICE PERSONNEL.
WARNING
TO REDUCE THE RISK OF FIRE OR
ELECTRIC SHOCK DO NOT EXPOSE
THIS EQUIPMENT TO RAIN OR MOISTURE.
Some states and specific countries do not allow the exclusion
of implied warranties or limitations on how long an implied
warranty may last, so the above limitations may not apply to
you. This warranty gives you specific legal rights. You may
have additional rights that vary from state to state, and country
to country.
It is the responsibility of the installer to ensure that the continuous power rating of the speakers is not exceeded, as
Drawmer Electronics Ltd will not accept any responsibility for damage caused by incorrect installation and settings.
In the interests of product development, Drawmer reserve the right to modify or
improve specifications of this product at any time, without prior notice.
2
CHAPTER 1
DRAWMER
SP2120
SPEAKER PROTECTOR
INTRODUCTION
The Drawmer SP2120 Speaker Protector offers both strict
level control and tremendous peace of mind to the contractor, installer and venue in the knowledge that, as its
name suggests, the 1U, two channel processor eliminates
the possibility of ’unauthorised’ excessive sound pressure
levels on speaker systems (as caused by spikes and pops
in the system, or by over-enthusiast dj’s/engineers) which
could result in damage to both chassis drivers and amplifier electronics. In addition only the maintenance engineer and the venue manager hold a key. The unit also
gives a wide variety of venues, such as clubs, theatres,
pubs, schools, universities etc. the opportunity to comply
with the local legislation regarding noise levels.
The key features are as follows:
• Key Holder access only
• Takes only minutes to install
• Tamper-Proof bracket (available separately) to lock-in the XLR’s and conform to Local Authority regulations.
• Dual 16 segment Left/Right bargraphs for ’at a glance’ level metering
• ’Protection’ processing 16 segment bargraph display
• No sound quality loss even during heavy protection processing
• Once installed and calibrated completely eliminates the possibility of ’unauthorised’ volume levels
• Eliminates sound system abuse and the resulting cost of chassis speaker re-cones, HF diaphragm
replacements and amplifier repairs.
• Reduces ’call-out’ costs of sound system service/repair engineers
• Reduces sound system ’down time’ and the consequential loss of venue income
• Isolation transformer output option.
The SP2120 front panel features an integral security lock
to ensure that adjustments to maximum volume levels are
implemented by key holders only. In ’unlocked’ mode two
front panel pre-sets are exposed and available for
adjustment by the installer. The first calibrates the 16
segment Left/Right bargraphs to the incoming audio and
dictates the point at which ’protection’ processing
commences. The second sets the absolute volume level
to which the sound system is allowed to perform. If the
SP2120 receives increased signal levels, the transparent
’protection’ circuitry is activated which maintains the
specified system volume level without degradation in sound
quality.
The SP2120 greatly benefits from Drawmer’s 25 years
experience in designing industry standard dynamic
processing devices. Its signal path combines a mixture of
’multiple time constant’ circuitry and automatic gain control
(AGC) which allow small overloads to sound louder – even
though they’re not.
Its concept and development was encouraged by Drawmer
distributors and installers dissatisfied with other protection
systems currently available. These often take the form of
a crude switch, either turning off the power or disconnecting
the speakers, both of which are ’disruptive’ in any event.
3
INSTALLATION
The SP2120 Speaker Protector is designed for standard
19" rack mounting and occupies 1U of rack space. Where
possible, avoid mounting the unit directly above power
amplifiers or power supplies that radiate significant amounts
of heat.
If the unit is to be used in a mobile situation, it is strongly
recommended that the rear of the unit is supported in the
carrying rack to avoid bending the front panel rack mounting
‘ears’. Use fibre or plastic washers to prevent the front panel
becoming marked by the mounting bolts. Always connect
the mains earth to the unit.
Fig. 2 shows the ideal connection setup, providing the
greatest protection for your system. Note the position of
the SP2120 along the audio chain - it should be connected
directly before the amplifier that is supplying the speakers,
(or before the active speakers), with the amplifier volume
set to maximum. If the SP2120 were to be connected earlier
in the chain, prior to the pre-amp/mixer for example, then
it would be possible to add gain, sending noise levels higher
than required.
The SP2120 can be used in a configuration where a stereo
output is distributed around several speakers. Fig.3 shows
a setup where the signal is distributed into six pairs using
a Drawmer DA6, whilst still providing speaker protection
for all twelve speakers. Again, note the position of the
SP2120’s along the audio chain - they should all be
connected directly before the amplifier that is supplying
the speakers (or active speakers), with the amplifier volume
set to maximum.
TAMPER-PROOF BRACKET
Drawmer have gone to great lengths to make the Speaker
Protector tamper-proof by incorporating the locking
mechanism on the front. However, if the rear of the unit,
along with the power amplifier, were reconnected then the
protection system would effectively be bypassed. For this
reason Drawmer have designed the Speaker Protector
Tamper-proof Bracket - trapping the XLR’s in place and
making it extremely difficult to disconnect them without
removing the bracket. This bracket could be specified in
order to conform to Local Authority noise abatement
regulations.
Installation of the Tamper-proof bracket could not be
simpler: After setting up the SP2120 Speaker Protector
as described in the manual, with the XLR’s in place,
simply slide the Tamper-proof Bracket over the rear of the
unit, making sure that the protruding cables locate through
the gaps on the bracket. Next, screw in to place at the
four locating points (arrowed below) using the M3 screws
provided. Further protection can be gained by fitting M3
TORX tamperproof screws, to a maximum length of 6mm,
though a specialist screwdriver will also be required.
In addition, for extra protection, both the SP2120 and the
power amp should be locked in a rack, where access to
the rear is very difficult.
You should note that the Tamper-proof bracket is only
available for SP2120’s who’s serial number is 0845 or higher
(September 2006). On older versions the bracket could
be retro- fitted, though this would invalidate any warranty
that Drawmer has provided for the SP2120. Alternatively,
Drawmer could bring your SP2120 up to current Drawmer
specification - please contact your local distributor or email:
[email protected] for further details.
AUDIO CONNECTIONS
The inputs and outputs are electronically balanced XLRs where pin 1 is screen, pin 2 hot, pin 3 cold and the XLR shell
is connected to chassis. The operating
level is nominally +4dBu. Balanced use is
recommended.
• Interference:
If the unit is to be used where it maybe
exposed to high levels of disturbance such
as found close to a TV or radio transmitter,
we advise that the unit is operated in a
balanced configuration. The screens of the
signal cables should be connected to the
chassis connection on the XLR connector
as opposed to connecting to pin1. The
SP2120 conforms to the EMC standards.
• Ground Loops:
If ground loop problems are encountered,
never disconnect the mains earth, but
instead, try disconnecting the signal
screen on one end of each of the cables
connecting the outputs of the SP2120 to
the patchbay. If such measures are
necessary, balanced operation is
fig.1 XLR WIRING
recommended.
4
fig.2
INSTALLATION AND CONNECTION GUIDE - Stereo Pair
5
fig.3
6
INSTALLATION AND CONNECTION GUIDE - Multiple Speakers
CHAPTER 2
CONTROL DESCRIPTION
1
2
1 SECURITY LOCK-OUT
3
4
5
A lock prevents access to the front panel controls of the SP2120 once it has been calibrated.
Unlock, calibrate, lock again. Only authorised personnel should be supplied with a key.
CALIBRATE
2 SET VU METER
TO 0dB
3 SET MAXIMUM
OUTPUT LEVEL
With the unit unlocked, rotate using a screwdriver to adjust the level of signal to the vu meters.
The general rule is to adjust the level so that the meters reach 0dB only on signal peaks.
W ith the unit unlocked, rotate using a screwdriver to adjust the level of signal supplied to
the amplifier.
4 VU METER
Two 16 LED, left and right bargraph meters provides a visual indication of the levels to adjust
the “Set VU meter to 0dB” control.
5 PROTECTION
A 16 LED bargraph meter provides a visual indication of the amount of protection that is being
carried out by the SP2120. The higher the protection meter reads the more the SP2120 is
having to work to keep the levels of sound within the set parameters - set the controls so that
this meter illuminates as little as possible.
METER
THE SETUP PROCEDURE
Use the following procedure to setup your system. In a configuration where a stereo output is distributed around several
speakers, such as in fig.3, then the setup procedure should be used for each speaker pair.
a.
Ensure that the system is connected correctly and
that both the SP2120 and the amplifier that follows
it are locked in a cabinet where access is limited.
b.
Using the key provided unlock the front
access the the calibration controls.
c.
Using a small screwdriver turn the calibrate controls
“Set VU Meter to 0dB” 2 and “Set Maximum Output
Level” 3 fully anti-clockwise to the min position.
1
f.
Adjust the “Set Maximum Output Level” control 3 until
the noise levels from the power amp reaches a level
as set by the local authority, or the maximum level
that can be tolerated (whichever is lowest) - in this
way even if the input levels are increased, by an
engineer applying gain on the mixing desk for
example, this noise level will never be exceeded.
g.
Lock the unit and remove the key
h.
If required, for increased security, or if regulations
recommend it, fit a Drawmer Tamper-Proof Bracket
to the rear. (Avaliable seperately).
i.
Lock the cabinet that the SP2120 and amplifier are
in.
to provide
d.
Turn the level on the power amp to its maximum
gain level.
e.
Playing a load piece of music, that will provide high
input levels to the SP2120, rotate the “Set VU Meter
to 0dB” control 2 until the L/R VU meters 4
reach 0dB on signal peaks, and no more than the
first two leds of the protection meter 5 are lit.
1.
Test the system by increasing gain from the mixing desk (or
anywhere preceeding the SP2120 in the audio chain) - as
you increase the level the protection meter 5
should
increase but the overall signal level of the system will remain
within the set parameters.
7
CHAPTER 3
GENERAL INFORMATION
It is the responsibility of the installer to ensure that the continuous power rating of the speakers is not
exceeded, as Drawmer Electronics Ltd will not accept any responsibility for damage caused by incorrect
installation and settings.
IF A FAULT DEVELOPS
CONTACTING DRAWMER
For warranty service please call Drawmer Electronics Ltd. or
their nearest authorised service facility, giving full details of
the difficulty.
Drawmer Electronics Ltd., will be pleased to answer all
application questions to enhance your usage of this
equipment. Please address correspondence to:
A list of all main dealers can be found on the Drawmer
webpages.
On receipt of this information, service or shipping instructions
will be forwarded to you.
No equipment should be returned under the warranty without
prior consent from Drawmer or their authorised representative.
For service claims under the warranty agreement a service
Returns Authorisation (RA) number will be issued.
Write this RA number in large letters in a prominent position
on the shipping box. Enclose your name, address, telephone
number, copy of the original sales invoice and a detailed
description of the problem.
Authorised returns should be prepaid and must be insured.
Drawmer (Technical Help line)
Coleman Street
Parkgate
Rotherham
S62 6EL
UK
Alternatively contact us by E-mail on :
[email protected]
Further information on all Drawmer dealers, Authorised service
departments and other contact information can be obtained
from our web pages on:
http://www.drawmer.com
All Drawmer products are packaged in specially designed
containers for protection. If the unit is to be returned, the original
container must be used. If this container is not available, then
the equipment should be packaged in substantial shock-proof
material, capable of withstanding the handling for the transit.
SP2120 SPEAKER PROTECTOR
DATA SPECIFICATION
INPUT
Input Impedance
Max Input level
CMR
20k Ohms
+21dBu
>40dB (22Hz-22kHz)
OUTPUT
Output Impedance
Output Level
Balance
100 Ohms
Variable. Infinity to +14dBu
>40dB (22Hz-22kHz)
Isolating Transformers can be fitted in Output stage.
Crosstalk
> 90dB at 20k Hz
Noise
-103dB (Unity gain ref +4dBu /
22Hz-22kHz)
8
Power Requirements
115Volt or 230Volt at 50-60Hz, 9VA
Fuse
CONFORMS TO IEC127-2.
230V=T50mA, 115V=T100mA.
Dimensions
482mm(W) x 44mm (H) x
160mm(D)
Weight
2.2kg
BLOCK DIAGRAM
SP2120 ver 03 A 15/11/12
9