1
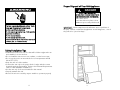
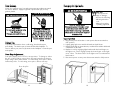
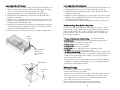
BUILT-IN ALL REFRIGERATOR/ALL FREEZER WARRANTY
TWO YEAR FULL WARRANTY
Built-in all refrigerators/all freezers and all of their components and accessories, except as detailed below*, are warranted
to be free from defects in material or workmanship under normal household use for a period of two (2) years from the
date of original retail purchase. Viking Range Corporation, warrantor, agrees to repair or replace, at its option, any part
which fails or is found to be defective during the warranty period
*Painted and decorative items are warranted to free from defective materials or workmanship for a period of ninety (90)
days from the date of original retail purchase. ANY DEFECTS MUST BE REPORTED TO THE SELLING DEALER WITHIN
NINETY (90) DAYS FROM DATE OF ORIGINAL RETAIL PURCHASE.
Viking Range Corporation uses the most up-to-date processes and best materials available to produce all color
finishes. However, slight color variation may be noticed because of the inherent differences in painted parts and
porcelain parts as well as differences in kitchen lighting, product locations, and other factors.
SIX YEAR FULL WARRANTY
Any sealed refrigeration system component, as listed below, or any automatic ice maker is warranted to be free from
defective materials or workmanship in normal household use during the third through the sixth year from the date of
original retail purchase. Viking Range Corporation, warrantor, agrees to repair or replace, at its option, any part which
fails or is found to be defective during the warranty period.
Viking Range Corporation
use & care manual
Sealed Refrigeration System Components:
Compressor, Evaporator,
Condenser, Connecting Tubing, Dryer/Strainer
TWELVE YEAR LIMITED WARRANTY
Any sealed refrigeration system component, as listed above, which fails due to defective materials or workmanship in
normal household use during the seventh through the twelfth year from the date of original retail purchase will be
repaired or replaced, free of charge for the part itself, with the owner paying all other costs, including labor.
This warranty extends to the original purchaser of the product warranted hereunder and to each transferee owner of the
product during the term of the warranty.
This warranty shall apply to products purchased and located in the United States and Canada. Products must be
purchased in the country where service is requested. Warranty labor shall be performed by an authorized Viking Range
Corporation service agency or representative. Warranty shall not apply to damage resulting from abuse, accident,
natural disaster, loss of electrical power to the product for any reason, alteration, improper installation, improper
operation or repair or service to the product by anyone other than an authorized Viking Range Corporation service
agency or representative. Warranty shall not apply to damage resulting from indoor units being used in outdoor
situations. This warranty does not apply to commercial usage. This warranty does not cover any food or medicine loss
due to product failure. Warrantor is not responsible for consequential or incidental damage whether arising out of
breach of warranty, breach of contract, or otherwise. Some jurisdictions do not allow the exclusion or limitation of
incidental or consequential damages, so the above limitation or exclusion may not apply to you.
Owner shall be responsible for proper installation, providing normal care and maintenance, providing proof of purchase
upon request, and making the appliance reasonably accessible for service. If the product or one of its component parts
contains a defect or malfunction during the warranty period, after a reasonable number of attempts by the warrantor to
remedy the defects or malfunctions, the owner is entitled to either a refund or replacement of the product or its
component part or parts. Replacement of a component part includes its free installation. Warrantor’s liability on any
claim of any kind, with respect to the goods or services covered hereunder, shall in no case exceed the price of the
goods or service or part there of which gives rise to the claim.
WARRANTY SERVICE: Under the terms of this warranty, service must be performed by a factory authorized Viking
Range Corporation service agent or representative. Service will be provided during normal business hours, and labor
performed at overtime or premium rates shall not be covered by this warranty. To obtain warranty service, contact the
dealer from whom the product was purchased, an authorized Viking Range Corporation service agent, or Viking Range
Corporation. Provide model and serial number and date of original purchase. For the name of your nearest authorized
Viking Range Corporation service agency, call the dealer from whom the product was purchased or Viking Range
Corporation. IMPORTANT: Retain proof of original purchase to establish warranty period.
The return of the Owner Registration Card is not a condition of warranty coverage. You, however, should return the
Owner Registration Card so that Viking Range Corporation can contact you should any question of safety arise which
could affect you.
Any implied warranties of merchantability and fitness applicable to the above described built-in all refrigerators/all
freezers are limited in duration to the period of coverage of the applicable express written limited warranties set forth
above. Some jurisdictions do not allow limitations on how long an implied warranty lasts, so the above limitation may
not apply to you. This warranty gives you specific rights, and you may also have other rights which may vary from
jurisdiction to jurisdiction.
Viking Range Corporation
111 Front Street
Greenwood, Mississippi 38930 USA • (662) 455-1200
Specifications subject to change without notice
For more product information, call 1-888-VIKING1(845-4641), or visit our web site at
http://www.vikingrange.com
F20323
(M1004VR)
built-in all refrigerator/
all freezer
Congratulations . . .
Important Safety Instructions
Your purchase of this product attests to the importance you
place upon the quality and performance of the major appliances you
use. With minimal care, as outlined in this guide, this product is
designed to provide you with years of dependable service. Please take
the few minutes necessary to learn the proper and efficient use and
care of this quality product.
We appreciate your choosing a Viking Range Corporation
product, and hope that you will again select our products for your
other major appliance needs.
Table of Contents
Warnings . . . . . . . . . . . . . . . . . . . . . . . . . . . . . . . . . . . . . . . . . . . . 3
Important Safety Instructions . . . . . . . . . . . . . . . . . . . . . . . . . . . . 4
Proper Disposal of Your Old Appliance . . . . . . . . . . . . . . . . . . . . 5
Features of Your Units. . . . . . . . . . . . . . . . . . . . . . . . . . . . . . . . . . 6
Before Using Your Unit . . . . . . . . . . . . . . . . . . . . . . . . . . . . . . . . . 8
Electronic Temperature Settings . . . . . . . . . . . . . . . . . . . . . . . . . . 9
Using Your Unit - All Refrigerator Features. . . . . . . . . . . . . . . . . . 12
Using Your Unit - All Freezer Features . . . . . . . . . . . . . . . . . . . . . 16
Using The Automatic Ice Maker . . . . . . . . . . . . . . . . . . . . . . . . . . 18
Cleaning and Maintenance. . . . . . . . . . . . . . . . . . . . . . . . . . . . . . 20
Understanding Sounds You May Hear . . . . . . . . . . . . . . . . . . . . . 25
Power Interruptions. . . . . . . . . . . . . . . . . . . . . . . . . . . . . . . . . . . . 26
Food Storage Guide . . . . . . . . . . . . . . . . . . . . . . . . . . . . . . . . . . . 26
Troubleshooting . . . . . . . . . . . . . . . . . . . . . . . . . . . . . . . . . . . . . . 29
Service Information . . . . . . . . . . . . . . . . . . . . . . . . . . . . . . . . . . . . 30
Warranty . . . . . . . . . . . . . . . . . . . . . . . . . . . . . . . . . . . . . . Rear Cover
WARNING
To reduce the risk of fire, electric
shock, or injury when using your
unit, follow these basic
precautions:
•Read all instructions before using
the unit.
•Never allow children to operate,
•FOR YOUR SAFETY•
play with, or crawl inside the unit.
DO NOT STORE OR USE
•Never clean unit parts with
GASOLINE OR OTHER
flammable fluids. The fumes can
FLAMMABLE VAPORS AND
create a fire hazard or explosion.
LIQUIDS IN THE VICINITY OF
•Always turn the power on/off
THIS OR ANY OTHER
switch (located behind the air
APPLIANCE. THE FUMES CAN
grille on top right side) to the OFF CREATE A FIRE HAZARD OR
position before attempting to
EXPLOSION.
change light bulbs, clean, or
service the unit.
-SAVE THESE INSTRUCTIONS-
Your safety is important to us. This use and care manual contains
safety symbols and statements. Please pay special attention to these
symbols and follow any instructions given.
This symbol alerts you to hazards such as fire,
electrical shock or other injuries.
2
3
Proper Disposal of Your Old Appliance
DANGER
Risk of Child Entrapment
BEFORE YOU THROW AWAY YOUR
OLD REFRIGERATOR OR FREEZER:
•Take off the doors.
•Leave the shelves in place so that
children may not easily climb inside.
ELECTRICAL SHOCK HAZARD
Plug into a grounded 3-prong outlet. If a 2prong wall receptacle is encountered,
contact a qualified electrician
Do not remove ground prong. Unit must be
grounded at all times.
Do not use an adapter.
Do not use an extension cord.
Failure to follow these instructions can result
in death, fire, or electrical shock.
IMPORTANT: Child entrapment and suffocation are not problems of
the past. Junked or abandoned appliances are still dangerous... even if
they will sit for “just a few days.”
Safety/Installation Tips
•Install and level the unit on a floor that will hold the weight and in an
area suitable for its size and use.
•Do not install the unit near an oven, radiator, or other heat source.
•Do not use the unit in an area where the room temperature will fall
below 550F (130C).
•Keep the unit out of the weather.
•Connect the unit only to the proper kind of outlet, with the correct
electrical supply and grounding. (Refer to the Electrical Requirements
section of the Installation Instructions.)
•Use the unit only of the uses described in this manual.
•Properly maintain the unit.
•Be sure the unit is not used by anyone unable to operate it properly.
4
5
Features of Your All Refrigerator
Features of Your All Freezer
6. Deli compartment drawers (2)
7. Spillproof shelves
30” W. Models - (4) Full width
36” W. Models - (4) Half width
(2) Full width
1. Electronic controls
2. Dairy compartments (2)
3. Adjustable door bins
30” W. Models - (4) Full width
36” W. Models - (2) Half width
(3) Full width
4. Meat SavorTM / Produce Drawer
5. Moisture-controlled produce
drawers (2)
1
1.
2.
3.
4.
5.
6.
7.
Electronic Controls
Wire Shelves (6)
Non-Adjusting Freezer Shelf (1)
Gliding Ice Drawer - (2) bins
Gliding Freezer Basket (2)
Lights
Adjustable Door Bins
30” W. Models - (3) Full width bins
36” W. Models - (1) Full width bin
(4) Half width bins
7
1
2
7
2
3
3
6
4
4
5
36” W. Model Shown
6
6
5
36” W. Model Shown
7
Before Using Your Unit
Electronic Temperature Settings
To obtain the best possible results from your unit, it is important that
you operate it properly. This section tells you how to set the
temperature controls, how to operate the features in your unit, and
how to save energy.
The electronic controls are located behind the door above the cabinet
interior. Press Activate Controls pad to activate control panel. All
other pads except for Alarm Off pad, remain inactive until Activate
Controls pad is pressed. Once activated, pads remain programmable
for at least 10 minutes.
Using the power on/off switch (power interrupter switch)
The power on/off switch is located behind the top grille. It is used to
turn the power to the unit off when cleaning it or changing the light
bulbs. The unit is shipped with the power interrupter switch on.
To turn power off:
1. Remove center grille blade.
2. Press power on/off switch to the OFF position.
To turn power on:
1. Press power on/off switch to the ON position.
2. Replace center grille blade.
Unit controls are preset at the mid setting, (5 bars are displayed). Wait
24 hours after connecting power for All Refrigerator or All Freezer
cabinet to reach this setting. After 24 hours, adjust controls as desired.
1 bar displayed is the warmest setting and 9 bars displayed is coldest
setting.
•To adjust refrigerator or freezer temperature, press Activate
Controls pad then Ref Temp pad or Freezer Temp pad. Press
Higher Temp pad or Lower Temp pad to adjust temperature
setting 1 level at a time. Holding down Higher Temp pad or Lower
Temp pad adjusts temperature more than 1 level at a time
Entry Tone
IMPORTANT: Be sure the power on/off switch is in the ON position
after cleaning the unit or changing light bulbs.
Using the showroom switch
The showroom switch allows electronic controls and interior lights to
function independently of refrigeration system. Showroom switch is
located behind the top grille to the right of the control panel. The unit
is shipped with the showroom switch in the on position.
Entry tone is the “beep” heard when a pad is pressed and command is
read and accepted.
•Deactivate entry tone by pressing and holding Activate Controls
pad for 3 to 5 seconds. Three short beeps indicate instructions
were accepted.
•Activate entry tone by pressing and holding Activate Controls pad
for 3 to 5 seconds.
Max Refrigerator Mode (All Refrigerator Only)
Showroom switch on - full cooling power to unit.
Showroom switch off - no cooling in unit (power only to lights and
electronic controls).
Power Switch
Max Refrigerator Mode adjusts All Refrigerator temperature to the
coldest setting for 10 hours. Then the refrigerator temperatures
automatically return to previous setting.
•Activate Max Refrigerator Mode by pressing Activate Controls pad
then Max Ref pad. Indicator light will glow.
•Deactivate Max Refrigerator Mode before automatic reset by
pressing Activate Controls pad then the Max Ref pad.
Showroom
Switch
8
9
Max All Freezer Mode (All Freezer Only)
Holiday Mode Feature for Sabbath Observance
Max Freezer Mode adjusts All Freezer temperature to the coldest
setting for 24 hours. Then freezer temperatures automatically return to
the previous setting.
•Activate Max Freezer Mode by pressing Activate Controls pad then
Max Frz pad. Indicator light will glow.
•Deactivate Max Freezer Mode before automatic reset by pressing
Activate Controls pad then the Max Frz pad.
Before the Holiday Mode is engaged, the bale arm of the ice maker
(All Freezer only) needs to be raised until it clicks into the detent. This
turns off the power to the ice maker.
Door Open Alarm
Door open alarm sounds and indicator light blinks if either door is
open for more than 3 minutes.
•Deactivate door open alarm by pressing Alarm Off pad or closing
either door.
High Temperature Alarm
High temperature alarm sounds and indicator light glows if All
Refrigerator or All Freezer temperature is high for 2 hours. A blinking
light signals affected compartment. Alarm ends when proper
temperature is reached.
•Deactivate high temperature alarm by pressing Alarm Off
Thermistor Alarm
Thermistor electronically senses All Refrigerator and All Freezer
temperatures. Thermistor alarm sounds and indicator lights scroll if All
Refrigerator or All Freezer thermistor is still not operating properly. The
alarm can be deactivated by pressing Alarm Off on control panel
If thermistor alarm sounds, contact an authorized Viking Range
Corporation technician immediately. If Alarm Off pad is pressed,
thermistor control retests to confirm situation has been corrected.
Alarm will sound again if thermistor is still not operating properly.
Display Lights
•Deactivate temperature display lights by pressing Activate Controls
pad then pressing Display Off pad.
•Activate temperature display lights by pressing Activate Controls
pad.
10
Mode Entry: To enter Holiday Mode the user must press Activate
Controls pad to activate control panel. Then, press and hold Activate
Controls and Display Off simultaneously for 3 seconds. The control
shall beep 3 times and light the 3 right blue squares to alert the user
that Holiday Mode has been entered. When the control enters Holiday
Mode it will disable the interior lights, display (excluding the 3 right
hand side lit blue squares), and alarm enunciators.
Power Loss: If in Holiday Mode and the control experiences a long
power loss, it will return to Holiday Mode when power is regained.
Exiting Holiday Mode: To exit Holiday Mode the user will press
Activate Controls pad to activate control panel. Then, press and hold
Activate Controls and Display Off simultaneously for 3 seconds. Three
beeps shall alert the user the Holiday Mode has been exited. The
control shall return to Normal Mode. Once the unit is back in the
Normal mode, the bale arm of the ice maker (All Freezer only) needs to
pushed downward until it is no longer in the detent. This will restore
power to the ice maker.
Setting the Controls
Set controls precisely with a household thermometer that includes
temperatures between -5o to 50oF (-21o to 10oC).
All Freezer
Put thermometer snugly between frozen packages in freezer section.
Wait 5-8 hours. If freezer temperature is not 0o to 2oF (-17o to -16oC),
adjust control, 1 number at a time. Check again after 5-8 hours.
All Refrigerator
Put thermometer in a glass of water in middle of refrigerator section.
Wait 5-8 hours. If refrigerator temperature is not 38o to 40oF (3o to 4oC),
adjust control, 1 number at a time. Check again after 5-8 hours.
11
Using Your Unit - All Refrigerator Features
Spillproof Shelves
Using the egg bin
The egg bin has three pieces - the lid, the egg tray, and the bin. Use
the egg bin to hold one, or two dozen eggs.
To hold one dozen eggs:
Place a dozen eggs into the egg
carrier. Then place the egg carrier
into the bin and cover with the lid.
Lid
Egg
tray
To hold two dozen eggs:
Place two dozen eggs loose in the
bin and cover them with the lid.
Use the carrier to transport eggs
between the bin and your cooking
area.
Bin
When the egg tray is removed, the
bin will accept items such as a standard egg carton, ice, etc.
Wine
trivets
Using the Wine Trivets
There are two interlocking wine
trivets. Place in the unit with the
raised edge at the back. Place
wine bottles in the trivets
horizontally. Wine trivets can be
interlocked to pyramid up to six
bottles.
Spillproof shelves are constructed of polypropylene molded around the
glass and metal rail. Therefore, the spillproof shelves are completely
encapsulated and liquids cannot seep under the glass. This localizes
spills and makes cleanup easier. Spillproof shelves also adjust to meet
individual storage needs. NOTE: Foods/beverages placed on
uppermost shelf under air vent may freeze
Shelf Adjustment
Adjust the shelves to match the
way you use your unit.
To remove shelves:
1. Tilt shelf up at front,
releasing hooks from shelf
support.
2. Pull shelf straight out.
To replace shelves:
1. Guide the rear hooks of shelf
into slots in the shelf supports.
2. Tilt shelf up at front until hooks drop into slots. Lower front of shelf
to level position.
Door Bin Adjustment
Door bins hold two-liter bottles and can
be placed in any position on the
refrigerator door.
Caution
To avoid personal injury and property damage, confirm shelf is
secure before placing items on shelf
Caution
To avoid personal injury or property damage, handle tempered
glass shelves carefully. Shelves may break suddenly if nicked,
scratched, or exposed to sudden temperature change.
12
To remove:
1. Grasp door bin.
2. Lift bin up and pull out.
To replace:
1. Place door bin over glides in unit
door.
2. Push door bin down to lock into
place.
13
Dairy Compartments
Dairy compartment doors are surrounded by gaskets for a tighter seal
which allow items to stay fresh longer. Dairy compartments also adjust
to meet individual storage needs.
To remove:
1. Grasp dairy compartment.
2. Lift compartment up and pull out.
To replace:
1. Place dairy compartment over glides in
refrigerator door.
2. Push compartment down to lock into place.
Chill Zone
The Chill Zone features the MEAT SAVOR™/PRODUCE drawer. Air
circulating in the Chill Zone is contained by an airduct above the
drawer. This drawer keeps food up to 3 - 50F (-16 - -310C) colder than
the average refrigerator temperature. The temperature control is
located to the right of the MEAT SAVOR™/PRODUCE drawer. The
control adjusts amount of air circulating in this area. Slide control down
for normal refrigerator temperature and up for colder temperatures.
The uppermost position is Quick Chill. This can be used to quickly chill
foods and beverages.
Removing MeatSavorTM/Produce Drawer
1. To remove, roll drawer out to the stop.
2. Remove drawer by lifting up on the handle/s molded into the
drawer.
3. Pull drawer out the rest of the way.
Glides
4. To replace, extend glides out to the
stop.
5. Place the drawer onto the glides and
push back until drawer engages.
6. Lower front part of drawer, grasp
glides/drawer and lightly squeeze
until drawer is level.
Handle
7. Slide drawer back until it stops.
Moisture-Controlled Produce Drawer(s)
The moisture control on the produce drawer gives you the ability to
change the amount of moisture or humidity in the produce drawer.
The clear top section allows you to see into the drawer without
opening it.
The moisture control is located underneath the front trim. Slide the
control to a higher setting for storing deli items and produce with
leaves such as lettuce, spinach, or cabbage. Slide the control to a
lower setting for storing fruits and vegetables with skins such as apples,
corn, or tomatoes. See “Food Storage Guide” (pg.26) for more
information on storing foods properly.
MEAT SAVOR™/PRODUCE Drawer
As the MEAT SAVOR™/PRODUCE drawer glides forward on an inner
and outer track, the lid raises for easy access of items. To open, grasp
the drawer on the molded handle/s and pull
Lid
forward. The MEAT SAVOR™/PRODUCE
drawer holds extra-large deli trays, wine
bottles, etc. The lid can also be removed
and the drawer repositioned for tall items
such as tiered cakes, flower
Molded
arrangements, etc.
handle
14
MOISTURE CONTROL
LOW
HIGH
15
Removing drawers:
1. To remove, roll drawer out to the stop.
2. On each side of the drawer, locate the black leveler on the glide
and lift up on leveler until drawer disengages from glide.
3. Pull drawer out the rest of the way.
4. To replace drawer, extend glides out to the stop.
5. Place the drawer onto the glides and push back until drawer
engages hook.
6. Lower front part of drawer, grasp
glides/drawer and lightly squeeze
until drawer snaps onto glide.
7. Slide drawer back until it stops.
Wire Basket Adjustment
Adjust the divider to match the way you use
your unit.
To remove:
1. Grasp divider in the center.
2. Pull divider straight up.
Black leveler
Using Your Unit - All Freezer Features
Wire Shelf Adjustment
Adjust the shelves to match the way
you use your unit.
To replace:
1. Guide divider around
basket wires in desired
location.
2. Push divider down until it
stops.
To remove shelves:
1. Tilt shelf up at front, releasing
hooks from shelf support.
2. Pull shelf straight out.
To replace shelves:
1. Guide the rear hooks of shelf into
slots in the shelf supports.
2. Tilt shelf up at front until hooks
drop into slots. Lower front of shelf
to level position.
Door Bin Adjustment
Door bins hold a variety of items and can be
placed in any position on the freezer
door.
To remove:
1. Grasp door bin.
2. Lift bin up and pull out.
To replace:
1. Place door bin over glides in unit door.
2. Push door bin down to lock into place.
16
17
Caution
To avoid damage to ice maker, observe the following:
•Do not force ice maker arm down or up past stop position.
•Do not place or store anything in ice bucket.
Using the Automatic Ice Maker
The ice maker and slide-out ice drawer are not adjustable. The ice
drawer slides forward for easy access of ice. After the All Freezer
reaches normal temperature, the ice maker fills with water and begins
operating. Allow 24-48 hours after installation before first harvest of
ice. Discard the first 3 harvests of ice after initially connecting unit to
household water supply and after extended periods of non-use. The
ice maker produces 7 to 9 batches of ice in a 24 hour period under
ideal conditions.
After ice is formed, the ice maker drops ice cubes into the ice bin.
During ice production, the ice maker arm raises and lowers. When the
ice bin is full, the ice maker arm turns ice maker off. To manually stop
ice production, raise the ice maker arm. A definite click is heard when
proper position is reached. Ice maker will not function unless ice bin is
pushed all the way back into position.
18
Ice Bin Adjustment
Ice bins can be adjusted to match the way you use your unit. The ice
bin on the left hand side is used for collecting ice from the icemaker.
Once the left hand ice bin is filled with ice, the bins can be reversed so
additional ice is made. If icemaker is not operating, the ice bin can be
used for cold storage.
To
1.
2.
3.
4.
5.
remove ice bins:
Extend ice drawer fully.
Place hand underneath ice bin.
Push ice bin upward.
Grab ice bin edge and lift upward.
Store ice bin in safe place.
Ice Bin below
Icemaker
To replace ice bins:
1. Lower ice bin in cutout on drawer
frame.
2. Adjust forward or backward as needed
Solving common ice maker problems
Problem
Possible Cause/Solution
Ice crescents attached at
corners
This is normal. They break apart easily.
Ice maker will not operate
or ice is not made fast
enough.
•On/Off lever is in the OFF (up)
position. Lower lever to ON (down)
position.
•Freezer is not cold enough. Adjust
temperature controls and wait 24
hours.
Off-taste or odor in ice
•New plumbing connections can cause
discolored or off-flavored ice.
Discard the first three harvests of ice.
•Cubes are stored too long. Throw
them away and make a new supply.
•Food is not wrapped properly.
•Freezer and ice bin need to be
cleaned.
•Water may contain minerals. A filter
may be needed to remove them.
Shake bin occasionally to keep cubes
separated.
19
CAUTION
To avoid personal injury or property damage, read and follow all
cleaning product manufacturer’s directions.
Cleaning Chart
Part
What to Use
How to Clean
Removable parts
(shelves, drawers)
Sponge or cloth with mild
detergent and warm water.
Hand wash,
rinse, and
dry thoroughly.
Front Door panels
•Stainless steel
Stainless steel cleaner
Wipe with soft
cloth.
•Painted
Sponge or cloth with mild
detergent and warm water.
Hand wash,
rinse, and
dry thoroughly
Interior walls
(allow freezer to
warm up so cloth
will not stick)
Sponge, soft cloth or paper
towel with baking soda or
or mild detergent and
warm water.
Hand wash,
rinse, and
dry thoroughly.
Door liners and
gaskets
Wash, wipe
and dry
thoroughly.
Remove shelf by lifting front, releasing hooks from metal track then
pulling out. Place shelf on a towel. Allow shelf to adjust to room
temperature before cleaning.
Sponge, soft cloth or paper
towel with mild detergent
and warm water. Do not
use cleaning waxes,
concentrated detergents,
or cleaners containing
chlorine bleach.
Plastic parts
(covers, panels)
To clean crevices:
1. Dilute mild detergent and brush solution into crevices using a
plastic bristle brush. Let set for 5 minutes.
2. Spray warm water into crevices using faucet spray attachment.
3. Dry shelf thoroughly and replace shelf by inserting hooks into metal
track and lowering front.
Soft, clean sponge or soft
clean cloth with mild
detergent and warm water
Do not use paper towels,
window sprays, or scouring
pads. These can scratch
and damage the finish.
Wash, wipe
and dry
thoroughly.
Condenser Coil
Vacuum cleaner with
extended narrow
attachment
Vacuum coils
when dusty or
dirty.
WARNING
To avoid electrical shock which can cause severe personal injury
or death, turn power disconnect switch to OFF before cleaning.
After cleaning, return power disconnect switch to ON position.
Cleaning & Maintenance
Your unit is built to give you many years of dependable service.
However, there are a few things you can do to help extend its product
life. This section tells you how to clean your unit and what to do when
going on vacation, moving, or during a power outage.
Interior Surfaces
Wash surfaces with 4 tablespoons baking soda dissolved in 1 quart
warm water and a soft, clean cloth. Rinse surfaces with warm water.
Dry with a soft clean cloth.
Do not use the following to clean interior surfaces:
•abrasive or harsh cleaners, ammonia, chlorine bleach
•concentrated detergents or solvents
•metal scouring pads
These items can scratch, crack and discolor surfaces.
Do not place ice bins or shelves in dishwasher.
Glass Shelves
CAUTION
To avoid personal injury or property damage, handle tempered
glass shelves carefully. Shelves may break suddenly if nicked,
scratched, or exposed to sudden temperature changes.
20
21
Door Gaskets
Changing the light bulbs
Clean door gaskets every 3 months using same procedures as stated
for interior surfaces. Apply a light film of petroleum jelly to keep
gaskets pliable.
Burn Hazard
Do not touch condenser coils
near defrost pan.
Doing so can result in burns.
Electrical Shock Hazard
Disconnect power or turn
power disconnect switch to
OFF position before removing
top grille. Failure to do so can
result in death or electrical
shock
Defrost Pan
To prevent condensation from overflowing, check defrost pan
periodically. The defrost pan is located behind the kickplate. To
remove defrost pan, remove (4) screws in the kickplate. Clean the pan
and replace.
Door Stop Adjustment
Your unit is factory set at 110o door stop position. To change to either
the 90o or 120o position, remove door stop pin located in the bottom
hinge using a 3/16” allen wrench. For 120o swing, move pin to utmost
forward stop hole. For 90o swing, move pin to utmost rear stop.
Electrical Shock Hazard
Disconnect power at breaker or turn
power disconnect switch to OFF
position before removing a light bulb.
Failure to do so can result in death or
electrical shock
CAUTION
To avoid personal
injury or damage,
observe the following:
•Allow light bulb to
cool.
•Wear gloves when
replacing light bulb.
Upper Light Bulb
1. Disconnect power at breaker or turn power disconnect switch to
OFF position.
2. Lightly grasp light cover with both hands and pull down.
3. Replace bulb with an incandescent, medium base tubular bulb with
a maximum of 40 watts.
4. Replace cover by engaging light bracket with the back fingers on
the light cover. Once engaged, snap the front fingers on the light
cover. Note: The clear section of the light cover is considered the
back section.
5. Reconnect power or turn power disconnect switch to ON position.
Door Stop Pin
120o
90o
Cover Fingers
Light Cover
22
23
Lower Light Bulbs (All Freezer)
1. Disconnect power at breaker or turn power disconnect switch to off.
2. Remove center freezer basket and frame by lifting up on the black
leveler on each side until drawer disengages from glide.
3. Lightly grasp light cover on the underneath side and pull up.
4. Replace with an incandescent, medium base tubular bulb with a
maximum of 40 watts.
5. Replace cover by engaging the top of the light cover over the light
bracket. Once engaged, snap the bottom of the light cover over
the light bracket with light pressure.
6. Replace center freezer basket and frame by aligning the inner glide
on the basket with the outer glide in the unit. Slide freezer basket
and frame back until black leveler “clicks”.
7. Reconnect power or turn power disconnect switch to ON position.
Black
Leveler
inner glide that
attaches to
outer glide in
unit
Light bulb
Light bracket
Lower Light Bulbs (All Refrigerator)
1. Disconnect power at breaker or turn power disconnect switch to off.
2. Lightly grasp light cover on the underneath side and pull up.
3. Replace with an incandescent, medium base tubular bulb with a
maximum of 40 watts.
4. Replace cover by engaging the top of the light cover over the light
bracket. Once engaged, snap the bottom of the light cover over
the light bracket with light pressure.
5. Reconnect power or turn power disconnect switch to ON position.
Understanding Sounds You May Hear
Your new unit may make different sounds than your old one. Hard
surfaces, such as the ceilings, walls, and cabinets around the unit can
make sounds seem louder. These sounds are normal and will soon
become familiar. These sounds also indicate unit is operating and
performing as designed.
Freezer or Refrigerator fresh food fan - air rushes and whirls.
•F
Sealed system - (evaporator and heat exchanger) refrigerant flow
•S
gurgles, pops or sounds like boiling water.
Defrost heater - sizzles, hisses or pops.
•D
Condenser fan - air rushes and whirls.
•C
C
•Compressor - has a high pitched hum or pulsating sound.
•IIce cubes - from ice maker drop into ice bin.
•IIce maker valve hookup - buzzes when ice maker fills with water. This
occurs whether or not All Freezer is connected to water supply. If All
Freezer is not connected to water supply, stop sound by raising ice
maker arm to OFF position.
•Foam insulation is very energy efficient and has excellent insulating
capabilities. However, foam insulation is not as sound absorbent as
previously used fiberglass insulation.
Saving Energy
Light bulb
cover
24
You can help your unit use less electricity.
•Clean the condenser coil regularly.
•Open the door as few times as possible. Think about what you need
before you open the door. Get everything out at one time. Keep
food organized so you will not have to search for what you want.
Close door as soon as food is removed.
•Don’t overcrowd the unit so air movement is blocked.
•Don’t set the unit to temperature colder than necessary.
25
Vacation Tips
Short Vacations
No need to shut off the unit if you will be away for less than four
weeks.
1. Use any perishables.
2. Freeze other items.
3. Raise the signal arm in the automatic ice maker to the OFF (up)
position and shut off water supply to the ice maker.
Long Vacations
If you will be away for a month or more:
1. Remove all food.
2. Turn the power disconnect switch to the OFF position.
3. Clean the unit and door gaskets according to the “Cleaning and
Maintenance” section on page 20.
4. Prop doors open with rubber or woods blocks so air can circulate
inside. This will keep odor and mold from building up.
5. Raise the signal arm in the automatic ice maker to the OFF (up)
position and shut off water supply to the ice maker.
Power Interruptions
1. If service will be interrupted 24 hours or less, keep doors closed.
This helps food stay frozen.
2. If service will be interrupted longer than 24 hours:
(a) Remove all frozen food and store in frozen food locker. OR
(b) Place 2 lbs. of dry ice in the unit for every cubic foot of interior
volume. This will keep food frozen for 2 to 4 days. Wear gloves
to protect your hands from dry ice burns. OR
(c) If neither a food locker or dry ice is available, use or can
perishable food at once.
Food Storage Guide
There is a correct way to package and store refrigerated or frozen food.
To keep food fresher longer follow these recommendations:
Storing Fresh Food
Wrap or store food in the refrigerator in airtight and moisture-proof
material. This prevents food odor and taste transfer throughout the
refrigerator. For dated products, check date to ensure freshness.
26
Leafy Vegetables
Remove store wrapping. Tear off bruised and discolored areas. Wash in
cold water and drain. Place in plastic bag or plastic container and store
in produce drawer.
Vegetables with Skins (carrots, peppers, etc.)
Store in plastic bags or plastic containers.
Fruit
Wash, let dry and store in plastic bags. Do not wash or hull berries until
they are ready to use. Sort and keep berries in original container in
produce drawer, or store in loosely closed paper bag on a refrigerator
shelf.
Eggs
Store without washing in original carton or in provided egg bin.
Milk
Wipe milk cartons. For best storage, place milk on interior shelf.
Butter or Margarine
Keep opened butter in covered dish or closed compartment. When
storing in freezer, wrap in freezer packaging.
Leftovers
Cover leftovers with plastic wrap, aluminum foil, or store in plastic
containers with tight lids.
Meat
Store meat in original wrapping as long as it is airtight and moistureproof. Rewrap if necessary. See below for recommended storage times.
When storing meat longer than the recommended times, freeze the
meat.
Chicken
1-2 days
Ground Beef 1-2 days
Steaks/Roasts 3-5 days
Cured Meats 7-10 days
NOTE: Use fresh fish and shellfish the
27
Bacon
Cold Cuts
Variety Meats
5-7 days
3-5 days
1-2 days
same day as purchased.
Troubleshooting
Storing Frozen Food
Packaging food for freezing
The secret of successful freezing is in the packaging. The way you
close and seal the package must not allow air or moisture in or out.
Packaging done in any other way could compromise the quality of the
frozen foods
Do not use:
•Bread wrappers
•Non-polyethylene plastic containers
•Containers without lids.
•Wax paper or wax-coated freezer wrap
•Thin, semi-permeable wrap
Recommended packaging:
•Rigid plastic containers with tight-fitting lids
•Straight-sided canning/freezing jars
•Heavy-duty aluminum foil
•Plastic-coated paper
•Non-permeable plastic wraps (made from saran film)
•Zip-top freezer bags
Performance problems are often minor and can be fixed without tools.
Listed in this chart are the most common problems consumers run into
with their appliances. Please read through this and see if it can solve
your problem before calling for service.
Problem
Check the following
Unit will not
operate
Is the power cord plugged into a live
circuit with the proper voltage?
Has a household fuse blown or circuit breaker
tripped? Is the power switch in the ON
position?
Unit makes
unfamiliar sounds
See “Understanding the sounds you
may hear” for descriptions of normal sounds
and what makes them.
Water in the defrost
pan
This is normal in hot, muggy weather. Make
sure the pan is level so it does not overflow.
Ice Maker will not
operate
Is the freezer cold enough to make ice? It
could take overnight for the freezer to reach
the proper temperature. Is the signal arm in
the ON (down) position? Is the water valve
turned on? Is water getting to the water
valve? Check water line for leaks.
Lights do not work
Has a household fuse blown or circuit breaker
tripped? Is a bulb burned out?
Motor seems to run
too long
The motor naturally runs longer on hot days, if
the room is too warm, if a large amount of
food has been added, or if the doors are
opened often.
Follow package or container instructions for proper freezing methods.
Freezing Foods
Do not expect your freezer to quick-freeze any large quantity of food.
Do not load more than 2-3 pounds of unfrozen food per cubic foot
within 24 hours. Leave enough space for air to circulate around
packages. Be careful to leave enough room at the front so the door
can close tightly.
A full freezer stays cold longer than a partly filled one. A freezer full of
meat stays cold longer than a freezer full of baked goods. If food
contains ice crystals, it may be safely refrozen, although the quality and
flavor may be affected. If the condition of the food is poor, or if you
feel it is unsafe, dispose of it.
Storage times will vary according to the quality of food, the type of
packaging or wrap used (airtight and moisture-proof), and the storage
temperature, which should be 0 - 2oF (-18 to -17oC).
28
29
Service Information
If service is required after checking the troubleshooting guide:
1. Call your dealer or authorized service agency. The name of the
authorized service agency can be obtained from the dealer or
distributor in your area.
2. Have the following information readily available:
•Model Number
•Serial Number
•Date of Purchase
•Name of dealer from whom purchased
3. Clearly describe the problem that you are having.
If you are unable to obtain the name of an authorized service agency,
or if you continue to have service problems, contact Viking Range
Corporation at (888) 845-4641 or write to:
VIKING RANGE CORPORATION
PREFERRED SERVICE
111 Front Street
Greenwood, Mississippi 38930 USA
Record the following information indicated below. You will need it if
service is ever required. The serial number and model number for your
unit is located on the upper wall behind the lighting.
Model Number
Serial Number
Date of Purchase
Date Installed
Dealer’s Name
Address
If service requires installation of parts, use only authorized parts to
ensure protection under the warranty.
Please retain the manual for future reference
30
31