1
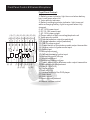
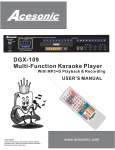
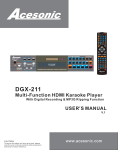
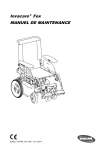
Acesonic PK-1248 Road Master Pro
1 2 0 W K a r a o k e / PA / G u i t a r P o r t a b l e S o u n d S y s t e m
With 7"LCD Touch Screen, Recording Function and Wireless Mic.
USER’S STARTING MANUAL
NOTE:
To ensure this component will work safely and to
its fullest potential, please read this user’s manual
carefully before operation and keep for future
reference.
www.acesonic.com
A cesonic PK-1248
Thank you for purchasing Acesonic's PK-1248 Acesonic takes pride in
providing our customers with only the most advanced and highest
quality karaoke products on the market. Please read trough this USER’S
MANUAL before operation to ensure proper usage, and keep for future
reference. Enjoy!
Table of Contents
Table of Contents
Included Accessories
Front Panel Functions and Operation
MP3G Playback/Recording Module Operation
Microphone & Body Pack
General Operation
Specifications
Manufacturer information
1
1
2-5
6-9
10
11
12
12
Included Accessories
Please check to make sure all accessories are included. If anything
is missing, please contact your dealer immediately.
- 1 Remote Control
- 2 Wireless Microphone Handheld
- 2 Wireless Microphone Receiving Antenna
- 1 AC Power Adapter Cord
- User's Manual/Warranty Card
- USB Cable
- DVD Front Panel Cover
- AA Batteries
About this Manual
For easy reference, names of all functions and/or
components on the hardware and accessories are denoted
by upper-case letters.
1
Front /Rear/Side View
Speaker View
Front View
Side View
(1) Extendible Carry Handle
(3) Speaker Mask
(5) Speaker Stand Hole
(7) MP3G Playback/Recording Module
(9)Control Panel
(11)Microphone Holder
(2) Extendible Carry Handle
(4) Wheels
(6) 7" LCD Touch Screen & Disc Player
(8)Wireless Microphone Receivers
(10)Batteries Cover
(12) Speaker Case
Recording/MP3G Playback Unit
7
3 4
2
8
6
1
5
1.KEY CONTROL:
1. LOW button (b) - lowers music key by one half-tone.
2. NORMAL button ( ) - resets music to original key.
3. HIGH button (#) - raises music key by one half-tone.
2.ARROW KEY & FAST FORWARD BUTTON- This button is
using in RECORD MODE
3.PLAY/PAUSE BUTTON- This button is using in RECORD
MODE
4.ARROW KEY & VOLUME DOWN BUTTON- This button is
using in RECORD MODE
5.RECORDING BUTTON- This button uses to record the
singing and music from selected A/V input. The recording file
will be store on the SD card on the recording module, under
RECORDING folder.
6.RETURN BUTTON- This button is using in RECORD MODE
7.ARROW KEY & VOLUME UP BUTTON- This button is using
in RECORD MODE
8.ARROW KEY & BACK FORWARD BUTTON- This button is
using in RECORD MODE
2
Microphone Panel &LCD/DVD player
Wireless microphone control panel:
1.Microphone vocal volume
2.Wireless microphone chanal display
3.IR signal launcher( only at #2 panel)
4.Chanal selecting button
5.Radio receiving indicator
6.Chanal selecting button
(1)
(2)
(3)
(4)
(5)
(6)
88
LCD monitor/DVD player control panel:
1. Auto Search/Programming radio station
2. LED information display
3. LCD open/close button
4. 7” color LCD monitor screen
5. LCD monitor angle adjustment buttons
6. DVD main menu button
7. Aux input
8. Connect
9. Previous/ Next/ Fast forward/ Fast backward
10.USB input
11.Microphone input for blue tooth function
12.Mode switching button
13.EQ selecting button
14.Band selecting button
15.front panel releasing button
16.Multiplex audio selecting button
17.Audio mute button
18.Power button of the DVD player
19.Play/Stop button
20.Remote sensor
21.Disc ejecting button
22.Main functions selection button
23.Disc tray
24.SD card slot
25.Player default setting
3
(4)
(5)
+
-
(23) (21) (20) (18) (16)(15)(14)(12) (10)
(22) (19) (17)
(1)
(13) (11)
(2)
(3)
(24) (25)
(6)
(7)
(8)
(9)
DVD Remote and Indicators
(1)
(5)
(4)
(19)
(2)
Remote Control for DVD Player:
1. Power on/off
2. Play/Stop
3. Mute
4. Arrow keys for menu selections
5. TV system selections
6. Enter
7. Volume adjustment
8. Song selection/fast forward/fast backwards
9. Programming
10.File display timer
11. Volume setting
12.Repeat display/ Auto save
13. Random display
14.Number keys
15. Multiplex - Sound channel switching
16. Menu
17.Title setup
18.File display timer setup
19.Modes switching
20.Stop/Back
21.Angel switching
22.Slow motion display
23.Setup menu
24.Title display
22.Video enlarge
(3)
(17)
(24)
(23)
(6)
(20)
(9)
(12)
(7)
(13)
(22)
(21)
(25)
(11)
(8)
(16)
(10)
(15)
(14)
(18)
(1)
(2)
(3)
(4)
(9)
(5)
(6)
(7)
(8)
(10)
Function indicators & wireless antennas:
1. Key changing indicators
2. Key + button
3. Key- button
4. Volume control of Mp3 recording
5. Input detecting indicator - Video Input
6. Input detecting indicator - Line Input
7. Input detecting indicator -Microphone Input
8. Input detecting indicator -Guitar Input
9. Antenna of wireless microphone A
10.Antenna of wireless microphone B
4
Front Panel Control & Wireless Microphone
(15) (17) (19) (21) (23) (25) (27) (30)
(14) (16) (18) (20) (22) (24) (26) (29)
(6) (5)
(7) (12) (1) (8) (9) (10)(11)
(4) (13) (2)
(3) (28)
Front Panel Control:
1. Main power switch
2. Battery power indicator: light turns red when battery
low, turns green when full.
3. Voice priority indicator.
4. Battery recharging status indicator: light turns red
while recharging battery. light turn green when fully
charged.
5. AC 110V power input
6. DC 12-14V power input
7. AC 110V power output
8. Power switch of Mp3 recording/playback unit
9. Voice priority switch
10.External speaker output(unswitched)
11.External speaker output(switched)
12 USB 5V power output
13.Chanel switch of the wireless audio output transmitter
14.Volume control of guitar audio input
15.Guitar input
16.Microphone input
17.Gain adjustment of guitar input
18.Microphone echo volume
19.Microphone input
20.Microphone delay volume
21.Power switch of the wireless audio output transmitter
22.Microphone tone adjustment
23.Line In 1 & 2 (L/R)
24.Line in volume
25.Line out (L/R)
26.Volume control of the DVD player
27.Video input
28.Video output
29.Music tone adjustment
30.Master volume control
5
MP3G playback/Recording Module
How to play/Record a song in MP3G mode:
DIGITAL RECORDING
1. MP3+G: Make sure your .Mp3 and .CDG file have
same name and in same folder in order to see the
Vidio and Audio while playback & recording. In
order to record video, press RECORD button
instead of ENTER. Record song while song playing
only will record Audio, but no video.
2. MP3+Lyrics: Make sure your .Mp3 and LRC file
have same name and in same folder in order to see
the Vidio and Audio while playback & recording. In
order to record video, press RECORD button
instead of ENTER. Record song while song playing
only will record Audio, but no video.
The KJV -835 allows user to record themself singing from all audio
inputs. Follow the steps below to record.
1.Insert a SD Card into the Recording Module slot.
2.Play any karaoke song from the DVD,AUX,PC or Recording Module
itself.
3.Push the RECORD button. You know it is recording when the REC LED
blinks red.
4.Push the RECORD button or RETURN button to stop recording.
5.Switch to RECORD mode to play the recorded file.(The recorded file is
in the “DIGITAL RECORDINGS” folder)
*Only the audio is recorded when recording any type of music other than
MP3+CDG which stores on the SD card. To record the audio plus the
background lyric video, follow the steps below.
1.Rip the song you want to record to MP3+G format. CDG= Video, Mp3 =
Audio.
2. Put these two files into one folder in the SD card.
3. Select the song and press REC button.
4. Finish recording
Operation Instructions--HOME PAGE
Home page P01
Music folder for selected songs
MP3+G/MP3+Lyrics Function Description
..
..
..
..
..
.
The functions are described as follows:
MP3+G
Supports open format:MP3+G and MP3+LRC lyrics.
Recording while singing (record music, vocals and background when singing).
General recording function (including music recording and conference recording).
Interface operation guide (TV displays operating interface).
Help function makes user's operation easy and convenient.
Dynamic landscape or blue color can be selected as background.
Playing status and play list can be displayed on the screen.
Songs can be edited and renamed.
Recording format is WAV, which enables users to share recorded songs with friends and family.
Key control, and Volume Control functions are built in DGX-109.
MP3+LRC
POP HITS
MONSTERS OF ROCK
BEST OF URBAN
COUNTRY HITS
Folder for recorded song files
This folder will be generated
automatically when SD card is
inserted.
Different types of music folders
These folders are created by
user. Please put all the MP3+G
or MP3+Lyrics songs into one of
the folders before playing or
recording.
Operation Instructions--HOME PAGE
Auto Vocal Cancel function for MP3+LRC format music.
.
Home page P02
MP3+G/MP3+Lyrics Features and Explanation
Audio & Video recording: choose one song, then pres REC button to
record music, vocals and background simultaneously.
ALL TIME FAVORITES
Audio recording: When playing songs, press REC button for
one second to record music and vocals.
POP HITS-LEO
Note:
MONSTERS OF ROCK-BEN
One folder can fit a
maximum of 200 songs.
ABC
BEST OF URBAN-BRIAN
Speech recording: in home page, press REC button for one second to record your voice
only. This is designed for meeting or speeches.
COUNTRY HITS-KAREN
COUNTRY HITS-DADDY
“MP3+G” Introduction : MP3+G stands for MP3 plus Graphics. MP3+G is derived from the
CD+G format and the CD+G disc format invented by Philips. MP3+G is created by extracting
the CD-Audio packets from the CD+G disc with a strawberry CD-ROM that is capable of also
extracting the RW channels from the disc. The digital audio portion is compressed to MP3 and
the RW Channels (CD+G graphics) are stored to a CDG file. The player products read each
file and synchronize the information to display the interpreted graphics along with the music.
Operation Instructions--ENTER SONG FOLDER
“.MP3+.LRC”Lyrics Introduction :MP3 is small size audio format with high sound quality.
LRC is a computer file format that synchronizes song lyrics with an audio file, such as MP3.When an
audio file is played with certain music players on a computer or on modern digital audio players, the
song lyrics are displayed. The lyrics file generally has the same name as the audio file. For example,
if you put song.MP3 and song. Lrc files into one folder and then DGX-109 can play the folder and
realize lyrics synchronization.
“WAV” Introduction WAV is Audio format and is being
used by windows and the majority of players. The capacity of 1-minute-long song is
About 1.5MB. WAV format is open audio format which is suitable for network transmission.
Its high sound quality is comparable to MP3. ACESONIC DGX-109
applies WAV format as recording format in order for the recorded files to be played and
transferred in the computer and players.
The name of opened folder
Songs in the folder
6
MP3G playback/Recording Module
14
Operation Instructions--FUNCTION SELECTION IN SONG FOLDER
Operation Instructions--BLUE IS SELECTED AS THE BACKGROUND
This function only works in
MP3+Lyrics mode. When you
select this funtcion in MP3+G
mode, machine will still using the
original backgorund instead of
this blue background.
In song folder, press arrow keys
to select songs, and press EDIT
to select different functions.
Operation Instructions--FUNCTION SELECTION IN SONG FOLDER
Operation Instructions--DYNAMIC PICTURE IS SELECTED AS THE BACKGROUND
..
..
..
.
.
This function works in both
MP3+G mode and MP3+Lyrics
mode.
Add the selected song to play list
Add all songs in the song folder to
play list
Delete the selected song
Delete all songs in the song folder
Rename the selected song
Choose dynamic pictures OR blue
color as karaoke background
When MP3+Lyrics mode, you can
choose lyrucs sync.or not sync.
If choose ON, it will return to this
function menu interface after you
sing, if choose OFF, it will not
return to this interface.
Operation Instructions--AUTO VOCAL CANCEL
Operation Instructions--FUNCTIONS AVAILABLE WHEN PLAYING
Auto Vocal Cancel function is designed
for MP3+LRC format songs.
When playing MP3+LRC format music,
DGX-109 is able to detect the format
and give user option to choose Auto
Vocal Cancel ON or OFF. Most MP3
music have original vocal. If you use
Auto Vocal Cancel function when user
is singing, the original vocal in MP3
music will be cancelled OR reduced,
which can turn the music to karaoke
songs.
Notes:
If user is not singing in Auto Vocal
Cancel ON status, original vocal
CANNOT be cancelled or reduced.
When playing songs, press MENU
button for one second to display
the function menu as shown in the
left picture. Press UP, DOWN, LEFT,
RIGHT and ENTER buttons to select
different functions.
7
MP3G playback/Recording Module
Operation Instructions--DELETE SONGS
Operation Instructions--FUNCTIONS AVAILABLE WHEN PLAYING
.
Some MP3+G music have vocal in
left or right channel, if users want
to cancel original vocals, select
Left to cancel the vocal in right
channel, select Right to cancel the
vocal in left channel. If users select
Stereo, DGX-109 will play music
together with original vocals.
Repeat this song
If choose ON, it will return to this
function menu interface after you
sing, if choose OFF, it will not
return to this interface.
Replay this song
NOTE: when user is using the
DELETE function, song files cannot be
recovered when deletion is confirmed.
Foldercannot be deleted by using
.
DELETE function. It can only be
deleted and renamed by computer.
.
Operation Instructions--NO SD CARD INSERTED IN RECORDING MODUELE
Operation Instructions--OPEN THE FOLDER OF REC
This file is audio
recording file. REC01 is the name
which is created automatically by
This is interface when there is no
DGX-109 itself according to the
recording sequence and it can be
renamed.
SD card inserted in KJV-835 card slot.
This file is audio and
video recorded file.
The file can be renamed. Refer to
instructions below.
Operation Instructions--SD CARD IS FULL
Operation Instructions--SONG NAME EDITING
Enter the folder, select song that
needs to be renamed, and press MENU
for one second to display the function menu.
Select RENAME then ENTER.
The name can be changed with UP,
DOWN, LEFT, RIGHT and ENTER button.
This message will shows
when SD card is no more
free space for recording.
Note:
Only song files can be renamed by
using Rename function, folder's
name can only be changed by
computer.
8
MP3G playback/Recording Module
Operation Instructions--FUNCTIONAL INTRODUCTION IN THE INTERFACE
Operation Instructions--NO MUSIC FILES IN FOLDER
Pause
Recording
This screen will shows up if
there is no MP3+G or
MP3+Lyric files found in any
folder on the SD card.
Playing
Information
Music Volume
The Remaining Time
Key Control +
Key Control -
Operation Instructions--NO MUSIC FILE IN PLAY LIST
This screen will shows up if
there is no file assign into the
play list
Operation Instructions--KEY CONTROL
Press KEY/CLEAR button, then
adjust KEY by LEFT or RIGHT button .
The default of KEY is 0.
9
Microphone & Body Pack
Microphone:
1. Cover
2. Power indicator
3. Battery low indicator
4. Power switch
5. Battery
6. Battery cover
7. UHF wireless antenna
8. IR channel matching unit
(1)
(3)
(2)
(4)
(5)
(6)
(8)
(7)
(7)
(8) (1)
(2)
(3)
(5)
(4)
(6)
Body Pack(sell separately):
1. Microphone input
2. IR channel matching unit
3. Power indicator
4. Battery low indicator
5. Power switch
6. Battery(3V)
7. Antenna
8. Folding clip
(7)
10
General Operation
Q1. How to turn on the machine and make DVD unit works:
A1: Turn on the main power of the machine and turn on the power of DVD player
Q2. No sound from DVD player
A2: Check both main volume control & DVD volume control
Q3. How to switch the wireless microphone channel
A3: Please see the instruction on the machine front panel
Q4. Cant power on the machine
A4: Check the rechargeable battery status and the power plug
Q5. No sound from wireless microphone
A5: check battery and also the channel usage.
Q6. Recording/Mp3G playback unit is not working
A6: turn on the power from the front panel.
11
Specifications
PK-1248 Specifications
RMS (continuous) Output
Microphone Input Sensitivity
Music Input Sensitivity
Microphone Frequency Response
Music Frequency Response
Microphone E Q characteristics
Music EQ characteristics
Key Control Range
Speaker W attage Im pedance
Supply Voltage
Width x Height x Depth
100 W / 4 Ohm RMS
<25mV
250m V/ 47 Kohm / 1Khz
20hz – 20Khz/ 3db
20hz – 20Khz/ 3db
T reble: +/- 10dB (10Khz), Bass: +/- 10dB (100hz)
T reble: +/- 10dB (10Khz), Bass: +/- 10dB (100hz)
+/- 5 half tones
4 Ohm – 8 Ohm
AC 110V
19x 17.4 x 27 inches.
1 Year Manufacturer Warranty
Lifetime Technical Support
Design in U.S.A
Technical Support: (626)820-0670
Address:161 South 8th Avenue
City Of Industry,
CA 91746-3208, USA
Website: www.acesonic.com
12