1
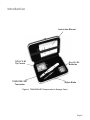
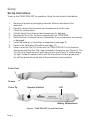
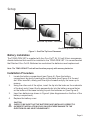
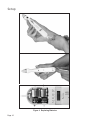
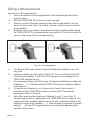
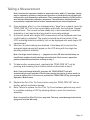
TONO-PEN VET™ Tonometer
User’s Guide
Rx Only
Table of Contents
Introduction ..................................... 4
Warnings and Cautions................ 6
Setup.................. 8
Calibration...................... 11
Taking a Measurement...................... 13
Interpreting the LCD........................ 16
Maintenance & Storage........................ 17
Troubleshooting........................ 19
Guidance and manufacturer’s declaration........... 20
Warranty........................ 23
Page Introduction
Overview
The Reichert TONO-PEN VET is a precision electronic tonometer which measures
intraocular pressure (IOP). The body of the instrument is specially designed to fit
comfortably in the user’s hand, facilitating fast and accurate measurements. The
stainless steel probe on the TONO-PEN VET contains a solid state strain gauge
which converts intraocular pressure (IOP) to an electrical signal. The probe tip
must be covered by a protective membrane. Reichert OCU-FILM® Tip Covers
are recommended. Utilizing a sophisticated “single chip” microprocessor and
electronics housed in the body of the instrument, the waveform produced by each
touch to the anesthetized corneal surface is analyzed and stored for a statistical
comparison process. Each single valid IOP reading is digitally displayed on the liquid
crystal display (LCD). When four valid readings are obtained, the mean IOP and the
standard deviation for those readings (an indication of reliability) are shown on the
LCD.
Intended Use
The TONO-PEN VET is intended for measuring IOP as a screening/monitoring tool
for Glaucoma or when increased IOP is suspected.
Components
The TONO-PEN VET unit (see Figure 1) is provided in a storage case, complete with:
•
•
•
•
•
Page Ocu-Cel™ XL Batteries
OCU-FILM® Tip Covers
Stylus Blade for battery replacement
Desiccant to keep the instrument and components dry (not shown in Figure 1)
Instruction Manual
Introduction
Instruction Manual
OCU-FILM
Tip Covers
TONO-PEN VET
Tonometer
Ocu-Cel XL
Batteries
Stylus Blade
Figure 1 TONO-PEN VET Components (in Storage Case)
Page Warnings and Cautions
WARNING: AN INSTRUCTION THAT DRAWS ATTENTION TO RISK OF INJURY OR DEATH
WARNING: THE TONO-PEN VET SHOULD BE USED IN STRICT ACCORDANCE WITH THE
INSTRUCTIONS OUTLINED IN THIS USER’S GUIDE. THE SAFETY OF THE PATIENT AND THE
PERFORMANCE OF THE INSTRUMENT CAN NOT BE GUARANTEED IF USED IN A MANNER
NOT SPECIFIED BY REICHERT, INC.
WARNING: THE BATTERY SHOULD ONLY BE REPLACED WITH THE BATTERY SPECIFIED IN
THIS MANUAL (OCU-CEL™ XL Battery). USE OF ANOTHER BATTERY MAY CAUSE FIRE OR
AN EXPLOSION.
WARNING: DO NOT PLACE A SHORTING DEVICE BETWEEN THE BATTERY TERMINALS,
OR ALLOW THE BATTERY TO BECOME WET. DO NOT DISASSEMBLE OR DISPOSE OF THE
BATTERY IN A FIRE. MISUSE OR IMPROPER DISPOSAL OF THIS BATTERY MAY CAUSE IT
TO BECOME VERY HOT, IGNITE OR EXPLODE. DAMAGE TO THIS UNIT AND/OR SERIOUS
PERSONAL INJURY MAY RESULT.
WARNING: DO NOT EXPOSE THE BATTERIES TO TEMPERATURES ABOVE 140º F. DO NOT
DISASSEMBLE THE BATTERIES. DO NOT CARRY BATTERIES LOOSE IN A POCKET OR
ELSEWHERE. DAMAGE TO THIS UNIT AND/OR SERIOUS PERSONAL INJURY MAY RESULT.
WARNING: IN ORDER TO ENSURE THAT CORRECT OPERATION OF THE INSTRUMENT IS
MAINTAINED, AND TO GUARANTEE THE SAFETY AND RELIABILITY OF THE INSTRUMENT,
ANY REPAIR OR SERVICE MUST BE PERFORMED BY REICHERT, INC. OR AN AUTHORIZED
SERVICE AGENT OF REICHERT, INC.
WARNING: APPROPRIATE CLINICAL PERSONNEL ONLY SHOULD USE THIS DEVICE IN ORDER
TO AVOID THE RISK OF DAMAGING A PATIENT’S EYE. BE SURE NOT TO APPLY TOO MUCH
FORCE TO THE PROBE TIP AS THIS MAY CAUSE EYE INJURY. A QUICK, GENTLE TAPPING
TECHNIQUE IS SUFFICIENT TO ACHIEVE MEASUREMENTS.
WARNING: OCU-FILM CONTAINS NATURAL RUBBER LATEX WHICH MAY CAUSE ALLERGIC
REACTIONS. QUESTION PATIENTS ABOUT ALLERGIES TO LATEX BEFORE EXAMINING THEM
WITH THE TONO-PEN VET.
WARNING: DO NOT RECHARGE THE BATTERIES. THE BATTERY IS NOT DESIGNED TO
BE CHARGED BY ANY OTHER ELECTRICAL SOURCE. CHARGING COULD GENERATE GAS
AND INTERNAL SHORT-CIRCUITING, LEADING TO DISTORTION, LEAKAGE, OVERHEATING,
EXPLOSION OR FIRE.
WARNING: NEVER SWALLOW. ALWAYS KEEP THE BATTERY OUT OF REACH OF INFANTS AND
YOUNG CHILDREN TO PREVENT IT FROM BEING SWALLOWED. IF SWALLOWED, CONSULT
A PHYSICIAN IMMEDIATELY.
WARNING: IF LEAKAGE IS SUSPECTED OR YOU DETECT A STRONG ODOR, KEEP THE
BATTERY AWAY FROM FIRE, BECAUSE THE LEAKED LIQUID COULD CATCH ON FIRE.
Page Warnings and Cautions
WARNING: NEVER ALLOW LIQUID LEAKING FROM THE BATTERY TO GET IN YOUR EYES OR
MOUTH. BECAUSE THIS LIQUID COULD CAUSE SERIOUS PERSONAL INJURY, IF IT DOES
COME IN CONTACT WITH YOUR EYES, FLUSH THEM IMMEDIATELY WITH PLENTY OF WATER
AND CONSULT A PHYSICIAN. LIKEWISE, IF THE LIQUID GETS IN YOUR MOUTH, RINSE
IMMEDIATELY WITH PLENTY OF WATER AND CONSULT A PHYSICIAN.
CAUTION: AN INSTRUCTION THAT DRAWS ATTENTION TO THE RISK OF DAMAGE TO THE
PRODUCT.
CAUTION: DO NOT USE ANY SOLVENTS OR STRONG CLEANING SOLUTIONS ON ANY PART
OF THIS INSTRUMENT OR DAMAGE TO THE UNIT MAY OCCUR.
CAUTION: THE TIP OF THE TONO-PEN VET IS A SENSITIVE ELECTRONIC COMPONENT. BE
CAREFUL NOT TO BUMP OR JAR THE UNIT AS THIS MAY DAMAGE THE TIP AND EFFECT
OPERATION.
CAUTION: DO NOT IMMERSE PROBE IN FLUIDS. THIS WILL CAUSE DAMAGE TO THE
ELECTRONICS AND VOID THE WARRANTY.
CAUTION: DO NOT STERILIZE THE PROBE. THIS WILL CAUSE DAMAGE TO THE ELECTRONICS
AND VOID THE WARRANTY.
CAUTION: Check to be sure that the batteries are installed correctly.
Incorrect installation could cause severe damage to the electronics and
void the Warranty.
CAUTION: USE OR STORAGE OF THE TONO-PEN VET UNIT WITHOUT AN OCU-FILM TIP COVER
CAN CAUSE SEVERE DAMAGE TO THE INSTRUMENT AND VOID THE WARRANTY.
CAUTION: REMOVAL OF THE ATTACHMENT SCREW WILL VOID THE WARRANTY.
CAUTION: MEDICAL ELECTRICAL EQUIPMENT NEEDS SPECIAL PRECAUTIONS REGARDING
EMC AND NEEDS TO BE INSTALLED AND PUT INTO SERVICE ACCORDING TO THE EMC
INFORMATION PROVIDED IN THIS GUIDE.
CAUTION: ELECTROMAGNETIC INTERFERENCE FROM OTHER DEVICES MAY AFFECT THIS
INSTRUMENT. IF INTERFERENCE IS PRESENT, TURN OFF OTHER ELECTRONIC DEVICES, OR
REMOVE THEM FROM THE IMMEDIATE AREA WHILE OPERATING THIS INSTRUMENT.
CAUTION: PORTABLE AND MOBILE RF COMMUNICATIONS EQUIPMENT CAN AFFECT MEDICAL
ELECTRICAL EQUIPMENT.
CAUTION: THE TONO-PEN VET SHOULD NOT BE USED ADJACENT TO OR STACKED WITH
OTHER EQUIPMENT. IF ADJACENT OR STACKED USE IS NECESSARY, THE TONO-PEN VET
SHOULD BE OBSERVED TO VERIFY NORMAL OPERATION IN THE CONFIGURATION IN WHICH
IT WILL BE USED.
Page Setup
Set Up Instructions
To set up the TONO-PEN VET for operation, follow the instructions listed below:
1.
.
3.
4.
5.
6.
.
8.
9.
Remove all protective packaging materials. Remove and discard the
desiccant.
Carefully remove the tonometer and accessories from the case.
Check for missing items.
Visually check the instrument and accessories for damage.
Remove the Ocu-Film Tip Cover shipped with the TONO-PEN.
Notify Reichert Customer Service immediately if any components are missing
or damaged.
Install the batteries in the battery compartment (see page 9).
Perform the Calibration Procedure (see page 11).
Slide a new Ocu-Film Tip Cover over the TONO-PEN VET unit’s stainless
steel probe until the Ocu-Film ridge is seated in the groove (see Figure 2). The
Ocu-Film Tip Cover should fit over the probe tip (see Figure 3), without being
too tight. Proper fit makes contact with the transducer surface (probe post),
but still has pleats along the side of the transducer head assembly.
Probe Post
Groove
Probe Tip
Operator’s Button
LCD
Battery Compartment
Figure 2 TONO-PEN VET Top and Side Views
Page Setup
Ocu-Film Tip Cover - Correct
Ocu-Film Tip Cover - Too Loose
Ocu-Film Tip Cover - Too Tight
Figure 3 Ocu-Film Tip Cover Placement
Battery Installation
The TONO-PEN VET is supplied with four Ocu-Cel™ XL 3.0 volt lithium manganese
dioxide batteries that need to be installed in the TONO-PEN VET. It is recommended
that Reichert Ocu-Cel XL Batteries be used when the batteries need replacement.
Note: The TONO-PEN VET unit will not function properly with mercury batteries.
Installation Procedure
1.
.
3.
4.
Locate the battery compartment (see Figure 4). Open the battery
compartment by gently inserting the stylus blade (see Figure 4) in the end
slot. After insertion, slowly push the stylus forward and pry the cover up to
remove.
Using the other end of the stylus, insert the tip into the holes on the underside
of the body mold. Insert the tip perpendicular into the battery removal holes
on the bottom of the base housing to push the batteries out (see Figure 4).
Insert two batteries as shown in Figure 4 (also diagrammed on the floor of the
battery compartment).
Replace the battery cover.
CAUTION
Check to be sure that the batteries are installed correctly.
Incorrect installation could cause severe damage to the
electronics and void the Warranty.
Page Setup
-
+
+
-
Figure 4 Replacing Batteries
Page 10
Calibration
Calibration Procedure
The TONO-PEN VET unit is internally calibrated, thus the instrument calibration
should be checked only before the first use each day or in the event of unanticipated
readings. Calibration must be routinely and successfully performed once daily prior
to instrument use. Calibration should also be performed whenever it is indicated by
the LCD display, when batteries are replaced, or after an unsuccessful calibration. It
is not necessary to check calibration prior to each use:
1.
.
3.
4.
5.
6.
.
Point the transducer end of the TONO-PEN straight down towards the floor
(see Figure 5a).
Depress the Operator’s Button two times rapidly. The time between the first
and second button press must be between 0.5 and 1.5 seconds. The TONOPEN will “beep” and display CAL.
Wait approximately 15 seconds for the TONO-PEN to “beep”. The display will
change from CAL to UP.
Immediately (within 1 second) invert the TONO-PEN smoothly, pointing the
transducer end straight up (see Figure 5b).
A properly functioning TONO-PEN will display Good followed by a “beep”.
Repeat this Calibration Procedure if bAd is displayed.
After Good is displayed, depress the Operator’s Button one time and the
TONO-PEN will display [8.8.8.8], followed by a single row of dashes, [- - - -],
and then by a double row of dashes [====] followed by a “beep” tone, indicating the instrument is ready to measure IOP (Depressing the activation button
a second time will interrupt this process and send the unit into calibration
mode).
Figure 5a
Figure 5b
Page 11
Calibration
Unsuccessful Calibration
If several consecutive attempts at checking the calibration are unsuccessful:
Loosen or remove the Ocu-Film Tip Cover from the TONO-PEN VET probe tip and
repeat the calibration check.
If still unsuccessful:
Spray the probe tip with compressed gas, and repeat the calibration check.
If still unsuccessful:
Replace the batteries and repeat the calibration check.
Note: If “CAL” appears followed by a row of four dashes [- - - -], the unit did not go into
calibration mode. To correct this, depress the button quicker two times or slower two
times (see step 2 of calibration procedure).
Note: Do not take measurements with the instrument if two consecutive “good” calibration
checks cannot be obtained. The instrument will not take a measurement when the prior
calibration check was “bAd”.
Note: If the TONO-PEN VET fails to yield a “Good” calibration, call Reichert Technical
Service.
Page 12
Taking a Measurement
Instrument Preparation
Prior to using the TONO-PEN VET for IOP measurement prepare the instrument
according to the instructions below:
1.
Allow the instrument to thermally stabilize at room temperature (72-82° F, 22
- 28° C) for approximately 30 minutes prior to use.
.
Remove the Ocu-Film Tip Cover from the probe. Visually inspect the
tonometer’s probe tip for cracks, chips or other irregularities. If irregularities
are present, contact Reichert. Do not use the instrument.
3.
If the probe tip passes a visual inspection, proceed.
4.
To help prevent build-up of debris around the probe post, spray the probe tip
with compressed gas before the first use of the day.
5.
Cover the TONO-PEN VET probe tip with a new Ocu-Film Tip Cover. Reichert
Ocu-Film Tip Covers are:
• Individually wrapped and non-sterile sanitized
• For Single Use only
6.
Perform daily routine calibration (See page 11)
Note: Calibration should only be performed on the TONO-PEN once daily, unless otherwise
indicated by the instrument. The TONO-PEN does not require calibration after every
patient examination.
CAUTION
Do not use the instrument without an Ocu-Film Tip Cover. Use without an Ocu-Film
Tip Cover will damage the instrument and void the Warranty.
Performing IOP Measurements
After the TONO-PEN VET has been prepared for operation, the patient must be
prepared and then IOP measurements can be performed.
CAUTION
Ocu-Film contains natural rubber LATEX which may cause allergic reactions.
Question patients about allergies to Latex before examining them with the TONOPEN VET.
To prepare a patient for an IOP measurement:
Instill a drop of topical anesthetic onto the eye to be examined.
1.
Position the patient, seated or supine, in front of a fixation target; or have the
.
patient fixate on a point of reference (i.e. ear, nose, distant object) to minimize
eye movement.
Note: The TONO-PEN VET unit will function in any stable position.
Page 13
Taking a Measurement
To perform an IOP measurement:
1.
Instruct the patient to look straight ahead at the fixation target with his/her
eyes fully open.
.
Hold the TONO-PEN VET unit as you would a pencil.
3.
Position yourself to facilitate viewing of the probe tip and patient’s cornea
where contact will be made. For normal corneas, central corneal contact is
recommended.
4.
Brace the heel of your hand on the patient’s cheek for stability while holding
the TONO-PEN VET unit perpendicular to and within 1/2 inch of the patient’s
cornea. (See Figure 6 for correct positioning.)
Correct
Incorrect
Figure 6 Corneal Applanation
5.
6.
.
8.
9.
Page 14
To initiate an IOP measurement, depress the Operator’s Button once, and
only once.
Initially you will see a brief display of [8.8.8.8]. This is a self-test of the LCD
(Liquid Crystal Display). If any of the LCD segments are not displayed, the
TONO-PEN requires service.
If a momentary display of [CAL] is seen, followed immediately by a single row
of dashes [- - - -], it indicates that the TONO-PEN requires calibration before
it will measure.
If a double row of dashes [====] is seen and a “beep” tone is heard, it
indicates that the TONO-PEN is ready to measure IOP. Proceed with
applanation within 15 seconds.
Note: After acquiring the double row of dashes [====], if more than 15
seconds elapses prior to applanation, the TONO-PEN will not measure. The
software will have initiated a battery-saving function, indicated initially by the
display of a single row of dashes [- - - -], then followed in sequence by a blank display [
]. A new IOP measurement can be initiated by depressing the
operator’s button once.
Taking a Measurement
Note: Anytime the operator’s button is depressed twice within 1.5 seconds, (which
may be caused by operator’s inadvertent pressure on the button) the software will
interpret this as a demand for calibration. Then a sustained display of [CAL] will be
seen which initiates the calibration sequence. The calibration sequence must be
successfully completed before further measurements can be accomplished.
10.
11.
1.
Once activated, after [====] is displayed and a “beep” tone is heard, touch the
TONO-PEN VET unit to the cornea lightly and briefly, then withdraw. Repeat
several times. The corneal surface needs only to be momentarily contacted;
indentation is not required and may lead to inaccurate readings.
A chirp will sound and a digital IOP measurement will be displayed each time
a valid reading is obtained. The single horizontal bar at the bottom of the
LCD, indicating statistical reliability, will not be displayed with each single IOP
measurement.
After four (4) valid readings are obtained, a final beep will sound and the
averaged measurement will appear on the LCD along with the single bar
denoting statistical reliability.
Note: If a single row of dashes [- - - -] appears on the LCD after the final beep, an
insufficient number of valid readings was collected. If this occurs, repeat the
patient examination procedure, starting at step 1.
13.
To take another measurement, reactivate the TONO-PEN VET unit by
pressing and releasing the activation switch as described in step 5.
Note: If not reactivated within 25 seconds, the TONO-PEN VET unit will
automatically turn off and the LCD will clear, placing the device in sleep mode, to
conserve battery life. If this occurs, activate the TONO-PEN VET by pressing the
Operator’s Button once.
14.
15.
Replace the Ocu-Film Tip Cover before using the TONO-PEN VET unit on
another patient and before storage.
Note: Failure to replace the Ocu-Film Tip Cover between patients may result
in unreliable readings of IOP by allowing debris to enter the transducer
assembly.
Note: A reused Ocu-Film Tip Cover may leak. This may cause damage to the strain
gauge and void the Warranty.
Page 15
Interpreting the LCD
The number display represents IOP in millimeters of mercury (mmHg.) A number with
a single horizontal bar displayed at the bottom of the LCD is an average of the valid
measurements. A number without the single bar is a single measurement of IOP.
(See Figure 7).
The display of one of four horizontal bars
located along the lower border of the LCD
block indicates the statistical reliability of the
averaged measurement. For example, if the 5%
bar is displayed, the standard deviation of the
valid measurements is 5% or less of the number
shown.
If the reliability measure is 20% or > 20%, a
repeat measurement is recommended.
A single row of dashes [- - - -] indicates that the
instrument is activated.
Two rows of dashes [====] followed by a “beep”
indicates that the instrument is ready to take
measurements.
“CAL” indicates that the instrument is in the
process of calibration check or the instrument
needs to undergo calibration check procedure.
If “CAL” is displayed following a long beep and
“- - - -”, the latter is the case. A “Good” calibration
check must be obtained.
Figure 7 LCD
(Single Measurement)
“Lob” indicates the need to replace both batteries prior
to using the instrument.
“UP” indicates that the instrument is being calibrated and the probe tip should be
turned from pointing down to pointing up.
“Good” indicates the calibration check procedure was successful. After two “Good”
calibration checks, the TONO-PEN VET unit is ready for use in patient examinations.
“bAd” indicates the calibration check procedure was unsuccessful and must be
repeated.
Page 16
Maintenance & Storage
Instrument Storage
1.
.
3.
Cover the probe tip with an Ocu-Film Tip Cover for protection.
If the TONO-PEN VET unit is not to be used until a subsequent day, the
instrument and accessories should be replaced in the storage case provided.
If the TONO-PEN VET unit is not to be used for an extended period of time,
remove the batteries from the instrument.
Maintenance Procedures
Maintenance that should be performed on the TONO-PEN VET consists of activities
such as protecting the probe tip, keeping surfaces free of dust and dirt and storing in
a dry and cool place so as not to adversely affect electronic parts, and replacing the
batteries.
Keep the probe tip protected with an Ocu-Film Tip Cover when in use or in storage.
Avoid any contact with the probe tip when not protected by an Ocu-Film Tip Cover.
The probe post must be cleaned only with optical quality compressed gas before the
first use each day, before instrument storage, in the event of unanticipated readings
or if a “Good” calibration check cannot be obtained. To clean the probe post:
1.
.
3.
4.
Remove the Ocu-Film Tip Cover.
Spray the compressed gas onto the probe tip for approximately 2 seconds.
Wait 3 minutes to allow the instrument to thermally stabilize.
Cover the TONO-PEN VET unit’s probe tip with a new Ocu-Film Tip Cover.
TONO-PEN VET Body
Avoid any shock or excessive vibration which will damage the unit. Clean with a nonabrasive, dry cloth.
CAUTION
DO NOT IMMERSE TONO-PEN VET BODY IN FLUIDS. THIS WILL CAUSE DAMAGE
TO THE ELECTRONICS AND VOID THE WARRANTY.
Battery Replacement
The batteries need replacing when multiple beeps sound and “Lob” appears on the
LCD upon depressing the activation switch. Occasionally, a noticeable slowing in the
calibration check process or in activating the instrument for taking measurements
may suggest that the batteries need replacing. Always replace both batteries. Do not
mix used and new batteries in the instrument. Reichert OCU-CEL XL batteries are
recommended.
Note: The instrument will not function properly when mercury batteries are used.
Page 17
Maintenance & Storage
Replace the batteries using the procedure described on page 9. If the instrument is
not to be operated for an extended period of time, remove both batteries. This will
avoid possible damage to the instrument due to battery leakage
Attachment Screw
The attachment screw, located on the underside of the instrument, is used to protect
the sensitive electronics against intrusion and should be removed only by the
manufacturer.
Note: Removal of the Attachment Screw will void the warranty.
Specifications
Dimensions7 1/4” X 1” X 7/8”
Weight
59.4g (2.1 oz.)
Range of Measurement
5 - 80 mmHg
Power Source
3V Lithium Manganese Dioxide Batteries (QTY 2)
Symbols
ATTENTION, SEE INSTRUCTIONS FOR USE
CATALOG NUMBER
SN SERIAL NUMBER
DATE OF MANUFACTURE
LOT NUMBER
WASTE OF ELECTRICAL AND ELECTRONIC EQUIPMENT
SYMBOLS FOR OCU-FILM ONLY
DO NOT REUSE. SINGLE USE
USE BY
Page 18
Troubleshooting
Overview
This section provides a guide for troubleshooting some basic TONO-PEN VET
operational problems. If a problem persists after using this guide contact Reichert
technical service.
Table 6-1: TONO-PEN VET Troubleshooting Guide
Symptom
Probable Cause
Correction
“Lob” Batteries are displayed
Low Batteries
Replace batteries
Noticeable slowing in the
calibration check process, in
activating instrument
Batteries are low
Replace batteries
Compressed air cleaning has
lowered the temperature of the
instrument
Allow TONO-PEN VET unit to warm
to room temperature
Multiple inaccurate readings
Improper technique
Review “Taking a Measurement”
section or watch Instructional DVD
Old or improperly
applied Ocu-Film Tip Cover
Replace Ocu-Film Tip Cover
Batteries are low
Replace batteries
Need to check calibration
Perform calibration check
procedure (see page 11)
Debris around probe post
Clean with compressed gas (see
page 17 for procedure)
Mechanical or electronic damage
Arrange for repair through Reichert
Technical Service
Activation switch not depressed
long enough
Depress activation
switch longer
Incorrect battery installation
Check batteries
Batteries are low
Replace batteries
Mechanical or electronic damage
Arrange repair through Reichert
Technical Service
Improper technique
Review page 11 or watch
Instructional DVD
Dirty transducer
Clean with compressed gas (see
page 17 for procedure)
No beeps and/or no dashes upon
activation
Unable to obtain “Good’ calibration
check
Page 19
Guidance & Manufacturer’s Declaration
Guidance and manufacturer’s declaration – electromagnetic immunity - Part
I
The TONO-PEN VET is intended for use in the electromagnetic environment specified below. The customer or the
user of the TONO-PEN VET should assure that it is used in such an environment.
EN 60601
test level
Immunity test
Electrostatic discharge
(ESD)
EN 61000-4-2
Power frequency (50/60
Hz) magnetic field
EN 61000-4-8
Compliance level
±6 kV contact
±6 kV contact
±8 kV air
±8 kV air
3 A/m
3 A/m
Electromagnetic
environment guidance
Floors should be wood,
concrete, or ceramic tile.
If floors are covered with
synthetic material, the
relative humidity should
be at least 30 %.
Power frequency
magnetic fields should
be at levels characteristic
of a typical location in
a typical commercial or
hospital environment.
Guidance and manufacturer’s declaration – electromagnetic emissions
The TONO-PEN VET is intended for use in the electromagnetic environment specified below. The customer or the
user of the TONO-PEN VET should assure that it is used in such an environment.
Emissions
Compliance
RF emissions
CISPR 11
Group 1
RF emissions
CISPR 11
Class B
Harmonic emissions
EN 61000-3-2
N/A
Voltage fluctuations
EN 61000-3-3
N/A
Page 20
Electromagnetic environment guidance
The TONO-PEN VET uses RF energy only for its
internal function. Therefore, its RF emissions are very
low and are not likely to cause any interference in
nearby electronic equipment.
The TONO-PEN VET is suitable for use in all
establishments, including domestic establishments
and those directly connected to the public low-voltage
power supply network that supplies buildings for
domestic purpose.
Guidance & Manufacturer’s Declaration
Recommended separation distances between portable and mobile RF
communications equipment and the TONO-PEN
The TONO-PEN VET is intended for use in the electromagnetic environment in which radiated RF disturbances
are controlled. The customer or the user of the TONO-PEN VET can help prevent electromagnetic interference by
maintaining a minimum distance between portable and mobile RF communications equipment (transmitters) and
the TONO-PEN VET as recommended below, according to the maximum output power of the communications
equipment.
Rated maximum power of
transmitter
W
Separation distance according to frequency of transmitter (meters)
150 kHz to
80 MHz
80 MHz to
800 MHz
800 MHz to
2.5 GHz
d = 1.2 √P
d = 1.2 √P
d = 2.3 √P
0.01
0.12
0.12
0.23
0.1
0.38
0.38
0.73
1
1.2
1.2
2.3
10
3.8
3.8
7.3
100
12
12
23
For transmitters rated at a maximum output power not listed above, the recommended separation distance d in
meters (m) can be estimated using the equation applicable to the frequency of the transmitter, where P is the
maximum output power rating of the transmitter in watts (W) according to the transmitter manufacturer.
NOTE 1 At 80 MHz and 800 MHz, the separation distance for the higher frequency range applies.
NOTE 2 These guidelines may not apply in all situations. Electromagnetic propagation is affected by absorption
and reflection from structures, objects and people.
Page 21
Guidance & Manufacturer’s Declaration
Guidance and manufacturer’s declaration – electromagnetic immunity - Part II
The TONO-PEN VET is intended for use in the electromagnetic environment specified below. The customer or the
user of the TONO-PEN VETshould assure that it is used in such an environment.
Immunity test
EN 60601
test level
Compliance
level
Electromagnetic environment - guidance
Portable and mobile RF communications equipment
should be used no closer to any part of the TONOPEN, including cables, than the recommended
separation distance calculated from the equation
applicable to the frequency of the transmitter.
Recommended separation distance
Conducted RF
EN 61000-4-6
Radiated RF
EN 61000-4-3
3 Vrms
150 kHz to
80 MHz
3 V/m
80 MHz to
2.5 GHz
N/A
3 V/m
d = 1.2 √P
d = 1.2 √P 80 MHz to 800 MHz
d = 2.3 √P 800 MHz to 2.5 GHz
where P is the maximum output power rating of the transmitter in watts (W) according to the transmitter
manufacturer and d is the recommended separation distance in meters (m). Field strengths from fixed RF
transmitters, as determined by an electromagnetic site surveys, should be less than the compliance level in each
frequency range.
Interference may occur in the vicinity of equipment marked with the following symbol:
NOTE 1 At 80 MHz and 800 MHz, the higher frequency range applies.
NOTE 2 These guidelines may not apply in all situations. Electromagnetic propagation is affected by absorption
and reflection from structures, objects and people
For transmitter Field strengths from fixed transmitters, such as base stations for radio (cellular/cordless)
telephones and land mobile radios, amateur radio, AM and FM radio broadcast and TV broadcast cannot be
predicted theoretically with accuracy. To assess the electromagnetic environment due to fixed RF transmitters,
an electromagnetic site survey should be considered. If the measured field strength in the location in which
the TONO-PEN VET is used exceeds the applicable RF compliance level above, the TONO-PEN VET should
be observed to verify normal operation. If abnormal performance is observed, additional measures may be
necessary, such as re-orienting or relocating the TONO-PEN VET.
Over the frequency range 150 kHz to 80 MHz, field strengths should be less than 3 V/m.
Page 22