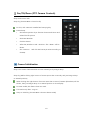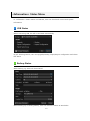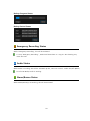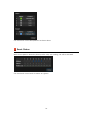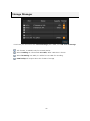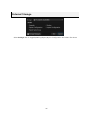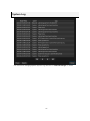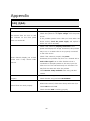
1
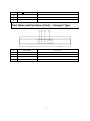
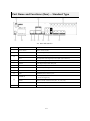
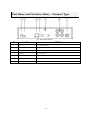
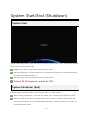
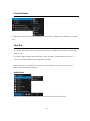
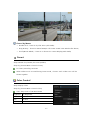
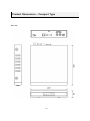
Viewtron Video Surveillance DVRs HD-SDI and Standard Definition CCTV Recorders User Manual Version 1.0 www.Viewtron.com 1 Contents Contents ................................................................................................................................................................................. 2 Overview ................................................................................................................................................................................. 5 Important Safety Instruction .................................................................................................................................... 5 Before Starting ............................................................................................................................................................. 6 DVR Features ................................................................................................................................................................... 7 Part Name and Functions (Front) - Standard Type ....................................................................................... 8 Part Name and Functions (Front) – Compact Type ...................................................................................... 9 Part Name and Functions (Rear) – Standard Type ..................................................................................... 10 Part Name and Functions (Rear) – Compact Type ..................................................................................... 11 System Start/End (Shutdown) ................................................................................................................................... 12 System Start .................................................................................................................................................................. 12 System Shutdown (End) .......................................................................................................................................... 12 Live Monitoring ................................................................................................................................................................ 13 LIVE MONITORING SCREEN CONFIGURATION ............................................................................................ 13 Live Video .................................................................................................................................................................. 13 Context Menu .......................................................................................................................................................... 14 Task Bar ...................................................................................................................................................................... 14 Camera Screen Division ........................................................................................................................................... 16 Screen Division ............................................................................................................................................... 16 Sequence ........................................................................................................................................................... 16 Freeze .................................................................................................................................................................. 16 Zoom (Digital) ................................................................................................................................................. 16 Covert ................................................................................................................................................................. 17 Color Control ................................................................................................................................................... 17 Pan/Tilt/Zoom (PTZ Camera Controls) ................................................................................................ 18 Cameo Initialization ................................................................................................................................... 18 <Information> Status Menu ................................................................................................................................. 19 USB Status ........................................................................................................................................................ 19 Backup Status .................................................................................................................................................. 19 Emergency Recording Status ................................................................................................................... 20 2 Audio Status .................................................................................................................................................... 20 Alarm/Buzzer Status ..................................................................................................................................... 20 Event Status ..................................................................................................................................................... 21 Network Status ............................................................................................................................................... 22 Storage Status................................................................................................................................................. 23 Current Time .................................................................................................................................................... 24 Video Recording Status .............................................................................................................................. 24 Search ................................................................................................................................................................................... 25 Time Table Search (Calendar) ............................................................................................................................... 25 Event Search ................................................................................................................................................................. 26 Video Playback ................................................................................................................................................................. 27 Playback Screen Configuration ............................................................................................................................ 27 Playback Video ........................................................................................................................................................ 27 Context Menu .......................................................................................................................................................... 27 Playback Control .................................................................................................................................................... 28 Playback Mode........................................................................................................................................................ 28 DVR Setup .......................................................................................................................................................................... 30 DVR Quick Setup ........................................................................................................................................................ 30 System Setup (1/3) ................................................................................................................................................ 30 Time Setup (2/3) .................................................................................................................................................... 31 Recording Setup (3/3) ......................................................................................................................................... 31 Advanced Setup .......................................................................................................................................................... 32 System ......................................................................................................................................................................... 32 Record ......................................................................................................................................................................... 34 Network ...................................................................................................................................................................... 37 Device .......................................................................................................................................................................... 38 Event ............................................................................................................................................................................ 40 Export/Import Configuration ............................................................................................................................ 42 User Interface Look & Feel .................................................................................................................................... 43 DVR Tools ........................................................................................................................................................................... 44 Upgrade (Firmware) ................................................................................................................................................... 44 USB ............................................................................................................................................................................... 44 Network ...................................................................................................................................................................... 44 3 Storage Manager ........................................................................................................................................................ 45 External Storage .......................................................................................................................................................... 46 System Log .................................................................................................................................................................... 47 Appendix ............................................................................................................................................................................. 48 FAQ (Q&A)..................................................................................................................................................................... 48 Product Dimensions – Standard Type .............................................................................................................. 49 Product Dimensions – Compact Type .............................................................................................................. 50 Warranty ......................................................................................................................................................................... 51 4 Overview Important Safety Instruction Instruction and Warnings for Safety Please read these operating instructions carefully before using the unit. Please follow all the safety instructions listed below. Keep these operating instructions handy for future reference. 1) Read these instructions. 2) Keep these instructions. 3) Heed all warnings. 4) Follow all instructions. 5) Do not use this apparatus near water. 6) Clean only with dry cloth. 7) Do not block any ventilation openings, Install in accordance with the manufacturer’s instructions. 8) Do not install near any heat sources such as radiators, heat registers, stoves, or other apparatus (including amplifiers) that produce heat. 9) Do not defeat the safety purpose of the polarized or grounding- type plug. A polarized plug has two blades with one wider than the other. A grounding type plug has two blades and a third grounding prong. The wide blade or the third prongs are provided for your safety. If the provided plug does not fit into your outlet, consult an electrician for replacement of the obsolete outlet. 10) Protect the power cord from being walked on or pinched particularly at plugs, convenience receptacles, and the point where they exit from the apparatus. 11) Only use attachments/accessories specified by the manufacturer. 12) Use only with the cart, stand, tripod, bracket, or table specified by the manufacturer, or sold with the apparatus. When a cart is used, use caution when moving the cart/apparatus combination to avoid injury from tip-over. 13) Unplug this apparatus during lightning storms or when unused for long periods of time. ***Refer all servicing to qualified service personnel. Servicing is required when the apparatus has been damaged in any way, such as power-supply cord or plug is damaged, liquid has been spilled or objects have fallen into the apparatus, the apparatus 5 Before Starting This user manual provides Information for using the Viewtron surveillance DVRs. Topics include introduction, part names, functions, connection to other equipment, menu setup, etc. Users have to keep in mind the following notices. Manufacturer retains the copyright on this manual. This manual cannot be copied without Manufacturer's prior written approval. We are not liable for any or all losses to the product incurred by your use of non-standard product or violation of instructions mentioned in this manual. Prior to opening the case, please consult a qualified technician first. Before installing an additional hard drive or connecting an external storage device (USB memory or USB HDD) to this DVR, check the compatibility. Consult your distributor or installer for the compatibility list. [Warning] Replacement Battery or Hard Disk It is essential that when changing the battery or HDD in the unit, the replacement must be of the same type or recommended ones, otherwise there may be a possibility of damage or explosion. System Shutdown Turning off the power while the product is in operation, or undertaking improper actions may cause damage or malfunction to the hard drive or the product. Please turn off the power using the Power button on the front of your DVR. After selecting <OK> in the pop-up menu, you can pull off the power cord. You may want to install a UPS system for safe operation in order to prevent damage caused by an unexpected power stoppage. (Any questions concerning UPS, consult your UPS retailer.) Operation Temperature The guaranteed operating temperature range of this product is 0°C ~ 40°C (32°F ~ 104°F).This product may not work properly if you run right after a long period of storage at a temperature below the guaranteed one. Prior to using a device that has been stored for a long period in low temperatures, allow the product to stand at room temperature for a period. Especially for the built-in HDD in the product, its guaranteed temperature range is 5°C ~ 55°C (41°F ~ 131°F). Likewise, the hard drive may not work at a temperature below the guaranteed one. 6 DVR Features Viewtron DVRs employ H.264 video encoding for 4, 8 or 16 channel inputs and G.723 audio encoding for 4 or 16 channels while simultaneously supporting hard disc recording and playback. Viewtron DVRs also supports network connectivity, providing remote monitoring from Windows and Mac PCs, as well as mobile apps for iPhone, iPad, and Android. Hybrid model DVRs support both SD Analog cameras (traditional CCTV), and HD-SDI cameras together on one stand-alone DVR. DVR Software Main Features H.264 High Quality Video Compression Stand Alone Linux Embedded DVR Full Real-Time Live Display & Recording in SD(Standard Definition) (4ch/8ch/16ch) 4CH Pure HD-SDI DVR Model (HD 4ch) SD (Analog) Camera & HD-SDI Camera in Hybrid Type DVR (HD 1~4ch + SD 4~8ch) HDMI & VGA monitor outputs enabling superior picture output quality (1920x1080p) Privacy Masking (to protect individual life) and <Covert> feature available Perfect synchronized Surveillance Audio Recording and Dual-Audio available too. Pentaplex (Live/Recording/Search/Network/Backup) and dual streaming of Network Easy to use graphical user interface <Look & Feel> Feature can choose your own GUI (like Window desktop theme) High-End Digital Zoom (Up to x10) to highlight HD-SDI UPnP (universal plug and play) function Built in DDNS Support Firmware updates over the Internet Emergency Recording (Panic recording) Java based Windows and Mac DVR Viewer via web browser Windows CMS Software Free mobile apps for iPhone, iPad, Android, Android tableys Various Remote Clients : Remote Live/Search/Setup, CMS, Backup Player Support various Brower(Web Client) : Firefox, Chrome, Safari and Internet Explorer 7 Part Name and Functions (Front) - Standard Type No. Part Name Functions ① ODD(Cover) DVD & DVD-RW for backup ② Direction / Select Button Used to change a value or move the cursor up/down/left/right. Selects ③ LED Indicator & IR Sensor Shows the status of Power, HDD and Network / IR Sensor LAYOUT(Screen Division) Changes Screen Division SEQ Each time you press the button in Live mode, the screen mode will be a menu item or executes the selected menu switched in sequence. ④ ⑤ FREEZE Freeze the Live Display PTZ Pop-up Pan/Tilt/Zoom Control Panel ZOOM Pop-up Zoom Control Panel SPOT Pop-up Spot Control Panel. ALARM Pop-up ALARM Control Panel SETUP Pop-up SETUP(ADVANCED) Control Panel PANIC Start/End Emergency Recording Mode USB Port USB connector port. Number Key(1~0/+10) Used to select channel numbers directly in the Live Mode, or numbers ⑥ in the numeric input mode.. (0/+10 : To input Plus 9.) EVENT( ) Used for backward frame-by-frame search / Shows Event Search control panel. FIRST( ⑦ ) LASTEST( LAST( Used for quick backward search / Playback first recorded data ) Pause Playback / Playback latest recorded data ) CARENDAR( Playback / Playback last recorded data. ) Used for forward frame-by-frame search / Show Calendar Search Control Panel 8 STOP( ) Stop Playback. ⑧ MENU Show Menu.(the same as right button of mouse) ⑨ HOME Show HOME menu in task bar ⑩ ESC Cancel and Escape previous task Part Name and Functions (Front) – Compact Type No. Part Name Functions ① LED Indicator Power LED ② LED Indicator HDD LED ③ ④ IR Sensor IR Sensor USB port USB connector port. 9 Part Name and Functions (Rear) – Standard Type <Ex. 4HD+8SD Model > No. Part Functions ① Power Switch Used to Power On/Off ② VGA VGA Video Signal Output Port SPOT A live screen output port, separate from the VIDEO OUT. CH’s SD Composite Video Signal Input Port (BNC type connector) ④ HD-SDI HD-SDI Video Signal Input Port ⑤ AUDIO Audio Signal Output Port (RCA jack) ⑥ HDMI HDMI connector port ⑦ RS-232 RS-232 Port (To debug) ⑧ USB Port USB connector port ⑨ LAN NETWORK (LAN) connector port. ③ ALARM IN ⑩ ⑪ Alarm Input port (1~8 CH and G(ground).) RS485 Used for RS-485 communication (TX+, TX-, RX+, RX-) ALARM OUT Alarm Output port (NO+C Or NC+C) DC 12V DC 12V Power Input Only 10 Part Name and Functions (Rear) – Compact Type <Ex. 1HD+4SD Model > No. Part Functions ① DC 12V DC 12V Power Input Only ② Recovery Recovery Button ③ LAN NETWORK (LAN) connector port. ④ USB Port USB connector port ⑤ VGA VGA Video Signal Output Port ⑥ CH’s SD Composite Video Signal Input Port (BNC type connector) ⑦ HD-SDI HD-SDI Video Signal Input Port 11 System Start/End (Shutdown) System Start Connect the DVRs power supply and switch on Power button at rear of unit. The booting window above will show and system starts. HDMI output does not show the booting window above. Normal booting time is within 1minute, but can take more time due to abnormal shutdown and hard drive stability check-up. When booting, users may hear the buzzer or beep sound Default ID & Password : admin & 1111 System Shutdown (End) [Home>System shutdown] Menu, users can shut down or restart system.. When clicking <Shutdown>, users will see <Power Off> message, then shutdown system. When the DVR in shut down by Switch Power Off or Unplug of Power Cable without the normal process above. This can damage DVR and HDD, so please shutdown the system by normal procedure above. 12 Live Monitoring LIVE MONITORING SCREEN CONFIGURATION Live Video Video OSD (Icon) Camera Name – Shows Camera Name(Title) Record Mode – Shows current Record Mode Continuous Record Event Record Emergency Record Motion Detection PTZ Audio Record – Show Audio Record Status – Show PTZ Camera(Connected) HD-SDI Input – HD-SDI Camera Status (1080P, 720P Auto Detection) When clicking right button of mouse and goes to [Context>Information Setup], users can setup all values 13 Context Menu Setup Screen Division and others like above. It is shown by <Right button of Mouse> or Menu Key. Task Bar In Task Bar like below, users can setup and check the <HOME> menu and all <Information> status menus. In [Context Menu>Always Show Task Bar], users can setup Task Bar always <Shown> or <Shown> by Mouse Move (like PC Window Task Bar) When users can’t see Task Bar, can setup all <Information> status menus in [Context Menu>Setup Information Display]. HOME Menu Show and Setup Playback/Search/Setup, and other major menus like above 14 Screen Division Tool Bar Setup and control Screen Division, Sequence (mode), Freeze and others like above Information Status Tool Bar Setup and Check current DVR’s Status USB(Storage) Connection Backup Status Panic Record Mute Alarm, Buzzer Status Event Status Network Status Storage Status 15 Camera Screen Division Setup and Control Screen Mode of Display Screen Division/Sequence/Freeze/Zoom Screen Division Mode - 1x1, 2x2, 3x3, 4x4, 1+5, 3+4, 1+7, 2+8, 1+12 Setup by [Context Menu>Screen] or Screen Division Tool Bar. According to Model (CH), Screen Division will be different. Sequence Shows current Screen Division in sequence Setup by [Context Menu>Screen] or Screen Division Tool Bar Setup – Advanced Setup>Device>Display Freeze Freeze Live Display Setup by [Context Menu>Screen>Freeze] This stops by clicking another Screen Model automatically Zoom (Digital) Setup and control Zoom in Display. Setup by [Context Menu>Control>Zoom] Zoom-In of HD-SDI CH, Mini View is not displayed. 16 Control by Mouse Double Click – Zoom-In by Click Point .(3rd Grade) Drag & Drop – Zoom-In wanted Area.(In Full Screen or Mini View Window like above) Scroll (Mouse Wheel) – Zoom-In or Zoom-Out current Display.(10th Grade) Covert Setup wanted CH (Camera) be covert (hidden). Setup by [Context Menu>Control>Covert] In Covert, Recording continues. When Video Loss is occurred during Covert mode, <Covert> and <Video Loss> will be shown together. Color Control Setup Display Colors Setup by [Context Menu>Control>Color] Can’t Setup Color of HD-SDI Camera Brightness Set Brightness Contrast Set Contrast. Hue Set Hue. Saturation Set Saturation. 17 Pan/Tilt/Zoom (PTZ Camera Controls) Setup and Control PTZ. Setup by [Context Menu>Control>PTZ] For this, PTZ camera is installed and setup rightly. Preset Setup Set Camera position by 4 direction button and Zoom and others like left picture. Set Preset Number. Click Set button. After that, Window to ask <Position> like <Near> will be shown. Set <Position> and click OK button.(It varies according to Camera) Cameo Initialization Setup Live Screen Camera Position as user wanted just by Drag & Drop. Setup by [While clicking right button of mouse (more than 1 second), and just Drag & Drop to wanted position]. When clicking the right button of mouse more than 1 second, Camera (like above) will be shown, then just Drag & Drop it to wanted position. In Live Display. In some model, this feature does not work. This works only after <Log-In>. Setup to Initial by [Context Menu>Screen>Cameo Initial]. 18 <Information> Status Menu In <Information> Status menus on Task Bar, users can check and control each System Information. USB Status When connecting USB, this will be activated automatically. By just selecting Device, users can Upgrade, Backup, Export/Import configuration and others like above. Backup Status While backing up, status will be activated. When backing up or starting backup, users can check the status as seen below 19 Backup Progress Status Backup Period Status Emergency Recording Status While “Emergency Recording”, this will be activated. To stop “Emergency Recording” , Authorized Users have to <Log-In>. But Starting, any users can start. Audio Status While Audio is working, this will be activated. By this, users can control <Audio On/Off>(Mute) In Full 1CH Mode, Audio is working. Alarm/Buzzer Status While Alarm/Buzzer(s) are working, this will be activated. 20 Can check and control Alarm/Buzzer as shown above. Event Status While Events (Motion Detection/Sensor/Video Loss) are working, this will be activated. Can check and control each CH status at a glance. 21 Network Status While Network is connected, this will be activated. One can check and control currently connected USERS, and view the Network detail information as shown above. IP Address Check and show connected external IP address and Port (9000: Default UPnP (Universal Plug & Play) When users use a Hub (Router) to access the Internet, UPnP function will set up the PortForward automatically in the Hub (Router). In [Advanced Setup>Network>Port & Bandwidth], users can do this manually as well. 22 DDNS Automatic Setup of DDNS while connected to the Internet In [Advanced Setup>Network>DDNS setup], users can set this up manually as well. Error Status Router does not support UPnP and Port-forward. Unknown Gateway. Gateway is not connected to the Internet Gateway is not connected to the Internet or connection test failed Connection Test – Connection Test Server is running. It automatically tests the connection from DVR to external servers and displays the test results. Storage Status Can check Backup Storage Status like below. No HDD found or not formatted. Rewriting One can check Storage on each Device as shown 23 above, Current Time Check and manage current time. One cCan check current time status as shown above. (Time Zone/ NTP address). Video Recording Status Can check each CH’s Recording Status like below. One check and control each CH detail as shown above (Resolution/Fps/Quality/Mode/Bps) Bps is automatically checked in every 10 second. 24 Search Easily search and playback recorded data like below. Time Table Search (Calendar) Calendar One can check and search Recorded data by day in Calendar. This is done by selecting the Year/Month by clicking Arrow Bar in Calendar. Time Table One can check and search Recorded data Time Table Bar according to Camera (CH). Minute Table One can check and search Recorded data by Time/Minute, and playback wanted Data just by double-clicking it. Continuous Recording – Green Events (Emergency) Recording – Red Overlap(Duplicated) Data If and when duplicate date is found it will be displayed in <Orange> in the Minute Table 25 Event Search Calendar When clicking a Date in Calendar, Event List is shown like above. Users can select Event, Search and playback. . Select Year/Month in clicking Arrow Bar in Calendar. Events Select Event List Motion Detection/Sensor/Video Loss per CH and Search and Playback Event List When selecting Events and search, users can get Event List like above. Select wanted Events and Playback instantly by clicking <Play> button. When Clicking <Play> button, each Video is playback. Events are showed by Time, all Video Data are playback. 26 Video Playback Playback Screen Configuration Playback Video Video OSD Camera Name – Shows Camera Name (Title) Playback Mode – Shows current Playback Context Menu Setup Screen Division and others like above. It is shown by <Right button of Mouse> or Menu Key. 27 Playback Control While in Playback mode, users can control and search data easily by using the Playback Control Bar as seen below. Playback Control Bar is always on top (fixed) or shown only by mouse movement. Can change Position in [Context Menu]. HOME Menu Setup and Control Search/Backup and other main features Screen Division Set Screen Division. Mute (Audio) Set Audio Mute Exit Exit to Live Display Playback Time & Status Can check Time of Recorded Data (Playback Time) and Status Playback Mode By clicking Icons below, users can easily search and playback data 28 Icon(Button) Name Pause Functions Pause Playback Backward & Forward Playback By clicking these button, it Fast Playback Backward/Forward In [Context Menu], users select Slow Backward/Forward. Step Moves Backward/Forward by one frame at a Backward/Forward time Start/End Goes to Start/End time of Data 29 DVR Setup DVR Quick Setup Can Set <Setup> Menu quickly.. When users don’t change, default and previous values continue. System Setup (1/3) DVR Name – Set DVR Name(Title) Language – Set OSD Language. Video Format – Set Video Format.(NTSC/PAL) To save Changed Setup, system must restart. Resolution – Set Display Resolution according to Monitor and VGA. When changed Resolution is not applied, previous Setup is applied. For best results in using HD-SDI, 1080P (1920x1080), users should match the DVR resolution of 1080P (1920x1080) with their Monitor, found in settings. 30 Time Setup (2/3) Date/Time: Set Time Zone according to Country. Date/Time: Must check your time zone and set this rightly first. Date Format: Set Date Format Y/M/D or D/M/Y. Time Format: Set Time Format 12H or 24H. Recording Setup (3/3) Record Policy – Recycle or other Mode – Continuous, Event, Complex(Continuous + Event) Mode Resolution – Set Recording Resolution CIF/D1/HD1 (HD-SDI 720P, 1024P, 1080P) Quality – Set Video Quality Lowest ~ Highest ,Total 5 Level Speed – Set FPS (Frame Per Second) for all Cameras (CH) by one click. 31 Advanced Setup Setup all detail & advanced values in each Operation Setup Menu System Information DVR Name – Set DVR Name (Title) to identify. Language – Set OSD Language. Upgrade – Check the current firmware version and upgrade to up-to-date versions by USB or Network. (Refer to –Upgrade Chapter) Video Format – Set NTSC/PAL To save Changed Setup, system must restart. For best results in using HD-SDI, 1080P (1920x1080), users should match the DVR resolution of 1080P (1920x1080) with their Monitor, found in settings. 32 Date/Time Time Zone – Set GMT Time Zone according to Country. Date/Time – Set Date/Time according to country Date Format - Set Date Format Y/M/D or D/M/Y. NTP – Set NTP using and Time Server address. Holidays – Set Holidays. When a day is set as Holiday, Recording ode is set as Sunday. Account Group – Set and Manage Group (Admin/Operator). User – Set and Mange User and Automatic Log-Out. Authority to Setup Search Can Search in Time Table and Events Setup Can set and change Setup Backup Can set and change Backup Alarm Can set and change Alarm Buzzer Can set and change Buzzer. Color Can set and change Color Network Can access by Remote Client Upgrade Can set and change Upgrade. System shutdown Can set System Shutdown Cameo Init Can set Cameo Init Covert Can set Covert. Emergency Can set and control Emergency Record PTZ Control Can set and manage PTZ control. PTZ setup Can set and manage PTZ Preset. Disk Format Can set and manage Disk Format. Dual Audio Can set and manage Dual-Audio. Date/Time Can set and manage Date/Time Factory Default Can set DVR to factory default System Log View Can check System Log System Log Delete Can delete System Log. 33 Record Policy Recycle/One Time. Record Can set: Record Mode/Resolution/Speed/Quality. 34 Record Mode No Record – Not Recording Normal – Continuous Record. Event – Events (Motion, Sensor, Video Loss) Recording. Complex – Continuous Record(in Normal)+ Events Recording Schedule –Record to Schedule. Schedule Normal Set Resolution/Speed/Quality in Continuous Record. Event Set Schedule for Recording. Set Resolution/Speed/Quality in Event Record. Emergency Set Resolution/Speed/Quality in Emergency Record. Emergency Record starts by Panic button in Task Bar or Panic Key in front Panel. 35 Record Speed (FPS) According to Model/Resolution, Max Record Speed is automatically totaled. Max per CH Max In CIF CIF 480 X1 HD1 240 X2 T D1 120 X4 S 720P 40 X12 1024P 30 1080P N C P SD HD SD A L HD 1008 1016 1108 1208 1404 1408 1400 20 15 7 7 15 X16 20 15 7 7 15 20 X24 20 15 7 x 15 CIF 400 X1 HD1 200 X2 D1 100 X4 720P 40 X10 20 12 6 6 12 1024P 30 X13 20 12 6 6 12 1080P 20 X20 20 12 6 x 12 30 25 When Total Record frame rate is set above supported rate, you will be prompted (with a red exclamation point) to reduced it to a support rate. 36 Network Basic LAN – Set IP and DNS. Port & Bandwidth – Set access port & bandwidth and Auto Port-Forward. Setup Values can be checked in Network Status Information Icon. (Refer to - Network Status) Service Max User – Set Max User at the same time. Live – Set Network Transmission Resolution/Quality/Speed (FPS) for each CH when remote access. Set each Network and DVR Streaming separately. Dual Audio – Set Dual-Audio access mode. 37 ETC DDNS – Set DDNS use or unused. Set DDNS address in Network Status Information Icon (Refer to - Network Status) E-mail – Send e-mail address in the event set. Device Camera Camera – Set Camera Name and others. Privacy Mask – Set Privacy Mask Areas. It is applied to Record Data. 38 Areas (Max 4 Areas like below.) Just by clicking Block or Drag & Drop, users can set or delete Areas. Save and Exit to [Context Menu]. Audio – Set and Check Audio for Record. PTZ – Set and Check PTZ. Audio Set Audio. Alarm Set Alarm Name and others. ETC Buzzer – Set Buzzer & Sound. Display – Set and manage Main (DVR)/Spot monitor’s resolution and duration time for sequence model. 39 Event Motion (Detection) Set Motion Detection Areas and Sensitivity. Set Event Synchronization (Integrated Action) with Alarm/Buzzer and others. (Refer to - Event Sync ) 40 Motion Detection Areas Just by clicking Block or Drag & Drop, users can set or delete Areas. Save and Exit to [Context Menu]. Sensor Set Sensor detection. Set Event Synchronization (Integrated Action). (Refer to - Event Sync ) Video Loss Set Video Loss. Set Event Synchronization (Integrated Action). (Refer to - Event Sync ) System Disk Error – Set Use or Unused and Synchronization. Disk Full – Set Use or Unused and Synchronization. SMART – Set Use or Unused and Synchronization. (Refer to - Event Sync ) Event Sync (Synchronization) While Events, users can link (Synchronize) that to actions(1:N) like below Record – Record in multiple cameras (CH). Setup in [Record>Event Setup] Alarm– Activate Alarm in multiple cameras (CH).. 41 Buzzer – Activate Alarm in multiple cameras (CH). Popup – Activate Pop-Up in Main or Spot Monitor. Email – Send email with images in Events. Setup email address in [Network>Email setup]. Log – Save Events Log and search them in Event Search. System Events are saved in System Log [Home>Tools>System Log] Export/Import Configuration Export Save current DVR’s Configuration in USB. Import Import DVR’s Configuration in USB, and apply this to current DVR System Reboots. Default Apply Factory Default. System Reboots. 42 User Interface Look & Feel Style Can Set and Mange UI Style just like desktop wallpaper theme. Look and set … from Dark Gray to Dark Orange. Font Set: Font and Size. Set: Big/Normal/Small. 43 DVR Tools Upgrade (Firmware) In [HOME>Tools>Upgrade] or [Advanced Setup>System>Upgrade], users can upgrade firmware. Upgrade starts after download from Network or file Copy from USB, and after full upgrade DVR reboots again. So restarting twice is required for full upgrade. USB Choose USB and upgrade. Network Choose Network upgrade and download latest firmware and upgrade. Please use USB when Network is slow or not reliable. 44 Storage Manager From here you can format both internal Storage (SATA HDD) and USB external Storage. “All formats” is available only for Internal (SATA). When installing an unformatted new HDD, “New” HDD Icon is shown. When formatting new HDD, it is added to new HDD for recording. DVD backup will require about 5G of HDD of storage. 45 External Storage Select Storage and do Upgrade/Backup/Export/Import Configuration and others like above. 46 System Log Can check and manage/playback System Log and save to external Storage or delete. 47 Appendix FAQ (Q&A) Symptom Check Point The system does not turn on and the indicator on the front panel does not work at all. Check if the power supply system is properly connected. Check the system for the input voltage from the power source. If the problem persists even after you have taken the above actions, check the power supply and replace it with a new one if necessary. Check if the camera is properly connected to the system and displays the image. Sometimes, this problem may occur on a camera that is not properly connected to the video source. Some channels display just a black screen even if they receive video Check if the camera is properly has power. Sometimes, this problem may occur on a channel with a weak video signal from a video distributor that is sources. connected to multiple systems. In this case, input the video source of the camera directly into the DVR. This may find the cause and solve the problem. Check Monitor 1080p available when using HD-SDI camera. HD-SDI camera does not properly Record does not work properly work Check whether using exclusive HD-SDI Cable. Check whether using exclusive HD-SDI BNC. Check Record Mode. When Event Record, check Event Setup and Event Sync. Check OSD Record ICON Check whether HDD is working properly. 48 Product Dimensions – Standard Type Unit : mm 49 Product Dimensions – Compact Type Unit: mm 50 Warranty According to Rule & Laws, we confirm the product warranty like below. But this detail can be changed and varies according to countries and agreement between Manufacture and Dealers. When damaged goods or malfunction, please check FAQ first and contact dealer for details. [Product Information] Product DVR (Digital Video Recorder) Model Serial No. Purchase Date D M Y Where was it Purchased [Detail] This product is manufactured through strict quality control and process inspection. One-Year Warranty This product carries a one year warranty from the date of purchase against defects from any cause except acts of abusive use. During this warranty period, the manufacturer will repair or exchange the product free of charge, except HDD and ODD and Adaptor Paid Service The manufacturer provides service outside of the warranty period for damage caused by the user. Please contact customer service for more information and prices. 51