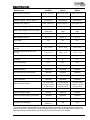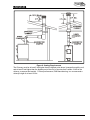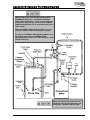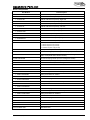
1
ENERGY KING Wood/Coal Boilers Models 35EK-D/45EK-D & ASME-Certified Model A40EK-D Installation, Operation & Maintenance Manual RJM Manufacturing, Inc. 1875 Olson Drive Chippewa Falls, WI 54729 (715) 720-1794 ♦ Fax (715) 720-1797 www.EnergyKing.com ENERGY KING Wood/Coal Boilers Models 35EK-D/45EK-D & ASME-Certified Model A40EK-D Installation and Operating Instructions Congratulations on your purchase of an ENERGY KING solid fuel heating appliance! Your ENERGY KING Wood/Coal Boiler is designed for a lifetime of durable, reliable performance and easy operation. This manual describes the installation, operation and maintenance of your ENERGY KING Wood/Coal Boiler. Save these instructions. Before installing your ENERGY KING Wood/Coal Boiler, please read and be sure you understand this entire owner’s manual and safety instructions. ENERGY KING Wood/Coal Boilers have been designed to use independently or as an addon to an existing hydronic heating system. The installation of any furnace or boiler is not a do-it-yourself project. To ensure the ENERGY KING Wood/Coal Boiler will operate safely and efficiently, the installation must be performed by a qualified installer with specific knowledge of hydronic heating systems. It is the owner’s responsibility to make certain that both the appliance and installation are acceptable to their insurance company, as well as ensuring compliance with all local, state and national codes and regulations. With proper installation and maintenance, your ENERGY KING Wood/Coal Boiler will give you years of trouble free service. Thank you for choosing the ENERGY KING Wood/Coal Boiler. We are constantly improving and updating our products in order to provide the highest quality and value possible. RJM Manufacturing, Inc., the manufacturer of this product, reserves the right to alter its products, their specifications and/or prices without notice. RJM Manufacturing, Inc 1875 Olson Drive Chippewa Falls, WI 54729 (715) 720-1794 | Fax (715) 720-1797 www.energyking.com Email: [email protected] ENERGY KING is a trademark of RJM Manufacturing, Inc. Safety Instructions Failure to follow these safety instructions may result in property damage, bodily injury or even death. ▲ ▲ Read this entire manual before installing, operating or maintaining this product. Proper installation of this heating appliance is crucial for safe and efficient operation. Save these instructions for later use. This heating appliance must be installed in accordance with local, state, and national codes and regulations. Contact your local building or fire officials about installation restrictions and inspection requirements in your area. ▲ Do not connect this heating appliance to a chimney flue serving any other appliance. ▲ Do not install this heating appliance in a mobile or manufactured home—this can be dangerous and will void your warranty. This heating appliance has not been tested to meet the strict requirements necessary for installation into a mobile or manufactured home. ▲ Install in an area with adequate air for combustion and ventilation. The use of outside air may be required for safe operation of this heating appliance. Contact your local building or fire officials about combustion air requirements in your area. ▲ All minimum clearances to combustible materials must be followed. ▲ This Boiler must be installed on a non-combustible floor or 3/8-inch thick fireproof millboard or equivalent. See Installation for further instructions. ▲ Disconnect all power to the ENERGY KING heating appliance at the breaker box or service panel before performing routine maintenance and service. Allow the heating appliance to cool before servicing. ▲ Never fire a boiler that is low on water. Never add water to a hot boiler. Rev 04/17/10 ▲ The fuel loading and ash removal doors must be closed tightly during operation. All seals must be maintained in good condition. ▲ The ENERGY KING Wood/Coal Boiler is designed to burn air-dried wood, or anthracite or bituminous coal only. Burning of any other type of fuel voids your ENERGY KING warranty. ▲ Do not burn: Treated wood, colored paper, garbage, cardboard, solvents, or trash—burning these may result in toxic fumes, or produce soot and large flakes of char or fly ash. Burning treated wood, colored paper, garbage, cardboard, solvents or trash can be dangerous and will void your ENERGY KING warranty. ▲ Do not place clothing or other flammable materials on this heating appliance or within marked clearances to combustibles. ▲ Do not use, store, or dispose of flammable liquids near the heating appliance. ▲ DANGER – Risk of Fire or Explosion: Do not burn garbage, gasoline, naphtha, drain or engine oil, or other flammable liquids or inappropriate materials in this heating appliance. ▲ Do not use chemicals or fluids, such as gasoline, gasoline-type lantern fuel, kerosene, charcoal lighter fluid, or similar liquids to start or freshen up a fire in this heating appliance. ▲ Establish a routine for the storage of fuel, care of the heating appliance and firing techniques. ▲ CAUTION – Hot Surfaces: Keep children away! Do not touch heating appliance during operation. ▲ Use caution when opening fuel loading door. Opening fuel loading door rapidly can cause smoke or flame to flash out the door. See Operation for further instructions. ENERGY KING™ Wood/Coal Boiler Owner’s Manual U. S. i Safety Instructions ▲ Dispose of ashes with care. Ashes should be placed in a metal container with a tight fitting metal lid. The closed container of ashes should be placed on a noncombustible floor or on the ground, well away from all combustible materials, pending final disposal. ▲ A working smoke detector must be installed in the same room as this heating appliance. For additional safety, RJM Manufacturing, Inc. also recommends installing working smoke detectors and a listed carbon monoxide warning device in the living areas of the home. All coal contains small amounts of dangerous elements. Therefore it is essential that all coal ash be disposed of in municipally designated areas. ▲ Always keep a working fire extinguisher on hand in case of fire. Failure to follow these safety instructions may result in property damage, bodily injury or even death. The National Fire Protection Association has information available on the safe use of solid-fuel heating appliances. You can contact the NFPA at: National Fire Protection Association, 1 Batterymarch Park, Quincy, MA 02169-7471 or www.nfpa.org. Rev 04/17/10 ENERGY KING™ Wood/Coal Boiler Owner’s Manual U. S. ii Table of Contents SAFETY IN ST RUCTI ON S ................................................................................................................................................ i T A BLE OF CONT ENT S ................................................................................................................................................... 1 SP ECI FICA TI ON S ............................................................................................................................................................ 3 C OM P ONENT DE SC RI PTI ON ....................................................................................................................................... 4 W HAT I S A SME -CE RTIF IC ATI ON? ............................................................................................................................. 6 P R EIN STA LL AT I ON C ON SI DE RA TION S .................................................................................................................. 7 FUE L RE QUIREMEN T S .................................................................................................................................................. 8 WOOD ............................................................................................................................................................................ 8 COAL.............................................................................................................................................................................. 9 IN STALLATION .............................................................................................................................................................. 10 GENERAL REQUIREMENTS ........................................................................................................................................... 10 Zones ........................................................................................................................................................................ 10 In-floor Heating ....................................................................................................................................................... 10 Placement ................................................................................................................................................................. 10 •Floor Protection ................................................................................................................................................................... 10 •As Primary Boiler................................................................................................................................................................ 11 •As Add-On Boiler ................................................................................................................................................................ 11 Clearances to Combustibles ................................................................................................................................................. 11 ASSEMBLING YOUR ENERGY KING WOOD/COAL BOILER ..................................................................................... 12 COMBUSTION AIR REQUIREMENTS .............................................................................................................................. 15 VENTING SYSTEM ......................................................................................................................................................... 16 Masonry Chimney .................................................................................................................................................... 18 Chimney Connector ................................................................................................................................................. 18 Barometric Draft Control ........................................................................................................................................ 19 PLUMBING ..................................................................................................................................................................... 20 OPE RATI ON .................................................................................................................................................................... 22 GENERAL INSTRUCTIONS ............................................................................................................................................. 22 GATE VALVES ............................................................................................................................................................... 22 FIRST FIRE .................................................................................................................................................................... 23 TYPICAL OPERATION CYCLE ....................................................................................................................................... 23 OVERFIRE ...................................................................................................................................................................... 24 POWER FAILURE INSTRUCTIONS .................................................................................................................................. 24 BURNING WOOD............................................................................................................................................................ 25 Starting a Wood Fire................................................................................................................................................ 25 Refueling .................................................................................................................................................................. 25 BURNING COAL ............................................................................................................................................................. 26 Starting a Coal Fire ................................................................................................................................................. 27 Refueling / Recharging ............................................................................................................................................ 27 MA INTENANC E .............................................................................................................................................................. 29 CREOSOTE – FORMATION AND NEED FOR REMOVAL ................................................................................................. 29 DISPOSAL OF ASHES...................................................................................................................................................... 29 GASKET REPLACEMENT ............................................................................................................................................... 30 ROUTINE MAINTENANCE .............................................................................................................................................. 30 TROUBLE SHOOTI NG GUIDE ...................................................................................................................................... 32 A PP EN DI X A : W I RIN G D I A G RAM ........................................................................................................................... 37 A PP EN DIX B : E XAM PLE P L UM BING DIA G RA M ................................................................................................. 39 APPEN DIX C: PARTS LIST ........................................................................................................................................ 41 A P P E N DI X D : P UR C H A S E & SE R VI C E REC O R D ................................................................................................ 45 A PP EN DI X E : W A RRANT Y C LA I M PRO CE D U RES ............................................................................................. 46 LIMITED WARRANTY ................................................................................................................................................. 49 S U P P LE M E N T A : A QU A S T A T -IM M E R S I ON C ON T R O L ...................................................................................... 51 SUPPLEMENT B: 24-V WA LL THE RM OST AT ....................................................................................................... 64 Rev 08/24/10 ENERGY KING™ Wood/Coal Boiler Owner’s Manual U. S. 1 This page is intentionally left blank. Rev 08/24/10 ENERGY KING™ Wood/Coal Boiler Owner’s Manual U. S. 2 Specifications Model Number A40EK-D 35EK-D 45EK-D 54.5″ x 24″ x 43″ 54.5″ x 24″ x 38″ 54.5″ x 24″ x 43″ 1,155 lbs. 1,055 lbs. 1,155 lbs. 140,000 BTU 140,000 BTU 160,000 BTU 1,500–2,500 sq. ft. 1,500–2,500 sq. ft. up to 4,000 sq. ft. 43 gallons 43 gallons 48 gallons Water Jacket (Sides, Front, Top, Back) 1/4″ SA516-70 Steel Plate 1/4″ A36 Steel Plate 1/4″ A36 Steel Plate Burn Chamber Dimensions (H x W x D) 30″ x 17″ x 30″ 30″ x 17″ x 30″ 30″ x 17″ x 35″ 8.5 cu. ft. 8.5 cu. ft. 10 cu. ft. 26″ 26″ 32″ Standard Standard Standard Cast Iron Fuel Loading Door Size (H x W) 15.5″ x 13.5″ 15.5″ x 13.5″ 15.5″ x 13.5″ Cast Iron Ash Removal Door Size (H x W) 7.25″ x 11.5″ 7.25″ x 11.5″ 7.25″ x 11.5″ Standard Standard Standard 8″ 8″ 8″ 55.5″ 55.5″ 55.5″ 4″ 4″ 4″ Insulated Cabinet Standard Standard Standard Pre-wired Electrical Components Standard Standard Standard Forced (60CFM) Forced (60CFM) Forced (60CFM) Standard Standard Standard 115 Volts, 60HZ, 1 Phase, less than 12 Amp Circuit 115 Volts, 60HZ, 1 Phase, less than 12 Amp Circuit 115 Volts, 60HZ, 1 Phase, less than 12 Amp Circuit Cast Iron Stationary (Wood) Grates Standard Standard Standard Cast Iron Shaker Grates Optional Optional Optional Cast Iron Hearth Plates (Front & Rear) Standard Standard Standard N/A Optional Optional ASME Code, Section 4 N/A N/A Dimensions (H x W x D) Shipping Weight (Approx.) Heating Capacity* - BTU’s (Approx.) Heating Area* (Approx.) Water Capacity (Approx.) Burn Chamber Volume Log Length Sliding Smoke Baffle Removable Ash Pan Flue Size Flue Collar Height Leg Height Draft Controls Wall Thermostat Electrical Requirements Domestic Hot Water Coil, 4″ Complies with Standards *The heating capacity specifications are provided as guidelines only and in no way guarantee the output or capacity of the units. The actual BTU output depends on the type of fuel being burned and its condition, the thermostat setting, the draft adjustments and the chimney into which the unit is installed. Rev 08/24/10 ENERGY KING™ Wood/Coal Boiler Owner’s Manual U. S. 3 Component Description Figure 1: Components (Cutaway View) 1. 8″ Chimney Outlet. Top Vent. Venting must be provided using a lined masonry chimney or a listed UL103 type HT chimney. The chimney exhausts smoke and flue gases that are a natural result of combustion and provides “draft” to the Boiler. Draft is the force that moves air from the burn chamber up through the chimney. See Venting for further instructions. Rev 08/24/10 2. Sliding Smoke Baffle. When open, the sliding smoke baffle allows smoke and flue gases to flow into the chimney connector without restriction. When closed, smoke and flue gases are diverted around the sliding smoke baffle, creating a longer path for the heated air and allowing your boiler to extract the maximum amount of heat from the fire. ENERGY KING™ Wood/Coal Boiler Owner’s Manual U. S. 4 Component Description 3. 2″ Hot Water Outlet. Your ENERGY KING Wood/Coal Boiler is equipped with one hot water outlet, located at the top of the appliance, which supplies heated water to your heating system. 4. Cold Water Inlet (Return). Cold water inlets return cooled water back to your Boiler. The ENERGY KING Model A40EKD Wood/Coal Boiler is equipped with one 11/2″ cold water inlet, located on the rear of the appliance. ENERGY KING Models 35EK-D/45EK-D Wood/Coal Boiler are equipped with two 1-1/4″ cold water inlets, located on the rear of the appliance. 5. Cast Iron Doors. Heavy cast iron fuel loading and ash removal doors are secured to the ENERGY KING using door pins (4 included). The door gaskets provide an airtight seal and should be inspected regularly to ensure that they are in good condition at all times. The gasket must be replaced if it becomes damaged or worn. Do not operate the ENERGY KING heating appliance with the fuel loading or ash removal doors open. 6. Cast Iron Hearth Plates. Cast with the words “Wood” and “Coal” on opposite sides, these plates help to ensure the precise amount of combustion air required to promote the most efficient combustion for either fuel. ENERGY KING Wood/Coal Boilers use two cast iron hearth plates— one at the front of the burn chamber, and one at the rear (2 included). 7. Cast Iron Stationary (Wood) Grates. This is where you build your wood fire. If you selected the Shaker Grate option, the Wood Grates will have been replaced with Shaker Grates at the factory. Cast Iron Shaker Grates (Optional). (Not Pictured)This is where you build your wood or coal fire. The handle to control the Shaker Grates is located at the front of the ENERGY KING, on the left side of the ash removal door. 8. Firebrick. (9″ x 4-1/2″ x 1-1/4″) 2000degree, heat retentive firebricks protect the sides of the Boiler’s burn chamber. ENERGY KING A40EK-D Boilers and 35EK-D Boilers use 12 firebricks (6 on each side). The ENERGY KING 45EK-D Boiler uses 14 firebricks (7 on each side). Rev 08/24/10 9. Ash Removal Pan. Designed for easy cleanup of fine ash accumulation. Do not operate the ENERGY KING heating appliance with the ash removal door open; keep it closed except to remove ashes. The ash removal door gasket provides an airtight seal and should be inspected to ensure that it is in good condition at all times. The gasket must be replaced if it becomes damaged or worn. Control Box. (Not Pictured) Controls the Boiler’s electrical system. The control box is pre-wired for forced air draft. Combustion Blower. (Not Pictured) This blower will supply air for combustion by forcing air into the burn chamber when your wall thermostat calls for heat. 24-V Wall Thermostat. (Not Pictured) Tells your ENERGY KING heating appliance when your home has cooled below your preferred temperature. Your draft system is controlled primarily by your wall thermostat. Aquastat-Immersion Control. (Not Pictured) Provides boiler water regulation by controlling the high and low water-temperature limits. See Appendix D for further information. Pressure-Temperature Gauge. (Not Pictured) Shows the water pressure and water temperature within your ENERGY KING Wood/Coal Boiler. Pressure Relief Valve. (Not Pictured) A safety feature, the pressure relief valve will release excess pressure within your ENERGY KING Wood/Coal Boiler. See Plumbing for further instructions. 10. Insulated Cabinet. The colored steel cabinet panels (sides and top) restrain the foil-backed insulation, allowing maximum heat from the Boiler to be circulated through the home’s hydronic heating system. 11. Legs. Raise the ENERGY KING heating appliance off the floor to prevent the accumulation of moisture between the floor and the bottom of the appliance. Domestic Hot Water Coil, 4″ (Optional): (Not Pictured) For heating domestic hot water. The domestic hot water coil is not available on ENERGY KING A40EK-D Boilers. ENERGY KING™ Wood/Coal Boiler Owner’s Manual U. S. 5 What is ASME-Certification? ENERGY KING Wood/Coal Boiler model A40EK-D is built and tested to the exacting standards of the American Society of Mechanical Engineers (ASME) Code Section 4, Construction of Heating Boilers, under the National Board ‘H’ stamp, and is independently inspected by a third party inspection agency. ENERGY KING Wood/Coal Boiler model A40EK-D is constructed of certified, high-grade 1/4” SA516-70 steel plate and is welded by experienced, ASME-certified welders, to ensure safety and durability. For additional safety, a 30 PSI pressure relief valve is included with every Energy King boiler. You can rest easy knowing that ENERGY KING A40EK-D boilers conform to an internationally recognized standard for safety and quality. The following information was taken from www.ASME.org and is reproduced here for informational purposes only. Please visit www.ASME.org for more information about the ASME and codes and standards. Founded in 1880 as the American Society of Mechanical Engineers, ASME is a not-for-profit professional organization that promotes the art, science and practice of mechanical and multidisciplinary engineering and allied sciences throughout the world. The core values of ASME are rooted in its mission to better enable mechanical engineering practitioners to contribute to the well-being of humankind. About Codes & Standards What is a standard? A standard can be defined as a set of technical definitions and guidelines, “how to” instructions for designers, manufacturers and users. Standards promote safety, reliability, productivity and efficiency in almost every industry that relies on engineering components or equipment. Standards can run from a few paragraphs to hundreds of pages, and are written by experts with knowledge and expertise in a particular field who sit on many committees. Are standards mandatory? Standards are considered voluntary because they serve as guidelines, but do not of themselves have the force of law. ASME cannot force any manufacturer, inspector, or installer to follow ASME standards. Their use is voluntary. Standards become mandatory when they have been incorporated into a business contract or incorporated into regulations. What is a code? A code is a standard that has been adopted by one or more governmental bodies and has the force of law. Why are standards effective? Standards are a vehicle of communication for producers and users. They serve as a common language, defining quality and establishing safety criteria. Costs are lower if procedures are standardized; training is also simplified. Interchangeability is another reason. It is not uncommon for a consumer to buy a nut in California for a bolt purchased in New Jersey. ASME.org. 2009. American Society of Mechanical Engineers. 19 May 2009 <http://www.asme.org>. Rev 08/24/10 ENERGY KING™ Wood/Coal Boiler Owner’s Manual U. S. 6 Preinstallation Considerations The ENERGY KING Wood/Coal Boiler is intended for use in residential buildings. Do not install this heating appliance in a mobile or manufactured home—this can be dangerous and will void your warranty. This heating appliance has not been tested to meet the strict requirements necessary for installation into a mobile or manufactured home. Always check with local authorities and obtain the necessary permits prior to installing this heating appliance. Before the position of the Boiler can be decided, a few questions should be considered. 1. Will this heating appliance be used as a primary (central) boiler, or will it be installed as an add-on to your existing hydronic heating system? 2. Will your preferred heating system require the use of storage tanks or mixing valves? Some systems, such as in-floor heating, cannot withstand the high water temperatures produced by the ENERGY KING Wood/Coal Boiler and may require the heated water to be mixed with cool water before it can be delivered into the home. 3. Can the ENERGY KING heating appliance be vented properly? a. Is your chimney appropriate for this application? This heating appliance requires installation into a lined masonry chimney or an 8″ UL103 Type HT all-fuel factory-built chimney. Do not connect this unit to any chimney flue serving any other appliance. See Venting for further instructions. b. Has your chimney been inspected? For your safety, it is important your chimney be clean and free from defect or damage prior to installing your ENERGY KING heating appliance. 4. This heating appliance may require an outside air source for combustion air. Will this be easily accessed in your desired location? 5. Are there any local, state or national codes or regulations governing the use and placement of this heating appliance? 6. Can the heating appliance be installed safely? a. The heating appliance should not be installed in a location where it could come into contact with curtains, drapes, walls, carpeting, or other combustible surfaces, and must not be installed in a sleeping room. b. Will your desired location require floor protection? c. The clearances specified in this manual are minimum clearances. Any reduction must be approved by the regulatory authority and is not recommended by RJM Manufacturing, Inc. 7. How close is the electrical source? The power source must conform to the requirements shown in Specifications. 8. Will the heating appliance be easily accessible for cleaning, refueling, maintenance, and repair? 9. Are there any structural reasons why the heating appliance cannot be placed where you want? Finally, do you have a reliable, consistent source of fuel for your ENERGY KING Wood/Coal Boiler? Please see Fuel Requirements for further information on fuel supply. Rev 08/24/10 ENERGY KING™ Wood/Coal Boiler Owner’s Manual U. S. 7 Fuel Requirements BURN AIR-DRIED WOOD, OR ANTHRACITE OR BITUMINOUS COAL ONLY Risk of Fire: Do not store fuel or other combustible material within the marked installation clearances. It is important to use fuel that is clean, dry and consistent. Solid-fuel boilers, such as your ENERGY KING Wood/Coal Boiler, naturally produce ash as a byproduct of the burning process. Even with the ENERGY KING heating appliance’s highly efficient design, your heating appliance will still produce some amount of ash which will need to be cleaned periodically. The type and quality of fuel you burn affects the amount of ash produced and the performance of your heating appliance. To assist you in determining which fuel to use, here are some guidelines to consider: WOOD Burning wood for heat is as old as civilization itself. More than any other major fuel, wood provides us with energy independence – an easily available, locally produced and renewable source of heat on which we can rely. • The ENERGY KING Wood/Coal Boiler has been tested for operation with air-dried wood. • Wood should be seasoned (dried) for at least 12 months before burning. Properly seasoned wood should have about 20% 25% moisture content. To properly season wood, split the logs as soon as possible and loosely stack them in a dry spot for at least 12 months. You should not burn wet or green wood in your Boiler. Burning wet or green wood in your Boiler will not only reduce the efficiency of your appliance, but also increases the risk of dangerous creosote build-up in your appliance and chimney. • Softwoods, such as pine and fir, are easily ignited and burn rapidly with hot flames. With softwoods, you will spend more time reloading your ENERGY KING Wood/Coal Boiler, and will have much more difficulty achieving an overnight burn. For a longer lasting fire, it is best to use more dense hardwoods. • Ideally, you should burn a mixture of hardwoods and softwoods, using the hotter, faster burning softwoods to start your fire, and the denser hardwoods to maintain a longer-lasting fire. Rev 08/24/10 • With this in mind, choosing the kind of firewood that is best for you depends on what is available in your area. If hardwoods are unavailable in your area, you can control the burn rate by using larger pieces of wood. • DO NOT BURN: Treated wood, colored paper, garbage, cardboard, solvents, or trash—burning these may result in toxic fumes, or produce soot and large flakes of char or fly ash. Burning treated wood, colored paper, garbage, cardboard, solvents or trash can be dangerous and will void your ENERGY KING warranty. • DANGER – Risk of Fire or Explosion: Do not burn garbage, gasoline, naphtha, drain or engine oil, or other flammable liquids or inappropriate materials in this heating appliance. Storage • Store all fuel in a dry location away from the elements. Never burn wet or green wood. • Do not store fuel within the heating appliance installation clearances or within the space required for refueling, ash removal and other routine maintenance operations. ENERGY KING™ Wood/Coal Boiler Owner’s Manual U. S. 8 Fuel Requirements BURN AIR-DRIED WOOD, OR ANTHRACITE OR BITUMINOUS COAL ONLY Risk of Fire: Do not store fuel or other combustible material within the marked installation clearances. COAL One of the world’s most widely-used fuel sources, coal can provide the energy independence and low fuel prices sought by owners of solid-fuel heating appliances. • The ENERGY KING Wood/Coal Boiler has been tested for operation with anthracite (hard) or bituminous (soft) coal. • Anthracite: Also known as Hard Coal, anthracite is a hard, lustrous coal with a high carbon content that burns with a clean blue, nearly smokeless, flame. • Bituminous: Also known as Soft Coal, bituminous coal is a soft type of coal that has a high sulfur content and burns with a yellow, smoky flame. • Bituminous coal tends to contain more impurities and sulfur than anthracite coal, which may decrease the expected lifespan of your ENERGY KING solid-fuel heating appliance and its components. If you choose to burn bituminous coal, be sure to select only high-grade bituminous coal. • Coal Size: Your ENERGY KING Wood/Coal Boiler is designed to use coal that is Nut size or larger. Rev 08/24/10 • DO NOT BURN: Treated wood, colored paper, garbage, cardboard, solvents, or trash—burning these may result in toxic fumes, or produce soot and large flakes of char or fly ash. Burning treated wood, colored paper, garbage, cardboard, solvents or trash can be dangerous and will void your ENERGY KING warranty. • DANGER – Risk of Fire or Explosion: Do not burn garbage, gasoline, naphtha, drain or engine oil, or other flammable liquids or inappropriate materials in this heating appliance. Storage • Store all fuel in a dry location away from the elements. Never burn wet coal. • Do not store fuel within the heating appliance installation clearances or within the space required for refueling, ash removal and other routine maintenance operations. ENERGY KING™ Wood/Coal Boiler Owner’s Manual U. S. 9 Installation Risk of Fire: • Do not operate with flue draft exceeding .06 in. (14.95 Pa) water column. • Do not operate with fuel loading or ash removal doors open. • Do not store fuel or other combustible material within marked installation clearances. • Inspect and clean flues and chimney regularly. Do not connect the ENERGY KING heating appliance to any chimney flue serving any other appliance. General Requirements The installation of any solid fuel heating appliance is not a do-it-yourself project. The ENERGY KING Wood/Coal Boiler should be installed by a qualified installer with specific knowledge of hydronic heating systems. Check with your fire department and building inspector for local, state, and federal codes and regulations regarding installation. Solid-fuel heating appliance related fires are caused almost exclusively by installation, operation, or maintenance errors. A smoke detector in “working” condition must be a part of every ENERGY KING solid-fuel heating appliance installation—this is the most inexpensive insurance you can buy! For additional safety, RJM Manufacturing, Inc. recommends installing working smoke detectors and a listed carbon monoxide warning device in the living areas of the home. The ENERGY KING Wood/Coal Boiler is designed to be used in conjunction with a listed gas- or oil-fired boiler, or as a central boiler. Zones A “heat dump” zone is required for all installations. The purpose of this zone is to circulate heated water away from the boiler when no other zones are calling for heat. In this way it will prevent your ENERGY KING Wood/Coal Boiler from overheating. However, as a safety feature, if your Boiler should overheat or build up excess pressure, it will trigger the pressure relief valve which will release water, thus relieving pressure. See Plumbing for further instructions. In-floor Heating Many newer homes feature in-floor heating. The ENERGY KING Wood/Coal Boiler may not be suitable for such applications as it produces water temperatures in excess of 185-degrees, which is much greater than can be withstood by most standard in-floor heating installations. To use the ENERGY KING Wood/Coal Boiler with in-floor heating, a mixing valve may be required to lower the water temperature before it is delivered to your in-floor heating system. Rev 08/24/10 Placement • Floor Protection Floor protection must be provided because of possible spillage of ashes and burning fuel. The ENERGY KING Wood/Coal Boiler must be installed on a non-combustible floor or 3/8-inch thick fireproof millboard or equivalent. The non-combustible material must be placed underneath the heating appliance, and must extend at least 18 inches on all sides of the heating appliance. Additionally, the non-combustible material must extend at least 18 inches on either side of the chimney connector. Consult your local ENERGY KING dealer for possible sources of non-combustible floor protection material acceptable for use with your ENERGY KING Wood/Coal Boiler. ENERGY KING™ Wood/Coal Boiler Owner’s Manual U. S. 10 Installation • As Primary Boiler Locate the ENERGY KING Wood/Coal Boiler as close to the new or existing chimney as possible. The ENERGY KING heating appliance should be placed so that you can easily complete operation and maintenance procedures. Locate the 24-V Wall Thermostat provided with your ENERGY KING heating appliance in the living area of the home. Your draft system is controlled primarily by the wall thermostat, so proper placement and installation of the wall thermostat is crucial. Strictly adhere to all requirements pertaining to clearances to combustibles, combustion air, venting system, draft control, and thermostat installation. • As Add-On Boiler The ENERGY KING Wood/Coal Boiler is designed to be used in conjunction with a listed gas- or oil-fired boiler, but not all boilers will accept an add-on application. Some small boilers may not be used in an add-on installation. Clearances to Combustibles • Sides: The ENERGY KING Wood/Coal Boiler must have clearances of 18 inches from the sidewall of the ENERGY KING Wood/Coal Boiler to combustibles. • Front: Leave a minimum clearance of 48 inches in front of your ENERGY KING heating appliance. This is for safe, easy loading and cleaning of your ENERGY KING heating appliance. • Rear: The minimum clearance from the rear of the ENERGY KING Wood/Coal Boiler to combustibles is 20 inches. • Top: The minimum clearance from the top of the ENERGY KING Wood/Coal Boiler to combustibles is 18 inches. • Stovepipe: Stovepipe must have a minimum of 18 inches to combustibles. • Additionally, when using your ENERGY KING Wood/Coal Boiler as an add-on, a 18-inch minimum clearance is required between the ENERGY KING Wood/Coal Boiler and your existing boiler. Rev 08/24/10 Before installing your ENERGY KING Wood/Coal Boiler, consult your heating contractor and local, state and national building codes and regulations to determine if your existing hydronic heating system is compatible with the ENERGY KING Wood/Coal Boiler. When using your ENERGY KING Wood/Coal Boiler in an add-on application, locate the ENERGY KING Wood/Coal Boiler as close to the new or existing chimney as possible, and as close to your existing boiler as practical. However a minimum clearance of 12-inches is required between your existing boiler and your ENERGY KING Wood/Coal Boiler. Locate the 24-V Wall Thermostat provided with your ENERGY KING heating appliance in the living area of the home, near your existing thermostat. Your draft system is controlled primarily by the wall thermostat, so proper placement and installation of the wall thermostat is crucial. Figure 2: Clearances to Combustibles ENERGY KING™ Wood/Coal Boiler Owner’s Manual U. S. 11 Installation Assembling Your ENERGY KING Wood/Coal Boiler The entire installation should be planned before putting the Boiler in place to ensure compliance with all the requirements outlined in the owner’s manual. Your new ENERGY KING Wood/Coal Boiler will have been shipped on a pallet with several boxed components that will need to be assembled prior to installation. Please see “Components” for a list of everything that was shipped along with your ENERGY KING Wood/Coal Boiler. Once your Boiler is placed in your desired location: 1. Remove the protective plastic coating from the outer cabinet of the heating appliance before assembling. 2. Cast Iron Hearth Plates. Position front and rear cast iron hearth plates in burn chamber. Your primary type of fuel (wood or coal) will determine how to position the hearth plates. The purpose of proper location is to introduce the precise amount of combustion air into the burn chamber to promote the most efficient combustion for either fuel. The words “Wood” and “Coal” are cast into the hearth plates on opposite sides. a. If you are going to burn wood, position the hearth plates with the word “Wood” facing out, not into the burn chamber. b. If you plan to primarily burn coal, position the hearth plates with the word “Coal” facing out. 3. Firebrick. The firebrick in your ENERGY KING heating appliance will have been installed at the factory; however they may have shifted during shipment. If adjustments are needed, position the firebrick by standing up on end on the left and right sides of the burn chamber. ENERGY KING A40EK-D and 35EK-D Boilers use 12 firebricks (6 on each side). ENERGY KING 45EK-D Boilers use 14 firebricks (7 on each side). 4. Cast Iron Doors. Mount the fuel loading door and ash removal door on the front of the heating appliance and secure with the enclosed door pins (4 included). 5. Control Box. a. Remove the control box cover. See Figure 3: Control Box for Forced Air Draft. b. Mount the control box on the lower left side of the heating appliance using the screws provided. Do not connect power to your ENERGY KING Wood/Coal Boiler until the installation is complete. Rev 08/24/10 ENERGY KING™ Wood/Coal Boiler Owner’s Manual U. S. 12 Installation Figure 3: Control Box for Forced Air Draft Figure 4: Forced Air Draft Blower 6. Draft System. a. Insert the conduit leading from your draft system into the control box and tighten screw to secure. b. Mount the pre-wired forced air draft blower to the draft opening located next to the ash removal door on the lower left front of the Boiler and secure using the bolts found on the draft opening. 7. Pressure-Temperature Gauge. Insert the PressureTemperature Gauge into the right-front receptacle located on top of the Boiler. 8. Pressure Relief Valve. Insert the Pressure Relief Valve into either the left-middle or right-middle receptacle located on the top of the boiler. The Pressure Relief Valve must be plumbed with a discharge tube that empties into a floor drain. See Plumbing for further instructions. Rev 08/24/10 ENERGY KING™ Wood/Coal Boiler Owner’s Manual U. S. 13 Installation 9. Aquastat-Immersion Control. a. Remove the cover of the prewired Aquastat-Immersion Control to adjust the High and Low temperature limits. Figure 7: Aquastat-Immersion Control, Mounted i. High Limit. Set the High Limit pointer to the temperature at which contacts are to open to prevent the boiler from overheating. Normal setting for the High Limit is 185º. Always set the high limit 20º or more above the low limit. ii. Low Limit. Set the Low Limit pointer to the lowest water temperature you would like the boiler to maintain. Normal setting is 160º. Always set the high limit 20º or more above the low limit. Figure 5: Aquastat-Immersion Control Blue Black b. Insert the probe well into the left-front receptacle located on the top of the Boiler and tighten to secure. Figure 6: Probe Well c. Squeeze the entire tube of heatconductive grease (included) into the probe well, and then insert the AquastatImmersion Control probe into the probe well, and secure. Rev 08/24/10 10. 4″ Domestic Hot Water Coil (Optional). a. Unscrew & remove the 4″ plug located at the upper left on the back of the ENERGY KING Wood/Coal Boiler model 35EK-D or 45EK-D. b. Apply pipe joint compound (not included) to the threads of the 4″ domestic hot water coil. c. Insert the 4″ domestic hot water coil into the opening at the upper left on the back of the ENERGY KING Wood/Coal Boiler and turn clockwise until tightened. d. Connect your domestic water supply according to the coil manufacturer’s instructions. 11. 24-V Wall Thermostat. Locate the 24-V Wall Thermostat provided with your ENERGY KING heating appliance in the living area of the home and install according to the thermostat manufacturer’s installation instructions (Supplement B). 12. Wiring. Do not connect power to your ENERGY KING Wood/Coal Boiler until the installation is complete. Once you’ve completed the installation of your ENERGY KING Wood/Coal Boiler, you may connect your 110V power supply in to the left side of the control box. Please see Appendix A: Wiring Diagram. Risk of electric shock. Disconnect power at the service panel or breaker box before servicing ENERGY KING Wood/Coal Boiler. ENERGY KING™ Wood/Coal Boiler Owner’s Manual U. S. 14 Installation Combustion Air Requirements Failure to provide adequate combustion air can lead to increased carbon monoxide production and increased emissions of combustion gases into the building, which may cause death or serious injury. The ENERGY KING Wood/Coal Boiler must have a minimum supply of 70 cubic feet of air per minute. All fuel-burning appliances must have air (oxygen) for proper combustion. The incomplete combustion that takes place when a solid-fuel appliance is “air-starved” causes carbon monoxide (CO) production in quantities that can be dangerous inside a building. Combustion air from outside may need to be brought in to prevent “air starvation”. Although an outside air source is strongly recommended for all installations, it may be necessary if: • The heating appliance does not draw steadily, smells, experiences smoke rollout, burns poorly, or backdrafts, whether or not there is combustion present. • Any of the above symptoms are alleviated by opening a window slightly on a calm day. • The house is equipped with a well-sealed vapor barrier and tight fitting windows and/or has any powered devices which exhaust house air, such as clothes dryers. • A ventilation system is installed in the house. Consult a qualified boiler installer to analyze whether the air supply in your installation environment is adequate. Rev 08/24/10 ENERGY KING™ Wood/Coal Boiler Owner’s Manual U. S. 15 Installation Venting System • Failure to provide correct chimney venting can lead to increased carbon monoxide production and increased emissions of combustion gases into the building, which may cause death or serious injury. • Do not connect the ENERGY KING heating appliance to any chimney flue serving any other appliance. • Risk of Fire: Inspect and clean flues and chimney regularly. • Risk of Fire: Do not operate with the flue draft exceeding .06″ (14.95 Pa) water column. Consult a qualified boiler installer, your local building inspector and your fire officials to make sure the chimney and all connections conform to all local, state and national codes and regulations. Your venting system is an extremely important part of any solid-fuel heating appliance installation and has two key functions: 1. To exhaust smoke and flue gases which are the natural result of combustion. 2. To provide “draft.” The draft, along with your combustion blower, provides a continuous supply of fresh air for proper combustion. A chimney connector and chimney make up the venting system and must be properly installed and maintained to protect against a fire. Consult a chimney and venting specialist. The ENERGY KING Wood/Coal Boiler requires installation into a lined masonry chimney or an 8-inch listed UL103 type HT all-fuel factory-built chimney. Minimum 24 gauge black steel chimney connector is required. An existing chimney must be cleaned and inspected to be sure it is clean and free from defect or damage. All connections must comply with NFPA Standard 211 and all applicable building codes and regulations. When installing a factory-built chimney, follow all installation instructions provided by the chimney manufacturer. For best performance, RJM Manufacturing, Inc. recommends using insulated chimney rather than triple wall or air cooled chimney. Rev 08/24/10 Important venting installation clearances and points for proper operation and safety: • The connection from the ENERGY KING Wood/Coal Boiler to the chimney must be made using 8″ black steel material with a minimum 24 gauge. Do not use galvanized steel. See Chimney Connector. • A minimum distance of 18 inches must be maintained between the chimney connector and combustible ceiling surfaces. • A minimum of 18 inches must be maintained between the chimney connector and the backwall, and 20 inches between the connector and sidewalls. • Secure all connector pipe joints with at least three sheet metal screws. • Avoid using more than two elbows in connecting the heating appliance to the chimney. • Any horizontal runs of connector pipe should have a minimum rise of 1/2-inch per linear foot. Use extra support hangers or brackets every three feet if it is absolutely necessary to have a run of more than six feet, which is not recommended. • The chimney must be at least 3 feet higher than the highest point where it passes through the roof, and at least 2 feet higher than the highest part of the roof or structure that is within 10 feet of the chimney, measured horizontally. Please refer to Figure 8: Venting Requirements. For best performance, RJM Manufacturing, Inc. recommends a chimney height of at least 12 feet. ENERGY KING™ Wood/Coal Boiler Owner’s Manual U. S. 16 Installation Figure 8: Venting Requirements The Chimney must be at least 3 feet higher than the highest point where it passes through the roof, and at least 2 feet higher than the highest part of the roof or structure that is within 10 feet of the chimney, measured horizontally. For best performance, RJM Manufacturing, Inc. recommends a chimney height of at least 12 feet. Rev 08/24/10 ENERGY KING™ Wood/Coal Boiler Owner’s Manual U. S. 17 Installation Masonry Chimney When connecting to an existing masonry chimney, an approved liner must be used in the chimney. An unlined chimney could remain cold and cause a downward pressure which creates the environment for poor burning, incomplete combustion, or backdraft. Chimney Connector The connection from the ENERGY KING Wood/Coal Boiler to the chimney must be made using 8″ black steel material with a minimum 24 gauge. Do not use galvanized steel. For proper operation, the chimney connector should be as short as possible. Horizontal lengths of chimney connector should have an upward slope of 1/2-inch per foot. Use extra support hangers or brackets every three feet if it is absolutely necessary to have a run of more than six feet, which is not recommended. Chimney connector sections must be attached to the heating appliance and to each other with the crimped end toward the heating appliance. Secure all chimney connector pipe joints with at least three sheet metal screws. Avoid using more than two elbows in connecting the ENERGY KING Wood/Coal Boiler to the chimney. Never use chimney connector pipe as a chimney. Figure 9: Chimney Connector Section A minimum distance of 18 inches must be maintained between the chimney connector and combustible ceiling surfaces. A minimum of 18 inches must be maintained between the chimney connector and the backwall and a minimum of 20 inches must be maintained between the chimney connector and sidewalls. DO NOT PASS CHIMNEY CONNECTOR THROUGH A COMBUSTIBLE WALL OR CEILING. Rev 08/24/10 ENERGY KING™ Wood/Coal Boiler Owner’s Manual U. S. 18 Installation Barometric Draft Control Risk of Fire: Do not operate with the flue draft exceeding .06″ (14.95 Pa) water column. Proper draft must be provided for your ENERGY KING Wood/Coal Boiler. Draft is the force that moves air from the boiler up through the chimney. Draft is measured in inches of water column. The amount of draft in your chimney depends on the length of the chimney, local geography, nearby obstructions and other factors. Too much draft may cause the fire to burn too fast, while inadequate draft may cause smoke to back up into the ENERGY KING heating appliance, creating a possible hazard. A barometric draft control must be installed into the chimney connector. Please refer to Figure 8: Venting Requirements and Figure 10: Barometric Draft Control. Barometric draft controllers limit the draft (the suction pulling air into the solid-fuel heating appliance burn chamber). A pivoted, counterbalanced flap is pulled open by the draft when the draft reaches a critical amount. This permits air to enter the chimney, thus preventing the draft in the heating appliance from rising any higher. After installation of the ENERGY KING Wood/Coal Boiler is complete and a fire has been built, the chimney draft should be established and maintained from .04″ to .06″ water column of draft. If this setting is exceeded, it could cause a solid fuel fire to burn out of control. With no draft in the chimney, the barometric draft control remains closed, allowing no air to enter. Moderate draft in the chimney will pull the barometric draft control open just enough to maintain the appropriate draft for your heating appliance. Excessive draft in the chimney will pull the barometric draft control further open, allowing more air into the chimney and reducing the draft. Figure 10: Barometric Draft Control Rev 08/24/10 ENERGY KING™ Wood/Coal Boiler Owner’s Manual U. S. 19 Installation Plumbing ENERGY KING A40EK-D Wood/Coal Boilers are equipped with: • One 2″ hot water outlet, located at the top of the Boiler • One 1-1/2″ cold water inlet, located on the rear of the Boiler. ENERGY KING 35EK-D/45EK-D Wood/Coal Boilers are equipped with: • One 2″ hot water outlet, located at the top of the Boiler • Two 1-1/4″ cold water inlets, located on the rear of the Boiler. Important points for proper plumbing: • Use pipe of no less than 1″ diameter for both the hot water outlet and the cold water inlets. • When plumbing into your existing heating system, RJM Manufacturing, Inc. recommends installing a series of three gate valves. o When the ENERGY KING Wood/Coal Boiler is in use, Valves #1 and #2 are open and Valve #3 is closed. o To isolate your ENERGY KING Wood/Coal Boiler from the heating system when not in use, close Valves #1 and #2 and open Valve #3. o Always remember to open Gate Valve #1 and #2 and close #3 when activating your ENERGY KING Wood/Coal Boiler again. Please refer to Appendix B for examples of basic plumbing configurations. Auto-Fill In order for a pressurized hot water heating system, such as the ENERGY KING Wood/Coal Boiler, to function safely and efficiently, it must be filled with water at all times and must maintain a fairly constant pressure. An auto-fill valve may be used for this purpose. If you include an auto-fill valve in your installation, be sure to choose one that is preset for 12 to 15 PSI. Note: If your system includes an auto-fill feature, it will be more difficult to recognize leaks because the auto-fill will constantly make up lost water. It will also be difficult to recognize if your boiler has overheated and triggered the Pressure Relief Valve. Always be sure to monitor your system for signs of leaks or overheating. Pressure Relief Valve The Pressure Relief Valve must be plumbed with a discharge tube that empties into a floor drain. Once installation is complete and you’ve filled the boiler with water, verify the Pressure Relief Valve’s proper functioning by manually opening the valve and releasing water into the floor drain. If no water flows, do not operate the Boiler until a new Pressure Relief Valve is installed. Expansion Tank All ENERGY KING Wood/Coal Boiler installations must include an expansion tank to allow water to expand or contract without adversely affecting the system pressure. The Pressure Relieve Valve will automatically release water when the water pressure reaches 30 PSI. Be sure to monitor the water level in your ENERGY KING Wood/Coal Boiler, and refill when necessary. If your heating system has an auto-fill feature, be sure the auto-fill does not raise the water pressure above 15 PSI. Expansion tanks must be properly sized to accommodate the water capacity of the ENERGY KING Wood/Coal Boiler. When installing the ENERGY KING Wood/Coal Boiler as an add-on to an existing system, you need not add a second expansion tank provided the existing expansion tank can accommodate the volume of both the ENERGY KING Wood/Coal Boiler and the existing boiler. Consult your plumber to verify your expansion tank is properly sized. Temperature Relief Valve In certain jurisdictions, a Temperature Relief Valve may be required in addition to the Pressure Relief Valve. For this reason, ENERGY KING A40EK-D Wood/Coal Boilers are equipped with a fourth receptacle, located on the top of the Boiler. Consult your local ENERGY KING dealer or plumber for possible sources of Temperature Relief Valves acceptable for use with your ENERGY KING Wood/Coal Boiler. Rev 08/24/10 ENERGY KING™ Wood/Coal Boiler Owner’s Manual U. S. 20 Installation Zones A “heat dump” zone is required for all installations. The purpose of this zone is to circulate heated water away from the boiler when no other zones are calling for heat. In this way it will prevent your ENERGY KING Wood/Coal Boiler from overheating. However, as a safety feature, if your Boiler should overheat or build up excess pressure, it will trigger the pressure relief valve which will release water, thus relieving pressure. In-floor Heating To use the ENERGY KING Wood/Coal Boiler with in-floor heating, a mixing valve may be required to lower the water temperature before it is delivered to your in-floor heating system. RJM Manufacturing, Inc. recommends installing a normally open zone valve and a strap-on (non-immersion, surface mounted) aquastat (not included) as part of every dump zone valve installation. Consult your local ENERGY KING dealer or plumber for possible sources of appropriate valves and strap-on aquastats acceptable for use with your ENERGY KING Wood/Coal Boiler. Rev 08/24/10 ENERGY KING™ Wood/Coal Boiler Owner’s Manual U. S. 21 Operation General Instructions Risk of Fire: ● Do not operate with flue draft exceeding .06″ (14.95 Pa) of water column. ● Do not operate with fuel loading or ash removal doors open. ● Do not store fuel or other combustible material within marked installation clearances ● Inspect and clean flues and chimney regularly. CAUTION – Hot Surfaces: Keep children away! Do not touch Boiler during operation. Please read this manual in its entirety prior to the first firing of your ENERGY KING Wood/Coal Boiler. It is very important that you follow these suggestions and limitations in order to maintain your warranty and to guarantee the long life of your ENERGY KING Wood/Coal Boiler. The ENERGY KING Wood/Coal Boiler is designed to burn for about 6 to 8 hours per load of wood or coal. If the ENERGY KING heating appliance is being fired hot constantly with full flames and operating at only a 2 to 4 hour burn cycle, it is being overfired. Your home heating needs may be too great for the size of heating appliance you have purchased. Forced firing or abuse can be detected upon inspection and will void your warranty. Keep the Boiler and pipes in the heating system filled with water at all times to reduce the possibility of rust and corrosion. Never fire a boiler that is low on water. The heating surface can be damaged if the water level is too low. Always add water to a boiler gradually. Never add water to a hot appliance. For greatest efficiency, you may sometimes need to allow your existing conventional heating system to assist your ENERGY KING Wood/Coal Boiler in the coldest weather. During the warmer seasons of spring and fall, you should control the heat output by limiting the amount of fuel, rather than the air supply. Shorter, hotter fires will allow your ENERGY KING Wood/Coal Boiler to operate at maximum efficiency and with minimum emissions. Gate Valves When plumbing into your existing heating system, RJM Manufacturing, Inc. recommends installing a series of three gate valves. The three gate valves are to be used in the event you do not use your Energy King Wood/Coal Boiler for an extended period (one or more weeks). • When the ENERGY KING Wood/Coal Boiler is in use, Valves #1 and #2 are open and Valve #3 is closed. • To isolate your ENERGY KING Wood/Coal Boiler from the heating system when not in use, close Gate Valves #1 and #2, and open Valve #3. • Always remember to open Gate Valves #1 and #2, and close #3 when activating your ENERGY KING Wood/Coal Boiler again. Gate Valve 1 Gate Valve 2 Gate Valve 3 Normal Usage Open Open Closed Extended Non-use Closed Closed Open For best combustion efficiency, chimney temperature should be 350-degrees F to 450-degrees F. RJM Manufacturing, Inc. recommends installing a magnetic chimney thermometer to monitor chimney temperature. Rev 08/24/10 ENERGY KING™ Wood/Coal Boiler Owner’s Manual U. S. 22 Operation First Fire Before lighting your first fire, inspect your ENERGY KING Wood/Coal Boiler to ensure that it has been properly installed and that all safety requirements have been met. During your inspection, pay particular attention to the clearances to combustibles, venting, and thermostat installation instructions. Verify the Pressure Relief Valve’s proper functioning by manually opening the valve and releasing water into the floor drain. If no water flows, do not operate the Boiler until a new Pressure Relief Valve is installed. Next, make sure that the burn chamber is clear of all objects. Do not fully load your ENERGY KING Wood/Coal Boiler until you become familiar with the operation of your ENERGY KING Wood/Coal Boiler. Some odors may be given off a new ENERGY KING Wood/Coal Boiler during the initial few hours of burning while the steel and the paint are being cured. Ventilating the room until the odors disappear is recommended. Check to make sure that your combustion blower is in proper working order. You can check the forced draft blower by turning the wall thermostat supplied with your ENERGY KING heating appliance to a high temperature. If your forced draft blower turns on, you may set the wall thermostat to the desired setting. Typical Operation Cycle After a fire has been established and the operating temperature has been reached, only the wall thermostat needs to be set to maintain the desired temperature. Your draft system is controlled primarily by the wall thermostat; therefore it is crucial to ensure proper placement and installation of the wall thermostat. • When your home cools, the wall thermostat located in the living area of the home activates the combustion blower, forcing combustion air into your burn chamber. • When the thermostat is satisfied, it will deactivate your forced draft control system, allowing the fire to cool until the next time your thermostat calls for heat. • As the fire burns hotter, the temperature of your heating water increases and activates your circulation system to deliver heat to your home. Your ENERGY KING Wood/Coal Boiler can run efficiently over extended periods of time and at different heat output levels as long as the fuel supply is uninterrupted and cleaning and maintenance are performed routinely. Rev 08/24/10 ENERGY KING™ Wood/Coal Boiler Owner’s Manual U. S. 23 Operation Overfire Do not overfire. Using too much wood or coal, burning trash in the Boiler, or operating with a flue draft that exceeds .06 inches water column, may result in overfiring—a dangerous condition which could produce excessive heat and pressure within the ENERGY KING Wood/Coal Boiler, or could ignite creosote within the chimney or Boiler. Forced firing or abuse can be detected upon inspection and will void your warranty. As a safety feature, if your Boiler should overheat, it will trigger the pressure relief valve and release water to relieve pressure. If this should occur, allow the Boiler to cool completely before refilling. Never fire a boiler that is low on water. Never add water to a hot boiler. Power Failure Instructions Do not operate the ENERGY KING Wood/Coal Boiler during a power failure. If operated during a power failure, your ENERGY KING Wood/Coal Boiler could overheat, creating a possible hazard and may result in property damage or bodily injury. Do not operate the ENERGY KING Wood/Coal Boiler during a power failure - this can be dangerous and will void your warranty. After power is restored, verify that there is power to the ENERGY KING Wood/Coal Boiler, and restart using the procedures described in Starting a Fire. Rev 08/24/10 ENERGY KING™ Wood/Coal Boiler Owner’s Manual U. S. 24 Operation BURN AIR-DRIED WOOD, OR ANTHRACITE OR BITUMINOUS COAL ONLY Burning Wood All home chimneys and hookups are different. After a few fires, you will find the best way to start a fire in your ENERGY KING Wood/Coal Boiler. Your ENERGY KING Wood/Coal Boiler is capable of holding very large logs. Do not try to add a log that is larger than what you can easily place in the ENERGY KING Wood/Coal Boiler. You will get the best efficiency when you add only the amount of wood needed for a 6 to 8 hour burn. Note: A full load is not always the best solution for your needs. Starting a Wood Fire 1. Pull the sliding smoke baffle (located above the fuel loading door) out to open. Refueling To refuel your ENERGY KING Wood/Coal Boiler: 2. Place a small amount of crumpled paper in the center of your ENERGY KING Wood/Coal Boiler. Crisscross a couple of handfuls of dry, 3/4″ thick kindling wood, then several small pieces of firewood. 1. Pull the sliding smoke baffle out. Be sure the sliding smoke baffle is fully open. 3. It will take 5 to 10 minutes for the fire to establish itself. Once you have some redhot burning embers, add larger pieces of wood. a. Vary the position of the wood in the burn chamber to maximize the exposed surface area of each piece of wood. b. Only use wood properly sized for your unit’s burn chamber. 2. Open the fuel loading door slowly: open the door about 1″-2″ then wait about 10 seconds before opening fully. Never stand in front of the fuel loading door when refueling; always stand to the side. 3. Rake the red-hot embers over the grates evenly. 4. Put a few smaller pieces of wood on the coals first, and then load the Boiler with larger pieces of wood. 5. Close the fuel loading door and sliding smoke baffle. Never overload your burn chamber. Do not load wood more than 8 inches above the top of the firebrick. 4. Push in the sliding smoke baffle after loading your ENERGY KING Wood/Coal Boiler and the fire has been established. 5. The burn time is controlled by the 24-V Wall Thermostat and the forced air draft controls on the Boiler. Rev 08/24/10 ENERGY KING™ Wood/Coal Boiler Owner’s Manual U. S. 25 Operation BURN AIR-DRIED WOOD, OR ANTHRACITE OR BITUMINOUS COAL ONLY All home chimneys and hookups are different. After a few fires, you will find the best way to start a fire in your ENERGY KING Wood/Coal Boiler. You will get the best efficiency when you add only the amount of coal needed for a 6 to 8 hour burn. A full load is not always the best solution for your needs. Burning Coal Burning coal will provide a lesson in patience. Take the time necessary to experiment and understand the operation of your ENERGY KING Wood/Coal Boiler. Please keep the following points in mind when burning coal: 1. A Barometric draft control in the chimney connector must be used when burning coal. 2. Never completely cover the live fire with fresh coal. Always leave a generous area of burning coal at the top and rear of the fire. 3. Always keep the ash pan clean. Coal firing produces much more ash than wood. These ashes must be removed often (possible daily) in order to avoid piling up too closely to the grates. Removal of the coal ash will allow for passage of primary air to the coal bed and prevent damage or warpage to the grates. 4. A coal fire should not be poked or broken up, as this tends to bring ash to the surface of the coal bed where it may fuse. If the ash fuses, clinkers will form. It may be necessary to remove all unburned material and ash from the burn chamber to remove the clinkers. These should be carefully removed using tongs, and always put into an airtight metal container. 5. If the fire goes out or does not hold overnight, check for the following: a. Poor Draft b. Incorrect damper settings. c. Improper firing methods for the coal being used. d. Coal is not sized to the boiler (see Fuel Requirements – Coal). e. Ashes, if allowed to accumulate in the ash pan, will not allow the passage of required air for combustion. Keep the ash pan clean. Dispose of ashes with care: Ashes should be placed in a metal container with a tight fitting metal lid. The closed container of ashes should be placed on a noncombustible floor or on the ground, well away from all combustible materials, pending final disposal. All coal contains small amounts of dangerous elements. Therefore it is essential that your coal ash be disposed of in municipally designated areas. Rev 08/24/10 ENERGY KING™ Wood/Coal Boiler Owner’s Manual U. S. 26 Operation Starting a Coal Fire 1. Pull the sliding smoke baffle (located above the fuel loading door) out to open. Refueling / Recharging To refuel/recharge the anthracite coal fire in your ENERGY KING Wood/Coal Boiler: 2. Place a small amount of crumpled paper in the center of your ENERGY KING Wood/Coal Boiler. Crisscross a couple of handfuls of dry, 3/4″ thick kindling wood, then several small pieces of firewood. Wait until the wood fire is established with hot, red embers before adding coal. 1. Pull the sliding smoke baffle out. Be sure the sliding smoke baffle is fully open. 3. It will take 5 to 10 minutes for the wood fire to establish itself. Once you have some redhot burning embers, add several small shovels of coal over the wood coals until you have a 2″-3″ bed of burning coals. Be sure to give each small layer about 5-10 minutes to ignite before covering it with the next layer of coal. 4. After the coal fire is established and spread throughout the burn chamber, gently shake the grate until ashes fall in the ash removal pan. Add larger amounts of coal to build up the coal bed. 2. Gently shake the grates down 3. Open the fuel loading door slowly: open the door about 1″-2″ then wait about 15 to 20 seconds before opening fully. When recharging, fresh coal tends to give off large quantities of volatile gas which may accumulate and possibly ignite, causing a backpuff. Always open the fuel loading door slowly to prevent backpuffing. Never stand in front of the fuel loading door when refueling; always stand to the side. 4. If the coal fire has died down before recharging, a fresh supply of kindling will need to be added. Only add fresh coal to a deep, hot bed of coals. Never overload your burn chamber. Do not load coal above the top of the firebrick. 5. Spread fresh coal evenly over existing coal, leaving some hot coals exposed in the center of the burn chamber. Be careful not to smother your existing coals. 5. Push in the sliding smoke baffle after loading your ENERGY KING Wood/Coal Boiler and your fire is established. Never overload your burn chamber. Do not load coal above the top of the firebrick. 6. The burn time is controlled by the 24-V Wall Thermostat and the forced air draft controls on the Boiler. Allow your ENERGY KING Wood/Coal Boiler to operate with draft controls fully open for approximately 15 minutes or until the fresh coal ignites. When the coal is properly ignited, adjust the thermostat accordingly. 6. Close the fuel loading door and sliding smoke baffle. Check the fire periodically to make sure it is spreading throughout the coal bed. Rev 08/24/10 ENERGY KING™ Wood/Coal Boiler Owner’s Manual U. S. 27 Operation Bituminous Recharging Because bituminous coal has higher sulfur content, bituminous recharging is slightly different from anthracite recharging. Banking Banking allows you to recharge your coal fire in such a manner as to retain a hot coal bed throughout the night. To refuel/recharge the bituminous coal fire in your ENERGY KING Wood/Coal Boiler: 1. Pull the sliding smoke baffle out. Approximately one hour before retiring for the night, push the coals to the rear of the burn chamber with the coal tapered down in the front. 2. Gently shake the grates down Be careful not to smother your existing coals. 3. Open the fuel loading door slowly: open the door about 1″-2″ then wait about 15 to 20 seconds before opening fully. Never overload your burn chamber. Do not load coal above the top of the firebrick. When recharging, fresh coal tends to give off large quantities of volatile gas which may accumulate and possibly ignite, causing a backpuff. Always open the fuel loading door slowly to prevent backpuffing. Never stand in front of the fuel loading door when refueling; always stand to the side. 4. If the coal fire has died down before recharging, a fresh supply of kindling will need to be added. Only add fresh coal to a deep, hot bed of coals. 5. Push the hot coals to the rear of the burn chamber and position fresh coal on the grate in front of the banked coal. Be careful not to smother your existing coals. Never overload your burn chamber. Do not load coal above the top of the firebrick. 6. Close the fuel loading door and sliding smoke baffle. Rev 08/24/10 ENERGY KING™ Wood/Coal Boiler Owner’s Manual U. S. 28 Maintenance Periodic maintenance is required to continue the performance of your ENERGY KING Wood/Coal Boiler. As with any solid-fuel heating appliance, the need for and frequency of cleaning depends on the amount and quality of fuel burned, the quality of the fire, and the length of time since the last cleaning. Weekly cleaning may be required in warmer weather, whereas monthly cleaning may be enough in colder weather. Before the first fire of each new heating season, check all installations and accessories to ensure a safe burning process. Risk of electric shock. Disconnect power at the service panel or breaker box before servicing ENERGY KING Wood/Coal Boiler. Keep the area around the ENERGY KING Wood/Coal Boiler clean and free of dust and debris. Creosote – Formation and Need for Removal When wood is burned slowly, it produces tar and other organic vapors, which combine with expelled moisture to form creosote. The creosote vapors condense in the relatively cool chimney flue of a slow-burning fire. As a result, creosote residue accumulates on the flue lining. When ignited, this creosote makes an extremely hot fire, the results of which can be tragic. Check daily for creosote build up until experience shows how often cleaning is necessary. The chimney connector and chimney should be inspected at least twice monthly during the heating season to determine if a creosote buildup has occurred. If creosote has accumulated, it should be removed to reduce the risk of a chimney fire. Be aware that the hotter the fire, the less creosote is deposited, and that weekly cleaning may be necessary in mild weather, even though monthly cleaning may be enough in the coldest months. Have a clearly understood plan to handle a chimney fire. Rev 08/24/10 Disposal of Ashes Ashes should be placed in a metal container with a tight fitting metal lid. The closed container of ashes should be placed on a noncombustible floor on the ground, well away from all combustible materials, pending final disposal. If the ashes are disposed of by burial in soil or otherwise locally dispersed, they should be retained in the closed container until all ash and cinders have thoroughly cooled. Do not place any other waste materials in this container. All coal contains small amounts of dangerous elements. Therefore it is essential that your coal ash be disposed of in municipally designated areas. NOTE: EMBERS REMAIN HOT FOR MANY DAYS. STORE IN A SAFE PLACE AWAY FROM COMBUSTIBLES. Never use a conventional vacuum cleaner or a shop vacuum to remove ashes from a solid-fuel heating appliance. Ashes remain hot for many days, and when trapped in a conventional vacuum can cause a fire hazard. Only use a vacuum designed for the safe cleaning and removal of ashes. ENERGY KING™ Wood/Coal Boiler Owner’s Manual U. S. 29 Maintenance Gasket Replacement The cast iron fuel loading and ash removal doors of your ENERGY KING Wood/Coal Boiler are equipped with gaskets to ensure safe operation and an airtight seal. When these gaskets become worn or damaged, you will need to replace them. To replace the gaskets you will need 3/4-inch, high temperature rope gasket, available from your ENERGY KING dealer or hardware store. 1. Remove the door and lay it face down on a clean, flat surface. 2. Find the ends of the gasket and pull it off. 3. Using a screwdriver, remove any excess gasket cement from the gasket channel. 4. If desired, a small drop of gasket cement may be applied to the corners of the gasket channel. 5. Lay the new door gasket in the channel, cutting off any excess gasket rope. Figure 11: Door Gasket 6. Reattach the door. If gasket cement was applied, keep the door closed until the cement has fully dried. Routine Maintenance Please use the following timeline as a guide for determining how much maintenance your ENERGY KING Wood/Coal Boiler requires to operate at peak performance. Failure to clean and maintain this Boiler as indicated can result in poor performance and safety hazards. Please use Appendix D: Purchase & Service Record to keep a record of your maintenance and service practices. In the event of a warranty claim, we may request a copy of this record. Inspect flue pipes, joints and seals regularly to ensure that smoke and flue gases are not drawing into the home. Daily Every 2 – 3 Days / Weekly Until a pattern of cleaning requirement is established, inspect and, if necessary, clean the following components daily: • Fuel Supply, refilling as necessary. • Water level, refilling as necessary. • Flue Pipes, including joints and seals, should be inspected to ensure that smoke and flue gases are not drawn in and circulated by the air-circulation system. • The ash removal pan should be emptied and cleaned regularly. Ash content is a good indicator of fuel efficiency and quality. High quality fuel will produce less ash and fewer clinkers than lower quality fuel. Never allow ash to build up to the level of the grates. Rev 08/24/10 Once a pattern of cleaning requirement is established, the following components should still be monitored on a regular basis: • Burn chamber • Ash removal pan • Water Level • Flue pipes, joints and seal ENERGY KING™ Wood/Coal Boiler Owner’s Manual U. S. 30 Maintenance Monthly Annually The water level on your ENERGY KING Wood/Coal Boiler should be monitored on a regular basis and refilled when necessary. Seasonally / Every 3 Months / After every 1 – 2 Tons of fuel burned Until you are familiar with how ash and creosote accumulate with your operating practices, we recommend inspecting your ENERGY KING Wood/Coal Boiler at least once per ton of fuel burned. Particular attention should be given to: • Draft Control system (blowers, etc.) • Gaskets (Fuel Loading and Ash Removal Doors) • Water Level • Fresh air intake • Chimney At least once each year: • Verify the Pressure Relief Valve’s proper functioning by manually opening the valve and releasing water into the floor drain. If no water flows, do not operate the Boiler until a new Pressure Relief Valve is installed. • Inspect the Boiler and plumbing for leaks. • Verify the proper operation of all pumps and valves. Spring Shutdown Cleaning the flue pipe and chimney is especially important at the end of the heating season to minimize corrosion during the summer months caused by accumulated ash. It is important to give the entire ENERGY KING Wood/Coal Boiler a thorough cleaning: • Your venting system should be inspected and cleaned annually. Clean and remove fly ash from chimney connector, flue pipes and chimney. Soot buildup should be removed to prevent the risk of a chimney fire and to minimize corrosion during the summer months. • Scoop out any unburned fuel from the burn chamber, and empty and clean the burn chamber and ash removal pan. ○ Do not allow fuel or ash to sit in the ENERGY KING Wood/Coal Boiler over the summer months. Fuel and ash can accumulate moisture over the summer months having a corrosive effect on metal and cast iron parts, and causing the fuel to mold. Failure to clean and maintain this heating appliance as indicated can result in poor performance and safety hazards. Please use Appendix D: Purchase & Service Record to keep a record of your maintenance and service practices. In the event of a warranty claim, we may request a copy of this record. Remember: A clean appliance burns efficiently and will remain trouble free! Rev 08/24/10 ENERGY KING™ Wood/Coal Boiler Owner’s Manual U. S. 31 Troubleshooting Guide Risk of electric shock. Disconnect power at the service panel or breaker box before servicing the ENERGY KING Wood/Coal Boiler. Many problems in the ENERGY KING Wood/Coal Boiler can be traced to a few commonplace causes and are easily fixed. Before making any repairs or replacing any components, be sure to check for these common problems: Fuel • Wet or Dirty fuel Solution: Empty and clean the burn chamber. Refill using only high quality, clean, dry fuel as outlined in Fuel Requirements. Improper Draft • Too little or too much draft • Insufficient combustion air Solution: Adjust the draft controls and observe until you determine which settings are most appropriate for your usage. See Operation for further information. Ash buildup in the ash removal pan Solution: Be sure to maintain your ENERGY KING Wood/Coal Boiler’s cleanliness by emptying the ash removal pan regularly. See Maintenance for further information. We also recommend establishing a routine of inspecting gaskets and replacing when necessary. Maintaining your ENERGY KING heating appliance’s cleanliness and adjusting the draft controls will remedy many problems. Rev 08/24/10 ENERGY KING™ Wood/Coal Boiler Owner’s Manual U. S. 32 Troubleshooting Guide Detailed Troubleshooting Once you have exhausted the above common problems, if you are still experiencing trouble with your ENERGY KING Wood/Coal Boiler, you may wish to consult the following list of problems, or consult with your ENERGY KING dealer for further assistance. Problem(s) Cause(s) / Solution(s) Fire won’t start or starts but won’t stay lit, or does not hold out overnight • Make sure all doors are closed tightly and all gaskets are in good condition. • Ashes, if allowed to accumulate in the ash removal pan, will block the passage of combustion air. Verify that your ash removal pan is clean. Never allow ashes to build up to the level of the grates. • Your exhaust or combustion air systems may be blocked. Verify all vents and pipes are free from obstruction and the draft controls are operating correctly. • Check your chimney for downdraft caused by taller surrounding trees or buildings. The chimney may have to be extended or a chimney vent cap installed. Please contact your ENERGY KING dealer or heating contractor. Fire is weak, lazy, or dirty, or startup is slow or smoky • Your exhaust or combustion air systems may be blocked. Verify all vents and pipes are free from obstruction and the draft controls are operating correctly. • Your home may have a negative pressure. If your home is too airtight, the ENERGY KING heating appliance cannot get enough combustion air to burn properly. You may need to bring outside air to the ENERGY KING heating appliance. Please contact your ENERGY KING dealer or heating contractor. • Check your chimney for downdraft caused by taller surrounding trees or buildings. The chimney may have to be extended or a chimney vent cap installed. Please contact your ENERGY KING dealer or heating contractor. Poor combustion or difficulty maintaining a “pilot” fire • Check the quality of your fuel. Refer to the Fuel Requirements section. • Your home may have a negative pressure. If your home is too airtight, the ENERGY KING heating appliance cannot get enough combustion air to burn properly. You may need to bring outside air to the ENERGY KING heating appliance. Please contact your ENERGY KING dealer or heating contractor. Excessive Fire Rev 08/24/10 • The chimney draft may be excessive. Adjust the barometric damper to maintain flue draft settings from 0.04″ to 0.06″ of water column. Do not operate with a flue draft exceeding .06″ (14.95 Pa) water column. ENERGY KING™ Wood/Coal Boiler Owner’s Manual U. S. 33 Troubleshooting Guide Problem(s) The ENERGY KING heating appliance is overheating or is burning without regard to the thermostat Cause(s) / Solution(s) • Your ENERGY KING heating appliance may have been installed incorrectly. Please contact your ENERGY KING dealer or heating contractor. • The thermostat or thermostat wiring may be faulty. Please contact your ENERGY KING dealer or heating contractor. • Your “heat dump” zone may have been closed off. Verify that your “heat dump” zone is open and all heat delivery systems are operating correctly. Excessive creosote • During warmer weather, you may need to adjust your firing practices. For maximum efficiency and minimum emissions, try shorter, hotter fires rather than large, slow-burning fires. • Your venting may be improperly installed. Verify that the ENERGY KING heating appliance is vented according to the instructions found in the Installation section. Please contact your ENERGY KING dealer or heating contractor. Smoke is visible or you smell fumes in your home • Make sure the fuel loading and ash removal doors are closed tightly and all gaskets are in good condition. • Your exhaust or combustion air systems may be blocked. Verify all vents and pipes are free from obstruction and the draft controls are operating correctly. • Your venting may be improperly installed. If the ENERGY KING heating appliance is smoking from vents or from the draft controls, immediately shut down the ENERGY KING heating appliance, ventilate the area, and contact your ENERGY KING dealer or heating contractor. Too much ash • Check the quality of your fuel. Refer to the Fuel Requirements section. Ash, soot, or fuel dust in the home • Verify all doors are closed tightly and all gaskets are in good condition. • Always be sure to handle ashes and fuel with care and open doors slowly. • Be sure to check the exhaust system for leaks and repair as necessary. Partially burned or unburned fuel in the combustion area • More air for proper combustion may be needed. Verify that your draft controls are working properly and that your exhaust and combustion air systems are clean and free from obstruction. The ENERGY KING heating appliance burns too much fuel, or the fuel burns off too quickly • The chimney draft may be excessive. Adjust the barometric damper to maintain flue draft settings from 0.04″ to 0.06″ of water column. Do not operate with a flue draft exceeding .06″ (14.95 Pa) water column. Rev 08/24/10 ENERGY KING™ Wood/Coal Boiler Owner’s Manual U. S. 34 Troubleshooting Guide Problem(s) Cause(s) / Solution(s) The ENERGY KING heating appliance will not heat the whole house or doesn’t produce as much heat as when first installed • Verify that the venting and draft control systems are clean and free from obstruction. Verify that all heat delivery systems are operating correctly. The water level is low • Excessive pressure in your ENERGY KING Wood/Coal Boiler may have triggered your Pressure Relief Valve. Allow the Boiler to cool and refill as necessary. Never fire a boiler that is low on water. Never add water to a hot boiler. • If your heating system features auto-fill, verify that the auto-fill does not raise the water pressure above 15 PSI, as this could trigger the Pressure Relief Valve when the water temperature rises. • Check for leaks in your ENERGY KING Wood/Coal Boiler and in your plumbing system. The ENERGY KING Wood/Coal Boiler requires frequent refilling • Your Pressure Relief Valve may be installed incorrectly, or may be faulty. Please contact your ENERGY KING dealer or heating contractor. • Check for leaks in your ENERGY KING Wood/Coal Boiler and in your plumbing system. The ENERGY KING heating appliance has power but is not responding • Check the power supply for adequate voltage. See the Installation section for power supply requirements. The user is shocked when touching the ENERGY KING heating appliance • Your ENERGY KING heating appliance may not have been properly grounded or may have loose wires or wiring components. Disconnect power to the ENERGY KING heating appliance at the breaker box or service panel and verify all connections. Please contact your ENERGY KING dealer or heating contractor. • Your ENERGY KING heating appliance, its electrical components, and/or thermostat may have been installed incorrectly. Please contact your ENERGY KING dealer or heating contractor. • Your ENERGY KING heating appliance may have experienced a power surge or power short. Please contact your ENERGY KING dealer or heating contractor. Rev 08/24/10 ENERGY KING™ Wood/Coal Boiler Owner’s Manual U. S. 35 This page is intentionally left blank. Rev 08/24/10 ENERGY KING™ Wood/Coal Boiler Owner’s Manual U. S. 36 Appendix A: Wiring Diagram Rev 08/24/10 ENERGY KING™ Wood/Coal Boiler Owner’s Manual U. S. 37 This page is intentionally left blank. Rev 08/24/10 ENERGY KING™ Wood/Coal Boiler Owner’s Manual U. S. 38 Appendix B: Example Plumbing Diagram When plumbing into your existing heating system, RJM Manufacturing, Inc. recommends installing a series of three gate valves. The three gate valves are to be used in the event you do not use your ENERGY KING Wood/Coal Boiler for an extended period (one or more weeks). When the ENERGY KING Wood/Coal Boiler is in use, Valves #1 and #2 are open and Valve #3 is closed. To isolate your ENERGY KING Wood/Coal Boiler from the heating system when the ENERGY KING Wood/Coal Boiler is not in use, close Valves #1 and #2 and open Valve #3. Always remember to open Gate Valve #1 and #2 and close #3 when activating your Energy King™ Wood/Coal Boiler again. Rev 08/24/10 ENERGY KING™ Wood/Coal Boiler Owner’s Manual U. S. 39 This page is intentionally left blank. Rev 08/24/10 ENERGY KING™ Wood/Coal Boiler Owner’s Manual U. S. 40 Appendix C: Parts List Electrical Components Part Number Part Description 4-ELE-24VTHERMOST 24-Volt Wall Thermostat 4-ELE-CTRLBXFD-B Control Box Assy (also includes Ctrl Box, Mtg Hardware, & Terminal Bars) • 4-ELE-24VRELAY 24 Volt Relay • 4-ELE-24VTRANSFOR 24 Volt Transformer 4-DRA-FDTUBEASSY Forced Draft Blower Assembly • 4-MOT-60CFMBLOWER 60CFM Forced Draft Blower • 4-MOT-60CFMROTARY Rotary switch for 60CFM Forced Draft Blower • 4-DRA-FORCEDTUBE Forced Draft Mounting Tube 4-ELE-AQUASTAT Aquastat-Immersion Control • 4-PLB-PROBEWELL Probe Well for Aquastat-Immersion Control • 4-PLB-HEATCONDU Heat-Conductive Grease Draft System Components Part Number 4-DRA-FD-BOX-BOIL Part Description Forced Draft Parts Box • 4-DRA-FDTUBEASSY Forced Draft Blower / Tube Assembly • 4-ELE-CTRLBX-FD-B Control Box Assembly • 4-ELE-24VTHERMOST 24 Volt Wall Thermostat • 4-ELE-AQUASTAT Aquastat-Immersion Control • 4-PLB-PROBEWELL Probe Well for Aquastat-Immersion Control • 4-PLB-HEATCONDU Heat-Conductive Grease • 4-ELE-PRESSTEMPGA Pressure Temperature Gauge • 4-ELE-PRESSRELIEF Pressure Relief Valve Plumbing Components Part Number Part Description 4-CAS-PLUG-TEMPRLF Plug for Temperature Relief receptacle 4-ELE-AQUASTAT Aquastat-Immersion Control • 4-PLB-PROBEWELL Probe Well for Aquastat-Immersion Control • 4-PLB-HEATCONDU Heat-Conductive Grease (tube) 4-ELE-PRESSRELIEF Pressure Relief Valve 4-ELE-PRESSTEMPGA Pressure Temperature Gauge 4-HOT-COIL 4” Hot Water Coil, Copper (optional) (models 35EK-D/45EK-D only) • 4-CAS-PLUG-COIL Rev 08/24/10 4″ Square-Head Plug for Domestic Hot Water Coil receptacle (models 35EK-D/45EK-D only) ENERGY KING™ Wood/Coal Boiler Owner’s Manual U. S. 41 Appendix C: Parts List Cast Components Part Number Part Description 4-CAS-CASTPLATE Cast Iron Hearth Plate, 2 required 4-CAS-DRAFTDIAL Cast Iron Draft Dial, located on Ash Removal Door 4-CAS-PLUG-COIL 4″ Square-Head Plug for Domestic Hot Water Coil receptacle (models 35EK-D/45EK-D only) 4-CAS-PLUG-TEMPRLF Plug for Temperature Relief receptacle 4-CAS-SHGR35SET Optional Shaker Grates Assembly (35EK-D & A40EK-D) • 4-CAS-LINKAGEBAR Linkage Bar for Optional Shaker Grates • 4-CAS-LINKAGEYOKE Linkage Yoke for Optional Shaker Grates • 4-CAS-SHGRBARFURN Shaker Grate Bars for Optional Shaker Grates (5 required) • 4-CAS-SHFRAME480 Shaker Grate Frame for Optional Shaker Grates (2 required) • 4-CAS-SHGRHNDL Shaker Grate Handle for Optional Shaker Grates • 4-HAN-1/2CHROME 1/2″ Chrome Spring Handle with Hardware 4-CAS-SHGR45SET Optional Shaker Grates Assembly (45EK-D) • 4-CAS-LINKAGEBAR Linkage Bar for Optional Shaker Grates • 4-CAS-LINKAGEYOKE Linkage Yoke for Optional Shaker Grates • 4-CAS-SHGRBARFURN Shaker Grate Bars for Optional Shaker Grates (6 required) • 4-CAS-SHFRAME480 Shaker Grate Frame for Optional Shaker Grates (2 required) • 4-CAS-SPACERGR45 Spacer Grate for 45EK-D • 4-CAS-SHGRHNDL Shaker Grate Handle for Optional Shaker Grates • 4-HAN-1/2CHROME 1/2″ Chrome Spring Handle with Hardware 4-CAS-WDGR35SET • 4-CAS-WDGR480 4-CAS-WDGR45SET Stationary (Wood) Grates Assembly (35EK-D & A40EK-D) Cast Iron Stationary (Wood) Grate (2 required) Stationary (Wood) Grates Assembly (35EK-D & A40EK-D) • 4-CAS-WDGR480 Cast Iron Stationary (Wood) Grate (2 required) • 4-CAS-SPACERGR45 Spacer Grate for 45EK-D 4-DOR-ASHDOORASSY Cast Iron Ash Removal Door Assembly • 4-DOR-ASHDOOR Cast Iron Ash Removal Door • 4-CAS-DRAFTDIAL Cast Iron Draft Spin Dial with Hardware • 4-GAS-DOOR 3/4″ Rope Gasket • 4-GAS-GSKTGLUE2OZ Gasket Cement (glue), 2 oz. Bottle (optional, not included) • 4-HAN-ASHDOOR-F/B Ash Door Handle • 4-HAN-1/2CHROME 1/2″ Chrome Spring Handle • 4-HAR-DOORPIN Door Pins (2 per door) • 4-HAR-HANDLE-F/B Door Handle Hardware 4-DOR-FEEDDOORASSY Cast Iron Fuel Loading Door Assembly • 4-DOR-FEEDDOOR Cast Iron Fuel Loading Door • 4-GAS-DOOR 3/4″ Rope Gasket • 4-GAS-GSKTGLUE2OZ Gasket Cement (glue), 2 oz. Bottle (optional, not included) • 4-HAN-ASHDOOR-F/B Fuel Loading Door Handle • 4-HAN-5/8CHROME 5/8″ Chrome Spring Handle • 4-HAR-DOORPIN Door Pins (2 per door) • 4-HAR-HANDLE-F/B Door Handle Hardware Rev 08/24/10 ENERGY KING™ Wood/Coal Boiler Owner’s Manual U. S. 42 Appendix C: Parts List Boiler Components Part Number 4-CAB-35-COMP Part Description 35EK-D Cabinet (Shroud) Assembly • 4-CAB-35-LT 35EK-D Cabinet Panel (Shroud), Left Side • 4-CAB-35-RT 35EK-D Cabinet Panel (Shroud), Right Side • 4-CAB-35-TOP 4-CAB-45-COMP 35EK-D Cabinet Panel (Shroud), Top Side 45EK-D Cabinet (Shroud) Assembly • 4-CAB-45-LT 45EK-D Cabinet Panel (Shroud), Left Side • 4-CAB-45-RT 45EK-D Cabinet Panel (Shroud), Right Side • 4-CAB-45-TOP 45EK-D Cabinet Panel (Shroud), Top Side 4-CAB-A40-COMP A40EK-D Cabinet (Shroud) Assembly • 4-CAB-A40-LT A40EK-D Cabinet Panel (Shroud), Left Side • 4-CAB-A40-RT A40EK-D Cabinet Panel (Shroud), Right Side • 4-CAB-A40-TOP A40EK-D Cabinet Panel (Shroud), Top Side 4-FIR-1-/4 Firebrick, 9″ x 4-1/2″ x 1-1/4″ 4-GAS-DOOR 3/4″ Rope Gasket (for Fuel Loading and Ash Removal Doors) 4-GAS-GSKTGLUE2OZ Gasket Cement (glue) for 3/4″ Rope Gasket (Optional) 4-HAN-1/2CHROME 1/2″ Chrome Spring Handle (for Ash Removal Door, Sliding Smoke Baffle, and Optional Shaker Grates Handles) 4-HAN-5/8CHROME 5/8″ Chrome Spring Handle (for Fuel Loading Door Handle) 4-HAR-DOORPIN Door Pins, 4 Required (2 per door) • 35EK-D requires 12 (6 per side) • 45EK-D requires 14 (7 per side) • A40EK-D requires 12 (6 per side) 4-HAR-HANDLE-F/B Door Handle Hardware (for Fuel Loading and Ash Removal Doors) 4-INS-35EK-D Insulation Blanket for 35EK-D 4-INS-45EK-D Insulation Blanket for 45EK-D 4-INS-A40EK-D Insulation Blanket for A40EK-D 4-MISC-35SMOKBFL 35EK-D Sliding Smoke Baffle Assembly • 4-MISC-35SLDGBFL Sliding Smoke Baffle for 35EK-D • 4-MISC-35SLDRROD Smoke Baffle Slider Control Rod for 35EK-D • 4-HAN-1/2CHROME 1/2″ Chrome Spring Handle & Hardware 4-MISC-45SMOKBFL 45EK-D Sliding Smoke Baffle Assembly • 4-MISC-45SLDGBFL Sliding Smoke Baffle for 45EK-D • 4-MISC-45SLDRROD Smoke Baffle Slider Control Rod for 45EK-D • 4-HAN-1/2CHROME 1/2″ Chrome Spring Handle & Hardware 4-MISC-A40SMOKBFL A40EK-D Sliding Smoke Baffle Assembly • 4-MISC-A40SLDGBFL Sliding Smoke Baffle for A40EK-D • 4-MISC-A40SLDRROD Smoke Baffle Slider Control Rod for A40EK-D • 4-HAN-1/2CHROME 1/2″ Chrome Spring Handle & Hardware 4-MISC-ASHPAN35 Ash Removal Pan for 35EK-D 4-MISC-ASHPAN45 Ash Removal Pan for 45EK-D 4-MISC-ASHPANA40 Ash Removal Pan for A40EK-D 4-PAI-SATINBL-AER Satin Black Paint Rev 08/24/10 ENERGY KING™ Wood/Coal Boiler Owner’s Manual U. S. 43 This page is intentionally left blank. Rev 08/24/10 ENERGY KING™ Wood/Coal Boiler Owner’s Manual U. S. 44 Appendix D: Purchase & Service Record ANNUAL INSPECTION BY QUALIFIED PROFESSIONAL IS RECOMMENDED. Purchase & Installation Record MODEL* SERIAL NUMBER* PURCHASE DATE DEALER INSTALLER ADDRESS ADDRESS CITY / STATE / ZIP CITY / STATE / ZIP CONTACT CONTACT PHONE NUMBER PHONE NUMBER INSTALLATION DATE COMMENTS *Model and serial number are located on the label on the left side of the unit. Service & Maintenance Record DATE TECHNICIAN DESCRIPTION OF WORK DONE Have you completed & returned your warranty card? Date Mailed: Has Dealer / Installer gone over the operation and maintenance of appliance? Rev 08/24/10 ENERGY KING™ Wood/Coal Boiler Owner’s Manual U. S. 45 Appendix E: Warranty Claim Procedures We make every effort to ensure that all ENERGY KING heating appliances and components adhere to our strict standards for quality and safety. However, should you receive a product or component that doesn't function as intended, please follow the instructions below for making a warranty claim. We will replace or repair the part, as outlined in the applicable warranty, as soon as possible to keep your ENERGY KING heating appliance functioning safely and efficiently as intended. Parts Units To make a warranty claim on faulty parts provided with an ENERGY KING heating appliance, please contact your ENERGY KING dealer. To make a warranty claim on a faulty ENERGY KING heating appliance, please contact your ENERGY KING dealer. If your ENERGY KING dealer is unavailable: 1. Please complete a Warranty Claim Form and return it to us. All warranty claim requests must be made in writing; verbal warranty claim requests will not be processed. The following information is required when submitting a warranty claim: ● Model number ● Serial Number ● Purchase Date ● Purchaser Name, Address, and Telephone 2. Additionally, if you have not mailed in your Warranty Registration Card, we will require a completed Warranty Registration Card to be returned to us along with dated proof of purchase (i.e. a copy of your receipt or invoice). If your ENERGY KING dealer is unavailable, please contact us at (715) 720-1794 for instructions. When contacting RJM Manufacturing, Inc for a warranty claim on a faulty ENERGY KING heating appliance, please have the following information ready: ● Model number ● Serial Number ● Purchase Date ● Purchaser Name, Address, and Telephone Additionally, if you have not mailed in your Warranty Registration Card, we will require a completed Warranty Registration Card to be returned to us along with dated proof of purchase (i.e. a copy of the receipt or invoice). We may also request a copy of the Service & Maintenance Log located in the Appendix of your Owner’s Manual. We may also request a copy of the Service & Maintenance Log located in the Appendix of your Owner’s Manual. Without this information, we will not be able to complete your requested warranty claim. Without this information, we will not be able to complete your requested warranty claim. All transportation charges are to be paid for by the purchaser. Once we receive your completed Warranty Claim Form and Warranty Registration Card, we will ship a replacement for the faulty part(s). All transportation charges are to be paid for by the purchaser. However, if a faulty part is to be returned to us, we will provide return-shipping via a call-tag. RJM Manufacturing, Inc. reserves the right to refuse any warranty claim, subject to the terms, conditions and restrictions of the warranty agreement found in the corresponding ENERGY KING™ or Bio-King™ installation & operation manual. Rev 08/24/10 ENERGY KING™ Wood/Coal Boiler Owner’s Manual U. S. 46 Appendix E: Warranty Claim Procedures ENERGY KING™ Warranty Claim Form For all ENERGY KING heating appliance warranty claims, please complete this form IN FULL and return it to RJM Manufacturing, Inc., via fax at (715) 720-1797 or via postal mail at: RJM Manufacturing, Inc., 1875 Olson Drive, Chippewa Falls, WI 54729 DEALER: PURCHASER: ATTENTION: ATTENTION: ADDRESS 1: ADDRESS 1: ADDRESS 2: ADDRESS 2: CITY, ST, ZIP CITY, ST, ZIP: TELEPHONE: TELEPHONE: FAX: EMAIL: Model: Serial No: Date of Purchase: Date of Failure: Date of Repair: Description of Failure / Repairs Made (please be specific): Signature: Date: PARTS REPLACED QTY PART NO. (if applicable) DESCRIPTION Return Faulty? Miscellaneous: Copies of invoices / receipts are required for all credits claimed on this form. RJM Manufacturing, Inc. reserves the right to refuse any warranty claim, subject to the terms, conditions and restrictions of the warranty agreement found in the corresponding ENERGY KING installation & operation manual. Rev 08/24/10 ENERGY KING™ Wood/Coal Boiler Owner’s Manual U. S. 47 This page is intentionally left blank. Rev 08/24/10 ENERGY KING™ Wood/Coal Boiler Owner’s Manual U. S. 48 ENERGY KING WOOD/COAL BOILER LIMITED WARRANTY Who is covered? You are covered under this warranty if you are the original purchaser of a new ENERGY KING solid-fuel heating appliance and your purchase was made through an authorized distributor/dealer of the ENERGY KING solid-fuel heating appliance. How long does the coverage last? The term of this warranty begins on the date of original purchase as evidenced by your purchase receipt, subject to the terms, conditions and restrictions of this agreement. Coverage is extended to you for the following time periods: • Burn chamber. The burn chamber is warranted for six (6) years on a prorated basis. The replacement value will decrease each year until the maximum life of the warranty exhausts any replacement value. Replacement value is reduced according to the following schedule and will be calculated on the cost of the burn chamber at the time the part is repaired or replaced. We will provide you with a credit to be applied towards the cost of the repair or replacement part. Year 1 Full Warranty Year 2 80% Credit Year 3 60% Credit Year 4 40% Credit Year 5 25% Credit Year 6 15% Credit • Sliding Smoke Baffle Assembly. The sliding smoke baffle assembly is warranted for one (1) year and includes the sliding smoke baffle and the damper control rod. • Castings. The castings are warranted for one (1) year and include the fuel loading door, ash removal door, and grates. • Electrical & Factory-Provided Plumbing Components. The electrical and factory-provided plumbing components are warranted for one (1) year and include, but are not limited to, the draft damper control motor or combustion blower, all components of the control box, the Aquastat-Immersion control, pressure relief valve, and pressure temperature gauge. What is covered by this warranty? This warranty covers any defects in materials or workmanship in your new ENERGY KING solid-fuel heating appliance. What is not covered by this warranty? This limited warranty does not apply: • If your appliance has not been installed, operated and maintained in strict accordance with instructions provided in the Installation, Operation and Maintenance Manual. • If any part has been damaged in shipment, modified, altered, tampered with, abused, or has been subject to accident or misuse. • If your appliance has been altered or repaired in a manner which, in our sole judgment, affects its performance, stability or reliability. • If parts not made or supplied by us have been used in connection with the appliance, if in our sole judgment, such use affects its performance, stability or reliability. • To transportation charges on appliances and appliance parts submitted for repair or replacement under this warranty. • To expendable, replaceable or wear items, such as firebrick, gaskets/seals, paint, handles and other items that in our judgment are expendable, replaceable or wear items. • To any heating system or systems to which the appliance may be attached. • To any of the smoke pipes, heat pipes, chimney, hardware, ducting, vents, or other accessories used for the installation and venting or ducting of the appliance. We are not responsible for installation and will not be liable in any respect under the terms of the warranty for injury or damage to the building structure in which the appliance has been installed, or to the person or persons and property therein, arising out of the use, or installation of the ENERGY KING appliance. The appliance must be installed in compliance with the local, state and national building and fire codes and regulations, and in strict adherence to the Manufacturer’s recommendations. Rev 08/24/10 ENERGY KING™ Wood/Coal Boiler Owner’s Manual U. S. 49 What will we do to correct problems? We will repair, or at our option, replace any ENERGY KING solid-fuel heating appliance or appliance part, which upon inspection shows a defect in materials or workmanship. How can you get service? If warranty service is needed during the warranty period, notify your authorized ENERGY KING dealer. If there is no ENERGY KING dealer in your area, contact RJM Manufacturing, Inc. directly. Provide your name, address, phone number, serial number and model number of the appliance, date of purchase, name and address of installer and a description of the problem. Disclaimer of Implied Warranties & Consequential Damages Our obligation under this limited warranty, to the extent allowed by law, is in lieu of all warranties, implied or expressed, including implied warranties of merchantability and fitness for a particular purpose and any liability for incidental and consequential damages with respect to the sale or use of the items warranted. Such incidental and consequential damages shall include but not be limited to: transportation / freight charges, cost of installation, duty, taxes, charges for service or adjustment, loss of income, rental or substitute equipment, and expenses due to loss, damage, detention or delay in the delivery of equipment or parts resulting from acts beyond our control. Some states do not allow the exclusion or limitation of incidental or consequential damages, or limitation of implied warranties, so the limitations or exclusions in this limited warranty may not apply to you. NO EMPLOYEE OR REPRESENTATIVE OF RJM MANUFACTURING, INC. IS AUTHORIZED TO CHANGE THIS LIMITED WARRANTY IN ANY WAY OR GRANT ANY OTHER WARRANTY UNLESS SUCH CHANGE IS MADE IN WRITING BY AN OFFICER OF RJM MANUFACTURING, INC. AT ITS HOME OFFICE. YOUR RESPONSIBILITY UNDER THE WARRANTY It is your responsibility to ensure that the appliance is installed in compliance with local, state and federal building and fire codes regulating installation and inspection. It is your responsibility to complete the warranty card and return it to the address indicated within 30 days of the purchase. You must also keep your receipt as proof of date of purchase. Failure to do so will mean that you may not later make a claim under this warranty. It is your responsibility to read the Installation, Operation & Maintenance Manual and to install, operate and maintain the appliance in accordance with all instructions and safety procedures. Failure to do so is a misuse of the appliance. It is your responsibility to inspect the appliance and to have any part(s) repaired or replaced when continued operation would cause damage or excessive wear to other parts or cause a safety hazard. It is your responsibility for any cost incurred by the distributor/dealer for travel to or transportation of the product for the purpose of performing a warranty obligation or inspection. RJM Manufacturing, Inc. 1875 Olson Drive Chippewa Falls, WI 54729 (715) 720-1794 ♦ Fax (715) 720-1797 Email: [email protected] www.energyking.com Rev 08/24/10 ENERGY KING™ Wood/Coal Boiler Owner’s Manual U. S. 50 Supplement A: Aquastat-Immersion Control The following document was prepared and published by Honeywell International for distribution with their models “L4081A,B and L6081A,C Multiple Aquastat Controllers.” It is reproduced here for reference purposes ONLY. Rev 08/24/10 ENERGY KING™ Wood/Coal Boiler Owner’s Manual U. S. 51 Supplement B: 24-V Wall Thermostat The following document was prepared and published by Honeywell International for distribution with their models “T822K,L & T827K” wall thermostats. It is reproduced here for reference purposes ONLY.