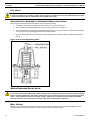
1
Cruisair Tempered Water System
Installation, Operation & Maintenance Manual
Dometic Group Marine Division
Rev. 20140627
L-2810 English
PN: 0880269
www.cruisair.com
COPYRIGHT © 2007-2014 Dometic Group Marine Division. All Rights Reserved.
No part of this publication may be reproduced, translated, stored in a retrieval system, or transmitted in any form or by any means
electronic, mechanical, photocopying, recording or otherwise without prior written consent by Dometic Group Marine Division. Every
precaution has been taken in the preparation of this manual to ensure its accuracy. However, Dometic Group Marine Division
assumes no responsibility for errors and omission. Neither is any liability assumed for damages resulting from the use of this product
and information contained herein.
Table of Contents
INTRODUCTION . . . . . . . . . . . . . . . . . . . . . . . . . . . . . . . . . . . . . 1
SAFETY . . . . . . . . . . . . . . . . . . . . . . . . . . . . . . . . . . . . . . . . . . . . 1
RECOGNIZE SAFETY SYMBOLS, WORDS AND LABELS . . . . . . . 1
OPERATIONAL SAFETY . . . . . . . . . . . . . . . . . . . . . . . . . . . . . . 1
HOW IT WORKS . . . . . . . . . . . . . . . . . . . . . . . . . . . . . . . . . . . . . 1
APPLICATION & INSTALLATION STANDARDS . . . . . . . . . . . 2
INSTALLATION . . . . . . . . . . . . . . . . . . . . . . . . . . . . . . . . . . . . . . 2
CUSTOM INFORMATION . . . . . . . . . . . . . . . . . . . . . . . . . . . . . . 2
MOUNTING . . . . . . . . . . . . . . . . . . . . . . . . . . . . . . . . . . . . . . . 2
Location of Components . . . . . . . . . . . . . . . . . . . . . . . 2
Lifting . . . . . . . . . . . . . . . . . . . . . . . . . . . . . . . . . . . . . . 3
Mounting Individual Modules . . . . . . . . . . . . . . . . . . . . 3
Mounting Frames . . . . . . . . . . . . . . . . . . . . . . . . . . . . . 3
PLUMBING . . . . . . . . . . . . . . . . . . . . . . . . . . . . . . . . . . . . . . . . . 3
GENERAL CONSIDERATIONS . . . . . . . . . . . . . . . . . . . . . . . . . . 3
Piping Support . . . . . . . . . . . . . . . . . . . . . . . . . . . . . . . 3
Tight Connections . . . . . . . . . . . . . . . . . . . . . . . . . . . . 3
Service Valves & Unions . . . . . . . . . . . . . . . . . . . . . . . 3
Water Hammer . . . . . . . . . . . . . . . . . . . . . . . . . . . . . . . 3
Reverse Return . . . . . . . . . . . . . . . . . . . . . . . . . . . . . . 4
Spare Pumps . . . . . . . . . . . . . . . . . . . . . . . . . . . . . . . . 4
CHILLER CONDENSATE . . . . . . . . . . . . . . . . . . . . . . . . . . . . . . 4
CIRCULATING WATER SYSTEM . . . . . . . . . . . . . . . . . . . . . . . . 4
Water In/Out . . . . . . . . . . . . . . . . . . . . . . . . . . . . . . . . . 4
Return Over Supply . . . . . . . . . . . . . . . . . . . . . . . . . . . 4
Avoiding Air & Water Traps . . . . . . . . . . . . . . . . . . . . . 4
Air Bleeders . . . . . . . . . . . . . . . . . . . . . . . . . . . . . . . . . 4
Strainer Requirements . . . . . . . . . . . . . . . . . . . . . . . . . 5
Material . . . . . . . . . . . . . . . . . . . . . . . . . . . . . . . . . . . . 5
Cleanliness . . . . . . . . . . . . . . . . . . . . . . . . . . . . . . . . . 5
Size . . . . . . . . . . . . . . . . . . . . . . . . . . . . . . . . . . . . . . . 5
Insulation . . . . . . . . . . . . . . . . . . . . . . . . . . . . . . . . . . . 6
Drain . . . . . . . . . . . . . . . . . . . . . . . . . . . . . . . . . . . . . . 7
Circulation Pump . . . . . . . . . . . . . . . . . . . . . . . . . . . . . 7
Two-Pump Systems . . . . . . . . . . . . . . . . . . . . . . . . . . . 7
Flow Controls . . . . . . . . . . . . . . . . . . . . . . . . . . . . . . . . 7
Expansion Tank . . . . . . . . . . . . . . . . . . . . . . . . . . . . . . 7
Pressure Gauges & Pressure Ports . . . . . . . . . . . . . . . 8
Sample Piping Diagram . . . . . . . . . . . . . . . . . . . . . . . . 8
Fill Valve . . . . . . . . . . . . . . . . . . . . . . . . . . . . . . . . . . 10
Adjusting Fill Assembly’s Pressure-Regulating Valve 10
Water Pressure Relief Valve . . . . . . . . . . . . . . . . . . . 10
Ball Valves . . . . . . . . . . . . . . . . . . . . . . . . . . . . . . . . . 10
SEAWATER/CONDENSER WATER SYSTEM . . . . . . . . . . . . . . . 11
General definition - Seawater Piping . . . . . . . . . . . . . 11
Water In/Out . . . . . . . . . . . . . . . . . . . . . . . . . . . . . . . . 11
Avoiding Air Traps - Self-draining Systems . . . . . . . . 11
Strainer . . . . . . . . . . . . . . . . . . . . . . . . . . . . . . . . . . . 11
Material . . . . . . . . . . . . . . . . . . . . . . . . . . . . . . . . . . . 11
Size . . . . . . . . . . . . . . . . . . . . . . . . . . . . . . . . . . . . . . 12
Through-hull fitting . . . . . . . . . . . . . . . . . . . . . . . . . . . 12
Sacrificial Anode . . . . . . . . . . . . . . . . . . . . . . . . . . . . 12
Anti-Fouling Device . . . . . . . . . . . . . . . . . . . . . . . . . . 12
Pump . . . . . . . . . . . . . . . . . . . . . . . . . . . . . . . . . . . . . 13
REFRIGERANT CIRCUIT . . . . . . . . . . . . . . . . . . . . . . . . . . . . . 13
HOT GAS BYPASS VALVE . . . . . . . . . . . . . . . . . . . . . . . . . . . 13
REFRIGERANT PRESSURE RELIEF VALVE . . . . . . . . . . . . . . . 13
WIRING . . . . . . . . . . . . . . . . . . . . . . . . . . . . . . . . . . . . . . . . . . . 13
PUMP WIRING . . . . . . . . . . . . . . . . . . . . . . . . . . . . . . . . . . . 13
PLUGS . . . . . . . . . . . . . . . . . . . . . . . . . . . . . . . . . . . . . . . . . 14
AIRHANDLERS . . . . . . . . . . . . . . . . . . . . . . . . . . . . . . . . . . . 14
TIGHTENING CONNECTIONS . . . . . . . . . . . . . . . . . . . . . . . . . 14
VOLTAGE RANGE . . . . . . . . . . . . . . . . . . . . . . . . . . . . . . . . . 14
MAX FUSE - CIRCUIT BREAKERS . . . . . . . . . . . . . . . . . . . . . . 14
MCA - MINIMUM CIRCUIT AMPACITY . . . . . . . . . . . . . . . . . . . 14
ELECTRICAL GROUNDING AND BONDING . . . . . . . . . . . . . . . . 14
SINGLE-PHASE NOTICE . . . . . . . . . . . . . . . . . . . . . . . . . . . . 15
3-PHASE NOTICE . . . . . . . . . . . . . . . . . . . . . . . . . . . . . . . . . 15
VFD - VARIABLE FREQUENCY DRIVE . . . . . . . . . . . . . . . . . . 15
CONTROLS . . . . . . . . . . . . . . . . . . . . . . . . . . . . . . . . . . . . . . 15
START-UP . . . . . . . . . . . . . . . . . . . . . . . . . . . . . . . . . . . . . . . . . 15
LEAK TEST . . . . . . . . . . . . . . . . . . . . . . . . . . . . . . . . . . . . . . 15
Copper pipe . . . . . . . . . . . . . . . . . . . . . . . . . . . . . . . . 15
Plastic pipe . . . . . . . . . . . . . . . . . . . . . . . . . . . . . . . . . 15
FLUSH . . . . . . . . . . . . . . . . . . . . . . . . . . . . . . . . . . . . . . . . . 16
REMOVING FINE DIRT . . . . . . . . . . . . . . . . . . . . . . . . . . . . . . 16
FILLING AND BLEEDING . . . . . . . . . . . . . . . . . . . . . . . . . . . . 16
ANTI-FREEZE . . . . . . . . . . . . . . . . . . . . . . . . . . . . . . . . . . . . 17
WATER FLOW RATES - INITIAL . . . . . . . . . . . . . . . . . . . . . . . 17
FINAL INSPECTION . . . . . . . . . . . . . . . . . . . . . . . . . . . . . . . . 18
OPERATION . . . . . . . . . . . . . . . . . . . . . . . . . . . . . . . . . . . . . . . 19
NORMAL OPERATION . . . . . . . . . . . . . . . . . . . . . . . . . . . . . . 19
LOAD AND POWER MANAGEMENT . . . . . . . . . . . . . . . . . . . . . 19
DEPTH OF SEAWATER . . . . . . . . . . . . . . . . . . . . . . . . . . . . . 19
SEAWATER TEMPERATURE . . . . . . . . . . . . . . . . . . . . . . . . . . 19
CONTROLS . . . . . . . . . . . . . . . . . . . . . . . . . . . . . . . . . . . . . . 20
MAINTENANCE . . . . . . . . . . . . . . . . . . . . . . . . . . . . . . . . . . . . . 20
MAINTENANCE LOG BOOK . . . . . . . . . . . . . . . . . . . . . . . . . . 20
DAILY . . . . . . . . . . . . . . . . . . . . . . . . . . . . . . . . . . . . . . . . . 20
Seawater Strainer . . . . . . . . . . . . . . . . . . . . . . . . . . . 20
MONTHLY . . . . . . . . . . . . . . . . . . . . . . . . . . . . . . . . . . . . . . 20
Air Filters . . . . . . . . . . . . . . . . . . . . . . . . . . . . . . . . . . 20
Run The System . . . . . . . . . . . . . . . . . . . . . . . . . . . . 20
EVERY THREE MONTHS . . . . . . . . . . . . . . . . . . . . . . . . . . . . 20
System Water Pressure . . . . . . . . . . . . . . . . . . . . . . . 20
Condensate Drains . . . . . . . . . . . . . . . . . . . . . . . . . . 20
Electrical Connections . . . . . . . . . . . . . . . . . . . . . . . . 20
Shell-and-Tube Condensers . . . . . . . . . . . . . . . . . . . 21
Seawater Connections . . . . . . . . . . . . . . . . . . . . . . . . 21
Anode . . . . . . . . . . . . . . . . . . . . . . . . . . . . . . . . . . . . . 21
YEARLY . . . . . . . . . . . . . . . . . . . . . . . . . . . . . . . . . . . . . . . . 21
Refrigerant . . . . . . . . . . . . . . . . . . . . . . . . . . . . . . . . . 21
Winterizing . . . . . . . . . . . . . . . . . . . . . . . . . . . . . . . . . 21
Pumps . . . . . . . . . . . . . . . . . . . . . . . . . . . . . . . . . . . . 22
Water Flow Rates - Maintained . . . . . . . . . . . . . . . . . 22
Airhandler Valves . . . . . . . . . . . . . . . . . . . . . . . . . . . . 22
Sensors . . . . . . . . . . . . . . . . . . . . . . . . . . . . . . . . . . . 22
AS NEEDED . . . . . . . . . . . . . . . . . . . . . . . . . . . . . . . . . . . . . 22
Circulating Water Strainer . . . . . . . . . . . . . . . . . . . . . 22
Clean Seawater Circuit . . . . . . . . . . . . . . . . . . . . . . . 22
CLEANING CONDENSER COILS . . . . . . . . . . . . . . . . . . . . . . . 22
Coaxial Condensers . . . . . . . . . . . . . . . . . . . . . . . . . . 23
Shell-And-Tube . . . . . . . . . . . . . . . . . . . . . . . . . . . . . 23
SHELL-AND-TUBE SPECIAL CONSIDERATIONS . . . . . . . . . 24
GASKETS: IMPORTANT! . . . . . . . . . . . . . . . . . . . . . . . . . . . 24
FIXING A LEAK - RESPOND QUICKLY! . . . . . . . . . . . . . . . 24
ANODE REPLACEMENT . . . . . . . . . . . . . . . . . . . . . . . . . . . . . 24
EXTERNAL ANODES . . . . . . . . . . . . . . . . . . . . . . . . . . . . . . . 25
CLEANING . . . . . . . . . . . . . . . . . . . . . . . . . . . . . . . . . . . . . . 25
NO STAGNANT WATER . . . . . . . . . . . . . . . . . . . . . . . . . . . . . 25
BOLT TORQUE . . . . . . . . . . . . . . . . . . . . . . . . . . . . . . . . . . . 25
EXTERNAL RUST . . . . . . . . . . . . . . . . . . . . . . . . . . . . . . . . . 25
TROUBLESHOOTING . . . . . . . . . . . . . . . . . . . . . . . . . . . . . . . . 25
FLOWSWITCHES . . . . . . . . . . . . . . . . . . . . . . . . . . . . . . . . . . 26
Circulating Pump . . . . . . . . . . . . . . . . . . . . . . . . . . . . 26
Air In Loop . . . . . . . . . . . . . . . . . . . . . . . . . . . . . . . . . 26
Plumbing . . . . . . . . . . . . . . . . . . . . . . . . . . . . . . . . . . 26
Water Strainer . . . . . . . . . . . . . . . . . . . . . . . . . . . . . . 26
Flow Switch Operation . . . . . . . . . . . . . . . . . . . . . . . . 26
HIGH- AND LOW-PRESSURE SWITCHES . . . . . . . . . . . . . . . . . 26
FREEZE FAULTS/LOW-TEMPERATURE FAULTS . . . . . . . . . . . . 26
OWNERS LIMITED WARRANTY . . . . . . . . . . . . . . . . . . . . . . . 27
SECTION I - WHAT’S COVERED . . . . . . . . . . . . . . . . . . . . . . . 27
SECTION II - WHAT’S NOT COVERED . . . . . . . . . . . . . . . . . . 28
SECTION III - COVERAGE PERIOD . . . . . . . . . . . . . . . . . . . . . 28
SECTION IV - GETTING SERVICE . . . . . . . . . . . . . . . . . . . . . . 29
TABLE OF WARRANTY PERIODS . . . . . . . . . . . . . . . . . . . . . . 30
GLOSSARY . . . . . . . . . . . . . . . . . . . . . . . . . . . . . . . . . . . . . . . . 31
Cruisair Tempered Water System Installation, Operation & Maintenance Manual
INTRODUCTION
INTRODUCTION
Congratulations on the purchase of your Cruisair tempered water system! This manual will provide necessary information for
the proper installation, operation, and maintenance of your system. Cruisair units are well-engineered, well-built, and thoroughly
tested at the factory. They will provide many years of trouble-free comfort if properly installed, operated, and maintained. And if
you need help, you have the comfort of knowing you have the marine HVAC industry's largest world-wide network of factory
trained dealers to promptly and professionally service your equipment. Moreover, you are backed by Cruisair's well-earned
reputation for above-and-beyond, world-class customer care.
SAFETY
RECOGNIZE SAFETY SYMBOLS, WORDS
AND
LABELS
The following symbols and labels are used throughout this manual to indicate immediate or potential safety hazards. it is the
owner’s and installer’s responsibility to read and comply with all safety information and instructions accompanying these
symbols. Failure to heed safety information increases the risk of personal injury, property damage, and/or product damage.
WARNING
The word “WARNING” indicates hazards or unsafe practices which COULD result in severe personal injury or death.
CAUTION
The word “CAUTION” indicates hazards or unsafe practices which COULD result in minor or moderate personal injury,
product damage, or property damage.
OPERATIONAL SAFETY
Installation and servicing of this system can be hazardous due to system pressure, moving parts, heat, and electrical
components. Only trained and certified service personnel should install, repair, or service equipment. When working on this
equipment, always observe precautions described in the literature, tags, and labels attached to the unit. Follow all safety codes.
Wear safety glasses and work gloves and place a fire extinguisher close to the work area. Do not work alone.
WARNING
Never install your air conditioner in the bilge or engine room areas. Ensure that the selected location is sealed from
direct access to bilge and/or engine room vapors.
Do not terminate condensate drain line within 4 feet (1.2 m) of any outlet of engine or generator exhaust systems, nor
in a compartment housing an engine or generator, nor in a bilge, unless the drain is connected properly to a sealed
condensate or shower sump pump.
Failure to comply may allow bilge or engine room vapors to mix with the air conditioner’s return air and contaminate
living areas which may result in injury or death.
WARNING
Electrical shock hazard. Disconnect voltage at main panel or power source before opening any cover.
WARNING
To minimize the hazard of electrical shock and personal injury, chillers, airhandlers, and all electrically powered
equipment must be effectively grounded. Refer to installation guidelines for further information.
HOW IT WORKS
Your tempered water air conditioning system consists of the chiller, airhandlers installed throughout the vessel, freshwater
piping connecting the chiller to the airhandlers, and the seawater system. The chiller consists of three major components: the
compressor, the condenser, and the evaporator (or heat exchanger). The chiller is charged with a refrigerant that circulates
throughout these components. The airhandlers consist of two major components: the blower and coil. Fresh water circulates
through the piping from the chiller to each airhandler and back.
In cooling mode, warm cabin air is drawn (or blown) across the airhandler coil by the blower. Heat is removed from the air as it
passes across the coil. The cooled air is then blown back into the cabin. The heat from the cabin air is transferred to the fresh
water circulating through the coil. The warmed water is pumped back to the chiller. The water is circulated through the chiller's
L-2810 ENGLISH
1
APPLICATION & INSTALLATION STANDARDS
Cruisair Tempered Water System Installation, Operation & Maintenance Manual
evaporator where the heat is transferred to the refrigerant in the evaporator coil, thus cooling the "chilled" water. The "heated"
refrigerant gas is returned to the compressor, compressed, and then circulated through the outer tube in the chiller's condenser
coil. Seawater is circulating through the condenser via the seawater system. The heat is transferred from the refrigerant to the
seawater and pumped overboard taking the original cabin air heat with it. The circulating, "chilled" water (not seawater) is then
pumped back through the piping to the airhandlers in a continuous loop as the cycle repeats.
If the vessel is heated, it is either by reverse cycle or electric heat. Each method pumps warm water from the module to the
airhandlers. For reverse cycle heating, the module's refrigerant flows in the opposite direction through a reversing valve, thus
adding heat to the fresh water loop, instead of removing it as in the cooling mode. Electric heat systems use a heater barrel to
warm the fresh water. Some systems also use electric heating coils built into the airhandlers that warm the air directly.
APPLICATION & INSTALLATION STANDARDS
The application and installation must comply with the applicable standards of American Boat and Yacht Council (ABYC). All
ABYC recommendations must be followed, but those sections dealing with breakers, branch circuit protection, circuit ampacity,
grounding, and bonding are especially noteworthy.
ABYC standards are available from:
American Boat and Yacht Council
613 Third Street, Suite 10
Annapolis, MD 21403 USA
Phone: +1 410-990-4460
Fax: +1 410-990-4466
www.abycinc.org
INSTALLATION
A circulated water system will only perform as well as the quality of the installation. This consists mainly of plumbing and wiring,
which can be handled by most boatyards. Each aspect of the installation should be thoroughly planned to minimize timeconsuming mistakes and maximize performance.
CUSTOM INFORMATION
Because Cruisair often provides customized, one-of-a-kind solutions for our customers, some systems are sold with a custom
drawing, also called a "customer sign-off drawing", and/or a custom wiring diagram. If so, it may have other information about
the correct manner of locating, lifting, mounting, installing, operating, wiring, or maintaining the unit or system. Information on
that drawing or wiring diagram takes precedence over the instructions in this manual. Likewise, be sure to check for labels on
the unit itself. Such labels frequently identify points where one should (or should NOT) lift the unit or make the various water
connections.
MOUNTING
LOCATION
OF
COMPONENTS
When selecting the site for a piece of equipment, try to choose a location which will keep noise to a minimum, but also allow for
future servicing.
Chiller
The chiller is usually located in the engine room or other mechanical space. Select a horizontal surface of sufficient strength to
withstand both static load and dynamic forces when boat is in motion. When choosing a location, keep in mind this is an
electromechanical piece of equipment and on occasion may need maintenance, repair, or replacement. Always provide
adequate visual and physical access. The Cruisair Applications department is available to help with the design of the system, or
to answer any specific questions one may have about either the equipment or the installation.
Controls
The control panel contains all of the necessary controls to operate the tempering unit. Mount the panel to a flat horizontal or
vertical surface. The location chosen should be free from water spray and heavy moisture and should also provide adequate
visual and physical access. The location should also be close enough so the factory connected leads will reach the unit.
Temperature Sensors
If plastic piping is used, a dry probewell should be used, since the plastic pipes will not transfer heat well enough for accurate
sensing. The probewell should be in the stream of flow, and a thermal compound should be used to ensure good thermal
contact between the sensor and the well. Insulate the piping and probewell together.
2
L-2810 ENGLISH
PLUMBING
Cruisair Tempered Water System Installation, Operation & Maintenance Manual
Variable Frequency Drives (VFD)
Mount the VFDs close to the compressors on a vertical surface (+/- 10°) mounted in an accessible location. The drives need at
least 2 inches (50 mm) clearance on the top, bottom, and both sides. Remove the protective cover (the sticker) on the top of the
drive. Removing the protective cover and providing clearance allows the drives to dissipate heat. The drives are IP20. Install
them where they will not get wet. For more information, refer to the manual that comes with the VFD. The VFD manual itself
takes precedence over these general VFD guidelines.
LIFTING
Figure 1: Minimum Strap Angle
Individual units with lifting eyes should be lifted by the lifting eyes. Otherwise,
individual modules (nominal 2 - 10 ton cooling capacity) should be lifted by the
condenser assembly and the tab that is welded on the compressor, or by the
base. Always make sure wiring is clear to avoid damaging the unit, and never use
the refrigerant tubing to lift the unit.
When lifting pre-framed units, lift by the eye bolts, if provided, or sling from
underneath.
To prevent damaging the frame rails, note the minimum 60° strap angle shown in
Figure 1, and the correct strap configuration around the frame rails.
MOUNTING INDIVIDUAL MODULES
Individual modular units are contained in a condensate pan, which is then secured
to the boat. Secure the unit on all four corners using the included mounting
brackets. Do not bolt through bottom of pan.
MOUNTING FRAMES
Holes are provided in the base rails to secure the frames. If stacking one frame on top of another, the frames will overlap and
the units should be bolted together. Be sure to secure the top of the frame to prevent movement.
PLUMBING
GENERAL CONSIDERATIONS
Careful attention should be paid to this section, because one of the most common sources of problems with chilled water
systems is the plumbing.
PIPING SUPPORT
Piping should be secured firmly with the correct fittings. Support all the piping by the boat's structure and do not rely on the
equipment for support. Neither the pump nor the tempering unit is designed to support the weight of the piping and water. For
chilled water pipes, be careful that the supports do not pinch or otherwise compromise the insulation.
TIGHT CONNECTIONS
Always be sure to double-check connections (especially hose clamps) for correct placement and tightness.
SERVICE VALVES & UNIONS
Use unions and service valves to connect modules to the manifolds for ease of service in the future. Always use full-flow ball
valves. The union goes between the valve and the module. Flanges may be used as an alternative to unions.
MTC and MTD chillers have unions. These unions are leak-tested at the factory, but may still develop leaks in the field. Thus,
they need to be checked and tightened as necessary in the field. This is a normal part of start-up and maintenance.
WATER HAMMER
Ends of main and branch chilled water lines should be extended and capped with threaded caps or plugs. This will help to
balance the water pressure, act as a cushion against “water hammer”, and provide a clean-out port.
L-2810 ENGLISH
3
PLUMBING
Cruisair Tempered Water System Installation, Operation & Maintenance Manual
REVERSE RETURN
Figure 2: Reverse Return Schematic
Reverse return helps evenly distribute the water (see Figure 2). Reverse
return is always good practice for seawater (or with keel coolers). For
chilled water, reverse return is always a good idea on the chiller manifolds.
For the airhandlers, reverse return is only needed if the airhandlers do NOT
have flow controls.
SPARE PUMPS
When a back-up pump is to be installed along with the main pump, there
are some special considerations which should be followed to ensure proper
operation. The backup pump should be installed in parallel with the main
pump, with full flow valves on the inlet and outlet of both pumps to allow total isolation of either pump. A power transfer switch
must be provided to select which pump operates. This should be located near pumps to lessen the chance of running a dry
pump, which could damage the pump and/or compressor. To ensure that the spare pump will operate when needed, the main
and back-up pumps should be switched at regular intervals so they are run evenly. Be sure to open the valves BEFORE turning
on the pump - do not run the pump with its valves closed.
Another option would be to completely "winterize" the back-up pump (i.e. keep it dry). This should help keep the pump seals in
good condition and prevent the pump impeller from freezing up. Labels identifying the switch and valves in the system would
help prevent operator error, and a note on the pumps to tell the user to keep both of the valves on the inactive pump closed
might stop a well meaning person from opening all valves which would just circulate water in the pump loop.
An easier and less expensive method might be to install the main pump with cut off valves and unions on the intake and
discharge. This would allow a failed pump to be easily replaced with a spare carried aboard. The spare pump could have union
fittings attached for a quicker installation, if desired.
CHILLER CONDENSATE
Each module has two 1/2" FPT condensate drains, one at each end. (Old style MTCs use 3/8" FPT.) Connect these outlets to
proper tubing and route to an appropriate location such as an overboard fitting or sump. Do not permit condensate to puddle in
the bilge.
CIRCULATING WATER SYSTEM
WATER IN/OUT
Note the arrows on the unit indicating direction of water flow. Reversing the flow can cause a number of problems, such as the
flowswitch not working properly. For MTCs and MTDs, the chilled water should enter the chiller at the lower copper connection,
and leave the chiller through the upper copper connection. For TWCs, the chilled water should enter the TWC through the upper
copper connection and leave through the lower copper connection. Note that most MTD and MTC seawater fittings can be
changed so the connections are on the top and bottom of the unit, instead of on the end, as from the factory.
RETURN OVER SUPPLY
Always put chilled water return lines (water returning to the chiller) above the chilled water supply lines (water coming from the
chiller). This is so that any air in the system will travel upwards with the water flow.
AVOIDING AIR & WATER TRAPS
A typical system will have the circulating pump as the lowest point in the water loop (or as low as possible), with the chiller being
the next highest piece of equipment followed by the airhandlers. Ideally, the only changes in the vertical direction will occur at
the airhandlers where the built in vents can be used to bleed any trapped air.
To avoid air and water traps, all piping should have constant inclining and declining slopes. Any time the piping reverses the
vertical direction, an air or water trap is created. Air traps can cause noise, and restrict or even stop the flow of water; and
therefore one must have a means of venting the air. Traps are a great hindrance when trying to fill, bleed, or drain a system. A
vent (or "bleeder") should be installed wherever an air trap is possible. To maximize the usefulness of the airhandlers' bleeders,
all piping should be installed so that the airhandlers are local high points. (Exception: If autobleeders are installed, the
autobleeder should be higher than the airhandlers.) A water trap will prevent complete draining of the system (for repair or
winterizing), so there must be a drain at the water trap.
AIR BLEEDERS
4
Manual Bleeders
Provision must be made to remove air from the system. Most airhandlers and most chillers include bleeder valves. In addition to
these, a main bleeder must be installed at the highest point in the system and routed to a valve and discharge in the engine
room. This allows the system to be conveniently filled and vented at the same time. Typically 1/2" or 3/4" piping works well.
There may also be "local" high points which need their own bleeders.
L-2810 ENGLISH
Cruisair Tempered Water System Installation, Operation & Maintenance Manual
PLUMBING
Engine Room Autobleeder - Spirovent®
The Spirovent® is an inline autobleeder. Install the Spirovent® in the main return line upstream of the circulating water pump but
downstream of all airhandlers, the fill assembly, expansion tank, strainer, etc. In applications where the system water flow would
exceed the maximum recommended flow rating of the Spirovent®, the Spirovent® may be installed in a sidestream (i.e., parallel
circuit). The sidestream should be located above the main return line such that air bubbles can easily flow up into the
sidestream. Isolate the Spirovent® with ball valves to allow for service. The bottom port of the Spirovent® should be plugged.
The bottom port is used to clean out accumulated debris, so do not use it as a place to connect other components. Spirovent®
and Spirotop® are registered trade names of Spirotherm, Inc.
High Point Autobleeder - Spirotop®
The Spirotop® is a single port autobleeder. Install a Spirotop® at the top of each return riser, or anywhere that air might collect. A
Spirotop® may be installed at any high point instead of a manual bleeder. It is important to ensure positive pressurization at the
Spirotop®. If the water pressure at the Spirotop® is less than atmospheric pressure, then any autobleeder will actually draw air
into the system rather than bleed air out. Isolate the Spirotop® with a ball valve to allow for service. Spirovent® and Spirotop®
are registered trade names of Spirotherm, Inc.
Plan for Water
Note that when air is bled from the system, some water is usually released. This is true of manual AND automatic bleeders. The
water may be collected in a sump or a bucket. Plan ahead and avoid a mess.
STRAINER REQUIREMENTS
•
Strainers are mandatory in the condenser/seawater circuit AND in the circulated water circuit. Failure to follow these
guidelines will void the warranty!
•
The circulated water strainer should be a 20-mesh "Y-strainer". The seawater strainer should be 10-mesh. Finer
meshes will clean the system better, but they are likely to need cleaning too often and thus become a nuisance. More
open meshes must not be used because they will not adequately protect the components.
•
The basket must be serviceable. Acceptable strainers have an arrow indicating proper direction of flow. The arrow
must be in the direction of flow. The arrow may point horizontally or down. The arrow may NOT point up. If the arrow is
horizontal, the basket should be below the pipe - never above it.
•
The strainer must be positioned upstream of the tempering units so as to protect the heat exchanger from debris.
Typically, the strainer is just upstream of the pump, and the pump is just upstream of the chiller. Putting the pump
upstream of the strainer is acceptable, but not recommended. There must not be any airhandlers between the strainer
and tempering units.
•
Install pressure gauges before and after the strainer. This will make it easy to see when the strainer needs cleaning.
(Refer to the section on pressure gauges for more information.)
•
Install ball valves before and after the strainer. This will make it easy to clean the strainer without releasing excessive
water.
MATERIAL
We recommend type "L" copper for circulated water.
CLEANLINESS
The strainer cannot catch fine dirt, so it is important that the system be assembled from clean pipe and components. Otherwise,
this dirt and debris will collect in the evaporators and cause failure. FROZEN EVAPORATORS WITH MUD OR DEBRIS IN
THEM ARE NOT COVERED UNDER WARRANTY! The best way to avoid this is cleanliness. Inspect pipe and other
components for cleanliness before installing them. If they are dirty, clean them. Pipes in storage should have the ends covered
to keep out dirt and other undesirables. A little dirt evenly spread out through a system becomes much dirt once it collects in the
bottom of an evaporator.
A mud separator can provide added protection, but it is unnecessary if the system was assembled with clean components and
filled with clean water. (Refer to the section about flushing the system for more information about mud separators.)
SIZE
The recommended pipe sizes shown in Table 1 are designed to keep pressure losses to a reasonable minimum. The next larger
pipe should be used whenever the capacity being served is near the upper limit of the range and any of the following is true:
•
The airhandlers do not have flow controls.
•
The pipe run has numerous bends.
•
The run is an extremely long distance.
L-2810 ENGLISH
5
PLUMBING
Cruisair Tempered Water System Installation, Operation & Maintenance Manual
•
There is a large vertical rise.
•
Possibility of adding more capacity.
Note that grossly over-sizing pipes can be harmful too. The drastic changes in water velocity can cause extra losses and noise
in the system.
Add up the total BTUs of the airhandlers served by a given pipe to determine the size of that pipe.
Note that chillers are typically sized to be approximately 80% of the total airhandler load. Smaller vessels often use a higher
percentage. Larger vessels may be able to use a smaller percentage.
Hose to an airhandler should match the hosebarb that comes with the airhandler. The ball valve for an airhandler should be ¾"
full port for all airhandlers up to 24K. Airhandlers 30-36K should be 1" full port.
Table 1: Circulated Water Pipe Sizing Chart
Capacity Range
(BTU/hr x 1000)
Pipe Size
(ID)
3 - 12
1/2”
12 - 24
3/4”
24 - 48
1”
48 - 96
1-1/4”
96 - 180
1-1/2”
180 - 360
2”
360 - 660
2-1/2”
660 - 800
3”
800-1560
4”
INSULATION
6
•
When to insulate: Leak checking the system after everything is insulated is sure to create frustration. Before the leak
check, it is OK to insulate straight lengths of pipe, but do not insulate the joints or fittings until AFTER the leak check. If
there are any leaks, they will probably be at the joints or fittings. Having the joints and fittings still uninsulated will make
the leaks easier to find and fix. After checking for leaks, insulate the joints and fittings. Any exposed pipe can sweat
and cause water damage so it is very important to insulate the piping thoroughly.
•
Insulation material: We recommend closed cell insulation at least 3/4" thick insulation on the pipes. Piping through
unconditioned space or other areas where the dewpoint may exceed 74°F will require thicker insulation.
•
Size: The internal diameter of the insulation should match the external diameter of the pipe. If the insulation is too
large, air will get between the insulation and the pipe and create condensation that may run down the pipe and show
up some place else. This condensation will be minimal if the air cannot circulate, but it is better to avoid it altogether by
avoiding the air gap. If the insulation is too small, it will be difficult to install. If split insulation is too small, it may
eventually split open. Taping the split insulation all around will prevent this. The ideal solution is un-split insulation that
closely fits or is just a little snug.
•
Separate supply and return: Supply and return piping should always be insulated individually and clearly identified.
•
Thorough: All piping should be thoroughly insulated to prevent condensation. Improper insulation is a common
problem with tempered water systems, and very difficult to find and correct, even after the water damage is noticed. A
gap in the insulation will produce condensation on the pipes, which can run down inside the insulation to a different
location. Insulation must be air tight.
•
Cover the ends: When putting the recommended closed cell foam insulation over the pipes, cover the ends of the
piping to prevent foreign material from getting inside the piping.
•
Split insulation: If using split insulation, seams should be closed tightly, sealed with glue or tape. Completely
wrapping split insulation with a sturdy cloth tape will also make it more durable and much less likely to split back open.
All water fittings, connections, valves, etc. in the system should be well insulated, after the system is leak tested.
•
Do not pinch the insulation: Do not compress the insulation. For example, do not use tie wraps on insulation. The
localized compression will cause poor performance, condensation, and eventually damage the insulation.
L-2810 ENGLISH
Cruisair Tempered Water System Installation, Operation & Maintenance Manual
PLUMBING
DRAIN
The system drain is placed at the lowest point in the loop to allow for easy servicing. Other drains may be necessary elsewhere
if water traps are unavoidable. (Refer to “Avoiding Air & Water Traps” on page 4.)
CIRCULATION PUMP
•
The circulating pump should be located near the chiller, pumping water into the chiller first, and then through the loop.
•
The pump discharge should be directed in a vertically upward position, with a straight run of vertical pipe leaving the
pump, to prevent air from becoming trapped in the pump head. Trapped air is a common problem which can prevent
proper flow causing flow switch shut downs, and can eventually damage the pump.
•
The immediate pipe at the inlet and discharge of the pump head should be straight for a length of at least 12". This is
especially important at the inlet so a uniform flow of water enters the pump.
•
The pump and fittings should be protected from being stepped on or hit by other objects and all connecting piping
should be well supported so as not to put any undue stress on the pump head or fittings.
•
Resilient pump mounts should be used to prevent excess vibration from being transmitted to the boat structure.
•
The fittings connecting the pipe to the pump should provide valves and unions to allow removal the pump for
maintenance and repair. Always use full flow ball valves.
•
Note that the correct size of the system piping is determined by the volume of the water flow, not the connection sizes
on the chiller, airhandler, or pump head.
•
Install pressure ports and gauges before and after the pump. (Refer to “Pressure Gauges & Pressure Ports” on
page 8.)
TWO-PUMP SYSTEMS
Figure 3: Diagram of a Typical 2-Pump System
When larger systems are installed, (tempering unit
capacity over 20 tons) often two circulating pumps are
used to ensure proper water flow. One pump (sized to
loop capacity) will serve the airhandlers, and a second
pump (sized to tempering unit needs) will draw water from
the airhandler loop and supply the tempering units. The
balancing pipe allows both pumps to provide the correct
water flow to each side of the loop. This is a self balancing
system, and a bypass flow control (BFC) is not needed.
A full-flow valve can be installed in this balancing pipe
which will allow one pump to supply the entire system,
providing at least partial operation in the case of a pump
failure. The minimum size of the balancing pipe can be
figured from Figure 3 by using the difference in capacities
to select pipe size.
FLOW CONTROLS
Cruisair recommends a flow control on each airhandler. The chillers do not need flow controls. Balancing flow controls are
available in many different capacities. Connections range from ½" female NPT to 1 ¼" female NPT.
If the total airhandler capacity exceeds the total chiller capacity by more than 10%, then a bypass flow control may be needed if
the pump cannot force the full airhandler flow through the chillers. In this case, the bypass flow control balances the system by
allowing only the correct amount of water to bypass the chillers.
If the total chiller capacity exceeds the total airhandler capacity, then a bypass flow control may be needed if the pump cannot
force the full chiller flow through the airhandlers. That will certainly be the case if the airhandlers have flow controls. In this case,
the bypass flow control balances the system by allowing only the correct amount of water to bypass the airhandlers.
EXPANSION TANK
The expansion tank should be connected on the inlet side of the circulating pump.
It is a good idea to install a service valve at the expansion tank to facilitate future maintenance. However, the valve handle
should be removed to prevent the tank from being isolated from the main loop.
The tank will function properly in any position, but it must not stress the connection to the supporting pipe. Thus, the tank should
usually be mounted vertically. Do not install the expansion tank (and its service valve) in such a way that its weight is a big lever
that stresses the pipe connection or pipe.
L-2810 ENGLISH
7
PLUMBING
Cruisair Tempered Water System Installation, Operation & Maintenance Manual
PRESSURE GAUGES & PRESSURE PORTS
The Y-strainer should have pressure gauges to measure the pressure differential across the strainer. This will indicate when it is
time to clean the strainer.
A pressure gauge at the pump inlet is MANDATORY. The pump inlet pressure gauge should be located to allow good visibility
when operating the fill valve.
A pressure gauge at the discharge of the pump is recommended. The gauges at the inlet and discharge of the circulating pump
will assist in properly filling the system and diagnosing flow restrictions. However, this pair of gauges usually cannot render
pump pressure differential accurately enough to allow the flow rate to be deduced.
Install pressure ports immediately upstream and downstream of the circulating pump, before any bends or restrictions of any
kind. This will allow the pump flow to be deduced by comparing the pressure difference with the pump curve. For this purpose,
both pressure measurements should both be taken with the same gauge. For best results, use one very accurate gauge with ½
psi or smaller graduations and simply move it from one port to the other. Thus, these ports are IN ADDITION to the system
pressure gauges mentioned below. For the ports, use ¼" Shrader valves or ¼" tube connections. We offer valves for this
purpose, part number 4073420 - ¼" male NPT x ¼" tube.
SAMPLE PIPING DIAGRAM
Refer to Figure 4 to see a sample piping schematic diagram.
8
L-2810 ENGLISH
Cruisair Tempered Water System Installation, Operation & Maintenance Manual
PLUMBING
Figure 4: Sample Piping Schematic Diagram
L-2810 ENGLISH
9
PLUMBING
Cruisair Tempered Water System Installation, Operation & Maintenance Manual
FILL VALVE
WARNING
If the fill valve might be connected to a potable water supply, then a Reduced Pressure Zone (RPZ) backflow preventer
is required to prevent possible contamination of the potable water supply.
ADJUSTING FILL ASSEMBLY’S PRESSURE-REGULATING VALVE
Refer to Figure 5 below and follow these steps to change the pressure setting:
1.
If the water in the system is hot, allow it to cool to ambient so as not to scald anyone.
2.
Use a screwdriver to hold the adjusting screw from turning, and loosen the hex jam nut.
3.
Turn the adjusting screw clockwise to increase the pressure setting, or counter-clockwise to lower the pressure setting.
Turn the screw slowly until the gauge indicates the desired pressure.
4.
Once the desired pressure has been reached, hold the adjusting screw stationary with a screwdriver and tighten the
jam nut.
Figure 5: Pressure-Regulating Valve
WATER PRESSURE RELIEF VALVE
WARNING
If an electric or a fuel-fired water heater is used to heat the loop, a 30 psi water pressure relief valve must be installed
and the discharge plumbed to a safe location. Boats with very high head requirements may need a setting higher than
30 psi—usually not more than 50 psi. If a higher setting is required, be sure that the pressure setting of the water
pressure relief valve does not exceed the pressure rating of the weakest system component.
BALL VALVES
Ball valves are required before and after the pump, before and after the strainer, before and after each airhandler, and as
needed to isolate anything else that needs to be serviced with a minimum release of water.
10
L-2810 ENGLISH
Cruisair Tempered Water System Installation, Operation & Maintenance Manual
PLUMBING
SEAWATER/CONDENSER WATER SYSTEM
GENERAL
DEFINITION
- SEAWATER PIPING
The seawater cooling system consists of a through-hull fitting, water shut-off valve or seacock, strainer, seawater pump, water
pipe or marine grade hose, and overboard discharge fitting.
WATER IN/OUT
Note the arrows on the unit indicating direction of water flow. Reversing the flow can cause a number of problems, such as lost
performance or an air-locked system. For TWCs, MTCs, and MTDs, the seawater should enter the chiller at the lower of the two
headers, and leave the chiller through the upper header. The headers are usually plastic, but may be bronze and cupronickel.
"Headers" are the small vertical manifolds that connect the condensers on an individual module. Small modules do not even
have seawater headers because they have only one condenser circuit. They have cupronickel stubs instead of headers.
Regardless, the seawater should always flow from low to high to encourage air to migrate out and thus avoid air locks. So,
seawater enters the chiller low and exits high.
AVOIDING AIR TRAPS - SELF-DRAINING SYSTEMS
It is imperative that the seawater plumbing be routed continually uphill, without loops and dips, from the pump to a high point
between the condenser assembly and the overboard discharge. The system is said to be self-draining because if the boat were
to be lifted out of the water, all of the water would drain out of the system. This will help prevent air lock if air is ever drawn into
the system, and also makes winterizing the system much easier. A properly plumbed system is absolutely necessary.
Air can easily get into the system if the boat is in heavy seas or makes a sharp turn. If this air is not expelled, it can become
trapped in the pump. With air in the pump, no pressure can be produced and the water flow stops. Trapped air can sometimes
block flow even if the air pocket is not in the pump itself.
The high point of the system is at the overboard discharge. This will allow any air which may be drawn into the system to
escape. If the discharge must be lower than the tempering units, there should only be one high point. This way, when the
seawater pump cuts off, the water in the system will drain out (to the water line), preventing the system from becoming air
locked.
STRAINER
The in-line basket type strainer (10-mesh) should be placed in the seawater line between the seacock and the pump. It should
be situated to provide easy access for regular cleaning. Make certain the seawater strainer is oriented properly. The arrow on
the strainer housing should point in the direction of the water flow, toward the seawater pump.
Environmental changes and stricter environmental laws are promoting faster growth of marine organisms. This growth often
occurs in the piping downstream of the 10-mesh pump inlet strainer. Shells are often dislodged and swept downstream. It is
important to catch this debris before it reaches the condenser. To do this, install a 20-mesh (or finer) strainer just upstream of
the condenser, as close to the condenser as possible.
Also, the pump inlet strainer is 10 mesh, because finer meshes may increase the likelihood of cavitating the pump or other
problems. However, a finer mesh is desirable to protect the condensers. For these reasons, two strainers are recommended.
MATERIAL
Use 90/10 cupronickel or equivalent. Confirm with your pipe supplier that it is compatible with the application.
L-2810 ENGLISH
11
PLUMBING
Cruisair Tempered Water System Installation, Operation & Maintenance Manual
SIZE
See Table 2 for recommended pipe sizing. If the hose or pipe is a long run or with many fittings, use the next larger size.
Table 2: Seawater Pipe Sizing Chart
Tempering Unit Capacity Range
Pipe or Hose Size
(BTU/hr x 1000)
(ID)
24 - 30
3/4”
30 - 72
1”
72 - 144
1-1/4”
144 - 180
1-1/2”
180- 360
2”
360 - 720
2-1/2”
720 - 880
3”
880 - 1700
4”
THROUGH-HULL
FITTING
A separate through-hull fitting and seacock should be used for each air conditioning seawater pump.
Special attention should be given to the location of the inlet through-hull fitting. A dedicated through-hull for the air conditioning
system should be located no more than 6 inches (15.2 cm) from the keel, and ahead of the stuffing box and engine intake
through-hull. Do not attempt to draw seawater from the engine or generator through-hull fitting. If a sea chest arrangement is
used, special precautions must be taken to ensure that the tempering unit will have adequate raw water flow.
A scoop-type through-hull is preferred for most installations, especially on faster boats. It should be facing forward and located
near the keel or centerline, where it will always be underwater whenever the air conditioner is running. Beware of the change of
location of the through-hull fitting relative to the waterline, given the motion of the boat.
Special attention should be given to sail boat applications, as the extreme heel angles they experience could result in the
through-hull fitting coming out of the water and air locking the pump.
Over-board discharges may be placed above or below the water-line. Both methods are acceptable if done properly. It is a
matter of preference. Above the water line, one can easily get visual confirmation of seawater flow. It is also easier to make the
system resistant to air traps. (See “Avoiding Air Traps - Self-draining Systems” on page 11.) Putting the overboard a short
distance above the water-line will reduce the noise from splashing water. Below the water line, there is no noise from splashing
water. Remember to use a seacock if the overboard is below the water line.
SACRIFICIAL ANODE
A sacrificial anode (typically zinc or aluminum) is recommended upstream of the seawater pump to protect the system,
especially the condenser, from corrosion. Alternatively, some vessels use an “impressed current” device. The size, type, and
location of the protection needed is determined by many factors. Many systems, not just the chiller, affect and are affected by
the sacrificial anode. For these reasons, Dometic does not supply sacrificial anodes, and their selection and installation is
beyond the scope of this manual. It may be helpful to add that in practice, one way of following this recommendation is by
putting a “pencil” anode in a tee upstream of the seawater pump. The tee itself is typically nonmetalic, so the anode is
electrically connected to the vessel's DC bonding strip.
It is the nature of the anode to dissolve away and require replacement. Larger anodes require less frequent replacement.
Anodes should never be painted.
ANTI-FOULING DEVICE
Marine growth, such as Zebra Mussels, are a leading cause of damaged condenser coils, regardless of brand or style. This
damage is often irreparable. For this reason, the maintenance section of this manual is very important. The condensers must be
kept free of marine growth. Devices that are designed to inhibit marine growth are commercially available. These may be worth
investigating, and we would love to hear your feedback.
12
L-2810 ENGLISH
Cruisair Tempered Water System Installation, Operation & Maintenance Manual
REFRIGERANT CIRCUIT
PUMP
The seawater pump must be placed in a location that is below the water line and near the tempering unit. The centrifugal pump
is not self-priming and water must flow freely to it. The pump may become air locked if air is drawn into the seawater system.
Sailboats may require special considerations to prevent air locking when heeling.
The pump head should always discharge upward with a straight run of vertical pipe leaving the pump. This will help prevent air
from becoming trapped in the pump head. Trapped air is a common nuisance that prevents proper flow and may damage the
pump.
Bolt the pump securely on a horizontal surface with the discharge connection as the highest point. The pump should be installed
with resilient mounts to prevent vibrations from being transmitted to the structure of the boat. Make certain that the pump is
easily accessible for service. Be sure the location chosen will not allow the pump to be stepped on or hit by other moving
machinery. The fittings connecting the pipe to the pump should include valves and unions to allow removal of the pump for
maintenance and repair.
Note that the piping is determined by the volume of the water flow, not the connection sizes on the pump head. The immediate
pipe to the inlet of the pump head should be straight for a length of at least 12" so a uniform flow of water enters the pump. Do
not install any type of check valve in the seawater system as this can cause the pump to air lock if any air gets into the system.
REFRIGERANT CIRCUIT
HOT GAS BYPASS VALVE
Some hot gas bypass valves (HGBV) have a bulb. Many experienced technicians understandably but incorrectly assume this
bulb should be strapped to a pipe. Appearances can be deceiving. Do NOT strap the bulb to a pipe or anything else. In this
application, it is just a reservoir—not a sensing bulb. It is supposed to "read" ambient in this application. It is secured at the
factory against excessive vibration. That is all it needs. Leave it alone.
REFRIGERANT PRESSURE RELIEF VALVE
As mandated by ABYC, most chillers with 80 oz (2.365 l) of refrigerant or more have a refrigerant pressure relief valve
(refrigerant PRV). All shell-and-tube chillers have a refrigerant relief valve. If there were a fire on the vessel, the pressure inside
the chiller would rise. The refrigerant pressure relief valve is present as a fail-safe. It prevents excessive pressure from creating
a rupture.
Use the ½" SAE flare fitting on the valve to connect a discharge line. Use type L copper or equal. Any portion of the discharge
line that could come in contact with seawater should use a suitable marine-grade metal such as 90/10 cupronickel. Do NOT use
plastic. If multiple refrigerant PRVs are manifolded together, we recommend using a ¾" line for that purpose. The discharge
line should release OUTSIDE the vessel in an area and in a direction such that the sudden release of high-pressure refrigerant
would not be hazardous.
Be careful not to break the seal. When tightening the flare to the valve, put a backup wrench on the top nut. When tightening the
valve to the unit, use the bottom nut. Do NOT attempt to adjust the valve for any reason.
Do NOT install a valve in the discharge line. Do NOT install a valve between the refrigerant PRV and the pressure source.
Exception: Certain three-port valves are specifically designed to allow two refrigerant PRVs. These valves are always open to
one or the other refrigerant PRV. This allows the refrigerant PRV on the closed side of the valve to be serviced without loss of
refrigerant.
WIRING
PUMP WIRING
The only wire to be connected to the pump will be the power wires from the output of the pump relay or control panel. Pay close
attention to the wiring schematic label on the side of the pump motor. Many of the pumps used in Cruisair systems are dual
voltage. Determine the supply voltage, and connect the pump accordingly. Connecting the wiring incorrectly could destroy the
motor.
There are some cases where the pump is supplied with a dual rotation motor. Be sure that the pump is rotating in the proper
direction, usually indicated by an arrow on the pump head. All field wiring should only be done by qualified people and the
correct wire size and proper terminals should always be used.
L-2810 ENGLISH
13
WIRING
Cruisair Tempered Water System Installation, Operation & Maintenance Manual
PLUGS
Connect power and accessories per the diagram in the electric box. MTC and MTD models have polarized plugs which mate
with plugs on the wire leads from the control panel. The standard TWC model has no plug, because it comes with an electric
box that includes the control circuit board pre-wired to the chiller.
AIRHANDLERS
Note that the air handling units are not electrically connected to the tempering unit or panel control. Please refer to the wiring
diagrams included with your airhandler. The airhandler diagram is affixed inside the lid of the airhandler junction box. The
airhandler control diagram is affixed inside the lid of the control box.
TIGHTENING CONNECTIONS
All electrical connections are tightened and retightened at the factory. However, they can still loosen with time, temperature,
and/or vibration. Go through all electrical connections and make sure they are tight. This includes every place where a screw is
used to make a tight electrical connection.
WARNING
Failure to maintain tight electrical connections can start fires or create dangerous electrical shorts.
VOLTAGE RANGE
Power to the unit must be within the operating voltage range indicated on the data plate. Operating outside the specified voltage
range may cause the chiller to draw excessive amps. Operating more than 5% outside the specified voltage range will damage
the compressor over time and void the warranty.
MAX FUSE - CIRCUIT BREAKERS
"Max fuse" is indicated on the unit's label. It is the maximum allowable size for the HACR breaker or fuse. Smaller sizes are
allowable and may be desirable. However, sizing the breaker too small invites nuisance trips. Breakers are usually sized at
175% to 200% of the current load. Curve 10 breakers should be used for the tempering units due to the starting loads of the
compressors. Always check with regulation codes (ABYC or Coast Guard) for final sizing of breakers or wiring.
MCA - MINIMUM CIRCUIT AMPACITY
MCA is indicated on the unit's label. Your wiring must be designed to continuously carry this electrical current. Be sure to read
ABYC concerning wire type, size, ambient conditions, etc.
ELECTRICAL GROUNDING AND BONDING
All chillers are supplied with a terminal strip mounted inside the electrical box. The electrical supply, ground wires, and pump
circuits are all connected at this terminal strip. All units must be effectively grounded to minimize the hazard of electric shock
and personal injury.
The chiller must be connected to the ship's bonding system to prevent corrosion due to stray electrical current or voltage. This
will help eliminate any possibility of corrosion due to stray current or voltage.
CAUTION
Failure to properly ground and bond the system will void the warranty.
Ensure the following:
14
1.
AC (alternating current) grounding (green wire) must be provided with the AC power conductors and connected to the
ground terminal (marked "GRND") at the AC power input terminal block of the unit(s), per ABYC standard E-8, or
equivalent.
2.
Connections between the vessel's AC system grounding conductor (green wire) and the vessel's DC (Direct Current)
negative or bonding system should be made as part of the vessel's wiring, per ABYC standard E-9, or equivalent.
3.
The AC ground of the chiller must be connected to the AC ground of the boat. Within the boat itself, the AC ground bus
must be connected to the DC ground bus at exactly one place (no more, no less).
4.
All pumps, metallic valves and fittings in the seawater circuit that are isolated from the unit by PVC or rubber hoses
must be individually bonded to the vessels bonding system also.
L-2810 ENGLISH
Cruisair Tempered Water System Installation, Operation & Maintenance Manual
START-UP
SINGLE-PHASE NOTICE
Single phase chillers usually have a position-sensitive start relay inside the electric box. When mounting the electric box, be
sure the start relay is oriented in an acceptable orientation. Read the text on the start relay itself to determine acceptable
orientation.
3-PHASE NOTICE
For all 3-phase units and pumps (power source is either 208-230VAC/3 or 380-460VAC/3 ), it is extremely important to ensure
that wiring and phase sequencing of the three phase power source is correct. Marine wiring standards call for power source
phases L1, L2, and L3 to be color-coded BLACK, WHITE, and RED, respectively. These must be connected to the unit with the
proper sequence. Otherwise, it will not operate properly.
If the wiring sequence is incorrect, the unit's compressor (Scroll type only) and pump (if applicable) will run in the reverse
direction, usually at a significantly increased noise level. Reverse compressor operation will result in increased suction pressure
and reduced head pressure. No cooling will be produced. If the circulating pump runs in the reverse direction, the closed water
loop will not achieve high enough operating pressures and air cannot be eliminated from the system. If the seawater pump runs
in the reverse direction, it will not deliver cooling water to the condenser. The electric heat may work properly, but reverse cycle
heating will not.
If this problem is encountered, simply swapping any two power wires—L1 and L2, for example—should cause the unit to run
properly. Just be sure to modify the wiring as necessary so that the wire colors are also correct according to the standard
mentioned above.
VFD - VARIABLE FREQUENCY DRIVE
Frequency drives are also known as VFDs, variable frequency drives, VSDs, variable speed drives, and sometimes just
"drives". Frequency drives are used primarily to eliminate the sudden current inrush that can cause lights to flicker when a
compressor turns on. Frequency drives can also be used to convert single-phase power to 3-phase.
The tempering unit must have a 3-phase compressor, but the VFD can use either 1- or 3-phase input power. The control panel
should match the ship's power, whether 1 or 3 phase. Power wiring typically goes from the control panel to the VFD, and from
the VFD to the compressor. The VFD functions as the contactor/starter. The control box typically provides a dry contact for the
VFD to control when the VFD turns on/off.
CONTROLS
Cruisair offers a variety of control solutions. The limited wiring information provided in this manual is applicable regardless of
what style controls are used. Your controls manual has more information specific to the particular type of controls used on your
system. Be sure to read it carefully.
START-UP
LEAK
TEST
COPPER
PIPE
It is a good practice to leak test the loop plumbing throughout the installation of the system, as well as after the installation is
complete. This is especially important when joints will be concealed and therefore very difficult to get to in case of a leak.
A simple procedure of pressurizing the pipes with air will indicate whether that section of plumbing is sound. The piping should
be able to hold 75 psi over a 12 hour period (minimum). Note that fluctuations in pressure may be noticed due to temperature
changes, but a drop of over 5 psi indicates a leak, which should be found and fixed.
Large leaks will be easily heard, but small leaks can be difficult to find. There are several ways of locating small leaks:
•
Add some water to the system before pressurizing with air. The water will travel to the leak and add to the noise as it
escapes, as well as create a wet spot.
•
If a joint is suspected to be leaking, a liquid leak detector (such as soap bubbles) can be applied to pinpoint the
problem.
•
Electronic devices are available which can help identify leaks by "listening" for high frequency noises characteristic of
a leak.
Finding leaks before the initial filling of the loop with water will save you from having to drain an entire system to fix leaks, as
well as avoid expensive water damage to a completed vessel.
PLASTIC
PIPE
Do NOT put pressurized gas into plastic pipe. It is unsafe.
L-2810 ENGLISH
15
START-UP
Cruisair Tempered Water System Installation, Operation & Maintenance Manual
FLUSH
As a condition of warranty, the installer is required to provide clean circulating water. Otherwise, dirt can collect in the
evaporators causing them to freeze and rupture. Airhandler valves and other components can also become clogged or
otherwise harmed by the dirt and debris.
The best way to provide clean water is to assemble the circuit from clean components, fill the circuit with clean water, and then
thoroughly flush the circulating water before connecting the chillers and airhandlers. However, even then it is common for the
assembly process itself to generate debris such as bits of threaded-seal tape or pipe dope. Do not operate or run water
through the chiller or airhandlers until the circulated water system has been thoroughly flushed.
After the circulated water system has been completely installed, leak tested, and bled of most air, the circulation circuit should
be flushed to remove any contaminants or debris in the piping. Follow these instructions for flushing the circulation circuit:
1.
Shut off the service valves to the airhandlers and auto-bleeders.
2.
Remove the flexible hose connection from the inlet hose barb on each airhandler.
3.
Remove the flexible hose connection from the outlet hose barb on the chilled water circuit.
4.
Connect these two hoses using a hose barb. Do this at the chiller and each airhandler. The objective is to bypass the
water flow and avoid running water through the chiller or airhandlers or other components where debris or sediment
could do harm. NOTE: The circuit may be flushed prior to attaching airhandlers by following steps 4-9.
5.
Use the Y-strainer on the suction side of the circulation pump to catch any particles. Optional: Temporarily install a mud
separator to remove sediment too fine for the Y-strainer. Since the chiller was disconnected and bypassed, that may be
a good place to make the temporary connection. (Refer to “Removing Fine Dirt” on page 16 for more information.
Follow the directions that come with the mud separator.)
6.
Locate the main system vent and open the valve (or vent tube) at this location. If this valve cannot be operated from
the location of the fill valve, a second person will be required to conduct this procedure.
7.
Open the fill valve and allow water to enter the system until it spills out of the vent line with no visible air bubbles. Bleed
the system of as much air as possible, then close the fill valve and the vent. If sections of the circuit are air locked, then
they will not be flushed out because the water will not pass through.
8.
Run the circulation pump for fifteen minutes or until the strainer begins clogging.
9.
Turn off the circulation pump and close the service valves to isolate the strainer.
10. Remove, clean, and replace the strainer basket.
11. Open the strainer's service valves and run the circulation pump until the strainer begins to clog again.
12. Repeat steps 9 -11 until no particles or contaminants are visible in the strainer basket and the mud separator is not
removing anymore dirt. The interval between cleanings will increase as the system gets cleaner. The entire process
can be expected to take from 4 to 24 hours depending on the boat. Rarely, exceptionally dirty applications may take up
to 72 hours. Build with clean components!
13. Upon completion of the above, drain the circulation circuit and reconnect the airhandlers and auto-bleeders if installed.
14. Watch the water as it drains, and collect some water in a bucket and look at it. It should be clean.
REMOVING FINE DIRT
Dust, dirt, silt, and other fine particles will generally NOT be caught by a strainer. They are too fine and will pass through. They
will collect in the bottom of evaporators and, if there is sufficient quantity, cause the evaporators to freeze and rupture. THIS IS
NOT COVERED UNDER WARRANTY! Much of this dust can be avoided. (Refer to “Cleanliness” on page 5.)
The same company that makes Spirovent® and Spirotop® also makes a version that effectively removes fine sediment from the
water (a "mud separator"). Mud separators are relatively expensive and are not usually necessary as a permanently installed
component if the system was assembled with clean pipe, filled with clean water, and adequately flushed. But, mud separators
are an effective means of removing dirt and silt.
OEMs and dealers are encouraged to invest in one or more good mud separators. Temporarily install a mud separator
downstream of the strainer to assist while flushing the system. Continue running water through it until the water is consistently
clean and crystal clear. After the system has been effectively flushed, the mud separator can be removed and used to clean
another boat. Spirovent® and Spirotop® are registered trade names of Spirotherm, Inc.
FILLING AND BLEEDING
The loop requires filling and bleeding before initial startup and after any servicing which requires draining of the system.
16
L-2810 ENGLISH
Cruisair Tempered Water System Installation, Operation & Maintenance Manual
START-UP
The water should be clean, such as potable water, and warm, if possible, so as to lessen the amount of air dissolved in the
water. Check the system thoroughly for leaks after the initial fill.
1.
Locate the main system vent (or the highest airhandler vent if a main system vent is not provided) and open the valve
(or vent tube) at this location. If this valve cannot be operated from the location of the fill valve, a second person will be
required to conduct this procedure. Open the fill valve and allow water to enter the system until it spills out of the vent
line with no visible air bubbles.
2.
Close the vent line and allow the static pressure to build to approximately 20 psi ,and then close the fill valve.
3.
Begin bleeding air from the tempering unit and each of the airhandlers, starting with the lowest and working toward the
highest. It may be necessary to add more water if the pressure drops much during the bleeding process. After this
initial bleeding is complete, open the fill valve and recharge the system back to 20 psi.
4.
NOTE: Low water pressure can cause some airhandlers, especially those high up, to be put into a negative pressure
situation. Whenever an airhandler's bleeder valve is opened, air or water should come OUT. If that doesn't happen, it
means there is not enough water pressure in the system.
5.
Turn the power on to the tempering unit, circulating pump, seawater pump and all the airhandlers.
6.
Adjust the temperature setting of the cabin controls to ensure that the bypass valves will remain activated in the
heating mode.
7.
Switch the control switch to the heating mode (air separates better from warm water). The circulating pump should
start immediately and the red heating control light should illuminate. The tempering unit will not start immediately due
to a built-in time delay. If the fault light remains on, the system may have to be shut down and bled again in order to
establish flow through the tempering units. Once the system is running, allow the water to heat to set point.
8.
After the system has operated in the heating mode for several minutes, shut it off by switching the control switch to the
off position (no lights should be lit on the panel).
9.
Let the water come to rest and then begin bleeding the equipment again, working from the lowest to the highest.
10. Restart the system and observe each airhandler's air discharge temperature to confirm adequate air temperature
difference. If there are some that are not acceptable, they may require additional bleeding.
In most cases, the bleeding process will have to be repeated after the system has been in operation for several weeks.
ANTI-FREEZE
Antifreeze is mandatory in all chiller systems. It must be added to the water after the bleeding process is complete and any
leaks have be fixed. The recommendation is 20% by volume of non-toxic, inhibited propylene glycol, such as Dowfrost™ or
Dowfrost HD™ by Dow Chemicals. Note that Dowfrost™ is clear. Dowfrost HD™ includes a fluorescent yellow dye. Both
products contain inhibitors to protect against the acids formed by propylene glycol. However, Dowfrost HD™ is preferred
because it also contains a special additive to offer some protection against the effect of hard water. Hard water depletes the
inhibitors. Whatever brand you use, be sure to follow the manufacturer's recommendations. Do not allow the freeze point to rise
above 20°F. Check the protection level whenever water is lost or added, and at least once per year. For systems that include
PVC, do not allow the concentration of propylene glycol to exceed 30%. For systems with CPVC, do not exceed 25%.
Greater concentrations can damage these plastics. Do not use automotive antifreeze, as these commonly contain additives
that corrode copper.
FAILURE TO MAINTAIN ANTIFREEZE MAY VOID THE WARRANTY. The antifreeze not only prevents damage in the event of
circulated water freezing in the loop, but additives in the antifreeze protect the system from corrosion and deposit build-up which
would lower the system's efficiency. Note that excessive anti-freeze will reduce system capacity.
An easy way to add the antifreeze is to drain the system just enough to release the static pressure. At the highest airhandler in
the loop, open the vent tube and place in a container of antifreeze. Carefully open the system drain again so that the draining
water siphons the antifreeze into the loop through the vent tube.
Use a refractometer to measure the concentration of antifreeze. Dometic recommends the ATAGO Digital Coolant
Refractometer (PAL-89S or PAL-88S for Propylene Glycol, available at www.amazon.com or www.mitchellinstrument.com) or
equal.
WATER FLOW RATES - INITIAL
Determine the chilled water and seawater flow rates using the pressure ports and procedure described previously. (See
“Pressure Gauges & Pressure Ports” on page 8.) This is a vital part of commissioning every installation and an important part of
regular maintenance. Measure and record this data, but first clean the strainers.
For the circulating water, the flow rate should be the greater of 3 gpm per ton of airhandler, or 3 gpm per ton of chiller. To a point,
lower flow rates are permissible but not recommended. Lower flow rates reduce the capacity of the airhandlers and chillers. The
L-2810 ENGLISH
17
START-UP
Cruisair Tempered Water System Installation, Operation & Maintenance Manual
water may be colder, but there is less flow, so the net capacity is reduced. Flow rates sufficiently low will cause flow-switch faults
and can severely damage chillers by causing them to freeze.
For the seawater, the flow rate should be 3 gpm per ton of chiller. (Some chillers may require a higher flow rate - consult the
factory if you are not sure.) Rates lower that 2.5 gpm will reduce the chiller capacity and raise the head pressure in cool mode.
In heat mode, flow rates sufficiently low can severely damage the chillers by causing them to freeze. Excessively high flow rates
can also damage condensers by eroding them. Do not allow the seawater flow rate to exceed the design flow rate by more than
10%. Adjust a valve or downsize an impeller as necessary.
FINAL INSPECTION
Prior to starting the system, conduct a final inspection of the installation using the following checklist:
SEAWATER SYSTEM
•
Is the seawater pump properly sized for the system?
•
Is the pump wired for proper voltage and correct motor rotation?
•
Is the pump oriented correctly and mounted securely?
•
Is the centrifugal seawater pump located so as to be below the water line at all times?
•
Are the inlet and outlet thru-hulls secure, properly sealed and properly oriented?
•
Are all seawater hoses double clamped and tight?
•
Are the inlet and outlet pipes connected to the correct fittings on the tempering unit?
•
Are there any loops or dips in the seawater plumbing that might cause the system to become air locked?
•
Is the strainer located between the seacock and the pump, and is it correctly oriented?
•
Are all valves open or closed as appropriate?
•
Sacrificial anode installed upstream of pump?
TEMPERING UNIT
•
Is the tempering unit mounted securely?
•
Are the water connections accessible if it is necessary to remove the unit for service later?
•
Are condensate drains properly routed to an overboard discharge or sump?
•
Is all wiring connected properly?
•
Is the balancing flow control the correct size and properly installed?
•
Are the unions tight and leak free?
AIRHANDLERS
•
Are the units securely mounted?
•
Are condensate drains properly routed to an overboard discharge or sump?
•
If only one condensate drain is used, have any other drain holes in the condensate pan been plugged?
•
Are the inlet and outlet pipes connected properly?
LOOP PLUMBING
•
Are joints tightened?
•
Are joints and tees properly insulated?
•
Are pipes individually insulated?
•
Are pipes fastened securely to the boat as needed throughout their length?
•
Leak test loop and repair any problems.
•
Does the system have the proper amount of antifreeze? Have you tested it with a refractometer?
AIR DISTRIBUTION SYSTEM
•
Is there unobstructed airflow from the return-air grille to the coil?
•
Is there a lint screen or filter in the return-air path where it is accessible for regular cleaning?
•
Have flexible ducts been pulled tight to remove bends and constrictions?
•
Are grilles and ducts correctly sized for the system?
CONTROLS AND WIRING
•
18
Is the return-air sensor properly located and secured in the return air path, out of direct sunlight, and out of direct
contact with any metal objects?
L-2810 ENGLISH
Cruisair Tempered Water System Installation, Operation & Maintenance Manual
OPERATION
•
Are all wiring harnesses properly secured?
•
Are wiring connections made, color to color, correctly at terminal strips?
•
Are plugs and pins properly aligned and securely connected?
•
Are all components properly grounded?
•
Are proper sized circuit breakers used?
•
Are terminal strips located in a dry, safe place and properly covered?
•
Check high voltage wiring.
•
Check low voltage wiring.
•
IMPORTANT: Tighten all feed-through terminals and any other electrical connections that use screw pressure to make
good contact.
OPERATION
NORMAL OPERATION
The following steps should be followed when starting the system.
1.
Switch on all circuit breakers for the air conditioning system at the boat's main distribution panel.
2.
Be sure to include the breakers for any pump relays.
3.
Open the seawater inlet valve and make sure the seawater strainer is clean.
4.
Check to see that all service valves in the circulated water system are open and that 15-20 psi of static water pressure
is indicated on the circulated water loop.
5.
Switch on the circuit breaker(s) on the control panel(s) for each tempering unit that is to be operated.
6.
Switch on any pump breakers (multi-modular panel or TPR type pump relay).
7.
Using the tempering units' controls, turn the tempering units on in the desired mode (cool or heat). The pumps and
tempering units should turn on after a time delay.
8.
Verify that seawater is flowing from the overboard discharge(s).
9.
Adjust airhandler thermostat set points as desired.
The tempering units operate entirely by sensing loop water temperature, and will cycle off when set point is reached. When the
loop water temperature changes more than the set differential (due to the airhandlers adding or removing heat from the water),
the tempering unit will cut back on.
LOAD AND POWER MANAGEMENT
One of the advantages of a tempered water system is the ability to manage the heat loads by shifting capacity to the airhandlers
that most need it. This happens under normal operation as the boat cools down and the airhandlers shut off at set point. But in
cases where the tempering units can only be operated at reduced capacity (such as a power supply problem or a unit down for
repair), the system operator can effectively utilize the available capacity by turning off airhandlers in areas not occupied, or
changing the set points so they have longer off cycles. This "shifts" the capacity to the desired areas.
With multiple tempering units, the control panel or panels will normally be set in stages based on loop water temperature, so that
only the required number of units will operate to keep the loop water in the desired range. In the case of limited power
availability, individual units can be shut down by turning off their circuit breakers. This will not affect the operation of the other
tempering units.
DEPTH
OF
SEAWATER
Never draft close to the bottom while the seawater pump is running. Sucking up sand and shell into the system can severely and
quickly damage any condenser. Sand is fine enough to pass through most strainers. Even at proper flow rates, pumping
abrasives like sand through a condenser will damage it.
SEAWATER TEMPERATURE
In extreme seawater temperatures, your Cruisair system may experience a reduction in capacity. In the cooling mode, the best
efficiency is achieved when the water temperature is below 80°F (27°C). At higher water temperatures, the cooling capacity will
be reduced, but should continue to provide cooling even in seawater temperatures up to 110°F (43°C).
In the heating mode, the opposite is true. As the water gets colder than 55°F (13°C), heating capacity diminishes. However, the
unit will continue to provide some heat with seawater temperatures as low as 40°F (4°C).
L-2810 ENGLISH
19
MAINTENANCE
Cruisair Tempered Water System Installation, Operation & Maintenance Manual
CONTROLS
Cruisair supplies a variety of controls for airhandlers and chillers. Refer to the appropriate control manual for more information.
MAINTENANCE
MAINTENANCE LOG BOOK
Create a maintenance log book for the chiller system, or add a section to the maintenance log book of the vessel. Begin by
recording the data taken at start-up. Keep track of the what, where, who, when, and why of all maintenance and service done to
the chiller. If it's worth measuring, it's worth recording. Such historical data can be very helpful if trouble-shooting is needed later.
DAILY
SEAWATER STRAINER
Check the seawater strainer daily. Remove any debris. If you are in waters where jellyfish or other debris are a problem, you
may find it necessary to add a strainer on the outside of the through-hull fitting. Do NOT run the seawater pump while the
strainer is removed, not even for a very short time. If the seawater pump sucks up a shell or other debris, it can lodge in the
condenser and possibly cause it to fail.
MONTHLY
AIR FILTERS
Dirty filters will reduce airflow and capacity. At least once a month, check the lint screen or filter behind the return-air grille or on
the face of the airhandler. Replace or clean if necessary. The pleated, Breath Easy™ microparticle filters should be replaced, not
cleaned. Reusable plastic filters should be vacuumed or washed with tap water. Do not use soap or solvents.
RUN THE SYSTEM
It is recommended that systems be operated regularly. Vessels not in use should have their chillers and airhandlers cycled on
30-60 minutes once a month. Vessels in use should cycle on limited-use components in similar intervals to those above.
Systems should also be cycled to their reverse mode (cool to heat, heat to cool). This helps to maintain pump seals and internal
mechanical contacts, while reducing the fouling effect of marine growth in the seawater circuit.
EVERY THREE MONTHS
SYSTEM WATER PRESSURE
There should be a pressure gauge at the inlet of the circulation pump, near the fresh water fill valve, which shows the loop water
pressure. Check the pressure at the inlet to the pump while the water is cold (45-60°F), the chillers are off, and the circulation
pump is running. For most boats, the return pressure should be 12-20 psig. If the system pressure has dropped below that, then
more water needs to be added. Do not overfill as the expansion tank will not work properly.
If the system pressure drops frequently, then there is probably a leak which should be located and fixed. Check all airhandler
and tempering unit bleed valves for leaks and tighten as needed.
If upper deck airhandlers' bleeders suck air IN rather than discharging water/air OUT, that is also a sign that water needs to be
added to raise the system pressure. Whenever an airhandler bleeder is opened, water or air should come out.
CONDENSATE DRAINS
Check the airhandler and tempering unit condensate drains for obstructions by pouring a quart of water rapidly into the
condensate pan. If it does not drain completely within 30 seconds, check the drain outlets for clogging. Remember that many
Cruisair systems have two drains, one at each end of the unit.
ELECTRICAL CONNECTIONS
Electrical connections should be inspected and tightened as needed. Heat and vibration can cause connectors to loosen,
causing poor contact and voltage drop or arcing. This can cause components to operate poorly, nuisance trip, or prematurely
fail. To service electrical components:
20
1.
Disconnect main power supply before repairing or replacing components or wires.
2.
Tighten all loose connections at terminal strip and components (contactors, timers, relays, etc.).
3.
Inspect connectors for burn marks, frayed wires, etc. If any are found, the connector or connection should be repaired/
replaced.
L-2810 ENGLISH
Cruisair Tempered Water System Installation, Operation & Maintenance Manual
4.
MAINTENANCE
Voltage to the equipment should be measured periodically to insure a proper power supply. Pumps, fans, etc. typically
allow voltage +/-10% of their nominal voltage rating. Compressors typically allow +/-5%.
SHELL-AND-TUBE CONDENSERS
Shell-and-tube condensers can last a long time, but only if properly cared for and maintained. Remove the end plate and check
for fouling and especially for marine growth. Clean as necessary. (See“Cleaning” on page 25 in the “SHELL-AND-TUBE
SPECIAL CONSIDERATIONS” section.) NO amount of marine growth is acceptable. Marine growth will create areas of
excessive turbulence leading to erosion and leaks. Use effective anti-marine growth and anti-fouling measures, and regularly
inspect for marine growth. Note specifically that checking head pressure is NOT sufficient. The tubes must be visually
inspected.
SEAWATER CONNECTIONS
Verify that all seawater connections are tight, and check for water flow from the overboard discharge.
ANODE
Check the condition of the sacrificial anode. Replace if necessary.
Some chillers have anodes of zinc, and/or anodes of copper, and/or anodes of iron in the seawater circuit. Copper and iron
anodes are relatively new, having begun in 2014. Earlier chillers are unlikely to have them. If present, the anodes are labeled to
help you find them.
The zinc anodes protect against galvanic and stray current corrosion. Copper anodes reduce marine growth such as shell and
slime. Iron anodes help the cupronickel condensers develop and maintain a protective passivated layer, and may also inhibit
certain bacteriological corrosion.
Some anodes have weep holes to indicate they need to be replaced. This is primarily true of third-party anodes, zinc anodes, or
anodes mounted directly in a shell and tube heat exchanger.
Some anodes are attached to a non-corrosive plug or are otherwise installed without an indicator. When they dissolve away,
they do not create a leak--they simply cease to function. In some cases, they can be checked by unscrewing a plug in a Ystrainer, in the bottom of a header, etc. If present, their locations are indicated with labels. In rare cases, the anodes were not
designed to be serviceable based on special customer requirements.
Some anodes are connected to an indicator valve. There is usually a translucent tube connecting the anode to the valve. Check
the anode by opening the valve. If there is water in the tube, then the anode should be replaced. If the tube is dry, then the
anode is still good. Close the valve after inspection. Be sure the valve is in an accessible location.
For maximum anode life, replace the anode with a temporary plug while chemically cleaning coils. Take the opportunity to check
if the anode needs replacement. When finished cleaning, don't forget to reinstall the anode.
YEARLY
REFRIGERANT
The modular tempering unit is pre-charged with refrigerant gas at the factory and is adequate for the life of the system. Routine
"seasonal" charging of the system is not necessary. If the refrigerant charge is low, there is a leak which should be fixed before
resuming operation.
WINTERIZING
To protect against freezing due to inactivity in cold weather, one can either remove the water, treat the water with propylene
glycol, or combine these methods. Propylene glycol is usually the easiest and most practical.
If you are relying on propylene glycol to protect against the cold, then be sure you have the correct concentration. Do not
exceed 25% propylene glycol in contact with CPVC or 30% with PVC. Higher concentrations will damage the plastic. If that does
not offer enough protection, then resort to draining instead. For boats with copper pipe and no sensitive materials (such as
CPVC or PVC) use whatever percentage propylene glycol is appropriate for the temperatures to be protected against.
Remember to REDUCE that percentage when it's time to start running the chiller again, or you may lose capacity.
For boats with plumbing sensitive to propylene glycol percentages, completely drain the system. Be sure to avoid residual water
collecting in traps. For example, pay attention to low points, pump heads, strainers, and anywhere else water might collect. It is
acceptable to put whatever concentration of propylene glycol is needed into the tempering unit and airhandlers - they are not
hurt by the propylene glycol, and it is difficult to get all the water out. Tempering units that have a bend in the bottom chilled
water piping (at the evaporator) have a drain in them. This is used for winterization or shipping to remove water that would
otherwise accumulate in the bottom of the evaporator. Most airhandlers have a plug on the bottom header of the coil for the
same purpose. Drain the airhandler and tempering unit of as much water as possible, then pump or pour propylene glycol into
them sufficient to ensure a concentration commensurate with the level of protection needed.
L-2810 ENGLISH
21
MAINTENANCE
Cruisair Tempered Water System Installation, Operation & Maintenance Manual
PUMPS
Remove oil, dust, dirt, water and chemicals from exterior of motor and pump. Keep motor air inlet and outlet open. Blow out
interior of open motors with clean compressed air at low pressure. Regularly drain moisture from TEFC motors. Check the
pump housing and impeller shroud for excessive wear. Worn or pitted impellers will reduce the water flow and should be
replaced. Excessively worn or corroded housings can develop leaks. Any signs of corrosion should be addressed immediately.
WATER FLOW RATES - MAINTAINED
Measure and record the water flow rate for circulating and seawater. One method of measuring the water flow is described in
“Pressure Gauges & Pressure Ports” on page 8. Also read the section on “Water Flow Rates - Initial” on page 17. Clean, adjust,
repair, or replace as necessary for proper flow as described in “Water Flow Rates - Initial” on page 17. Be sure to clean the
strainers BEFORE measuring or adjusting the flow rate.
AIRHANDLER VALVES
Airhandler motorized water valves should be inspected for corrosion that may bind the gear.
1.
With the airhandler off, access the water valve and remove the motor case. Inspect the gears and remove any build-up
on the motor gear and/or the valve gear.
2.
Dry thoroughly and lubricate with a silicon spray or equivalent.
3.
Manually test the gear mechanism using the lever on the top of the valve before reassembly.
SENSORS
All control probes and sensors should be inspected for proper location and fastening. Improperly located and/or secured probes
will provide erroneous readings, causing improper operation.
1.
Inspect all temperature probes and sensors on the chilled water unit.
2.
Those inserted into probe well in the circulation circuit should be inserted all the way into the well, filled with a thermal
mastic for efficient heat transfer, and insulated on the end to hold the probe in place and prohibit condensation.
3.
Those externally fastened to coils, pipes, etc. should be securely fastened with thermal mastic between the contact
surfaces and insulated when necessary to provide accurate readings.
4.
Check all sensors at each airhandler for proper location. Water sensors should be securely fastened and insulated on
the supply connection (water inlet) of the airhandler. If the built in air sensor on the controller display panel is not
utilized, the remote air sensors should be located in the return air stream as close to the cabin area as possible without
being in contact with any other hot or cold surface.
5.
All sensors should be securely fastened.
AS NEEDED
CIRCULATING WATER STRAINER
Circulating water strainers must be cleaned as needed. New installations and modifications may introduce contaminants. Thus,
it is important to check the strainer hourly after any new installation or modification.
Measure and record the pressure drop across the strainer when it is clean. As it gets dirtier, the pressure drop will increase. As
soon as the pressure drop has increased by 2 - 5 psi, the strainer needs to be cleaned. Over time, the strainer will clean up the
system and maintenance frequency will decrease. Hourly becomes daily, daily becomes weekly, then monthly, or even yearly.
Frequency must be determined by experience and good sense. The gauges recommended above will make it easy to know
when cleaning is required.
CLEAN SEAWATER CIRCUIT
Condenser coils and seawater plumbing below the waterline can become fouled over a period of time due to marine growth
and/or scale build-up inside the coils. This both obstructs water flow and prohibits proper heat transfer, causing continuous
compressor operation with high pressures, temperatures and amperages.
•
Condenser coils and seawater hoses can be flushed and cleaned by connecting a closed loop system and circulating
a solution designed as a scale dissolver. See “Cleaning Condenser Coils” on page 22 for details.
•
Most authorized servicing dealers or large boatyards can provide this service.
CLEANING CONDENSER COILS
Condenser coils should NOT be cleaned unless there is a good reason for it. Excessive exposure to acidic cleaning compounds
by frequency, duration, or concentration will reduce the life of the condenser with no commensurate benefit.
22
L-2810 ENGLISH
Cruisair Tempered Water System Installation, Operation & Maintenance Manual
MAINTENANCE
EXCESSIVE CLEANING WILL VOID THE WARRANTY. Therefore, a factory-approved dealer should carefully document the
amps, pressures, temperatures, and water flow rates that justify the coil cleaning BEFORE cleaning the coil. Coil cleaning is
NOT a routine maintenance item and should NOT be done unless these symptoms are present: Over a period of weeks or
months, dirty coils will gradually cause the head pressure and amperage to rise, while the capacity decreases.
For maximum anode life, replace the anode with a temporary plug while cleaning coils. Take the opportunity to check if the
anode needs replacement. When finished cleaning, don't forget to reinstall the anode.
Do NOT use muriatic acid (hydrochloric acid), bleach, or bromine. Do NOT increase the flow rate, such as by valving off some
condensers to force more water through the others.
CHLORINE: Chlorine can be very corrosive when used improperly. Industry reports are mixed concerning the safety, dangers,
and applications. Dometic cautions very strongly that if chlorine is chosen as the marine growth control agent, then the user
must fully understand and accept the risk to equipment and dangers of handling corrosive chemicals. If used excessively or
improperly, damage could occur to the equipment that is no fault of the equipment design.
There are two types of condensers commonly used: Coaxial and Shell-And-Tube. The information above applies to both types.
What follows below are specific instructions depending on the type of condenser:
COAXIAL CONDENSERS
1.
With the system turned off at the circuit breaker on the ships panel, disconnect the inlet and outlet connections of the
condenser coil manifolds.
2.
Use chemical resistant hoses (white 5/80 I.D.) and adapter connections to connect the inlet and outlet of the manifold
to a chemical resistant, submersible pump (PML-500 pump, etc.).
3.
Place the pump into a container filled with cleaning solution. Dometic does not warrant the efficacy of any third-party
cleaners. Do NOT use muriatic acid (hydrochloric acid), bleach, or bromine. These chemicals accelerate corrosion and
can cause coil failure. Do NOT exceed the recommended concentration or duration. Use as large a container as
possible to hold the solution (5 - 25 gal.) (19 - 95 liters).
4.
Power the pump and circulate the solution through the manifold for 15 - 45 minutes depending upon the size of the
coils and the extent of the contamination. Visual inspection of the solution in the container should indicate when
contamination removal has stopped.
5.
Flush the system for at least five minutes using fresh water that is not recirculated. This is to remove the residual
cleaning solution, debris, and byproducts.
6.
Restart the system and check operational parameters (pressures, amperage, etc.) to ensure thorough cleaning has
taken place. Additional cleaning(s) may be necessary with extreme contamination.
7.
Force the seawater pump to run for at least one hour before allowing it to turn off. This is to continue the flushing
operation.
CAUTION
For the purpose of protecting the environment, dispose of any contaminated acid solutions in accordance with
federal, state and/or local regulations.
SHELL-AND-TUBE
Do not chemically clean shell and tube heat exchangers, but mechanically clean them as follows. Do not use hard metals that
can scratch the tubes and invite pitting.
•
Soft deposits: Soft deposits are biological growth in the form of mud, slime, and algae. This is best cleaned using a
pneumatic tube cleaning gun which forces plugs down the tubes. Some have a brush between two rubber plugs and
others are specially designed plugs which scrape the tube walls as they travel down the tube.
•
Scale: Scale is minerals that have been deposited on the inside of the tubes resulting from the use of water with high
alkalinity. These deposits are harder to clean and require special equipment. These systems use a flexible shaft which
rotates a brush as it is fed down the tube, they can also simultaneously flush out the tubes with water. There is a wide
variety of brushes and tools available that attach to the shaft to clean both soft and hard deposits.
L-2810 ENGLISH
23
SHELL-AND-TUBE SPECIAL CONSIDERATIONS Cruisair Tempered Water System Installation, Operation & Maintenance Manual
SHELL-AND-TUBE SPECIAL CONSIDERATIONS
Figure 6: Shell-and-Tube Components
GASKETS: IMPORTANT!
The gasket should be replaced every time the cover is removed. If the gasket is in poor condition or improperly installed, the
tube sheet can be seriously damaged. If necessary, use a minimal amount (no more than is necessary) of silicone to stick the
gasket to the head so that the gasket stays properly aligned during installation. Improper alignment of the gasket can cause
destructive erosion.
FIXING A LEAK - RESPOND QUICKLY!
Shell-and-tube condensers are sturdy and rarely develop leaks. If they do, one advantage of a shell-and-tube is that it can be
repaired—IF it is caught in time.
Water flows through the tubes. Refrigerant flows through the shell. If there is a leak, it is very important that water not be allowed
to enter the shell. If water enters the shell, the system will be contaminated and the shell itself may corrode inside, damaging its
ability to withstand pressure. If water has entered the shell, then the condenser should be replaced.
If the leak is very small and the refrigerant pressure is higher than the water pressure, then water will not enter the shell. Once a
leak is detected, close the condenser's isolation ball valves (if any). Remove the condenser's end plate and completely drain the
water from the condenser. This will keep water from entering the shell even when there is no more refrigerant pressure.
Because there are so many tubes, one (or more) tube(s) can be plugged without significantly affecting performance.
ANODE REPLACEMENT
Some shell-and-tube condensers include one or more sacrificial anodes in the end cover. Some are designed to weep a little
seawater when the anode is depleted.
24
1.
The anode screws into the anode support. Only the anode needs to be replaced.
2.
Remove the end cover from the condenser.
3.
Remove the anode support from the end cover and brush the threads clean.
4.
Remove the anode from the anode support and brush the threads clean.
5.
Apply Loctite® 565TM thread sealant to the threads of the anode. Careful! There is a hole in the axis of the anode. Do
NOT get any thread sealant in the hole. Loctite® is a registered trademark and 565TM is a trademark of Henkel
Corporation.
6.
Screw the anode into the anode support.
7.
Apply Loctite® 565TM thread sealant to the threads of the anode support. Loctite® is a registered trademark and 565TM
is a trademark of Henkel Corporation.
8.
Screw the anode support into the end cover.
L-2810 ENGLISH
Cruisair Tempered Water System Installation, Operation & Maintenance Manual
9.
TROUBLESHOOTING
Reattach the end cover to the condenser. See “Bolt Torque” on page 25.
EXTERNAL ANODES
Sacrificial anodes offer protection against galvanic corrosion. If the condenser itself does not have an anode, the installer must
provide one separately. Maintain a sacrificial anode in the seawater pipe upstream of the seawater pump. How often it needs to
be replaced will depend on the application and the size of the anode. FAILURE TO USE AN ANODE MAY VOID THE
WARRANTY! See “Sacrificial Anode” on page 12 and “Electrical Grounding And Bonding” on page 14.
CLEANING
See “Cleaning Condenser Coils” on page 22.
NO STAGNANT WATER
Do not allow water to stagnate in the condenser for more than 36 hours. Leave the pump running, or drain the condenser by
removing the end cap.
BOLT TORQUE
When putting the end cap back on, tighten the bolts in three steps:
1.
First, tighten all the bolts to 30 foot-pounds in the order shown in Figure 7 for Step 1.
2.
Second, further tighten all the bolts to 50 foot-pounds in the order shown in Figure 7 for Step 2.
3.
Finally, further tighten all the bolts to 70 foot-pounds in the order shown in Figure 7 for Step 3.
Figure 7: Bolt-Tightening Pattern
EXTERNAL RUST
Due to the strength requirements of a large pressure vessel, the shell is made of steel just like the compressor. Inspect the shell
annually for rust. If rust is found, clean it down to the metal, then prime and paint with a polyurethane paint.
TROUBLESHOOTING
CAUTION
Do not leave any safeties (i.e., flowswitch, high-pressure switch, low-pressure switch, freeze sensor) switched/jumped
out. They are safety devices designed to protect the system. Damage to the tempering units could result if the safety
devices are not working.
CAUTION
If a safety trips, it is important to find out WHY it tripped and fix the root problem. For example, a chiller may be able to
adequately cool a boat despite the fact that the flow switch trips intermittently. But if a flow problem goes uncorrected,
it will likely cause the evaporator to freeze and rupture. This is considered negligence and is NOT covered under
warranty. DO NOT IGNORE THE SAFETIES! Find and fix the root cause.
L-2810 ENGLISH
25
TROUBLESHOOTING
Cruisair Tempered Water System Installation, Operation & Maintenance Manual
FLOWSWITCHES
CIRCULATING PUMP
The circulating pump should come on as soon as the system is put in either cooling or heating mode. If not, check:
•
AC power panel breakers
•
Pump relay circuit
AIR IN LOOP
Air in the system can block water flow through tempering units. Refer to “Filling And Bleeding” on page 16. Also check if the
circulating pump is air locked, especially if pump outlet isn't in vertical position. An air bleeder may need to be installed if not
already fitted.
PLUMBING
Is water getting to the tempering units? Make sure:
•
All valves in loop are open.
•
Spare pump (if installed) is valved OUT of loop.
•
Water flowing in proper direction.
•
Pipe sizes are correct.
WATER STRAINER
If the circulated water Y-strainer is clogged with debris, the tempering unit may not be getting enough water flow.
FLOW SWITCH OPERATION
All of the above checks assume the flow switch is working properly, and that there is adequate flow through the unit. Otherwise,
check the switch as follows:
HIGH-
•
Correct micro-switch position is the normally open position (NO).
•
Arrow on flow switch should point in the direction the water is flowing.
•
If sliding the micro-switch to the normally closed position (NC) eliminates the fault, and there is flow through the unit,
then the paddle may be stuck. (Do NOT attempt to change the NO/NC setting on black plastic flow switches.)
AND
LOW-PRESSURE SWITCHES
High pressure can occur due to:
•
Loss of seawater in cooling mode.
•
Loss of circulated water in heating mode.
•
Refrigerant over charge.
•
Fouled condenser coils.
Low pressure can occur due to:
•
Loss of refrigerant charge.
•
Loss of circulated water flow in cool mode.
•
Extremely cold circulating water in cool mode.
•
Loss of seawater flow in heat mode.
•
Extremely cold seawater in heat mode.
Note that the low-pressure switch (and possibly the high-pressure and flow switches on early control panels) may be bypassed
briefly when the compressor first starts. This is to avoid nuisance faults.
A properly charged system running at normal operating loop water temperatures should have a cold and sweaty return line to
the compressor. The compressor itself should be hot on top, and cool on the sides.
FREEZE FAULTS/LOW-TEMPERATURE FAULTS
Freeze protection generally senses the discharge water temperature from each tempering module. If that water is too cold, the
affected module will turn off and indicate a freeze fault. Note that different controls may have slightly different set points—
usually around 33 - 36°F. See your controls manual for more information.
If the freeze control circuit is suspected, follow the steps below:
26
L-2810 ENGLISH
Cruisair Tempered Water System Installation, Operation & Maintenance Manual
OWNERS LIMITED WARRANTY
1.
Measure the circulated water temperature differential between the plate coil inlet and outlet. In the cooling mode, a
temperature drop greater than 10°F (5.6°C) indicates restricted water flow through the unit. THIS MUST BE
CORRECTED. THE EVAPORATOR WILL BE DESTROYED IF WATER IS ALLOWED TO FREEZE!! Note that the
flow switch should have caught this, so there may be a flow switch problem also.
2.
Check that the sensor wells have ample thermal mastic. Check if the sensors are installed correctly, and working. See
wire schematic of fault circuit. If you move the sensor to read a warm temperature (i.e., greater than 40°F), the sensor
should eventually satisfy and allow the unit to run. You may have to reset the controls. This is for diagnostic purposes
ONLY. DO NOT LEAVE THE SENSOR LIKE THIS! Do NOT try this unless you know what you are doing. Otherwise,
you can freeze the evaporator and cause severe damage.
OWNERS LIMITED WARRANTY
As hereinafter described, Dometic limits the duration of any implied warranty to the duration of the underlying express
warranty and also disclaims any liability for consequential or incidental damages arising from any application,
installation, use or malfunction of any warranted product.
SECTION I - WHAT’S COVERED
What does the Limited Warranty cover?
Products manufactured by Dometic Corporation (Dometic) are under limited warranty to be free from defects in workmanship or
materials. This being under normal use and service, with the obligation of Dometic under this limited warranty, being limited to
replacing or repairing any component(s) which shall disclose defects within the limits defined in Section III. Which upon
examination by Dometic, shall appear to the satisfaction of Dometic to be defective or not up to specifications.
This Limited Warranty is made in lieu of all other express warranties, obligations, or liabilities on the part of Dometic.
In addition, Dometic shall not be responsible for any incidental or consequential damages. In those instances in which a
cash refund is made, such refund shall effect the cancellation of the contract of sale without reservation of rights on the part of
the purchaser. Such refund shall constitute full and final satisfaction of all claims which the purchaser has or may have
against Dometic due to any actual or alleged breach of warranty, either express or implied, including, without
limitation, any implied warranty or merchantability or fitness for a particular purpose. Some states do not allow the
exclusion or limitation of incidental or consequential damages so the above limitation may not apply to you.
The Dealer is not an agent for Dometic, except for the purpose of administering the above warranty to the extent herein
provided. Dometic does not authorize the dealer or any other person to assume for Dometic any liability in connection
with such warranty, or any liability or expense incurred in the replacement or repair of its products other than those
expressly authorized herein. Dometic shall not be responsible for any liability or expense except as is specifically
authorized and provided in this section.
Dometic reserves the right to improve its products, through changes in design or material without being obligated to incorporate
such changes in products of prior manufacture. Dometic can make changes at any time in design, materials, or part of units of
any one, model year, without obligation or liability to owners of units of the same year's model of prior manufacture.
This warranty gives you; the purchaser, specific legal rights, and you may also have other rights which vary from state to state.
You also have implied warranty rights, including an implied warranty of merchantability, which means that your product must be
fit for the ordinary purposes for which such goods are used. The duration of any implied warranty rights is limited to the
duration of the express warranty as found in Section III. Some states do not allow limitations on how long an implied
warranty lasts, so the above limitation may not apply to you.
L-2810 ENGLISH
27
OWNERS LIMITED WARRANTY
Cruisair Tempered Water System Installation, Operation & Maintenance Manual
SECTION II - WHAT’S NOT COVERED
What does this Limited Warranty not cover?
This Warranty Shall Not Apply to:
1.
Failures resulting from improper installation or use contrary to instructions.
2.
Failures resulting from abuse, misuse, accident, fire, or submergence.
3.
Any part manufactured by Dometic, which shall have been altered so as to impair its original characteristics.
4.
Any parts which fail as a result of misuse, improper application or improper installation.
5.
Items not manufactured by Dometic, i.e., items, which are purchased from another manufacturer and supplied as
received by Dometic without alteration or modification except as any part of a Dometic manufactured unit or
component.
6.
Components or parts used by or applied by the purchaser, as an integral part of products not manufactured by
Dometic.
7.
Labor resulting from difficult access to a Dometic product. The original installer or OEM is responsible for accessibility
of unit.
8.
Leaks due to improper installation of split systems and refrigeration systems, for example; packing glands, flare nuts,
quick disconnects. The adjustment of the refrigerant charge on a split system should be charged to the original installer
or OEM.
9.
Freight Damage (see page 10 for instructions for handling freight damage).
10. Pumps that have been run dry, are water damaged or have blown freeze plugs.
11. Pumps with cracked heads.
12. Pump seals are not covered.
13. UV light bulbs are not covered.
14. Liquid line filter dryers are not covered.
15. Blowers with water damage.
16. Logic boards with water damage.
17. Logic boards with blown MOV's (Power Surge)
18. Mis-programmed displays.
19. Display heads with water damage.
20. Dirty Condensers and/or Evaporators.
21. Failures due to improper winterization.
22. Unit damage as a result of improper return packaging.
23. Replacement of freon with substitute without authorization from factory.
24. Environmental and/or Recovery Fees.
25. Welding and Nitrogen Fees.
26. Travel costs are included in the hourly labor allowances and should not be billed as a separate item without
preapproval form the factory.
Installation and application of Dometic components is not warranted by Dometic, because Dometic has no control or
authority over the selection, location, application, or installation of these components.
SECTION III - COVERAGE PERIOD
What is the period of coverage?
(See Table of Warranty Periods)
All Dometic components bear a data plate on which there are model and serial numbers. The serial number is date coded. To
determine whether or not any Dometic component is in warranty, proceed as follows:
1.
28
Determine the manufacture date of the component from the serial number on the data plate. If you are not familiar with
the date code, write or call the Dometic Customer Service Department to obtain the manufacture date. The hours of
L-2810 ENGLISH
Cruisair Tempered Water System Installation, Operation & Maintenance Manual
OWNERS LIMITED WARRANTY
the Customer Service Department are 8:00 a.m. - 5:00 p.m. (USA, Eastern Standard Time Zone) Monday through
Friday excluding holidays.
2.
It is possible that there might exist a considerable time lag between the date a component is manufactured and the
date it is put in service. In such instances, the date of manufacture could indicate that the item is out of warranty.
However, based on the date the equipment is first put in service, the item may still be covered by the Dometic warranty
as described in Section I. For proof of date put in service, Dometic will require a copy of the bill of sale of the Dometic
equipment from the installer or new boat dealer to the original owner.
SECTION IV - GETTING SERVICE
How do you get service?
Please read the following Warranty Procedure:
If the failure of a Dometic component is determined to be covered under the Dometic warranty and the time in service is
determined to be within the warranty time limit, the owner has the following three options:
1.
Preferred option: Have a Dometic authorized Servicing Dealer, perform the work needed. The customer needs to call
Dometic Customer Service Department for a recommendation as to the closest dealer. If the customer already knows
an authorized servicing dealer, the dealer should be contacted directly.
2.
Second option: If the customer contacts Dometic Service Department for a Servicing Dealer and Dometic has no one
in that particular area, Dometic will authorize the use of a local service company and Dometic will work with the local
company to assist in any way possible.
3.
Third option: The customer may send his equipment back to the factory to have the repair work done. Dometic will
make every effort to return the equipment to the customer within a three week time period. If the claim represents a
legitimate warranty problem, Dometic will pay the freight both ways. Dometic prefers option one first, option two
second, and option three only if one and two are not available.
The customer may contact the Dometic Service Departments at (804) 746-1313 (Virginia plant) or (954) 973-2477 (Florida
plant) Monday through Friday, 8:00am - 5:00pm.
After hours (evenings and weekends) technical support is offered through Dometic's 24/7 Hotline at (888) 440-4494.
L-2810 ENGLISH
29
OWNERS LIMITED WARRANTY
TABLE
OF
Cruisair Tempered Water System Installation, Operation & Maintenance Manual
WARRANTY PERIODS
AIR CONDITIONING
Important Notes:
1. Warranty periods begin from the date of possession of the boat by the first owner if OEM installed or date of installation if dealer
installed, but not to exceed three (3) years from date of production. The warranty is transferable and will carry the remainder of the
original owner's warranty based on the original date of purchase or date of installation.
2. Proof of purchase or installation may be required to verify warranty coverage.
3. Any unit or replacement part installed due to a warranty failure carries the remainder of the original warranty. Warranty coverage
does not start over from the repair/replacement date.
4. Warranty coverage shall not exceed three (3) years from the date of production.
5. These warranty periods are effective March 1, 2010.
CRUISAIR - Direct Expansion, Self-Contained, Split-Systems, and Modulating Systems
Product
Sale Type
Warranty Coverage
Stowaway Turbo
Stowaway Compact
Emerald Series
Condensers and Evaporators
OEM or Dealer Installed with digital or
mechanical controls.
2-Year Warranty
1st Year parts and labor, 2nd Year parts only.
Not to exceed three (3) years from date of production.
Pump warranty, see Pump section.
CRUISAIR - Tempered Water Systems
Product
Sale Type
Warranty Coverage
Tempered Water Systems
OEM or Dealer Installed with TWLC or
latest series control.
2-Year Warranty
1st Year parts and labor, 2nd Year parts only.
Not to exceed three (3) years from date of production.
Pump warranty, see Pump section.
New Model sold as a replacement
unit or partial retro-fit to an existing
installation.
Installed with old controls or competitor’s
controls.
Parts and Labor: 90 days.
CRUISAIR- Chiller Refit Policy
Dometic chillers installed in conjunction with a control system other than a Cruisair or Marine Air control, or a control system that is outdated
carries a 90-day warranty on defective material or workmanship from the date it is put into service. There will be no warranty coverage for
operation failures such as control malfunctions, freeze failure and the like. Dometic’s Customer Service and Applications departments will be
glad to assist with recommendations on the installation, but Dometic will not be responsible for the controls.
CRUISAIR - Pumps, Compressors, Replacement Parts
Product
Sale Type
Warranty Coverage
Pumps
OEM or Dealer Installed with complete
system.
1-Year warranty, parts and labor.
Wearable parts such as pump seals, brushes and
plastic valves are not covered under warranty.
Dealer Installed and Aftermarket sales.
1-Year warranty, parts only.
Wearable parts such as pump seals, brushes and
plastic valves are not covered under warranty.
Compressors
Aftermarket sales
1-Year warranty, parts only
Replacement parts and components
Aftermarket sales
90-Day warranty, parts only
DOMETIC - Air Conditioning Accessories
Product
Sale Type
Warranty Coverage
In-Duct Breathe Easy Air Purifiers
Aftermarket sales
1-Year warranty, parts only
UV bulb is not covered under warranty.
SmartStart Control
Aftermarket sales
1-Year warranty, parts only
30
L-2810 ENGLISH
Cruisair Tempered Water System Installation, Operation & Maintenance Manual
GLOSSARY
GLOSSARY
AIRHANDLER: The fan coil unit that circulates air into a specific area for heating or cooling.
ANTIFREEZE: An additive (typically propylene glycol) for the circulating water used to lower the freezing point and inhibit corrosion.
BACKFLOW PREVENTER: A device used to prevent contamination of a potable water supply when the potable water supply is temporarily
connected to a non-potable system such as for flushing or filling a chilled water system. "RPZ" or "Reduced Pressure Zone" backflow
preventers are used when the non-potable water system might contain hazardous substances or pathogens.
BLEEDER PORTS: Capped ports connected to 1/4" flexible tubing located on the airhandlers for purging air from the chilled water circulation
system.
BONDING: In the vessel's electrical system, any metal that might come into contact with salt water is connected to the bonding circuit to help
alleviate the effects of electrolysis (follow ABYC standards).
BTU: (British Thermal Unit) A common term used to define and measure capacity or refrigeration effect.
CFM: Abbreviation for "cubic feet per minute", a term used to specify the volume of airflow through the airhandlers and ducting.
CHILL CHASER: An auxiliary electric heater located in the airhandler.
CHILLED WATER CIRCULATION CIRCUIT: This is supply and return piping from the chiller to the airhandlers. The supply piping carries
chilled water (in cool mode) from the chiller to the airhandlers. Return piping carries warmed water (in cool mode) from the airhandlers
back to the chiller. The supply and return piping form a continuous closed loop.
CHILLED WATER CIRCULATION PUMP: A centrifugal pump used to circulate the fresh water between the chiller and the airhandlers for heat
transfer. Since this pump is located in a "closed loop" system, it does not need to be installed below the water line of the vessel.
Whereas the seawater pump does need to be installed below the water line.
CIRCUIT BREAKER: An electrical device which provides high current and short circuit protection for the compressor, airhandlers and pumps
used in the chilled water system. HACR (heating, air conditioning & refrigeration) type circuit breakers are recommended for the ship's
panel. HACR circuit breakers have a long delay to compensate for the electrical surge associated with compressor.
COMPRESSOR: An electrical motor/pump that draws cool, low-pressure refrigerant gas and compresses the gas into a hot, high-pressure gas.
COMPRESSOR OVERLOAD: An electrical device used to protect the compressor from excessive heat or current draw.
CONDENSATE DRAIN PAN: The pan directly under the airhandler's coil for removal of the "condensed" moisture taken out of the cabin air.
Two drain spud attachments are provided for connection to drain hoses for proper removal of the water to a sump. There is also a
condensate drain pan located under each chiller and the chilled water pump.
CONDENSER: The heat exchanger through which heat is transferred between the refrigerant in the chiller and the seawater flowing through the
coils and manifold.
CWMC: "Chilled Water Master Controller", a type of chiller control related to the DDC.
DDC: "Digital Diagnostic Controller", a type of chiller control.
DOWFROST™ is a trademark of Dow Chemical Company. It is a heat-transfer fluid containing specially formulated packages of food-grade
industrial inhibitors that help prevent corrosion.
ELECTRIC HEAT: Electric resistance heaters are used as a chill chaser in the airhandlers to warm the air, or in the chiller heater barrels to
warm the circulating water in heat mode.
EXPANSION VALVE: See "Thermostatic Expansion Valve".
EXPANSION TANK: A container housing a diaphragm (20 psig) to cushion against any water hammer in the circulation system piping. It also
provides for expansion of the water volume as the water is heated.
FAN SPEED CONTROL: An "on/off" switch that also regulates the amount of voltage supplied to the fan motor, thus controlling the speed at
which the motor turns.
FILL ASSEMBLY: The point where a water hose is temporarily attached to the circulating water circuit in order to fill it. The fill assembly typically
includes a ball valve and a pressure reducing valve.
FLOW SWITCH: A control device located on the chilled water supply side of each of the brazed plate heat exchangers that prevents the system
from operating until water flow has been established, and turns the system off if the water flow is insufficient.
FREEZE STAT: A low temperature thermostat used as a control device to sense chilled water temperatures and shut the entire condensing unit
off when supply water temperatures in the circulation piping system reach 38°F. This prevents the possibility of rupturing the chilled
water evaporator coil, as well as any other piping in the system, due to the water freezing.
FREQUENCY DRIVE: An electronic device that can change the frequency (measured in Hz) of the voltage leaving it. It can also convert 1phase power to 3-phase power, but not vice-versa. It is typically used to reduce the inrush current that would otherwise accompany
compressor start-up. Also called "variable frequency drive", "VFD", "variable speed drive", and "VSD".
FRESH WATER FILL SYSTEM: Components installed on the return line to the chiller for filling the circulation circuit piping system.
GPM: Abbreviation for "gallons per minute", a term used to specify the amount of water flow through the chilled water or seawater system.
L-2810 ENGLISH
31
GLOSSARY
Cruisair Tempered Water System Installation, Operation & Maintenance Manual
HIGH LIMIT SWITCH: A high temperature thermostat used as a safety device to shut down the condensing unit when the water temperature in
the circulation piping circuit reaches 120ºF. This prevents the possibility of damaging any PVC piping or any other components due to
the water getting too hot.
HIGH/LOW PRESSURE SWITCHES: Electrical control devices operated by high and low side system refrigerant pressures respectively. If
pressure is too high (425 psig) or too low (35 psig) the appropriate switch automatically opens the electrical circuit and shuts down the
respective compressor. These switches reset automatically.
LINE REACTOR: An inductor, like a large transformer - a big coil of wire around an iron block - used to stop the transmission of electrical (NOT
audible) noise. It is installed in between the power source and the frequency drive to reduce the amount of harmonic distortion that the
frequency drive can impart onto the ship's AC power supply. The frequencies affected by a line reactor are the fundamental AC line
frequency (50 or 60Hz) and its first 50 harmonics.
LOCTITE® 565TM is a thread sealant that locks and seals the threads of metal tapered pipe thread fittings. Loctite® is a registered
trademark and 565TM is a trademark of Henkel Corporation.
MOTORIZED WATER VALVE: An electrically operated 3-way water regulating valve on an individual airhandler controlled by the thermostat.
This valve provides water flow through the airhandler when opened, and bypasses water flow from the supply side to the return side
when closed.
PUMP RELAY PANEL (PRP): Used with more than one chiller, the PRP is a circuit board module wired between the chillers and the chilled
water or seawater pump (one PRP for each pump). When any of the chillers is turned on to heat or cool both PRPs are energized and
switch each pump on. Each PRP should have its own circuit breaker sized for the pump, but not to exceed 20 amps.
REFRACTOMETER: An instrument use to determine the freezing point of the solution (i.e., of the mixture of circulating water and antifreeze).
The refractometer determines the refractive index of the solution. Using data provided by the antifreeze supplier, the refractive index is
used to determine the concentration of antifreeze in the solution (i.e., the mixture of circulating water and antifreeze). The concentration
of antifreeze determines the freezing point of the solution.
REVERSING VALVE: (on reverse cycle units only) An electromagnetically controlled valve that reverses the flow of refrigerant between the
condenser and evaporator of the chilled water condensing unit, thereby permitting heat to be extracted from the cabin in the cooling
mode and added into the cabin in the heating mode.
RFI FILTER: "Radio Frequency Interference" filter. RFI filters are typically used with frequency drives to reduce conducted, high-frequency
electrical noise. RFI filters are typically mounted as a sub-base to the frequency drive. They are installed in the wiring between the
power supply and the frequency drive. RFI filters increase the frequency drives EMC rating from Class A to Class B.
RUN CAPACITOR: An electrical storage device used to reduce amperage to some electric motors for more efficient operation.
SEAWATER PUMP: A pump and motor combination that provides a continuous water flow through the condenser coil(s). The seawater pump
must be installed below the water line for proper operation.
SEAWATER STRAINER: A housing containing a screen made of metal or nylon to filter out debris drawn into the seawater circuit that could
foul up the seawater pump or piping. The strainer must located between the thru hull inlet and seawater pump.
SMARTSTART™ is a trademark of Dometic Corporation. It is a proprietary device that takes the place of a start relay and start capacitor. It
greatly reduces the starting current of 1-phase compressors.
SPIROTOP® is a registered trademark of Spirotherm, Inc. It is a device used to remove air from circulating water. It is typically installed at high
points in the system.
SPIROVENT® is a registered trademark of Spirotherm, Inc. It is a device used to remove air from circulating water. It is typically installed inline
in the circulating water piping in the engine room upstream of the pump.
START CAPACITOR: An electrical component that assists the compressor by releasing stored current during initial start up.
START RELAY: An electrical device that controls the duration of voltage supplied from the start capacitor to the compressor on start up.
THERMAL MASTIC: Thermal mastic is a paste-like substance with a high heat transfer coefficient. It is used to encourage heat transfer,
especially between a temperature sensor and the surface whose temperature it is sensing.
THERMOSTAT: An adjustable control device that senses room temperature, via an air thermistor or sensor, and operates the motorized valve (if
installed) on an airhandler for water flow. For example, it is necessary in most sensor wells.
THERMOSTATIC EXPANSION VALVE (TXV): A metering device used to convert high-pressure liquid refrigerant to low-pressure liquid
refrigerant.
THRU-HULL FITTING: There are two different thru hull fittings used in the seawater circuit. The speed scoop strainer inlet fitting is mounted
below the water and serves as the inlet for the seawater circuit. The discharge thru hull fitting is mounted above the water line and
serves as the outlet for the seawater circuit.
TON: In refrigeration/air conditioning, a ton is the amount of heat absorbed in melting a ton (2000 pounds/908 kg) of ice over a 24-hour period.
The ton of refrigeration is equal to 288,000 BTU in 24 hours. Divide 288,000 by 24 and get 12,000 BTU per hour. Therefore, one ton of
refrigeration = 12,000 BTU/hr.
TWLC: "Tempered Water Logic Controller" a type of chiller control.
Y STRAINER: A serviceable inline device used to filter debris from the water. It has a physical shape reminiscent of the letter "Y".
32
L-2810 ENGLISH
NOTES