1
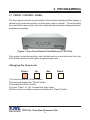
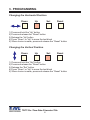
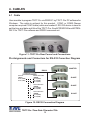
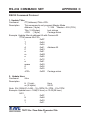
TDCT-Pro
Time-Date-Character-Titler
Operation Manual
July 2011
1
TDCT-Pro
CAUTION!
RISK OF ELECTRICAL SHOCK!
DO NOT OPEN!
TO PREVENT ELECTRIC SHOCK, DO NOT REMOVE THE COVER. DO
NOT EXPOSE THE EQUIPMENT TO RAIN OR MOISTURE. NO USER
SERVICEABLE PARTS ARE INSIDE. REFER SERVICING TO QUALIFIED
PERSONNEL.
WARNING!
THIS EQUIPMENT GENERATES, USES, AND CAN RADIATE RADIO FREQUENCY
ENERGY AND IF NOT INSTALLED AND USED IN ACCORDANCE WITH THE
INSTRUCTION MANUAL MAY CAUSE INTERFERENCE TO RADIO COMMUNICATIONS. IT HAS BEEN TESTED AND FOUND TO COMPLY WITH THE LIMITS
FOR A CLASS A COMPUTING DEVICE PURSUANT TO SUBPART J OF PART
15 OF FCC RULES, WHICH ARE DESIGNED TO PROVIDE REASONABLE PROTECTION AGAINST SUCH INTERFERENCE WHEN OPERATED IN A COMMERCIAL ENVIROMENT. OPERATION OF THIS EQUIPMENT IN A RESIDENTIAL
AREA IS LIKELY TO CAUSE INTERFERENCE IN WHICH CASE THE USER AT
HIS/HER OWN EXPENSE WILL BE REQUIRED TO TAKE WHATEVER MEASURES MAY BE REQUIRED TO CORRECT THE INTERFERENCE.
AVE Multiview UK
Endeavor House 3rd Floor
Coppers End Rd.,Stansted,
Essex,CM24 1SJ, UK
Tel: 440-845-600-9323
Fax: 440-845-600-9363
Email: [email protected]
www.multiview.net
AVE Multiview USA
2501 Central Parkway C-1
Houston, Texas, 77092
Tel: 1-281-443-2300
Fax: 1-281-443-8915
Email: [email protected]
http://www.americanvideoequipment.com
AVE Thailand Co., Ltd.
147 Soi On-Nut 44, Sampheenong Villa
Sukhumvit 77 Rd., Suan Luang
Bangkok 10250,Thailand
Tel: 662-331-9364, 331-9285
Fax: 662-331-9365
Email: [email protected]
http://www.ave.co.th (Thai)
AVE Europe LTD
123 Millennium Business Park
Ballycoolin, Dublin 15, Ireland
Tel:353 1 684 7450 Fax: 353 1 684 7451 Email; [email protected] Website: www.ave-europe.eu
Copyright C
AVE Thailand Co., Ltd. 2000-2011
2
CONTENTS
1. INTRODUCTION .................................................................................4
2. FEATURES .......................................................................................4
3. PROGRAMMING ...............................................................................5
3.1
3.2
3.3
3.4
3.5
3.6
3.7
3.8
3.9
Front Control Panel................................................................5
Main Programming Menu........................................................7
Set Master / Slave.................................................................7
Time and Date.......................................................................8
Set Time and Date.................................................................9
Reset Time and Date.............................................................9
Titler....................................................................................10
Screen Setup.......................................................................11
Communication....................................................................13
4. CABLES...........................................................................................14
APPENDIX.............................................................................................15
A. RS-485 Network.....................................................................15
B. TDCT-Pro Software................................................................16
C. RS-232 Command Set...........................................................17
D. Master Reset........................................................................19
FIGURES
Figure1: Four Front Pannel Push Buttons of TDCT-Pro................................5
Figure2: TDCT-Pro main menu..................................................................7
Figure3: Set Master/Slave menu...............................................................7
Figure4: Time & Date menu......................................................................8
Figure5: Titler menu...............................................................................10
Figure6: Screen Setup menu...................................................................11
Figure7: Alarming Display sub-menu........................................................12
Figure8: CNT7 Counter sub menu..................................................................12
Figure9: Communication menu................................................................13
Figure10: Help menu..............................................................................13
Figure11: TDCT-Pro Rear Pannel and Connections.....................................14
Figure12: RS232 Connection Diagram.....................................................14
Figure13: USB Connection Diagram.....................................................15
Figure14: TDCT-Pro RS485 Connection Diagram......................................15
Figure15: TDCT-Pro PC Software main menu...........................................16
3
1. INTRODUCTION
Introduction
The TDCT-Pro is the powerful time, date, character, and titler which has all the
features of existing TDCT products (TDCT-T, mTDCT, TDCT-60, TDCT-Military,
MTDCT, STDCT, mSTDCT, and mSVTDCT). Daylight Savings time is also supported along with a set of RS-232 commands which allows the master unit to
be programmed by other devices of Title and Time and Date settings. The
following are the features of TDCT-Pro.
2. FEATURES
•
•
•
•
•
•
•
•
•
•
•
•
•
•
•
•
•
Easy On Screen Programming.
Programmable Date & Time.
Programmable Alarming OSD by RTS alarm input
Programmable On Screen 7 Digit counter from RTS alarm input
Programmable single line or dual line Time & Date display.
Programmable Time Format hh/mm/ss or hh/mm/ss/fr (hh/mm/ss/fr will
result in two line time and date display. The fr = field rate 1/60 sec for
NTSC and 1/50 for PAL)
Programmable for Tenths of Second or Field Rate Counter
Programmable 12 hour or 24 hour time format
Daylight Savings Time for USA/Canada/Australia/Tasmania
Programmable Date mm/dd/yy or dd/mm/yy or yy/mm/dd
Programmable title up to 20 characters and single line display
Programmable 10 character sizes
Gray scale and border selection from front panel and from programming
menu.
Programmable master and slave selection
Set or change the title of the master or the slave TDCT via serial interfacing
between the master TDCT and a communication device (e.g Personal computer).
Synchronizing the time and date between master and slave.
Compatible with the AVE RS-232 to RS-485 Adapter for distances of up to
3000 feet for master slave connections.
TDCT-Pro Time-Date-Character-Title
4
3. PROGRAMMING
3.1 FRONT CONTROL PANEL
The front panel controls are provided to allow simple changing of the display’s
vertical and horizontal position and the gray scale or border. This eliminates
the need of the user to enter the main menu and inadvertently change important
programming setups.
Figure 1: Four Front Pannel Push Buttons of TDCT-Pro
Gray scale, horizontal position, and vertical position can also be set from the
front buttons without entering the programming mode.
Changing the Gray scale
Down
Up
Set
Reset
1) Press and hold the “Down” button
2) Press and release the “Reset” button
3) Release the “Down” button
4) Press “Down” or “Up” to select the Gray scale
5) When choice is made, press and release the “Reset” button
TDCT-Pro Time-Date-Character-Title
5
3. PROGRAMMING
Changing the Horizontal Position
Down
Up
Set
Reset
1) Press and hold the “Up” button
2) Press and release the “Reset” button
3) Release the “Up” button
4) Press “Down” or “Up” to move the text block
5) When choice is made, press and release the “Reset” button
Changing the Vertical Position
Down
Up
Set
Reset
1) Press and hold the “Set” button
2) Press and release the “Reset” button
3) Release the “Set” button
4) Press “Down” or “Up” to move the text block
5) When choice is made, press and release the “Reset” button
TDCT-Pro Time-Date-Character-Title
6
3. PROGRAMMING
3.2 Main Programming Menu
TDCT-Pro has an easy On-Screen programming option that can be accessed
by pressing and holding the “UP” & “DOWN” buttons and then pressing and
releasing the “RESET” button. Then release the “Up” and “Down” buttons when
the On-Screen Menu is displayed.
Following is a detailed description of the Menu selections and the programming
capabilities of the TDCT-Pro.
SET MASTER/SLAVE
TIME & DATE
SET TIME & DATE
RESET TIME & DATE
TITLER
SCREEN SETUP
COMMUNICATION
HELP
Figure 2: TDCT-Pro main menu
Note: If a sub menu has an "EXIT" selection, always go there and press "SET".
Pressing "RESET" at the main menu exits you from the program
3.3 Set Master / Slave
This programming feature can be used to select the TDCT-Pro as a master or
slave or a stand-alone unit. The Following menu appears when you select the
Set Master Slave from the main menu.
SET ADDRESS
EXIT
MSTR/ANY/1..254
Figure 3: SET MASTER/SLAVE menu
TDCT-Pro Time-Date-Character-Title
7
3. PROGRAMMING
Selecting the Set Address between 1 to 254 make TDCT-Pro to act as a slave
and that make TDCT-Pro ready to receive command from the master.
Selecting “ANY” will make TDCT-Pro as a stand-alone unit.
Selecting “MSTR” make the TDCT-Pro to act as a master.
TDCT-Pro can sense all the slaves by pressing the reset button and synchronize the time of slaves TDCT-Pros connected with it. Chapter4 illustrates the
connection information between master and salve.
3.4 Time & Date
This programming feature can be used to format the time and date display.
Following menu appears on the screen when “Time & Date” is selected from the
main programming menu.
TIME DISPLAY
ON/OFF
DATE DISPLAY
LN1/LN2/OFF
DISPLAY FMT
BOTTOM/TOP
COUNTER
FIELD/ T/10 /OFF
TIME FMT
12 HOUR/24 HOUR
DATE FMT
[MM/DD/YY]/[DD/MM/YY]/[YY/MM/DD]
DST
DISABLED/USA/CANADA/AUSTRALIA/TASMANIA
EXIT
Figure 4: TIME & DATE menu
Time Display can be programmed ON or OFF by selecting ON or OFF. Date
Display can be displayed in 1st line or, 2nd lines or can be programmed off by
selecting Date display feature. If the counter is turned on then the date is
automatically displayed in the 2nd line. The Counter can be programmed either
as a field counter or as 1/10th of the second counter. Field counter counts the
number of fields in a second (60 fields per second in NTSC or 50 fields per
second in PAL). If 1/10th of second is selected, then its count from 0 to 10 in
a second. Time format can be programmable as a 12-hour display or 24-hour or
military time display. Date format is programmable to (mm/dd/yy), (dd/mm/
yy), or (yy/mm/dd).
TDCT-Pro Time-Date-Character-Title
8
3. PROGRAMMING
If Daylight savings selected then the time is automatically advanced one hour in
the Spring and automatically reversed in the Fall at the appropriate time for the
selected country.
Display FMT can be programmed bottom or top by selecting BOTTOM or TOP,
If “TOP” is selected which is the default, the “TIME” and/or “COUNTER” and/or
“DATE” and/or “CNT7 COUNTER” and/or “TITLE” is respectively displayed at
the top of the screen. If “BOTTOM” is selected then the “TIME” and/or “COUNTER
”and/or “DATE” and/or “CNT7 COUNTER” and/or “TITLE” is respectively displayed
at the bottom of the screen.
3.5 Set Time & Date
Time and Date can manually set by selecting set time and date from the programming menu.
To set the Time and Date manually. Press the “Up” or “Down” button to move
the arrow to “Set Time & Date” and press “Set”. The time/date will appear and
the cursor will start flashing. Press the “Up” or “Down” button to change the
value and press “Set” when the desired value is displayed. The value is selected
and the cursor will advance to the next position. When the desired time/date is
displayed, press the “Up” and “Down” buttons simultaneously to enter the time/
date into memory and return to the previous menu.
3.6 Reset Time & Date
Time and date can be set to the factory default by selecting the “Reset Time
and Date” from the main menu.
TDCT-Pro Time-Date-Character-Title
9
3. PROGRAMMING
3.7 Titler
Selecting titler in the programming menu displays the following menu on the
screen.
TITLER
TITLE
EXIT
ON/OFF
Figure 5: TITLER menu
The title can be programmed either ON or OFF by selecting ON or OFF from
the TITLER sub-menu. A 20 characters title can be entered by selecting the
title from the programming menu.
Title
The TDCT-Pro gives you the option of a 20 character display for easy identification. To create a title, position the arrow in front of “TITLE” and press and
release “SET”. You will see a solid white box on the top screen. To change the
character in the first position, press the “UP” or “DOWN” buttons to cycle through
the alphanumeric selections from the following list of available characters:
ABCDEFGHIJKLMNOPQRSTUVWXYZ
0123456789 ^ /*-+.,:’=!?)(
The solid white box is used for a blank space. Make your selection and press
and release “SET”. This will advance to the next block, repeat until you have
entered the desired title. When finished, simultaneously press and release the “DOWN” & “UP” buttons to enter your title into memory. The
white boxes will disappear and your title will be displayed as it will appear on
screen.
Note: Remember, enabling the TITLE will limit text insertions to 1 line
TDCT-Pro Time-Date-Character-Title
10
3. PROGRAMMING
3.8 Screen Setup
Character size, position, and gray scale is programmed from this menu. Following menu pop ups when selected Screen setup from the main program menu.
CHARACTER SIZE
BORDER/GRAY SCALE
HORIZONTAL POS
VERTICAL POS
ALARMING DISPLAY
CNT7 COUNTER
EXIT
Figure 6: SCREEN SETUP menu
Character Size
To change the size of the characters on the screen, position the arrow cursor in
front of “ CHARACTER SIZE” and press and release “SET”. A grid of character
blocks will appear on the screen. Use “UP” or “DOWN" buttons to cycle through
the selections. There are 10 character sizes to choose from, however choosing
a larger display size may not display all characters on screen. If the screen
skews during this setup mode, this is normal. Large characters off screen will
effect most monitors this way.
Border Gray Scale
To change the display border and/or the gray scale of the text on screen, position the arrow cursor in front of “BORDER/GRAY SCALE” and press and release “SET”. Cycle through the selections by pressing the “UP” or “DOWN”
buttons. There are 10 settings to choose from. Make your selection and press
and release “SET” to return to the main menu.
Vertical Position
To change the vertical position of the inserted text on-screen, position the arrow
in front of “VERTICAL POS” and press “SET”. Press the “UP” or “DOWN”
buttons to move the text to the desired vertical position.
TDCT-Pro Time-Date-Character-Title
11
3. PROGRAMMING
Horizontal Position
To change the horizontal position of the inserted text on-screen, position the
arrow in front of “HORIZONTAL POS” and press “SET”. Press the “UP” or
“DOWN” buttons to move the text to the desired horizontal position.
Alarming Display
Alarming OSD to turn display on or off via RTS input. This will be a programmable selection that when True (RTS to Ground) turns full OSD display off and
when false (RTS Open) turns on.
Alarming Display can be programmed enable or disable by selecting an enable
as ON or an enable as OFF.The default will be OFF so always display characters.
ENABLE
EXIT
OFF
Figure 7: ALARMING DISPLAY sub-main menu
CNT7 Counter
CNT7 Counter accepts a TTL or 12VDC input active low to the RTS pin (7). To
reset the count via the front panel press the “Set” button. If the count exceeds
the maximum 7 digits it wraps around and continues counting from 0 again. If
you press “Set” button at any time the counter is reset to 0.
If CNT7 Counter is enabled and you use the title setting, the 7digit
count will be the first 7 characters on the title line and then the title will be
limited to only 13 characters.
CNT7 Counter can be programmed enable or disable by selecting an
enable as ON or an enable as OFF.The default will be OFF.
ENABLE
EXIT
OFF
Figure 8: CNT7 COUNTER sub-menu
TDCT-Pro Time-Date-Character-Title
12
3. PROGRAMMING
3.9 Communication
This programming feature let TDCT-Pro to communicate with master or slave or
with a RS-232 serial device. Following menu pops up when communication is
selected from the main menu.
RX BAUDRATE
TX BAUDRATE
PARITY
DATA BITS
HANDSHAKE
EXIT
9600
9600
ODD/EVEN/NONE
8/7
ON/OFF
Figure 9: COMMUNICATION menu
3.10 Help
“Help” on the main-menu provides a quick reference guide of the functions of
the “Up” and “Down” and “Set” buttons.
KEY DEFINITIONS:
UP/DOWN
CHANGE VALUES
SET
ENTER CHANGE MODE
STORE CHANGES
GOTO NXT POSITION
UP AND DOWN
SAVE STRING INPUT
Figure 10: HELP menu
TDCT-Pro Time-Date-Character-Title
13
4. CABLES
4.1 Cable
User are able to program TDCT-Pro via RS232C by TDCT- Pro PC software for
Windows. The cable is optional for this product. COM1 or COM2 (Newer
computer required COM1 cable) cable are needed if RS-232 device is used to
set the time and date and title of the TDCT-Pro. See APPENDIX B and APPENDIX C for TDCT-Pro software and RS232 command set.
Figure 11: TDCT-Pro Rear Pannel and Connections
Pin Asignments and Connectors for RS-232 Conection Diagram
MASTER
RS232
PC Com
(DB9F)
Pin-5 (GND)
Pin-3 (TXD)
Master TDCT-Pro
(DB9M)
Pin-5 (GND)
Pin-2 (RXD)
Pin-3 (TXD)
Slave TDCT-Pro
(DB9M)
Pin-5 (GND)
Pin-2 (RXD)
Slave TDCT-Pro
(DB9M)
Pin-5 (GND)
Pin-2 (RXD)
Figure 12: RS232 Connection Diagram
TDCT-Pro Time-Date-Character-Title
14
SLAVE
SLAVE
SLAVE
RS-485 NETWORK
APPENDIX A
AVE USB232
MASTER
RS232
USB
Master TDCT-Pro
(DB9M)
Pin-5 (GND)
Pin-2 (RXD)
Pin-3 (TXD)
SLAVE
USB232
(DB9F)
Pin-5 (GND)
Pin-3 (TXD)
USB Cable
Type A to Type B
PC
Slave TDCT-Pro
(DB9M)
Pin-5 (GND)
Pin-2 (RXD)
SLAVE
Slave TDCT-Pro
(DB9M)
Pin-5 (GND)
Pin-2 (RXD)
SLAVE
Figure 13: USB Connection Diagram
RS-485 Network
For extended distance use the AVE RS-232 to RS-485 converter and get extend up to 3000 feet between the Master and Slave units.
RS232
RS485 Network
RS232
RS232
RS232
Figure 14: TDCT-Pro RS485 Connection Diagram
TDCT-Pro Time-Date-Character-Title
15
APPENDIX B
TDCT-Pro SOFTWARE
TDCT-Pro Software
To send the title to the TDCT-Pro first enters the address of the TDCT-Pro in the
address window. After that enter the title in the title window and press the send
button. To change and time and date, enter the time and date and press the
send button. Pressing the update button will get the system time in the time
and date window. System time and date display the system time and date in
the time and date window. Selecting the SYNC TIME DATE will synchronize
the system time with the TDCT-Pro. It will send time and date information to
the TDCT-Pro on every minute if the sync time date is checked. See Main Menu
on following page.
TDCT-Pro Windows Software
Figure 15: TDCT-Pro PC Software Main Menu
TDCT-Pro Time-Date-Character-Title
16
RS-232 COMMAND SET
APPENDIX C
RS232 Command Protocol
1. Update Titler
Command
/TT(Address)<Title><CR>
Description
This command is only support Master Mode
Address (1 byte)
1 - 254 *Master = 255 (FFH)
Title (1-20 bytes)
text strings
<CR> (1 byte)
Carriage return
Example Update titler at address 65 with Camera 65
/TTACamera 65<CR>
/
0x2F
T
0x54
T
0x54
A
0x41
Address 65
C
0x43
a
0x61
m
0x6D
e
0x65
r
0x72
a
0x61
space
0x20
6
0x36
5
0x35
<CR>
0x0D Carriage return
2. Update Hour
Command
/Hxx
Description
H (1 byte)
Hour
xx (2 bytes)
00-23
Note: 00=12AM,01=1AM,..,12=12PM,13=1PM,..,23=11PM
Example Update hour = 1AM(12 hour) or 13:00(24 hour)
/H01
/
0x2F
H
0x48
0
0x30
1
0x31
TDCT-Pro Time-Date-Character-Title
17
APPENDIX C
3.Update Minute
Command
/Mxx
Description
M (1 byte)
xx (2 bytes)
Example Update minute = 3
/M03
/
M
0
3
RS-232 COMMAND SET
Minute
00-59
0x2F
0x4D
0x30
0x33
4. Update Year
Command
/Yxx
Description
Y(1 byte)
Year
xx(2 bytes)
00-99
Note: 00=2000,01=2001,..,10=2010,..,99=2099
Example Update Year = 2007
/Y07
/
0x2F
Y
0x59
0
0x30
7
0x37
5. Update Month
Command
/mxx Note: m is a small letter
Description
m(1 byte)
Month
xx(2 bytes)
01-12
Note: 01=JAN,02=FEB,..,10=OCT,..,12=DEC
Example Update month = October
/m10
/
0x2F
m
0x6D
1
0x31
0
0x30
TDCT-Pro Time-Date-Character-Title
18
RS-232 COMMAND SET
6. Update Date
Command
/Dxx
Description
D(1 byte)
xx(2 bytes)
Example Update Date = 5
/D05
/
D
0
5
APPENDIX C
Date
01-31
0x2F
0x44
0x30
0x35
MASTER RESET
APPENDIX D
Master Reset
If you wish to set the unit back to the original factory defaults you can do this by
a Master Reset.
Warning: Doing this will erase all your programming setups !!!
Press and hold the “UP” & “DOWN” & “SET” buttons and then press and release the “RESET” button. Then release the “Up”, “Down” & “Set buttons. You
will see the copyright and release notice on-screen.
TDCT-Pro Time-Date-Character-Title
19
ASIA
AVE (Thailand) Co., Ltd.
147 On-Nut 44, Sampheenong Villa
Sukhumvit 77 Rd., Suan Luang
Bangkok, 102500 Thailand
Tel: (66) 2 331 9364,(66)2 331 9285
Fax: (66) 2 331 9365
Email: [email protected]
www.avethailand.com
NORTH AMERICA
AVE USA
2501 Central Parkway, Suite C-1
Houston, Texas 77092, USA
Tel: 713-686-8409, 281-443-2300,
and 800-550-4464
Fax: 713-686-8509, 281- 443-8915
Email: [email protected]
www.americanvideoequipment.com
UNITED KINGDOM
AVE Multiview
Endeavor House 3rd Floor
Coppers End Rd., Stansted
Essex, CM24 1SJ, UK
Tel: 440-845-600-9323
Fax: 440-845-600-9363
Email: [email protected]
www.multiview.net
EUROPE
AVE Europe LTD
123 Millennium Business Park
Ballycoolin, Dublin 15, Ireland
Tel: 353 1 864 7450 Fax: 353 1 864 7451
Email [email protected]
www.ave-europe.eu
20