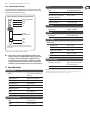
1
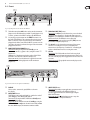
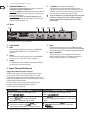
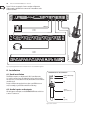
User Manual RACKTUNER BTR2000 Ultra-Flexible, Auto-Chromatic 2-Channel Tuner with Metronome and Integrated Racklight 2 RACKTUNER BTR2000 User Manual Table of Contents Important Safety Instructions...............................3 Legal Disclaimer......................................................3 Limited Warranty....................................................3 1. Introduction........................................................4 1.1 Before you get started...........................................4 2. Control Elements and Connections.................4 2.1 Front..............................................................................5 2.2 Rear...............................................................................6 3. Input Channel Selection ...................................6 4. Tuner....................................................................7 4.1 Instrument tuning...................................................7 4.2 Selecting tun er mode...........................................8 4.3 Calibrating the tuner..............................................8 4.4 Transposition.............................................................9 4.5 Setting your own tempering..............................9 5. Metronome.......................................................10 5.1 Setting the BPM rate............................................ 10 5.2 Using the TAP function....................................... 10 5.3 Acoustic and visual BPM indicator................. 10 6. Using a Footswitch...........................................11 7. Application Examples......................................11 8. Installation........................................................12 8.1 Rack installation ...................................................12 8.2 Audio inputs and outputs..................................12 8.3 Footswitch wiring.................................................13 9. Specifications...................................................13 10. Short Instructions..........................................14 3 RACKTUNER BTR2000 User Manual Important Safety Instructions Terminals marked with this symbol carry electrical current of sufficient magnitude to constitute risk of electric shock. Use only high-quality professional speaker cables with ¼" TS or twistlocking plugs pre-installed. All other installation or modification should be performed only by qualified personnel. This symbol, wherever it appears, alerts you to the presence of uninsulated dangerous voltage inside the enclosure voltage that may be sufficient to constitute a risk of shock. This symbol, wherever it appears, alerts you to important operating and maintenance instructions in the accompanying literature. Please read the manual. Caution To reduce the risk of electric shock, do not remove the top cover (or the rear section). No user serviceable parts inside. Refer servicing to qualified personnel. Caution To reduce the risk of fire or electric shock, do not expose this appliance to rain and moisture. The apparatus shall not be exposed to dripping or splashing liquids and no objects filled with liquids, such as vases, shall be placed on the apparatus. Caution These service instructions are for use by qualified service personnel only. To reduce the risk of electric shock do not perform any servicing other than that contained in the operation instructions. Repairs have to be performed by qualified service personnel. 1. Read these instructions. 2. Keep these instructions. 3. Heed all warnings. 4. Follow all instructions. 5. Do not use this apparatus near water. 6. Clean only with dry cloth. 7. Do not block any ventilation openings. Install in accordance with the manufacturer’s instructions. 8. Do not install near any heat sources such as radiators, heat registers, stoves, or other apparatus (including amplifiers) that produce heat. 9. Do not defeat the safety purpose of the polarized or grounding-type plug. A polarized plug has two blades with one wider than the other. A groundingtype plug has two blades and a third grounding prong. The wide blade or the third prong are provided for your safety. If the provided plug does not fit into your outlet, consult an electrician for replacement of the obsolete outlet. 10. Protect the power cord from being walked on or pinched particularly at plugs, convenience receptacles, and the point where they exit from the apparatus. 11. Use only attachments/accessories specified by the manufacturer. 12. Use only with the cart, stand, tripod, bracket, or table specified by the manufacturer, or sold with the apparatus. When a cart is used, use caution when moving the cart/apparatus combination to avoid injury from tip-over. 13. Unplug this apparatus during lightning storms or when unused for long periods of time. 14. Refer all servicing to qualified service personnel. Servicing is required when the apparatus has been damaged in any way, such as power supply cord or plug is damaged, liquid has been spilled or objects have fallen into the apparatus, the apparatus has been exposed to rain or moisture, does not operate normally, or has been dropped. 15. The apparatus shall be connected to a MAINS socket outlet with a protective earthing connection. 16. Where the MAINS plug or an appliance coupler is used as the disconnect device, the disconnect device shall remain readily operable. LEGAL DISCLAIMER TECHNICAL SPECIFICATIONS AND APPEARANCES ARE SUBJECT TO CHANGE WITHOUT NOTICE AND ACCURACY IS NOT GUARANTEED. BEHRINGER, KLARK TEKNIK, MIDAS, BUGERA, AND TURBOSOUND ARE PART OF THE MUSIC GROUP (MUSIC-GROUP.COM). ALL TRADEMARKS ARE THE PROPERTY OF THEIR RESPECTIVE OWNERS. MUSIC GROUP ACCEPTS NO LIABILITY FOR ANY LOSS WHICH MAY BE SUFFERED BY ANY PERSON WHO RELIES EITHER WHOLLY OR IN PART UPON ANY DESCRIPTION, PHOTOGRAPH OR STATEMENT CONTAINED HEREIN. COLORS AND SPECIFICATIONS MAY VARY FROM ACTUAL PRODUCT. MUSIC GROUP PRODUCTS ARE SOLD THROUGH AUTHORIZED FULLFILLERS AND RESELLERS ONLY. FULLFILLERS AND RESELLERS ARE NOT AGENTS OF MUSIC GROUP AND HAVE ABSOLUTELY NO AUTHORITY TO BIND MUSIC GROUP BY ANY EXPRESS OR IMPLIED UNDERTAKING OR REPRESENTATION. THIS MANUAL IS COPYRIGHTED. NO PART OF THIS MANUAL MAY BE REPRODUCED OR TRANSMITTED IN ANY FORM OR BY ANY MEANS, ELECTRONIC OR MECHANICAL, INCLUDING PHOTOCOPYING AND RECORDING OF ANY KIND, FOR ANY PURPOSE, WITHOUT THE EXPRESS WRITTEN PERMISSION OF MUSIC GROUP IP LTD. ALL RIGHTS RESERVED. © 2013 MUSIC Group IP Ltd. Trident Chambers, Wickhams Cay, P.O. Box 146, Road Town, Tortola, British Virgin Islands LIMITED WARRANTY For the applicable warranty terms and conditions and additional information regarding MUSIC Group’s Limited Warranty, please see complete details online at www.music-group.com/warranty. 4 RACKTUNER BTR2000 User Manual 1. Introduction 1.1.2 Initial operation Thank you for the confidence you have placed in us with your purchase of the BTR2000. You have acquired an extraordinary combination of a tuner and a metronome with integrated rack lighting that also makes it perfect for on-stage use. This advanced equipment sets new standards with its extensive list of features. It is an auto-chromatic tuner, which means it can automatically recognize any pitch when tuning your instrument. It also offers 3 individually configurable functions in tuner mode: • With 11 different modes, the tuner lets you respond fully to the specific needs of your instrument. For example, in guitar mode the BTR2000 recognizes the pitches of the open guitar strings, while in chromatic mode it recognizes all 12 half-tones. • The standard “A” pitch can be calibrated individually. This makes the tuning of your instrument even more flexible. • To achieve a particular sound or to allow you to play better with other instruments (such as brass), the RACKTUNER lets you transpose your instrument by half steps, tuning it higher or lower. This way you can be fully responsive to the unique features of both the music and your instrument. In addition to its function as a tuner, the BTR2000 can also be used as a metronome. You can set the BPM rate manually or use the TAP function. With its well-engineered circuitry, the RACKTUNER can be used with one or two amplifiers, so that you can adapt the BTR2000 for use in many different settings, where it will provide optimal support in any situation. Be sure that there is enough space around the unit for cooling. To avoid overheating, please do not place the VINTAGER near radiators and other equipment emitting heat. The BTR2000 features a shockproof housing to ensure safe operation without requiring separate grounding. 1.1 Before you get started 1.1.1 Shipment The RACKTUNER was carefully packed at the assembly plant to assure secure transport. If the condition of the cardboard box suggests that damage may have occurred, please inspect the unit immediately and look for physical indications of damage. ◊ Damaged equipment should NEVER be sent directly to us. Please inform the dealer from whom you acquired the unit immediately as well as the transportation company from which you took delivery of the unit. Otherwise, all claims for replacement/repair may be rendered invalid. ◊ To assure optimal protection of your BTR2000 during transport, we recommend utilizing a carrying case. ◊ If the unit needs to be shipped, please always use the original packaging to avoid damage. ◊ Never let unsupervised children play with the BTR2000 or with its packaging. ◊ Please dispose of all packaging materials in an environmentally-friendly fashion. 1.1.3 Online registration Please register your new BEHRINGER equipment right after your purchase by visiting http://behringer.com and read the terms and conditions of our warranty carefully. Should your BEHRINGER product malfunction, it is our intention to have it repaired as quickly as possible. To arrange for warranty service, please contact the BEHRINGER retailer from whom the equipment was purchased. Should your BEHRINGER dealer not be located in your vicinity, you may directly contact one of our subsidiaries. Corresponding contact information is included in the original equipment packaging (Global Contact Information/ European Contact Information). Should your country not be listed, please contact the distributor nearest you. A list of distributors can be found in the support area of our website (http://behringer.com). Registering your purchase and equipment with us helps us process your repair claims more quickly and efficiently. Thank you for your cooperation! 2. Control Elements and Connections This chapter describes the different control elements of your BTR2000. All of the buttons and connectors are explained in detail with useful information on how to make the most of them. Most of the buttons on the RACKTUNER have a dual function. The different functions on each button are distinguished by how long the button is held down when pressed. The RACKTUNER’s operating mode—tuner or metronome mode—also determines button function. There are one or two LEDs above each button. They correspond to the functions of the buttons. For example, either the “1” or “2/MIC” light is always on above the INPUT SELECT (9) button. The “MUTE” LED on the other hand only lights up when the MUTE button (8) is pressed to turn off the sound of the unit. ◊ When you switch to metronome mode, the LEDs for the tuner mode are turned off. 5 RACKTUNER BTR2000 User Manual 2.1 Front (1) (2) (7) (3) (4) (5) (6) (8) (9) (1 Fig. 2.1: Operating elements on the left side of the BTR2000 (1) The built-in microphone MIC can be used to tune the instrument (chapter 4.4.2) and calibrate the standard “A” pitch (chapter 4.2.2). To do this, you must select INPUT 2 and press the MUTE button. (2) You can plug your instrument into the INPUT 1 connector on the front of the BTR2000. This connector takes priority over the INPUT 1 connector on the rear panel. If there are instruments plugged into both the front and back INPUT 1 connectors at the same time, the unit only evaluates the signal of the instrument plugged into the front. (3) MODE/FINE [DISPLAY/MODE] button. Tuner mode: After pressing this button briefly you can select a tuner mode (e.g. guitar or bass) using the control (5) (chapter 4.1). A long press of the button toggles the scaling of the LED bar between 1 cent/LED and 5 cents/LED. (Chapter 4.5). Metronome mode: Press this button to toggle the metronome display between a flashing light and a needle simulation (chapter 5.3). (4) TRANSPOSE/REF [TAP] button. Tuner mode: A short tap on this button lets you use the wheel for transposition (chapter 4.3). Keeping the button pressed longer lets you calibrate the standard “A” pitch (chapter 4.2.1). Metronome mode: The BTR2000 can recognize and save a tempo that is entered by pressing the [TAP] button at least 4 times in rhythm (chapter 5.2). (5) The wheel is used to change the parameters of the various functions. For example, it is used to set the BPM of the metronome or the frequency of standard “A.” A flashing light indicates which function can be set using this control. (6) LED bar Tuner mode: The LED bar indicates how far the note played deviates from the ideal during instrument tuning (chapter 4.4). The scale of the display can be toggled between ±50 cents and ±10 cents. Metronome mode: The graphical metronome display uses the LED bar (chapter 5.3). (7) (6) (8) (9) (10) (11) Fig. 2.2: Control elements on the right side of the BTR2000 (7) DISPLAY Various values–tuner mode, pitch, BPM–are shown in this display. (8) MUTE/LIGHT button The BTR2000 comes with a rack light. It is switched on and off with a long tap on the MUTE/LIGHT button. Tuner mode: Pressing the MUTE/LIGHT button briefly mutes the entire MAIN output. Metronome mode: Unlike in tuner mode, briefly pressing the MUTE/LIGHT button only mutes the metronome click and not the entire MAIN output; the instrument remains audible. (9) INPUT SELECT button Tuner mode: Depending on your application, you must use and/ or select different inputs on the BTR2000 (chapter 3). You can toggle between the two channels by pressing the INPUT SELECT button. Metronome mode: Pressing this button starts or stops the metronome (acoustic and optical indicator). 6 RACKTUNER BTR2000 User Manual (10) SOUND/METRONOME button To switch between tuner and metronome mode you must press and hold the SOUND/METRONOME button. Tuner mode: Briefly pressing this button switches the reference tone on or off (chapter 4.4.3). The volume of the reference tone can be set with the wheel. Metronome mode: When the SOUND/METRONOME button is pressed briefly, you can adjust the volume of the metronome click using the wheel (chapter 5.3). (12) EL BTR2000 CAUTION IVED AND DESIGNED BY NGER GERMANY. IN CHINA CE FUSE WITH SAME YPE AND RATING. NTION To disconnect the power from the unit, unplug the power cord. When you start up the unit, ensure that the plug is easily accessible. If the unit is mounted in a rack, please ensure easy power disconnection with a plug or all-pole switch. ◊ The power button does not completely disconnect the power from the unit. Therefore the cable should be unplugged from the outlet if the unit will not be in use for a longer period of time. 2.2 Rear RISK OF ELECTRIC SHOCK! DO NOT OPEN! (13) (14) (15) MUTE SELECT SOUND (16) MAIN (17) 2 1 ATTENTION RISQUE DE CHOC ELECTRIQUE! NE PAS OUVRIR! TION ER UN FUSIBLE DE RECHANGE ME TYPE ET CALIBRE. (11) The POWER button switches on the BTR2000. CAUTION TO REDUCE THE RISK OF FIRE OR ELECTRIC SHOCK DO NOT EXPOSE THIS EQUIPMENT TO RAIN OR MOISTURE. (RING = MUTE) FOOTSWITCH OUTPUT INPUT Fig. 2.3: Serial number and sockets on the rear of the BTR2000 (12) SERIAL NUMBER (13) MUTE (16) MAIN You can connect a single footswitch (such as the BEHRINGER DUAL A/B SWITCH AB200) to the 1/4" TS MUTE connector (chapter 6) (14) SELECT You can connect a double footswitch (such as the BEHRINGER FS112) to the 1/4" stereo SELECT connector (chapter 6) (15) SOUND The SOUND connector can output the sounds generated by the unit (reference tone, metronome click). Depending on the cable connections on the BTR2000 the MAIN connector can either output the sounds generated by the unit and the instrument signal or the instrument signal alone (chapter 3). (17) INPUT 1 and INPUT 2 You can connect one or two instruments to the unit via the INPUT 1 and INPUT 2 connectors. The built-in microphone is available only when INPUT 2 is selected (chapter 3). 3. Input Channel Selection Signal distribution to the outputs The BTR2000 has 2 inputs and 2 outputs. Depending on the input selection and on what is connected to the outputs, the sounds generated by the unit (metronome click and reference tones) can be output from the SOUND connector or from the MAIN output connector together with the instrument signal. You can decide whether to use two different amplifiers for the instrument sound and the BTR2000 sounds or just one. Possible connection configurations: Listen to instrument and BTR2000 tones utilizing Select Select (to use the integrated microphone, push MUTE as well) Connect instrument amp to ; Connect your amp to to hear metronome click signal or reference tones Table 3.1: Setups for working with one or two amplifiers Listen to instrument and BTR2000 tones utilizing Select (to use the integrated microphone, push MUTE as well) Connect your amp to ; whatsoever may be connected to 7 RACKTUNER BTR2000 User Manual ◊ To enable reference tones and the metronome, click to be output from the MAIN connector, INPUT 2 must be selected and there must be nothing plugged into the SOUND connector! Using the built-in microphone If you want to use the built-in microphone, you must select INPUT 2 and the MUTE button must be pressed. 4. Tuner The BTR2000 tuner lets you control several parameters: • There are 11 different tuner modes. • The standard “A” pitch can be calibrated individually. • You can transpose the pitch if desired. This lets you set the optimal configuration for any purpose. ◊ When the BTR2000 is first switched on or when no functions are selected, the display shows the following: ---. Once a button has been pressed to select a function, the display shows the values that have been set. 4.1 Instrument tuning There are several ways to use the BTR2000 to tune your instrument: • You can tune an instrument plugged into the input connector by using the tuning display. • If the instrument is not connected to the BTR2000, you can tune it using the built-in microphone. • You can also tune an instrument using a reference tone emitted by the BTR2000. 4.1.1 Tuning with an instrument plugged in 1. Plug your instrument into one of the INPUT connectors on the front or rear panel of the unit (see chapter 3). 2. Press the INPUT SELECT button to select the input your instrument is plugged into. The 1 or 2/MIC LED will light up depending on which input is selected. 3. Select the tuner mode you wish to use (see chapter 4.2). ◊ The BTR2000 only recognizes and displays certain pitches depending on the selected tuner mode. 4. Calibrate the reference tone and set the transposition if desired (see chapter 4.3 / 4.4). 5. Play a note on your instrument (generally an open string). The tuner is set to recognize the frequency of the pitch. 6. The display will show the name of the note closest to the frequency you have generated. ◊ The unit displays the note that is available in this mode and comes closest to the frequency played. ◊ In chromatic mode the BTR2000 can recognize half-tones. These are indicated by a “b” in the display. For example, a note that is played and identified on the display as “A” may deviate somewhat from the ideal pitch. The LED bar clearly indicates this deviation. 7. Using the LED bar, you can monitor how far and in what direction your note deviates from the ideal. If the display tends to the left, the note played is somewhat flat and if the LEDs tend to the right your note is too sharp. ◊ The LED bar on the BTR2000 can indicate deviations up 8. 9. to 50 cents (a quarter tone) sharp or flat. If the incoming frequency deviates more than this from the displayed note, the LED display either remains on the far left or right or jumps to the next note. Tune the string of your instrument until the green light in the center of the LED bar lights up. Repeat steps 5 through 8 for all of the strings of your instrument. 4.1.2 Tuning with the built-in microphone ◊ To be able to work with the built-in microphone, there must 1. 2. 3. 4. be no cable plugged into the INPUT 2 connector in the back of the BTR2000 and the MUTE button must be depressed. Select INPUT 2 with the INPUT switch on the front of the BTR2000. The 2/MIC LED lights up. Mute this channel by pressing MUTE/LIGHT; the MUTE LED above the MUTE/LIGHT button lights up. The built-in microphone is now activated and ready for use. Position your instrument as close as possible to the BTR2000. Make certain that there is as little noise as possible to disrupt the tuning process. Tune your instrument as described in steps 3 through 9 in chapter 4.1.1. 4.1.3 Tuning with a reference tone The BTR2000 can generate and output notes. You can then tune your instrument by ear without an optical display. ◊ If your instrument is plugged into INPUT 1, the reference tone is output only through the SOUND output connector; if it is plugged into the INPUT 2 connector and there is nothing plugged into the SOUND output, the reference pitch is played through the MAIN output together with the instrument signal. 1. Select the tuner mode you wish to use (see chapter 4.2). ◊ The BTR2000 can only recognize certain pitches depending on the tuner mode selected. 2. Calibrate the reference tone and set the transposition if desired (see chapter 4.3 / 4.4). 3. Briefly press the SOUND/METRONOME button. The sound mode is activated and the SOUND LED above the SOUND/METRONOME flashes. The display shows the volume level currently set (1 , 2, ... 12). 4. The unit emits the lowest pitch available in this mode or the last pitch set in the tuner (even if it is not available in the currently selected tuner mode) through the SOUND and/or MAIN connector on the back panel of the BTR2000. 5. The volume of the reference tone can be set with the wheel. 6. After briefly pressing the TRANSPOSE/REF button you can turn the wheel to change the reference tone emitted depending on the selected tuner mode. During this adjustment the TRANSP and SOUND LEDs are illuminated. 7. After a short time or after the TRANSPOSE/REF button is pressed again, the unit returns to sound mode and the wheel can again be used to control the volume. 8. Tune each string of your instrument to an appropriate reference tone. 8 RACKTUNER BTR2000 User Manual When you press the MUTE button, the MAIN output (instrument sound and possibly the reference tone as well) is muted; the SOUND output is not affected. To exit sound mode, briefly press the SOUND/METRONOME button again. The SOUND LED will go out and the tone will no longer be emitted. ◊ When it is switched off, the BTR2000 stores the selected tuner mode. The names of the notes are shown on the display as follows: C C#/Db D D#/Eb E F F#/Gb G G#/Ab A A#/Bb B 4.2 Selecting tun er mode The open strings on each instrument (e.g. guitar, bass, ukulele) are tuned differently. It is also possible to deliberately tune an instrument such as a guitar to a so-called “open tuning” to make it easier to play in a particular key. The BTR2000 provides a tuner mode to suit many different purposes so you can optimally tune your instrument. Depending on which of the 11 tuner modes you select, the tuner only recognizes specific pitches: Chromatic (chr) The tuner can recognize all 12 half-tones of a scale. (C - C sharp - D - D sharp - E - F - F sharp - G - G sharp - A - B flat - B) Guitar (GUI) The tuner recognizes the pitches of a 7-string guitar. (B - E - A - D - G - B - E) Tab. 4.1: Note display Bass (BAS) This mode is especially well suited for a 6-string bass. (B - E - A - D - G - C) To give you every available option for tuning your instrument, you can change the setting of the standard “A” pitch. In order to clarify what this involves we will take a slight digression. The so-called standard “A” pitch has risen over time since its initial measurement: The tuning forks used by Bach, Händel or Mozart were at 415, 420 or 421 Hz (cycles per second). Today’s orchestras tune to an “A” of 444 Hz. The Berlin Philharmonic is right at the forefront: their standard “A” is 447 Hz. The pitch of the standard “A” on the BTR2000 is set at the factory to 440 Hz. In the event you want to play with a major orchestra that tunes to a standard “A” of 444 Hz, you need a function that will let you change the frequency of the “A.” ◊ The calibration settings are stored even if you switch the BTR2000 off. Baritone (brt) This setup helps you tune a guitar to a baritone tuning, in which each string is tuned 5 half-tones (a fourth) lower than a normal guitar. (B - E - A - D - F sharp - B) Banjo (bjo) The very widely used banjo tuning is made possible with this mode. (G - D - G - B - D) Ukulele (ule) The BTR2000 recognizes the notes of the open strings of a ukulele. (G - C - E - A) Open D (o-d) The open strings are tuned so that they create a D major chord. (D - A - D - F sharp - A - D) Open E (o-E) The open strings are tuned so that they create an E major chord. (E - G sharp - E - G sharp - B - E) Open G (o-G) All open strings create a G major chord. One good variant of this is the following tuning: G - B - D - G - B - D. Since the low strings are under very high tension in this tuning, the strings can also be tuned as follows: D - B - D - G - B - D Open A (o-A) The tuner recognizes only the notes of an A major chord. (E - A - C sharp - A - C sharp - E) DADGAD (dad) In this mode, the tuner recognizes the following notes: D - A - D - G - A - D. 4.3 Calibrating the tuner 4.3.1 Manual calibration The pitch of the standard “A” is set to a particular frequency using the BTR2000 control panel. 1. Depress the TRANSPOSE/REF button for at least two seconds. The ≠ 440 LED flashes. The display shows the frequency currently set for the standard “A,” e.g. 440. 2. You can adjust the pitch of the standard “A” by up to 12 Hz higher or lower by turning the wheel. 3. When you press the TRANSPOSE/REF button again for at least two seconds, the unit saves the frequency you set for standard “A,” the frequency is no longer displayed and the ≠ 440 light stops flashing. 4. If the pitch of the standard “A” is other than 440 Hz, the ≠ 440 LED above the TRANSPOSE/REF button lights up. 4.3.2 Automatic calibration The BTR2000 recognizes a pitch played on an instrument plugged into the unit or into the integrated microphone. The corresponding “A” is determined and stored. 9 RACKTUNER BTR2000 User Manual ◊ Any note can be played for the automatic calibration. Connect your instrument to an input of the BTR2000. You can also use the built-in microphone (select INPUT 2 and press the MUTE button). 2. Depress the TRANSPOSE/REF button for at least two seconds. The display shows the frequency currently set for the standard “A” and the ≠ 440 light flashes above the TRANSPOSE/REF button during the entire process. 3. Turn the frequency all the way down (to the left) with the wheel. After the lowest possible frequency for the standard “A” (428 Hz), auT appears on the display, automatic calibration is activated and the unit waits for an input frequency. 4. Play a note. The display shows the name of the note closest to the one you played. The LED bar indicates the deviation from the displayed note. If this is unsatisfactory, you can play the note again. You can cancel the calibration by pressing and holding the TRANSPOSE/REF button. ◊ If the input note is too unstable or too soft, the automatic calibration cannot proceed. 5. If the note is satisfactory and the display in the LED bar is stable, you must briefly press the TRANSPOSE/REF button. The BTR2000 stores a standard “A” pitch that is attuned to the note you played. The frequency of this “A” is displayed. 6. The calibration is completed by pressing and holding the TRANSPOSE/REF button. If you do not hold the button long enough, the calibration process restarts. 7. If the pitch of the standard “A” is other than 440 Hz, the ≠ 440 LED above the TRANSPOSE/REF button lights up. In order to change the frequency of a stored standard “A,” press the TRANSPOSE/REF button for at least one second and adjust the frequency using the wheel. 2. 1. 4.4 Transposition For certain applications, it may be useful to shift the tuning of the instrument by a few half-tones. Easier interplay with other instruments Say a song needs to have brass accompaniment. While pieces in a flat key (such as F major (1 flat), B flat major (2 flats) and C minor (3 flats)) are especially well suited to brass, many guitarists and bassists are not very comfortable playing in these keys. There are several options for playing such pieces: • The guitarist and bassist play the complicated fingerings of the flat keys. • These two players’ instruments are tuned (transposed) so that the easier fingerings of a different key (e.g. C major or G major) can be used to produce the correct chords in the actual key of the piece. Achieve a specific sound With a different tuning, the tension on the strings is different. This change creates different overtones when the strings are played, giving the instrument a different sound. The BTR2000 lets you complete such a transposition easily and accurately. 1. Briefly press the TRANSPOSE/REF button. The TRANSP light flashes and the display shows the transposition currently set (0, if no transposition is set). 3. 4. Turn the wheel to transpose up to 7 half-tones higher or lower. The display indicates the number of half-tones by which a nontransposed instrument is too high (1 , 2, ..., 7) or too low (-1, -2, ..., -7), when compared with the BTR2000 transposition. You can exit this menu by pressing the TRANSPOSE/REF button again. When a transposition is set, the TRANSP LED above the TRANSPOSE/REF button lights up. Example A piece should be played in F major. This key has 1 flat, and thus it has several complex fingerings. You want to retune the guitar so that you can use G major fingerings to play F major chords. To do this, you must transpose the instrument down 2 half-tones. • To set the transposition, briefly press the TRANSPOSE/REF button. The display still shows the number 0 (no transposition set). • Turn the wheel so that the display shows the number 2 (2 half-tones higher). Now your instrument is tuned 2 half-tones above the tuner and must be tuned down. ◊ When a transposition has been set, the TRANSP LED above the TRANSPOSE/REF button lights up. • Select a tuner mode (chapter 4.2) and tune all strings of your instrument as described in chapter 4.1. • When the tuning process is finished, the fingering for a G major chord plays an F major chord. ◊ The calibration settings are stored even if you switch the BTR2000 off. To turn off the transposition, press the TRANSPOSE/REF button and turn the wheel until the display indicates a transposition up/down or 0. The TRANSP light goes out. 4.5 Setting your own tempering The topic of “tempering” is a very interesting and extensive one. It has been much studied scientifically and this knowledge gives you many ways to work with the specific characteristics of your instrument and individual pieces. This topic can only be touched upon here. You can find more exciting information about this at our website at behringer.de (behringer.com). Equal tempering The pre-set tuner modes of the BTR2000 are all based on an equal tempering. This means that only the octave interval is exactly right (frequency doubling); to generate other intervals, the octave is divided into 12 equal half steps, which make up the individual intervals (e.g. a fourth = 5 half steps). However, the resulting intervals do not correspond entirely to the ideal intervals (intervals of a natural scale); each interval is slightly out of tune. At any rate, these deviations are barely audible and are thus not perceived as dissonant. This type of tuning is nevertheless a compromise, but it enables all keys to be played with just one tuning. 10 RACKTUNER BTR2000 User Manual Custom tempering The BTR2000 tuner makes it possible to tune using different temperings, whether existing or customized. This means that some strings are tuned a few cents higher or lower according to a certain system. The scale of the LED bar can be changed from ±50 cents to ±10 cents. This enables extremely precise tunings since each light in the bar corresponds to exactly 1 cent. ◊ Before starting fine tuning, you should first tune your instrument as described in chapter 4.1. 1. To change the scale of the LED bar, press and hold the MODE/FINE button. If the “±10 Cent” display is selected, the FINE light above the MODE/FINE button lights up. 2. Tune your instrument as described in chapter 4.1. Now you can see the smallest deviations from the pre-set pitch on the LED bar and adjust them with complete confidence. 5.3 Acoustic and visual BPM indicator 5. Metronome Acoustic indicator The selected tempo is also output at the SOUND or MAIN connector. ◊ If your instrument is plugged into INPUT 1, the metronome click is output only through the SOUND connector. If it is plugged into INPUT 2, and the SOUND output is not in use, the metronome click is output together with the instrument signal from the MAIN connector. You can change the volume of the click at any time and thus control the volume ratio between instrument and click if you are listening to both using one amp. 1. Briefly press the SOUND/METRONOME button. The SOUND LED above the button lights up. 2. With the wheel you can adjust the volume of the click with 12 volume levels. ◊ Even at the lowest volume level 1 ( ), the metronome click is still audible. The click can be shut off with the MUTE button. 3. If the volume is not changed for some time or if the SOUND/ METRONOME button is pressed again, the SOUND light goes out. The metronome can naturally be muted without affecting the visual display. 1. Press the MUTE/LIGHT button. 2. The metronome click is muted and no longer output through the MAIN connector. The integrated metronome in the BTR2000 has a range of 30 beats per minute (BPM) to 240 BPM. There are essentially 2 ways to use the metronome: • You can pre-set a tempo (e.g. 60 BPM). • The BTR2000 can pick up a tempo set by you. To use the metronome, the BTR2000 must be in metronome mode: 1. Press and hold the SOUND/METRONOME button for 2 seconds. 2. The metronome function is selected when the METR light above the button is lit. 3. Briefly press INPUT SELECT; the click and the optical display of the metronome start up. ◊ The metronome values set most recently (BPM, type of graphic display, click volume, MUTE) are stored when the BTR2000 is turned off. 5.1 Setting the BPM rate 1. 2. 3. 4. 5. Set the BTR2000 to metronome mode (press and hold the SOUND/METRONOME button for 2 seconds). The selected BPM rate appears in the display. You can adjust the BPM rate using the wheel. Briefly press the INPUT SELECT button. The metronome starts up. The selected tempo appears in the display and is indicated optically and acoustically. 5.2 Using the TAP function 1. Set the BTR2000 to metronome mode (press and hold the SOUND/METRONOME button for 2 seconds). 2. Press the TAP button at least 4 times in succession in the desired tempo. During your entry, the letters tap appear in the display. 3. The BTR2000 metronome takes this tempo and displays it in BPM. ◊ If the TAP button is pressed fewer than four times, the metronome returns to the last set value after 2 seconds. 4. If necessary, the tempo can be readjusted after setting using the wheel. 5. Briefly press the INPUT SELECT button. The metronome starts up. 6. The detected tempo is indicated visually and acoustically. Visual display The BTR2000 has two ways of indicating the selected tempo on the LED bar: • A flashing light indicates the tempo. • A light moves constantly from one side to the other with the beat. This simulates the needle of a standard mechanical metronome. You can toggle between these two display types as follows: 1. Set the BTR2000 to metronome mode (press and hold the SOUND/METRONOME button for 2 seconds). 2. Start the metronome by pressing the INPUT SELECT button. 3. Briefly press the MODE/FINE button to toggle between the two display types. 11 RACKTUNER BTR2000 User Manual 6. Using a Footswitch Single footswitches can be plugged into the MUTE and SELECT connectors (not included). ◊ Use only non-latching footswitches! The BEHRINGER DUAL A/B SWITCH AB200 is ideally suited. The following functions are available with the footswitch: TUNER METRONOME MUTE To mute MAIN output To mute MAIN output SELECT Toggle between INPUT1 and INPUT2/MIC inputs Activate/deactivate metronome Table 6.1: Options overview If you have a double footswitch such as the BEHRINGER FS112, it must be connected to the SELECT connector! Both functions (MUTE and SELECT) are then transmitted over a stereo connection and can be controlled using the two buttons. 7. Application Examples The following sample configurations should give you an idea how the BTR2000 can be integrated in a more or less complex environment. If you have only one amplifier available, the setup shown in figure 7.1 is recommended. AC POWER INPUT MODEL BTR2000 CONCEIVED AND DESIGNED BY BEHRINGER GERMANY. MADE IN CHINA CAUTION REPLACE FUSE WITH SAME FUSE TYPE AND RATING. AT TENTION UTILISER UN FUSIBLE DE RECHANGE DE MEME TYPE ET CALIBRE. RACKTUNER BTR2000 CAUTION RISK OF ELECTRIC SHOCK! DO NOT OPEN! MUTE SELECT SOUND MAIN 2 1 ATTENTION RISQUE DE CHOC ELECTRIQUE! NE PAS OUVRIR! CAUTION TO REDUCE THE RISK OF FIRE OR ELECTRIC SHOCK DO NOT EXPOSE THIS EQUIPMENT TO RAIN OR MOISTURE. (RING = MUTE) FOOTSWITCH OUTPUT INPUT MAIN INPUT 2 INPUT V-TONE GMX212 Fig. 7.1: BTR2000 configuration with only one amp 12 RACKTUNER BTR2000 User Manual Figure 7.2 shows an example of a more complex configuration. In this example, the BTR2000 is connected to 2 instruments and a double footswitch. AC POWER INPUT MODEL BTR2000 CONCEIVED AND DESIGNED BY BEHRINGER GERMANY. MADE IN CHINA CAUTION REPLACE FUSE WITH SAME FUSE TYPE AND RATING. AT TENTION UTILISER UN FUSIBLE DE RECHANGE DE MEME TYPE ET CALIBRE. MUTE CAUTION RISK OF ELECTRIC SHOCK! DO NOT OPEN! SELECT SOUND MAIN 2 1 ATTENTION RISQUE DE CHOC ELECTRIQUE! NE PAS OUVRIR! CAUTION (RING = MUTE) TO REDUCE THE RISK OF FIRE OR ELECTRIC SHOCK DO NOT EXPOSE THIS EQUIPMENT TO RAIN OR MOISTURE. FOOTSWITCH OUTPUT INPUT RACKTUNER BTR2000 SELECT SOUND POWERPLAY PRO-XL HA4700 INPUT 1 (1) DIRECT IN MAIN PHONES OUT HPS3000 INPUT 2 (2) V-TONE GMX212 Fig. 7.2: Separate playback of metronome click/reference tone (1) and instrument signal (2) 8. Installation 8.1 Rack installation Unbalanced ¼" TS connector strain relief clamp The BTR2000 requires one height unit (1 HU) for installation in a 19" rack. Be certain to leave an additional 10 cm free in the back for the connectors. For installation in a rack, M6 machine screws and nuts should be used. Ensure a sufficient air supply and to not place your BTR2000 on an end, for example, to prevent the unit from overheating. sleeve tip 8.2 Audio inputs and outputs sleeve (ground/shield) All audio inputs and outputs on the BEHRINGER BTR2000 are laid out as mono TS connectors. tip (signal) Fig. 8.1: 1/4" TS connector 13 RACKTUNER BTR2000 User Manual 8.3 Footswitch wiring Tuner If a double footswitch is plugged into the SELECT connector on the back of the BTR2000, the MUTE function is transmitted on the ring and SELECT is transmitted on the tip. Scale 12 equally tempered notes Frequency range 27.5 Hz to 4186 Hz Reference tone for manual or automatic calibration 440 Hz ± 12 Hz strain relief clamp Display scale ± 50 Cent (± 0.5 half steps) sleeve ring tip Display resolution ± 1 cent, ± 5 cents Stereo plug for non-latching footswitch Metronome Tempo range sleeve ground/shield ring mute tip select 30 BPM - 240 BPM Racklight Illumination 4 x LED, 5 mm, white Power Supply Power range The non-latching footswitch briefly connects either the sleeve and the ring or the sleeve and and the tip. Fig. 8.2: 1/4" TRS connector plug of a double footswitch ◊ Always make sure that only technically qualified people install and operate your RACKTUNER. During and after the installation, all those handling the equipment need to be sufficiently grounded in order to avoid the potentially damaging electrostatic discharge or similar damage that could have a permanent adverse effect on your equipment. 9. Specifications Audio Connectors INPUT 1 1/4" TS connector on the front and back Input impedance 1 MΩ, relay hard bypass INPUT 2 1/4" TS connector Input impedance 1 MΩ, buffered SOUND 1/4" TS connector Output impedance 4.5 kΩ MAIN 1/4" TS connector Output impedance 500 Ω Connector for Footswitch MUTE 1/4" TS connector SELECT 1/4" TRS connector USA/Canada 120 V~, 60 Hz China 220 V~, 50 Hz Europe/U.K./Australia 240 V~, 50 Hz Japan 100 V~, 50 - 60 Hz Power consumption 9W Dimensions/Weight Dimensions (W x H x D) approx. 440 x 113 x 483 mm (1.73 x 4.45 x 19.02") Weight approx. 1.24 kg (2.73 lbs) BEHRINGER is constantly striving to maintain the highest professional standards. As a result of these efforts, modifications may be made from time to time to existing products without prior notice. Specifications and appearance may differ from those listed or shown. 14 RACKTUNER BTR2000 User Manual 10. Short Instructions We Hear You