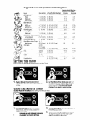
1
0127~INCH
BUILT-IN SELF-CLEANING &
CONTINUOUS-CLEANING
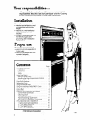
ELECTRIC OVENS Model RB47OPXL
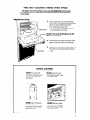
Manual Oven
light Switch
Upper
i
II
Copy
’ Complete
Model ant Serlai Numbers
iust behlnd the upper even dcmr)
2 Purchase
Your Model
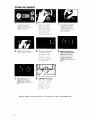
Air-Flow
Oven Door
Fiberglass
Heat Seal
Continuous-Cleaning
Lower Oven
II
v
and Serial Numbers
Here
(lrL)r-t the plare
date from your sales slop
Co~v this InformatIon
In these spaces
Keeo fhls book,
you; warrantv and the sales slop together
In a handy
place
See the “Cooking
Guide”for
important
Oven
Servce
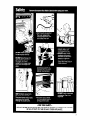
safety
To~c?ony
information.
and
Phone
Number
Your responsibilities.
l
.
Proper installation
ESDOnSibilitieS.
G&te”carefully
and safe use of the oven are your personal
this “Use and Care Guide”and
the “Cooking
for important
use and safety information.
Read
Installation
You must be sure your oven Is...
l
installed and leveled in a wall
or cabinet that will hold the
weight;
l
installed in a well-ventilated
area protected
from the
weather;
l
properly connected
to the correct electric supply and
grounding.
(See “Installation
Instructions.“)
Proper use
You must be sure your oven Is...
l
used only for jobs expected
of
home ovens;
@ used only by people who can
operate it properly;
l
properly
maintained.
Contents
Yotir Responsibilities
....
lnstallatlon
...
Pioperbse
.......
Safety
Using Your Ovens ...................
Baking in Either Oven .................
Adjusting the Oven Temperature
Controls
Broiling in Either Oven ...................
Oven Rack Positions .....................
..........
Setting the Clock
Using the Minute limer ....................
Using the Automatic
MEALTIMER Clock
Oven Lights ............................
Oven Vents ...............................
Cleaning
and Caring For Your Ovens .....
Control Panel and Knobs ...............
Cleaning
Chart ........................
The Lower Oven Door ...................
The Self-Cleaning
Upper Oven ..........
The Continuous-Cleaning
Lower Oven
.........
If You Need Service or Assistance
.........
1. Before Calling for Assistance
...............
2. If You Need Assistance
3. If You Need Service ..................
...............
4. If You Have a Problem
61986 Whirlpool Corporation
*Tmk
2
l
FOR
YOUR
SAFETY.
.INE OR OTHER FlAMh IABLE VAPORS AND LIQUIDS
OF THIS OR ANY OTHI IR APPLIANCE.
3
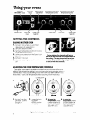
Using your ovens
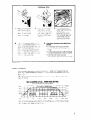
Automatic
MEALTIMER Clock
I
Minute
Timer
Manual Oven
Light Switch
Stop Time
Knob
/
/
Start Time
Knob
Adjustable
Upper Oven
Temperature
Control
Adjustable
Lower Oven
Temperature
Control
Clean
Lower Oven
Selector
Light
I
\
Lock Light
\
Upper Oven
Selector
SETTING THE CONTROLS
BAKING IN EITHER OVEN
1. Put oven ,acks where you want
2.
3.
4.
5.
6.
therrt
(See page 5 for suggestions
)
Set Oven Selector to BAKE
Set Oven Temperature
Control tc the baking temperature
you want
Let the oven preheat until the Signal Light
goes off
Put food n the oven
When dc ?e baking, turn both knobs to
OFF
ADJUSTING
During baking, the elements will turn on
and ofl to help hold the oven temperature
at
the settlng. (The top element will never turn
red, but will be hot.) The Slgnal Light will turn
on and off with the elements.
THE OVEN TEMPERATVRE CONTROLS
Does either oven seem to be hotter or colder
than your old oven at the same
settings?
The temperature
setting
in your old oven may have changed
gradual
:’
over the yea:s
The accurate
setting of your new ovens can seem different
If yoc.
think either cl’ both oven temperatures
Notches
1.
Pull the Cven Ternperature
Control
straight of.
2.
need
adjustlng.
Locking
Screw
1
lootn
L
Loosen the Locke
Ing screw,
NOTICE position
:?f notches
Tighten
the locking
follow
these steps
3. To lower the
temperature,
move
a notch closer to LO
Each notch equals
Jbout 10°F (5°C)
screw.
Replace
the knob.
4. To raise the
temperature,
move
a notch closer to HI.
tach notch equals
,2bout 10°F (5°C)
Tmk
BROILING IN EITHER OVEN
1.
Place the rack where LOU
want It loi brorlrng (See
below to suggestions
I
2.
4.
Set Over Temperature
Control t: J BROIL [Set c:~“Q
lower tel lperature
fc:
slower b-olllng
See
below )
5. Dbring broiling the oven
door must be partly open
A bull+-!n stop will hold It
there
Put broiler pan and focd
on the rack
3.
6.
Set Oven Selector
BROIL.
to
When broiling is done,
turn both knobs to OFF
Broiling can be slowed by setting the Oven Ternperature Control to a setting
lower than BROIL When it’s on BROIL, the broil element is on all the time. When it’s
or’ a temperature,
the element turns off and on The lower the setting, the shorter
tht-- times when the element is on.
The Oven Selector must be on BROIL and the door partly
open for all broiling temperatures.
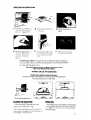
OVEN RACK POSITIONS
Position racks before turning on the oven.
There are two racks in the upper oven and one rack in the lower oven
The racks can be used in either oven.
Brorl Element
BAKING OR ROASTING
BROILING
Food for baking or roasting should be
placed
in the center of the over-i
Always le\.lve at least 1’ I to 2 Inches
(4-5 cm) be+,ween the slues of a ban and the?
oven wall a.id another p, in For more Infor,-:atlon see the Cooking Griiae
Adjust the top rack so the food to be broiled is
at a suggested
distance from the broil element,
isee page 6). ALWAYS broil with the door open
to the broil-stop.
5
Suggested
oven-rack
Food
Beef Steaks
Rare
Medium
Well done
Beef Steaks
Rare
Medium
Well Done
Hamburgers
Lamb Chops
Medium
Ham slice, precooked
or tendered
Canadian
Bacon
Pork Rib or Loin Chop
Well done
Chicken
Fish
positions
and broiling
times
Approximate
Minutes Selector set to BROIL
1st slde
2nd side
Descrlptlon
Inches fCm1 from toD
of food\o Bioll Elem’ent
1 (2.5 cm)
1 (2.5cm)
1 (2.5 cm)
3 (8 cm)
3 (8cm)
3 (8 cm)
7-9
9-11
II-13
3-5
4-7
5-7
lq2 (4cm)
I’,? (4cm)
1’~~ (4 cm)
14 (1 cm]
4
4
4
3
13-15
17-19
19-21
6-8
6-8
8-10
14-16
4-5
1 (2.5cm]
1+ .I
(l-2.5 cm)
i/2 (I cm)
34 -1
(2-2.5 cm)
2-3 lb
(l-l.5 kg)
cut in half
whole
fillets
3 (8cm)
6-8
4-5
3 (8 cm)
3 (8 cm)
6-8
6
4-5
4
-5 (IO-13 cm)
-5’ (IO-13 cm)
-5’ (10-l 3 cm)
(8cm)
4 -5 (IO-13 cm)
15
IO
7 -9 (18-23 cm)
3 (8cm)
3 (8 cm)
25-30
II-16
7-8
1 o-12
9-14
5-7
3 (8cm)
4 -5 (IO-13 cm]
3
6-7
3
4-5
Liver
Frankfurters
5ETIIN.G THE CLOCK
Push In and turn the Minute Emer Knob to set the Clock
1.
Push In Minute Timer Knob and turn
clokkwlse
until clock shows the right t,me
of day.
USING THE MINUTE
6
Let the Minute Timer Knob pop out. Turn
counterclockwise
until the Minute Timer
dial shows OFF. The clock setting will
change If you push In when turnrng.
TIMER
DO NOT PUSH IN THE KNOB when setting
1.
2.
the Min lute Timer
Wlthout pushing It In, turn the Minute
Timer Knob until the hand passes ths
setting YOU want
PUSHING IN AND TURNING THE KNOB
CHANGES THE CLOCK SDTING.
2.
Wlthout pushlng In, turn the knob back
the setting you want.
3.
When the time is up, a buzzer will sound
To stop the buzzer, turn the dial to OFF
wlthout pushing In the knob.
to
USING THE AUTOMATIC
1’ e Automatic
‘:t t, ws VOU set
To start
1.
and
stop
baking
4. Vlake sure the clock
To stop
baking
automatically:
IS set
of dclv
2.
Set the Oven Selector
TIMED BAKE
on
3.
Set the Oven Temperature
Control on the baking
temperature
you want
5.
Push in and turn the Start
Time Knob clockwise
to the time you want bck-
6.
Push in and turn the Stop
Time Knob clockwise
to the time you want the
oven to shut off
8.
To stop the oven before
the preset time, turn both
knobs to OFF
automatically
3,,: -: e ‘<
P> ,~ree yv.. aam ‘7er-n and
~;:cI.. >3tns rr~j,ys~jr, tt~e ,qven
>‘117, <:A1: ‘-” ‘-,e,e::t(>, * TIMED BAKE
1.
a.
3
:,e’ *- t3 c 0’. Iemperc!clre
Control on the
‘I -: \ LJI. I.:;)-rature
qod want
4~ r;q ;-- S(J, ‘Tr: >lC k !: #:ot to the right tlrne
! * L
SPECIAI CAUTION:
Use foe ds that will not go bad or spoil
#hihe
wa tlng for cooking to start. Avoid
-islqg dis-ies with milk or eggs, cream
soups, cl oked meats or fish, or any item
*lth oakbng powder or yeast
Smoke 1 or frozen meats may be used,
;<.I :: an vi>getables.
fruits and casserole*YC!G foo~ls Vegetables
can be cooked
in
.
CLOCK
MEALTIMER Clock is designed
to turn the upper oven on and off
even when you are not around. IMPORTANT: Follow these steps In order.
Put the racks where you
,c/~r?l then. and place the
*C:i.X!
;rl tht
oven
+I_U,F>r,g, . :Ice
MEALTIMER*
5.
Push in and turn the Stop Time Knob clockwise to the time you want the oven to shut
Off
6.
After baking is done turn both <rot:: I(
OFF
7. To stop the oven before the preset t1:~r-r~
turn both knobs to OFF
a covered
baking dish with about a halfcup (118 mL) of wafer for 1 to 1% hours.
Any food that has to wait for cooking
to
start should be very cold or frozen before
it is put in the oven. MOST UNFROZEN
FOODS SHOULD NEVER STAND MORE THAN
TWO HOURS BEFORE COOKING STARTS
7
If the steps ;or using the Automatic
MEALTIMER’ Clock are not followed in
order, the electric oven door lock may
be turned on. The door will then either
l not open;
l not close
all the way [the oven light stays
on].
If the Door Won’t Open:
1. Make sure the Clock, Start and Stop
Times are set to the right time of day.
2. Turn the Oven Selector and Oven
Temperature
Control to CLEAN.
3. Push in and turn the Stop Time Knob
past the right time of day
4. Wait 30 seconds.
5. Turn the Oven Selector to OFF and leave
the Oven TemperatureControl
at CLEAN.
The door will be unlocked within 10
seconds.
If the Door won’t Close:
1. Make sure the Clock, Start and Stop
Times are set to the right time of day:
open the oven door.
2. Turn the Oven Selector and Oven
Temperature Control to CLEAN
3. Push in and turn the Stop Time Knob
past the right time of day.
4. Push the automatic
light switch in and
hold it in for 10 seconds.
5. Let the oven switch go, turn the Oven
Selector to OFF. and leave the Oven
Temperature Control at CLEAN.
6. Push in the automatic
oven light switch
and hold it for another 10 seconds.
7. Close the oven door.
* Tmk
THE OVEN LIGHTS
Both oven lights will come on when you push the light Switch. Push
the switch again to shut them off. Both lights will also come on when the
upper oven door is opened.
To replace
the upper
or lower
1.
Turn oft tqe electric
at the rrain power
4.
Replace the bulb with a
OO-watt appliance
bulb
available
from most grocery, variety and
hardware stores
power
suppl\i
oven
light
bulb:
2. Remove the bulb cover by
pulling out on the wire
holder and moving it to the
side
3. Remove the light bulb from
its socket.
5. Replace the bulb cover
and snap the wire holder
In place The bulb must
have thb cover when the
oven is being used.
6.
Turn electrical
power back
on at main power supply.
THE OVEN VENTS
When the oven IS on, hot air and moisture
escape through a vent on top of the control
Tnese vents are needed for air circulation.
Do not block
the vents. Poor baking
panel.
can result.
Cleaning and caring for your ovens
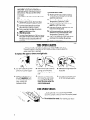
CONTROLPANELANDKNOBS
1.
First make sure
knobs are on OFF
then pull knob
stralght off.
2.
3. w3 n b'
Use warrv soapy
water ana a s3ff
cloth to wipe
the panel Rinse
and wipe dr,v
W(;‘~T 5..,.-,:
wc*er 4 r-f
an : dr
4.
.
Push knobs
straight back on
Make sure they
(-2’~ on OFF
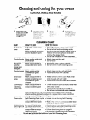
CLEANING CHART
WHAT TO USE
PART
Outside
oven
_~----~
Control
ot
Soft cloth, warm soapy
water
Nylon or plastic scouring
pad for stubborn spots
~~
knobs -warm, sudsy water and
bristle brush
Warm, soapy water or
Porcelainsoapy steel wool pads
enamel
broiler pan
and grid
Warm, soapy water
Control panel
Commercial
glass
cleaner
Warm, soapy water or
Oven door
plastic scrubbing
pad
glass
Commercial
glass
cleaner
Warm, soapy water or
Continuoussoapy scrubbing
pad
cleaning
lower oven
HOW TO CLEAN
l
l
l
l
l
l
l
-
Wipe off regularly
when oven is cool.
Do not allow food containing
acids
(such as vinegar, tomato, lemon juice or
milk) to remain on surface. Acids will
remove the glossy finish.
Do not use abrasive or harsh cleansers.
Wash, rinse and dry well
Do not soak
Wash with other cooking utensils.
Do not clean in self-cleaning
cycle.
l
Wash, rinse and dry with soft cloth.
a Follow directions
with cleaner.
Make certain oven !s cool. Wash, rinse
and dry well with soft cloth.
@ Follow directions
provided
with cleaner.
l
Clean stubborn spots or stains. Rinse well
with clean water
l
Follow directions
given on page 15.
l
Do not use commercial
oven cleaners.
Most fat spatters on the continuous-cleaning
porcelain-enamel
interior surface gradually
reduce to a presentably
clean condition
during normal baking or roasting operations
Self-Cleaning
Oven cycle
l Leave
In oven during Self-Cleaning
Oven racks
cycle.
Warm, soapy water or
l Wash. ?rnsf; znr3 ilrv
dse soapy steel wool
soapy steel wool pads
pails
for
stubborn
ureas
---~~
~
~~~
Self-Cleaning
For areas outside Selfl Clean
before using S&If-Cleaning
cycle
Cleaning
area use warm.
to prevent burn-on of soil
Upper Oven
l Follow
directmns
given on pagelll.
soapy water or soapy
steel wool pads
l Do not use commercial
oven cleaners.
Do not use foil to line the bottom of your Self-Cleaning
Oven.
l
9
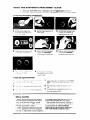
THE OVEN DOOR
The upper
REMOVING
oven door should
not be removed.
THE LOWER OVEN DOOR
3.
Pull the door, with the
hinges, straight away
from the oveP
3.
Wnen the stops in the
hinge supports slide into
the oven openings,
the
door will snap into place
and can be closed
REPLACING THE LOWER OVEN DOOR
THE SELF-CLEANING
UPPER OVEN CYCLE
The upper oven self-cleaning
cycle uses very hlgh heut to burn away
soil. Before you start, make sure you understand
exactly how to use the
cycle safely.
BEFORE YOU START
1.
Clean areas that may not be cleaned
during the cycle. Use hot water and detergent or a soapy steel-wool pad on...
l the frame
around the oven
l the inside
of the door, especially
the
part outside the oven seal.
DO NOT try to clean the fiberglass
NOT move it or bend it.
seal. DO
2.
Remove any pots or pans you may have
stored in the oven. They can’t stand the
high heat.
3.
Wipe out any loose soil or grease. This will
help reduce smoke during the cleaning
cycle.
SPECIAL CAUTIONS
DO NOT block the vent
during the cleaning
cycle.
Air must move freely for
best results
DO NOT use commercial
oven cleaners in your oven.
Damage to the porcelain
finish may occur.
DO NOT touch the oven
during the cleaning
cycle
...it can burn you.
DO NOT use foil or other
liners in the oven, During
the cleaning
cycle, they
can burn or melt.
11
1.
Make sure the clock
and start and stop
time a:als all have the
right tit-ie of dav
2.
4.
Set the Oven Tempers
ature ( gntrcl tr’ CLEAbd
5.
7.
When the door IS unlocked turn the Oven
Temperature Control to
OFF
Push in the Stop nrne
Knob ant *urn the
ilCll~cl
3.
Set the Oven Selector
to CLEAN. The Clean
Light will come on
and the door will lock
automatically
6.
When the Lock Light
goes off, turn the Oven
Selector to OFF and
leave the Oven Temperature Control at
CLEAN. This unlocks the
door.
clockvvlse
~Jbout two or three
hmrs [Twc Tour’. tor
Night solI. trlree c’
rnore for heavier
si;~
The Lock Light comes
or :vhen the over]
yeb above
i1orricI
baclrig
temperaturelhe rloor (xln t be
,Inli,ckeil
ahen +?e
10~4 Light c. on
DO NOT TOUCH THE OVEN DURING THE CLEANING CYCLE. IT CAN BURN YOU.
SPECIAL TIPS
1.
Keep
,ientli
clear
get rI
,jdor
-16 kitchen wel;
:tec; during thf;
ng <cycle to tlt-‘iiI
of IIorrr.al neii!
IT:-! srn:-jke
3.
If the cleaning
cycle
doesn’t get the oven as
-lean as you
expected,
the cycle
Tay not have been set
long enough Set the
r-leaning time longer
for heavier so11
5. To stop the cleaning
cycle atter it has
started:
l
Turr the Stop Time Knob clockwlse
until tne hrJnd cloints to the right time
3’ day.
* -‘I!rI: the Oven Selector to OFF and leave
tPe Oven Temperature Control at CLEAN
4 When the oven cools, you can
:?:len the door Walt until the oven IS cool
HOW IT WORKS
r)urIr, 4 +t~ self-clearllng
c;yc.le Itle :;v~n get: rri~( ,ri hotter rhcn It does for vaking
875 F (468 C] ‘his he:j! breaks up grease and soil and
or br III;Q approximately
burr’ it si!
The (. -aph shCl%wsa:?vroximute
tempera?i.,i+;
an:: !!rres U’irlng a self-cleaning
cvcl4 for ? cloljrs
SELF-CLEANING
(Approximate
1 hr
CYCLE-THREE
Temperatures
1’. hrs
2 hrs
HOUR SEITING
and
Times)
2 $2 hrs
~JOI ;e rhat t*le hefJtlng
stoos XwherTthe 3-hour setting
for. e eden ‘:I COCIIdown enc,~gD !o :.Ir-,lc: +
IS
uu b.3 that It take:
lor?ger
13
THE CONTINUOUS-CLEANING
Standard
oven
c lntinuous-cleaning
porcelain-enamel
walis
LOWER OVEN
W;~P smc,,sth r;orcelalrl-enor7eI
ure _ x!ed
over! ~L’o~!s are ::L>ated with a sper:lal
rougher
*GIL.
;:(J: ..3:p3,gs ,>u: CT’ ;Qe ‘s-,.,jhr
‘he ‘. !. Lc;~, s.jrtpre
A fat spatter
beodc. .jr.
s Irface
The beaa
ot :a? iV,ars ant: turns black
T?e :,: rexd-out
fat gradually
t Jrns away
at medium
to high baking temperatures
; 357 -475 F 17” :.3! Ci jrondltltc:th e oven Cari :etarn to c aresentabl,/
yeor’
USING FOIL
Foil must be used on the lower oven bottom
be used properly.
cjslriq foi; n ;hs. self-clecri!ng
Cut foil from
a roll of heavk-3ufv
(f .grt NQ 24143’,: trr)r~. ,J:>~J~‘N~II
:Ift the cool bake element
slightly
to Ift the feet off the
oven botts >rn
:B-Inch
‘:,:jili
to catch
spillovers.
The foil must
IS not rec:.rr!menae;:
upper
oven
(45 cm) aiijmtncim
Applla7ce
S;!Je the foil ,-rnderthe
element
fOli or %jub a fol! KI?
de,.:ie,
Dake
Fo! proper
boklng.
!ower
bake element
so all feet
rest solldly
on the foil.
the
1.
The oven window and racks are not
coated. Clean them by hand.
2. The oven door does not get as hot as the
walls. Some hand
be needed.
cleaning
3.
If you do more broiling than baking,
cleaning
may be needed.
4.
Use aluminum foil on the oven bottom according
to instructions.
Spillovers do not burn away and
may stain the bottom.
may
hand
HAND CLEANING
DO NOT USE OVEN
CLEANING PRODUCTS.
Some can be trapped
in
the porcelain-enamel
surface and give off
harmful fumes.
WINDOW-Keep
clean
with hot sudsy water,
Do not use steel wool or
abrasive
cleansers
Use a
plastic scouring pad for
stubborn spots. Rinsewell.
RACKS - Use a soapy
steel-wool
pad for best
results. Rinse well.
WALLS AND DOOR - Wash with hot soapy
water. Use a soapy steei-wool
pad or
plastic scouring pad for stubborn spots. Rinse well
If you need service or assistance,
we suggest you follow these four steps:
1
l
Before calling for assistance.. .
Performance
problems often result from
little things you can find and fix yourself without tools of any kind.
If nothlng operates:
Is the oven correctly
wired to a live circuit
with the proper voltage?
(See lnstallatlon
Instructlons.)
l Have you checked
your home’s main fuses or
circuit breaker box?
l
If the upper oven will not operate:
Is the Upper Oven Selector turned to a setting (BAKE or BROIL, but not TIMED BAKE]?
l Is the Upper
Oven Temperature
Control
turned to a temperature
setting?
l
If the lower oven will not operate:
l Is the Lower Oven Selector
turned to a setting (BAKE or BROIL]?
l Is the Lower Oven Temperature
Control
turned to a temperature
setting?
If the self-cleanlng
cycle will not operate:
Are the Upper Oven Selector and Upper
Oven Temperature
Controls set to “CLEAN”?
l Does the Start Ttme dial show the correct
time of day?
l Is the Stop Time dial set ahead
to the time
you want the cleaning
cycle to stop?
l
If roll Is vlslble on continuous-cleaning
oven
flnlsh:
a The special finish is designed
to gradually
reduce oven soil during normal baking
or roasting. It is not designed
to keep your
oven spotless...only
presentably
clean.
l
If you broil often, you may see oven soil.
l
The door is cooler than oven walls. Soil will
be more visible on the door than other areas
in the oven. See page 15, “Hand Cleaning.”
15
If cooklng results aren’t what you expect:
Is the oven level?
Are you using pans recommended
in the
Cooklng Guide?
If baking, have you allowed
i% to 2 inches
(4-5 cm] on all sides of the pans for air
circulation?
Does the oven temperature
seem too low or
too high? See page 4, “Resetting the oven
temperature
controls.”
Have you preheated
the oven as the recipe calls for?
Are the pans the size called for in the
recipe?
Are you following a tested recipe from a
reliable source?
Do the cooking utensils have smooth, flat
bottoms?
See the Cooklng Guide for more information
on cooking problems and how to solve them
2
l
Ifyou need assistance”‘. . .
Call the Whirlpool
COOL-LINE * service assistance telephone
number. Dial tree from:
Continental
US. . . . . . . . . (800) 253-1301
Michigan
. . . . . . . . . . . . . . . . (800) 632-2243
Alaska & Hawaii . . . . . . . . (800) 253-l 121
and talk with one of our trained Consultants.
The Consultant
can instruct you in how to obtain satisfactory
operation
from your appliance or, if service is necessary,
recommend
a
qualified
service company
in your area.
3
If you need service * . . .
l
Whirlpool
has a
nationwide
network of franchised
TECH-CARE ’ Service
Companies.
TECH-CARE service
technicians
are
trained to fulfill the
product
warrantv
and provide
afterwarranty
service,
anywhere
in the United
States. To locate TECH-CARE service
in your
area, call our COOL-LINE service assistance
telephone
number [see Step 2) or look in your
telephone
directory
Yellow Pages under:
’ de
ELECTRICALAPPLIANCESMAJOR-REPAIRING
APPLIANCES-HOUSEHOLDMAJOR-SERVICE
B REPAIR
OR
WHIRLPOOLAPPLIANCES
FRANCHISEDTECH-CARE
SERVICE
SE‘QX~,(‘E
XYZ SERVICECO
123 Maple
999 9999
C’O.MPA VIES
OR
.SEHI'I('I?‘
XYZSERVICECO
123Maple
WASHING MACHINES.
8 IRONERS-SERVICING
4
l
8 PARTS
WHIRLPOOLAPPLIANCES
FRANCHISEDTECH-CARESERVICE
('0.\!/'.4
VIE.';
999~9999
DRYERS
WHIRLPOOLAPPLIANCES
FRANCHISEDTECH-CARE
SERVICE
S.EH\,~'t
XYZSERVICE CO
123 Maple
999.9999
('OM1?4.YIE.S
If you have a problem”‘. . .
Call our COOL-LINE service assistance
telephone number [see Step 2) and talk with one
of our Consultants, or if you prefer, write to:
Mr. Robert Stanley, Division Vice President
Whirlpool Corporation,
2000 US-33, North
Benton Harbor, Ml 49022
If you must call or write, please provide: model
number, serial number, date of purchase, and
a complete
description
of the problem.
This
information
is needed
in order to better respond to your request for assistance.
FSP is a regrslered
trademark
of Whirlpool
Corporation
for
quality parts Look for this
FSP
symbol of qualrty whenever
you need CI replacement
part
R for your Whirlpool
appliance
FSP replacement
parts
wrll fit rtght and work rrght, because
they are
made to the same exactrng
specifications
used to burld every new Whrrlpool
appliance
0
Benlon Harbor. Michigan. Aulomalic Washers. Ctolhes Dryers
Freezers, Refngeralor-Freezers.
Ice Makers, Dishwashers
Built-in Ovens and Surtace Units. Ranges. Microwave Ovens,
Compaclors. Room Air Condilioners. Dehumidifiers.
Central
Healing and Air Condilioning Systems.
Part No. 5040210/816018 Rev. B
PI986 Whirlpool Corporation
Printed in U.S.A.