1
OWN ER'SMANUAL
SEWING
MACHINE
MODEL _385._17724_ _O
IMPORTANT SAFETY
nNSTRUCTIONS
Your
sewing
machine
Read all instruction
is designed
before
and constructed
using this
sewing
only
4.
Never
operate
ventilation
accumulation
for HOUSEHOLD
use.
machine.
Never drop
6.
Do not use outdoors.
7.
Do
8.
t.
G E _-
An appliance
unplug
2.
should
this
and before
Always
To reduce the risk of electric shock:
never
appliance
from
be left unattended
the
electric
when
outlet
not
plugged
immediately
in.
Always
after
10.
before
relamping.
Replace
bulb
with
same type
Do
rated
not
11.
reach
for
the
appliance
that
has
fallen
into
water.
4.
Do
not
place
or sink.
or store
Do not place
appliance
where
{n or drop
into
it can fall
water
or be pulled
or other
into
a tub
or miury
To
reduce
the
risk of
fire,
disconnect,
not
Keep
fingers
Do
not
allow
appliance
the sewing
Always
use the
Do not pull
Switch
the
15.
2_
Use this
3.
Close attention
is necessary
when
this
only
attachments
for
its intended
recommended
use as described
by the manufacturer
in this manuat.
as contained
in
manual.
Never
working
water.
center
Keep
free from
any opening.
(spray)
products
are being
used or where
to
the off
('0")
position,
then
remove
on cord.
To unplug,
grasp the
plug,
not
from
all
machine
operate
this
properly,
Return
appliance
if
it has been
the appliance
for examination,
if it has a damaged
repair,
to
cord
dropped
or damaged,
the nearest
authorized
electrical
or mechanical
or plug,
if it is not
or dropped
dealer
into
or service
adjustment.
the
proper
moving
parts.
Special
care
is required
needle.
needle
ptate.
The
wrong
plate
can cause
the
the
needle
any adjustment
in
needles.
or push fabric
sewing
area,
machine
such
bobbin,
or changing
Always
unplug
mentioned
while
the needle causing
covers,
off
_t to break.
("O")
as threading
presser foot,
the
stitching.
sewing
lubricating,
in the instruction
when
needle,
making
changing
needle,
threading
and the like.
machine
or when
from
the
making
electrical
any
other
.outlet
when
adjustments
manual.
is used by or near children.
appliance
Use only
this
to be used as a toy.
aerosol
pulling
away
around
removing
t.
into
all controls
by
13.
shock,
to persons.
any object
turn
unplug
It may deflect
electric
blocked.
controller
outlet.
Do not use bent
liquid.
burns,
opening
and foot
dust, and loose cloth.
where
12.
14.
WAR Ni NG-
air
needle to break.
Unplug
immediately.
Do
any
machine
cord,
using
15 Watts.
3.
9.
or Insert
operate
with
of the sewing
is being administered.
p!ug from
cleaning.
unplug
To
appliance
of tint,
5.
oxygen
DAN
the
openings
SAVE THESE INSTRUCTIONS
SEARS, ROEBUCK
AND CO.
Dear Customer:
You have just invested in a very fine zigzag sewing machine. Before using your new Kenmore machine,
please pause for a moment and carefully read this booklet which contains instructions on how to operate
and care for your machine.
Specific instructions are given on threading, tenston adjustments, cleaning, oiling, etc. This will help you
obtain the best sewing results and avoid unnecessary service expense for conditions beyond our control.
Advice on the operation and care of your machine is always available at your nearest Sears Retail Store.
Please _emember, if you have questions about your machine or need parts and service, always mention
the model number and serial number when you inquire.
Kenmore Sewing Machine
Record
m
number
of this
are located
space
provided
appliance.
below
the
The model
on the nomenclature
plate,
modef
number
number
and
serial
and serial number
as identified
on Page 4 of
this booklet.
Model No. 385,
Serial No,
Retain these numbers for future reference.
THIS MODEL
IS A CENTER
NEEDLE,
LOW BAR SEWING MACHINE,
TABLE
SECTION
SECTION
SECTI ON
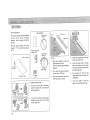
KNOW YOUR MACHINE
A Portable case or Cabinet is Available ...............
Locate and Identify the parts ................
identify the Accessories ......................
2.
PREPARE YOUR MACHINE FOR SEWING
OF CONTENTS
1.
Darning ..............................
Straight Stretch ...........................
Zigzag Stitches ..........................
o Basic Zigzag ...........................
o Satin Stitch ............................
o Applique .....................
Bar Tacking .........................
o Monogramming
........................
o Embroidery .........................
o Sewa Button ..........................
o Overcasting Stitch ........................
• Rick-Rack Stretch ......................
o Three-Step Zigzag .......................
Overcast Stretch Stitching
...................
• Serging or Pine Leaf Stretch Stitching ............
Blind Hemming ............................
Lace Work ................................
Buttonhole Making ........................
• Learning to Sew Buttonholes
................
o Built-in System ........................
o Using Buttonhole Attachment ...............
Sew in a Zipper ..........................
Shell Stitching ............................
Two-Point Shell Stitching ......................
Smocking ...............................
Stretch Patching ...........................
Fagoting Stitch ...........................
Herring Bone Stretch .........................
Elastlc Stretch Stitch .........................
Box Stitching ..............................
Two-point Box Stitch ........................
Overedging Stitch ...........................
Decorate with Geometric Patterns ...............
2
2_'3
4
Set Up the Machine .........................
5_9
e Plug in the Machine and Switch on the Power .......
5
o Foot Control Use ..........................
5
o Setthe Pressure Dial .........................
6
o Setting Spool Pins ..........................
7
= Adjust the Presser Foot Lever .............
7
a Accessory Storage Box ....................
8
• Free Arm Sewing: the Removal Extension Table . _ . 8"9
Know What the Presser Feet Will Do ............
10_!3
o Check Your Presser Foot ....................
10
a Change the Presser Foot ......................
10
• Presser FootTypes
...........
, ............
11"_13
Choose Your Needle and Thread , . , ...........
13_14
o Check Your Needle ........................
13
o Fabric, Needle, Thread and Stitch Length Chart .....
14
o To Change Your Needle .......................
14
Prepare the Bobbin ........................
15_16
o To Remove the Bobbin from the Machine .........
15
• Wind the Bobbin
.........................
15
• insert the Bobbin into the Bobbin Holder .........
16
Prepare Your Top Thread ....................
17_20
o Thread Your Needle ...................
t7
o Pick Up Your Bobbin Thread .................
18
o Adjustthe Top Thread Tension ..............
19_20
Stitch Selector ..............................
20
Stitch Width Control .........................
21
Stitch Length Control ........................
21
Adjusting Stretch Stitch Balance ................
21
Reverse Stitch Control ........................
22
Starting To Sew ...........................
22
3.
LEARN THE STITCHES
Practical Stitch Chart .....................
23"_27
Straight Stitches .......................
28"_29
e Straight Stitch ...........................
28
o Use the Seam Guides .......................
28
o Turn a Square Corner ......................
28
• Use the Darning Plate .....................
29
• Topstitching
............................
29
SECTION
4.
PERFORMANCE
PROBLEMS CHART
When to Do When ........................
SECTION
5.
56"_57
CARE FOR YOUR MACHINE
Replace the Light Bulb ........................
Clean the Bobbin Holder ......................
Clean the Hook Race and Feed Dogs ..............
Oiling the Machine ..........................
PARTS LIST
30
30
31_38
31
32
33
33
34
34
35
36
36
37
38
38
39
40
41_47
41
42_-43
44_47
48_49
50
50
51
52
52
52
53
53
54
54
55
......................................
58
58
59
59
60"61
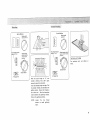
,!,Ro_tarole
:Gase:_:gr_,_Cabmet';tsAva=labl
_L{!!A
ei_J
A
full line of
nearest
Sears
sewing
retail
cabinets
store
or
is available
through
our
at your
general
catalog,
Another
your
option
Kenmore
_ . _ buy a Carrying
goes anywhere,
can
Thread
Case _ , . then
be stored
Spool
Pins
anyBobbin
where.
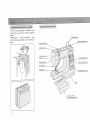
Upper
Take-up
Thread
Winding
Spindle
Guide
Lever
Top Thread Tension
Stitch
Face Cover Plate
Control
_
Width
Control
Stitch
Length
Control
Reverse
Stitch
Control
Thread Cutter
Needle Plate
k.
(-
Base
I
i
,J
Arm
Cover
Carrytng
Pla_,e
Handfe
\
Guide
Needle
Clamp
Presser Foot
Thumb
Screw
Hand Wheel
Push-Pull
Thread
Foot
CIu[ch
Snap-on
Sti[ch
Selector
Stretcll
S_tch
Button
Presser
Free Arm
Light and
Power Sw_[ct_
Adiuster
_
Foot
,_/
Control
/
Plug Con nector
Nomenclature
Plate
3
f
Bobbin
Darning
Zipper
plate
toot
Buttonhole
opener
Large screw
driver
Needle
Small
Lint
brush
Spoo{
pin
set
screw
dr_ver
Y
Satin
toot
Straight
stHch |oot
Siiding
buttonhole
stitch
toot
Buttonhole
Buttonhole
4
guide
plate
Base plate
Buttonhole
felt
templates
_
toot
o
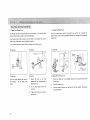
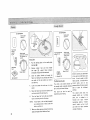
Plug m the Machine
and Switch
•
on the Power
Foot
Cont_o|
Use
f
Power
suppty
plug
Power
switch
I: .....
/.t
.....
::;,;::;,,L ...........
!
/
Foot control
Sewing ligl_l
Power
sw_ tch
k_
4.
Plug
connector
inserting
machine,
be
sure
the
plug
into
the
power
your
sw_tch
ts
OFF.
Check
Vott
2.
3.
your
outlet
a 110to
t20
the
outlet,
as shown,
machine
the power
sw_tch to turn
The
FEATURE:
machine
interrupted
or
light/power
sw_tch
control
you
not
operate
is turned
stop
sewing,
to
unless
the
If you
are
on.
turn
prevent
off
the
injury
to
To
regulates
plug
into
the
ft will
only
supply
plug into
three-prong
fit one way.
the outlet.
the
speed
at
sew.
increase
speed,
the ball of your
will
switch
foot
which
light.
decrease
gently
press down
with
foot.
speed,
release
your
foot
control
is sensmve
pres-
sure slightly.
NOTE:
The
foot
wilt
increase
sewing
AC outlet.
insert
Insert
to be sureitls
and sewing
light/power
chitdren.
1.
and power
To
SAFETY
Your
Before
light
on the power
Machine
plug
NOTE.
J
Push the
decrease
speed
Practice
on
regulate
your
your
or
and
your
immediately.
a scrap
sewing
taste and needs.
of
fabric
to
speed
to
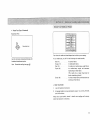
o Setthe
Pressure Dial
The pressure
control
Set the dial aligning
dial
the setting
3 .....
most
2 .....
applique
t
basting,'sewing
.....
NOTE:
is located
mark
on the dial with
the groove
as follows.
sew}ng
and Cut-Out
for velours
The
pressure
the machine
work
chiffon,
Also
it.
}nside the face cover plate,
lace, organdy
and knits
dia}
should
is ready
iwJth
more
and other
be reset at 3 after
for most
normal
lightweight
fabrics.
stretch).
sewing
changing
pressure,
the next time
so
you use
o Setting
Spool
Pins
a
Adjust
the Presser Foot
Lever
o
Thread
Cutter
F
(.- ....
Spool pin tel_._
Spoo_ p_n ....
,
--
I
Normat up
pl_stllOn
The
spool
spools
pins
of thread
are used
m order
for
to
holding
the
feed thread
to
You
the machine,
To use, putl
spool
storage,
felt
up
on
the
the
spool
pros,
pins.
Place the
The
Push
down
presser foot,
for
You
Presser
Foot
Lever
to help
foot.
you
and
lowers
your
for
174" higher
easy removal
place
heavy
than the normal
of the presser foot
fabrics
under
the
or
presser
need a pair
after
handy
thread
The
threads
starting
can ratse it about
up position
raises
don*t
thread
of scissors to cut the
you finish
sewing.
Just use the
cutter.
are cut
the next
the
seam,
proper
length
for
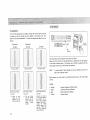
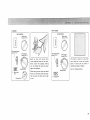
Accessory
Storage
Box
o
Free-Arm
Sewing:
the Removable
Extension
Table
Your sewing machine can do free arm sewing,
This feature makes sewing easy for:
To remove:
\
\
To Remove
the Extension
(for free-arm
1.
The lid
of
open toward
the
accessory
storage
box
lifts
you,
Grip
Table
sewing)
the table
wtth
your
index finger
and thumb,
as shown.
2.
Pull gently
toward
you_
J
Sewing accessories
tn the box.
are conveniently
tocated
The extenston
table w_lt snap out.
Bar tacking
and
To Attach:
made
Extension table
around
jlot
To Attach
the Extension
(for flat-bed
Table
sewing)
1.
Fit the tabs into
2.
With
your
thumb
the slot,
as shown.
and index
finger,
gent|y
snap in.
to reinforce
waistlines
garments
on
to avoid
the needle.
pockets,
ready-made
fabric
plackets
or homebunching
* Stitchingsleeves,
waistbands,
pant_egs0
or anycirculargarment
area.
* Darning
socksor mending
knees,
elbows,
or areas
ofwearinchildren's
clothes.
* Sewingbuttonsonsleeves,
waistbands,
etc.
=
Check Your PresserFoot
The
Presser feet are an important
what
each foot
does in order
Your
presser foot
snaps on the foot
If you
feature
to use them
of this
need to remove
which
or attach
is seldom
the foot
You
Use the
need to know
effectively.
is held in place by a Foot
holder,
machine,
Holder.
Each presser foot
merely
correct
Stitch
Pattern
presser
feet.
presser
Chart
foot
and the
for
the
detailed
stitch
you
directions
wish
to
sew,
for sewing
with
Consult
the
the various
removed.
holder,
here is what
you do:
To Attach:
To Remove:
Change the Presser Foot
To
Snap Off:
Presser bar --
Foot
holder
SCreW
I
To Remove:
Turn
the
the
screw
machine.
To Snap Off the Presser Foot:
To Attach:
toward
Use the
the
back
large
of
1.
screw
driver.
Match
the
holder
with
hole
in
the
the threaded
foot
1.
hole in
the presser bar.
2_
Fit
the
foot
holder
screw
into
the hole,
3.
10
Raise
the
toward
you.
screw
by
turning
it
needle
bar to
Raise the presser foot.
3.
Press the
will
its highest
position
by turning
the
hand
wheel
you,
2,
foot
Tighten
the
toward
snap-on
drop off.
button
on
tile
back
of
the foot
holder.
The presser
e Presser Foot Types
Straight
f
Zigzag Foot
f
A:
Zigzag
foot
Foot
H:
Straight
foot
To Snap On
f
stitching.
Use this foot exclusively for straight stitching
using center needle position only.
Uses:
Uses:
Use this foot .for both
Gr°°ve _
P_
To Snap On the Presser Foot:
1.
Place the presser foot so the horizontal pin on the foot lies just
under the groove of the foot
holder.
2.
Lower the presser foot holder to
lock the presser foot in place.
NOTE:
If
you
do
not
hear the
presser foot snap in place,
press down on the presser
foot holder firmly until you
hear the snap.
straight and zigzag
Zigzag stitching (see page 31),
Bar tacking (see page 33),
Button sewing (see page 35),
Rick-rack stretch (see page 3_6),
Three-step zigzag (see page 37),
Straight stitching (see page 2__8),
Topstitching (see page 2__99),
Straight stretch (see page 30).
Overcast stretch (see page 38),
Lace work !see page 40),
Two-point shell stitching
(see page 5__00},
Smocking (see page 51),
Stretch patching (see page 51),
Fagoting (see page 52),
Herring bone stretch (see page 52),
Elastic stretch (see page 533),
Box stitching (see page 5__3),
Two-point box stitch (see page 54),
Overedging stitch (see page 5_44).
11
o
PresserFoot Types (Continued)
SlidingButtonhole
Foot
Zipper
Slid ing bu ttonhoie
Use this foot
for
buttonholes
system,
it is marked
buttonholes accurately.
Uses:
Buttonhole
to
Foot
foot
of built
Stitch
Foot
F:
E: Zipper foot
in
This
foot
measure your
your
zipper.
making (see page 42).
Satin
zipper
Uses:
can be set to sew on each side
The edges of the foot
guide the
and keep the seam straight.
Zipper application
of
(see page 4_88).
Use this transparent
outlining applique.
Uses:
Satin
stitch
Applique
(see page 32),
(see page 33),
stitching
Geometric
(see page 3_4_4),
isee page 5_0),
decoratwe
(see page 5_55).
I2
foo=
foot for satJnstitch and
Monogramm+ng
Shell
Sat+r} stitch
stitching
o PresserFoot Types
Buttonhole
(Continued)
Foot
t3uttonholo
toot
Your
Use this
footwhen
buttonhole
Uses:
making
attachment
But_onhote
buttonholes
with
In your
system.
making
choice
of needle and thread
needle case, you will
Blue (1])
Orange
(see page 44)
............
Purple
the following
for
........
fabrics
or medium-heavy
medium-heavy
topstJtchJng
(This
Green
(18)
..........
for
o
Check
Your
has
topstitch
heavy
stitching
weight
weight
and
fabrics
decorative
on these fabrics
needle
thicker
needles:
fabrics
medium
for
you are sewing.
color-coded
for lightweight
............
(16)
find
on the fabric
for stretch
( t t ) ........
Red (14)
depends
a larger
thread
hole
for
lng thread.)
weight
fabrics
and decorative
top-
on these fabrics
Needle
t_
Look for barbed
2.
A damaged
needie
and silk-like
fabrics.
Always
buy
smooth
and consistent
a good
or blunt
point.
can cause permanent
quality
thread,
it should
snags or runs
resist
in knits,
tangling
fine silks
and be strong,
in thickness.
13
Fabric,
Needle,
Thread
FABRIC
Lightweight:
Batiste, Dimity, Chiffon,
Silks, Fine Lace, Organza,
Crepe, Taffeta,
Voile,
Organdy
Medium Weight:
Cotton,
Cotton
8tends,
Percale, Gingham,
Shantung,
Piclue_
Seersucker,
Satin, Knits,
Vinyl Suntmgs, Linen,
Woof Crepe, Leather
Medium
Heavy Weight:
Corduroy,
Denim, Wool,
Sailcloth,
Wool FIannel,
Gabardine,
Velvets,
Leather
and
Stitch
Length
NEEDLE
SIZE AND
COLOR
11-ORANGE
14-RED
To Change
Chart
THREAD
SIZE
Polyester Core/Cotton
Wrap
Fine Mercerized
Cotton
Silk A
2
(12 stitches
inch}
50 Mercerized
Cotton
Polyester Core/Co tton
Wrap
Silk A
2--2,5
|10-12 stntches
per inch)
per
4.
Needle
L.
14-RED
or
16-PURPLE
Heavy Weight:
Coatings,
Upholstery
Cotton
Duck, Heavy
Twills. Canvas
18-GREEN
OecoratLve top*stLtchlng
on all types ot fabric
16-PURPLE
18*GREEN
Stretch Fabric:
Polyester
Double Knits.
Nylon Tricot,
Jersey.
Stretch Terry, Spandex,
Cire Tricot
11-gLUE
(STRETCH
FABRIC
NEEDLE)
50 Mercerized
Cotton
Mercerized
Heavy-Duty
Polyester
Core/Cotton
Wrap
Silk A
2-3
(8-10 stitches
per inch )
Heavy Duty Mercerized
Cotton
Po)yester
Core/Cotton
Wrap
Silk A
3
{8 stitches
inch}
Buttonhole
Twist
(Use as top thread only)
Polyester
Core/Cotton
Wrap
50 Mercerized
Cotton
Needle
RECOMMENDED
STITCH
LENGTH
SETTING
"
;
clamp screw
/,
F}et
s_de
away
irom
you
-.,/
per
NOTE:
Raise
tion
.....
3-4 ' '
(6-8 stitches
per inch )
2--2,5
(10-12 stitches
per inch )
the
by
needle
bar
turmng
the
to
its
hand
highest
wheel
positoward
you.
t.
Loosen
the
toward
needle
Remove
3,
Insert
the
the
needle
new
with
the
flat
4.
Push
the
needle
5.
Tighten
box.
clamp
screw
by
turmng
nt
you.
2.
large
14
Your
the
by
pulling
needle
into
side
away
up
needle
screwdriver
from
it
downward,
the
needle
you,
as far as _t will
clamp
from
screw
your
clamp
go.
firmly
accessory
with
the
storage
'
o
To Remove
the Bobbin
from
o
the Machine
Wind the Bobbin
f
1.
Gently
push
_t towards
2.
Set astde.
3.
Lift
down
on
the
bobbin
cover
plate
and slide
you.
Ctu[ch
out the bobbin,
as shown.
1.
Put
your
spool
of
thread
onto
spool
pin,
with
the
thread
winding
in the
direction
sh own.
2.
Putl
the
clutch
winding
NOTE:
The
bobbin
the
amount
(example
winder
of
1/ 2 full
adjustment
loosen
you
use
the screw
to
stopper.
stopper
thread
adjust
or full
your
one
the
can
needed
position
Do not take screw
on
etc.).
large
turn
be adjusted
the
Draw thread
4.
Place
To
screw
make
driver
or tess, This
of
bobbin
all the wayout.
for
will
the
and
allow
winder
from
the
machine
to
stop
the
needle
from
moving
while
you
through
bobbin
on
bobbin
winder
tension
the bobbin
winding
to the right
until
disc as shown.
spindle
so that
the
thread
comes
on top,
Push the bobbin
6.
Holding
7.
When
the
spool
the threaded
5.
bobbin
from
the bobbin.
3.
out
away
onto
the
winder
spindle
end of thread,
bobbin
is slightly
depress
fiIled,
the foot
stop
it clicks.
control.
the machine
and clip
the thread
coming
from
bobbtn.
8.
Slowly
start
the machine
9.
Push the
10,
Remove
11.
Push in the clutch
bobbin
winder
again and wind
spindie
the thread
until
the bobbin
stops.
to the }eft and clip the thread,
the bobbin.
for normal
sewing
operation.
15
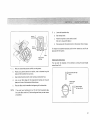
Insert the Bobbin
into the Bobbin
Holder
Q
®
.............
1.
Put
the
holder
bobbin
so
that
counter-cJockwJse
®
®
J
into
the
the
thread
lleft).
bobbin
feeds
2.
Pull
about
toward
you
slot
,.
@
4
inches
through
of
the
thread
tension
3.
Then
puft
the
toward
the
through
the slot
back
thread
of
_
clockwise
the
machine
-
4.
J
Slide
pushing
it down
bobbin.
Allow
thread
plate,
* Threading chart is located
the face cover plate.
chart
16
behind
the bobbin
to show
cover plate while
slightly
about
above
over
the
4 inches of
the
needle
2.
The numbered
steps
above follow
the
numbers
on the illustrations.
Dotted
loops
Lines
and then
show
places
is pulled
tight+
where
the
While
holding
check
spring
hotder.
thread
draw
thread
3.
Firmly
4.
Draw
5+
Thread
then
6.
Thread
needle from
thread
down
near spool,
draw
up and through
and slip it through
thread
take-up
down
lever from
the thread
into
the tension
right
to left.
area
and then
around
the
guide.
thread
NOTE:
is slipped
You may want
into needle bar thread
front
guide.
to back..
to cut the end of thread
with
sharp sctssors for easmr needle threading.
17
K
1.
Raise
presser
needle
and
you
18
thread
rotate
foot
lever.
loosely
in left hand
handwheel
one complete
turn.
Hold
toward
2.
Bring
top
bobbin
thread..
thread
up by pulling
3.
Pull both threads
back
under
and to the
of the presser foot,
to 6 inches of thread
clear.
leaving 4
Adjust
the Top Thread
Tension
Choose
Top s_de of fabric
the Correct
The best tension
Se[t_ng
mark
Tension:
will
depend
on;
the stiffness
and thickness
the number
of fabric
of the fabric
layers
the type of stitch
L°°sen
_/_ _
Top.
thread
The top thread
_s too loose.
Tighten
The lop thread
is [oo [_gh[
Top s_de
o!
J
tabr_c
2
For Straight
The
ideal
fabric,
If
you
straight
as shown
look
gaps, that
When
Stitch
stttch
above,
at the
each stitch
adjusting
wilt
have threads
magnified
stitch,
front
_ssmooth
top thread
locked
between
the two
layers
of
The top thread
appears on me
underside ot [he
fabrtc_
to show detail.
and back,
you
wilt
notice
that
there
are no
The
bobbin
thread
appears
on the
upper
surface
o_r the
tabr_c,
and even.
tension,
the higher
the number,
the tighter
the top
thread.
k,
Tension
The
top
bottom
is too
loose:
thread
ot the stitch
is too tight:
through
the
The
bobbin
The bottom
side
the
top
shows
of the fabric.
J
Tension
wil! feel bumpy.
the stitch
thread
will
of the fabric.
will
come
The top
through
side of
feel bumpy.
19
For Zigzag Stitch
In the
of
correct
fabric
below
zigzag
and
the
stitch,
top
for the correct
the
bobbin
threads
will
appearance.
threads
show
will
slightly
To match
not show
on
the
on the top side
bottom
th_s appearance,
adjust
side.
your
See
top
tension.
E3 C3 O
Top tension
Top tension
Too Tight
Too Loose
C3 E3 E3 C3 C3 EJ _
C3 C3 IC3 R
E3 C3 E3 C3 E3
Red
indicator
The stitch
1
t
Top side ot Fabric
Top s_de of Fabric
turn
on the
stitch
stitch
Top
selector
Simply
this
control
control
indicator
length
control
determines
until
the stitch
the desired
panel.
The bottom
is set at the stretch
you select.
stitch
is indicated
row
stitch
To avoid
fabric
Stitch
patterns
needle
when
or fabr:ic damage,
selecting
i!:
--
--
2O
Corner
o| each
zigzag
will
pull
together
on the
top side of Tabrics.
The
top
thread
will
loop through
bottom
s_de
o¢
labrlc
and will be
pulled
almost
together.
Bottom
the
be sure your
side of Fabric
Just Right:
Mlmm_ze
the
amount
ot top thread vlsible on
the
bottom
side
ot
labrtc
without
causing
excessive
puckering
or
causing
#In
bobbin
thread
to show on the
top side.
Results vary
with fabric,
t_}read and
sewmg condition&
o
Orange
e
Green
are color-coded
o
Blue
a
Yellow'.
.......
.........
.........
........
needle
is up and out
of
a stitch.
to
recommend
setting
zones
ZONES
Bottom side of Fabric
Too Loose:
when
position.
control.
Bottom side of Fabric
red indicator
is selected
s_de of Fabric
NOTE:
Too Tight:
by the
of stitches
Straight,
Zigzag
Geometric
and Utility
Decorative
Buift-in
Buttonhole
Stretch
Stitches
Stitches
Stitches
Making
at the stitch
length
Length
Width
1234
4-
..............
The
width
The
stitch.
stitch
width
of the stitch
higher
control
regulates
the
you select.
the number,
the
wider
the
The stitch
length
length
of stitch,
stitches
setting.
The higher
J-
tttct_
Stretch
control
regulates
J
the
and also has a stretch
In stretch
-Lf
adjuster
stitch
sewing,
should
usually
position
the
number,
the longer
(betwee,_
position).
the
may
stitch.
the stretch
be
"'+"
Wizen sewing
need
balance
to
and
"--",
or
some fabrics,
adjust
the stitches
stitch
in a neutral
this
for
you
control
appearance
to
sake.
0 means no feed.
If design
To
select
control
NOTE.
Stretch
at Stretch
When
Stitches,
you
you
select
decorative
or
(blue),
do
built-in
make
sure
not set the stitch
control
at
"Stretch
Stitch".
Study
the
yellow
and
around
this
are
to
orange,
blue
length
the
the stitch
green,
"I'i
Rickrack
seems open
left,
adjust
toward
"--"
until
center
design.
If
the
the
the
design
right
control
toward
design
appears
hand
like the illustrations
the
to
control
looks
be closed
illustrations,
'%"
until
slightly
like
turn
stitching
the
as in
the
is as
you desire.
stretch
sections
control.
recommended
stitch
to
Smocking stretch
(green}
buttonhole
tengh
this
Stitch.
stitches
that
set
These
zones
of
and color-coded
stitches
indicator
pictured
on
panel,
21
Now that
you
Reverse
you
are familiar
are ready
each time you
1,
Inspect
for
2.
the controls
to sew with
sit down
to sew:
the
needle,
the fabric
fabrics
with
to start
It shoutd
and thread
placing
inches
to the
the
machine
and with
the accessories
Kenmore
sewing
be straight,
properly
set and sharp on the point.
blends
material
rear of
on your
new
being used.
made ot synthetic
Before
your
Do not be afratd
tend
on the
to dull
Hold
to change
the needles more
machine,
the machine.
machine.
see that
the
on to threads
Below
your
provided
for the machine,
are some good habits
It should
be the correct
needle frequently.
than
fabrics
made of natural
ends of
the
threads
have been
the sewing
size
Many of the new
easily
during
to fo!low
fibers.
drawn
of the first 3 or 4 stitches
about
4
of the
seam.
3.
Test the machine
the machine
To reverse
stitch,
trol during
sewing,
hold
down
4,
again.
of stitch
you plan to use. The fabNc should
and tenslon
suitable
to your
presser foot
w_th the
be double
thickness.
Adjust
fabric.
Fabric
should
right
be placed
under
edge of the
material
machine
a slow
the
placed
on the
5/8"
bulk
of the material
seam marking
to the left of the needle
on the needle plate when
making
and
a simple
seam,
5.
Run
the
machine
will
at
even speed.
Fasten
each seam by back tacking
7.
Always
finish
8.
Guide
9.
the
sewing
fabric
the normal
When turning
The
more
pressure
you
put
on the foot
control,
the faster
the
sew.
6.
that
22
on a scrap of fabric
this conthe
Release to sew forward
stitch
for the length
at the beginning
each seam with
gently
feeding
with
your
and end of the seam,
the needle at its highest
hand
in front
point.
of the needle,
Never
is altered,
the hand wheel
manually,
always
turn
it toward
you.
pull
or hold the fabric
in such a way
;_ Practical Stitch Chart
!
Stitch ....
STRAIGHT
I
t
I
t
t
Stitch
I Selection
Foot
and Other Attach.
S_ra_gh_
i
I
I
I
t
I
STRAIGHT
STRETCH
Check
Chart
on p. t_44
%
Darn mg
plate
|
Stitch
Length
Stitch
Width
Uses
2 _ 6
Orange
Zone
0
Regular
etc.
searms,
zrppers,
2 _ 6
Yell ow
Stretch
Stitch
Position
0
Use on knits and other
for topst_tching.
Referto
topstttching,
darmng,
28 _ 30,
48 _ 49
Check
Chart
,
stretch
fabrics,
good
3O
%
on p. t4
ZIGZAG
Zigzag
Check
Chart
on p. t4
3 _ 8
Orange
Zone
1 _ 5
Fintsh edges, buttons,
satin stitch, applique,
monogram,
embroidery,
sewing bar tacks.
RICK-RACK
STRETCH
Zigzag
Check
Chart
2 _ 6
Yel low
Stretch
Stitch
Position
2~5
Decorate
2_6
Orange
Zone
2_3
Use for finishing
III
III
IU
III
on p. 1_44
BLIND
HEM
STITCH
Zigzag
Page
I
Zipper
foot
Straight
Thread
Tension
Needle
Check
Chart
garments
w_th one row or several.
seams.
3! _ 35
36
39
on p.14
23
|
Stitch
Stitch
SoIection
Foot
and Other
Attach.
l
Needle
Thread
Tension
Stitch
Length
2 _ 6
Yellow
Stretch
Stitch
PosFtion
Stitch
Width
Uses
Refer to Page
t
OVERCAST
STRETCH
Zigzag
%
=
THREE-STEP
ZIGZAG
Zigzag
,€
SMOCKING
STITCH
%
Zigzag
%
J_4
Satin
SHELL
STITCH
%
SERGING
Zigzag
tk
24
%
Check
Chart
on p. 14
Check
Chart
2~6
3 ~ 5
0.5~t
Use for swtmwear0
ski pants and other
garments that require stretch.
38
Use for finishing
seams.
37
or as a decorative
on p. 14
5t
Check
Chart
on p. 14
2 ~ 6
Yellow
Stretch
Stitch
Posmon
3~5
Use m smocking
Check
Chart
on 13,.14
4 ~ 9
Orange
Zone
345
Finish hems, sleeve and neck openings.
Use on nylon tricot and other lingerie to
overcast and seam,
Do shell tucking on blouses and lingerie.
5O
Blue 111)
3 _ 6
Yellow
Stretch
Stitch
Position
3~5
Finish hems, sleeve and neck openings,
Use on nylon tricot and other lingerie to
overcast and seam.
Do shell tucking on blouses and linger=e.
38
on p.14
stitch,
Stitch
Stitch
Salect_on
Foot
BOX
STITCHING
Zigzag
%
ELASTIC
STR ETCH
<
<
<
and Other
Zigzag
I
>
>
FAGOTING
i
%
Zigzag
%
STRETCH
PATCHING
<
<
t,
Zigzag
Attach.
Needte
Check
Chart
Thread
Tension
Stitch
Width
3 _ 8
Orange
Zone
3~5
Use for overlapping
3 _ 6
Yeflow
Stretch
Stitch
Position
3_5
Use
3 _ 8
0.5~2
2 _ 6
Yellow
Stretch
Stitch
Position
5
3 _ 8
Orange
Zone
3_5
Uses
Refer to Page
seams_
53
onp.14
Check
Chart
on p, t4
Check
Chart
for
applying
53
elastic,
Join two folded edges tot
open-work appearance.
decorative
52
on p. 14
Check
Chart
on p. 14
<
<
<
Stitch
Length
Use for patchwork
quilting.
51
,,
TWO-POINT
SHELL
STITCHING
Zigzag
Check
Chart
on p. 14
Do shell tucking
on blouses and lingerie.
This stitch can a_so be used as a single
Overiock stitch as welt.
50
L>
¢
25
Stitch
Stitch
HERRING
BONE
STRETCH
and Other
Zigzag
!
TWO-POINT
BOX STITCH
L_
%
Zigzag
C_
E
Foot
Selection
%
Attach,
Needle
Thread
Tension
Stitch
Length
Stitch
W_dth
Uses
Check
Chart
on p. 1_44
2 _ 6
Yellow
Stretch
Stitch
Position
3 _ 5
Use as hemming
stitch
c{oth and draperies.
Check
Chart.
on p. 14
3 _ 8
Orange
Zone
3~5
Use for overlapping
Check
Chart
3 _ 8
Orange
Zone
3 _ 8
Green
Zone
3~B
0.5_
Refer to Page
tot blankets,
table-
52
54
seams,
r
L,
OVEREDGE
STITCH
Zigzag
J
.................
54
Use for Overedgmg.
on p, 1_4
DECORATIVE
GEOMETRICS
Satin
Check
Chart
3~5
Decorate garments with one row
one stitch or a combination.
2_5
Use for applique
work, also as decorat=ve
fimsh for piacemats,
blankets, coltars,
cuffs and pockets.
or several,
55
on p.14
SATIN
26
STITCH
Sattn
Check
Chart
on p. 14
1
32
Stitch
Stitch
Selection
Foot
and Other
Sliding
buttonhole
Attach.
Needle
Check
Chart
Thread
Tension
2 _ 6
Stitch
Length
Stitch
Width
Blue Zone
3 _ 5
(Blue Zone)
Uses
Buttonholes:
also corded
Refer
buttonholes.
to Page
42 _ 43
on p, 1_44
BUTTONHOLE
D
,Buttonhole
Check
Chart
2~6
Raund-end
buttonholes.
buttonholes
and keyhole
44 ~ 47
on p. I!
27
=
Straight
Stitch
o
Use the Seam Guides
Set the Machine
Stitch width
control 0
/
Cornering guide
,J
Top thread tension
controi 2 to 6
J
Stitch length
controt orange
Before
zone
foot,
sewing
always
control
to
with
the straight
stitch
set
the
width
0 to
stitch
avoid
breakmg
2.
Strelch Stltch
3.
Place
to
the
sewing
obtained
results
with
stitch
foot,
foot
will
acceptable
the
but
also
resutts.
the
are
straight
z_gzag
edge
a stftchmg
needle
Best
may want
and
end
of
to reverse to
are engraved
width.
to help you measure
The lines are 1/8"
the 5/8"
plate
and 7/8"
seam
apart,
wtth
lines marked,
Raise the
presser foot
and remove
= Turn
a Square
Corner
to
its highest
9,
Cut the threads.
/!Cornering
of
the fabr{c
guide
plate
line
(5/8"
next
on the
ts
most
common).
_.__,,
4.
Draw
the threads
and lower
toward
the presser
the back
foot.
5.
Press the foot
Hold
the fabric
guide
that
Do
it
along
control.
1.
loosely
the
and gently
guide
line,
so
it feeds naturally,
not
force
pul_ it tight.
the
fabric
or try
)
To turn
fabric
provide
6.
a square corner
Stop
stitching
2,
by
turning
toward
you
when
facmg
you
tines
Raise
from
the
Lower
stitching
lower
hand
the fabric
up
the
wheel
edge
with
the
and
turn
guide, as shown,
the
fabric
the 5/8"
3,
and
needle
cornering
to
5/8"
edge:
the
28
needle
posit{on.
H: Straight foot
NOTE;
needte
beginnmg
on the
the fabric,
Raise the presser foot.
the
the
seam guides
lock the stitch.
8.
Raise
At
seam, you
the
needle.
1,
7.
The
presser
foot
to
the
edge with
foot
and begin
fine
seam guide.
the
presser
in the new d_rectlon.
= UsetheDarning
Plate
=
Topstitching
f
Set the Machine
Darning prate
\
Stitch width
control 0
Top thread tension
control 2 to 6
Stitch length
control orange
Here's How
zone
Sometimes
when
The Darning
you
Plate
sew,
covers
you
the feed
want
to
control
dogs so that
they
the
fabric
do not touch
yourself.
the fabric.
1.
Lower the presser foot.
2.
Keep
to
To Put on the Darning
NOTE:
The
Plate:
rectangular
needle
right
prate,
in the
in the
darning
Pos}tion
the darning
2,
Fit
darning
mark.
Darning
ptate,
plate with
plate
pins
Darning
Button
Plate
these
plate
match
holes
the holes
are slightly
m the
to
Stretch Stitch
3,
the
Evenly
edge
ot
guide
the fabric
the
next
presser
to
the
needle
show through
piate
holes
the darmng
in the following
(see page 35)
ways:
produce
5/8"
along
an even
from
the
this
row
of
edge.
H: Strmght foot
on the bottom.
at the
plate
The Stitch
and Its Uses
Topstitchmg
lsee page 30},
Sewing
the pins
into
The feed dogs will
holes.
Use the darning
of the fabric
edge
topstttching
1.
the
edge
right
foot.
holes
of center,
5/8"
the
the
your
emphasizes
garment
and
keeps
the
lines
seams
of
and
edges flat and crisp.
Accent
two
outer
suits
rows
ot
or
blouses
topstitching
edges of cuffs,
with
one
around
or
the
lapels or collars.
29
Set the Machine
Stitch
Set the Machine
Stitch width
control 0
width
control 0
@
1234
Top thread
tenskon
control
2 to6
Stitcl_ iength
control any number
(not necessary to
adiust)
Top thread tension
control 2 to G
Stitch length
control yellow
stretch stitch
position
Here's
1.
How
Put
the
darning
plate
on
the
needle
plate
(see page 29).
No preSSer
foot
2,
(see
Stretch Stitch
3.
Darmng
Remove
plate
presser
page
toot
10),
stretch
embroidery
hoops with
Draw
bobbin
the
fabric
one
at
holder
fabric
up
the top
the
toot
between
spot
through
thread
where
Lower
the
presser
bar
and
Move
you
w_sh to
sew
at
a slow
Turn
the fabric
back
the
fabric
If your
and
forth
the darning
half
tayer ot stltchLng
NOTE;
The Stitch
stitch
=S the
the
straight
stitch,
turn
tabnc
_s thin
or badly
This
stitch
topstitch=rig
damaged,
under
stretch
variation
especially
and stretch
can
the
of
develop-
aiso
on all fabrics.
be
used
fabrics
as well.
curved
for
When you finish
plate and replace
3O
darning,
foot
remove
holder
the darning
and foot.
and
will
well
on
receive
strain
(ie.
and
other
on
any
a great
children's
clothes).
The
stretch,
actuatiy
stitch
stretch
but
forward
does
as it
stitched
back
called
stitch},
when
instead
is
and
(sometimes
give
7.
that
of
on
tt works
seams
garments
deal
fabrics.
fabrics
tt can be used
action"
it.
was developed
knits,
sewn,
iayer,
p_ece of fabric
hole to reinforce
unti_
and sew antother
over the first
use a separate
slowly
area.
stitching
to be used on stretch
and Its Uses
This
ed for knits
you have covered
6.
H: Strai_Jht toot
and taking
speed.
5.
Stretch
the
start darmng.
4.
Stretch Stitch
hole centered.
thread
by holding
stitch
and
the
so
in
motion
a
that
fabric
of breaking.
not
Isbeing
"reverseit will
stretches
a
Basic Zigzag
Set the Machine
Stitch width
control I to 5
i
Top thread tension
control 3 to 8
234
Stitch length
control orange
Zor]e
Here's How
There
are many
Consult
Satin
the specific
Stitch
Applique
Stretch Stitch
Monogramming
Embroidery
Button
The StItch
The
ztgzag
common
your
and its Uses
stitch
machine.
for sewing
ming,
is one of the
and most
It can be a utility
buttons,
ing.
It
with
trims,
can
also
be used
appliques
or as a decorative
directions.
page 33,
page 33,
page 3_44,
page 3_4,
page 35,
page 36.
on
hem-
and
to
for detailed
stitch
buttonholes,
mending
variations
most
versatile stitches
overcasting,
Sewing
Overcasting
to sew a zigzag stitch.
page 32,
Work
Bar Tacking
A: Zigzag foot
ways
darn-
decorate
and cut-out
work
stitch.
3_
= Satin Stitch
Set the Machine
Zigzag
Stitch w=dth
control 2 to 5
_ 2
Top thread
tension
control 3 to 8
w_d_h :
Stitch
length
!
3 4
Stitch length
control 0.5 to 1
2
>
>
>-
>
>
>
>
CIose
to 0
Stretch Stitch
F._ Satin stitch
foot
Pressuredial: t or
The Stitch
The Satin
used
and Its Uses
stitch
decorative
is a versatile
stitch,
be used to overcast
ample,
blankets,
but
and often
a raw edge (for
linens,
ex-
tablecloths
in applique.
32
stitch
Once
is espematly
How
attractive
your
machine
ot the fabrlc
welght
and napkins).
The Satin
Here's
it can also
fabrics.
is set up to
you are planning
stitch,
you may want
to use, Too
tight
satin
to experiment
stitch
on a fragment
may pucker
some light
o
r
Applique
Set
the
Bar
Tacking
set the Machine
Machine
Stitch
Stitch w=dth
control 2 to 5
width
control
2 to
5
@
.s Z
34
_
length
0,5 to
34
t:: : 7 ,::::i::::,:*! ::i::-::
Top thread tension
control 2 to 6
1
........................
Baste
lor
joiner)
sure
ruse
apptique
Stitch
around
the
F :
Satin
stitch
with
iron-on
fabric
This
on the
fabric.
satin
stitch
points
'of
applique
fails
along
making
the
outer
When
/_'_-_'_,
sewing
foot
Pressure
........
dial:
2
_
into
and
corners,
the fabric.
pivot
the
stitch
pockets
is similar
and
strain
to
is used
such
a very
to
short
reinforce
as corners
or
and straps on lingerie.
Sew 4 to 6 z_gzag stitches.
Stitch
down
toot
.: :*::
Stitch tength
controt
0.5 to
pieces
the
needle
J
edge of the applique,
Stretch
:::
i:Z'i
Top thread
tension
control
2 to 6
Stitch
control
2
lower
Stretch
the needle
Stitch
Raise the presser
fabric
to the
right
A:
Zigzag
foot
or left,
J
33
=
Monogramming
Embroidery
Set the Machino
Set the Machine
Stitch wLdth
control 5
Stitch w=dth
control 1 to 5
@
i
Top thread tension
control
2 to G
2
3
4
_
Top thread tension
control 2 to 6
Stitch length
control 0.5 to ]
2
Here's
2
3 4
Stitch length control
Any number (not
necessary to adiust)
Here's How
How
1.
1.
Set the same as satin stitch.
2.
Back
the
fabric
with
letters
on
paper
or
interfacing.
Stretch
Stitch
3.
Draw
with
the
tailor's
the
fabric
No pre_er
foot
Remove
3.
Adiust
Stretch Stitch
Satin stitch
foot
4.
Satin
stitch,
width
as necessary
If using
when
plate
on the
needle
foot
holder
the
(see page 10),
stitch
width
as desired
on
the
(see page 21 ),
chalk.
adjusting
the stitch
to form
each
paper,
carefully
you have finished
remove
sewing.
Draw
with
Darn m9 plate
pattern,
5.
darning
(see page 29),
2,
4.
F'
Put the
plate
5.
the
design
tailor's
Stretch
the. fabric
dery
hoops
needle.
it
6,
Lower
the
between
and
place
presser
engage the top thread
7,
Holding
to
thread
rotate
the
hand
you one complete
turn.
the
bobbin
top
thread
thread
through
under
the
lever
to
tension.
top
Pull
embrol-
foot
the
hand,
fabric
chalk.
in your
wheel
to
left
toward
draw
the
to the surface
of the fabric.
8.
Using
the
fabric
34
a medium
marked
carefully
speed,
outline,
by hand.
stitch
guiding
along
the
Sewa Button
Set the Machine
Stitch
width
control
i!iiiii
iii!i i
Top thread tension
control 2 tO 6
Stitch length control
Any number {not
necessary to adjust)
Use the darning
1,
Match
plate for button
the center
sewing
of the but-ton
To
(see page 2__9).
holes
to
the center
of the slot on the presser
foot,
Stretch Stitch
2,
Ad.iust
3,
Lower
Turn
A_
the stitch
the foot
the hand
width
to hold
wheei
so that
needle will
the button
by
hand
drop
in each hole,
that
needle
enter
the
shank,
cut
the
a 8"
tail.
Bring
the
needle
thread
down
in the
button
and w_nd
Drew
will
leaving
through
the hole
it around
the
bottom
side
shank.
in place,
so
strengthen
threads
either hole of the
the
thread
to
the
and knot.
button.
4,
Stitch
several
t_mes,
35
=
Overcasting
o
Stitch
Rick-Rack Stretch
Set the Machine
Set the Machine
Stitch
Stitch width
control 2 to 5
width
control 3 to 5
I
Top thread tension
contro! 3 to 8
2
3,_
Top thread tension
control 2 to G
Stitch length
control orange
.....
zone
Start
overcasting
raw corner
right
up
Stretch
about
of your
1/8"
inside
seam. If you
Stitch length
control yellow
stretch stitch
poslt_on
Zigzag
start
you might
at the edge, the fabric will bunch
and Hints
the
stitches
wilt
become
Th_s stitch
top
Stitch
The Stitch
This
and Its Uses
zigzag variation
garment
A:
foot
is very
construction
raw edges of any sewing
36
and
usefut
m fimshing
proiect.
in
and Its Uses
Sew on stretch
the
Stretch Stitch
A:
The Stitch
Zigzag foot
stItch
fabrics
in any area that
use a zigzag stitch.
can be used as a decorative
as welt,
e
Three-Step
Zigzag
Set the Machine
Stitch w=dth
control 5
@
'i _ 3 4
Top thread tension
i control 2 tO O
Stitch length
control 0.5 to I
2
Seam Fimshmg
Place
the fabric
so that
the right
Stretch Stitch
A:
zigzag
zigzag and straight
three-step
would
flatter
The
under
edge will
the presser foot
be slightly
reside
Position
that
the
tear
the stitching
under
will
the
catch
needle
both
so
sides.
hand side of the presser foot.
Guide
the
stitches
fall at the edge of the fabnc.
work
so
the
right
hand
and Its Uses
The three-step
has
the
Mending
Zigzag toot
The Stitch
the
(Overcasting)
use
more
zigzag
the
basic
strength,
than a regular
three-step
ly useful
is a combination
stitch.
You
may use
everywhere
zigzag
you
stitch.
elastimty,
and
It
is
zigzag.
z_gzag stttch
_sespecial-
for:
-
mending
-
sewing
patches
smoothly
and
securely.
--
repatring
strmght
--
finishing
seams.
tears.
37
Overcast
Stretch
o
Stitching
Serging or Pine Leaf Stretch
f
Set the Machine
Set the Machine
Stitch width
control 3 to 5
Stitch width
control 3 to 5
Top thread tension
control
2 to 6
Stitching
Top thread tension
control
3 to 6
Stitch tength
controt yellow
stretch st=tch
position
2
Here's
How
Place
the
the LEFT
raw
edge of
the
fabric
Stitch length
control yetlow
stretch stitch
position
Here's How
Place
to
foot
of the needle as shown.
the
fabric
so that
under
the
the
strtches
presser
are
made
over the edge.
Stitch
Stretch
Stitch
so the needle
just short
ot the outside
Or, place
your
seam,
A:
Raw
Thts
stitch
seam wlth
and its Uses
can
finish.
and
one
operation.
you
are making
stretch.
38
other
be used for
is formed
seam
and
can
an overcast
The
then
fabnc
trLm
edge.
to atlow
seam
sewing
a
allowance
m
It can be used when
swlmwear,
garments
A: Zigzag toot
or worn
be
that
ski
pants
require
edges of older
overcast
to
prevent
further
Use
a blue
needle,
prevents
stretch
which
skipped
fabric
effectively
stitches.
The Stitch
and Its Uses
Use
stitch
this
narrow
you
you
do not
press open
flat.
tt _s ideal
seams
knits
or
heavyweight
want
woven
a narrow
for making
using
fabric,
use a blue
fabric
needle
sMpped
when
seam that
on
When
stretch
effectively
garments
raveling.
NOTE:
finished
NOTE:
Stretch Stitch
a 5/8"
after.
Zigzag toot
The Stitch
pierces the fabric
a
need to
tot
1/4"
on
medium
to
fabrics
where
you
seam.
elastic
want
swim
|t is also great
wear.
kmt
stretch
which
prevents
stitches.
Set the Machine
Stitch w_dth
control 2 to 3
I14"
I
Ligl_t
Weight
Fabric
Top thread tension
control
9 to 6
Stitch length
control orange
Heavy
Weight
Fabric
Zone
2
t,1 _S
Stretch
A: Zigzag toot
114"
Stitch
1.
Finish
the raw edge of your
2.
Measure,
turn
NOTE.
For light
3.
the
Fold
up your
weight
material
hem any way you desire.
(See overcrasting
page 36).
hem and pin.
fabrics,
(bottom
you may need a double
side
out)
on
the
edge
fold.
to
be stitched,
as shown,
leaving
1/4"
of
the
finished
be sewn on extended
edge.
hem
edge
showing.
%
4.
5.
Place
garment
stitch
should
under
After
hemming,
just catch
presser
foot
the fold
press both
in such
a manner
that
straight
stitches
wit!
The zigzag
of the garment.
sides of the
finished
hem.
The top side of the garment
will
show only
the blind
stitches.
39
Set the Machine
Stitch width
control 2 to 3
i_ i!ii_ili_i_!!i_i_i_i_
_ii!i_i
''_
'_'_,_
_
Top thread tension
control 2 to 6
Stitch length
control 1
Stretch Stitch
Lace
to
A:
Zigzag
foot
a fanciful,
and
feminine
lingerie.
and
pit]ows
become
when
trimmed
with
Turn
raw edge of fabrlc
5/8"_
Place
stitch
using stretch
Trim
40
adds
blouses
more
linens
elegant
lace.
under
lace underneath
excess fabric
touch
Table
blind
at least
and top-
hem stitch.
close to stitching,
=
Learning
With
your
to Sew Buttonho|es
Kenmore
buttonholes.
snap-in
sewing
You
automatic
may
machine
use the
buttonhole
you have two
built-in
system
attachment
system.
methods
or you
of makmg
Tips on buttonholing
may use the
Always
use.
Always
Choose the buttonhole
1.
Buitt-in
Choose
2.
3_
Tissue
irectangular),
this style for waistband,
need only
one or two
a practice
buttonhole
with
use an interfacing
on a scrap of fabric
the button
in area of
you will
garment
you
ptan to
use.
where
buttonholes
are
placed.
style
bottonholes
make
Try the buttonhole
cuffs,
belt slots or where
you will
st}tching,
paper or regular
For heavier
buttons.
interfacing
can be used.
Tear paper
away
after
Jf it is used..
weight
fabrics,
loosen
your
top
thread
tension
slightly.
Round end buttonholes (Template No. 213504005, 213505006}.
Choose this style for series of buttonholes on dresses, btouses,
vests, jackets or coats.
Keyhole
Choose
buttonholes
th}s
need more
_Template
style for tailored
room
for button
No, 213506007),
vests, jackets, coats
or any time
you
shank.
41
o
Built-in System
Set the Machine
Stitch
width
control 3 to 5
(Blue zone)
Stitch length
control
B_ue zone
I
!311 i
i! iG'i !i!iiiiiI;II
¸il
i!i!i!i!i ii
t.
a. Carefully
length
mark
on your
the
buttonhole
2, a. Move
garment.
B11
b.
Change
to the sliding
buttonhole
b,
foot.
Top thread tension
control
2 to 6
c,
Stretch Stitch
Insert
foot
Sliding buttonhole
foot
the
with
ing runmng
garment
under
the _buttonhole
toward
the
so that
c.
NOTE:
meets the start
Line
up
with
the
the top
the Stitch
Depending
own
upon
preference
may
alter
density
m
For
2.
For
NOTE.
blue
Iength
density,
stitch
buttonhole
turn
Q
Coarse
stitches
for
heavy
iabrics
dial
the
dial
@
F ine
denstty,
turn
the
dial
make
tonhole
on a scrap fabric
to
light
{abr _cs
Always
suitable
s_atcI_es
tor
"0 '°
plan
42
you
"t"
more
toward
or your
buttonhole
the
less
toward
{abnc
buttonholes,
the
within
range on the stitch
t.
Density
your
a practice
use to find
stitch
length.
butyou
the more
ii
Stretch Stttch
you
(C) on the
mark
markings
Lower
mark
The
markings
on
3. a. Set the stitch
on
the
front
slider
m centimeters.
until
marking
of
at
l'l
you reach the
your
button-
hole.
the
on your
selector
b. Sew forward
(B).
the presser toot.
are engraved
Adjusting
toward
mark
garment.
mark-
you.
(A)
top
slider
foot
the
slider
the
c,
Stop sewing
at the left stitch.
• • : ••H••
i::i:•:!••!]_::_':•:•_ii:i:i
¸¸¸I•
4. a. Set the stitch
selector
at
D
b. Sew 4 to 6 stitches.
c. Stop
sewing
[t
5. a, Set the stitch
selector
at
b. Sew until
reach
the
NOTE;
at the
sliding buttonhole
and sewm reverse(
edge of fabric,
foot
_-->
Lj
back of
the buttonhole.
at the r_ght stitch.
c. Stop
When sewing
you
set
as illustrated
_"_->_]-,-r_
).
-t.__t Lj
_4
sewing
6.
a,
Set the stitch
at
r_
U
b. Sew 4 to 6 stitches,
7.
Remove
hole
opener
c. Stop sewing
at the right
selector
at the left stitch.
the
open
fabric
with
m your
the
and
cut
the
buttonhole
accessory
storage
box.
stitch.
ilii
!iii!!ii
:!i!_!_;ii
43
o
Using Buttonhole Attachment
Buttonhob
Attachment
Buttonhole
System
For more varied and accurate buttonholes, you will enjoy using the buttonhole attachment and templates.
Know the parts read carefully how to set up
your machine properly.
attachment system,
Guide
You
wilt
Style and Size
Round End
Bu ttonhote
Keyhole
Buttonhole
need these items for the buttonhole
slot
Template
213504005
213505006
213506007
318" 112"
15/16"
718" 1-11t6 '°
5/8"
1-1/4" 1-1/2"
1-1116"
Sizes
13/16"
!-1/4"
I-3/8"
Catch
Buttonhole
guide plate
Guide
NOTE:
length easily by matching
on the template.
bJock
Buttonhole
templates
Lever
Pins
Hook
_
"-Gear
Base plate
Buttonhole
44
IllustratIons
of buttonhole
on template show actual length of
buttonhole to be sewn. You witt find the most suitable buttonhole
foot
the button
with the proper illustration
Set the Machine
Stitch width
control 2
i
2
3
Level
4
Top
E
thread
Top thread tension
contro412 to 6
\
Stitch length
contro]
_4
Rectangular
1.
Stretch Stitch
Buttonhole
Helpful
You
#60
bobbin
NOTE:
toot
Hints
can
_
obtain
#80
best
light
results
weight
to
use
threads
as
Remove
b,
Raise the needle
to its highest
c.
Remove
holder.
d.
PuB bobbin
thread
e.
Insert
of base plate
f,
Pull Lever back to align the hook
g.
Snap
two
is advisable
stretch
fabric
sewing
knits
to
the extens!on
hole
a.
the foot
hook
base plate
round
Release
thread.
It
Base plate
Hook
holes
table,
out about
down
to
into
fit
position.
3" straight
back toward
rectangular
two
with
pins
rear of machine.
hole of needle plate,
the rectangular
(A)
at the
hole.
back
of base plate
into
(B) on needle plate.
lever,
use a blue
needle
and
when
synthetic
fabrics.
You
can
with
a wider
settmg
control
obtain
the
buttonholes
cutting
stitch
at 1,5 instead
space by
width
of 2.
45
nhote toot
e gu _deplate
Gear,x _t..f
Gu_d__
Slot
Tempfa_e
__Catch
"4ii_i_l
Setting Mark
_!:!fl;:i!_;i_i
Guide block
Gear
obbin
thread
2_
a_
When
you
have selected
the template
hole you need, slide the template
b,
c.
Pull
catch
toward
you while
with
sliding
the template
is at the setting
insert
into
into the center
base plate
button-
into the guide plate.
hole size you have chosen
gear of
the size and style
slot
until
the
3.
a.
Attach the buttonhole
b.
Adjust position
template.
button-
mark,
of template
"
_"
point
toot.
of gear so it is aligned
with
the starting
point
of
The lever can be used to change gear position.
and fit
guide
block
C_
Pull the bobbin thread up through guide slot by turning the hand wheel
toward you while holding top thread.
d.
Place the bobbin and top threads to the left side of gu=de plate.
of the guide slot.
Leave 3 to 4 inches of thread.
46
"" _
5.
Marked
buttonhole
a.
Lower
b.
Start
c.
Allow
d,
Center
marking-
To
the buttonhole
sewing
foot.
slowly.
the machine
to do the work
(Do not try
to guide the fabric.)
Stop sewing
when
release
the
base plate off
buttonhole
by itself.
the needle returns
base plate,
pull
the
to the position
lever toward
where
you
it begins.
and lift
the
the machine.
Fabric
Measurement
mai_kings
Adjusting the stitch density
You may alter the closeness of the stitches
control from 4 to 3.
Mark your
Placing
buttonhole
your
position
garment
behind
carefully
the
machine,
insert
foot
as shown.
C°
Align
marked
with
center
marking
d.
Line
up your
the
measurement
plate just
e.
buttonhole
fabric
in front
Pierce the fabric
edge with
of the buttonhole
with
foot
it between
the
If you
line
want
your
up the fabric
tabrtcs
on buttonhole
markings
foot.
(_
Fine stitches
for light
on the guide
Stitch length
control 4
as shown,
the needle at the beginning
buttonhole
to
w_th the 1/2 inch
length
guide
of the bu_onhole,
(_
NOTE:
the stitch
f
on the garment.
ptate and the buttonhole
by turning
be 1/2
inch
markings
from
the garment
each time
you start
Coarse stttches
for heavy fabrics
edge,
to sew
a buttonhole.
Stretch Stitch
47
Fabric
Preparation:
Put the top
and
sew
opening.
Set the Machine
sides of the fabric
to
the
end
Use the
of
reverse
the
Itt8")
Stitch width
together
control
/Zipper
to lock
leech
0
zipper
Zipper
tape
the
stitches.
Sew
length
the
zipper
at "4"
opening
and
top
with
thread
stitch
tension
at "3"-
Top thread tension
control 2 to 6
Stitch length
contrOt 2
o_ opening
To Sew:
1,
Top s_de
ot tabrlc
Stretch
E: Zipper
foot
3.
Turn under the right seam allowance to form a 1/8" fold.
5.
o
To
the zipper
sew on the
attach
the
foot:
left
presser
on the zipper
pros
foot,
e pin on the_
ricjht hand snde
o
To sew on the right stde of the zipper,
attach the presser bar to the left pins
on the zipper foot.
48
Lower
6.
the zipper
foot.
foot
bottom
the needle
and the zipper
tape.
Sew
the
zipper
Place the zipper teeth next to the
1/8" fold and pin in piece,
presser bar to the right
at the
so that
slider
Lower
fabric
side of the zipper,
bar to the right
the
on the zipper
side
7.
To attach
Attach
pins
Stitch
2_
Top edge ot tabr_c
Reset stitch length at 2 and top
thread tension at 2 to 6.
Fold back the left seam atiowance
as shown.
4,
through
on the top
of
the
pierces
fold
tape to the point
zipper
the fold
and
the
where the
begins,
the
needle
to
hold
and raise the presser foot,
the
..... J
8,
9.
Open
Lower
10.
the ztpper.
the presser foot
and stitch
Close
fabric
the
top
zoper
and
turn
the
1!.
Remove
attach
side up.
the
the
zipper
presser
pros on the zipper
*he rest of the seam.
12.
Stitch
tom
13.
across
and
foot
bar to
and
the
foot.
below
the
bot-
the
corner
and continue
to
guide
the
teeth,
as shown.
Stitch
through
zipper
foot
the
fabric
zipper
and
2" from
the top
of the
Lower
the
needle
into
the
fabric
and raise the presser foot.
16.
along the
Stop about
zipper.
15.
of the zipper.
Turn
14.
left
Remove
open
t7,
the
basting
stitches
and
the z_pper,
Lower
the
of the
seam. Make
foot
and stItch
the rest
sure the_old
is
even.
tape.
49
....
ii ii iiii ¸i i .....
Set the Machine
Stitch width
control 3 to 5
Top thread tension
control
4 to 9
Set the Machine
Stitch width
control 3 to 5
Top thread tension
control 3 to 8
Stitch length
control orange
Here's
zoRe
2
1.
How
For best effect:
set the
stitch
length
Stitch length
control Orange
zone
2
as you
desire.
Stretch
you may need to tighten
top thread
Stitch
-
allow
fabric
2.
The Stitch
and tts Uses
The Shell
Stitch
blind
hem
rows
of
folded
stitching
by sewing
fabric.
a
Several
are called
shell
tucks.
Shell
stitching
can
be used
hems, sleeve and neck
Shell
_ckmg
scalloped,
lingerie.
5O
can
tucks
to
finish
to
create
openings.
be used
on
If you
sew
blouses
and
You
can
soft sifky
to
edge of the
A:
rows
of shell stitches,
5/8"
Stretch Stitch
just
it ztgzags.
sew Shell
wovens
needle
folded
the
slightly.
when
space the rows
is formed
over
shell
the
clear the
F _ Satin stitch
foot
tension
apart,
St=tch
on knits
m any direction,
or
Zigzag foot
This
i;{ :::=/,},::i
:]- :,_i'}
can
also
stitch
single overlock
stitch
_ ::{:_ =,;,
be
as well.
used
as
a
Set the Machine
Stitch w_dth
Set the Machine
Stitch width
control 3 to 5
Top thread tension
control
2 to 6
Top thread tension
control 2 to 6
Stitch length
control yellow
stretch st_[ch
|
Stitch length control
yellow stretch stttch
posmon
The Stitch
postt_on
For
and Its Uses
patching
worn
out
elbows
or
knees,
Stretch
Stretch
Stitch
Stitch
A: Zigzag foot
A: Zigzag toot
With
the
straght
stitch
length
stitching
at
lines
"4",
sew
3/8"
apart
across the area to be smocked.
Knot
the
the threads
bobbin
gathers
the
evenly,
other
stitch
along
threads
Secure
end.
between
Sew
the
Loosen
tension
the
to
Pull
the
the threads
the
gathenng
Pull out the gathering
NOTE:
one edge.
and distribute
at
decorative
stitches,
stitches,
top
make
thread
gathering
easier.
51
Set the Machine
Set the Machine
Stitch width
control 3 to 5
Stitch width
4234
ii:iiii:iiii iiii
!iiiiiiiiiliiii
iiiii
!!:iii
i!ii¸iii
iii!!"i ii i
Top thread tenston
control 3 to 8
Top thread tens=on
controt 2 to 6
Stitch length
control 0.5 to 2
pos_t_on
Here's How
1.
Fold
Stitch length
control yeltow
stretch stitch
under
each fabric
Here's How
Place
edge 5/8"
and press.
2.
Stretch
Pin
the
tear-away
Stitch
3.
Sew
so the
A:
Zigzag
The Stitch
Use
fabric
this
edges
backing
slowly,
needle
to
create
iota
to
1/8"
guiding
catches
edge on each side,
paper
or
the
fabric
the
folded
Stretch
A:
two
an
and add deslgn
pieces
open
of
work
interest.
Use
Stitch
Zigzag loot
and Its Uses
as hemming
tablecloth
stitch
and draperies.
for
blankets,
fabric
top
from
Trim
close to stitching.
prevent
apart.
The Stitch
and Its Uses
stitch
to
appearance
52
foot
two
the
3/8"
slde up,
and sew
the edge.
raveling.
The stitch
will
::::::_: =7?L>-i_i:_' i:::/"
:; : ! __! ;7::=:¸¸::¸:¸;!¸:__:¸¸:¸::- ::_':=: =i'{+ _ :
Elastic Stretch Stitch ::_
Set the Machine
Set the Machine
Stitch w=dth
control 3 to 5
Stitch w=dth
control 3 to 5
Top thread tension
control
3 to 6
Top thread tens=on
control
3 to 8
Stitch length
contro_ yellow
stretch sUtch
Stitch length
control orange
zone
Use
posltlor_
this
stitch
to
join
heavy
weight
interlining.
Stretch
Stretch
Overlap
two
use this
stitch
raw
edges together
to ioin
and
them.
Stitch
Stitch
A: Zigzag foot
A: Zigzag toot
\,
Choose
this
stitch
to attach
elastic
to
garments,
1,
2.
Mark
the elastlc
to
into
quarters
the
center
and
match
these
center
back and side seams.
Place
the
middle
of
the
elastic
under
the
center
of
the
presser
foot
and stitch
sure
the
elastic
into
front,
piace0 making
+s evenly
distri-
bu ted.
53
Set the Machine
Set the Machine
Stitch width
control 3 to 5
Stitch width
control 3 to 5
1234
Top thread tenston
control 3 to 8
Stitch length
control orange
zone
2
,>1_3
Top thread tension
control 3 to 8
This stitch is usefut for elastic fabrics
Stitch length
control orange
zone
2
This
_.__3
to join them together,
4
Stretch
A:
Stretch
Stitch
Zigzag foot
A:
%,,
54
stitch
edging stitch.
,
Zigzag
toot
Stitch
can
be
used
for
a over-
Set the Machine
Stitch wtdth
control
3 to 5
Top thread tension
control 3 to 8
Stitch length
control 9teen
J
zorl{_
Here's How
1.
Ad!ust
the
stitch
width
and
length
as
you desire.
2.
F, Satin stitch
toot
The Stitches
and Their
These stitches
You
special
can
are pureiy
sew
one
row
Stretch
Uses
decoratIve.
or several
or vary
the
st=tch wtdth
and tength
on a scrap ot fabnc
special
effects
lines
on a scrap of fabric.
Mark
the
using
4.
Lower
the
for
decoration
5.
Lower
the presser foot,
a washable
on
fabric
the
marker.
needle at the starting
point,
for
Gently
maked
to see what
the stftch
fabric,
6.
effects.
Experlment
3.
Stitch
Practtce
guide
the
fabric
along
the
line.
are possible,
55
PROBLEM
PROBABLE
Incorrect
Irregular
Breaking
Bunching
Puckering
Stitches
Needle
of Thread
CORRECTION
s}ze needle.
improper
threading.
Loose upper thread tension.
Pulling fabric.
Loose presser foot,
Unevenly
wound bobbin.
Nicks or burrs at hole of needle plate,
Choose correct
size needle for thread
Rethread machine,
Incorrect setting of needle.
Loose presser foot.
and fabric,
Tighten
upper thread tension.
Do not pull fabric; guide it gently.
Reset presser foot.
Rewind bobbin.
Replace
needle
plate,
or polish
off burrs
Do not pull fabric; guide it gently,
Choose correct size needle for thread
Reset needle,
Pultin£ fabric_
incorrect size needle.
Reset presser
completely.
and fabric.
foot,
Upper and lower threads not drawn back
under presser foot before starting seam.
When startmg a seam be sure to draw both threads under and
back of presser foot about 4" and hold until a few stitches are
formed.
incorrect
Reset thread
thread
tension.
Using two different
sizes or kinds
Bent or blunt needle,
Loose
Fabric
56
CAUSE
presser foot.
too sheer or too soft.
of thread,
tension,
Upper thread and bobbin
Insert new needle.
thread
Reset presser foot,
Use underlay
of t_ssue paper.
should
be same s_ze and kind.
PROBLEM
SMpping
PROBABLE
Stitches
Upper
Thread
Choose correct size needle for thread
Insert new needfe.
incorrect
Reset needle.
setting
upper
ot needle.
thread
Fabric
Bobbin
Loosen upper thread tension.
Choose correct slze needle for thread
Insert new needle.
Jamming
piate,
race.
Knocking
Noise
clutch
Thread caught
Lmt {n bobbin
needle plate,
Check bobbin
Clean bobbin
speed.
or polish
threading.
holder and hook
Remove darning plate.
Adiust Stitch Length Control.
Place both threads back under
to stitch.
Push in the clutch.
is disengaged.
m hook race.
holder or hook
Replace
race.
and fabric.
tension.
Tight upper thread tension,
incorrect
size needle.
Push-putt
Machine
thread
Start to stitch at a medium
Rethread machine.
Darning plate in place.
Stitch Length set at O.
Thread knotted
under fabric.
not Mowng
upper
Starting
to stitch too fast.
Improper
threading.
Improper
bobbin threading.
Lint in bobbin holder or hook
Thread
Loosen
tension.
Sharp eye in needle,
Nicks or burrs at hole of needle
Breaking
COR RECTION
incorrect
size needle.
Bent or blunt needle,
Tight
Breaking
CAUSE
off
and fabric.
burrs
completely,
race,
presser
foot
before
beginning
Disassemble and clean hook race.
Clean bobbin holder and hook race.
57
i_Re_pla_
e_tl_e_=_
'igh_t:i
,B_i_;:_
t_ C Iea n:7,:t
he:_Bo6 bl n:HOtd e r:i;
_:i
To
insure
essential
that
parts
The bobbin
or knock
ti
your
machine
operates
at
_ts best,
you
need
to
keep
the
clean at all times.
area can attract
_oudiy
if a thread
dust and lint,
Your
machine
can become
sluggish
is caught.
1!I
.... J
Unplug
the
machine
and open the
face cover.
CAUTION!
The .light
HOT.
fingers
handle
,
Push
bulb
the
bulb
wiil
Protect
bulb
when
be
your
it.
up
counter-clockwise
Follow
and
turn
the
Put the new
up and turning
58
1.
2.
bulb
in by pushing
tt cJockwJse.
these directmns:
Turn
off
the
power
4_
or unplug
Remove
firmly
it
3.
Remove
5.
the bobbin
pulling
cover plate by
it toward
the bobbin.
you.
Brush
or vacuum
the dust and lint
out of the bobbin
the
machine.
to remove
it.
3.
Bobbin
cover plate
you
Replace
the bobbin,
holder.
6.
Slide on the bobbin
pushing
it into
cover plate by
the grooves.
Open face cover
two
drops
Remove
plate
and oil
points
as shown
below
at least once a year. Oneor
of oil is sufficient.
excess oil, otherwise
it may stain fabrics.
¢
1.
Unplug
the
machine
the presser foot
2.
3_
Remove
Remove
the
the
of the needle
and
remove
5.
Take
bobbin
cover
out
bobbin
and needle.
the
bobbin.
holder
Lift
and remove
up the
_t.
plate.
screw on the left side
with
the large screw
driver.
In
4.
Remove
the needle plate.
case
machine
extended
time,
Use good
quality
No other
oiling
Above
require
points
oiling
is not
oil
it
used
before
sewing
machine
for
an
sewing.
oil.
is required
are
only
area
which
on this machine.
Red marks
J
J
6.
Use
the
lint
brush
to
clean
the
7.
Line
up the
red
feed dogs, hook race and bobbm
holder.
Also
use a soft,
dry
the
bobbin
next
to
holder
cloth,
race, as shown
the
marks
and place
so the knob
stopper
m the
fits
hook
above.
59
PARTS
LIST
f
4
1
14
12
10
9
/
21
6O
22
23
20
19
17
16
24
25
26
All parts listed herein may be ordered trom any Sears Roebuck and Co. store or
service center.
WHEN ORDERING
INFORMATION:
1.
2.
3.
4.
REPAIR
PARTS,
ALWAYS
GIVE
THE
FOLLOWING
PART NUMBER
PART DESCRIPTION
MODEL NUMBER
NAME OF ITEM
tf the parts you need are not stocked locally, your order witl be electronically
transmitted to a Sears Repair Parts Distribution Center tor expedited handling.
ReL No.
1
2
3
4
5
6
7
8
9
10
tl
12
t3
14
15
16
17
18
19
20
2t
22
23
24
25
26
Part No.
"!02869107
102403202
813404013
647814020
647814031
647814042
647814053
652806014
685502019
825813005
823803006
822804118
"784805004
000009906
820832005
647803004
802424004
647808009
"I3!402005
652802009
213502003
213501002
213504OO5
213505006
213506007
213503004
*200002008
*200003009
*200005001
*200013105
*214872000
*941620000
* Theseitems are notturnished
instructions above.
i
Description
10 bobbins
Spool pin felt
No. 1t Stretch tabric needles (BLU)
No. 1t Single needles (ORG)
No. 14 Single needles (RED)
No. I6 Single needles (PUR)
No. 18 Single needles (GRN)
Straight toot
Zigzag toot
Sliding buttonhole foot
Zipper toot
Satin stitch foot
Needle threader
Light bulb
Large screw dnver
Small screw driver
Lint brush
Buttonhole opener
Oil
Darning plate
Buttonhole guide plate
Base plate
Template (Round end small)
Template (Round end large)
Template (Keyhole)
Buttonhole loot
Piping toot
Gathering toot
Pin-tucking foot
Hemmer toot
Walking loot
Ruffler
withthe
machine, butmay beordered
per
61
INDEX
A
Accessory
storage
box..............
Appliqueing
.....................
F
2,8
23,33
Fabric, needle, thread
chart
....................
Face cover
B
Bar tacking ...................
Base ...........................
Baseplate ..............
4,
Basic zigzag ...................
Blind hemming .............
Bobbin ...........
4, t5_16,
Bobbin holder
..........
Bobbin thread ..................
Bobbin winding ..................
Bobbin winding spindle ...........
Box stitching ..................
Buttonhole
...................
Buttonhole attachment
........
Buttonhole foot .........
4, t3,
Buttonhole gutde plate ....
4, 27,
Buttonhole making ..............
Buttonhole opener .........
4,
Buttonhole template ......
4, 27,
Button sewing .................
C
Cabinet .......................
Changing needle ..................
Changing presser foot ............
Cleaning hook race and feed dogs
Cornering guide ..................
23, 33
2
48, 60"_61
23, 31
23, 39_40
58, 60_61
16, 58_59
18_19
15
2, 15
25, 53
27, 41
27, 41, 44
27, 44_45
44, 60r_61
41_47
43, 60_61
44, 60_61
23, 35
......
2
14
10_11
59
28
Darning ..................
23, 29, 31
Darning plate .....
4, 29, 31, 34_"35, 60"_61
Decorative geometric patterns .......
26, 55
62
..........
Fagoting
.....................
Feed dogs ...................
Foot control
...................
Free arm sewing
................
H
Hand wheel ..................
Herring bone stretch .............
Hook race ......................
L
Lace work ....................
Large screw driver ............
Light and power switch .............
Light bulb .................
Lint brush ...................
length
14
2, 6, 58_59
25, 52
59
3, 5
8_9
3, 18
26, 52
59
40
4, 60_61
3, .5
57, 60_6t
4, 58_61
M
Monogramming
N
Needle
Needle
Needle
Needle,
Needle
................
................
clamp ..................
plate ...................
thread and fabric chart
threading
...............
23, 34
13_14, 60_61
3, 14
2, 16
........
14
17"18
O
D
E
Elastic stretch .................
Embroidery ...................
Extension table ..................
plate
and stitch
25, 53
23, 34
2, 8
Oiling .........................
Overcasting stitch .................
Overcast stretch ................
Overedging stitch ...............
P
Parts list .....................
Performance problems ............
Plug connector ...................
Portable case ....................
59
36
24, 38
26, 54
60_6t
56_57
3, 5
2
Power switch ...................
Practicaf stitch chart ............
Pressure control diai ...............
Presser foot .................
Presser foot lever .................
Push-pull clvtch ................
3, 5
23_27
6
3, t0_! 3
3, 7
3, 15
R
Reverse stitch control ..........
Rick-rack stretch stitching ........
2, 22, 28
23, 36
S
Satin stitch foot ....................
.......
4, 12, 24, 26, 32_34, 50, 55, 60_6t
Sating stitching
.............
26, 32
Seam guides .....................
28
Serging ......................
24, 38
Serging or pine leaf stretch .........
24, 38
Sewing light ......................
5
Shell stitching
...............
24, 50
Sliding buttonhole foot ...............
..............
4, 12, 27, 42_43, 60_61
Small screw driver ............
4, 60_61
Smocking ....................
24, 51
Snap-on button
..............
3, 10
Spoo_ pin felt ..............
4, 7, 60_61
Spool pins ..................
2, 7
Stitch length control ..........
. . 2, 21
Stitch selector ..................
3, 20
Stitch width control ..............
2, 21
Straight stitching
............
23, 28"29
Straight stitch foot ...................
.............
4,11, 23, 28""30, 60_61
Straight stretch stitching
..........
23, 30
Stretch patching ................
25, 51
Stretch stitch adjuster ...........
3, 21
T
Take-up lever ...................
Thread guide ................
Three-step zigzag ...............
Topstitching
................
2,
2_3,
24,
23,
17
17
37
29
Top thread ..................
Top thread tension ............
Top thread tension control
.....
Turning a square corner
..........
Two-point box stitching ...........
Two-point shell stitching ........
17_20
19_20
2, t9_20
28
26, 54
25, 50
Z
Zigzag
.....
Zigzag
Zigzag
Zipper
Zipper
foot ....................
11, 23_26, 31, 35_40, 50_53,
stitching
...........
23,
overcasting ................
application
...........
23,
foot ......
4, 12, 23, 48_49,
60_6t
31_36
36
48_49
60_61
63
#
#
WARRANTY
FULL
25-YEAR
WARRANTY
For 25 years from
•_
m the mechanical
FULL
#
For
the date of purchase,
components
TWO YEAR
two
years
appear _n the
speed control.
ON SEWING
from
electrical
Sears will,
of the sewing
WARRANTY
the
MACHINE
date
equipment
purchase,
of
the
_=
repair
_n material
or workmanship
which
appear
Sears will,
free
machine,
#
()
EQUIPMENT
sewing
defects
head,
ON ELECTRICAL
of
HEAD
free of charge,
machine
.----
OF SEWING
of charge,
including
repair
MACHINE
defects
electronic
#
in material
components,
or workmanship
motor,
w_rmg,
which
switch
and
(1
_
#
#
FULL
90-DAY
WARRANTY
For 90 days from
necessary for proper
ON ALL
the date
operation
PARTS
AND
MECHANICAL
ADJUSTMENTS
of purchase,
Sears will, free of charge,
replace any parts
of the sewing machine, except for normal maintenance.
and
provide
mechanical
service
0
#
WARRANTY
SERVICE
CENTER/DEPARTMENT
Th_s warranty
IS AVAILABLE
IN THE
gives you specific
UNITED
legal rights,
SEARS,
BY
RETURNING
THE
SEWING
MACHINE
TO THE
NEAREST
SEARS
STATES.
{)
and you may also have other
ROEBUCK
AND
SERVICE
CO., D1817 WA,
rights
Hoffman
which
vary from
Estates,
state to state.
IL 60179
SEWING MACHINE
Now that you have purchased your Kenmore Sewing Machine, should a need ever exist for repair parts
or service, simply contact your nearest Sears Serv,ce Canter. Be sure to provide all pertinent facts when
you call or visit,
The model number of your Sewing Machine witl be shown on your nomenclature
your Sewing Machine. See page 3 for location.
WHEN ORDERING
REPAIR PARTS, ALWAYS
*MODEL
*NAME
If
the
Repair
NUMBER
parts
you
need
Parts Distribution
INFORMATION:
OF ITEM *PART DESCRIPTION
are not
Center
SEARS,
S-385
GIVE THE FOLLOWING
plate on the back of
stocked
locally,
your
order
will
be electronically
transmitted
to a Sears
for handling.
ROEBUCK
AND
CO,, Chicago,
Printed
tL60684
in Taiwan
UoS.A.
Part No, 652800443
@